Hibernate简单注解开发和事务处理(四)
勿以恶小而为之,勿以善小而不为--------------------------刘备
劝诸君,多行善事积福报,莫作恶
上一章简单介绍了Hibernate实现简单的CRUD操作和常见类(三),如果没有看过,请观看上一章
Hibernate开发时,有两种形式,一种是XML配置的方式,另外一种是注解形式的开发。
XML配置是,需要写一个实体类User,还要在它的同级目录下创建一个相对应的User.hbm.xml,
而注解方式比较简单,只需要在User类中添加相应的注解即可。
一. Hibernate的注解开发
一.一 创建简单的实体类User
User.java 文件:
package com.yjl.pojo;

import java.io.Serializable;
import java.util.Date;

/**
 @author: 两个蝴蝶飞
 @date: 2018年10月9日 下午8:53:39
 @Description Hibernate操作时相应的实体类,实现序列化
*/

public class User implements Serializable{
	private static final long serialVersionUID = 1L;
	/**
	 * @param 主键id 用Integer包装类
	 * @param userName 用户名
	 * @param password 密码
	 * @param sex 性别
	 * @param age 年龄
         * @param birthday 生日
	 * @param description 相关描述
	 */
	private Integer id;
	private String userName;
	private String password;
	private String sex;
	private Integer age;
        private Date birthday;
	private String description;
	public Integer getId() {
		return id;
	}
	public void setId(Integer id) {
		this.id = id;
	}
	public String getUserName() {
		return userName;
	}
	public void setUserName(String userName) {
		this.userName = userName;
	}
	public String getPassword() {
		return password;
	}
	public void setPassword(String password) {
		this.password = password;
	}
	public String getSex() {
		return sex;
	}
	public void setSex(String sex) {
		this.sex = sex;
	}
	public Integer getAge() {
		return age;
	}
	public void setAge(Integer age) {
		this.age = age;
	}
        public Date getBirthday() {
		return birthday;
	}
	public void setBirthday(Date birthday) {
		this.birthday = birthday;
	}
	public String getDescription() {
		return description;
	}
	public void setDescription(String description) {
		this.description = description;
	}
}
一.二 在User.java中添加相应的注解
一.二.一 添加@Entity注解
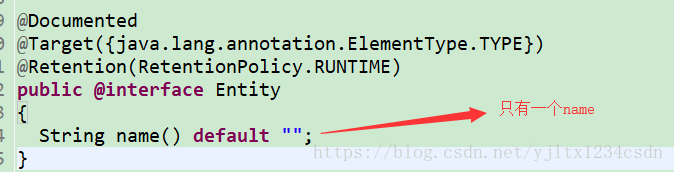
直接在类User上使用 @Entity 注解即可。 这个注解@Entity 有一个属性 name,这个name指的是实体类的名称,通常省略不写.
这个这个Entity 注解位于
import javax.persistence.Entity;
下面所有的注解,都是位于这个包下。
一.二.二 添加@Table 注解
@Table 与@Entity 联合使用。 其中@Table下有一个重要的name属性,这个值指向数据库中表的名称。表示生成后的表名为user.  如果省略不写的话,表示与User实体类名相同。 通常为了可读性,常常写。

联合使用后的User 修饰为:

@Entity
@Table(name="user")
public class User implements Serializable{

}

一.二.三 Id 标识
Id标识时用@Id 注解,默认生成策略是native, 自然的。可以省略不写。 用@GeneratedValue 注解。
      @Id  //表示是id
	@GeneratedValue  //表示生成策略是native, 是默认的。
	private Integer id;
其中@Id注解为:
@Target({java.lang.annotation.ElementType.METHOD, java.lang.annotation.ElementType.FIELD})
@Retention(RetentionPolicy.RUNTIME)
public @interface Id {}

@GeneratedValue 注解为:

@Target({java.lang.annotation.ElementType.METHOD, java.lang.annotation.ElementType.FIELD})
@Retention(RetentionPolicy.RUNTIME)
public @interface GeneratedValue
{
  GenerationType strategy() default GenerationType.AUTO; //strategy 表示生成策略

  String generator() default "";
}
其中GenerationType 可以取的值为:
package javax.persistence;

public enum GenerationType
{
  TABLE,  SEQUENCE,  IDENTITY,  AUTO;  //枚举类型取值

  private GenerationType() {}
}
如果是IDENTITY模式的话,那么需要写成:
        @Id  //表示是id
	@GeneratedValue(strategy=GenerationType.IDENTITY)  //表示生成策略是IDENTITY
	private Integer id;
如果想显式说明的是native的话,可以这样:
	@Id  //表示是id
	@GeneratedValue(generator="_native")  //生成策略是native形式
	@GenericGenerator(name="_native",strategy="native")
	private Integer id;
GeneratedValue与GenericGenerator联合使用。 Value中的generator的值要与Generator中name的值保持一致。
如果想表示是uuid形式的话,可以这样:
        @Id  //表示是id
	@GeneratedValue(generator="_uuid")  //生成策略是uuid
	@GenericGenerator(name="_uuid",strategy="uuid")
        private String uid;
其中GenericGenerator注解为:
@Target({java.lang.annotation.ElementType.PACKAGE, java.lang.annotation.ElementType.TYPE, java.lang.annotation.ElementType.METHOD, java.lang.annotation.ElementType.FIELD})
@Retention(RetentionPolicy.RUNTIME)
@Repeatable(GenericGenerators.class)
public @interface GenericGenerator
{
  String name();

  String strategy();

  Parameter[] parameters() default {};
}
一.二.四 普通属性注解@Column
普通属性用@Column 常见的配置有:
        @Column(name="userName",length=20)
	private String userName;
可以直接@Column, 可以省略name,如果省略name的话,表示生成的表中字段与类中的属性名称一致。
其中@Column注解中有一些其他的配置,这样配置主要如下:
@Target({java.lang.annotation.ElementType.METHOD, java.lang.annotation.ElementType.FIELD})
@Retention(RetentionPolicy.RUNTIME)
public @interface Column
{
  String name() default "";

  boolean unique() default false;

  boolean nullable() default true;

  boolean insertable() default true;

  boolean updatable() default true;

  String columnDefinition() default "";

  String table() default "";

  int length() default 255;

  int precision() default 0;

  int scale() default 0;
}
其中name表示生成表中字段的名称,如果省略不写的话,与类中属性值保持一致。
unique 表示是否是唯一的,默认为false. 如果为true,则表示唯一,是唯一约束关系。
nullable 表示是否可以为空,默认为true, 如果为false,表示不能为空。
insertable 表示是否可以插入,默认为true. 这个用的不多.
updateable 表示是否可以修改,默认为true. 如果为false的话,表示这个字段不能被修改。如sex字段。 一但被插入进去之后,就不能进行相应的修改了。
columnDefinition 表示列类型,即是int,还是varchar,date等。 但兼容性不好。
length 表示长度,即字段的长度。
precision 和scale共同构成了精度,如double类型时,precision 指的是总长度,scale 指的是位数。 即double(6,2) 样式的。
precision=6, scale=2。
一.二.五 修饰日期形式 @Temporal
如果是日期Date,Time,Timestamp 等形式,不能用普通的@Column 注解了,要用一个@Temporal 注解 。 中文意思是时间。
      @Temporal(TemporalType.TIMESTAMP)
	private Date birthday;
其中Temporal 注解:
@Target({java.lang.annotation.ElementType.METHOD, java.lang.annotation.ElementType.FIELD})
@Retention(value=RetentionPolicy.RUNTIME)
public @interface Temporal
{
  TemporalType value();
}

而TemporalType是枚举,取值是:

public enum TemporalType
{
  DATE,  TIME,  TIMESTAMP;  //对应的是数据库中的日期,时间,时间戳

  private TemporalType() {}
}
常用的值是TIMESTAMP. 其中value 可以省略。
一.二.六 指定类型 @Type
修饰列的类型,要用@Type 注解 。这个注解不像其他注解位于javax.persistence 包下
而是位于org.hibernate.annotations,与GenericGenerator 注解位于的包下相同。
@Type(type = "string")
	private String description;
其中Type为:
@Target({java.lang.annotation.ElementType.FIELD, java.lang.annotation.ElementType.METHOD})
@Retention(RetentionPolicy.RUNTIME)
public @interface Type
{
  String type();

  Parameter[] parameters() default {};
}
type="类型名称",与Hibernate中XML中的type 值相同,可以取double,int,long,string等常见的类型。 如果是Date,使用上面的@Temporal注解。
一.二.七 忽略注解@Transien
如果不想让User中的某个属性生成为表中的字段,可以在这个上面添加一个@Transien, 这样就可以避免生成表中的字段了。 如常见的User中的可能多余的属性,如确认密码,验证码等。
一.二.八 综合后的注解User.java
package com.yjl.pojo;
import java.io.Serializable;
import java.util.Date;
import javax.persistence.Column;
import javax.persistence.Entity;
import javax.persistence.GeneratedValue;
import javax.persistence.Id;
import javax.persistence.Table;
import javax.persistence.Temporal;
import javax.persistence.TemporalType;
import javax.persistence.Transient;

import org.hibernate.annotations.GenericGenerator;
import org.hibernate.annotations.Type;
/**
 @author: 两个蝴蝶飞
 @date: 2018年10月9日 下午8:53:39
 @Description Hibernate操作时相应的实体类,实现序列化
*/
@Entity
@Table(name="user")
public class User implements Serializable{
	private static final long serialVersionUID = 1L;
	/**
	 * @param 主键id 用Integer包装类
	 * @param userName 用户名
	 * @param password 密码
	 * @param sex 性别
	 * @param age 年龄
	 * @param description 相关描述
	 */
	/**
	 * 主键生成策略为native
	 */
	@Id
	@GeneratedValue(generator="_native")
	@GenericGenerator(name="_native",strategy="native")
	private Integer id;
	/**
	 * 类名为userName,长度是20,表示唯一
	 */
	@Column(name="userName",length=20,unique=true)
	private String userName;
	/**
	 * 去除password的生成
	 */
	@Transient
	private String password;
	/*
	 * 设置性别不为空,默认属性值为sex
	 */
	@Column(nullable=false)
	private String sex;
	/*
	 * int 类型,默认生成列属性值为age
	 */
	@Type(type="int")
	private Integer age;
	@Temporal(TemporalType.TIMESTAMP)
	private Date birthday;
	@Type(type = "string")
	@Column(name="description",length=100)
	private String description;
	public Integer getId() {
		return id;
	}
	public void setId(Integer id) {
		this.id = id;
	}
	public String getUserName() {
		return userName;
	}
	public void setUserName(String userName) {
		this.userName = userName;
	}
	public String getPassword() {
		return password;
	}
	public void setPassword(String password) {
		this.password = password;
	}
	public String getSex() {
		return sex;
	}
	public void setSex(String sex) {
		this.sex = sex;
	}
	public Integer getAge() {
		return age;
	}
	public void setAge(Integer age) {
		this.age = age;
	}

	public Date getBirthday() {
		return birthday;
	}
	public void setBirthday(Date birthday) {
		this.birthday = birthday;
	}
	public String getDescription() {
		return description;
	}
	public void setDescription(String description) {
		this.description = description;
	}
}
一.三. hibernate.cfg.xml中配置引入.java注解文件
<?xml version="1.0" encoding="UTF-8"?>
<!-- 引入相应的结束 -->
<!DOCTYPE hibernate-configuration PUBLIC
        "-//Hibernate/Hibernate Configuration DTD 3.0//EN"
        "http://www.hibernate.org/dtd/hibernate-configuration-3.0.dtd">
<!-- 对节点暂时不做介绍 -->
<hibernate-configuration>
	<session-factory>
		<!-- 关于数据库的相应配置 -->
		<property name="hibernate.connection.driver_class">com.mysql.jdbc.Driver</property>
		<property name="hibernate.connection.url">jdbc:mysql://localhost:3306/hibernate?characterEncoding=utf8</property>
		<property name="hibernate.connection.username">root</property>
		<property name="hibernate.connection.password">abc123</property>
		<!-- 关于Hibernate的相应配置 -->
		<!-- 引入方言 -->
		<property name="dialect">org.hibernate.dialect.MySQL5Dialect</property>
		<property name="hibernate.show_sql">true</property>
		<property name="hibernate.hbm2ddl.auto">update</property>
		<property name="hibernate.format_sql">true</property>
		<!-- 引入相应的约束文件  ctrl点击时可以正确进入-->
	 	<mapping class="com.yjl.pojo.User"/>
	</session-factory>
</hibernate-configuration>
一.四 测试运行
运行第三章的saveTest()方法
@Test
	public void saveTest(){
		//1  得到Session对象
		Session session=HibernateUtil.getSession();
		//2 打开事务
		Transaction tran=session.beginTransaction();
		//3 实例化对象
		User user=new User();
		user.setUserName("两个蝴蝶飞");
		user.setSex("男");
		user.setAge(24);
		user.setPassword("123456");
		user.setDescription("一个有梦想的程序员");
		//4利用save()方法进行相应的保存
		session.save(user);
		//5 提交事务
		tran.commit();
		//6 关闭session
		session.close();
	}
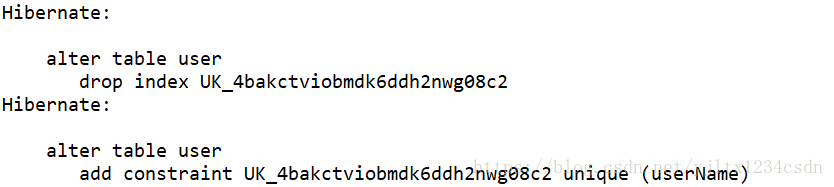
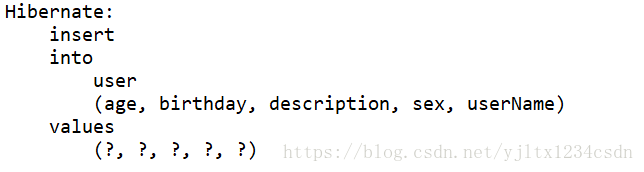
一.五 观察控制台日志输出
生成表:

添加约束:
插入值:
一.六 观察数据表
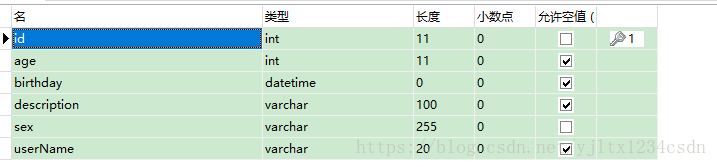
创建的结构正常. 没有生成password字段。

数据插入正常。
使用注解方式开发Hibernate,自动生成表正常。
二. Hibernate事务处理

具体代码形式为:
//1  得到Session对象
		Session session=HibernateUtil.getSession();
		//2 打开事务
		Transaction tran=session.beginTransaction();
		try{
			//3 实例化对象
			User user=new User();
			user.setUserName("两个蝴蝶飞");
			user.setSex("男");
			user.setAge(24);
			user.setPassword("123456");
			user.setDescription("一个有梦想的程序员");
			//4利用save()方法进行相应的保存
			session.save(user);
			//5 提交事务
			tran.commit();
		}catch(Exception e){
			//出错了,进行回滚事务.
			tran.rollback();
		}finally{
			//6 关闭session
			session.close();
		}
利用try ... catch ...finally 来进行处理异常。
谢谢您的观看,如果喜欢,请关注我,再次感谢 !!!

 浙公网安备 33010602011771号