
PiscCode实现MediaPipe 的人体姿态识别:三屏可视化对比实现 - 教程
一、前言
人体姿态识别(Pose Estimation)是计算机视觉中的一个重要方向,它通过检测人体的关键点位置(如鼻子、肩膀、肘部、膝盖、脚踝等),帮助我们理解人体的动作和姿势。
常见应用包括:
健身动作纠正
体育训练辅助
动作捕捉(游戏、动画)
安防与人机交互
Google 开源的 MediaPipe 提供了强大的姿态识别模型,支持实时检测人体 33 个关键点。
今天这篇文章,我们将基于 MediaPipe Pose Landmarker,实现一个“三屏对比”效果:
左侧:原始图像
中间:骨架图(仅关键点和连线)
右侧:骨架叠加在原始图像上
效果如下(示意图):
这样我们可以更直观地对比识别结果,便于调试与演示。
二、环境准备
同时,还需要下载 MediaPipe 官方提供的 Pose 模型文件(如 pose_landmarker_heavy.task),放在本地目录下。
三、核心代码解析
我们来看主要的类:PoseObjectDIYTriple
1. 初始化模型
base_options = python.BaseOptions(model_asset_path=model_path)
options = vision.PoseLandmarkerOptions(
base_options=base_options,
num_poses=num_poses,
running_mode=vision.RunningMode.IMAGE
)
self.detector = vision.PoseLandmarker.create_from_options(options)
这里通过 vision.PoseLandmarkerOptions 配置模型参数:
model_path:模型路径num_poses:最大检测人数(默认 1)running_mode=IMAGE:以单张图片模式运行
最终得到 self.detector,它是一个可调用的姿态检测器。
2. 定义关键点颜色
为了让不同关键点更易区分,我们给每个点定义了颜色(BGR 格式):
self.landmark_colors = {
0: (0, 0, 255),   # 鼻子 红色
7: (255, 0, 0),   # 左耳 蓝色
11: (255, 165, 0),# 左肩 橙色
13: (255, 0, 255),# 左肘 紫色
27: (0, 128, 128),# 左脚踝 青色
...
}
这样骨架在画面中会非常直观。
3. 绘制骨架
核心绘制函数 _draw_skeleton:
def _draw_skeleton(self, frame, pose_landmarks, draw_points=True):
skeleton_img = np.zeros_like(frame)
h, w, _ = frame.shape
# 画骨架连线
for start_idx, end_idx in self.connections:
x1, y1 = int(pose_landmarks[start_idx].x * w), int(pose_landmarks[start_idx].y * h)
x2, y2 = int(pose_landmarks[end_idx].x * w), int(pose_landmarks[end_idx].y * h)
cv2.line(skeleton_img, (x1, y1), (x2, y2), self.line_color, self.line_thickness)
# 画关键点
if draw_points:
for idx, lm in enumerate(pose_landmarks):
cx, cy = int(lm.x * w), int(lm.y * h)
color = self.landmark_colors.get(idx, (255, 255, 255))
cv2.circle(skeleton_img, (cx, cy), self.point_size, color, -1)
return skeleton_img
要点:
每个 landmark 的
x,y坐标都是 归一化的 (0-1),需要乘以图片的宽高才能得到像素坐标。使用
cv2.line画连线,cv2.circle画关键点。
4. 三屏拼接
最后的 do 方法把三幅画面拼接在一起:
def do(self, frame):
mp_image = mp.Image(
image_format=mp.ImageFormat.SRGB,
data=cv2.cvtColor(frame, cv2.COLOR_BGR2RGB)
)
detection_result = self.detector.detect(mp_image)
# 初始化中间和右侧帧
skeleton_only = np.zeros_like(frame)
skeleton_overlay = np.zeros_like(frame)
if detection_result.pose_landmarks:
for pose_landmarks in detection_result.pose_landmarks:
# 仅骨架
skeleton_only = self._draw_skeleton(skeleton_only, pose_landmarks, draw_points=True)
# 骨架叠加
skeleton_overlay = self._draw_skeleton(np.zeros_like(frame), pose_landmarks, draw_points=True)
skeleton_overlay = cv2.addWeighted(frame, 1.0, skeleton_overlay, 1.0, 0)
# 横向拼接三张图
triple_frame = np.concatenate([frame, skeleton_only, skeleton_overlay], axis=1)
return triple_frame
这样就能得到一个三屏对比画面,非常直观!
四、运行示例
import cv2
import numpy as np
import mediapipe as mp
from mediapipe import solutions
from mediapipe.framework.formats import landmark_pb2
from mediapipe.tasks import python
from mediapipe.tasks.python import vision
class PoseObjectDIYTriple:
def __init__(self,
model_path="文件地址/pose_landmarker_heavy.task",
num_poses=1,
point_size=10,
line_thickness=6,
landmark_colors=None,
line_color=(255, 255, 255)):
"""初始化 Mediapipe PoseLandmarker 自定义版(三屏对比)"""
base_options = python.BaseOptions(model_asset_path=model_path)
options = vision.PoseLandmarkerOptions(
base_options=base_options,
num_poses=num_poses,
running_mode=vision.RunningMode.IMAGE
)
self.detector = vision.PoseLandmarker.create_from_options(options)
self.point_size = point_size
self.line_thickness = line_thickness
self.line_color = line_color
self.connections = solutions.pose.POSE_CONNECTIONS
# 默认颜色方案(左右对应部位颜色一致)
if landmark_colors is None:
self.landmark_colors = {
0: (0, 0, 255),      # nose
1: (0, 255, 0), 2: (0, 255, 0), 3: (0, 255, 0),
4: (0, 255, 0), 5: (0, 255, 0), 6: (0, 255, 0),
7: (255, 0, 0), 8: (255, 0, 0),
9: (0, 255, 255), 10: (0, 255, 255),
11: (255, 165, 0), 12: (255, 165, 0),
13: (255, 0, 255), 14: (255, 0, 255),
15: (0, 128, 255), 16: (0, 128, 255),
17: (128, 0, 128), 18: (128, 0, 128),
19: (0, 128, 0), 20: (0, 128, 0),
21: (128, 128, 0), 22: (128, 128, 0),
23: (0, 0, 128), 24: (0, 0, 128),
25: (128, 0, 0), 26: (128, 0, 0),
27: (0, 128, 128), 28: (0, 128, 128),
29: (128, 128, 128), 30: (128, 128, 128),
31: (0, 0, 0), 32: (0, 0, 0)
}
else:
self.landmark_colors = landmark_colors
def _draw_skeleton(self, frame, pose_landmarks, draw_points=True):
"""绘制骨架,支持自定义点和线"""
skeleton_img = np.zeros_like(frame)
h, w, _ = frame.shape
# 画骨架连线
for start_idx, end_idx in self.connections:
x1, y1 = int(pose_landmarks[start_idx].x * w), int(pose_landmarks[start_idx].y * h)
x2, y2 = int(pose_landmarks[end_idx].x * w), int(pose_landmarks[end_idx].y * h)
cv2.line(skeleton_img, (x1, y1), (x2, y2), self.line_color, self.line_thickness)
# 画关键点
if draw_points:
for idx, lm in enumerate(pose_landmarks):
cx, cy = int(lm.x * w), int(lm.y * h)
color = self.landmark_colors.get(idx, (255, 255, 255))
cv2.circle(skeleton_img, (cx, cy), self.point_size, color, -1)
return skeleton_img
def do(self, frame,device):
"""生成三屏对比帧"""
if frame is None:
return None
mp_image = mp.Image(
image_format=mp.ImageFormat.SRGB,
data=cv2.cvtColor(frame, cv2.COLOR_BGR2RGB)
)
detection_result = self.detector.detect(mp_image)
h, w, _ = frame.shape
# 初始化中间和右侧帧
skeleton_only = np.zeros_like(frame)
skeleton_overlay = np.zeros_like(frame)
if detection_result.pose_landmarks:
for pose_landmarks in detection_result.pose_landmarks:
skeleton_only = self._draw_skeleton(skeleton_only, pose_landmarks, draw_points=True)
skeleton_overlay = self._draw_skeleton(np.zeros_like(frame), pose_landmarks, draw_points=True)
skeleton_overlay = cv2.addWeighted(frame, 1.0, skeleton_overlay, 1.0, 0)
# 拼接三屏
triple_frame = np.concatenate([frame, skeleton_only, skeleton_overlay], axis=1)
return triple_frame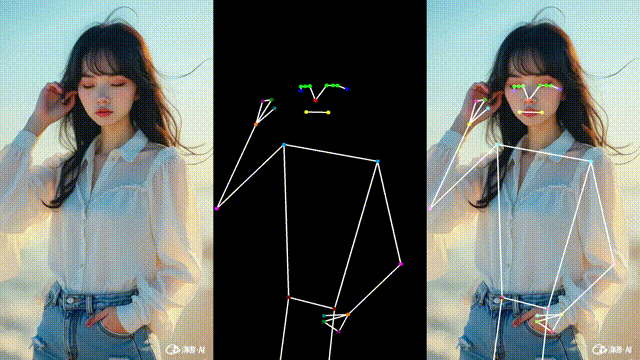
运行后即可看到:
左边:原始视频
中间:骨架画面
右边:骨架叠加在原始视频上
垂直布局可改为
triple_frame = np.concatenate([frame, skeleton_only, skeleton_overlay], axis=0)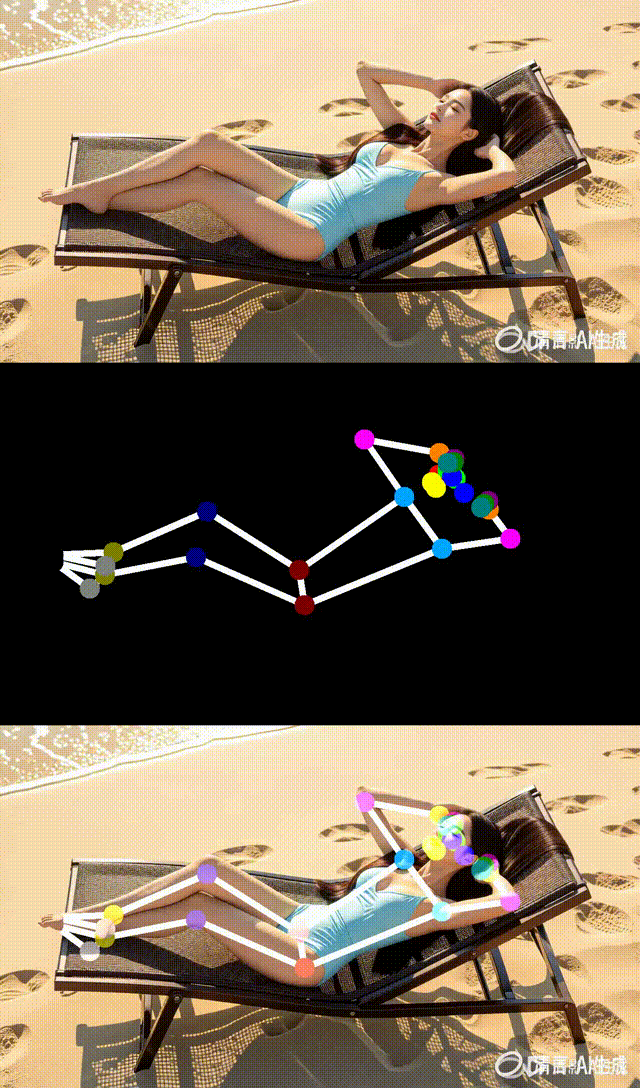
五、总结与拓展
这篇文章,我们实现了一个基于 MediaPipe Pose Landmarker 的 三屏对比工具,它能够:
✅ 可视化人体姿态识别结果
✅ 对比原始图像与骨架效果
✅ 便于调试模型识别效果
未来你可以进一步拓展:
竖屏拼接:改成上下排列三屏
多人检测:设置
num_poses > 1动作识别:基于关键点坐标,识别举手、深蹲、跑步等动作
实时健身指导:与标准动作对比,给出提示
对 PiscTrace or PiscCode感兴趣?更多精彩内容请移步官网看看~ PiscTrace

 浙公网安备 33010602011771号