
纯血鸿蒙(HarmonyOS NEXT)应用编写完全指南
深入Stage模型与ArkTS开发范式 | 基于OpenHarmony API 10
一、环境配置与工具准备
1. 开发环境要求
操作系统:Windows 10+ / macOS 12+ / Ubuntu 20.04+
开发工具:DevEco Studio 4.1+(官方下载)
SDK配置:
OpenHarmony SDK API 10+
ArkTS 3.8+
Node.js 18+
Ohpm包管理器
2. 环境验证
# 验证关键组件版本
ohpm --version  # v1.0.0+
arkts --version # v3.8.0+
node --version  # v18.0.0+
3. 模拟器配置
# 安装本地模拟器
Tools > Device Manager > Local Emulator
选择Phone设备 > API 10 > 下载镜像
二、核心概念解析
1. Stage模型架构
| 层级 | 组件 | 功能 |
|---|---|---|
| 应用层 | UIAbility | 应用入口,管理窗口 |
| WindowStage | 窗口管理,内容加载 | |
| 服务层 | ServiceAbility | 后台服务 |
| DataAbility | 数据共享 | |
| 基础层 | HDF驱动 | 硬件抽象 |
2. ArkTS语言特性
类型安全:编译时类型检查 + 运行时验证
声明式UI:
@Component struct MyButton { build() { Button('Click Me') .onClick(() => console.log('Clicked')) } }响应式系统:
@State:组件私有状态@Prop:父组件传递状态@Link:双向绑定状态@Provide/@Consume:跨组件状态共享
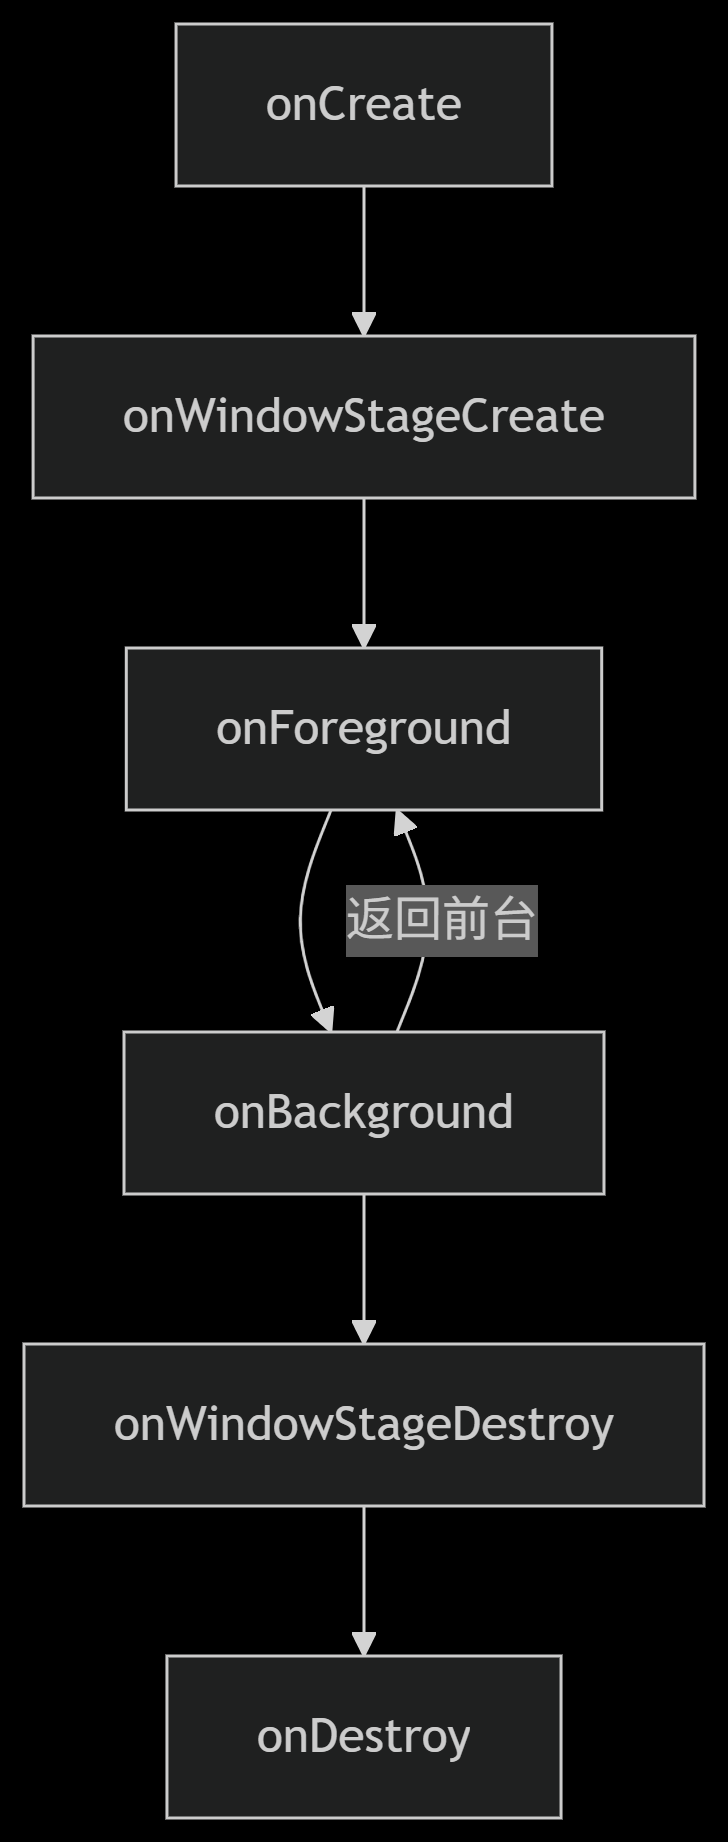
3. 应用生命周期(Stage模型)
三、项目开发实战
1. 创建项目结构
/src
├── main
│   ├── ets
│   │   ├── entryability      # 入口Ability
│   │   ├── pages             # 页面组件
│   │   ├── model             # 数据模型
│   │   ├── utils             # 工具类
│   │   └── services          # 后台服务
│   └── resources            # 资源文件
├── oh-package.json          # 依赖管理
└── module.json5             # 模块配置
2. EntryAbility核心实现
// entryability/EntryAbility.ets
import UIAbility from '@ohos.app.ability.UIAbility';
import window from '@ohos.window';
import Logger from '../utils/Logger';
const TAG = 'EntryAbility';
export default class EntryAbility extends UIAbility {
// 应用初始化
onCreate(want, launchParam) {
Logger.info(TAG, 'Ability onCreate');
}
// 窗口创建(核心)
onWindowStageCreate(windowStage: window.WindowStage) {
Logger.info(TAG, 'Ability onWindowStageCreate');
// 加载主页面
windowStage.loadContent('pages/IndexPage', (err) => {
if (err) {
Logger.error(TAG, `Failed to load content: ${JSON.stringify(err)}`);
return;
}
Logger.info(TAG, 'Content loaded successfully');
// 获取窗口对象进行高级配置
windowStage.getMainWindow((err, win) => {
win?.setWindowBackgroundColor('#F1F3F5');
win?.setFullScreen(true); // 全屏显示
});
});
}
// 应用进入前台
onForeground() {
Logger.info(TAG, 'Ability onForeground');
// 恢复网络连接/动画等
}
// 应用进入后台
onBackground() {
Logger.info(TAG, 'Ability onBackground');
// 释放非必要资源
}
// 窗口销毁
onWindowStageDestroy() {
Logger.info(TAG, 'Ability onWindowStageDestroy');
// 清理UI资源
}
// 应用销毁
onDestroy() {
Logger.info(TAG, 'Ability onDestroy');
// 释放所有资源
}
}
3. 上下文管理工具类
// utils/ContextUtils.ets
import common from '@ohos.app.ability.common';
class ContextUtils {
private static abilityContext: common.UIAbilityContext | null = null;
// 初始化上下文
static init(context: common.UIAbilityContext) {
this.abilityContext = context;
}
// 获取全局上下文
static getContext(): common.UIAbilityContext {
if (!this.abilityContext) {
throw new Error('Context not initialized!');
}
return this.abilityContext;
}
// 启动其他Ability
static startAbility(want: Want) {
this.getContext().startAbility(want).catch(err => {
console.error(`Failed to start ability: ${JSON.stringify(err)}`);
});
}
}
export default ContextUtils;
4. 主页面开发
// pages/IndexPage.ets
import router from '@ohos.router';
import ContextUtils from '../utils/ContextUtils';
@Entry
@Component
struct IndexPage {
@State message: string = "欢迎使用HarmonyOS NEXT";
@State counter: number = 0;
build() {
Column({ space: 20 }) {
// 标题文本
Text(this.message)
.fontSize(26)
.fontWeight(FontWeight.Bold)
.fontColor(Color.Blue)
// 计数器
Counter({ count: $counter })
// 功能按钮
Button('访问详情页')
.width('80%')
.onClick(() => router.pushUrl({ url: 'pages/DetailPage' }))
Button('启动服务')
.width('80%')
.margin({ top: 30 })
.onClick(() => this.startBackgroundService())
}
.width('100%')
.height('100%')
.padding(20)
.backgroundColor('#FFFFFF')
}
// 启动后台服务
private startBackgroundService() {
const want = {
bundleName: 'com.example.myapp',
abilityName: 'BackgroundService'
};
ContextUtils.startAbility(want);
}
}
// 计数器组件
@Component
struct Counter {
@Link count: number;
build() {
Row({ space: 20 }) {
Button('-')
.width(60)
.height(60)
.fontSize(24)
.onClick(() => this.count--)
Text(`${this.count}`)
.fontSize(30)
.fontWeight(FontWeight.Bold)
.margin({ left: 20, right: 20 })
Button('+')
.width(60)
.height(60)
.fontSize(24)
.onClick(() => this.count++)
}
.margin({ top: 30, bottom: 40 })
}
}
5. 后台服务实现
// services/BackgroundService.ets
import ServiceAbility from '@ohos.app.ability.ServiceAbility';
import Logger from '../utils/Logger';
const TAG = 'BackgroundService';
export default class BackgroundService extends ServiceAbility {
private timerId: number = -1;
onCommand(want, startId) {
Logger.info(TAG, 'Service onCommand');
this.startBackgroundTask();
}
onConnect(want) {
Logger.info(TAG, 'Service connected');
return null; // 不需要IPC通信
}
onDisconnect(want) {
Logger.info(TAG, 'Service disconnected');
}
onDestroy() {
Logger.info(TAG, 'Service destroying');
this.stopBackgroundTask();
}
private startBackgroundTask() {
if (this.timerId === -1) {
this.timerId = setInterval(() => {
Logger.debug(TAG, 'Background task running');
// 执行后台任务逻辑
}, 5000);
}
}
private stopBackgroundTask() {
if (this.timerId !== -1) {
clearInterval(this.timerId);
this.timerId = -1;
}
}
}
四、数据管理与网络通信
1. 数据持久化方案
// model/StorageManager.ets
import preferences from '@ohos.data.preferences';
import { BusinessError } from '@ohos.base';
const STORE_NAME = 'appDataStore';
class StorageManager {
private static prefs: preferences.Preferences | null = null;
// 初始化存储
static async init(context: common.Context) {
try {
this.prefs = await preferences.getPreferences(context, STORE_NAME);
} catch (err) {
console.error(`Failed to get preferences: ${(err as BusinessError).message}`);
}
}
// 存储数据
static async put(key: string, value: preferences.ValueType) {
if (!this.prefs) throw new Error('Preferences not initialized');
await this.prefs.put(key, value);
await this.prefs.flush();
}
// 读取数据
static async get(key: string, defValue: preferences.ValueType) {
if (!this.prefs) throw new Error('Preferences not initialized');
return await this.prefs.get(key, defValue);
}
}
export default StorageManager;
2. 网络请求封装
// utils/HttpClient.ets
import http from '@ohos.net.http';
import { BusinessError } from '@ohos.base';
class HttpClient {
private static instance: http.HttpRequest | null = null;
// 获取单例实例
static getInstance(): http.HttpRequest {
if (!this.instance) {
this.instance = http.createHttp();
}
return this.instance;
}
// GET请求
static async get(url: string, headers: Object = {}) {
try {
const response = await this.getInstance().request(
url,
{
method: http.RequestMethod.GET,
header: {
'Content-Type': 'application/json',
...headers
}
}
);
if (response.responseCode === http.ResponseCode.OK) {
return JSON.parse(response.result.toString());
} else {
throw new Error(`HTTP error: ${response.responseCode}`);
}
} catch (err) {
console.error(`Request failed: ${(err as BusinessError).message}`);
throw err;
}
}
// POST请求
static async post(url: string, data: Object, headers: Object = {}) {
try {
const response = await this.getInstance().request(
url,
{
method: http.RequestMethod.POST,
header: {
'Content-Type': 'application/json',
...headers
},
extraData: JSON.stringify(data)
}
);
if (response.responseCode >= 200 && response.responseCode < 300) {
return JSON.parse(response.result.toString());
} else {
throw new Error(`HTTP error: ${response.responseCode}`);
}
} catch (err) {
console.error(`Request failed: ${(err as BusinessError).message}`);
throw err;
}
}
}
export default HttpClient;
五、调试与优化技巧
1. 性能分析工具
# 启动性能分析
hdc shell hiprofiler -t 5s -o /data/local/tmp/trace.trace
2. 生命周期调试
// 在module.json5中开启调试模式
{
"module": {
"abilities": [
{
"name": "EntryAbility",
"launchType": "standard",
"debug": true  // 启用调试
}
]
}
}
3. 内存优化策略
图片资源处理:
Image($r('app.media.large_image')) .width(200) .height(200) .interpolation(ImageInterpolation.High) // 高质量缩放 .syncLoad(true) // 同步加载避免闪烁列表渲染优化:
List({ space: 10 }) {
ForEach(this.items, (item) => {
ListItem() {
ItemComponent({ item: item })
}
}, item => item.id.toString())
}
.cachedCount(5) // 预渲染数量
.edgeEffect(EdgeEffect.None) // 禁用边缘效果
六、避坑指南
1. 常见问题解决
问题现象 原因分析 解决方案 UI渲染异常 主线程阻塞 使用TaskPool异步处理 应用闪退 内存溢出 使用@Weak绑定避免循环引用 网络请求失败 权限未配置 在module.json5添加权限 跨设备通信失败 设备未认证 调用distributedDeviceManager.authenticateDevice 2. 权限配置示例
// module.json5
{
"module": {
"requestPermissions": [
{
"name": "ohos.permission.INTERNET",
"reason": "Required for network access"
},
{
"name": "ohos.permission.DISTRIBUTED_DATASYNC",
"reason": "For cross-device data sync"
}
]
}
}
七、项目构建与发布
1. 签名配置流程
1. File > Project Structure > Signing Configs
2. 创建新签名证书(或使用自动生成)
3. 配置Bundle名称和包信息
4. 应用配置到Build Variants
2. 构建发布包
# 生成HAP包
Build > Build HAP(s) > Release
# 生成App Pack
Build > Generate App Pack
3. 上架应用市场
创建新应用 > 选择HarmonyOS
上传签名的App Pack文件
填写应用元数据并通过审核
八、进阶学习方向
1. 分布式能力开发
// 跨设备数据同步
import distributedData from '@ohos.data.distributedData';
const kvManager = distributedData.createKVManager({
bundleName: 'com.example.myapp',
options: {
kvStoreType: distributedData.KVStoreType.SINGLE_VERSION
}
});
2. 原生能力扩展
// native层接口示例(C++)
#include "napi/native_api.h"
static napi_value Add(napi_env env, napi_callback_info info) {
napi_value result;
double a, b;
// 解析参数
napi_get_value_double(env, argv[0], &a);
napi_get_value_double(env, argv[1], &b);
// 计算结果
napi_create_double(env, a + b, &result);
return result;
}
// 注册模块
EXTERN_C_START
static napi_value Init(napi_env env, napi_value exports) {
napi_property_descriptor desc = { "add", 0, Add, 0, 0, 0, napi_default, 0 };
napi_define_properties(env, exports, 1, &desc);
return exports;
}
EXTERN_C_END
3. 性能优化深度实践
渲染优化:使用Canvas替代复杂布局
内存优化:NativeBuffer共享内存
启动优化:资源预加载+按需渲染
推荐资源:
结语
纯血鸿蒙通过全栈技术重构实现了真正的自主可控操作系统。掌握Stage模型与ArkTS开发范式,将使开发者能够:
构建高性能的原生鸿蒙应用
实现跨设备的无缝协同体验
接入AI大模型等前沿技术
开发元服务等创新应用形态
本指南涵盖了从环境搭建到高级优化的完整开发流程,可作为深入鸿蒙生态的技术基石。随着OpenHarmony 5.0的发布,鸿蒙原生应用开发将迎来更广阔的发展空间。

 浙公网安备 33010602011771号