

MongoDB的用户和权限管理
作者:尹正杰
版权声明:原创作品,谢绝转载!否则将追究法律责任。
目录
一.启用MongoDB的安全认证功能
1.关于用户验证库
mongodb数据库默认是没有用户名及密码的,即无权限访问限制,为了方便数据的管理和安全,应启用认证和创建数据库用户。

关于用户验证库要注意如下事项:
	- 1.创建用户时,use所在的库就是此用户的验证库;
	- 2.登录时,必须明确指定验证库才能登录;
	- 3.一个数据库可以成为多个用户的验证库,但一个用户只能使用一个验证库;
	- 4.对于管理员用户,必须在admin下创建,即管理员用的验证库是admin;
	- 5.普通用户的验证库一般是所管理的库;
	- 6.如果直接登录到数据库,不进行use,默认验证库为test;
	- 7.从3.6+版本开始,配置文件中不添加bindIp参数,默认不允许远程登录,只能本地管理员登录;
2.创建超级管理员用户
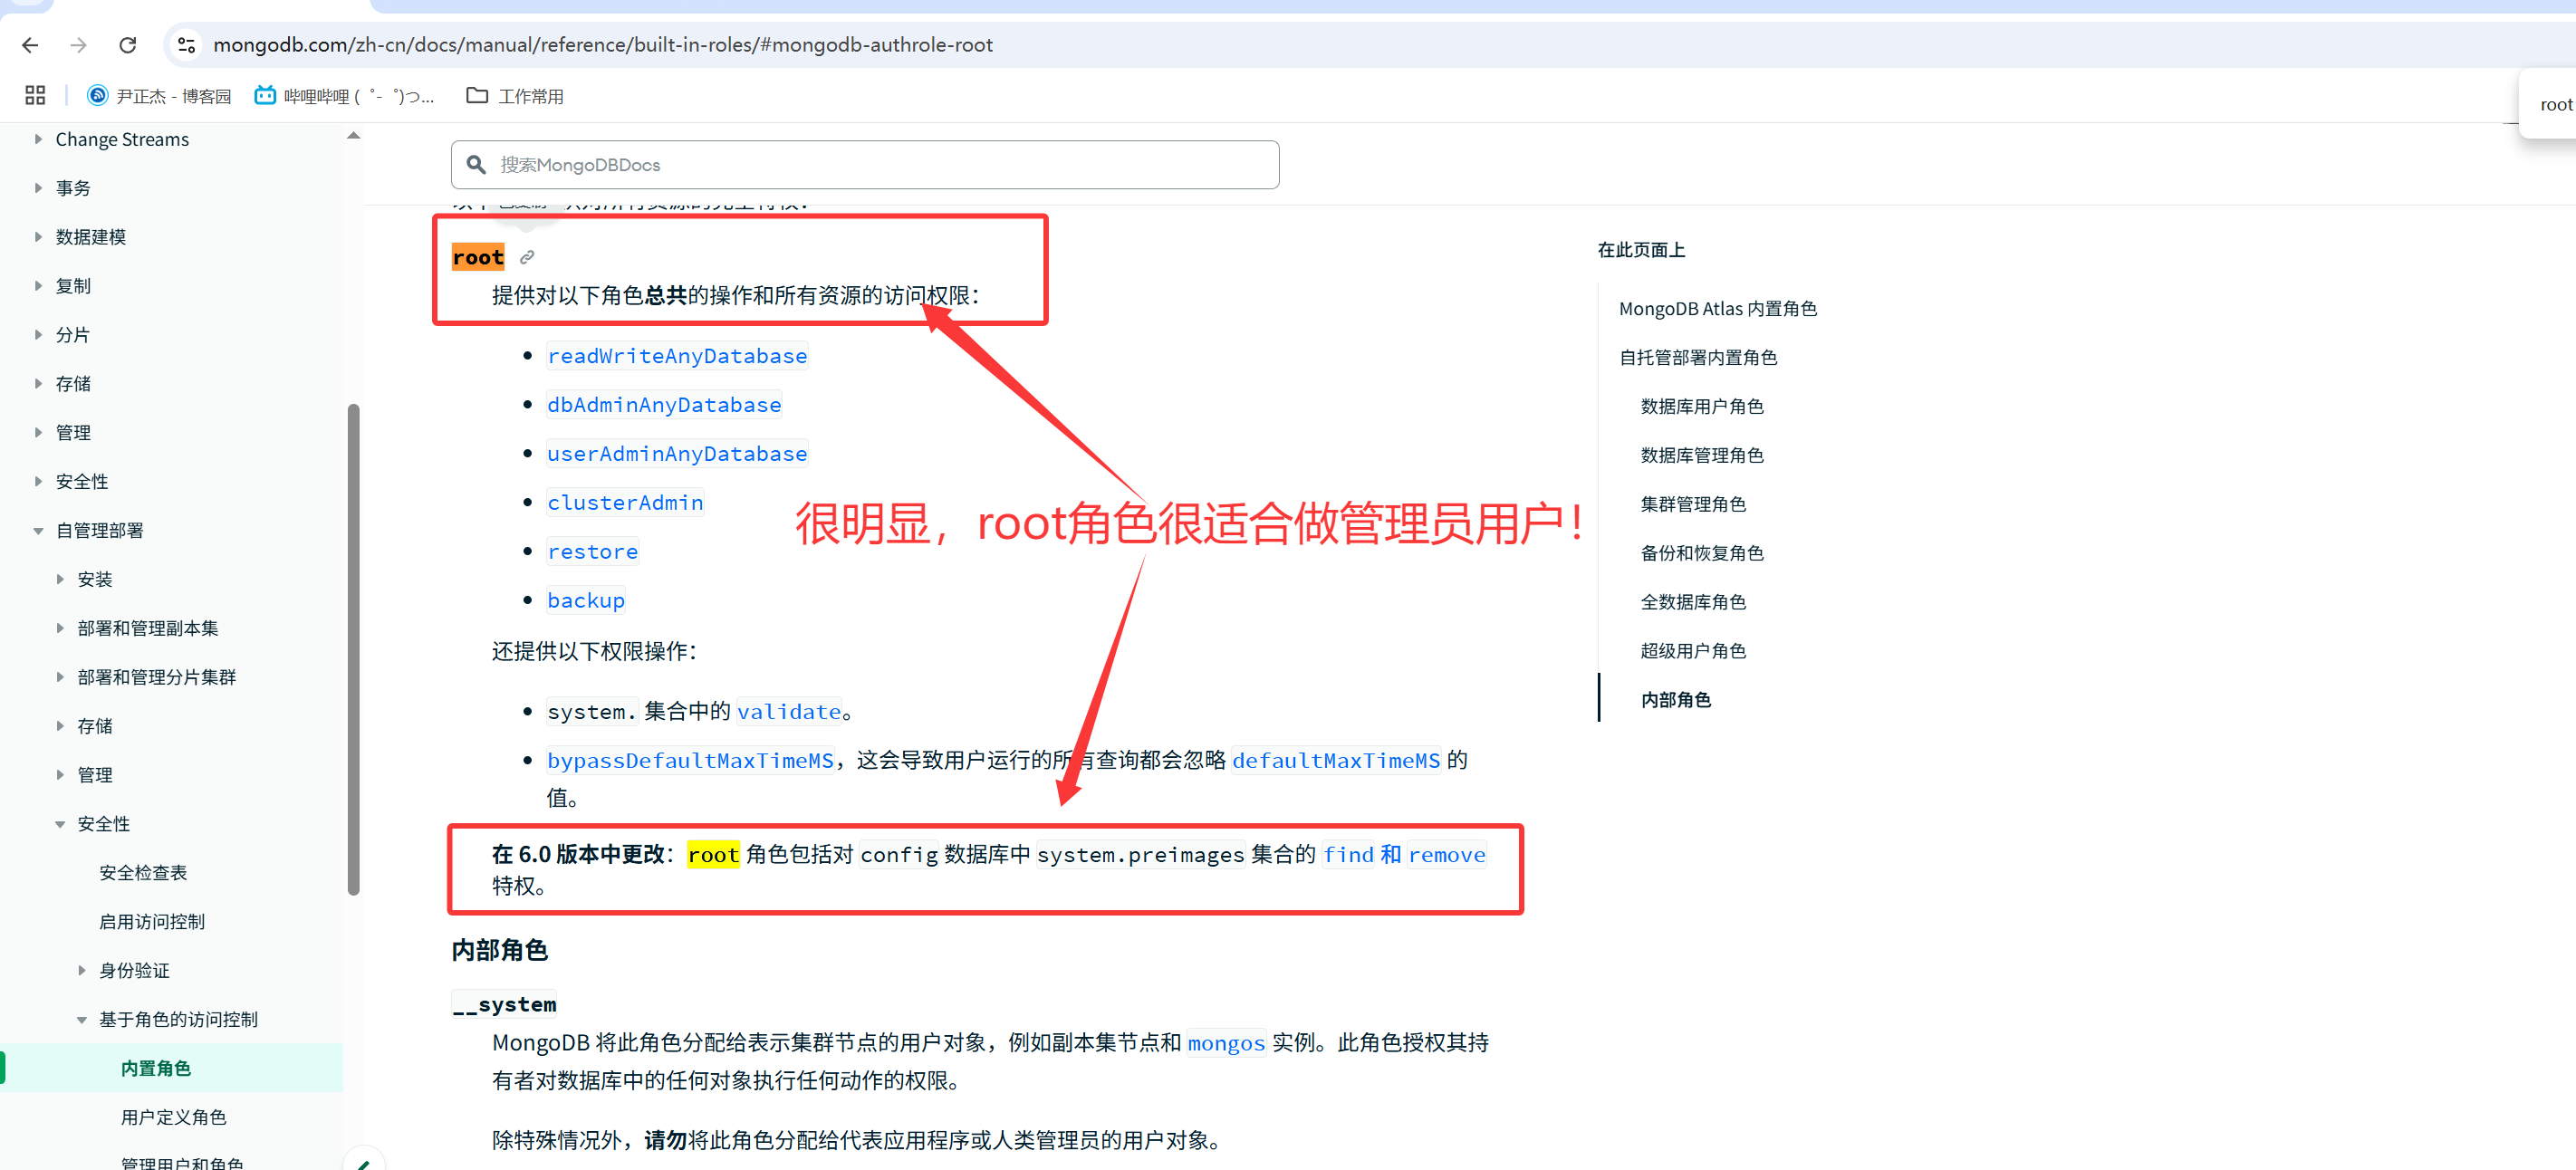
参考链接:
	https://www.mongodb.com/zh-cn/docs/manual/tutorial/create-users/
	https://www.mongodb.com/zh-cn/docs/manual/reference/built-in-roles/


创建超级管理员用户实战案例:
	1.进入到验证库(管理员必须在admin验证库,其他普通用户验证库名称随意)
test> use admin
switched to db admin
admin>

	2.创建管理员并授权root角色
admin> db.createUser({user: "jasonyin",pwd: "yinzhengjie",roles: [{role: "root",db: "admin"}]})
{ ok: 1 }
admin>

相关字段说明:
	user: 用户名
	pwd:密码
	roles: 角色信息。
		role: 绑定的角色为root,该角色权限如上图所示
		db: 定义验证库。


	3.验证用户
admin> db.auth("jasonyin","yinzhengjie")
{ ok: 1 }
admin>
3.启用MongoDB的安全认证功能
	1.修改MongoDB的配置文件
[root@prometheus-server31 ~]# cat /yinzhengjie/softwares/mongodb/conf/mongo.conf
systemLog:
  destination: file
  path: "/yinzhengjie/softwares/mongodb/log/mongodb.log"
  logAppend: true

storage:
  dbPath: "/yinzhengjie/softwares/mongodb/data/"
  journal:
    commitIntervalMs: 100

processManagement:
  fork: true

net:
  port: 27017
  bindIp: 0.0.0.0

security:
  authorization: enabled
[root@prometheus-server31 ~]#


	2.重启MongoDB服务
[root@prometheus-server31 ~]# systemctl restart mongod.service
[root@prometheus-server31 ~]# ss -ntl | grep 27017
LISTEN 0      4096         0.0.0.0:27017      0.0.0.0:*
[root@prometheus-server31 ~]#


	3.测试验证
		3.1 不认证直接登录测试
[root@prometheus-server31 ~]# mongosh
Current Mongosh Log ID:	67e4070e5a488072c801337a
Connecting to:		mongodb://127.0.0.1:27017/?directConnection=true&serverSelectionTimeoutMS=2000&appName=mongosh+2.4.2
Using MongoDB:		8.0.5
Using Mongosh:		2.4.2

For mongosh info see: https://www.mongodb.com/docs/mongodb-shell/

test> show dbs  # 发现提示认证失败啦~
MongoServerError[Unauthorized]: Command listDatabases requires authentication
test>


		3.2 认证登录测试
[root@prometheus-server31 ~]# mongosh -u jasonyin -p yinzhengjie --host 10.0.0.31  --authenticationDatabase admin
Current Mongosh Log ID:	67e40750248b27b2aa01337a
Connecting to:		mongodb://<credentials>@10.0.0.31:27017/?directConnection=true&authSource=admin&appName=mongosh+2.4.2
Using MongoDB:		8.0.5
Using Mongosh:		2.4.2

For mongosh info see: https://www.mongodb.com/docs/mongodb-shell/

------
   The server generated these startup warnings when booting
   2025-03-26T21:52:19.246+08:00: Using the XFS filesystem is strongly recommended with the WiredTiger storage engine. See http://dochub.mongodb.org/core/prodnotes-filesystem
   2025-03-26T21:52:20.188+08:00: For customers running the current memory allocator, we suggest changing the contents of the following sysfsFile
   2025-03-26T21:52:20.188+08:00: For customers running the current memory allocator, we suggest changing the contents of the following sysfsFile
   2025-03-26T21:52:20.188+08:00: We suggest setting the contents of sysfsFile to 0.
   2025-03-26T21:52:20.188+08:00: Your system has glibc support for rseq built in, which is not yet supported by tcmalloc-google and has critical performance implications. Please set the environment variable GLIBC_TUNABLES=glibc.pthread.rseq=0
   2025-03-26T21:52:20.188+08:00: vm.max_map_count is too low
   2025-03-26T21:52:20.188+08:00: We suggest setting swappiness to 0 or 1, as swapping can cause performance problems.
------

test> show dbs  # 很明显,认证成功啦~
admin        132.00 KiB
config        84.00 KiB
local         72.00 KiB
test          72.00 KiB
yinzhengjie  328.00 KiB
test>
二.普通用户创建及权限验证
1.创建普通用户
test> db.createUser({user: "test01", pwd: passwordPrompt(),roles: [{role: "readWrite",db:"xixi"},{role: "read",db:"haha"}]})
Enter password  # 此处输入密码时会被加密隐藏。此处我设置的密码为: "123456"
******{ ok: 1 }
test>


相关参数说明:
	user: 用户名
	pwd:密码,其中"passwordPrompt()"表示用户需要交互式写入密码。
	roles: 角色信息。
		role: 绑定的角色为root,该角色权限如上图所示
		db: 定义验证库。


温馨提示:
	我们创建用户是在test库中创建的,那么登录时的验证库就是"test"。
2.查看用户信息
test> db.getUsers()
{
  users: [
    {
      _id: 'test.test01',
      userId: UUID('a92c3b7a-e29e-4e40-ba89-40e915c2124d'),
      user: 'test01',
      db: 'test',
      roles: [
        { role: 'read', db: 'haha' },
        { role: 'readWrite', db: 'xixi' }
      ],
      mechanisms: [ 'SCRAM-SHA-1', 'SCRAM-SHA-256' ]
    }
  ],
  ok: 1
}
test>
3.登录测试
	1.使用错误的验证库
[root@prometheus-server31 ~]# mongosh -u test01 -p 123456 --host 10.0.0.31  --authenticationDatabase admin
Current Mongosh Log ID:	67e40a6403eb5dc7a101337a
Connecting to:		mongodb://<credentials>@10.0.0.31:27017/?directConnection=true&authSource=admin&appName=mongosh+2.4.2
MongoServerError: Authentication failed.
[root@prometheus-server31 ~]#


	2.使用正确的验证库
[root@prometheus-server31 ~]# mongosh -u test01 -p 123456 --host 10.0.0.31  --authenticationDatabase test
Current Mongosh Log ID:	67e40a6ac004e2e2c201337a
Connecting to:		mongodb://<credentials>@10.0.0.31:27017/?directConnection=true&authSource=test&appName=mongosh+2.4.2
Using MongoDB:		8.0.5
Using Mongosh:		2.4.2

For mongosh info see: https://www.mongodb.com/docs/mongodb-shell/

test>
4.验证权限
4.1 对于test库我们的test01用户并没有读写权限
test> db
test
test>
test> show tables
MongoServerError[Unauthorized]: not authorized on test to execute command { listCollections: 1, filter: {}, cursor: {}, nameOnly: true, authorizedCollections: false, lsid: { id: UUID("f39b8092-5db2-4268-8401-21964b764ca9") }, $db: "test" }
test>
4.2 验证xixi库的读写权限
	1.验证写入安全性
test> use xixi
switched to db xixi
xixi> db.xiyouji.insertMany([{name:"孙悟空","hobby":["孙悟空","紫霞仙子"]},{name: "猪八戒",age: 500,hobby:["高老庄","猴哥"]}])
{
  acknowledged: true,
  insertedIds: {
    '0': ObjectId('67e40b72c004e2e2c201337b'),
    '1': ObjectId('67e40b72c004e2e2c201337c')
  }
}
xixi>


	2.验证读取权限
xixi> show tables
xiyouji
xixi> db.xiyouji.find()
[
  {
    _id: ObjectId('67e40b72c004e2e2c201337b'),
    name: '孙悟空',
    hobby: [ '孙悟空', '紫霞仙子' ]
  },
  {
    _id: ObjectId('67e40b72c004e2e2c201337c'),
    name: '猪八戒',
    age: 500,
    hobby: [ '高老庄', '猴哥' ]
  }
]
xixi>
4.3 验证haha的写权限
	1.验证写权限,发现无法写入成功
xixi> use haha
switched to db haha
haha> show tables

haha> db.xiyouji.insertOne({name:"唐三藏",hobby:"阿弥陀佛"})
MongoServerError[Unauthorized]: not authorized on haha to execute command { insert: "xiyouji", documents: [ { name: "唐三藏", hobby: "阿弥陀佛", _id: ObjectId('67e40becc004e2e2c201337d') } ], ordered: true, lsid: { id: UUID("7d2bf5c8-6183-4485-a507-170f337163ec") }, $db: "haha" }
haha>


	2.验证读取权限,先用管理员创建测试数据再读取
haha> use admin  # 管理员登陆需要先切换到验证库
switched to db admin
admin> db.auth("jasonyin","yinzhengjie")
{ ok: 1 }
admin> use haha
switched to db haha
haha> db.xiyouji.insertOne({name:"唐三藏",hobby:"阿弥陀佛"})
{
  acknowledged: true,
  insertedId: ObjectId('67e40ce0c004e2e2c201337e')
}
haha> db.xiyouji.find()
[
  {
    _id: ObjectId('67e40ce0c004e2e2c201337e'),
    name: '唐三藏',
    hobby: '阿弥陀佛'
  }
]
haha>


	3.再次测试读取的权限,发现可读但不可写!
haha> use test  # 普通用户也需要切换到对应的验证库后才能进行验证哟~
switched to db test
test> db.auth("test01","123456")
{ ok: 1 }
test> use haha
switched to db haha
haha> db.xiyouji.find()
[
  {
    _id: ObjectId('67e40ce0c004e2e2c201337e'),
    name: '唐三藏',
    hobby: '阿弥陀佛'
  }
]
haha> db.xiyouji.insertOne({name:"沙悟净",hobby:"大师兄,师傅被妖怪抓走了"})
MongoServerError[Unauthorized]: not authorized on haha to execute command { insert: "xiyouji", documents: [ { name: "沙悟净", hobby: "大师兄,师傅被妖怪抓走了", _id: ObjectId('67e40d6bc004e2e2c201337f') } ], ordered: true, lsid: { id: UUID("fc8164ec-b6fb-46b9-b47f-d3bd92ba964b") }, $db: "haha" }
haha>
三.用户管理补充知识点
1.查看系统的所有用户
[root@prometheus-server31 ~]# mongosh -u jasonyin -p yinzhengjie --host 10.0.0.31  --authenticationDatabase admin
Current Mongosh Log ID:	67e40e383f1ac9080701337a
Connecting to:		mongodb://<credentials>@10.0.0.31:27017/?directConnection=true&authSource=admin&appName=mongosh+2.4.2
Using MongoDB:		8.0.5
Using Mongosh:		2.4.2

For mongosh info see: https://www.mongodb.com/docs/mongodb-shell/

------
   The server generated these startup warnings when booting
   2025-03-26T21:52:19.246+08:00: Using the XFS filesystem is strongly recommended with the WiredTiger storage engine. See http://dochub.mongodb.org/core/prodnotes-filesystem
   2025-03-26T21:52:20.188+08:00: For customers running the current memory allocator, we suggest changing the contents of the following sysfsFile
   2025-03-26T21:52:20.188+08:00: For customers running the current memory allocator, we suggest changing the contents of the following sysfsFile
   2025-03-26T21:52:20.188+08:00: We suggest setting the contents of sysfsFile to 0.
   2025-03-26T21:52:20.188+08:00: Your system has glibc support for rseq built in, which is not yet supported by tcmalloc-google and has critical performance implications. Please set the environment variable GLIBC_TUNABLES=glibc.pthread.rseq=0
   2025-03-26T21:52:20.188+08:00: vm.max_map_count is too low
   2025-03-26T21:52:20.188+08:00: We suggest setting swappiness to 0 or 1, as swapping can cause performance problems.
------

test> use admin
switched to db admin
admin> db.system.users.find()
[
  {
    _id: 'admin.jasonyin',
    userId: UUID('4067f632-01f3-4395-a545-c38f874bc19c'),
    user: 'jasonyin',
    db: 'admin',
    credentials: {
      'SCRAM-SHA-1': {
        iterationCount: 10000,
        salt: 'oOe5h/0T55pSwS3xIGoJZw==',
        storedKey: '9mYIMX1yI8bv3pf3u7Jah/ljX2s=',
        serverKey: '1bhc0xBpE2QtHMrLJNNvvVbGebs='
      },
      'SCRAM-SHA-256': {
        iterationCount: 15000,
        salt: 'vPK7UjgzeYYcAyhbl9U8K4cukWExQZltNpwdbQ==',
        storedKey: 'GqvdX8CrOyxlHQYxmXbw/dGnFXEgSBbJy8EJnVyYuVQ=',
        serverKey: 'VP9fvhHJ9ErNxQcqDgRnWmK9rzsJygh2gbciazhjzc8='
      }
    },
    roles: [ { role: 'root', db: 'admin' } ]
  },
  {
    _id: 'test.test01',
    userId: UUID('a92c3b7a-e29e-4e40-ba89-40e915c2124d'),
    user: 'test01',
    db: 'test',
    credentials: {
      'SCRAM-SHA-1': {
        iterationCount: 10000,
        salt: 'GvjUmr6UGrc8Nm0vuI/9cw==',
        storedKey: '8sphOqbnNSfriOwawsQqLBbswOM=',
        serverKey: 'w+brHiJv2MJuxOgDwKOm6PhkxsA='
      },
      'SCRAM-SHA-256': {
        iterationCount: 15000,
        salt: 'Mzjb1RF6u/n9hwag/0CgoyPq5CC7BaUwO4dOYw==',
        storedKey: '+zp/3qiFhKK1pg6PYoNXICAuGTaXRULERbm9yYDiOsk=',
        serverKey: 'r0h7kpImDoDU0YDsONCZL+34N7dgeWM9DxF0LeWXFUM='
      }
    },
    roles: [ { role: 'read', db: 'haha' }, { role: 'readWrite', db: 'xixi' } ]
  }
]
admin>
2.更改用户密码
参考连接:
	https://www.mongodb.com/zh-cn/docs/manual/tutorial/change-own-password-and-custom-data/

完整示例:
	1.修改密码
test> use admin
switched to db admin
admin> db.system.users.find()
[
  {
    _id: 'admin.jasonyin',
    userId: UUID('4067f632-01f3-4395-a545-c38f874bc19c'),
    user: 'jasonyin',
    db: 'admin',
    credentials: {
      'SCRAM-SHA-1': {
        iterationCount: 10000,
        salt: 'oOe5h/0T55pSwS3xIGoJZw==',
        storedKey: '9mYIMX1yI8bv3pf3u7Jah/ljX2s=',
        serverKey: '1bhc0xBpE2QtHMrLJNNvvVbGebs='
      },
      'SCRAM-SHA-256': {
        iterationCount: 15000,
        salt: 'vPK7UjgzeYYcAyhbl9U8K4cukWExQZltNpwdbQ==',
        storedKey: 'GqvdX8CrOyxlHQYxmXbw/dGnFXEgSBbJy8EJnVyYuVQ=',
        serverKey: 'VP9fvhHJ9ErNxQcqDgRnWmK9rzsJygh2gbciazhjzc8='
      }
    },
    roles: [ { role: 'root', db: 'admin' } ]
  },
  {
    _id: 'test.test01',
    userId: UUID('0d6baf51-1785-449b-8765-7565d903bc4c'),
    user: 'test01',
    db: 'test',
    credentials: {
      'SCRAM-SHA-1': {
        iterationCount: 10000,
        salt: 'EUqUxJCCHHBiDzGHh0478Q==',
        storedKey: 'rCH6SsxnZYi8yfut9xKlxPW6yPI=',
        serverKey: 'pmjiwwOT/KEcjtmL2fhKbchmLfE='
      },
      'SCRAM-SHA-256': {
        iterationCount: 15000,
        salt: 'uePcL4oNDt0OPLcqyI47GWXvx0dZDVCPvzcBFQ==',
        storedKey: 'obAXYKBKpIzX2UlCJvAevymgmDvBIXC+QMwPtOHnocM=',
        serverKey: 'JZPKO8W6BWN+WSS75U7X3jZbvL8HyeK0cISj2YIjWW4='
      }
    },
    roles: [ { role: 'readWrite', db: 'xixi' }, { role: 'read', db: 'haha' } ]
  }
]
admin> use test
switched to db test
test> db.updateUser("test01",{pwd: passwordPrompt()})
Enter password  # 此处我修改的密码为"yinzhengjie"
***********{ ok: 1 }
test>


	2.验证密码是否修改成功,直接登录测试即可
[root@prometheus-server31 ~]# mongosh -u test01 -p 123456 --host 10.0.0.31  --authenticationDatabase test  # 很明显,旧的密码无法正常登录!
Current Mongosh Log ID:	67e411e7104897e89601337a
Connecting to:		mongodb://<credentials>@10.0.0.31:27017/?directConnection=true&authSource=test&appName=mongosh+2.4.2
MongoServerError: Authentication failed.
[root@prometheus-server31 ~]#
[root@prometheus-server31 ~]# mongosh -u test01 -p yinzhengjie --host 10.0.0.31  --authenticationDatabase test  # 注意哈,使用修改后的密码是可以正常登录的。
Current Mongosh Log ID:	67e411edd402150b6801337a
Connecting to:		mongodb://<credentials>@10.0.0.31:27017/?directConnection=true&authSource=test&appName=mongosh+2.4.2
Using MongoDB:		8.0.5
Using Mongosh:		2.4.2

For mongosh info see: https://www.mongodb.com/docs/mongodb-shell/

test> show dbs
haha  40.00 KiB
xixi  40.00 KiB
test>
3.删除用户
test> db.dropUser("test01")  # 删除用户
{ ok: 1 }
test> db.system.users.find()  # 在test库中是无法查看系统用户的

test> use admin
switched to db admin
admin> db.system.users.find()  # 只有在admin库中才能看到所有的用户哟~
[
  {
    _id: 'admin.jasonyin',
    userId: UUID('4067f632-01f3-4395-a545-c38f874bc19c'),
    user: 'jasonyin',
    db: 'admin',
    credentials: {
      'SCRAM-SHA-1': {
        iterationCount: 10000,
        salt: 'oOe5h/0T55pSwS3xIGoJZw==',
        storedKey: '9mYIMX1yI8bv3pf3u7Jah/ljX2s=',
        serverKey: '1bhc0xBpE2QtHMrLJNNvvVbGebs='
      },
      'SCRAM-SHA-256': {
        iterationCount: 15000,
        salt: 'vPK7UjgzeYYcAyhbl9U8K4cukWExQZltNpwdbQ==',
        storedKey: 'GqvdX8CrOyxlHQYxmXbw/dGnFXEgSBbJy8EJnVyYuVQ=',
        serverKey: 'VP9fvhHJ9ErNxQcqDgRnWmK9rzsJygh2gbciazhjzc8='
      }
    },
    roles: [ { role: 'root', db: 'admin' } ]
  }
]
admin>
本文来自博客园,作者:尹正杰,转载请注明原文链接:https://www.cnblogs.com/yinzhengjie/p/18782225,个人微信: "JasonYin2020"(添加时请备注来源及意图备注,有偿付费)
当你的才华还撑不起你的野心的时候,你就应该静下心来学习。当你的能力还驾驭不了你的目标的时候,你就应该沉下心来历练。问问自己,想要怎样的人生。

 浙公网安备 33010602011771号