

K8S集群CNI网络插件之Cilium底层原理
作者:尹正杰
版权声明:原创作品,谢绝转载!否则将追究法律责任。
一.BPF和eBPF概述
1.什么是BPF
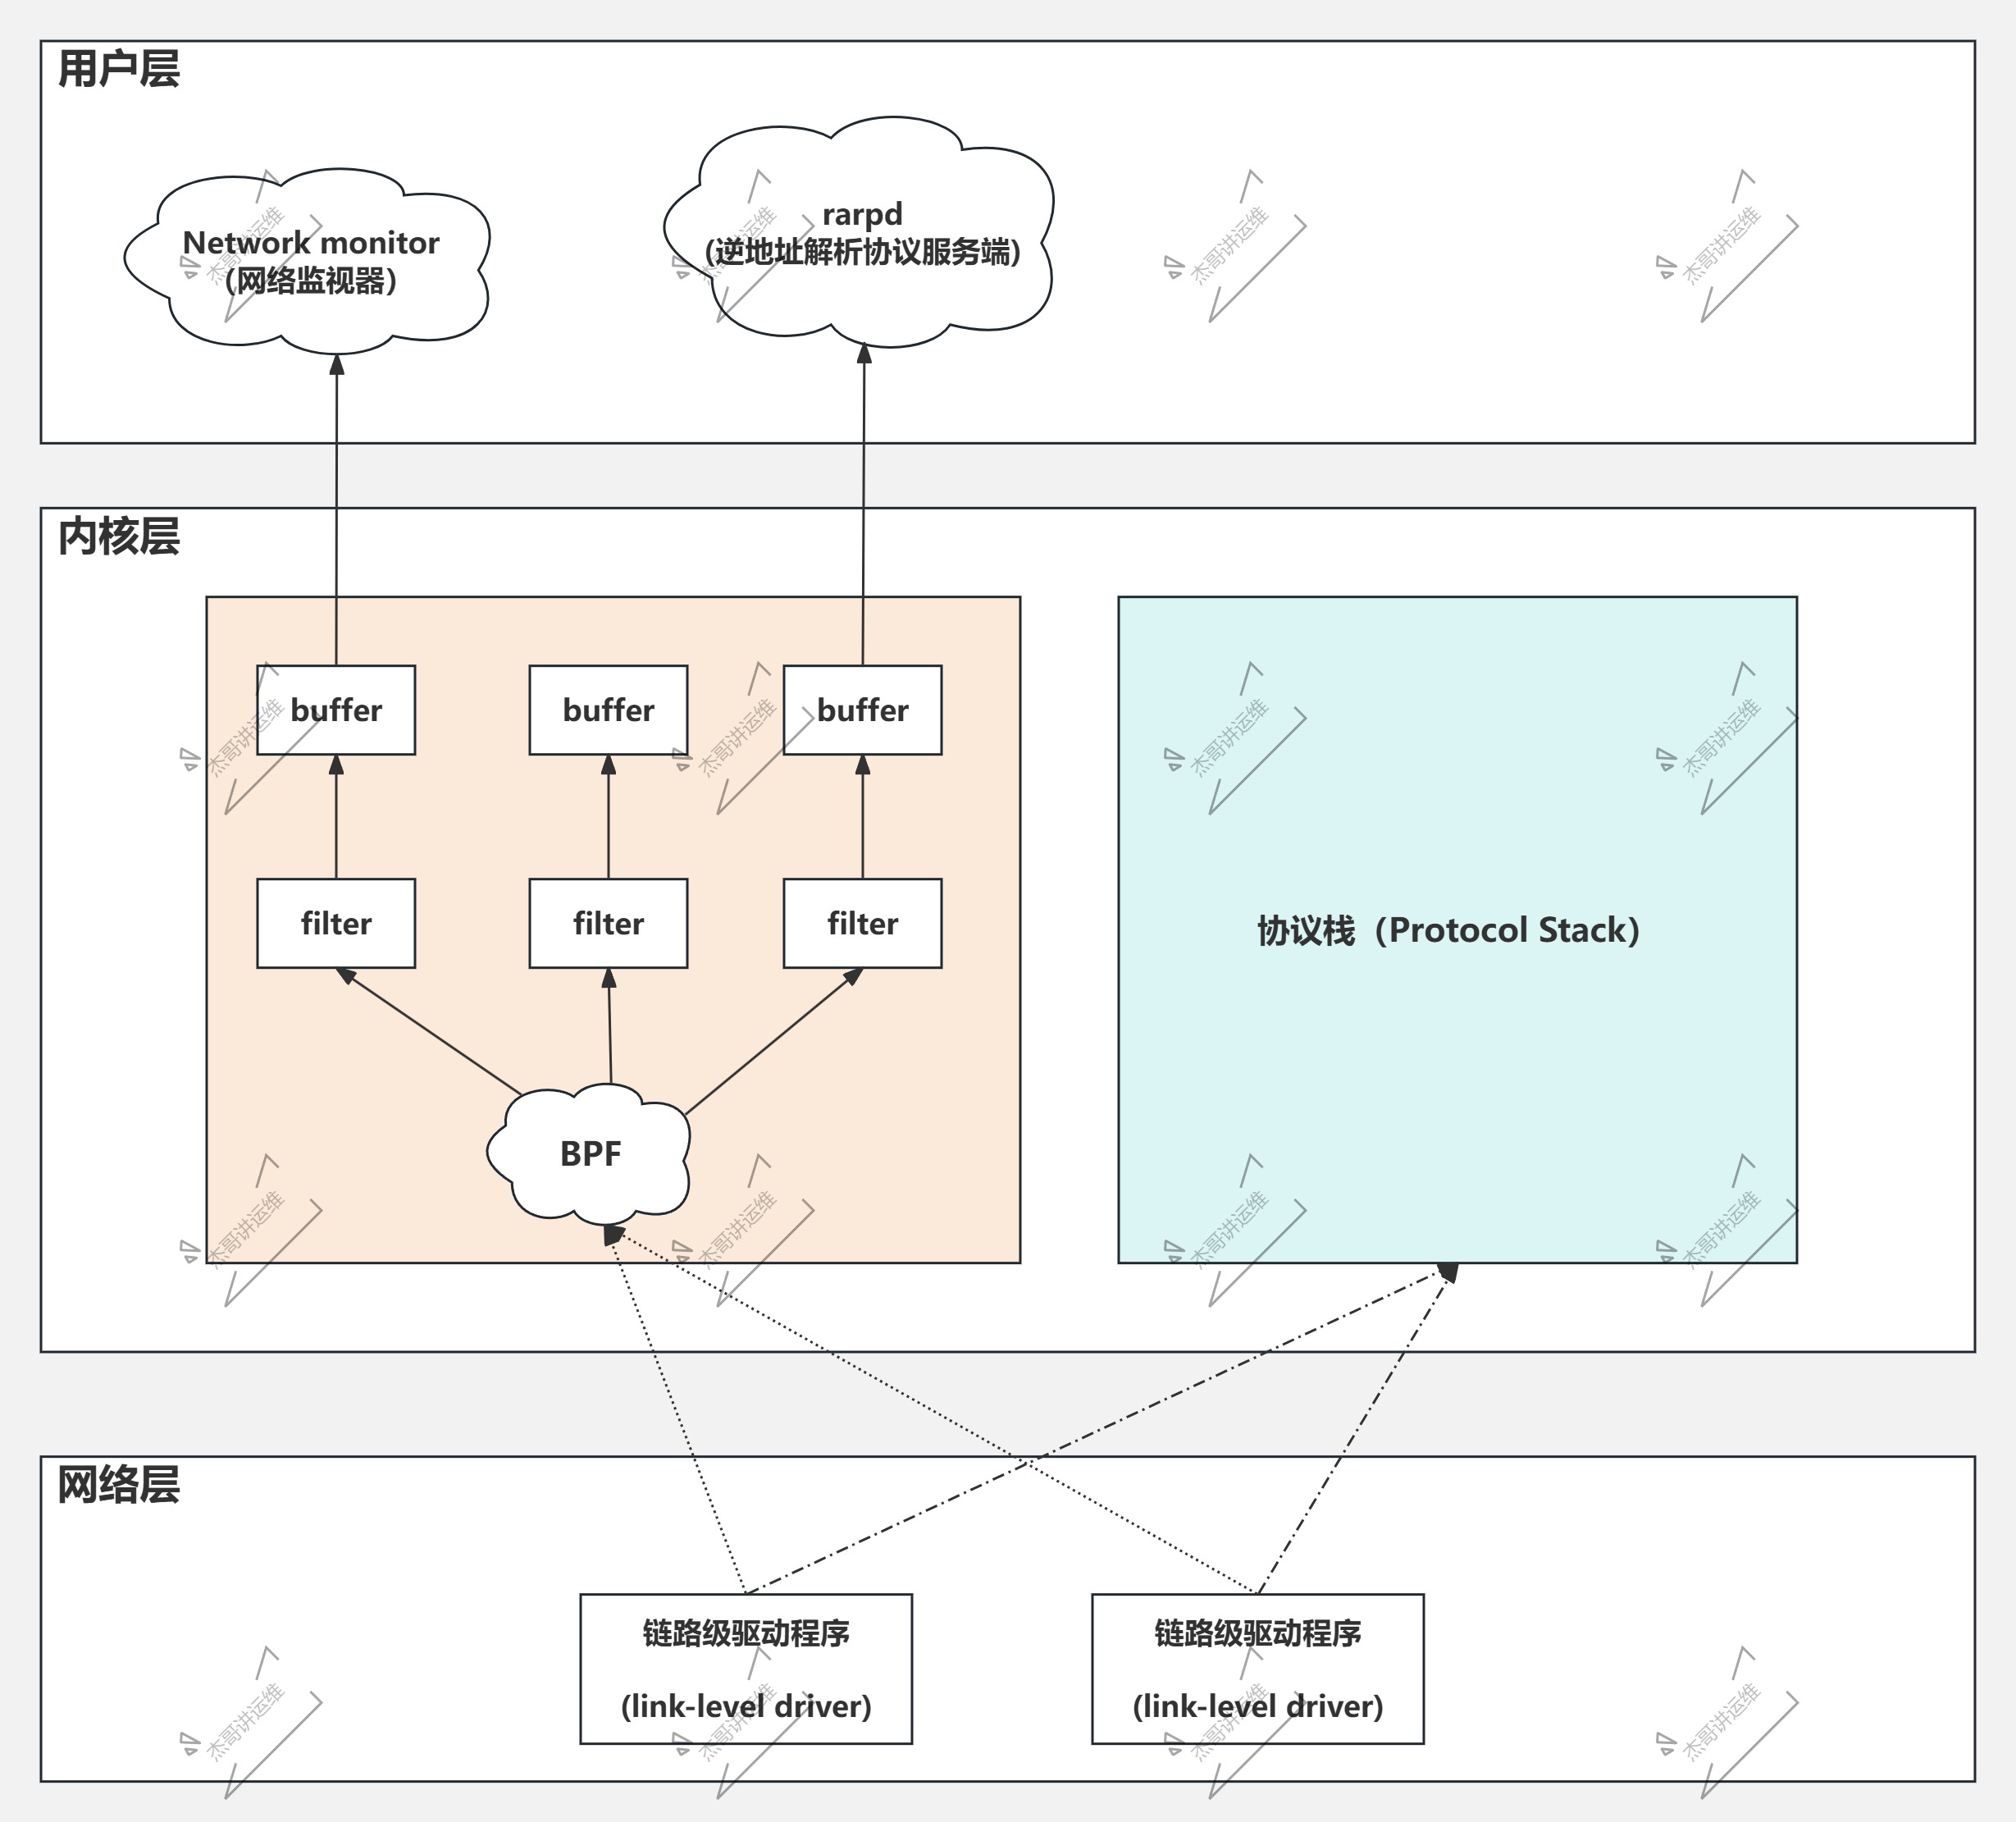
BPF全称为"Berkeley Package Filter",于1997年自Linux 2.1.75版本的内核引入。

基于寄存器的虚拟机,运行于内核空间:
	- 1.负责运行从用户空间注入的代码而无须对内核进行编程(开发内核模块);
	- 2.使用自定义的64位RISC指令集;
	- 3.能够在Linux内核内部运行时本地编译的"BPF程序",并能访问内核功能和内存的子集;

收到数据报后,驱动程序不仅会发给协议栈,还会发给BPF一份,由BPF根据不同的filter直接就地进行过滤,而将结果送往Buffer。

最初因tcpdump而知名,如今各个类Unix系统几乎都在使用BPF作为网络数据包过滤技术。

综上所述,简而言之,就是BPF工作在内核层效率高。
2.什么是eBPF
eBPF即"extended BPF",由Alexei Straovoitov于2014年实现,最早出现在Linux3.15版本的内核中。
	- 1.针对现代硬件进行了优化,较之BPF执行速度更快,据说快了将近4倍;
	- 2.2014年6月,eBPF扩展到用户空间,从而演进成了一个通用执行引擎,应用场景不再局限于数据包过滤,而是逐步扩展到内核各子模块,随后被广泛应用在观测,网络和安全等领域;
	- 3.目前已然成为Linux内核的顶级子系统,地位和内存,磁盘,文件系统等管理处于同一个级别;

eBPF为用户提供通过简单程序扩展或定制内核功能的接口,用户可编写eBPF程序内核中的目标时间相关联,并由这些事件触发执行。

eBPF不仅是一个包过滤系统,用户可以通过"bpf()"系统调用允许在Linux内核中直接运行在用户空间编写的代码。

由网友类比,eBPF在内核的地位,就类似于JavaScript在浏览器中的地位。
3.eBPF的应用场景
eBPF有很多应用场景:
	- SDN Configuration: 软件级的系统配置。
	- DDos Mitigation: DDos攻击的防范。
	- Intrusion Detection: 入侵检测系统。
	- Container Security: 容器安全。
	- Observability: 可观测性。
	- Firwalls: 防火墙的访问控制。
	- Device Drivers: 增强设备驱动。


eBPF相关的子系统:
	- CPU(Scheduling)
	- Memory
	- Disks
	- File Systems
	- Networking
	- Applications
	- kernel
	- Hypervisors
	- Containers

温馨提示:
	BCC全称为"BPF Compiler Collection",是一款eBPF的开发工具,程序包名称为"bcc-tools",开发的小伙伴感兴趣的话可自行研究。
4.eBPF和XDP
XDP的全称为"eXpress Data Path",在内核级提供可编程数据包处理机制。

数据包到达时,网络驱动程序执行XDP Hook上eBPF程序,无需处理上下文切换,中断等,可大大减少内核开销。

Linux内核基于eBPF提供的高性能数据路径,支持绕过内核的网络栈直接在网络驱动程序的级别处理数据包。
5.eBPF vs iptables
对于kube-proxy组件的iptables工作模式,随着Pod数量的增多,其底层的iptables规则也会逐渐增多,当集群规模较大时,对于遍历iptables表就是一件很痛苦的事情。

eBPF的解决方案就是基于hash的方式查找规则,底层逻辑处理方式和ipvs类似。
二.Cilium概述
1.什么是Cilium
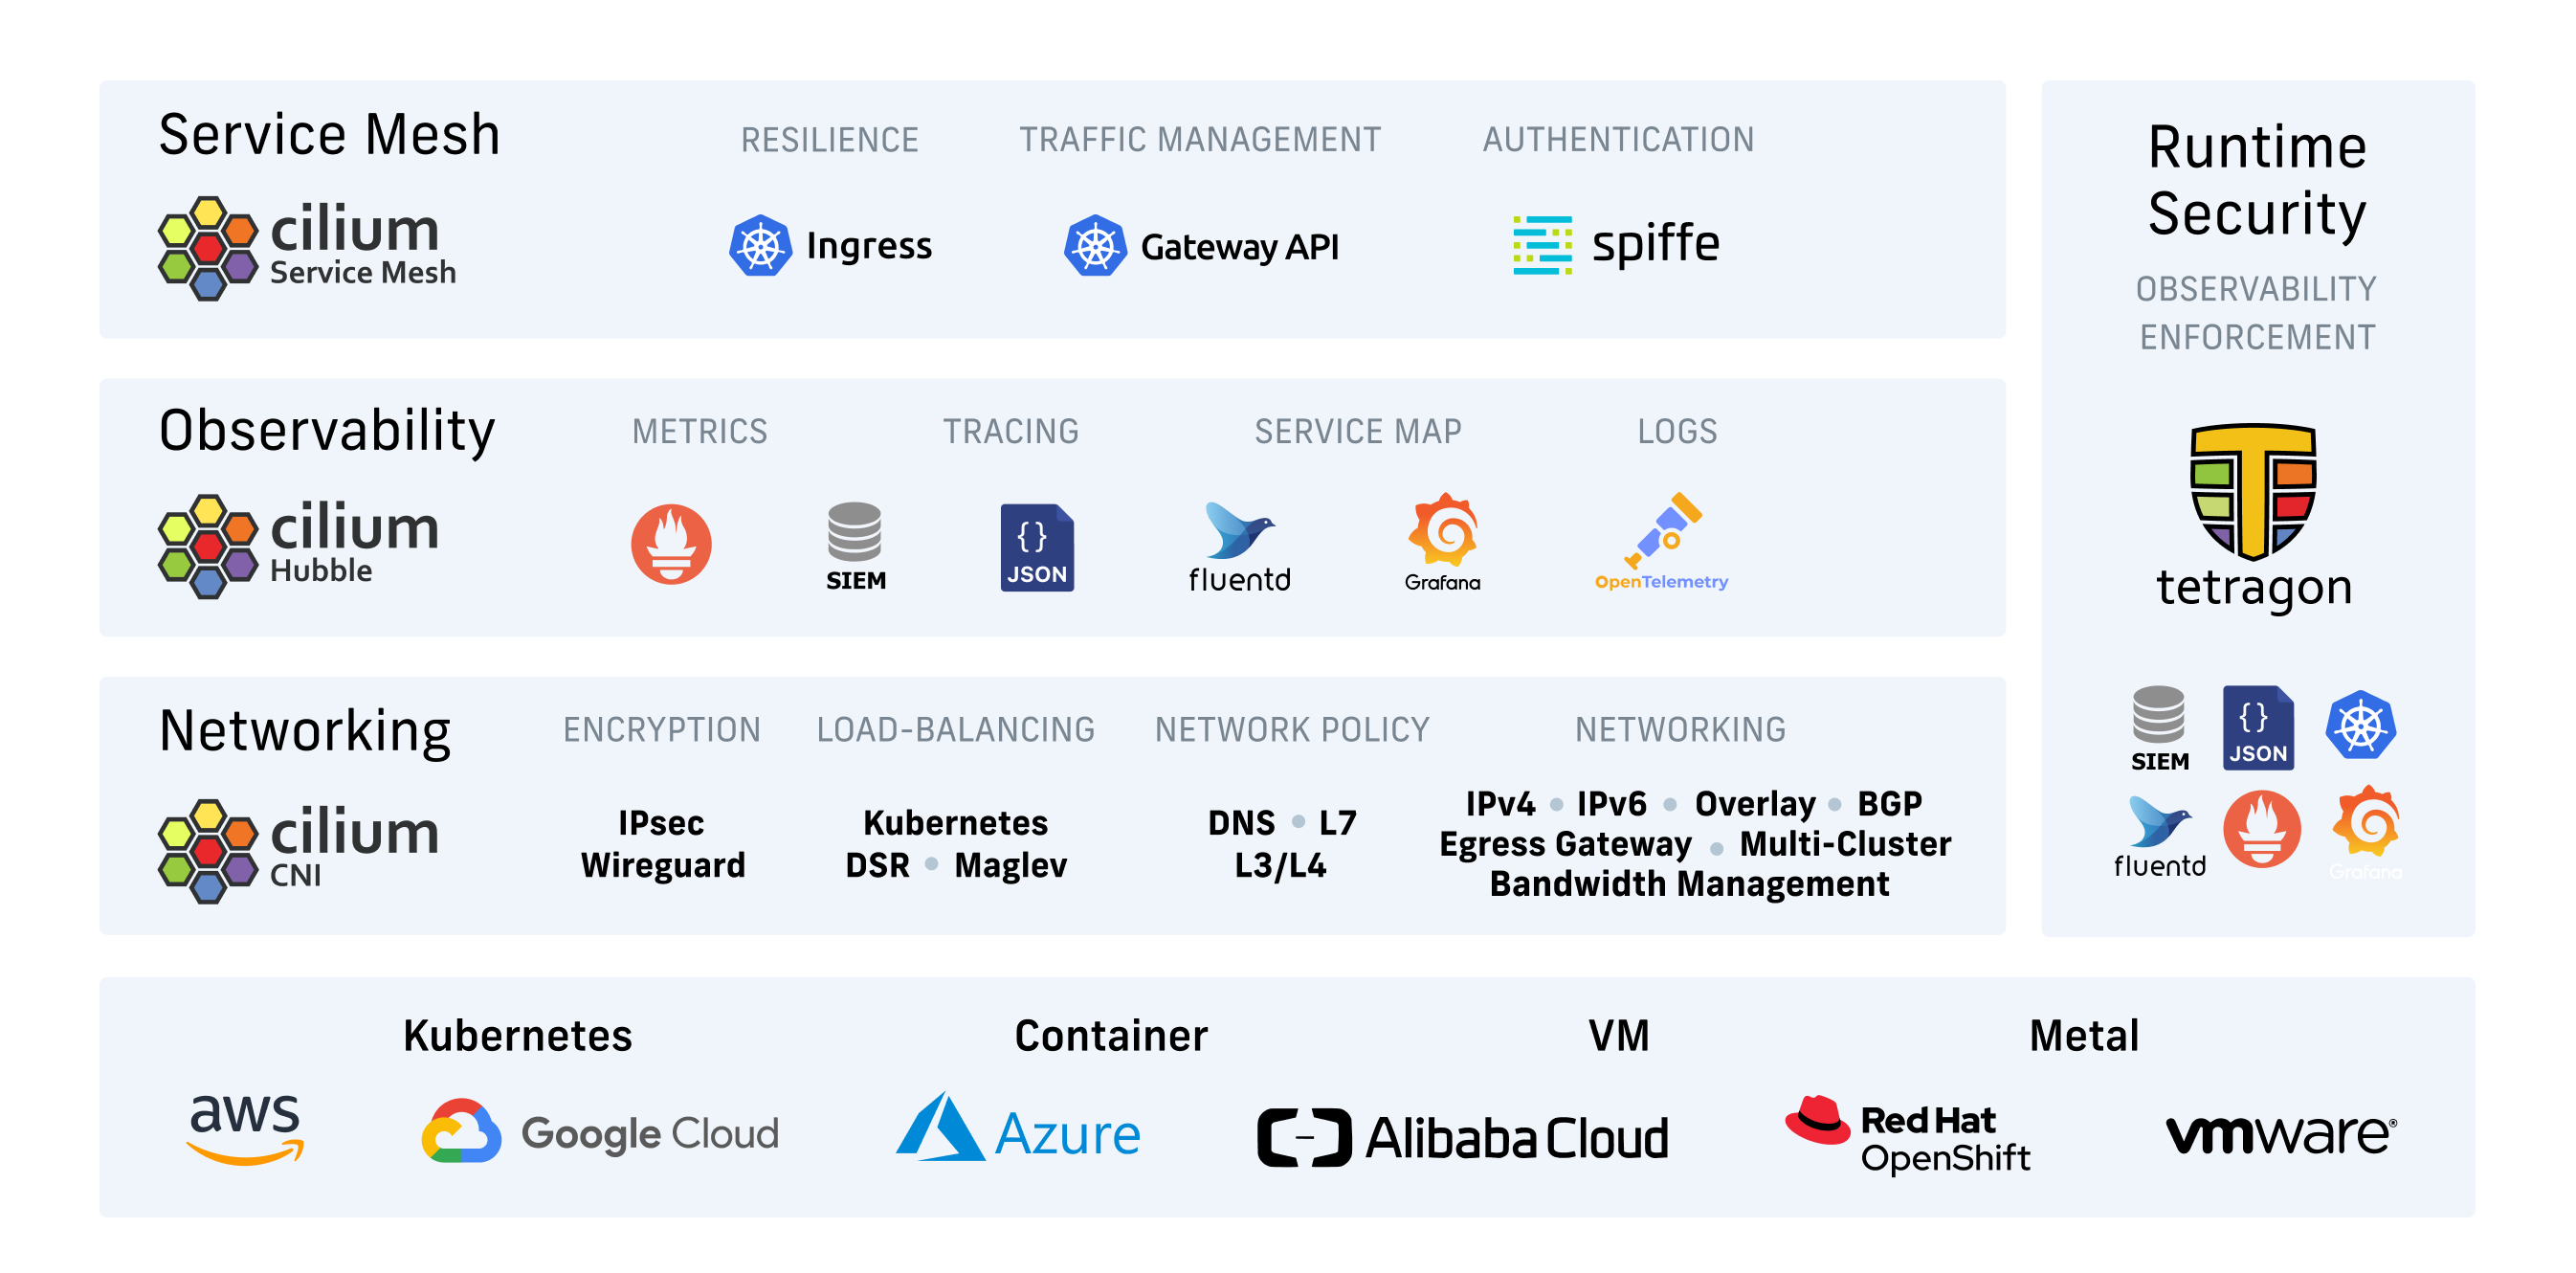
Cilium是基于eBPF和XDP的Kubernetes高性能网络插件,支持可观测性和安全机制,提供ServiceMesh的数据平面。

Cilium支持将多个Kubernetes集群定义成Mesh。

Cluster Mesh支持的模式有HA,Shard Services,Splitting Services和Load Service Affinity和Remote Service Affinity。

Cilium的主要功能如下:
	容器网络解决方案和负载均衡:
		- CNI:
			提供Pod容器跨主机互联的网络组件。
		- Kubernetes Services
			可以支持K8S svc的功能,意味着部署该组件后,我们甚至不用部署kube-proxy组件。
		- Multi-Cluster
        	支持多集群网络管理。

	网络安全:
		- Network Policy:
			支持容器的网络策略。
		- Identity-based:
			可实现端到端的认证通信。
		- Encryption:
			可以实现链路加密。

	可观测性:
		- Metrics:
			支持指标观测,意味着将来可以接入Prometheus。
		- Flow Visibility:
			支持可视化。
		- Service Dependency:
			服务的依赖关系。


温馨提示:
	Cilium高级特性依赖Linux内核版本,最好Linux内核能大于5.10+版本。
	建议生产环境中选择Ubuntu 22.04+ LTS系统部署,内核版本较新。


官网地址:
	https://github.com/cilium/cilium
2.Cilium组件
Cilium:
	- Cilium Agent
		- 1.由daemonset编排运行集群中的每个节点上。
		- 2.从Kubernetes或API接口接收配置: 网络,LB,Network Policy等;
		- 3.基于SDK调用节点上的eBPF实现相关的功能;

	- Cilium Client
		- 命令行工具,通过Rest API同当前节点上的Cilium Agent进行交互;
		- 常用语检查本地Cilium Agent的状态;
		- 也可用于直接访问eBPF Map;
		- 另外还有一个客户端工具称为Cilium CLI,负责管理整个Cilium集群,而非当前Cilium Agent。

	- Operator
		- 负责监视和维护整个集群;
		- 同Cilium的网络功能和网络策略机制不相关;
			- 其故障并不会影响报文转发和网络策略的进行;
			- 但会影响IPAM和KVstore的数据存取;

	- CNI Plugin
		- Cilium自身即为Kubernetes CNI插件,同时还可以完全取代kube Proxy的功能。


Hubble: 分布式的网络可观测性平台,建立在cilium和eBPF之上,存储展示从cilium获取的相关数据。
	- Server:
		服务端接收数据,进行分析处理。

	- Relay:
		采集被监控端的数据。

	- Client:
		可以和Server进行通信的组件。

	- Graphical UI
		用于从Server端展示数据的WebUI相关组件。

eBPF:
	Cilium底层使用的就是eBPF功能。

Data Store: (数据存储)
	- Kubernetes CRDs(Default,推荐使用这种方式):
	- Key-Value Store
3.Cilium支持网络模式
Encapsulation(隧道封装,Overlay网络):
	- 1.VXLAN:
		默认模式,8472/UDP。
	- 2.Geneve:
		6081/UDP。


Native-Routing(原生路由,直接路由,默认不支持跨路由,underlay网络):
	- 1.将所有非本地目标地址报文都交由内核的路由子系统,处理逻辑等同于本地进程生成的报文;
	- 2.节点上的路由表将决定如何路由Pod报文;
	- 3.开启方式: "--set tunnel=disabled --set routing-mode=native";
4.部署Cilium方式
方案一: 只作为CNI网络插件
	Service的功能仍由kube-proxy实现。


方案二: 作为CNI网络插件,同时取代kube-proxy部分功能
	余下的功能仍由kube-proxy实现,因此还是需要部署kube-proxy组件。


方案三: 完全取代kube-proxy
	说白了,就是使用Cilium来取代kube-proxy的所有功能。


温馨提示:
	使用kubeadm部署K8S集群时可以使用"--skip-phases=addon/kube-proxy"选项,以跳过kube proxy的部署。
5.部署Cilium工具
- helm
	基于helm方式部署Cilium。

- cilium CLI:
	由Cilium官方提供的一款部署工具。
6.Cilium网络插件的实现
cilium会在宿主机上创建四个虚拟网络接口:
	- cilium_host和cilium_net
		- 1.一组veth_pair,由cilium agent创建;
		- 2.cilium_host会被配置为该主机分配到的PodCIDR中的第一个地址,并作为该子网的默认网关;
		- 3.CNI插件负责创建BPF规则,以便于在内核接通veth pair的两端;

	- cilium_vxlan
    	负责在vxlan模式下,封装或解封装vxlan报文。

    - lxc_health
    	节点健康状态检测。


Pod网络接口:
	- cilium会为每个Pod创建一组veth pair:
		- 一端作为pod中的网络接口存在,网关指向cilium_host的地址;
		- 另一端表现为宿主机上名称形如"lxcXXXXX"的虚拟接口;
	- LXC接口的MAC地址用于响应ARP请求:
		- 执行命令"cilium bpf tunnel list",此命令需要进入到Cilium-agent的容器中执行。


测试验证:
	1.查看网卡设备
[root@master241 ~]# ifconfig
cilium_host: flags=4291<UP,BROADCAST,RUNNING,NOARP,MULTICAST>  mtu 1500
        inet 10.100.0.56  netmask 255.255.255.255  broadcast 0.0.0.0
        inet6 fe80::bc14:bfff:febc:e3df  prefixlen 64  scopeid 0x20<link>
        ether be:14:bf:bc:e3:df  txqueuelen 1000  (Ethernet)
        RX packets 206  bytes 17801 (17.8 KB)
        RX errors 0  dropped 0  overruns 0  frame 0
        TX packets 28  bytes 3954 (3.9 KB)
        TX errors 0  dropped 0 overruns 0  carrier 0  collisions 0

cilium_net: flags=4291<UP,BROADCAST,RUNNING,NOARP,MULTICAST>  mtu 1500
        inet6 fe80::5cca:d6ff:fe2b:255f  prefixlen 64  scopeid 0x20<link>
        ether 5e:ca:d6:2b:25:5f  txqueuelen 1000  (Ethernet)
        RX packets 28  bytes 3954 (3.9 KB)
        RX errors 0  dropped 0  overruns 0  frame 0
        TX packets 206  bytes 17801 (17.8 KB)
        TX errors 0  dropped 0 overruns 0  carrier 0  collisions 0

cilium_vxlan: flags=4163<UP,BROADCAST,RUNNING,MULTICAST>  mtu 1500
        inet6 fe80::30d7:15ff:fea8:e671  prefixlen 64  scopeid 0x20<link>
        ether 32:d7:15:a8:e6:71  txqueuelen 1000  (Ethernet)
        RX packets 376  bytes 25277 (25.2 KB)
        RX errors 0  dropped 0  overruns 0  frame 0
        TX packets 380  bytes 24461 (24.4 KB)
        TX errors 0  dropped 0 overruns 0  carrier 0  collisions 0

...

lxc_health: flags=4163<UP,BROADCAST,RUNNING,MULTICAST>  mtu 1500
        inet6 fe80::ac24:a3ff:fe62:ca48  prefixlen 64  scopeid 0x20<link>
        ether ae:24:a3:62:ca:48  txqueuelen 1000  (Ethernet)
        RX packets 251  bytes 20300 (20.3 KB)
        RX errors 0  dropped 0  overruns 0  frame 0
        TX packets 326  bytes 27674 (27.6 KB)
        TX errors 0  dropped 0 overruns 0  carrier 0  collisions 0

[root@master241 ~]#


	2.查看基于bpf构建出的vxlan隧道信息
[root@master241 ~]# kubectl get pods -n kube-system -l app.kubernetes.io/name=cilium-agent -o wide
NAME           READY   STATUS    RESTARTS   AGE   IP           NODE        NOMINATED NODE   READINESS GATES
cilium-2c6st   1/1     Running   0          17m   10.0.0.243   worker243   <none>           <none>
cilium-9hf7b   1/1     Running   0          17m   10.0.0.242   worker242   <none>           <none>
cilium-fwcjw   1/1     Running   0          17m   10.0.0.241   master241   <none>           <none>
[root@master241 ~]#
[root@master241 ~]# kubectl -n kube-system exec -it cilium-2c6st -c cilium-agent -- bash
root@worker243:/home/cilium#
root@worker243:/home/cilium# cilium bpf tunnel list
TUNNEL       VALUE
10.100.1.0   10.0.0.242:0
10.100.0.0   10.0.0.241:0
root@worker243:/home/cilium#
root@worker243:/home/cilium# cilium status  # 查看cilium状态信息,如果想要查看更详细信息,可以添加"--verbose"选项。
KVStore:                 Disabled
Kubernetes:              Ok         1.31 (v1.31.6) [linux/amd64]
Kubernetes APIs:         ["EndpointSliceOrEndpoint", "cilium/v2::CiliumClusterwideNetworkPolicy", "cilium/v2::CiliumEndpoint", "cilium/v2::CiliumNetworkPolicy", "cilium/v2::CiliumNode", "cilium/v2alpha1::CiliumCIDRGroup", "core/v1::Namespace", "core/v1::Pods", "core/v1::Service", "networking.k8s.io/v1::NetworkPolicy"]
KubeProxyReplacement:    True   [eth0   10.0.0.243 fe80::20c:29ff:fec0:3c55 (Direct Routing)]
Host firewall:           Disabled
SRv6:                    Disabled
CNI Chaining:            none
CNI Config file:         successfully wrote CNI configuration file to /host/etc/cni/net.d/05-cilium.conflist
Cilium:                  Ok   1.17.0 (v1.17.0-c2bbf787)
NodeMonitor:             Listening for events on 128 CPUs with 64x4096 of shared memory
Cilium health daemon:    Ok
IPAM:                    IPv4: 5/254 allocated from 10.100.2.0/24,
IPv4 BIG TCP:            Disabled
IPv6 BIG TCP:            Disabled
BandwidthManager:        Disabled
Routing:                 Network: Tunnel [vxlan]   Host: Legacy
Attach Mode:             Legacy TC
Device Mode:             veth
Masquerading:            IPTables [IPv4: Enabled, IPv6: Disabled]
Controller Status:       37/37 healthy
Proxy Status:            OK, ip 10.100.2.222, 0 redirects active on ports 10000-20000, Envoy: external
Global Identity Range:   min 256, max 65535
Hubble:                  Ok              Current/Max Flows: 4095/4095 (100.00%), Flows/s: 9.31   Metrics: Disabled
Encryption:              Disabled
Cluster health:          3/3 reachable   (2025-03-09T02:09:18Z)
Name                     IP              Node   Endpoints
Modules Health:          Stopped(0) Degraded(0) OK(60)
root@worker243:/home/cilium#
三.部署Kubernetes 1.31.6集群
1.安装kubeadm相关软件包
1.1 配置软件源
	1.所有节点安装依赖包
apt-get update && apt-get install -y apt-transport-https


	2.所有节点添加软件源【将来如果想要安装其他版本,将1.31更换为你想要的版本即可,此方法仅对K8S 1.29+有效】
curl -fsSL https://mirrors.aliyun.com/kubernetes-new/core/stable/v1.31/deb/Release.key |
    gpg --dearmor -o /etc/apt/keyrings/kubernetes-apt-keyring.gpg
echo "deb [signed-by=/etc/apt/keyrings/kubernetes-apt-keyring.gpg] https://mirrors.aliyun.com/kubernetes-new/core/stable/v1.31/deb/ /" |
    tee /etc/apt/sources.list.d/kubernetes.list


参考链接:
	https://developer.aliyun.com/mirror/kubernetes
	https://www.cnblogs.com/yinzhengjie/p/18353027
1.2 查看支持安装的kubeadm列表
	1.更新软件源
apt-get update


	2.查看支持安装的kubeadm列表,目前最新版为"1.31.6-1.1"
[root@master241 ~]# apt-cache madison kubeadm
   kubeadm | 1.31.6-1.1 | https://mirrors.aliyun.com/kubernetes-new/core/stable/v1.31/deb  Packages
   kubeadm | 1.31.5-1.1 | https://mirrors.aliyun.com/kubernetes-new/core/stable/v1.31/deb  Packages
   kubeadm | 1.31.4-1.1 | https://mirrors.aliyun.com/kubernetes-new/core/stable/v1.31/deb  Packages
   kubeadm | 1.31.3-1.1 | https://mirrors.aliyun.com/kubernetes-new/core/stable/v1.31/deb  Packages
   kubeadm | 1.31.2-1.1 | https://mirrors.aliyun.com/kubernetes-new/core/stable/v1.31/deb  Packages
   kubeadm | 1.31.1-1.1 | https://mirrors.aliyun.com/kubernetes-new/core/stable/v1.31/deb  Packages
   kubeadm | 1.31.0-1.1 | https://mirrors.aliyun.com/kubernetes-new/core/stable/v1.31/deb  Packages
[root@master241 ~]#
1.3 安装指定版本的kubeadm软件包
	1.安装软件包
apt-get -y install kubelet=1.31.6-1.1 kubeadm=1.31.6-1.1 kubectl=1.31.6-1.1


	2.查看软件的安装版本
[root@master241 ~]# kubeadm version
kubeadm version: &version.Info{Major:"1", Minor:"31", GitVersion:"v1.31.6", GitCommit:"6b3560758b37680cb713dfc71da03c04cadd657c", GitTreeState:"clean", BuildDate:"2025-02-12T21:31:09Z", GoVersion:"go1.22.12", Compiler:"gc", Platform:"linux/amd64"}
[root@master241 ~]#
[root@master241 ~]# kubectl version
Client Version: v1.31.6
Kustomize Version: v5.4.2
The connection to the server localhost:8080 was refused - did you specify the right host or port?
[root@master241 ~]#
[root@master241 ~]# kubelet --version
Kubernetes v1.31.6
[root@master241 ~]#
2.安装containerd
2.1 Linux基础优化
	1.关闭swap分区
swapoff -a && sysctl -w vm.swappiness=0  # 临时关闭
sed -ri '/^[^#]*swap/s@^@#@' /etc/fstab  # 基于配置文件关闭


	2.修改时区
ln -svf /usr/share/zoneinfo/Asia/Shanghai /etc/localtime


	3.允许iptable检查桥接流量
cat <<EOF | tee /etc/modules-load.d/k8s.conf
br_netfilter
EOF

cat <<EOF | tee /etc/sysctl.d/k8s.conf
net.bridge.bridge-nf-call-ip6tables = 1
net.bridge.bridge-nf-call-iptables = 1
net.ipv4.ip_forward = 1
EOF
sysctl --system
2.2 集群所有节点安装containerd
	1.解压我给大家准备好的安装包
tar xf yinzhengjie-autoinstall-containerd-v1.6.36.tar.gz


	2.安装containerd服务
./install-containerd.sh i
3.基于kubeadm初始化K8S集群
3.1 初始化master节点
kubeadm init --control-plane-endpoint 10.0.0.241 \
  --kubernetes-version=v1.31.6 \
  --pod-network-cidr=10.100.0.0/16 \
  --service-cidr=10.200.0.0/12 \
  --upload-certs \
  --image-repository=registry.cn-hangzhou.aliyuncs.com/google_containers \
  --skip-phases=addon/kube-proxy

...
[addons] Applied essential addon: CoreDNS  # 注意哈,组件仅安装了coreDNS,并不会安装kube-proxy组件

Your Kubernetes control-plane has initialized successfully!

To start using your cluster, you need to run the following as a regular user:

  mkdir -p $HOME/.kube
  sudo cp -i /etc/kubernetes/admin.conf $HOME/.kube/config
  sudo chown $(id -u):$(id -g) $HOME/.kube/config

Alternatively, if you are the root user, you can run:

  export KUBECONFIG=/etc/kubernetes/admin.conf

You should now deploy a pod network to the cluster.
Run "kubectl apply -f [podnetwork].yaml" with one of the options listed at:
  https://kubernetes.io/docs/concepts/cluster-administration/addons/

You can now join any number of the control-plane node running the following command on each as root:

  kubeadm join 10.0.0.241:6443 --token bcgvtt.70kxqw5s57o4pg3o \
	--discovery-token-ca-cert-hash sha256:acd620b40bdcba9b382d85ceb4291d84ac04db82e2fda273b44833ec391ca5c6 \
	--control-plane --certificate-key 9d56d479b5b6a622cea587fec4365b9f98ea580b98c20eb7be452b5065b3e091

Please note that the certificate-key gives access to cluster sensitive data, keep it secret!
As a safeguard, uploaded-certs will be deleted in two hours; If necessary, you can use
"kubeadm init phase upload-certs --upload-certs" to reload certs afterward.

Then you can join any number of worker nodes by running the following on each as root:

kubeadm join 10.0.0.241:6443 --token bcgvtt.70kxqw5s57o4pg3o \
	--discovery-token-ca-cert-hash sha256:acd620b40bdcba9b382d85ceb4291d84ac04db82e2fda273b44833ec391ca5c6
[root@master241 ~]#
3.2 worker节点加入
[root@worker242 ~]# kubeadm join 10.0.0.241:6443 --token bcgvtt.70kxqw5s57o4pg3o \
	--discovery-token-ca-cert-hash sha256:acd620b40bdcba9b382d85ceb4291d84ac04db82e2fda273b44833ec391ca5c6


[root@worker243 ~]# kubeadm join 10.0.0.241:6443 --token bcgvtt.70kxqw5s57o4pg3o \
	--discovery-token-ca-cert-hash sha256:acd620b40bdcba9b382d85ceb4291d84ac04db82e2fda273b44833ec391ca5c6
3.3 配置管理节点
	1.准备kubeconfig文件
mkdir -p $HOME/.kube
sudo cp -i /etc/kubernetes/admin.conf $HOME/.kube/config
sudo chown $(id -u):$(id -g) $HOME/.kube/config


	2.查看节点状态信息
[root@master241 ~]# kubectl get nodes -o wide
NAME        STATUS     ROLES           AGE     VERSION   INTERNAL-IP   EXTERNAL-IP   OS-IMAGE             KERNEL-VERSION       CONTAINER-RUNTIME
master241   NotReady   control-plane   7m57s   v1.31.6   10.0.0.241    <none>        Ubuntu 22.04.4 LTS   5.15.0-119-generic   containerd://1.6.36
worker242   NotReady   <none>          22s     v1.31.6   10.0.0.242    <none>        Ubuntu 22.04.4 LTS   5.15.0-119-generic   containerd://1.6.36
worker243   NotReady   <none>          8s      v1.31.6   10.0.0.243    <none>        Ubuntu 22.04.4 LTS   5.15.0-119-generic   containerd://1.6.36
[root@master241 ~]#
3.4 配置自动补全功能
kubectl completion bash > ~/.kube/completion.bash.inc
echo source '$HOME/.kube/completion.bash.inc' >> ~/.bashrc
source ~/.bashrc
四.部署Cilium网络插件
1.安装Cilium网络插件
1.1 安装cilium客户端
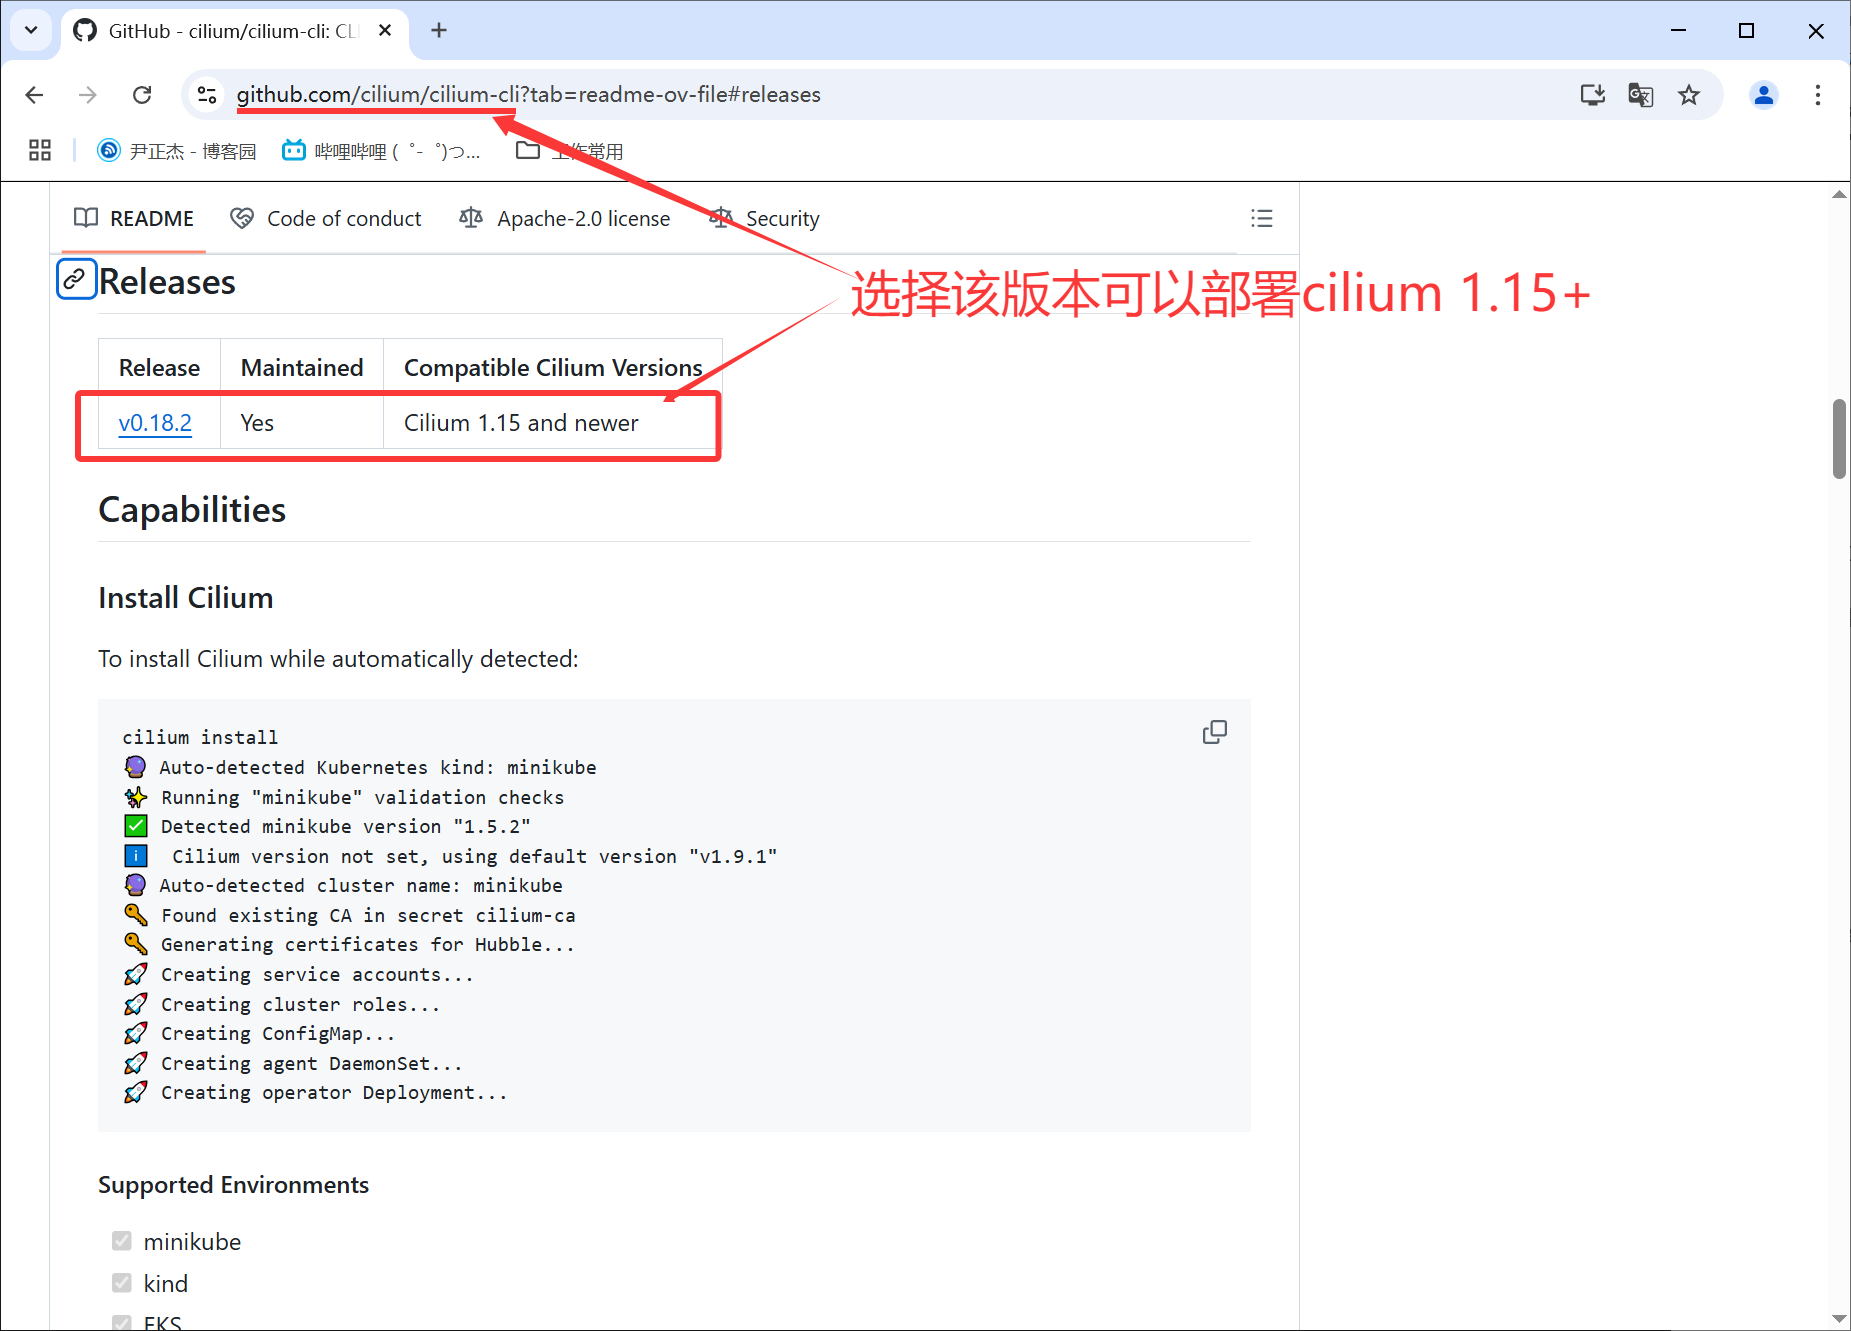
参考链接:
	https://github.com/cilium/cilium-cli


部署cilium组件:
	1.下载cilium-cli程序
[root@master241 ~]# wget https://github.com/cilium/cilium-cli/releases/download/v0.18.2/cilium-linux-amd64.tar.gz


	2.解压程序
[root@master241 ~]# tar xf cilium-linux-amd64.tar.gz  -C /usr/local/bin/


	3.查看Cilium支持的安装版本列表
[root@master241 ~]# cilium install --list-versions
v1.17.0 (default)
v1.17.0-rc.2
v1.17.0-rc.1
v1.17.0-rc.0
v1.17.0-pre.3
v1.17.0-pre.2
v1.17.0-pre.1
v1.17.0-pre.0
...
v1.6.12
v1.6.11
v1.6.10
v1.6.9
v1.6.8
v1.6.7
v1.6.6
v1.6.5
[root@master241 ~]#
1.2 部署cilium的vxlan模式
	1.安装指定版本的cilium
[root@master241 ~]# cilium install \
      --set kubeProxyReplacement=true \
      --set ipam.mode=kubernetes \
      --set routingMode=tunnel \
      --set tunnelProtocol=vxlan \
      --set ipam.operator.clusterPoolIPv4PodCIDRList=10.100.0.0/16 \
      --set ipam.operator.clusterPoolIPv4MaskSize=24 \
      --set version=v1.17.0
...# 具体输出如下所示
ℹ️  Using Cilium version 1.17.0  # 部署的版本
🔮 Auto-detected cluster name: kubernetes  # 集群的名称
🔮 Auto-detected kube-proxy has not been installed  # 发现了kube-proxy未被安装
ℹ️  Cilium will fully replace all functionalities of kube-proxy  # cilium替换kube-proxy功能
[root@master241 ~]#


	2.检查是否安装成功
[root@master241 ~]# kubectl get pods -n kube-system -l app.kubernetes.io/part-of=cilium -o wide
NAME                               READY   STATUS    RESTARTS   AGE     IP           NODE        NOMINATED NODE   READINESS GATES
cilium-2c6st                       1/1     Running   0          2m46s   10.0.0.243   worker243   <none>           <none>
cilium-9hf7b                       1/1     Running   0          2m46s   10.0.0.242   worker242   <none>           <none>
cilium-envoy-d4kkx                 1/1     Running   0          2m46s   10.0.0.243   worker243   <none>           <none>
cilium-envoy-fp7s6                 1/1     Running   0          2m46s   10.0.0.241   master241   <none>           <none>
cilium-envoy-mhxcg                 1/1     Running   0          2m46s   10.0.0.242   worker242   <none>           <none>
cilium-fwcjw                       1/1     Running   0          2m46s   10.0.0.241   master241   <none>           <none>
cilium-operator-84f88cb595-lv4n5   1/1     Running   0          2m46s   10.0.0.243   worker243   <none>           <none>
[root@master241 ~]#


	3.查看cilium状态
[root@master241 ~]# cilium status
    /¯¯\
 /¯¯\__/¯¯\    Cilium:             OK
 \__/¯¯\__/    Operator:           OK
 /¯¯\__/¯¯\    Envoy DaemonSet:    OK
 \__/¯¯\__/    Hubble Relay:       disabled
    \__/       ClusterMesh:        disabled

DaemonSet              cilium                   Desired: 3, Ready: 3/3, Available: 3/3
DaemonSet              cilium-envoy             Desired: 3, Ready: 3/3, Available: 3/3
Deployment             cilium-operator          Desired: 1, Ready: 1/1, Available: 1/1
Containers:            cilium                   Running: 3
                       cilium-envoy             Running: 3
                       cilium-operator          Running: 1
                       clustermesh-apiserver
                       hubble-relay
Cluster Pods:          2/2 managed by Cilium
Helm chart version:    1.17.0
Image versions         cilium             quay.io/cilium/cilium:v1.17.0@sha256:51f21bdd003c3975b5aaaf41bd21aee23cc08f44efaa27effc91c621bc9d8b1d: 3
                       cilium-envoy       quay.io/cilium/cilium-envoy:v1.31.5-1737535524-fe8efeb16a7d233bffd05af9ea53599340d3f18e@sha256:57a3aa6355a3223da360395e3a109802867ff635cb852aa0afe03ec7bf04e545: 3
                       cilium-operator    quay.io/cilium/operator-generic:v1.17.0@sha256:1ce5a5a287166fc70b6a5ced3990aaa442496242d1d4930b5a3125e44cccdca8: 1
[root@master241 ~]#
1.3 检查worker节点是否就绪
[root@master241 ~]# kubectl get nodes -o wide
NAME        STATUS   ROLES           AGE   VERSION   INTERNAL-IP   EXTERNAL-IP   OS-IMAGE             KERNEL-VERSION       CONTAINER-RUNTIME
master241   Ready    control-plane   10h   v1.31.6   10.0.0.241    <none>        Ubuntu 22.04.4 LTS   5.15.0-119-generic   containerd://1.6.36
worker242   Ready    <none>          10h   v1.31.6   10.0.0.242    <none>        Ubuntu 22.04.4 LTS   5.15.0-119-generic   containerd://1.6.36
worker243   Ready    <none>          10h   v1.31.6   10.0.0.243    <none>        Ubuntu 22.04.4 LTS   5.15.0-119-generic   containerd://1.6.36
[root@master241 ~]#
2.验证cilium是否正常工作
2.1 检查CNI组件是否正常工作
	1.编写资源清单
[root@master241 ~]# cat > yinzhengjie-network-cni-test.yaml <<EOF
apiVersion: v1
kind: Pod
metadata:
  name: xiuxian-v1
spec:
  nodeName: worker242
  containers:
  - image: registry.cn-hangzhou.aliyuncs.com/yinzhengjie-k8s/apps:v1
    name: xiuxian

---

apiVersion: v1
kind: Pod
metadata:
  name: xiuxian-v2
spec:
  nodeName: worker243
  containers:
  - image: registry.cn-hangzhou.aliyuncs.com/yinzhengjie-k8s/apps:v2
    name: xiuxian
EOF

	2.创建Pod
[root@master241 ~]# kubectl apply -f yinzhengjie-network-cni-test.yaml
pod/xiuxian-v1 created
pod/xiuxian-v2 created
[root@master241 ~]#
[root@master241 ~]# kubectl get pods -o wide
NAME         READY   STATUS    RESTARTS   AGE   IP             NODE        NOMINATED NODE   READINESS GATES
xiuxian-v1   1/1     Running   0          6s    10.100.1.42    worker242   <none>           <none>
xiuxian-v2   1/1     Running   0          6s    10.100.2.195   worker243   <none>           <none>
[root@master241 ~]#


	3.访问测试
[root@master241 ~]# curl 10.100.1.42
<!DOCTYPE html>
<html>
  <head>
    <meta charset="utf-8"/>
    <title>yinzhengjie apps v1</title>
    <style>
       div img {
          width: 900px;
          height: 600px;
          margin: 0;
       }
    </style>
  </head>

  <body>
    <h1 style="color: green">凡人修仙传 v1 </h1>
    <div>
      <img src="1.jpg">
    <div>
  </body>

</html>
[root@master241 ~]#
[root@master241 ~]#
[root@master241 ~]# curl 10.100.2.195
<!DOCTYPE html>
<html>
  <head>
    <meta charset="utf-8"/>
    <title>yinzhengjie apps v2</title>
    <style>
       div img {
          width: 900px;
          height: 600px;
          margin: 0;
       }
    </style>
  </head>

  <body>
    <h1 style="color: red">凡人修仙传 v2 </h1>
    <div>
      <img src="2.jpg">
    <div>
  </body>

</html>
[root@master241 ~]#
2.2 tcpdump抓包vxlan设备数据报文
	1.访问测试
[root@master241 ~]# kubectl get pods -o wide
NAME         READY   STATUS    RESTARTS   AGE   IP             NODE        NOMINATED NODE   READINESS GATES
xiuxian-v1   1/1     Running   0          17m   10.100.1.42    worker242   <none>           <none>
xiuxian-v2   1/1     Running   0          17m   10.100.2.195   worker243   <none>           <none>
[root@master241 ~]#
[root@master241 ~]# curl  10.100.2.195
<!DOCTYPE html>
<html>
  <head>
    <meta charset="utf-8"/>
    <title>yinzhengjie apps v2</title>
    <style>
       div img {
          width: 900px;
          height: 600px;
          margin: 0;
       }
    </style>
  </head>

  <body>
    <h1 style="color: red">凡人修仙传 v2 </h1>
    <div>
      <img src="2.jpg">
    <div>
  </body>

</html>
[root@master241 ~]#


	2.使用vxlan设备进行Pod抓包
[root@worker243 ~]# tcpdump -i cilium_vxlan -nn host 10.100.2.195
tcpdump: verbose output suppressed, use -v[v]... for full protocol decode
listening on cilium_vxlan, link-type EN10MB (Ethernet), snapshot length 262144 bytes
10:24:56.225340 IP 10.100.0.56.57100 > 10.100.2.195.80: Flags [S], seq 4009844643, win 64860, options [mss 1410,sackOK,TS val 29932480 ecr 0,nop,wscale 7], length 0
10:24:56.225494 IP 10.100.2.195.80 > 10.100.0.56.57100: Flags [S.], seq 2178855995, ack 4009844644, win 64308, options [mss 1410,sackOK,TS val 1769040274 ecr 29932480,nop,wscale 7], length 0
10:24:56.225957 IP 10.100.0.56.57100 > 10.100.2.195.80: Flags [.], ack 1, win 507, options [nop,nop,TS val 29932480 ecr 1769040274], length 0
10:24:56.225957 IP 10.100.0.56.57100 > 10.100.2.195.80: Flags [P.], seq 1:77, ack 1, win 507, options [nop,nop,TS val 29932480 ecr 1769040274], length 76: HTTP: GET / HTTP/1.1
10:24:56.226063 IP 10.100.2.195.80 > 10.100.0.56.57100: Flags [.], ack 77, win 502, options [nop,nop,TS val 1769040274 ecr 29932480], length 0
10:24:56.226252 IP 10.100.2.195.80 > 10.100.0.56.57100: Flags [P.], seq 1:239, ack 77, win 502, options [nop,nop,TS val 1769040274 ecr 29932480], length 238: HTTP: HTTP/1.1 200 OK
10:24:56.226348 IP 10.100.2.195.80 > 10.100.0.56.57100: Flags [P.], seq 239:594, ack 77, win 502, options [nop,nop,TS val 1769040275 ecr 29932480], length 355: HTTP
10:24:56.226467 IP 10.100.0.56.57100 > 10.100.2.195.80: Flags [.], ack 239, win 506, options [nop,nop,TS val 29932481 ecr 1769040274], length 0
10:24:56.226754 IP 10.100.0.56.57100 > 10.100.2.195.80: Flags [.], ack 594, win 504, options [nop,nop,TS val 29932481 ecr 1769040275], length 0
10:24:56.227134 IP 10.100.0.56.57100 > 10.100.2.195.80: Flags [F.], seq 77, ack 594, win 504, options [nop,nop,TS val 29932482 ecr 1769040275], length 0
10:24:56.227285 IP 10.100.2.195.80 > 10.100.0.56.57100: Flags [F.], seq 594, ack 78, win 502, options [nop,nop,TS val 1769040275 ecr 29932482], length 0
10:24:56.228144 IP 10.100.0.56.57100 > 10.100.2.195.80: Flags [.], ack 595, win 504, options [nop,nop,TS val 29932483 ecr 1769040275], length 0
...


	3.到相应节点宿主机抓包测试
[root@worker243 ~]# tcpdump -i eth0 -nn host 10.0.0.241
...  # 咱们的报文带有"OTV(Overlay Virtualization Transport)"标识,其底层使用的就与vxlan模式(端口为"8472")通信
10:24:56.225340 IP 10.0.0.241.52043 > 10.0.0.243.8472: OTV, flags [I] (0x08), overlay 0, instance 6
IP 10.100.0.56.57100 > 10.100.2.195.80: Flags [S], seq 4009844643, win 64860, options [mss 1410,sackOK,TS val 29932480 ecr 0,nop,wscale 7], length 0
10:24:56.225517 IP 10.0.0.243.53086 > 10.0.0.241.8472: OTV, flags [I] (0x08), overlay 0, instance 10307
IP 10.100.2.195.80 > 10.100.0.56.57100: Flags [S.], seq 2178855995, ack 4009844644, win 64308, options [mss 1410,sackOK,TS val 1769040274 ecr 29932480,nop,wscale 7], length 0
10:24:56.225957 IP 10.0.0.241.52043 > 10.0.0.243.8472: OTV, flags [I] (0x08), overlay 0, instance 6
IP 10.100.0.56.57100 > 10.100.2.195.80: Flags [.], ack 1, win 507, options [nop,nop,TS val 29932480 ecr 1769040274], length 0
10:24:56.225957 IP 10.0.0.241.52043 > 10.0.0.243.8472: OTV, flags [I] (0x08), overlay 0, instance 6
IP 10.100.0.56.57100 > 10.100.2.195.80: Flags [P.], seq 1:77, ack 1, win 507, options [nop,nop,TS val 29932480 ecr 1769040274], length 76: HTTP: GET / HTTP/1.1
10:24:56.226076 IP 10.0.0.243.53086 > 10.0.0.241.8472: OTV, flags [I] (0x08), overlay 0, instance 10307
IP 10.100.2.195.80 > 10.100.0.56.57100: Flags [.], ack 77, win 502, options [nop,nop,TS val 1769040274 ecr 29932480], length 0
10:24:56.226264 IP 10.0.0.243.53086 > 10.0.0.241.8472: OTV, flags [I] (0x08), overlay 0, instance 10307
IP 10.100.2.195.80 > 10.100.0.56.57100: Flags [P.], seq 1:239, ack 77, win 502, options [nop,nop,TS val 1769040274 ecr 29932480], length 238: HTTP: HTTP/1.1 200 OK
10:24:56.226356 IP 10.0.0.243.53086 > 10.0.0.241.8472: OTV, flags [I] (0x08), overlay 0, instance 10307
IP 10.100.2.195.80 > 10.100.0.56.57100: Flags [P.], seq 239:594, ack 77, win 502, options [nop,nop,TS val 1769040275 ecr 29932480], length 355: HTTP
10:24:56.226467 IP 10.0.0.241.52043 > 10.0.0.243.8472: OTV, flags [I] (0x08), overlay 0, instance 6
IP 10.100.0.56.57100 > 10.100.2.195.80: Flags [.], ack 239, win 506, options [nop,nop,TS val 29932481 ecr 1769040274], length 0
10:24:56.226754 IP 10.0.0.241.52043 > 10.0.0.243.8472: OTV, flags [I] (0x08), overlay 0, instance 6
IP 10.100.0.56.57100 > 10.100.2.195.80: Flags [.], ack 594, win 504, options [nop,nop,TS val 29932481 ecr 1769040275], length 0
10:24:56.227134 IP 10.0.0.241.22 > 10.0.0.1.65159: Flags [P.], seq 417:829, ack 152, win 501, length 412
10:24:56.227134 IP 10.0.0.241.52043 > 10.0.0.243.8472: OTV, flags [I] (0x08), overlay 0, instance 6
IP 10.100.0.56.57100 > 10.100.2.195.80: Flags [F.], seq 77, ack 594, win 504, options [nop,nop,TS val 29932482 ecr 1769040275], length 0
10:24:56.227134 IP 10.0.0.1.65159 > 10.0.0.241.22: Flags [.], ack 829, win 4106, length 0
10:24:56.227327 IP 10.0.0.243.53086 > 10.0.0.241.8472: OTV, flags [I] (0x08), overlay 0, instance 10307
IP 10.100.2.195.80 > 10.100.0.56.57100: Flags [F.], seq 594, ack 78, win 502, options [nop,nop,TS val 1769040275 ecr 29932482], length 0
10:24:56.228144 IP 10.0.0.241.52043 > 10.0.0.243.8472: OTV, flags [I] (0x08), overlay 0, instance 6
IP 10.100.0.56.57100 > 10.100.2.195.80: Flags [.], ack 595, win 504, options [nop,nop,TS val 29932483 ecr 1769040275], length 0
10:24:56.228893 IP 10.0.0.241.22 > 10.0.0.1.65159: Flags [P.], seq 829:929, ack 152, win 501, length 100
10:24:56.274039 IP 10.0.0.1.65159 > 10.0.0.241.22: Flags [.], ack 929, win 4105, length 0
10:24:56.506461 IP 10.0.0.241.59343 > 10.0.0.242.8472: OTV, flags [I] (0x08), overlay 0, instance 4
IP 10.100.0.63.4240 > 10.100.1.247.44970: Flags [.], ack 341364297, win 502, options [nop,nop,TS val 1169120106 ecr 1743764241], length 0
10:24:56.506641 IP 10.0.0.242.49250 > 10.0.0.241.8472: OTV, flags [I] (0x08), overlay 0, instance 6
IP 10.100.1.247.44970 > 10.100.0.63.4240: Flags [.], ack 1, win 507, options [nop,nop,TS val 1743779346 ecr 1169089857], length 0
10:24:56.812831 IP 10.0.0.242.49250 > 10.0.0.241.8472: OTV, flags [I] (0x08), overlay 0, instance 6
IP 10.100.1.247.44970 > 10.100.0.63.4240: Flags [.], ack 1, win 507, options [nop,nop,TS val 1743779651 ecr 1169089857], length 0
10:24:56.813344 IP 10.0.0.241.59343 > 10.0.0.242.8472: OTV, flags [I] (0x08), overlay 0, instance 4
IP 10.100.0.63.4240 > 10.100.1.247.44970: Flags [.], ack 1, win 502, options [nop,nop,TS val 1169120413 ecr 1743779346], length 0
...
2.3 验证Service功能是否正常
因为我们使用cilium来替代kube-proxy组件,而kube-proxy有一个重要功能就是为Service提供底层的代理功能。

综上所述,我们要验证Service功能是否正常工作,具体验证方式如下:
	1.为Pod打标签
[root@master241 ~]# kubectl get pods  --show-labels -o wide
NAME         READY   STATUS    RESTARTS   AGE   IP             NODE        NOMINATED NODE   READINESS GATES   LABELS
xiuxian-v1   1/1     Running   0          34m   10.100.1.42    worker242   <none>           <none>            <none>
xiuxian-v2   1/1     Running   0          34m   10.100.2.195   worker243   <none>           <none>            <none>
[root@master241 ~]#
[root@master241 ~]#
[root@master241 ~]# kubectl label pod --all apps=xiuxian
pod/xiuxian-v1 labeled
pod/xiuxian-v2 labeled
[root@master241 ~]#
[root@master241 ~]# kubectl get pods  --show-labels -o wide
NAME         READY   STATUS    RESTARTS   AGE   IP             NODE        NOMINATED NODE   READINESS GATES   LABELS
xiuxian-v1   1/1     Running   0          35m   10.100.1.42    worker242   <none>           <none>            apps=xiuxian
xiuxian-v2   1/1     Running   0          35m   10.100.2.195   worker243   <none>           <none>            apps=xiuxian
[root@master241 ~]#


	2.创建svc暴露Pod服务
[root@master241 ~]# kubectl expose pod xiuxian-v1 --name svc-xiuxian --selector apps=xiuxian --port 80
service/svc-xiuxian exposed
[root@master241 ~]#


	3.查看svc信息
[root@master241 ~]# kubectl get service svc-xiuxian -o wide
NAME          TYPE        CLUSTER-IP     EXTERNAL-IP   PORT(S)   AGE   SELECTOR
svc-xiuxian   ClusterIP   10.204.89.73   <none>        80/TCP    53s   apps=xiuxian
[root@master241 ~]#
[root@master241 ~]# kubectl describe service svc-xiuxian
Name:                     svc-xiuxian
Namespace:                default
Labels:                   apps=xiuxian
Annotations:              <none>
Selector:                 apps=xiuxian
Type:                     ClusterIP
IP Family Policy:         SingleStack
IP Families:              IPv4
IP:                       10.204.89.73
IPs:                      10.204.89.73
Port:                     <unset>  80/TCP
TargetPort:               80/TCP
Endpoints:                10.100.1.42:80,10.100.2.195:80
Session Affinity:         None
Internal Traffic Policy:  Cluster
Events:                   <none>
[root@master241 ~]#


	4.访问测试,发现svc功能是正常的
[root@master241 ~]# for i in `seq 10`; do curl 10.204.89.73;sleep 0.5;done
<!DOCTYPE html>
<html>
  <head>
    <meta charset="utf-8"/>
    <title>yinzhengjie apps v1</title>
    <style>
       div img {
          width: 900px;
          height: 600px;
          margin: 0;
       }
    </style>
  </head>

  <body>
    <h1 style="color: green">凡人修仙传 v1 </h1>
    <div>
      <img src="1.jpg">
    <div>
  </body>

</html>
<!DOCTYPE html>
<html>
  <head>
    <meta charset="utf-8"/>
    <title>yinzhengjie apps v2</title>
    <style>
       div img {
          width: 900px;
          height: 600px;
          margin: 0;
       }
    </style>
  </head>

  <body>
    <h1 style="color: red">凡人修仙传 v2 </h1>
    <div>
      <img src="2.jpg">
    <div>
  </body>

</html>
...
3.部署cilium的原生路由模式
3.1 卸载cilium
前面部署的cilium基于vxlan模式工作,如果我们想要切换为原生路由模式,则需要先卸载之前的cilium再重新部署即可。


具体操作步骤如下:
	1.卸载前查看K8S集群各节点路由信息
[root@master241 ~]# ifconfig cilium_host
cilium_host: flags=4291<UP,BROADCAST,RUNNING,NOARP,MULTICAST>  mtu 1500
        inet 10.100.0.56  netmask 255.255.255.255  broadcast 0.0.0.0
        inet6 fe80::bc14:bfff:febc:e3df  prefixlen 64  scopeid 0x20<link>
        ether be:14:bf:bc:e3:df  txqueuelen 1000  (Ethernet)
        RX packets 870  bytes 78405 (78.4 KB)
        RX errors 0  dropped 0  overruns 0  frame 0
        TX packets 1910  bytes 128174 (128.1 KB)
        TX errors 0  dropped 0 overruns 0  carrier 0  collisions 0

[root@master241 ~]#
[root@master241 ~]# route -n
Kernel IP routing table
Destination     Gateway         Genmask         Flags Metric Ref    Use Iface
...  # 注意看网关,都交由"cilium_host"网络设备加密传输
10.100.0.0      10.100.0.56     255.255.255.0   UG    0      0        0 cilium_host
10.100.1.0      10.100.0.56     255.255.255.0   UG    0      0        0 cilium_host
10.100.2.0      10.100.0.56     255.255.255.0   UG    0      0        0 cilium_host
[root@master241 ~]#


[root@worker242 ~]# ifconfig cilium_host
cilium_host: flags=4291<UP,BROADCAST,RUNNING,NOARP,MULTICAST>  mtu 1500
        inet 10.100.1.247  netmask 255.255.255.255  broadcast 0.0.0.0
        inet6 fe80::f451:8aff:fe9a:5e15  prefixlen 64  scopeid 0x20<link>
        ether f6:51:8a:9a:5e:15  txqueuelen 1000  (Ethernet)
        RX packets 756  bytes 59525 (59.5 KB)
        RX errors 0  dropped 0  overruns 0  frame 0
        TX packets 1910  bytes 128160 (128.1 KB)
        TX errors 0  dropped 0 overruns 0  carrier 0  collisions 0

[root@worker242 ~]#
[root@worker242 ~]# route -n
Kernel IP routing table
Destination     Gateway         Genmask         Flags Metric Ref    Use Iface
...  # 注意看网关,都交由"cilium_host"网络设备加密传输
10.100.0.0      10.100.1.247    255.255.255.0   UG    0      0        0 cilium_host
10.100.1.0      10.100.1.247    255.255.255.0   UG    0      0        0 cilium_host
10.100.2.0      10.100.1.247    255.255.255.0   UG    0      0        0 cilium_host
[root@worker242 ~]#


[root@worker243 ~]# ifconfig cilium_host
cilium_host: flags=4291<UP,BROADCAST,RUNNING,NOARP,MULTICAST>  mtu 1500
        inet 10.100.2.222  netmask 255.255.255.255  broadcast 0.0.0.0
        inet6 fe80::b85d:5bff:fe0e:1cb2  prefixlen 64  scopeid 0x20<link>
        ether ba:5d:5b:0e:1c:b2  txqueuelen 1000  (Ethernet)
        RX packets 771  bytes 60370 (60.3 KB)
        RX errors 0  dropped 0  overruns 0  frame 0
        TX packets 1910  bytes 128160 (128.1 KB)
        TX errors 0  dropped 0 overruns 0  carrier 0  collisions 0

[root@worker243 ~]#
[root@worker243 ~]# route -n
Kernel IP routing table
Destination     Gateway         Genmask         Flags Metric Ref    Use Iface
...  # 注意看网关,都交由"cilium_host"网络设备加密传输
10.100.0.0      10.100.2.222    255.255.255.0   UG    0      0        0 cilium_host
10.100.1.0      10.100.2.222    255.255.255.0   UG    0      0        0 cilium_host
10.100.2.0      10.100.2.222    255.255.255.0   UG    0      0        0 cilium_host
[root@worker243 ~]#


	2.卸载cilium
[root@master241 ~]# cilium uninstall
🔥 Deleting pods in cilium-test namespace...
🔥 Deleting cilium-test namespace...
⌛ Uninstalling Cilium
[root@master241 ~]#


	3.发现资源也会被删除哟
[root@master241 ~]# kubectl get pods -n kube-system -l app.kubernetes.io/part-of=cilium -o wide
No resources found in kube-system namespace.
[root@master241 ~]#
3.2 部署cilium的原生路由模式
	1.安装cilium时指定原生路由模式,效率更高
[root@master241 ~]# cilium install \
      --set kubeProxyReplacement=true \
      --set ipam.mode=kubernetes \
      --set routingMode=native \
      --set autoDirectNodeRoutes=true \
      --set ipam.operator.clusterPoolIPv4PodCIDRList=10.100.0.0/16 \
      --set ipam.operator.clusterPoolIPv4MaskSize=24 \
      --set ipv4NativeRoutingCIDR=10.100.0.0/16 \
      --set bpf.masquerade=true \
      --set version=v1.17.0
... # 输出效果如下所示
ℹ️  Using Cilium version 1.17.0
🔮 Auto-detected cluster name: kubernetes
🔮 Auto-detected kube-proxy has not been installed
ℹ️  Cilium will fully replace all functionalities of kube-proxy
[root@master241 ~]#


      2.验证是否部署成功
[root@master241 ~]# kubectl get pods -n kube-system -l app.kubernetes.io/part-of=cilium -o wide
NAME                               READY   STATUS    RESTARTS   AGE   IP           NODE        NOMINATED NODE   READINESS GATES
cilium-envoy-d589r                 1/1     Running   0          61s   10.0.0.243   worker243   <none>           <none>
cilium-envoy-hxhst                 1/1     Running   0          61s   10.0.0.242   worker242   <none>           <none>
cilium-envoy-x695g                 1/1     Running   0          61s   10.0.0.241   master241   <none>           <none>
cilium-hxnxp                       1/1     Running   0          61s   10.0.0.242   worker242   <none>           <none>
cilium-operator-84f88cb595-rn5m9   1/1     Running   0          61s   10.0.0.242   worker242   <none>           <none>
cilium-qxm68                       1/1     Running   0          61s   10.0.0.241   master241   <none>           <none>
cilium-xszwf                       1/1     Running   0          61s   10.0.0.243   worker243   <none>           <none>
[root@master241 ~]#


	3.接下来我们再次检查下K8S集群各节点路由信息
[root@master241 ~]# ifconfig cilium_host
cilium_host: flags=4291<UP,BROADCAST,RUNNING,NOARP,MULTICAST>  mtu 1500
        inet 10.100.0.56  netmask 255.255.255.255  broadcast 0.0.0.0
        inet6 fe80::bc14:bfff:febc:e3df  prefixlen 64  scopeid 0x20<link>
        ether be:14:bf:bc:e3:df  txqueuelen 1000  (Ethernet)
        RX packets 870  bytes 78405 (78.4 KB)
        RX errors 0  dropped 0  overruns 0  frame 0
        TX packets 1910  bytes 128174 (128.1 KB)
        TX errors 0  dropped 0 overruns 0  carrier 0  collisions 0

[root@master241 ~]#
[root@master241 ~]# route -n
Kernel IP routing table
Destination     Gateway         Genmask         Flags Metric Ref    Use Iface
... # 很明显去往其他节点的路由直接到宿主机,去往本机才交由'cilium_host'设备处理
10.100.0.0      10.100.0.56     255.255.255.0   UG    0      0        0 cilium_host
10.100.1.0      10.0.0.242      255.255.255.0   UG    0      0        0 eth0
10.100.2.0      10.0.0.243      255.255.255.0   UG    0      0        0 eth0
[root@master241 ~]#


[root@worker242 ~]# ifconfig cilium_host
cilium_host: flags=4291<UP,BROADCAST,RUNNING,NOARP,MULTICAST>  mtu 1500
        inet 10.100.1.247  netmask 255.255.255.255  broadcast 0.0.0.0
        inet6 fe80::f451:8aff:fe9a:5e15  prefixlen 64  scopeid 0x20<link>
        ether f6:51:8a:9a:5e:15  txqueuelen 1000  (Ethernet)
        RX packets 756  bytes 59525 (59.5 KB)
        RX errors 0  dropped 0  overruns 0  frame 0
        TX packets 1910  bytes 128160 (128.1 KB)
        TX errors 0  dropped 0 overruns 0  carrier 0  collisions 0

[root@worker242 ~]#
[root@worker242 ~]# route -n
Kernel IP routing table
Destination     Gateway         Genmask         Flags Metric Ref    Use Iface
... # 很明显去往其他节点的路由直接到宿主机,去往本机才交由'cilium_host'设备处理
10.100.0.0      10.0.0.241      255.255.255.0   UG    0      0        0 eth0
10.100.1.0      10.100.1.247    255.255.255.0   UG    0      0        0 cilium_host
10.100.2.0      10.0.0.243      255.255.255.0   UG    0      0        0 eth0
[root@worker242 ~]#


[root@worker243 ~]# ifconfig cilium_host
cilium_host: flags=4291<UP,BROADCAST,RUNNING,NOARP,MULTICAST>  mtu 1500
        inet 10.100.2.222  netmask 255.255.255.255  broadcast 0.0.0.0
        inet6 fe80::b85d:5bff:fe0e:1cb2  prefixlen 64  scopeid 0x20<link>
        ether ba:5d:5b:0e:1c:b2  txqueuelen 1000  (Ethernet)
        RX packets 772  bytes 60440 (60.4 KB)
        RX errors 0  dropped 0  overruns 0  frame 0
        TX packets 1911  bytes 128230 (128.2 KB)
        TX errors 0  dropped 0 overruns 0  carrier 0  collisions 0

[root@worker243 ~]#
[root@worker243 ~]# route -n
Kernel IP routing table
Destination     Gateway         Genmask         Flags Metric Ref    Use Iface
... # 很明显去往其他节点的路由直接到宿主机,去往本机才交由'cilium_host'设备处理
10.100.0.0      10.0.0.241      255.255.255.0   UG    0      0        0 eth0
10.100.1.0      10.0.0.242      255.255.255.0   UG    0      0        0 eth0
10.100.2.0      10.100.2.222    255.255.255.0   UG    0      0        0 cilium_host
[root@worker243 ~]#
3.3 tcpdump抓包宿主机设备数据报文验证
	1.在直接抓包Pod的IP地址
[root@worker243 ~]# tcpdump -i eth0 -nn host 10.100.2.195
tcpdump: verbose output suppressed, use -v[v]... for full protocol decode
listening on eth0, link-type EN10MB (Ethernet), snapshot length 262144 bytes
11:09:49.078853 IP 10.0.0.241.38592 > 10.100.2.195.80: Flags [S], seq 1526009510, win 64240, options [mss 1460,sackOK,TS val 4246647951 ecr 0,nop,wscale 7], length 0
11:09:49.078989 IP 10.100.2.195.80 > 10.0.0.241.38592: Flags [S.], seq 1715449442, ack 1526009511, win 65160, options [mss 1460,sackOK,TS val 2995384073 ecr 4246647951,nop,wscale 7], length 0
11:09:49.079421 IP 10.0.0.241.38592 > 10.100.2.195.80: Flags [.], ack 1, win 502, options [nop,nop,TS val 4246647952 ecr 2995384073], length 0
11:09:49.079421 IP 10.0.0.241.38592 > 10.100.2.195.80: Flags [P.], seq 1:77, ack 1, win 502, options [nop,nop,TS val 4246647952 ecr 2995384073], length 76: HTTP: GET / HTTP/1.1
11:09:49.079519 IP 10.100.2.195.80 > 10.0.0.241.38592: Flags [.], ack 77, win 509, options [nop,nop,TS val 2995384074 ecr 4246647952], length 0
11:09:49.079756 IP 10.100.2.195.80 > 10.0.0.241.38592: Flags [P.], seq 1:239, ack 77, win 509, options [nop,nop,TS val 2995384074 ecr 4246647952], length 238: HTTP: HTTP/1.1 200 OK
11:09:49.079838 IP 10.100.2.195.80 > 10.0.0.241.38592: Flags [P.], seq 239:594, ack 77, win 509, options [nop,nop,TS val 2995384074 ecr 4246647952], length 355: HTTP
11:09:49.079999 IP 10.0.0.241.38592 > 10.100.2.195.80: Flags [.], ack 239, win 501, options [nop,nop,TS val 4246647953 ecr 2995384074], length 0
11:09:49.080057 IP 10.0.0.241.38592 > 10.100.2.195.80: Flags [.], ack 594, win 501, options [nop,nop,TS val 4246647953 ecr 2995384074], length 0
11:09:49.080311 IP 10.0.0.241.38592 > 10.100.2.195.80: Flags [F.], seq 77, ack 594, win 501, options [nop,nop,TS val 4246647953 ecr 2995384074], length 0
11:09:49.080703 IP 10.100.2.195.80 > 10.0.0.241.38592: Flags [F.], seq 594, ack 78, win 509, options [nop,nop,TS val 2995384075 ecr 4246647953], length 0
11:09:49.081063 IP 10.0.0.241.38592 > 10.100.2.195.80: Flags [.], ack 595, win 501, options [nop,nop,TS val 4246647954 ecr 2995384075], length 0
...


	2.tcpdump抓包宿主机设备数据报文
[root@worker243 ~]# tcpdump -i eth0 -nn host 10.0.0.241
...  # 很明显,在物理网卡抓包,发现没有隧道模式了,而是直接返回了。
11:09:49.078853 IP 10.0.0.241.38592 > 10.100.2.195.80: Flags [S], seq 1526009510, win 64240, options [mss 1460,sackOK,TS val 4246647951 ecr 0,nop,wscale 7], length 0
11:09:49.078989 IP 10.100.2.195.80 > 10.0.0.241.38592: Flags [S.], seq 1715449442, ack 1526009511, win 65160, options [mss 1460,sackOK,TS val 2995384073 ecr 4246647951,nop,wscale 7], length 0
11:09:49.079421 IP 10.0.0.241.38592 > 10.100.2.195.80: Flags [.], ack 1, win 502, options [nop,nop,TS val 4246647952 ecr 2995384073], length 0
11:09:49.079421 IP 10.0.0.241.38592 > 10.100.2.195.80: Flags [P.], seq 1:77, ack 1, win 502, options [nop,nop,TS val 4246647952 ecr 2995384073], length 76: HTTP: GET / HTTP/1.1
11:09:49.079519 IP 10.100.2.195.80 > 10.0.0.241.38592: Flags [.], ack 77, win 509, options [nop,nop,TS val 2995384074 ecr 4246647952], length 0
11:09:49.079756 IP 10.100.2.195.80 > 10.0.0.241.38592: Flags [P.], seq 1:239, ack 77, win 509, options [nop,nop,TS val 2995384074 ecr 4246647952], length 238: HTTP: HTTP/1.1 200 OK
11:09:49.079838 IP 10.100.2.195.80 > 10.0.0.241.38592: Flags [P.], seq 239:594, ack 77, win 509, options [nop,nop,TS val 2995384074 ecr 4246647952], length 355: HTTP
11:09:49.079999 IP 10.0.0.241.38592 > 10.100.2.195.80: Flags [.], ack 239, win 501, options [nop,nop,TS val 4246647953 ecr 2995384074], length 0
11:09:49.080057 IP 10.0.0.241.38592 > 10.100.2.195.80: Flags [.], ack 594, win 501, options [nop,nop,TS val 4246647953 ecr 2995384074], length 0
11:09:49.080311 IP 10.0.0.241.22 > 10.0.0.1.65159: Flags [P.], seq 53:457, ack 36, win 592, length 404
11:09:49.080311 IP 10.0.0.241.38592 > 10.100.2.195.80: Flags [F.], seq 77, ack 594, win 501, options [nop,nop,TS val 4246647953 ecr 2995384074], length 0
11:09:49.080406 IP 10.0.0.241.22 > 10.0.0.1.65159: Flags [P.], seq 457:501, ack 36, win 592, length 44
11:09:49.080406 IP 10.0.0.1.65159 > 10.0.0.241.22: Flags [.], ack 457, win 4100, length 0
11:09:49.080703 IP 10.100.2.195.80 > 10.0.0.241.38592: Flags [F.], seq 594, ack 78, win 509, options [nop,nop,TS val 2995384075 ecr 4246647953], length 0
11:09:49.081063 IP 10.0.0.241.38592 > 10.100.2.195.80: Flags [.], ack 595, win 501, options [nop,nop,TS val 4246647954 ecr 2995384075], length 0
...
五.Hubble及cilium指标展示
1.Hubble介绍

Hubble是分布式的网络可观测性平台,建立在cilium和eBPF之上,存储展示从cilium获取的相关数据。

Hubble相关的组件如下:
	- Server:
		服务端接收数据,进行分析处理。

	- Relay:
		采集被监控端的数据。

	- Client:
		可以和Server进行通信的组件。

	- Graphical UI
		用于从Server端展示数据的WebUI相关组件。

参考链接:
	https://github.com/cilium#hubble
2.cilium命令启用Hubble方式
2.1 启用Hubble组件
	1.启用Hubble组件
[root@master241 ~]# cilium hubble enable --ui


	2.检查Hubble状态
[root@master241 ~]# cilium status
    /¯¯\
 /¯¯\__/¯¯\    Cilium:             OK
 \__/¯¯\__/    Operator:           OK
 /¯¯\__/¯¯\    Envoy DaemonSet:    OK
 \__/¯¯\__/    Hubble Relay:       OK  # 注意哈,此时说明Hubble已经启用成功啦!
    \__/       ClusterMesh:        disabled

DaemonSet              cilium                   Desired: 3, Ready: 3/3, Available: 3/3
DaemonSet              cilium-envoy             Desired: 3, Ready: 3/3, Available: 3/3
Deployment             cilium-operator          Desired: 1, Ready: 1/1, Available: 1/1
Deployment             hubble-relay             Desired: 1, Ready: 1/1, Available: 1/1
Deployment             hubble-ui                Desired: 1, Ready: 1/1, Available: 1/1
Containers:            cilium                   Running: 3
                       cilium-envoy             Running: 3
                       cilium-operator          Running: 1
                       clustermesh-apiserver
                       hubble-relay             Running: 1
                       hubble-ui                Running: 1
Cluster Pods:          6/6 managed by Cilium
Helm chart version:    1.17.0
Image versions         cilium             quay.io/cilium/cilium:v1.17.0@sha256:51f21bdd003c3975b5aaaf41bd21aee23cc08f44efaa27effc91c621bc9d8b1d: 3
                       cilium-envoy       quay.io/cilium/cilium-envoy:v1.31.5-1737535524-fe8efeb16a7d233bffd05af9ea53599340d3f18e@sha256:57a3aa6355a3223da360395e3a109802867ff635cb852aa0afe03ec7bf04e545: 3
                       cilium-operator    quay.io/cilium/operator-generic:v1.17.0@sha256:1ce5a5a287166fc70b6a5ced3990aaa442496242d1d4930b5a3125e44cccdca8: 1
                       hubble-relay       quay.io/cilium/hubble-relay:v1.17.0@sha256:022c084588caad91108ac73e04340709926ea7fe12af95f57fcb794b68472e05: 1
                       hubble-ui          quay.io/cilium/hubble-ui-backend:v0.13.1@sha256:0e0eed917653441fded4e7cdb096b7be6a3bddded5a2dd10812a27b1fc6ed95b: 1
                       hubble-ui          quay.io/cilium/hubble-ui:v0.13.1@sha256:e2e9313eb7caf64b0061d9da0efbdad59c6c461f6ca1752768942bfeda0796c6: 1
[root@master241 ~]#
2.2 访问cilium的WebUI
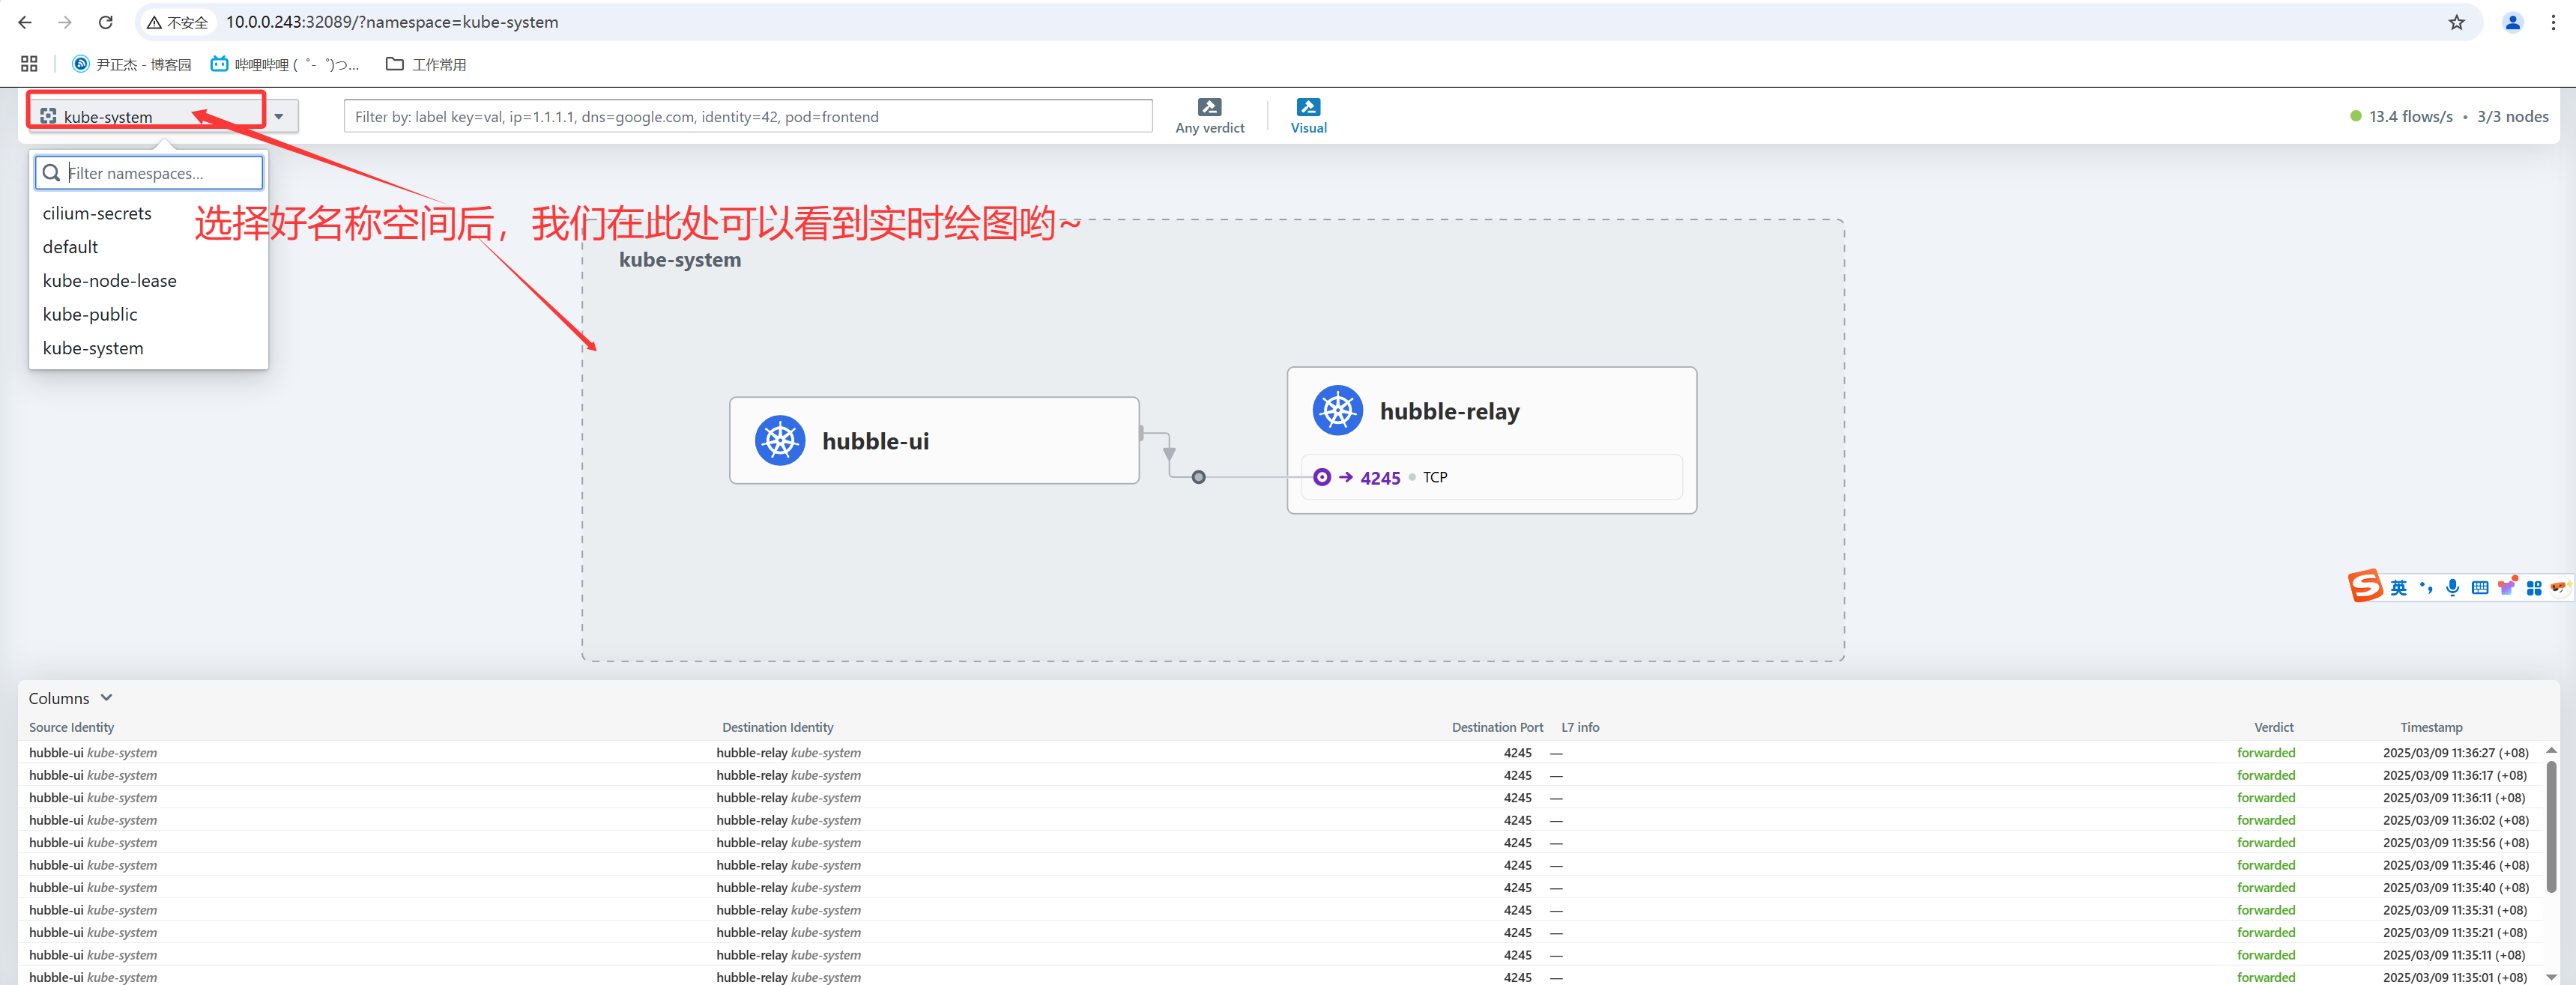
	1.修改svc的类型
[root@master241 ~]# kubectl -n kube-system get svc hubble-ui
NAME        TYPE        CLUSTER-IP     EXTERNAL-IP   PORT(S)   AGE
hubble-ui   ClusterIP   10.197.82.62   <none>        80/TCP    5m46s
[root@master241 ~]#
[root@master241 ~]# kubectl -n kube-system get svc hubble-ui -o yaml | sed '/type/s#ClusterIP#NodePort#' | kubectl apply -f -
Warning: resource services/hubble-ui is missing the kubectl.kubernetes.io/last-applied-configuration annotation which is required by kubectl apply. kubectl apply should only be used on resources created declaratively by either kubectl create --save-config or kubectl apply. The missing annotation will be patched automatically.
service/hubble-ui configured
[root@master241 ~]#
[root@master241 ~]# kubectl -n kube-system get svc hubble-ui
NAME        TYPE       CLUSTER-IP     EXTERNAL-IP   PORT(S)        AGE
hubble-ui   NodePort   10.197.82.62   <none>        80:32089/TCP   5m52s
[root@master241 ~]#
[root@master241 ~]#


	2.访问Hubble的WebUI
如上图所示,我们成功访问到Hubble的WebUI啦~
3.部署cilium时直接启用Hubble
3.1 启用Hubble示例
[root@master241 ~]# cilium install \
      --set kubeProxyReplacement=true \
      --set ipam.mode=kubernetes \
      --set routingMode=native \
      --set autoDirectNodeRoutes=true \
      --set ipam.operator.clusterPoolIPv4PodCIDRList=10.100.0.0/16 \
      --set ipam.operator.clusterPoolIPv4MaskSize=24 \
      --set ipv4NativeRoutingCIDR=10.100.0.0/16 \
      --set bpf.masquerade=true \
      --set version=v1.17.0 \
      --set hubble.enabled="true" \
      --set hubble.listenAddress=":4244" \
      --set hubble.relay.enabled="true" \
      --set hubble.ui.enabled="true"
... # 输出效果如下所示
ℹ️  Using Cilium version 1.17.0
🔮 Auto-detected cluster name: kubernetes
🔮 Auto-detected kube-proxy has not been installed
ℹ️  Cilium will fully replace all functionalities of kube-proxy
[root@master241 ~]#
3.2 暴露Hubble指标给Prometheus示例
[root@master241 ~]# cilium install \
      --set kubeProxyReplacement=true \
      --set ipam.mode=kubernetes \
      --set routingMode=native \
      --set autoDirectNodeRoutes=true \
      --set ipam.operator.clusterPoolIPv4PodCIDRList=10.100.0.0/16 \
      --set ipam.operator.clusterPoolIPv4MaskSize=24 \
      --set ipv4NativeRoutingCIDR=10.100.0.0/16 \
      --set bpf.masquerade=true \
      --set version=v1.17.0 \
      --set hubble.enabled="true" \
      --set hubble.listenAddress=":4244" \
      --set hubble.relay.enabled="true" \
      --set hubble.ui.enabled="true" \
      --set prometheus.enable=true \
      --set operator.prometheus.enabled=true \
      --set hubble.metrics.port=9665 \
      --set hubble.metrics.enableOpenMetrics=true \
      --set hubble.metrics.enable="{dns,drop,tcp,flow,port-distribution,icmp,httpV2:expmplars=true;lablesContext=source_ip\,source_namespace\,source_workload\,destination_ip\,destination_namespace\,destination_workload\,traffic_direction}"
... # 输出效果如下所示
ℹ️  Using Cilium version 1.17.0
🔮 Auto-detected cluster name: kubernetes
🔮 Auto-detected kube-proxy has not been installed
ℹ️  Cilium will fully replace all functionalities of kube-proxy
[root@master241 ~]#
本文来自博客园,作者:尹正杰,转载请注明原文链接:https://www.cnblogs.com/yinzhengjie/p/18760212,个人微信: "JasonYin2020"(添加时请备注来源及意图备注,有偿付费)
当你的才华还撑不起你的野心的时候,你就应该静下心来学习。当你的能力还驾驭不了你的目标的时候,你就应该沉下心来历练。问问自己,想要怎样的人生。

 浙公网安备 33010602011771号