

使用mdadm工具实现软RAID 0实战案例
使用mdadm工具实现软RAID 0实战案例
作者:尹正杰
版权声明:原创作品,谢绝转载!否则将追究法律责任。
一.准备工作
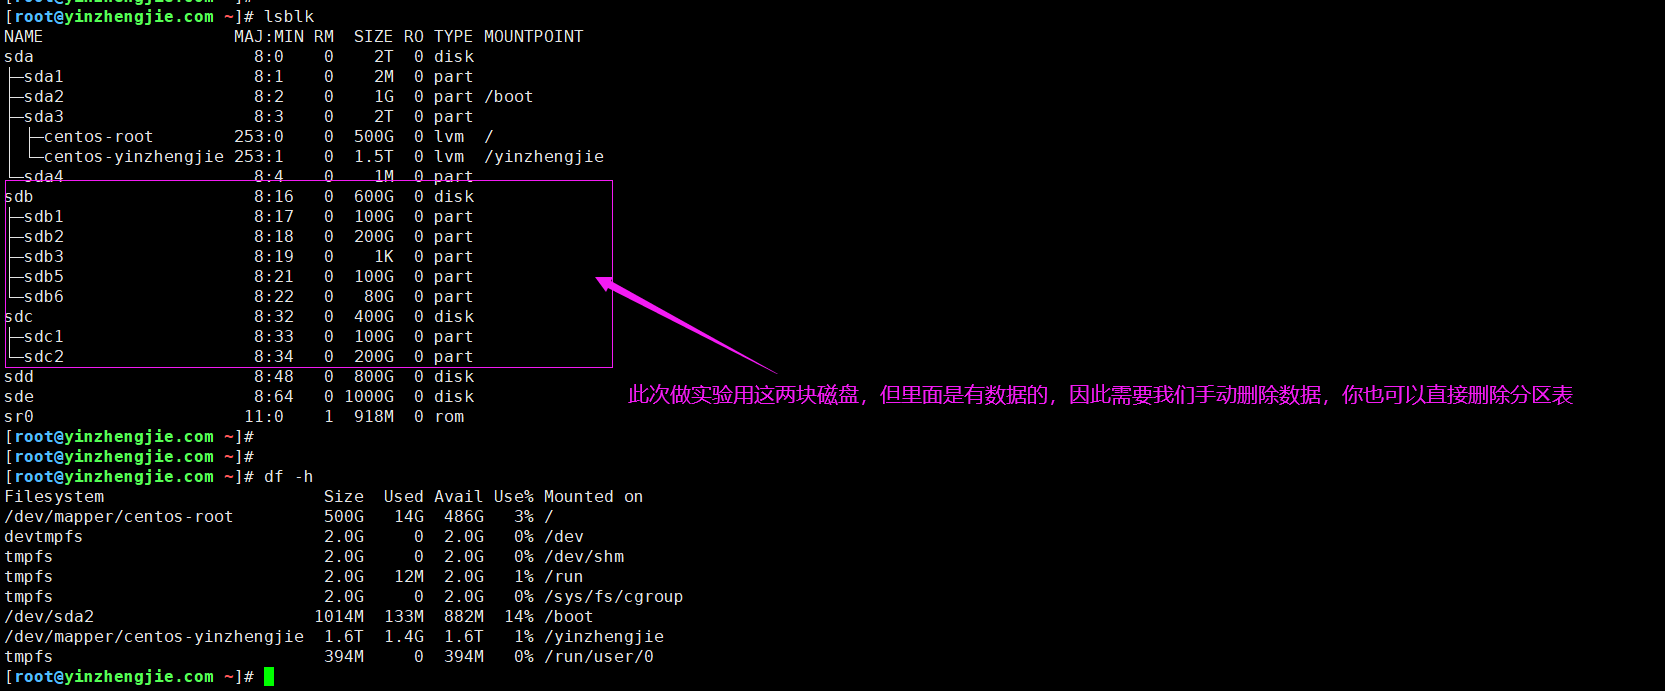
1>.准备2块磁盘
  假设你刚刚从别的服务器下架了2块磁盘设备(sdb和sdc)并安装到了你新买的服务器,如下图所示。

  这个时候可能需要咱们手动删除磁盘上的数据,当然,你也可以只删除分区表,先在脑海里回忆一下如何操作,然后再继续往下看。
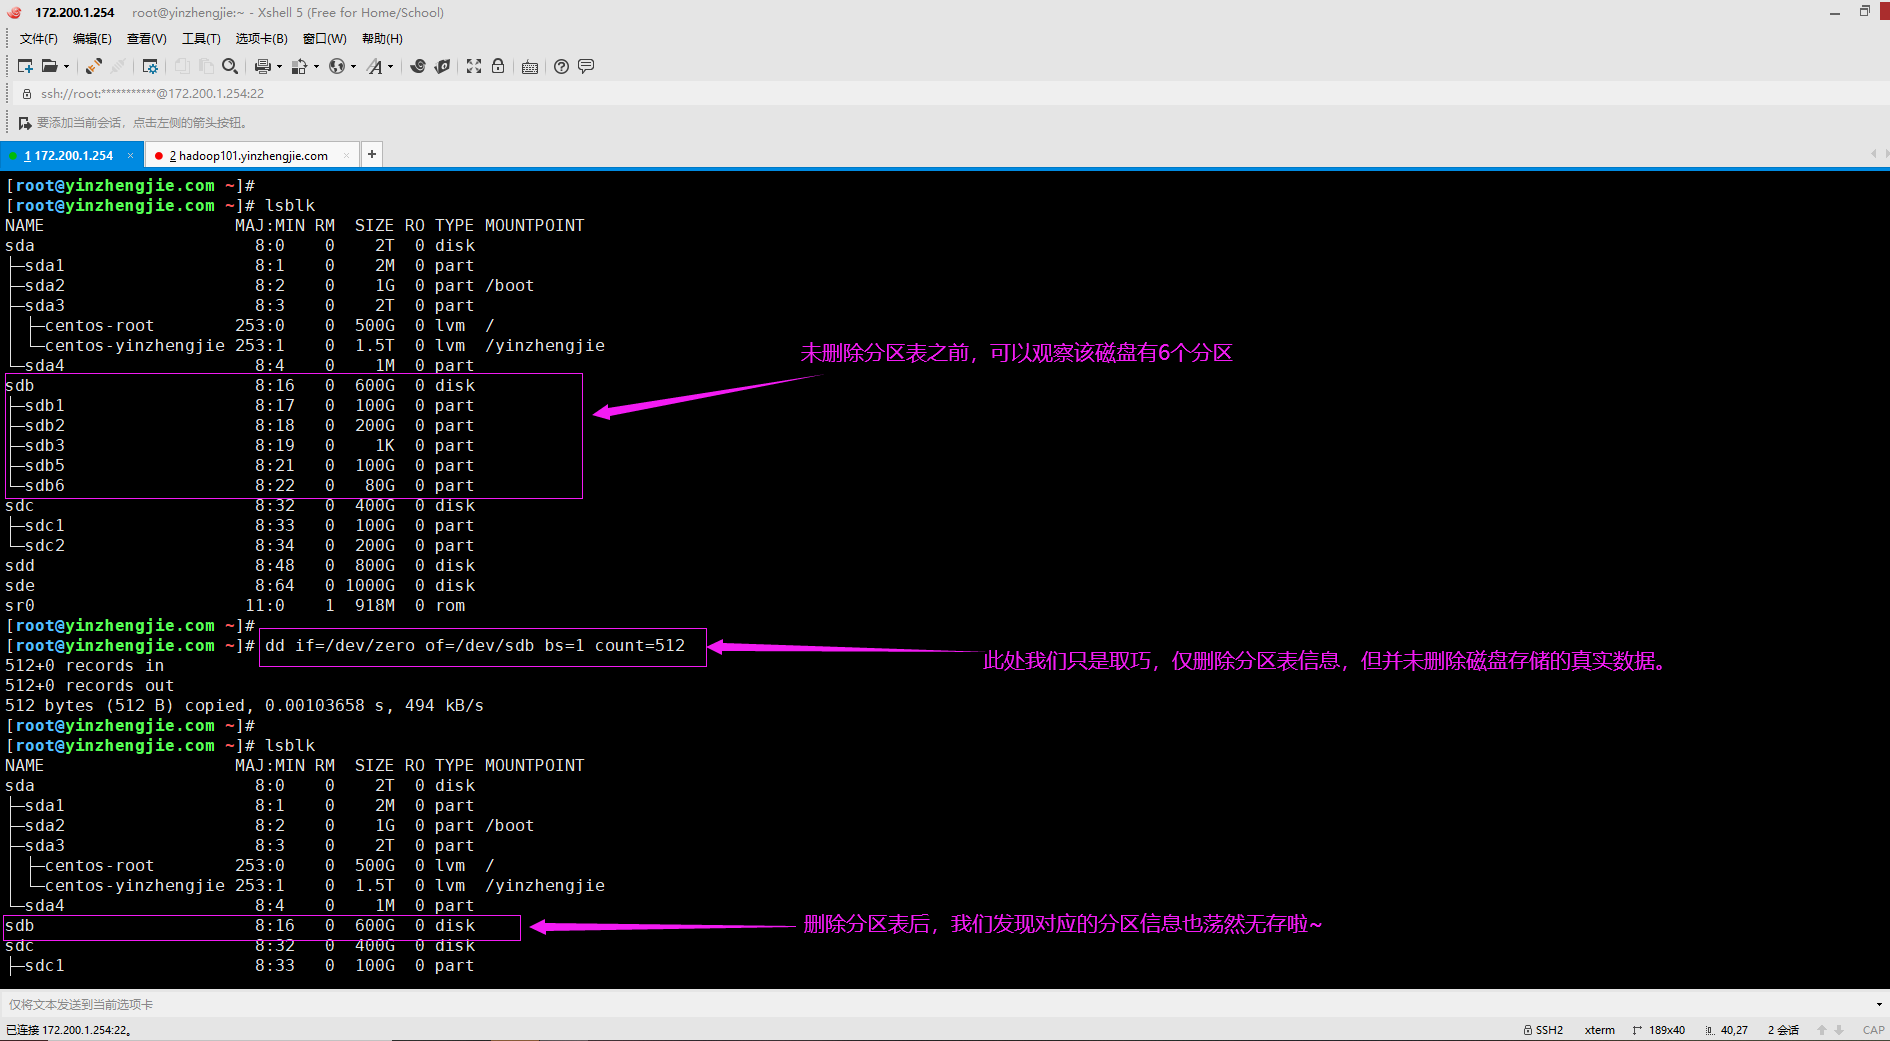
2>.删除sdb磁盘分区表
  如果删除分区表后使用"lsblk"命令查看并未同步的情况,可以参考我之前的笔记,我记录了相关解决方案的笔记。

  博主推荐阅读:
    https://www.cnblogs.com/yinzhengjie/p/12359248.html


[root@yinzhengjie.com ~]# lsblk
NAME                   MAJ:MIN RM  SIZE RO TYPE MOUNTPOINT
sda                      8:0    0    2T  0 disk
├─sda1                   8:1    0    2M  0 part
├─sda2                   8:2    0    1G  0 part /boot
├─sda3                   8:3    0    2T  0 part
│ ├─centos-root        253:0    0  500G  0 lvm  /
│ └─centos-yinzhengjie 253:1    0  1.5T  0 lvm  /yinzhengjie
└─sda4                   8:4    0    1M  0 part
sdb                      8:16   0  600G  0 disk
├─sdb1                   8:17   0  100G  0 part
├─sdb2                   8:18   0  200G  0 part
├─sdb3                   8:19   0    1K  0 part
├─sdb5                   8:21   0  100G  0 part
└─sdb6                   8:22   0   80G  0 part
sdc                      8:32   0  400G  0 disk
├─sdc1                   8:33   0  100G  0 part
└─sdc2                   8:34   0  200G  0 part
sdd                      8:48   0  800G  0 disk
sde                      8:64   0 1000G  0 disk
sr0                     11:0    1  918M  0 rom
[root@yinzhengjie.com ~]#
[root@yinzhengjie.com ~]# dd if=/dev/zero of=/dev/sdb bs=1 count=512        #只删除磁盘的分区表信息
512+0 records in
512+0 records out
512 bytes (512 B) copied, 0.00103658 s, 494 kB/s
[root@yinzhengjie.com ~]#
[root@yinzhengjie.com ~]# lsblk
NAME                   MAJ:MIN RM  SIZE RO TYPE MOUNTPOINT
sda                      8:0    0    2T  0 disk
├─sda1                   8:1    0    2M  0 part
├─sda2                   8:2    0    1G  0 part /boot
├─sda3                   8:3    0    2T  0 part
│ ├─centos-root        253:0    0  500G  0 lvm  /
│ └─centos-yinzhengjie 253:1    0  1.5T  0 lvm  /yinzhengjie
└─sda4                   8:4    0    1M  0 part
sdb                      8:16   0  600G  0 disk
sdc                      8:32   0  400G  0 disk
├─sdc1                   8:33   0  100G  0 part
└─sdc2                   8:34   0  200G  0 part
sdd                      8:48   0  800G  0 disk
sde                      8:64   0 1000G  0 disk
sr0                     11:0    1  918M  0 rom
[root@yinzhengjie.com ~]#
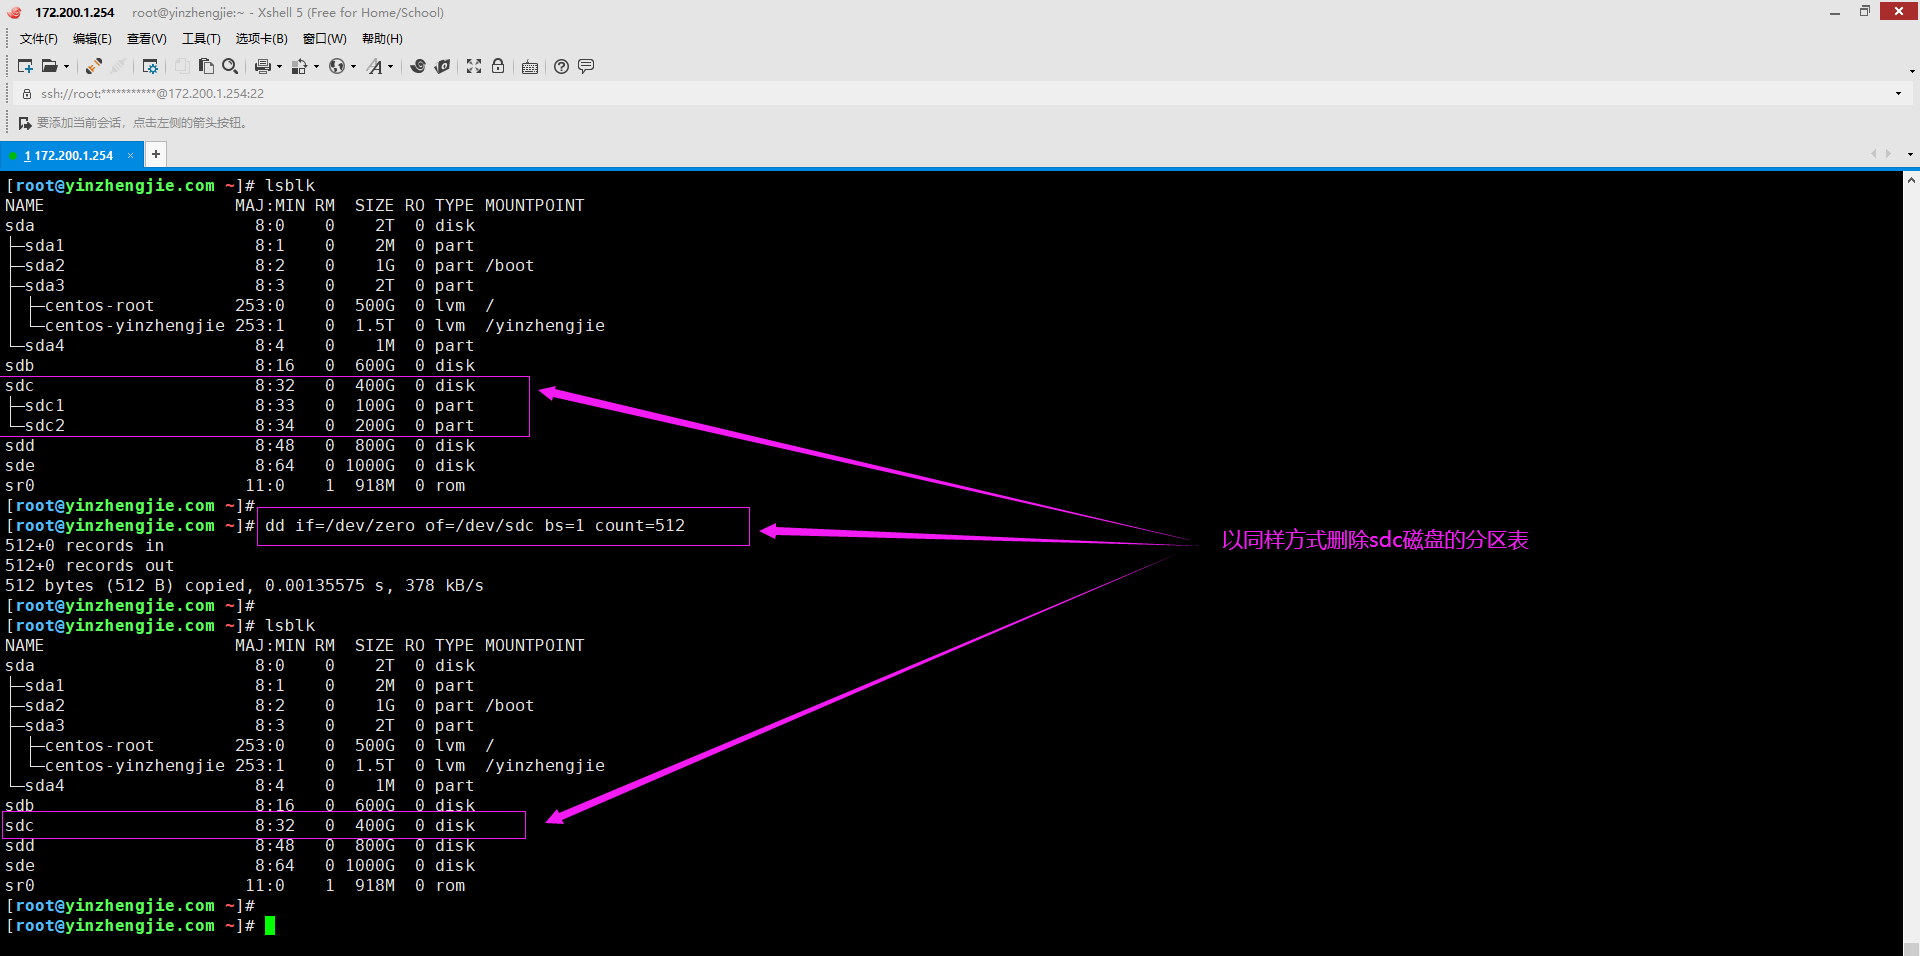
3>.以同样的方式删除sdc磁盘分区表
[root@yinzhengjie.com ~]# lsblk
NAME                   MAJ:MIN RM  SIZE RO TYPE MOUNTPOINT
sda                      8:0    0    2T  0 disk
├─sda1                   8:1    0    2M  0 part
├─sda2                   8:2    0    1G  0 part /boot
├─sda3                   8:3    0    2T  0 part
│ ├─centos-root        253:0    0  500G  0 lvm  /
│ └─centos-yinzhengjie 253:1    0  1.5T  0 lvm  /yinzhengjie
└─sda4                   8:4    0    1M  0 part
sdb                      8:16   0  600G  0 disk
sdc                      8:32   0  400G  0 disk
├─sdc1                   8:33   0  100G  0 part
└─sdc2                   8:34   0  200G  0 part
sdd                      8:48   0  800G  0 disk
sde                      8:64   0 1000G  0 disk
sr0                     11:0    1  918M  0 rom
[root@yinzhengjie.com ~]#
[root@yinzhengjie.com ~]# dd if=/dev/zero of=/dev/sdc bs=1 count=512
512+0 records in
512+0 records out
512 bytes (512 B) copied, 0.00135575 s, 378 kB/s
[root@yinzhengjie.com ~]#
[root@yinzhengjie.com ~]# lsblk
NAME                   MAJ:MIN RM  SIZE RO TYPE MOUNTPOINT
sda                      8:0    0    2T  0 disk
├─sda1                   8:1    0    2M  0 part
├─sda2                   8:2    0    1G  0 part /boot
├─sda3                   8:3    0    2T  0 part
│ ├─centos-root        253:0    0  500G  0 lvm  /
│ └─centos-yinzhengjie 253:1    0  1.5T  0 lvm  /yinzhengjie
└─sda4                   8:4    0    1M  0 part
sdb                      8:16   0  600G  0 disk
sdc                      8:32   0  400G  0 disk
sdd                      8:48   0  800G  0 disk
sde                      8:64   0 1000G  0 disk
sr0                     11:0    1  918M  0 rom
[root@yinzhengjie.com ~]#
[root@yinzhengjie.com ~]#
[root@yinzhengjie.com ~]#
[root@yinzhengjie.com ~]# lsblk
NAME                   MAJ:MIN RM  SIZE RO TYPE MOUNTPOINT
sda                      8:0    0    2T  0 disk
├─sda1                   8:1    0    2M  0 part
├─sda2                   8:2    0    1G  0 part /boot
├─sda3                   8:3    0    2T  0 part
│ ├─centos-root        253:0    0  500G  0 lvm  /
│ └─centos-yinzhengjie 253:1    0  1.5T  0 lvm  /yinzhengjie
└─sda4                   8:4    0    1M  0 part
sdb                      8:16   0  600G  0 disk
sdc                      8:32   0  400G  0 disk
sdd                      8:48   0  800G  0 disk
sde                      8:64   0 1000G  0 disk
sr0                     11:0    1  918M  0 rom
[root@yinzhengjie.com ~]#
4>.对sdb磁盘进行分区
[root@yinzhengjie.com ~]# fdisk /dev/sdb               #使用"fdisk"工具对"/dev/sdb"磁盘进行分区
Welcome to fdisk (util-linux 2.23.2).

Changes will remain in memory only, until you decide to write them.
Be careful before using the write command.

Device does not contain a recognized partition table
Building a new DOS disklabel with disk identifier 0x8c3b1f6e.

Command (m for help): P

Disk /dev/sdb: 644.2 GB, 644245094400 bytes, 1258291200 sectors
Units = sectors of 1 * 512 = 512 bytes
Sector size (logical/physical): 512 bytes / 512 bytes
I/O size (minimum/optimal): 512 bytes / 512 bytes
Disk label type: dos
Disk identifier: 0x8c3b1f6e

   Device Boot      Start         End      Blocks   Id  System

Command (m for help): N
Partition type:
   p   primary (0 primary, 0 extended, 4 free)
   e   extended
Select (default p): P
Partition number (1-4, default 1): 1
First sector (2048-1258291199, default 2048):
Using default value 2048
Last sector, +sectors or +size{K,M,G} (2048-1258291199, default 1258291199): +100G
Partition 1 of type Linux and of size 100 GiB is set

Command (m for help): p              #分区创建完毕后,查看一下当前的信息,注意观察Id字段,我们需要配置RAID,因此需要修改它的值。

Disk /dev/sdb: 644.2 GB, 644245094400 bytes, 1258291200 sectors
Units = sectors of 1 * 512 = 512 bytes
Sector size (logical/physical): 512 bytes / 512 bytes
I/O size (minimum/optimal): 512 bytes / 512 bytes
Disk label type: dos
Disk identifier: 0x8c3b1f6e

   Device Boot      Start         End      Blocks   Id  System
/dev/sdb1            2048   209717247   104857600   83  Linux

Command (m for help): t                  #使用"t"可以修改分区的Id,如果只有一个分区的话我们是无需选择分区的,它会自动帮咱们选择那个唯一的分区编号。
Selected partition 1
Hex code (type L to list all codes): L           #使用"L"可以查看支持的Id编号

 0  Empty           24  NEC DOS         81  Minix / old Lin bf  Solaris
 1  FAT12           27  Hidden NTFS Win 82  Linux swap / So c1  DRDOS/sec (FAT-
 2  XENIX root      39  Plan 9          83  Linux           c4  DRDOS/sec (FAT-
 3  XENIX usr       3c  PartitionMagic  84  OS/2 hidden C:  c6  DRDOS/sec (FAT-
 4  FAT16 <32M      40  Venix 80286     85  Linux extended  c7  Syrinx
 5  Extended        41  PPC PReP Boot   86  NTFS volume set da  Non-FS data
 6  FAT16           42  SFS             87  NTFS volume set db  CP/M / CTOS / .
 7  HPFS/NTFS/exFAT 4d  QNX4.x          88  Linux plaintext de  Dell Utility
 8  AIX             4e  QNX4.x 2nd part 8e  Linux LVM       df  BootIt
 9  AIX bootable    4f  QNX4.x 3rd part 93  Amoeba          e1  DOS access
 a  OS/2 Boot Manag 50  OnTrack DM      94  Amoeba BBT      e3  DOS R/O
 b  W95 FAT32       51  OnTrack DM6 Aux 9f  BSD/OS          e4  SpeedStor
 c  W95 FAT32 (LBA) 52  CP/M            a0  IBM Thinkpad hi eb  BeOS fs
 e  W95 FAT16 (LBA) 53  OnTrack DM6 Aux a5  FreeBSD         ee  GPT
 f  W95 Ext'd (LBA) 54  OnTrackDM6      a6  OpenBSD         ef  EFI (FAT-12/16/
10  OPUS            55  EZ-Drive        a7  NeXTSTEP        f0  Linux/PA-RISC b
11  Hidden FAT12    56  Golden Bow      a8  Darwin UFS      f1  SpeedStor
12  Compaq diagnost 5c  Priam Edisk     a9  NetBSD          f4  SpeedStor
14  Hidden FAT16 <3 61  SpeedStor       ab  Darwin boot     f2  DOS secondary
16  Hidden FAT16    63  GNU HURD or Sys af  HFS / HFS+      fb  VMware VMFS
17  Hidden HPFS/NTF 64  Novell Netware  b7  BSDI fs         fc  VMware VMKCORE
18  AST SmartSleep  65  Novell Netware  b8  BSDI swap       fd  Linux raid auto
1b  Hidden W95 FAT3 70  DiskSecure Mult bb  Boot Wizard hid fe  LANstep
1c  Hidden W95 FAT3 75  PC/IX           be  Solaris boot    ff  BBT
1e  Hidden W95 FAT1 80  Old Minix
Hex code (type L to list all codes): fd          #此处我们将分区类型从83改为fd。
Changed type of partition 'Linux' to 'Linux raid autodetect'

Command (m for help): p                    #再次查看分区信息,注意观察"Id"列。

Disk /dev/sdb: 644.2 GB, 644245094400 bytes, 1258291200 sectors
Units = sectors of 1 * 512 = 512 bytes
Sector size (logical/physical): 512 bytes / 512 bytes
I/O size (minimum/optimal): 512 bytes / 512 bytes
Disk label type: dos
Disk identifier: 0x8c3b1f6e

   Device Boot      Start         End      Blocks   Id  System
/dev/sdb1            2048   209717247   104857600   fd  Linux raid autodetect

Command (m for help): w                  #需要注意的是,上面的所有操作都是在内存中完成的,要将内存的数据真正写入磁盘,需要我们使用"w"选项哟~
The partition table has been altered!

Calling ioctl() to re-read partition table.
Syncing disks.
[root@yinzhengjie.com ~]#
[root@yinzhengjie.com ~]# fdisk -l /dev/sdb

Disk /dev/sdb: 644.2 GB, 644245094400 bytes, 1258291200 sectors
Units = sectors of 1 * 512 = 512 bytes
Sector size (logical/physical): 512 bytes / 512 bytes
I/O size (minimum/optimal): 512 bytes / 512 bytes
Disk label type: dos
Disk identifier: 0x8c3b1f6e

   Device Boot      Start         End      Blocks   Id  System
/dev/sdb1            2048   209717247   104857600   fd  Linux raid autodetect
[root@yinzhengjie.com ~]#

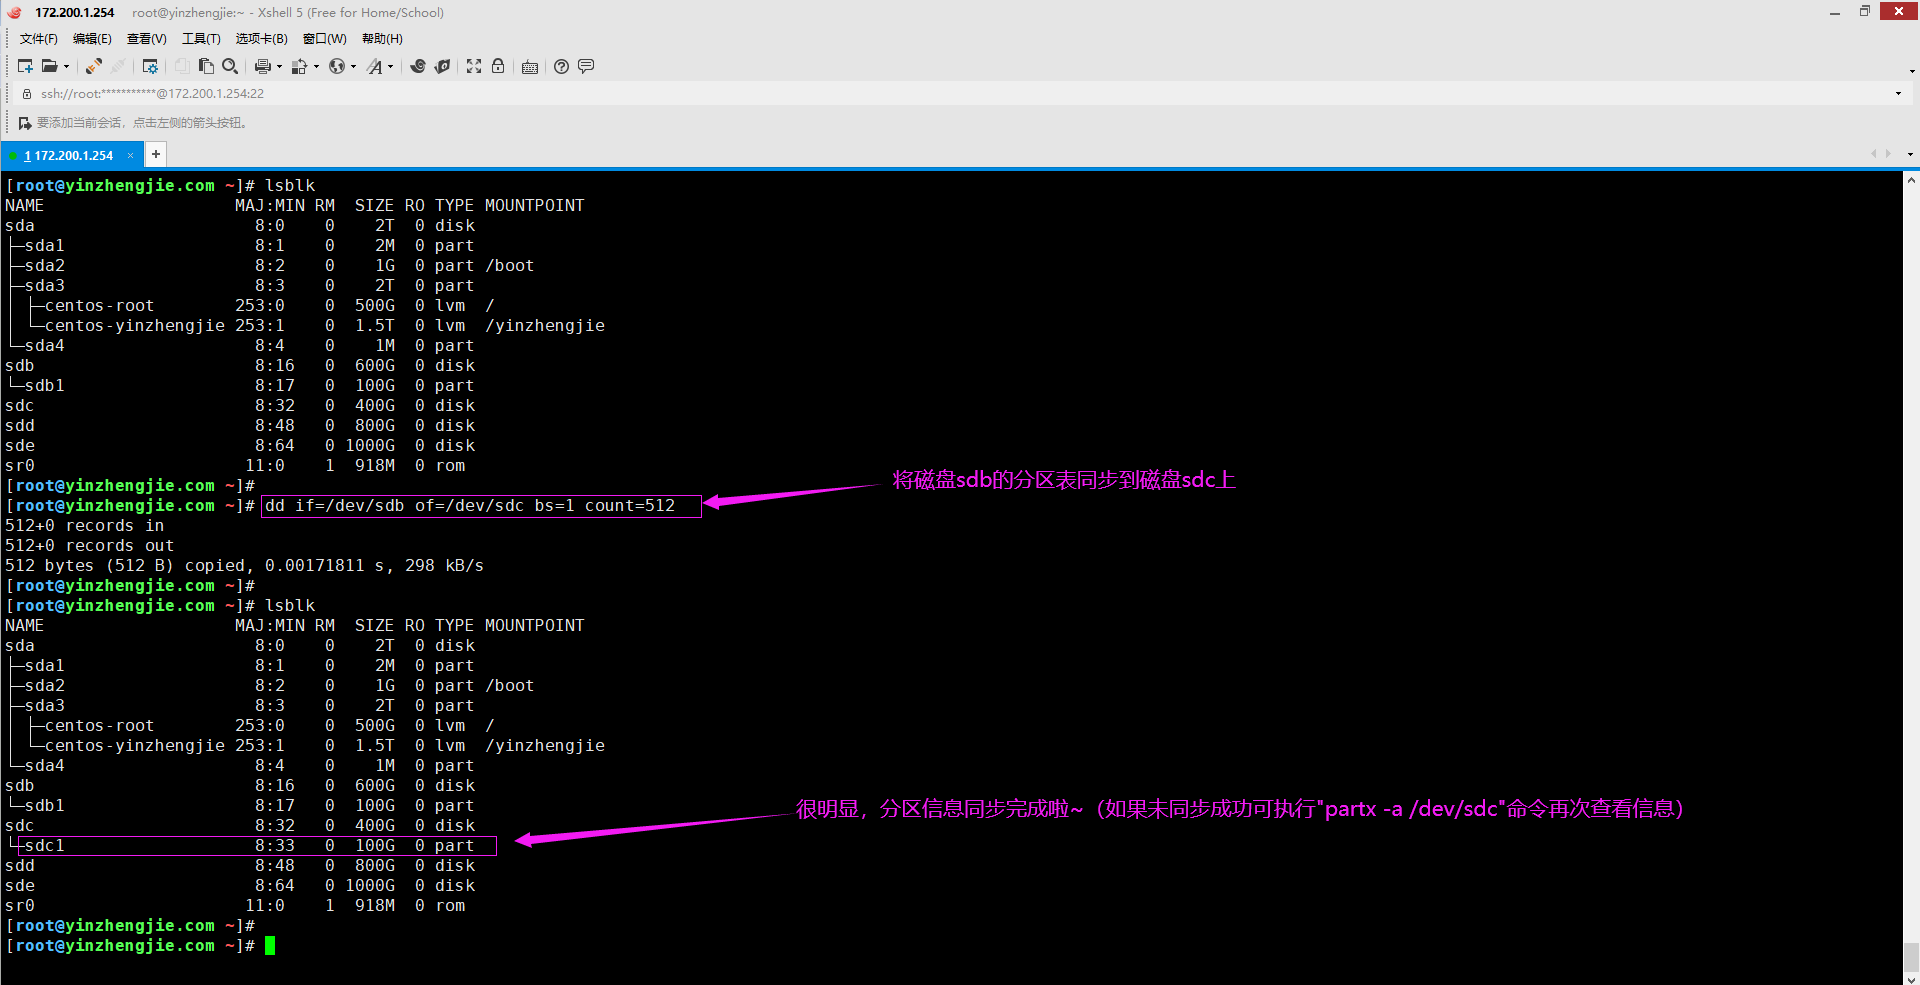
5>.对sdc磁盘进行分区
[root@yinzhengjie.com ~]# lsblk
NAME                   MAJ:MIN RM  SIZE RO TYPE MOUNTPOINT
sda                      8:0    0    2T  0 disk
├─sda1                   8:1    0    2M  0 part
├─sda2                   8:2    0    1G  0 part /boot
├─sda3                   8:3    0    2T  0 part
│ ├─centos-root        253:0    0  500G  0 lvm  /
│ └─centos-yinzhengjie 253:1    0  1.5T  0 lvm  /yinzhengjie
└─sda4                   8:4    0    1M  0 part
sdb                      8:16   0  600G  0 disk
└─sdb1                   8:17   0  100G  0 part
sdc                      8:32   0  400G  0 disk
sdd                      8:48   0  800G  0 disk
sde                      8:64   0 1000G  0 disk
sr0                     11:0    1  918M  0 rom
[root@yinzhengjie.com ~]#
[root@yinzhengjie.com ~]# dd if=/dev/sdb of=/dev/sdc bs=1 count=512          #此处我偷懒,直接将sdb磁盘的分区表同步到sdc磁盘上啦~(这样可以免得手动去重复上面的操作来一步步手动分区。)
512+0 records in
512+0 records out
512 bytes (512 B) copied, 0.00171811 s, 298 kB/s
[root@yinzhengjie.com ~]#
[root@yinzhengjie.com ~]# lsblk
NAME                   MAJ:MIN RM  SIZE RO TYPE MOUNTPOINT
sda                      8:0    0    2T  0 disk
├─sda1                   8:1    0    2M  0 part
├─sda2                   8:2    0    1G  0 part /boot
├─sda3                   8:3    0    2T  0 part
│ ├─centos-root        253:0    0  500G  0 lvm  /
│ └─centos-yinzhengjie 253:1    0  1.5T  0 lvm  /yinzhengjie
└─sda4                   8:4    0    1M  0 part
sdb                      8:16   0  600G  0 disk
└─sdb1                   8:17   0  100G  0 part
sdc                      8:32   0  400G  0 disk
└─sdc1                   8:33   0  100G  0 part
sdd                      8:48   0  800G  0 disk
sde                      8:64   0 1000G  0 disk
sr0                     11:0    1  918M  0 rom
[root@yinzhengjie.com ~]#
[root@yinzhengjie.com ~]# fdisk -l /dev/sdc

Disk /dev/sdc: 429.5 GB, 429496729600 bytes, 838860800 sectors
Units = sectors of 1 * 512 = 512 bytes
Sector size (logical/physical): 512 bytes / 512 bytes
I/O size (minimum/optimal): 512 bytes / 512 bytes
Disk label type: dos
Disk identifier: 0x8c3b1f6e

   Device Boot      Start         End      Blocks   Id  System
/dev/sdc1            2048   209717247   104857600   fd  Linux raid autodetect
[root@yinzhengjie.com ~]#
二.创建RAID 0块设备实战案例
1>.安装mdadm工具(用于创建RAID磁盘)
[root@yinzhengjie.com ~]# yum -y install mdadm
Loaded plugins: fastestmirror
Determining fastest mirrors
epel/x86_64/metalink                                                                                                                                                  | 4.5 kB  00:00:00
 * base: mirrors.bfsu.edu.cn
 * epel: mirrors.tuna.tsinghua.edu.cn
 * extras: mirrors.huaweicloud.com
 * updates: mirror.bit.edu.cn
base                                                                                                                                                                  | 3.6 kB  00:00:00
docker-ce-stable                                                                                                                                                      | 3.5 kB  00:00:00
epel                                                                                                                                                                  | 4.7 kB  00:00:00
extras                                                                                                                                                                | 2.9 kB  00:00:00
updates                                                                                                                                                               | 2.9 kB  00:00:00
(1/6): extras/7/x86_64/primary_db                                                                                                                                     | 206 kB  00:00:00
(2/6): epel/x86_64/group_gz                                                                                                                                           |  95 kB  00:00:00
(3/6): docker-ce-stable/x86_64/primary_db                                                                                                                             |  45 kB  00:00:00
(4/6): updates/7/x86_64/primary_db                                                                                                                                    | 3.8 MB  00:00:00
(5/6): epel/x86_64/updateinfo                                                                                                                                         | 1.0 MB  00:00:23
epel/x86_64/primary_db         FAILED
https://download.nus.edu.sg/mirror/epel/7/x86_64/repodata/c91de4e9f4240b1b26a52668116b16495413e7f52c600294e89772ce3be7b6a8-primary.sqlite.bz2: [Errno 12] Timeout on https://download.nus.edu
.sg/mirror/epel/7/x86_64/repodata/c91de4e9f4240b1b26a52668116b16495413e7f52c600294e89772ce3be7b6a8-primary.sqlite.bz2: (28, 'Operation timed out after 30000 milliseconds with 0 out of 0 bytes received')Trying other mirror.
(6/6): epel/x86_64/primary_db                                                                                                                                         | 6.9 MB  00:00:01
Resolving Dependencies
--> Running transaction check
---> Package mdadm.x86_64 0:4.1-4.el7 will be installed
--> Processing Dependency: libreport-filesystem for package: mdadm-4.1-4.el7.x86_64
--> Running transaction check
---> Package libreport-filesystem.x86_64 0:2.1.11-53.el7.centos will be installed
--> Finished Dependency Resolution

Dependencies Resolved

=============================================================================================================================================================================================
 Package                                              Arch                                   Version                                              Repository                            Size
=============================================================================================================================================================================================
Installing:
 mdadm                                                x86_64                                 4.1-4.el7                                            base                                 439 k
Installing for dependencies:
 libreport-filesystem                                 x86_64                                 2.1.11-53.el7.centos                                 base                                  41 k

Transaction Summary
=============================================================================================================================================================================================
Install  1 Package (+1 Dependent package)

Total download size: 479 k
Installed size: 1.0 M
Downloading packages:
(1/2): libreport-filesystem-2.1.11-53.el7.centos.x86_64.rpm                                                                                                           |  41 kB  00:00:00
(2/2): mdadm-4.1-4.el7.x86_64.rpm                                                                                                                                     | 439 kB  00:00:00
---------------------------------------------------------------------------------------------------------------------------------------------------------------------------------------------
Total                                                                                                                                                        2.4 MB/s | 479 kB  00:00:00
Running transaction check
Running transaction test
Transaction test succeeded
Running transaction
  Installing : libreport-filesystem-2.1.11-53.el7.centos.x86_64                                                                                                                          1/2
  Installing : mdadm-4.1-4.el7.x86_64                                                                                                                                                    2/2
  Verifying  : mdadm-4.1-4.el7.x86_64                                                                                                                                                    1/2
  Verifying  : libreport-filesystem-2.1.11-53.el7.centos.x86_64                                                                                                                          2/2

Installed:
  mdadm.x86_64 0:4.1-4.el7

Dependency Installed:
  libreport-filesystem.x86_64 0:2.1.11-53.el7.centos

Complete!
[root@yinzhengjie.com ~]#
2>.使用mdadm工具创建一个RAID0的块设备
[root@yinzhengjie.com ~]# mdadm --help
mdadm is used for building, managing, and monitoring
Linux md devices (aka RAID arrays)
Usage: mdadm --create device options...
            Create a new array from unused devices.
       mdadm --assemble device options...
            Assemble a previously created array.
       mdadm --build device options...
            Create or assemble an array without metadata.
       mdadm --manage device options...
            make changes to an existing array.
       mdadm --misc options... devices
            report on or modify various md related devices.
       mdadm --grow options device
            resize/reshape an active array
       mdadm --incremental device
            add/remove a device to/from an array as appropriate
       mdadm --monitor options...
            Monitor one or more array for significant changes.
       mdadm device options...
            Shorthand for --manage.
Any parameter that does not start with '-' is treated as a device name
or, for --examine-bitmap, a file name.
The first such name is often the name of an md device.  Subsequent
names are often names of component devices.

 For detailed help on the above major modes use --help after the mode
 e.g.
         mdadm --assemble --help
 For general help on options use
         mdadm --help-options
[root@yinzhengjie.com ~]#
[root@yinzhengjie.com ~]# lsblk /dev/sd{b,c}            #注意哈,我本次试验会用到sdb和sdc这两块磁盘
NAME   MAJ:MIN RM  SIZE RO TYPE MOUNTPOINT
sdb      8:16   0  600G  0 disk
└─sdb1   8:17   0  100G  0 part
sdc      8:32   0  400G  0 disk
└─sdc1   8:33   0  100G  0 part
[root@yinzhengjie.com ~]#
[root@yinzhengjie.com ~]# ll /dev/md*                #目前"/dev/"目录下没有任何以"md*"开头的文件,一会执行命令后你就会发现存在啦~
ls: cannot access /dev/md*: No such file or directory
[root@yinzhengjie.com ~]#
[root@yinzhengjie.com ~]# cat /proc/mdstat              #观察md的状态
Personalities :
unused devices: <none>
[root@yinzhengjie.com ~]#
[root@yinzhengjie.com ~]# mdadm -C -a yes /dev/md001 -l 0 -n 2 /dev/sd{b,c}1      #将sdb1和sdc1分区RAID0级别,使用"-n"指定设备个数,使用"-l"指定RAID级别,使用"-C -a yes"表示初始化创建的意思。
mdadm: Defaulting to version 1.2 metadata
mdadm: array /dev/md001 started.
mdadm: timeout waiting for /dev/md001
[root@yinzhengjie.com ~]#
[root@yinzhengjie.com ~]# cat /proc/mdstat              #观察md的状态
Personalities : [raid0]
md1 : active raid0 sdc1[1] sdb1[0]
      209582080 blocks super 1.2 512k chunks

unused devices: <none>
[root@yinzhengjie.com ~]#
[root@yinzhengjie.com ~]# ll /dev/md*                #我们会发现多了一个块设备,但没有以我定义的"/dev/md001"来命名!
brw-rw---- 1 root disk 9, 1 Aug 21 01:50 /dev/md1
[root@yinzhengjie.com ~]#
3>.使用mdadm命令查看RAID设备的详细信息
[root@yinzhengjie.com ~]# mdadm -D /dev/md1
/dev/md1:
           Version : 1.2
     Creation Time : Fri Aug 21 01:50:32 2020
        Raid Level : raid0                        #RAID级别是"raid 0"
        Array Size : 209582080 (199.87 GiB 214.61 GB)        #这里的总容量是200G左右
      Raid Devices : 2
     Total Devices : 2
       Persistence : Superblock is persistent

       Update Time : Fri Aug 21 01:50:32 2020
             State : clean                         #目前状态是"clean",
    Active Devices : 2                           #活动设备是2个
   Working Devices : 2
    Failed Devices : 0
     Spare Devices : 0

        Chunk Size : 512K                         #组块大小是512K

Consistency Policy : none

              Name : yinzhengjie.com:001  (local to host yinzhengjie.com)
              UUID : e7e1a4a7:f73b2990:a52b16b3:92be0561      #注意观察这个UUID哈,下面也会用到
            Events : 0

    Number   Major   Minor   RaidDevice State
       0       8       17        0      active sync   /dev/sdb1
       1       8       33        1      active sync   /dev/sdc1
[root@yinzhengjie.com ~]#
4>.为RAID设备创建文件系统
[root@yinzhengjie.com ~]# mkfs.xfs /dev/md1             #我们将RAID 0设备格式化文件系统类型为XFS。
meta-data=/dev/md1               isize=512    agcount=16, agsize=3274624 blks
         =                       sectsz=512   attr=2, projid32bit=1
         =                       crc=1        finobt=0, sparse=0
data     =                       bsize=4096   blocks=52393984, imaxpct=25
         =                       sunit=128    swidth=256 blks
naming   =version 2              bsize=4096   ascii-ci=0 ftype=1
log      =internal log           bsize=4096   blocks=25584, version=2
         =                       sectsz=512   sunit=8 blks, lazy-count=1
realtime =none                   extsz=4096   blocks=0, rtextents=0
[root@yinzhengjie.com ~]#
[root@yinzhengjie.com ~]# blkid /dev/sd{b,c}1          #查看sdb1和sdc1分区都用一个统一的UUID,和上面的RAID设备的UUID完全相同。但这2个分区也有各自独立的UUID编号,当然,类型均为"linux_raid_member"
/dev/sdb1: UUID="e7e1a4a7-f73b-2990-a52b-16b392be0561" UUID_SUB="595fb659-a792-aaac-3a2d-800b3e0795ac" LABEL="yinzhengjie.com:001" TYPE="linux_raid_member"
/dev/sdc1: UUID="e7e1a4a7-f73b-2990-a52b-16b392be0561" UUID_SUB="78244c8b-f961-577f-9d32-af6c474e9f2b" LABEL="yinzhengjie.com:001" TYPE="linux_raid_member"
[root@yinzhengjie.com ~]#
[root@yinzhengjie.com ~]# blkid /dev/md1             #我们也可以看到RAID 0设备(/dev/sdb1)的文件系统类型为XFS。
/dev/md1: UUID="bc7d4ffa-439e-4544-b59e-58d10228569c" TYPE="xfs"
[root@yinzhengjie.com ~]#
5>.挂载RAID设备
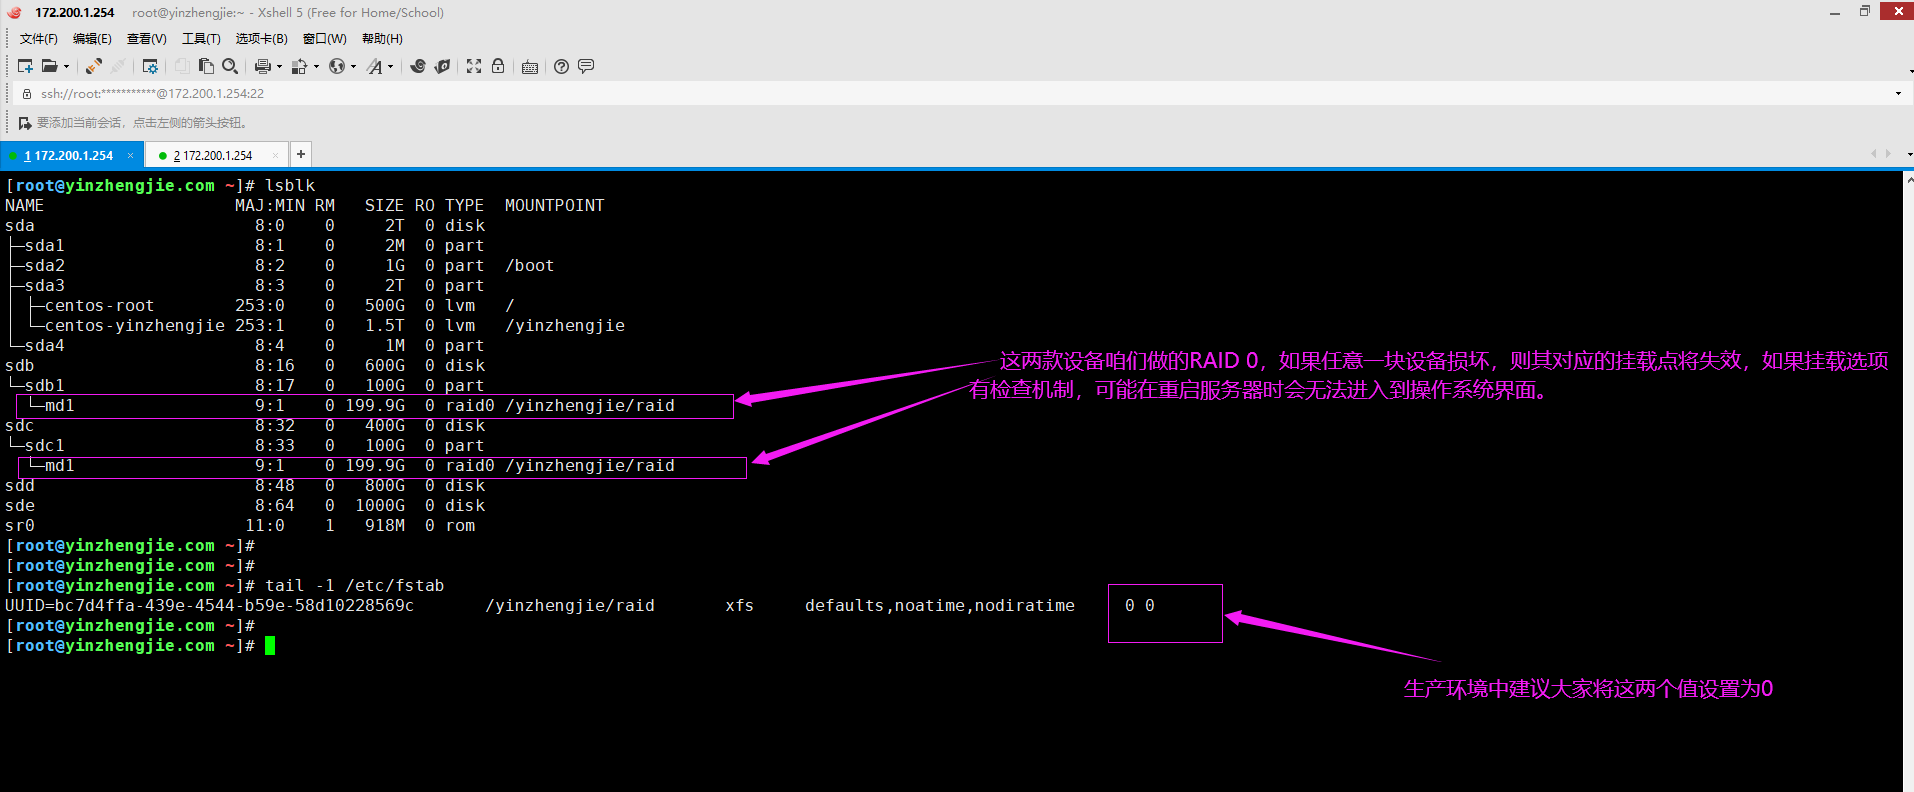
[root@yinzhengjie.com ~]# mkdir -pv /yinzhengjie/raid      #创建挂载点
mkdir: created directory ‘/yinzhengjie/raid’
[root@yinzhengjie.com ~]#
[root@yinzhengjie.com ~]# tail -1 /etc/fstab            #你可以使用"mount"命令手动挂载,但我推荐大家写在配置文件中,这样重启服务器时会自动帮咱们挂载的.
UUID=bc7d4ffa-439e-4544-b59e-58d10228569c     /yinzhengjie/raid     xfs    defaults,noatime,nodiratime    0 0
[root@yinzhengjie.com ~]#
[root@yinzhengjie.com ~]# mount -a                 #我们使用该命令可以帮咱们实现自动挂载
[root@yinzhengjie.com ~]#
[root@yinzhengjie.com ~]# df -h
Filesystem                      Size  Used Avail Use% Mounted on
/dev/mapper/centos-root         500G   14G  486G   3% /
devtmpfs                        2.0G     0  2.0G   0% /dev
tmpfs                           2.0G     0  2.0G   0% /dev/shm
tmpfs                           2.0G   12M  2.0G   1% /run
tmpfs                           2.0G     0  2.0G   0% /sys/fs/cgroup
/dev/sda2                      1014M  133M  882M  14% /boot
/dev/mapper/centos-yinzhengjie  1.6T  1.4G  1.6T   1% /yinzhengjie
tmpfs                           394M     0  394M   0% /run/user/0
/dev/md1                        200G   33M  200G   1% /yinzhengjie/raid
[root@yinzhengjie.com ~]#
[root@yinzhengjie.com ~]#
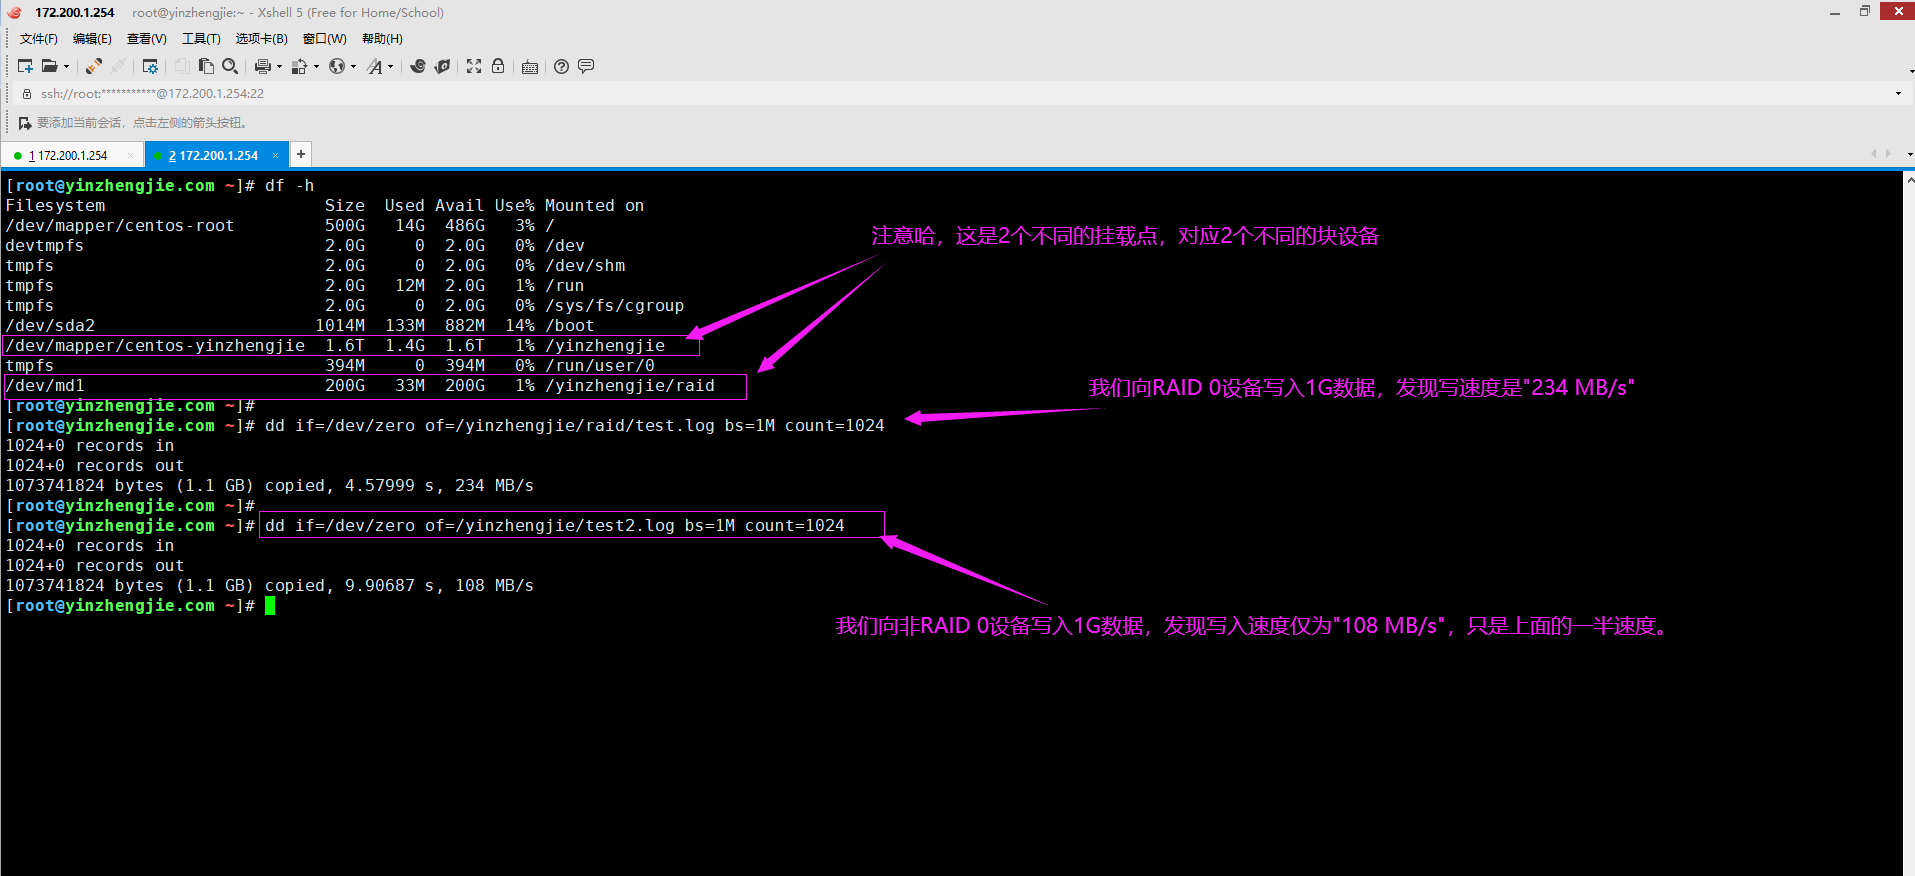
6>.测试RAID 0设备的写入速度
[root@yinzhengjie.com ~]# df -h
Filesystem                      Size  Used Avail Use% Mounted on
/dev/mapper/centos-root         500G   14G  486G   3% /
devtmpfs                        2.0G     0  2.0G   0% /dev
tmpfs                           2.0G     0  2.0G   0% /dev/shm
tmpfs                           2.0G   12M  2.0G   1% /run
tmpfs                           2.0G     0  2.0G   0% /sys/fs/cgroup
/dev/sda2                      1014M  133M  882M  14% /boot
/dev/mapper/centos-yinzhengjie  1.6T  1.4G  1.6T   1% /yinzhengjie
tmpfs                           394M     0  394M   0% /run/user/0
/dev/md1                        200G   33M  200G   1% /yinzhengjie/raid
[root@yinzhengjie.com ~]#
[root@yinzhengjie.com ~]# dd if=/dev/zero of=/yinzhengjie/raid/test.log bs=1M count=1024
1024+0 records in
1024+0 records out
1073741824 bytes (1.1 GB) copied, 4.57999 s, 234 MB/s
[root@yinzhengjie.com ~]#
[root@yinzhengjie.com ~]# dd if=/dev/zero of=/yinzhengjie/test2.log bs=1M count=1024
1024+0 records in
1024+0 records out
1073741824 bytes (1.1 GB) copied, 9.90687 s, 108 MB/s
[root@yinzhengjie.com ~]#
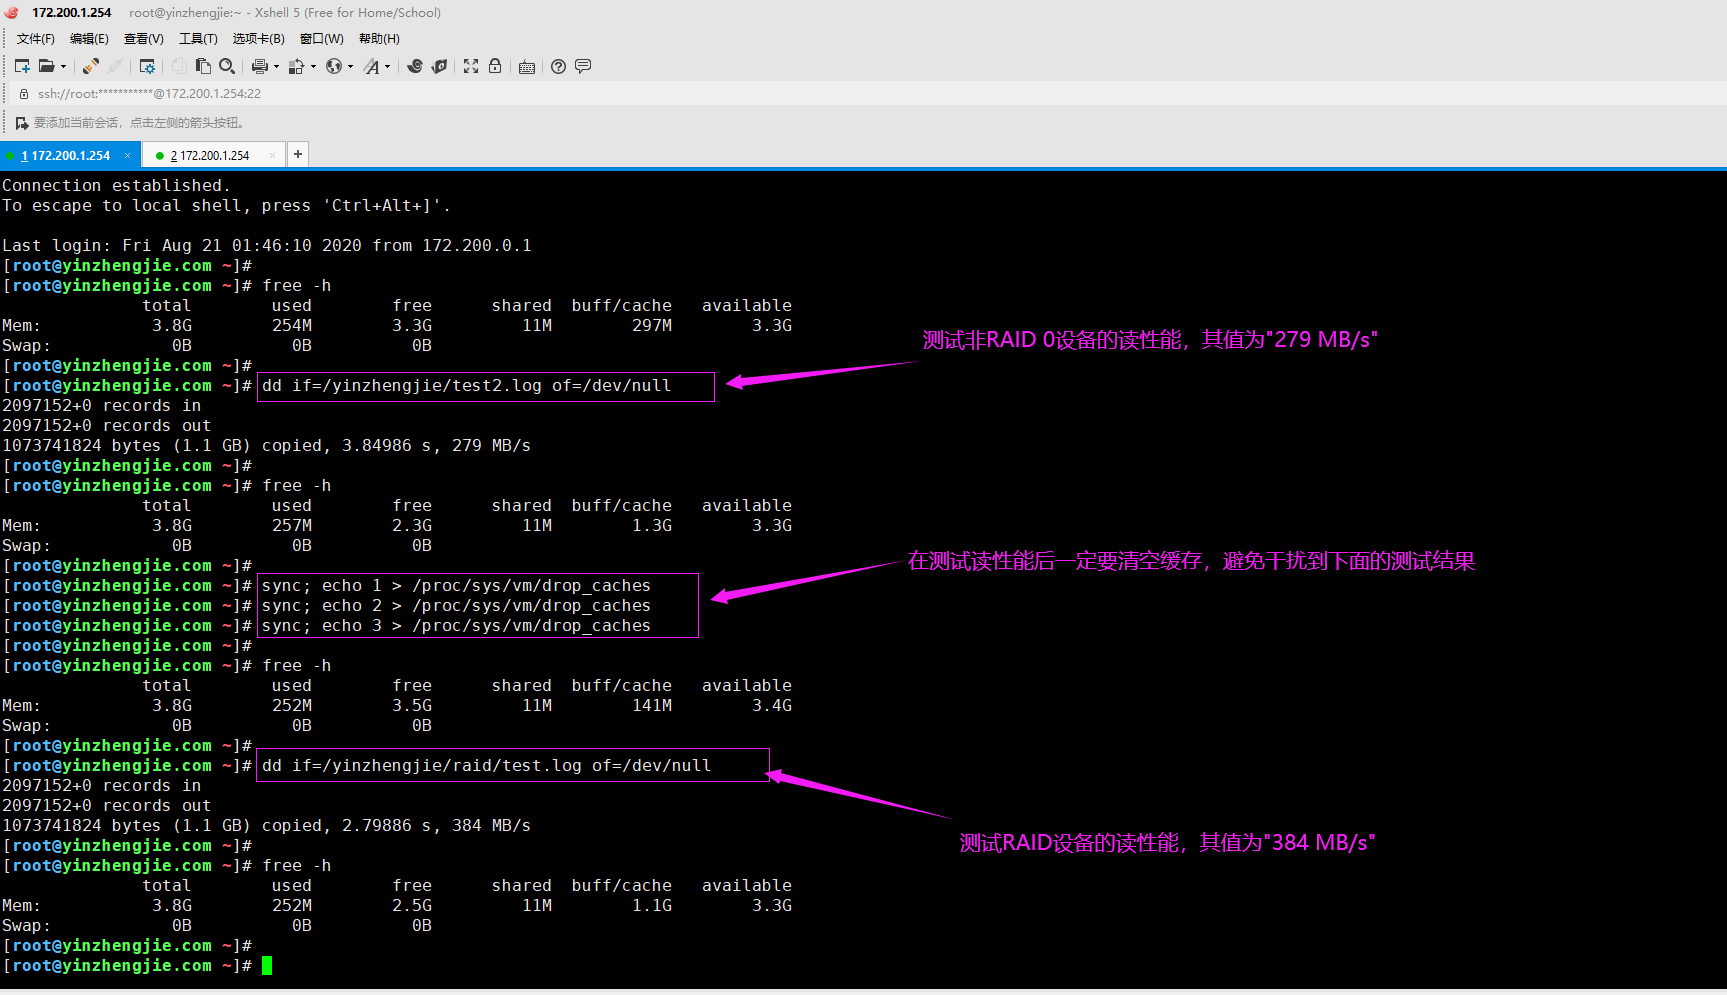
7>.测试RAID 0设备的读取速度
[root@yinzhengjie.com ~]# free -h
              total        used        free      shared  buff/cache   available
Mem:           3.8G        254M        3.3G         11M        297M        3.3G
Swap:            0B          0B          0B
[root@yinzhengjie.com ~]#
[root@yinzhengjie.com ~]# dd if=/yinzhengjie/test2.log of=/dev/null
2097152+0 records in
2097152+0 records out
1073741824 bytes (1.1 GB) copied, 3.84986 s, 279 MB/s
[root@yinzhengjie.com ~]#
[root@yinzhengjie.com ~]# free -h
              total        used        free      shared  buff/cache   available
Mem:           3.8G        257M        2.3G         11M        1.3G        3.3G
Swap:            0B          0B          0B
[root@yinzhengjie.com ~]#
[root@yinzhengjie.com ~]# sync; echo 1 > /proc/sys/vm/drop_caches
[root@yinzhengjie.com ~]# sync; echo 2 > /proc/sys/vm/drop_caches
[root@yinzhengjie.com ~]# sync; echo 3 > /proc/sys/vm/drop_caches
[root@yinzhengjie.com ~]#
[root@yinzhengjie.com ~]# free -h
              total        used        free      shared  buff/cache   available
Mem:           3.8G        252M        3.5G         11M        141M        3.4G
Swap:            0B          0B          0B
[root@yinzhengjie.com ~]#
[root@yinzhengjie.com ~]# dd if=/yinzhengjie/raid/test.log of=/dev/null
2097152+0 records in
2097152+0 records out
1073741824 bytes (1.1 GB) copied, 2.79886 s, 384 MB/s
[root@yinzhengjie.com ~]#
[root@yinzhengjie.com ~]# free -h
              total        used        free      shared  buff/cache   available
Mem:           3.8G        252M        2.5G         11M        1.1G        3.3G
Swap:            0B          0B          0B
[root@yinzhengjie.com ~]#
[root@yinzhengjie.com ~]#
8>.重启服务器后再次查看挂载情况(编辑"/etc/fstab"文件后,虽说可以使用"mount -a"命令使之立即生效,但生产环境务必要重启服务器进行测试哟)
[root@yinzhengjie.com ~]# lsblk /dev/sd{b,c}          #此处我们只看磁盘/dev/sdb和/dev/sdc这两块设备信息。
NAME    MAJ:MIN RM   SIZE RO TYPE  MOUNTPOINT
sdb       8:16   0   600G  0 disk
└─sdb1    8:17   0   100G  0 part
  └─md1   9:1    0 199.9G  0 raid0 /yinzhengjie/raid
sdc       8:32   0   400G  0 disk
└─sdc1    8:33   0   100G  0 part
  └─md1   9:1    0 199.9G  0 raid0 /yinzhengjie/raid
[root@yinzhengjie.com ~]#
本文来自博客园,作者:尹正杰,转载请注明原文链接:https://www.cnblogs.com/yinzhengjie/p/12995834.html,个人微信: "JasonYin2020"(添加时请备注来源及意图备注,有偿付费)
当你的才华还撑不起你的野心的时候,你就应该静下心来学习。当你的能力还驾驭不了你的目标的时候,你就应该沉下心来历练。问问自己,想要怎样的人生。

 浙公网安备 33010602011771号