

Linux操作系统-CentOS6启动流程和服务管理
Linux操作系统-CentOS6启动流程和服务管理
作者:尹正杰
版权声明:原创作品,谢绝转载!否则将追究法律责任。
一.Linux组成
1>.Linux: kernel+rootfs
kernel:
  进程管理、内存管理、网络管理、驱动程序、文件系统、安全功能

rootfs:
  程序和glibc

库:
  函数集合, function, 调用接口(头文件负责描述)

过程调用:
  procedure,无返回值

函数调用:
  function

程序:
  二进制执行文件
2>.内核设计流派
单内核(monolithic kernel):Linux
  把所有功能集成于同一个程序

微内核(micro kernel):Windows(微软公司), Solaris(之前属于sun公司后被Oracle收购)
  每种功能使用一个单独子系统实现
3>.Linux内核特点
Linux内核特点:
  支持模块化:.ko(内核对象)
    如:文件系统,硬件驱动,网络协议等
  支持内核模块的动态装载和卸载

组成部分:
  核心文件:/boot/vmlinuz-VERSION-release
    ramdisk:辅助的伪根系统
    CentOS 5: /boot/initrd-VERSION-release.img
    CentOS 6,7: /boot/initramfs-VERSION-release.img
  模块文件:/lib/modules/VERSION-release


[root@node101.yinzhengjie.org.cn ~]# ll /lib/modules/3.10.0-957.el7.x86_64/kernel/      #CentOS 7.6.x版本的内核模块存放目录
total 16
drwxr-xr-x.  3 root root   17 Jul  8 16:23 arch
drwxr-xr-x.  3 root root 4096 Jul  8 16:23 crypto
drwxr-xr-x. 70 root root 4096 Jul  8 16:23 drivers
drwxr-xr-x. 26 root root 4096 Jul  8 16:23 fs
drwxr-xr-x.  3 root root   19 Jul  8 16:23 kernel
drwxr-xr-x.  4 root root  249 Jul  8 16:23 lib
drwxr-xr-x.  2 root root   35 Jul  8 16:23 mm
drwxr-xr-x. 34 root root 4096 Jul  8 16:23 net
drwxr-xr-x. 12 root root  173 Jul  8 16:23 sound
drwxr-xr-x.  3 root root   17 Jul  8 16:23 virt
[root@node101.yinzhengjie.org.cn ~]#
[root@yinzhengjie ~]# cat /etc/redhat-release
CentOS release 6.10 (Final)
[root@yinzhengjie ~]#
[root@yinzhengjie ~]# uname -r
2.6.32-754.el6.x86_64
[root@yinzhengjie ~]#
[root@yinzhengjie ~]# uname -m
x86_64
[root@yinzhengjie ~]#
[root@yinzhengjie ~]# ll /lib/modules/2.6.32-754.el6.x86_64/kernel/                       #CentOS 6.10.x版本的内核模块存放目录
total 36
drwxr-xr-x.  3 root root 4096 Dec  1 07:30 arch
drwxr-xr-x.  3 root root 4096 Dec  1 07:30 crypto
drwxr-xr-x. 63 root root 4096 Dec  1 07:30 drivers
drwxr-xr-x. 30 root root 4096 Dec  1 07:30 fs
drwxr-xr-x.  3 root root 4096 Dec  1 07:30 kernel
drwxr-xr-x.  6 root root 4096 Dec  1 07:30 lib
drwxr-xr-x.  2 root root 4096 Dec  1 07:30 mm
drwxr-xr-x. 28 root root 4096 Dec  1 07:30 net
drwxr-xr-x.  9 root root 4096 Dec  1 07:30 sound
[root@yinzhengjie ~]#
二.CentOS6启动流程
1>.POST加电自检
POST:
  Power-On-Self-Test,加电自检,是BIOS功能的一个主要部分。负责完成对CPU、主板、内存、硬盘子系统、显示子系统、串并行接口、键盘等硬件情况的检测
ROM:
  BIOS,Basic Input and Output System,保存着有关计算机系统最重要的基本输入输出程序,系统信息设置、开机加电自检程序和系统启动自举程序等
RAM:
  并不是指内存条,而是CMOS互补金属氧化物半导体,保存各项参数的设定,当然这依赖于主板上的小电池哟。

按次序查找引导设备,第一个有引导程序的设备为本次启动设备
2>.MBR:第一个扇区
前446字节
  保存bootloader信息,在GRUB第一节点的1.5stage。

中间64字节
  分区表

最后2字节(标记位)
  55AA
3>.bootloader: 引导加载器,引导程序
windows:
  ntloader,仅是启动OS

Linux:
  功能丰富,提供菜单,允许用户选择要启动系统或不同的内核版本;把用户选定的内核装载到内存中的特定空间中,解压、展开,并把系统控制权移交给内核
    LILO:LInux LOader(早期Linux/windows都可以基于它启动,但是它功能较弱最后被弃用了)
    GRUB:GRand Unified Bootloader(Linux选择功能更强的它使用)
        GRUB 0.X: GRUB Legacy(CentOS 5/6选择的是0.97版本)
        GRUB2(CentOS 7默认使用该版本)
        CentOS 5/6版本可以使用"rpm -qi grub"命令查看对应的GRUB信息,而CentOS 7则需要使用"rpm -qi grub2"命令来查看GRUB信息。
        GRUB分为2个阶段:
          第一阶段:primary boot loader
            该阶段表现为磁盘上某些扇区的二进制数据。
            1st stage(可以定位1.5所对应的扇区位置)
            1.5 stage(保存boot分区的文件系统驱动)
          第二阶段:secondary boot loader
            该阶段表现为文件方式。
            2nd stage加载后,就可以通过该阶段的配置文件找到内核文件的路径并加载,然后通过内核在逐步加载操作系统。
4>.kernel:自身初始化
  探测可识别到的所有硬件设备

  加载硬件驱动程序(借助于ramdisk加载驱动)

  以只读方式挂载根文件系统

  运行用户空间的第一个应用程序:/sbin/init
[root@node101.yinzhengjie.org.cn /data]# ll
total 0
[root@node101.yinzhengjie.org.cn /data]#
[root@node101.yinzhengjie.org.cn /data]# cp /boot/initramfs-3.10.0-957.el7.x86_64.img ./
[root@node101.yinzhengjie.org.cn /data]#
[root@node101.yinzhengjie.org.cn /data]# ll
total 21244
-rw------- 1 root root 21752722 Nov 29 07:24 initramfs-3.10.0-957.el7.x86_64.img
[root@node101.yinzhengjie.org.cn /data]#
[root@node101.yinzhengjie.org.cn /data]# file initramfs-3.10.0-957.el7.x86_64.img
initramfs-3.10.0-957.el7.x86_64.img: ASCII cpio archive (SVR4 with no CRC)
[root@node101.yinzhengjie.org.cn /data]#
[root@node101.yinzhengjie.org.cn /data]# cpio -idv < initramfs-3.10.0-957.el7.x86_64.img     #查看cipo归档文件案例
.
kernel
kernel/x86
kernel/x86/microcode
kernel/x86/microcode/GenuineIntel.bin
early_cpio
192 blocks
[root@node101.yinzhengjie.org.cn /data]#
5>.ramdisk
内核中的特性之一:
  使用缓冲和缓存来加速对磁盘上的文件访问,并加载相应的硬件驱动
  ramdisk --> ramfs 提高速度
  CentOS 5: initrd
    工具程序:mkinitrd
  CentOS 6,7: initramfs
    工具程序:mkinitrd, dracut
[root@node101.yinzhengjie.org.cn ~]# cd /boot/
[root@node101.yinzhengjie.org.cn /boot]#
[root@node101.yinzhengjie.org.cn /boot]# ll
total 107232
-rw-r--r--. 1 root root   151918 Nov  9  2018 config-3.10.0-957.el7.x86_64
drwxr-xr-x. 3 root root       17 Jul  8 16:22 efi
drwxr-xr-x. 2 root root       27 Jul  8 16:23 grub
drwx------. 5 root root       97 Jul  8 16:25 grub2
-rw-------. 1 root root 57158964 Jul  8 16:24 initramfs-0-rescue-9ccdf621e5984f3b8626614f6fa15a48.img
-rw-------. 1 root root 21752722 Jul  8 16:25 initramfs-3.10.0-957.el7.x86_64.img
-rw-------  1 root root 13584214 Jul  9 10:49 initramfs-3.10.0-957.el7.x86_64kdump.img
-rw-r--r--. 1 root root   314036 Nov  9  2018 symvers-3.10.0-957.el7.x86_64.gz
-rw-------. 1 root root  3543471 Nov  9  2018 System.map-3.10.0-957.el7.x86_64
-rwxr-xr-x. 1 root root  6639904 Jul  8 16:24 vmlinuz-0-rescue-9ccdf621e5984f3b8626614f6fa15a48
-rwxr-xr-x. 1 root root  6639904 Nov  9  2018 vmlinuz-3.10.0-957.el7.x86_64
[root@node101.yinzhengjie.org.cn /boot]#
[root@node101.yinzhengjie.org.cn /boot]# rm -f initramfs-3.10.0-957.el7.x86_64.img       #删除这个虚拟文件系统后,重启操作系统将无法正常启动
[root@node101.yinzhengjie.org.cn /boot]#
[root@node101.yinzhengjie.org.cn /boot]# date
Fri Nov 29 07:37:05 CST 2019
[root@node101.yinzhengjie.org.cn /boot]#
[root@node101.yinzhengjie.org.cn /boot]# mkinitrd initramfs-`uname -r`.img `uname -r`     #因此我们得赶紧用该命令进行恢复,第一个参数为文件名,第二个参数是基于内核版本号,如果重启时无法进入操作系统,可以先进入救援模式"chroot /mnt/sysimage(切根)"执行该命令并调用"sync(确保咱们生成的文件被保存到磁盘)"保存即可。
[root@node101.yinzhengjie.org.cn /boot]#
[root@node101.yinzhengjie.org.cn /boot]# ll
total 106764
-rw-r--r--. 1 root root   151918 Nov  9  2018 config-3.10.0-957.el7.x86_64
drwxr-xr-x. 3 root root       17 Jul  8 16:22 efi
drwxr-xr-x. 2 root root       27 Jul  8 16:23 grub
drwx------. 5 root root       97 Jul  8 16:25 grub2
-rw-------. 1 root root 57158964 Jul  8 16:24 initramfs-0-rescue-9ccdf621e5984f3b8626614f6fa15a48.img
-rw-------  1 root root 21272978 Nov 29 07:38 initramfs-3.10.0-957.el7.x86_64.img
-rw-------  1 root root 13584214 Jul  9 10:49 initramfs-3.10.0-957.el7.x86_64kdump.img
-rw-r--r--. 1 root root   314036 Nov  9  2018 symvers-3.10.0-957.el7.x86_64.gz
-rw-------. 1 root root  3543471 Nov  9  2018 System.map-3.10.0-957.el7.x86_64
-rwxr-xr-x. 1 root root  6639904 Jul  8 16:24 vmlinuz-0-rescue-9ccdf621e5984f3b8626614f6fa15a48
-rwxr-xr-x. 1 root root  6639904 Nov  9  2018 vmlinuz-3.10.0-957.el7.x86_64
[root@node101.yinzhengjie.org.cn /boot]#
ramdisk文件的制作:
  (1) mkinitrd命令
    为当前正在使用的内核重新制作ramdisk文件
    mkinitrd /boot/initramfs-$(uname -r).img $(uname -r)
  (2) dracut命令
    为当前正在使用的内核重新制作ramdisk文件
    dracut /boot/initramfs-$(uname -r).img $(uname -r)
6>.系统初始化
POST --> BootSequence (BIOS) --> Bootloader(MBR) --> kernel(ramdisk) --> rootfs(只读) --> init(systemd)
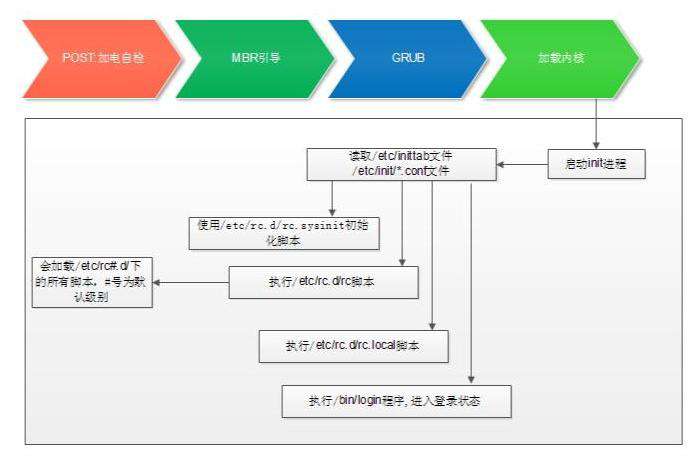
7>.CentOS6启动流程总结
  (1)加载BIOS的硬件信息,获取第一个启动设备
  (2)读取第一个启动设备MBR的引导加载程序(grub)的启动信息
  (3)加载核心操作系统的核心信息,核心开始解压缩,并尝试驱动所有的硬件设备
  (4)核心执行init程序,并获取默认的运行信息
  (5)init程序执行/etc/rc.d/rc.sysinit文件
  (6)启动核心的外挂模块
  (7)init执行运行的各个批处理文件(scripts)
  (8)init执行/etc/rc.d/rc.local
  (9)执行/bin/login程序,等待用户登录
  (10)登录之后开始以Shell控制主机
三.运行级别相关配置文件(说白了,所谓的运行级别(runlevel)就是不同服务开机启动的组合而已)
1>.init程序的类型
SysV: init, CentOS 5之前
  配置文件:
    /etc/inittab

Upstart: init,CentOS 6
  配置文件:
    /etc/inittab
    /etc/init/*.conf

Systemd:systemd, CentOS 7
  配置文件:
    /usr/lib/systemd/system
     /etc/systemd/system
[root@node101.yinzhengjie.org.cn ~]# rpm -qf /sbin/init
systemd-219-62.el7.x86_64
[root@node101.yinzhengjie.org.cn ~]#
[root@node101.yinzhengjie.org.cn ~]# yum info systemd-219-62.el7.x86_64
Loaded plugins: fastestmirror
Loading mirror speeds from cached hostfile
 * base: mirrors.huaweicloud.com
 * epel: mirrors.aliyun.com
 * extras: mirrors.huaweicloud.com
 * updates: mirrors.aliyun.com
Installed Packages
Name        : systemd
Arch        : x86_64
Version     : 219
Release     : 62.el7
Size        : 23 M
Repo        : installed
From repo   : anaconda
Summary     : A System and Service Manager
URL         : http://www.freedesktop.org/wiki/Software/systemd
License     : LGPLv2+ and MIT and GPLv2+
Description : systemd is a system and service manager for Linux, compatible with
            : SysV and LSB init scripts. systemd provides aggressive parallelization
            : capabilities, uses socket and D-Bus activation for starting services,
            : offers on-demand starting of daemons, keeps track of processes using
            : Linux cgroups, supports snapshotting and restoring of the system
            : state, maintains mount and automount points and implements an
            : elaborate transactional dependency-based service control logic. It can
            : work as a drop-in replacement for sysvinit.

[root@node101.yinzhengjie.org.cn ~]#
[root@node101.yinzhengjie.org.cn ~]#
[root@node101.yinzhengjie.org.cn ~]# pstree
systemd─┬─NetworkManager─┬─dhclient
        │                └─2*[{NetworkManager}]
        ├─agetty
        ├─atd
        ├─auditd───{auditd}
        ├─crond
        ├─dbus-daemon
        ├─irqbalance
        ├─lvmetad
        ├─polkitd───6*[{polkitd}]
        ├─rsyslogd───2*[{rsyslogd}]
        ├─sshd─┬─sshd───bash
        │      └─sshd───bash───pstree
        ├─systemd-journal
        ├─systemd-logind
        ├─systemd-udevd
        └─tuned───4*[{tuned}]
[root@node101.yinzhengjie.org.cn ~]#
[root@yinzhengjie ~]# cat /etc/redhat-release
CentOS release 6.10 (Final)
[root@yinzhengjie ~]#
[root@yinzhengjie ~]# uname -r
2.6.32-754.el6.x86_64
[root@yinzhengjie ~]#
[root@yinzhengjie ~]# uname -m
x86_64
[root@yinzhengjie ~]# rpm -qf /sbin/init
upstart-0.6.5-17.el6.x86_64
[root@yinzhengjie ~]#
[root@yinzhengjie ~]# yum info upstart-0.6.5-17.el6.x86_64
Loaded plugins: fastestmirror, refresh-packagekit, security
Loading mirror speeds from cached hostfile
 * base: mirror.jdcloud.com
 * extras: mirrors.huaweicloud.com
 * updates: mirrors.huaweicloud.com
base                                                                                                                    | 3.7 kB     00:00
extras                                                                                                                  | 3.4 kB     00:00
updates                                                                                                                 | 3.4 kB     00:00
Installed Packages
Name        : upstart
Arch        : x86_64
Version     : 0.6.5
Release     : 17.el6
Size        : 554 k
Repo        : installed
From repo   : anaconda-CentOS-201806291108.x86_64
Summary     : An event-driven init system
URL         : http://upstart.ubuntu.com
License     : GPLv2 and LGPLv2+
Description : Upstart is an event-based replacement for the /sbin/init daemon which
            : handles starting of tasks and services during boot, stopping them
            : during shutdown and supervising them while the system is running.

[root@yinzhengjie ~]#
2>./sbin/init(CentOS6之前)
运行级别:为系统运行或维护等目的而设定;0-6:7个级别
  0:关机
  1:单用户模式(root自动登录), single, 维护模式(只有服务器自己可以使用,无法通过网络连接登录,进入该模式一般用于破解服务器root口令。)
  2: 多用户模式,启动网络功能,但不会启动NFS;维护模式
  3:多用户模式,正常模式;文本界面
  4:预留级别;可同3级别
  5:多用户模式,正常模式;图形界面
  6:重启

默认级别:3, 5

切换级别:init #

查看级别:
  [root@node101.yinzhengjie.org.cn ~]# runlevel
  N 3
  [root@node101.yinzhengjie.org.cn ~]#
  [root@node101.yinzhengjie.org.cn ~]# who -r
  run-level 3 2019-11-28 06:20
  [root@node101.yinzhengjie.org.cn ~]#

温馨提示:
  运行级别说白就是不同服务的组合而已,我们可以通过修改脚本的方式将Linux操作系统的3模式和5模式启动的服务互换,试验一下即可,生产环境不建议大家这样干,基本上保持默认即可。
  如果有使用RedHat 5的小伙伴且开机自启动了sendmail服务,建议大家将主机名和127.0.0.1进行解析(修改"/etc/hosts"文件即可),这样可以大大提升开机的速度。
3>.init初始化
  init读取其初始化文件:/etc/inittab
  初始运行级别(RUN LEVEL)
  系统初始化脚本
  对应运行级别的脚本目录
  捕获某个关键字顺序
  定义UPS电源终端/恢复脚本
  在虚拟控制台生成mingetty(mingetty会自动调用login程序)
  在运行级别5初始化X
4>.CentOS 5的inittab文件
配置文件:
  /etc/inittab

每一行格式: id:runlevel:action:process
  id:是惟一标识该项的字符序列
  runlevels: 定义了操作所使用的运行级别
  action: 指定了要执行的特定操作
    wait: 切换至此级别运行一次
    respawn:此process终止,就重新启动之
    initdefault:设定默认运行级别;process省略
    sysinit:设定系统初始化方式
  process:定义了要执行的进程

示例:
  id:3:initdefault:
  si::sysinit:/etc/rc.d/rc.sysinit
  l0:0:wait:/etc/rc.d/rc 0
  l1:1:wait:/etc/rc.d/rc 1...
  l6:6:wait:/etc/rc.d/rc 6
  ca::ctrlaltdel:/sbin/shutdown -t3 -r now
5>.CentOS 6 /etc/inittab和相关文件
/etc/inittab
  设置系统默认的运行级别
  id:3:initdefault:

示例:
  破解CentOS5和6的root口令

/etc/init/control-alt-delete.conf
/etc/init/tty.conf
/etc/init/start-ttys.conf
/etc/init/rc.conf
/etc/init/prefdm.conf
6>./etc/rc.d/rc.sysinit: 系统初始化脚本
/etc/rc.d/rc.sysinit: 系统初始化脚本工作大致流程如下:
  (1) 设置主机名
  (2) 设置欢迎信息
  (3) 激活udev和selinux
  (4) 挂载/etc/fstab文件中定义的文件系统
  (5) 检测根文件系统,并以读写方式重新挂载根文件系统
  (6) 设置系统时钟
  (7) 激活swap设备
  (8) 根据/etc/sysctl.conf文件设置内核参数
  (9) 激活lvm及software raid设备
  (10) 加载额外设备的驱动程序
  (11) 清理操作

说明:rc N --> 意味着读取/etc/rc.d/rcN.d/
  K*: K##*:##运行次序;数字越小,越先运行;数字越小的服务,通常为依赖到别的服务
  S*: S##*:##运行次序;数字越小,越先运行;数字越小的服务,通常为被依赖到的服务

  源代码如下:
    for srv in /etc/rc.d/rcN.d/K*; do  #说明以K开头的服务都不开启
      ...
      $srv stop
    done
    for srv in /etc/rc.d/rcN.d/S*; do   #说明以S开头的服务才开启
      ...
      $srv start
    done
四.服务管理(ntsysv和chkconfig实战)
1>.ntsysv命令
[root@yinzhengjie ~]# cat /etc/redhat-release
CentOS release 6.10 (Final)
[root@yinzhengjie ~]#
[root@yinzhengjie ~]# uname -r
2.6.32-754.el6.x86_64
[root@yinzhengjie ~]#
[root@yinzhengjie ~]# uname -m
x86_64
[root@yinzhengjie ~]#
[root@yinzhengjie ~]# runlevel      #查看当前运行级别为5
N 5
[root@yinzhengjie ~]#
[root@yinzhengjie ~]# ls /etc/rc5.d/   #查看5运行级别服务目录下对应的开机启动服务(K开头的不启动,S开头的启动),需要注意的是该目录下所有文件均是软连接文件哟~
K01smartd        K15httpd       K74ntpd            K88sssd          S01sysstat       S11auditd       S15mdmonitor         S25cups       S50bluetooth       S83abrt-ccpp
K02oddjobd       K50dnsmasq     K75ntpdate         K89netconsole    S02lvm2-monitor  S11portreserve  S22messagebus        S25netfs      S50kdump           S90crond
K05wdaemon       K60nfs         K75quota_nld       K89rdisc         S05rdma          S12rsyslog      S23NetworkManager    S26acpid      S55sshd            S95atd
K10psacct        K61nfs-rdma    K76ypbind          K92pppoe-server  S08ip6tables     S13cpuspeed     S24nfslock           S26haldaemon  S70spice-vdagentd  S99certmonger
K10saslauthd     K69rpcsvcgssd  K84wpa_supplicant  K95firstboot     S08iptables      S13irqbalance   S24rpcgssd           S26udev-post  S80postfix         S99local
K15htcacheclean  K73winbind     K87restorecond     K99rngd          S10network       S13rpcbind      S25blk-availability  S28autofs     S82abrtd
[root@yinzhengjie ~]#
[root@yinzhengjie ~]# ll /etc/rc5.d/ | grep atd    #很显然,在5这个运行级别中,atd服务是开机启动的,因为它是S开头的,接下来我们使用"ntsysv"命令将该服务关闭掉,如下图所示。
lrwxrwxrwx. 1 root root 13 Dec 1 07:30 S95atd -> ../init.d/atd
[root@yinzhengjie ~]#

[root@yinzhengjie ~]# cat /etc/redhat-release
CentOS release 6.10 (Final)
[root@yinzhengjie ~]#
[root@yinzhengjie ~]# uname -r
2.6.32-754.el6.x86_64
[root@yinzhengjie ~]#
[root@yinzhengjie ~]# uname -m
x86_64
[root@yinzhengjie ~]#
[root@yinzhengjie ~]# runlevel
N 5
[root@yinzhengjie ~]#
[root@yinzhengjie ~]# ll /etc/rc5.d/ | grep atd        #不难发现,"atd"服务由之前的"S"开头变为"K"开头的服务啦~
lrwxrwxrwx. 1 root root 13 Dec  2 05:28 K05atd -> ../init.d/atd
[root@yinzhengjie ~]#
[root@yinzhengjie ~]# ll /etc/rc3.d/ | grep atd        #不难发现,"在运行级别为"3"的atd服务并没有被关闭,依旧是以"S"开头的,因此使用"ntsysv"命令对各个运行级别是单独修改的,即它同时只能改一个模式的,修改起来比较麻烦。因此我们推荐使用chkconfig命令来管理运行级别。
lrwxrwxrwx. 1 root root 13 Dec 1 07:30 S95atd -> ../init.d/atd
[root@yinzhengjie ~]#
2>.chkconfig命令常用选项
[root@yinzhengjie ~]# cat /etc/redhat-release
CentOS release 6.10 (Final)
[root@yinzhengjie ~]#
[root@yinzhengjie ~]# uname -r
2.6.32-754.el6.x86_64
[root@yinzhengjie ~]#
[root@yinzhengjie ~]# uname -m
x86_64
[root@yinzhengjie ~]#
[root@yinzhengjie ~]# chkconfig --list        #查看当前服务器所有服务器各个运行级别是否开机自启动,"on"表示开机自启动,"off"表示开机不启动
NetworkManager     0:off    1:off    2:on    3:on    4:on    5:on    6:off
abrt-ccpp          0:off    1:off    2:off    3:on    4:off    5:on    6:off
abrtd              0:off    1:off    2:off    3:on    4:off    5:on    6:off
acpid              0:off    1:off    2:on    3:on    4:on    5:on    6:off
atd                0:off    1:off    2:off    3:on    4:on    5:off    6:off
auditd             0:off    1:off    2:on    3:on    4:on    5:on    6:off
autofs             0:off    1:off    2:off    3:on    4:on    5:on    6:off
blk-availability    0:off    1:on    2:on    3:on    4:on    5:on    6:off
bluetooth          0:off    1:off    2:off    3:on    4:on    5:on    6:off
certmonger         0:off    1:off    2:off    3:on    4:on    5:on    6:off
cpuspeed           0:off    1:on    2:on    3:on    4:on    5:on    6:off
crond              0:off    1:off    2:on    3:on    4:on    5:on    6:off
cups               0:off    1:off    2:on    3:on    4:on    5:on    6:off
dnsmasq            0:off    1:off    2:off    3:off    4:off    5:off    6:off
firstboot          0:off    1:off    2:off    3:off    4:off    5:off    6:off
haldaemon          0:off    1:off    2:off    3:on    4:on    5:on    6:off
htcacheclean       0:off    1:off    2:off    3:off    4:off    5:off    6:off
httpd              0:off    1:off    2:off    3:off    4:off    5:off    6:off
ip6tables          0:off    1:off    2:on    3:on    4:on    5:on    6:off
iptables           0:off    1:off    2:on    3:on    4:on    5:on    6:off
irqbalance         0:off    1:off    2:off    3:on    4:on    5:on    6:off
kdump              0:off    1:off    2:on    3:on    4:on    5:off    6:off
lvm2-monitor       0:off    1:on    2:on    3:on    4:on    5:on    6:off
mdmonitor          0:off    1:off    2:on    3:on    4:on    5:on    6:off
messagebus         0:off    1:off    2:on    3:on    4:on    5:on    6:off
netconsole         0:off    1:off    2:off    3:off    4:off    5:off    6:off
netfs              0:off    1:off    2:off    3:on    4:on    5:on    6:off
network            0:off    1:off    2:on    3:on    4:on    5:on    6:off
nfs                0:off    1:off    2:off    3:off    4:off    5:off    6:off
nfs-rdma           0:off    1:off    2:off    3:off    4:off    5:off    6:off
nfslock            0:off    1:off    2:off    3:on    4:on    5:on    6:off
ntpd               0:off    1:off    2:off    3:off    4:off    5:off    6:off
ntpdate            0:off    1:off    2:off    3:off    4:off    5:off    6:off
oddjobd            0:off    1:off    2:off    3:off    4:off    5:off    6:off
portreserve        0:off    1:off    2:on    3:on    4:on    5:on    6:off
postfix            0:off    1:off    2:on    3:on    4:on    5:on    6:off
pppoe-server       0:off    1:off    2:off    3:off    4:off    5:off    6:off
psacct             0:off    1:off    2:off    3:off    4:off    5:off    6:off
quota_nld          0:off    1:off    2:off    3:off    4:off    5:off    6:off
rdisc              0:off    1:off    2:off    3:off    4:off    5:off    6:off
rdma               0:off    1:on    2:on    3:on    4:on    5:on    6:off
restorecond        0:off    1:off    2:off    3:off    4:off    5:off    6:off
rngd               0:off    1:off    2:off    3:off    4:off    5:off    6:off
rpcbind            0:off    1:off    2:on    3:on    4:on    5:on    6:off
rpcgssd            0:off    1:off    2:off    3:on    4:on    5:on    6:off
rpcsvcgssd         0:off    1:off    2:off    3:off    4:off    5:off    6:off
rsyslog            0:off    1:off    2:on    3:on    4:on    5:on    6:off
saslauthd          0:off    1:off    2:off    3:off    4:off    5:off    6:off
smartd             0:off    1:off    2:off    3:off    4:off    5:off    6:off
spice-vdagentd     0:off    1:off    2:off    3:off    4:off    5:on    6:off
sshd               0:off    1:off    2:on    3:on    4:on    5:on    6:off
sssd               0:off    1:off    2:off    3:off    4:off    5:off    6:off
sysstat            0:off    1:on    2:on    3:on    4:on    5:on    6:off
udev-post          0:off    1:on    2:on    3:on    4:on    5:on    6:off
wdaemon            0:off    1:off    2:off    3:off    4:off    5:off    6:off
winbind            0:off    1:off    2:off    3:off    4:off    5:off    6:off
wpa_supplicant     0:off    1:off    2:off    3:off    4:off    5:off    6:off
ypbind             0:off    1:off    2:off    3:off    4:off    5:off    6:off
[root@yinzhengjie ~]#
[root@yinzhengjie ~]# who -r       #很显然,当前运行级别为5
run-level 5 2019-12-01 19:45
[root@yinzhengjie ~]#
[root@yinzhengjie ~]# chkconfig --list | grep atd      #不拿发现,我们上面使用"ntsysv"命令将运行级别为5的atd服务关闭了,也验证运行级别为3的服务是开启的,但是我们使用chkconfig命令可以一目了然的看出各个运行级别atd服务是否开机启动。
atd 0:off    1:off    2:off    3:on    4:on    5:off    6:off
[root@yinzhengjie ~]#
[root@yinzhengjie ~]# ll /etc/rc1.d/ | grep atd        #接下来就是咱们要chkconfig命令的验证,发现各个运行级别对应的软连接开头和上面显示的相符合,以"K"开头的运行级别表示开机不启动,而以"S"开头的运行级别表示开机启动服务
lrwxrwxrwx. 1 root root 13 Dec 1 07:30 K05atd -> ../init.d/atd
[root@yinzhengjie ~]#
[root@yinzhengjie ~]# ll /etc/rc2.d/ | grep atd
lrwxrwxrwx. 1 root root 13 Dec 1 07:30 K05atd -> ../init.d/atd
[root@yinzhengjie ~]#
[root@yinzhengjie ~]# ll /etc/rc3.d/ | grep atd
lrwxrwxrwx. 1 root root 13 Dec 1 07:30 S95atd -> ../init.d/atd
[root@yinzhengjie ~]#
[root@yinzhengjie ~]# ll /etc/rc4.d/ | grep atd
lrwxrwxrwx. 1 root root 13 Dec 1 07:30 S95atd -> ../init.d/atd
[root@yinzhengjie ~]#
[root@yinzhengjie ~]# ll /etc/rc5.d/ | grep atd
lrwxrwxrwx. 1 root root 13 Dec 2 05:28 K05atd -> ../init.d/atd
[root@yinzhengjie ~]#
[root@yinzhengjie ~]# ll /etc/rc6.d/ | grep atd
lrwxrwxrwx. 1 root root 13 Dec 1 07:30 K05atd -> ../init.d/atd
[root@yinzhengjie ~]#
[root@yinzhengjie ~]# runlevel
N 5
[root@yinzhengjie ~]#
[root@yinzhengjie ~]# chkconfig --list atd        #只查看某个服务的各个运行级别是否开机自启动
atd                0:off    1:off    2:on    3:on    4:on    5:on    6:off
[root@yinzhengjie ~]#
[root@yinzhengjie ~]# service atd status         #通过上面两条命令可以知道运行级别为5的服务是开机自启动atd服务的,且目前处于运行级别为5的模式,atd服务目前是启动着的
atd (pid  2229) is running...
[root@yinzhengjie ~]#
[root@yinzhengjie ~]#
[root@yinzhengjie ~]# ll /etc/rc1.d/ | grep atd        #接下来就是咱们要chkconfig命令的验证,发现各个运行级别对应的软连接开头和上面显示的相符合,以"K"开头的运行级别表示开机不启动,而以"S"开头的运行级别表示开机启动服务
lrwxrwxrwx. 1 root root 13 Dec 1 07:30 K05atd -> ../init.d/atd
[root@yinzhengjie ~]#
[root@yinzhengjie ~]# ll /etc/rc2.d/ | grep atd
lrwxrwxrwx. 1 root root 13 Dec 1 07:30 K05atd -> ../init.d/atd
[root@yinzhengjie ~]#
[root@yinzhengjie ~]# ll /etc/rc3.d/ | grep atd
lrwxrwxrwx. 1 root root 13 Dec 1 07:30 S95atd -> ../init.d/atd
[root@yinzhengjie ~]#
[root@yinzhengjie ~]# ll /etc/rc4.d/ | grep atd
lrwxrwxrwx. 1 root root 13 Dec 1 07:30 S95atd -> ../init.d/atd
[root@yinzhengjie ~]#
[root@yinzhengjie ~]# ll /etc/rc5.d/ | grep atd
lrwxrwxrwx. 1 root root 13 Dec 2 05:28 K05atd -> ../init.d/atd
[root@yinzhengjie ~]#
[root@yinzhengjie ~]# ll /etc/rc6.d/ | grep atd
lrwxrwxrwx. 1 root root 13 Dec 1 07:30 K05atd -> ../init.d/atd
[root@yinzhengjie ~]#
[root@yinzhengjie ~]# chkconfig --list atd          #只查看"atd"服务的运行级别
atd                0:off    1:off    2:off    3:on    4:on    5:off    6:off
[root@yinzhengjie ~]#
[root@yinzhengjie ~]# chkconfig --level 135 atd on     #我们只把135运行级别对应的atd服务设置为开机自启动
[root@yinzhengjie ~]#
[root@yinzhengjie ~]# chkconfig --list atd
atd                0:off    1:on    2:off    3:on    4:on    5:on    6:off
[root@yinzhengjie ~]#
[root@yinzhengjie ~]# ll /etc/rc1.d/ | grep atd
lrwxrwxrwx. 1 root root 13 Dec 2 05:49 S95atd -> ../init.d/atd
[root@yinzhengjie ~]#
[root@yinzhengjie ~]# ll /etc/rc2.d/ | grep atd
lrwxrwxrwx. 1 root root 13 Dec 1 07:30 K05atd -> ../init.d/atd
[root@yinzhengjie ~]#
[root@yinzhengjie ~]# ll /etc/rc3.d/ | grep atd
lrwxrwxrwx. 1 root root 13 Dec 2 05:49 S95atd -> ../init.d/atd
[root@yinzhengjie ~]#
[root@yinzhengjie ~]# ll /etc/rc4.d/ | grep atd
lrwxrwxrwx. 1 root root 13 Dec 1 07:30 S95atd -> ../init.d/atd
[root@yinzhengjie ~]#
[root@yinzhengjie ~]# ll /etc/rc5.d/ | grep atd
lrwxrwxrwx. 1 root root 13 Dec 2 05:49 S95atd -> ../init.d/atd
[root@yinzhengjie ~]#
[root@yinzhengjie ~]# ll /etc/rc6.d/ | grep atd
lrwxrwxrwx. 1 root root 13 Dec 1 07:30 K05atd -> ../init.d/atd
[root@yinzhengjie ~]#
[root@yinzhengjie ~]#
[root@yinzhengjie ~]# ll /etc/rc1.d/ | grep atd
lrwxrwxrwx. 1 root root 13 Dec  1 07:30 K05atd -> ../init.d/atd
[root@yinzhengjie ~]#
[root@yinzhengjie ~]# ll /etc/rc2.d/ | grep atd
lrwxrwxrwx. 1 root root 13 Dec  1 07:30 K05atd -> ../init.d/atd
[root@yinzhengjie ~]#
[root@yinzhengjie ~]# ll /etc/rc3.d/ | grep atd
lrwxrwxrwx. 1 root root 13 Dec  1 07:30 S95atd -> ../init.d/atd
[root@yinzhengjie ~]#
[root@yinzhengjie ~]# ll /etc/rc4.d/ | grep atd
lrwxrwxrwx. 1 root root 13 Dec  1 07:30 S95atd -> ../init.d/atd
[root@yinzhengjie ~]#
[root@yinzhengjie ~]# ll /etc/rc5.d/ | grep atd
lrwxrwxrwx. 1 root root 13 Dec  2 05:28 K05atd -> ../init.d/atd
[root@yinzhengjie ~]#
[root@yinzhengjie ~]# ll /etc/rc6.d/ | grep atd
lrwxrwxrwx. 1 root root 13 Dec  1 07:30 K05atd -> ../init.d/atd
[root@yinzhengjie ~]#
[root@yinzhengjie ~]# chkconfig --list atd
atd                0:off    1:on    2:off    3:on    4:on    5:on    6:off
[root@yinzhengjie ~]#
[root@yinzhengjie ~]# chkconfig --level 1345 atd off      #我们只将1345运行级别对应的atd服务开机不启动
[root@yinzhengjie ~]#
[root@yinzhengjie ~]# chkconfig --list atd
atd                0:off    1:off    2:off    3:off    4:off    5:off    6:off
[root@yinzhengjie ~]#
[root@yinzhengjie ~]# ll /etc/rc6.d/ | grep atd
lrwxrwxrwx. 1 root root 13 Dec  1 07:30 K05atd -> ../init.d/atd
[root@yinzhengjie ~]#
[root@yinzhengjie ~]# ll /etc/rc5.d/ | grep atd
lrwxrwxrwx. 1 root root 13 Dec  2 05:54 K05atd -> ../init.d/atd
[root@yinzhengjie ~]#
[root@yinzhengjie ~]# ll /etc/rc4.d/ | grep atd
lrwxrwxrwx. 1 root root 13 Dec  2 05:54 K05atd -> ../init.d/atd
[root@yinzhengjie ~]#
[root@yinzhengjie ~]# ll /etc/rc3.d/ | grep atd
lrwxrwxrwx. 1 root root 13 Dec  2 05:54 K05atd -> ../init.d/atd
[root@yinzhengjie ~]#
[root@yinzhengjie ~]# ll /etc/rc2.d/ | grep atd
lrwxrwxrwx. 1 root root 13 Dec  1 07:30 K05atd -> ../init.d/atd
[root@yinzhengjie ~]#
[root@yinzhengjie ~]# ll /etc/rc1.d/ | grep atd
lrwxrwxrwx. 1 root root 13 Dec  2 05:54 K05atd -> ../init.d/atd
[root@yinzhengjie ~]#
[root@yinzhengjie ~]# ll /etc/rc0.d/ | grep atd
lrwxrwxrwx. 1 root root 13 Dec  1 07:30 K05atd -> ../init.d/atd
[root@yinzhengjie ~]#
[root@yinzhengjie ~]#
[root@yinzhengjie ~]# chkconfig --list atd
atd                0:off    1:off    2:off    3:off    4:off    5:off    6:off
[root@yinzhengjie ~]#
[root@yinzhengjie ~]# chkconfig atd on          #该命令默认会开启2345运行级别对应的atd服务开机启动
[root@yinzhengjie ~]#
[root@yinzhengjie ~]# chkconfig --list atd
atd                0:off    1:off    2:on    3:on    4:on    5:on    6:off
[root@yinzhengjie ~]#
[root@yinzhengjie ~]#
[root@yinzhengjie ~]# runlevel
N 5
[root@yinzhengjie ~]#
[root@yinzhengjie ~]# ls /etc/rc5.d/      #我们知道该目录是存放运行级别为5的服务对应的软连接,以"K"开头表示开机不自动启动,而以"S"开头表示开机自启动该服务。那以"S"开头后对应的数字是什么意思呢?
K01smartd        K60nfs         K84wpa_supplicant  S01sysstat       S12rsyslog         S24nfslock           S28autofs          S95atd
K02oddjobd       K61nfs-rdma    K87restorecond     S02lvm2-monitor  S13cpuspeed        S24rpcgssd           S50bluetooth       S99certmonger
K05wdaemon       K69rpcsvcgssd  K88sssd            S05rdma          S13irqbalance      S25blk-availability  S55sshd            S99local
K10psacct        K73winbind     K89netconsole      S08ip6tables     S13rpcbind         S25cups              S70spice-vdagentd
K10saslauthd     K74ntpd        K89rdisc           S08iptables      S15mdmonitor       S25netfs             S80postfix
K15htcacheclean  K75ntpdate     K92pppoe-server    S10network       S-1kdump           S26acpid             S82abrtd
K15httpd         K75quota_nld   K95firstboot       S11auditd        S22messagebus      S26haldaemon         S83abrt-ccpp
K50dnsmasq       K76ypbind      K99rngd            S11portreserve   S23NetworkManager  S26udev-post         S90crond
[root@yinzhengjie ~]#
[root@yinzhengjie ~]# ls /etc/rc5.d/ | grep S    #我们先看一下开机自启动的服务,不难发现S开头后面对应着具体的数字,而这个数字就表示服务器开机启动时所需要的启动脚本的次序,如果我们在编写自启动脚本时,应该尽量要大于系统自带服务对应的数字哟,因为有可能咱们的服务依赖于系统自带的服务呢,若服务器自带的服务没有启动可能会导致咱们也无法正常启动自定义的服务。
S01sysstat
S02lvm2-monitor
S05rdma
S08ip6tables
S08iptables
S10network
S11auditd
S11portreserve
S12rsyslog
S13cpuspeed
S13irqbalance
S13rpcbind
S15mdmonitor
S-1kdump
S22messagebus
S23NetworkManager
S24nfslock
S24rpcgssd
S25blk-availability
S25cups
S25netfs
S26acpid
S26haldaemon
S26udev-post
S28autofs
S50bluetooth
S55sshd
S70spice-vdagentd
S80postfix
S82abrtd
S83abrt-ccpp
S90crond
S95atd
S99certmonger
S99local
[root@yinzhengjie ~]#
[root@yinzhengjie ~]# /etc/init.d/atd
Usage: /etc/init.d/atd {start|stop|status|restart|condrestart|try-restart|reload|force-reload}
[root@yinzhengjie ~]#
[root@yinzhengjie ~]# /etc/init.d/atd restart
Stopping atd:                                              [  OK  ]
Starting atd:                                              [  OK  ]
[root@yinzhengjie ~]#
[root@yinzhengjie ~]# /etc/init.d/atd status
atd (pid  4829) is running...
[root@yinzhengjie ~]#
[root@yinzhengjie ~]# /etc/init.d/atd stop
Stopping atd:                                              [  OK  ]
[root@yinzhengjie ~]#
[root@yinzhengjie ~]# /etc/init.d/atd status
atd is stopped
[root@yinzhengjie ~]#
[root@yinzhengjie ~]# service atd status
atd is stopped
[root@yinzhengjie ~]#
[root@yinzhengjie ~]# service atd start
Starting atd:                                              [  OK  ]
[root@yinzhengjie ~]#
[root@yinzhengjie ~]# /etc/init.d/atd status
atd (pid  4898) is running...
[root@yinzhengjie ~]#
[root@yinzhengjie ~]# service atd status
atd (pid  4898) is running...
[root@yinzhengjie ~]#
[root@yinzhengjie ~]# service atd restart
Stopping atd:                                              [  OK  ]
Starting atd:                                              [  OK  ]
[root@yinzhengjie ~]#
[root@yinzhengjie ~]# /etc/init.d/atd status
atd (pid  4945) is running...
[root@yinzhengjie ~]#
[root@yinzhengjie ~]# service atd status          #经过测试发现,该命令是调用了"/etc/init.d/atd"脚本来管理atd服务,而咱们使用server命令一般情况下传参为"status,stop,start,restart"。但"/etc/init.d/atd"脚本却会支持更多的参数哟~
atd (pid  4945) is running...
[root@yinzhengjie ~]#
[root@yinzhengjie ~]#
3>.编写自定义启动脚本并交给chkconfig命令管理实战
[root@yinzhengjie ~]# cat /etc/init.d/myServer      #编写自定义服务脚本
#!/bin/bash
#chkconfig: 35 96 03
#description:        The test service
#********************************************************************
#注意,上面的chkconfig和desciption是启动脚本必须写的。"*"内部的版权信息可以不用写。
#chkconfig后有三个参数,第一个参数是指定运行级别,我的这个测试脚本写的是3和5运行级别开机自启动,如果你写成"-"则表示所有服务均不开机自启动。第二个参数表示开机自启动服务(以"S"开头的软连接)对应的数字,第三个参数表示关机时关闭服务(以"K"开头的软连接)时对应的数字,注意第二,三个参数不难和系统对应的数字重复哟~
#description表示对当前脚本的描述信息,描述该脚本的作用。
#
#Author:        yinzhengjie
#QQ:             1053419035
#Date:             2019-12-02
#FileName:        myServer
#URL:             http://www.cnblogs.com/yinzhengjie
#Copyright notice:     original works, no reprint! Otherwise, legal liability will be investigated.
#********************************************************************

. /etc/init.d/functions      #导入系统函数库,我们在当前脚本需要用到"action"函数

case $1 in
start)
    touch /var/lock/subsys/myServer
    action "Starting myServer" true
    ;;
stop)
    rm -f /var/lock/subsys/myServer
    action "Stopping myServer" true
    ;;
restart)
    action "Starting myServer" true
    action "Stopping myServer" true
    ;;
status)
    if [ -f /var/lock/subsys/myServer ];then
        echo "myServer is running..."
    else
        echo "myServer is stopped"
    fi
    ;;
*)
    echo "Usage: /etc/init.d/myServer {start|stop|status|restart}"
    ;;
esac
[root@yinzhengjie ~]#
[root@yinzhengjie ~]# bash /etc/init.d/myServer
Usage: /etc/init.d/myServer {start|stop|status|restart}
[root@yinzhengjie ~]#
[root@yinzhengjie ~]# bash /etc/init.d/myServer status
myServer is stopping...
[root@yinzhengjie ~]# bash /etc/init.d/myServer start
Starting myServer                                          [  OK  ]
[root@yinzhengjie ~]# bash /etc/init.d/myServer stop
Stopping myServer                                          [  OK  ]
[root@yinzhengjie ~]#
[root@yinzhengjie ~]# bash /etc/init.d/myServer restart
Starting myServer                                          [  OK  ]
Stopping myServer                                          [  OK  ]
[root@yinzhengjie ~]#
[root@yinzhengjie ~]#
[root@yinzhengjie ~]# service myServer status
env: /etc/init.d/myServer: Permission denied
[root@yinzhengjie ~]#
[root@yinzhengjie ~]# chmod +x /etc/init.d/myServer     #需要给咱们自定义启动脚本添加执行权限
[root@yinzhengjie ~]#
[root@yinzhengjie ~]# service myServer status        #只要咱们把启动脚本放在"/etc/init.d"目录下,九可以使用service命令来管理咱们自定义的服务啦,前提是别忘记给脚本添加执行权限哟~
myServer is stopped
[root@yinzhengjie ~]#
[root@yinzhengjie ~]# service myServer start
Starting myServer                                          [  OK  ]
[root@yinzhengjie ~]#
[root@yinzhengjie ~]# service myServer status
myServer is running...
[root@yinzhengjie ~]#
[root@yinzhengjie ~]# service myServer restart
Starting myServer                                          [  OK  ]
Stopping myServer                                          [  OK  ]
[root@yinzhengjie ~]#
[root@yinzhengjie ~]# service myServer status
myServer is running...
[root@yinzhengjie ~]#
[root@yinzhengjie ~]# service myServer stop
Stopping myServer                                          [  OK  ]
[root@yinzhengjie ~]#
[root@yinzhengjie ~]# service myServer status
myServer is stopped
[root@yinzhengjie ~]#
[root@yinzhengjie ~]# chkconfig --list myServer        #我们发现在"/etc/init.d"目录下编写的脚本虽然可以被service命令管理但并不会交给chkconfig命令来管理,需要执行相应的命令才可以,根据下面的提示咱们就知道该敲击啥了。
service myServer supports chkconfig, but is not referenced in any runlevel (run 'chkconfig --add myServer')
[root@yinzhengjie ~]#
[root@yinzhengjie ~]# chkconfig --add myServer        #我们编写的脚本是支持"chkconfig"功能的,这是因为咱们再脚本中声明了chkconfig的相关参数,使用"-add"就会添加对运行级别的引用。
[root@yinzhengjie ~]#
[root@yinzhengjie ~]# chkconfig --list myServer        #我们发现只有在3和5运行级别为ON,这就是归功于咱们在脚本中定义chkconfig的第一个参数
myServer           0:off    1:off    2:off    3:on    4:off    5:on    6:off
[root@yinzhengjie ~]#
[root@yinzhengjie ~]#
[root@yinzhengjie ~]# runlevel
N 5
[root@yinzhengjie ~]#
[root@yinzhengjie ~]# ll /etc/rc5.d/ | grep myServer    #执行上述命令后,咱们发现在当前运行级别目录下生成了对应以"S"开头的软链接啦~(发现后面那个数字了没?那就是归功于咱们脚本中第二个参数哟~)
lrwxrwxrwx. 1 root root 18 Dec  2 06:57 S96myServer -> ../init.d/myServer
[root@yinzhengjie ~]#
[root@yinzhengjie ~]# ll /etc/rc3.d/ | grep myServer    #我们发现运行级别为3的模式中对应的软链家是以"S"开头,说明该级别是开机自启动服务。
lrwxrwxrwx. 1 root root 18 Dec  2 07:07 S96myServer -> ../init.d/myServer
[root@yinzhengjie ~]#
[root@yinzhengjie ~]# chkconfig --list myServer
myServer           0:off    1:off    2:off    3:on    4:off    5:on    6:off
[root@yinzhengjie ~]#
[root@yinzhengjie ~]# chkconfig --level 3 myServer off  #我们将运行级别为3的myServer服务关闭掉,注意观察"/etc/rc3.d/"目录下对应的软链接文件哟~
[root@yinzhengjie ~]#
[root@yinzhengjie ~]# chkconfig --list myServer
myServer           0:off    1:off    2:off    3:off    4:off    5:on    6:off
[root@yinzhengjie ~]#
[root@yinzhengjie ~]# ll /etc/rc3.d/ | grep myServer    #我们发现该目录对应的软链接文件并不是以"S"开头啦,而是以"K"开头,说明该运行级别服务是不开机启动的,注意字母"K"后面的数字,这归功于咱们自定脚本中chkconfig的第三个参数哟~
lrwxrwxrwx. 1 root root 18 Dec  2 07:08 K03myServer -> ../init.d/myServer
[root@yinzhengjie ~]#
[root@yinzhengjie ~]# ll /etc/rc5.d/ | grep myServer       #虽说咱们将自定义的myServer脚本运行级别为3的关闭啦,但是运行级别为5的依旧是开机自启动的哟~
lrwxrwxrwx. 1 root root 18 Dec  2 06:57 S96myServer -> ../init.d/myServer
[root@yinzhengjie ~]#
[root@yinzhengjie ~]# chkconfig --list | grep myServer
myServer           0:off    1:off    2:off    3:off    4:off    5:on    6:off
[root@yinzhengjie ~]#
[root@yinzhengjie ~]# ll /etc/rc*.d/*myServer
lrwxrwxrwx. 1 root root 18 Dec  2 06:57 /etc/rc0.d/K03myServer -> ../init.d/myServer
lrwxrwxrwx. 1 root root 18 Dec  2 06:57 /etc/rc1.d/K03myServer -> ../init.d/myServer
lrwxrwxrwx. 1 root root 18 Dec  2 06:57 /etc/rc2.d/K03myServer -> ../init.d/myServer
lrwxrwxrwx. 1 root root 18 Dec  2 07:08 /etc/rc3.d/K03myServer -> ../init.d/myServer
lrwxrwxrwx. 1 root root 18 Dec  2 06:57 /etc/rc4.d/K03myServer -> ../init.d/myServer
lrwxrwxrwx. 1 root root 18 Dec  2 06:57 /etc/rc5.d/S96myServer -> ../init.d/myServer
lrwxrwxrwx. 1 root root 18 Dec  2 06:57 /etc/rc6.d/K03myServer -> ../init.d/myServer
[root@yinzhengjie ~]#
[root@yinzhengjie ~]# chkconfig --del myServer          #使用"--del"就会删除对运行级别的引用,其实本质上是删除myServer对应"/etc/rc*.d/"目录下的软链接。
[root@yinzhengjie ~]#
[root@yinzhengjie ~]# chkconfig --list | grep myServer
[root@yinzhengjie ~]#
[root@yinzhengjie ~]# ll /etc/rc*.d/*myServer
ls: cannot access /etc/rc*.d/*myServer: No such file or directory
[root@yinzhengjie ~]#
[root@yinzhengjie ~]#
五.xinetd管理的服务(在CentOS 7中有对应的替代产品,不推荐使用它了)
1>.xinetd概述
  我们知道chkconfig命令可以让服务开机自启动或者不启动,若启动的服务一年四季都没人访问或者访问次数屈指可数这无疑是要浪费服务器内存空间的。于是对不经常访问的服务就有了一种新的设计思想,即瞬态服务(也称之为非独立服务)。

  所谓瞬态服务(非独立服务)就是平时开机不启动,但需要的时候,即有人访问时可以单独找一个服务将其唤醒并对外提供服务,服务完毕后又可以关闭了。

  在Unix操作系统上叫inted进程,在Linux操作系统中,瞬态(Transient)服务(非独立服务)被xinetd进程所管理,进入的请求首先被xinetd代理。telnet服务就依赖于xinetd服务。

  被xinetd管理的服务优点是可以不开机启动,而是当有人访问某个服务时,xinetd接收到请求后会自动去启动该请求需要访问的服务,从而达到节省资源的效果。

  配置文件:
    /etc/xinetd.conf
    /etc/xinetd.d/<service>
2>.telnet超级守护进程案例
[root@yinzhengjie ~]# yum -y install telnet-server          #安装telnet服务时会默认按住xinetd服务哟~
Loaded plugins: fastestmirror, refresh-packagekit, security
Setting up Install Process
Loading mirror speeds from cached hostfile
 * base: mirror.jdcloud.com
 * extras: mirrors.huaweicloud.com
 * updates: mirrors.huaweicloud.com
Resolving Dependencies
--> Running transaction check
---> Package telnet-server.x86_64 1:0.17-48.el6 will be installed
--> Processing Dependency: xinetd for package: 1:telnet-server-0.17-48.el6.x86_64
--> Running transaction check
---> Package xinetd.x86_64 2:2.3.14-40.el6 will be installed
--> Finished Dependency Resolution

Dependencies Resolved

===============================================================================================================================================
 Package                              Arch                          Version                                  Repository                   Size
===============================================================================================================================================
Installing:
 telnet-server                        x86_64                        1:0.17-48.el6                            base                         37 k
Installing for dependencies:
 xinetd                               x86_64                        2:2.3.14-40.el6                          base                        122 k

Transaction Summary
===============================================================================================================================================
Install       2 Package(s)

Total download size: 159 k
Installed size: 313 k
Downloading Packages:
(1/2): telnet-server-0.17-48.el6.x86_64.rpm                                                                             |  37 kB     00:00
(2/2): xinetd-2.3.14-40.el6.x86_64.rpm                                                                                  | 122 kB     00:00
-----------------------------------------------------------------------------------------------------------------------------------------------
Total                                                                                                           31 kB/s | 159 kB     00:05
warning: rpmts_HdrFromFdno: Header V3 RSA/SHA1 Signature, key ID c105b9de: NOKEY
Retrieving key from file:///etc/pki/rpm-gpg/RPM-GPG-KEY-CentOS-6
Importing GPG key 0xC105B9DE:
 Userid : CentOS-6 Key (CentOS 6 Official Signing Key) <centos-6-key@centos.org>
 Package: centos-release-6-10.el6.centos.12.3.x86_64 (@anaconda-CentOS-201806291108.x86_64/6.10)
 From   : /etc/pki/rpm-gpg/RPM-GPG-KEY-CentOS-6
Running rpm_check_debug
Running Transaction Test
Transaction Test Succeeded
Running Transaction
  Installing : 2:xinetd-2.3.14-40.el6.x86_64                                                                                                                            1/2
  Installing : 1:telnet-server-0.17-48.el6.x86_64                                                                                                                       2/2
  Verifying  : 1:telnet-server-0.17-48.el6.x86_64                                                                                                                       1/2
  Verifying  : 2:xinetd-2.3.14-40.el6.x86_64                                                                                                                            2/2

Installed:
  telnet-server.x86_64 1:0.17-48.el6

Dependency Installed:
  xinetd.x86_64 2:2.3.14-40.el6

Complete!
[root@yinzhengjie ~]#
[root@yinzhengjie ~]# chkconfig --list                #当安装xinetd服务后,查看该命令时我们发现多出来个xinetd服务,还有基于xinetd服务之上的一些服务。
NetworkManager     0:off    1:off    2:on    3:on    4:on    5:on    6:off
abrt-ccpp          0:off    1:off    2:off    3:on    4:off    5:on    6:off
abrtd              0:off    1:off    2:off    3:on    4:off    5:on    6:off
acpid              0:off    1:off    2:on    3:on    4:on    5:on    6:off
atd                0:off    1:off    2:on    3:on    4:on    5:on    6:off
auditd             0:off    1:off    2:on    3:on    4:on    5:on    6:off
autofs             0:off    1:off    2:off    3:on    4:on    5:on    6:off
blk-availability    0:off    1:on    2:on    3:on    4:on    5:on    6:off
bluetooth          0:off    1:off    2:off    3:on    4:on    5:on    6:off
certmonger         0:off    1:off    2:off    3:on    4:on    5:on    6:off
cpuspeed           0:off    1:on    2:on    3:on    4:on    5:on    6:off
crond              0:off    1:off    2:on    3:on    4:on    5:on    6:off
cups               0:off    1:off    2:on    3:on    4:on    5:on    6:off
dnsmasq            0:off    1:off    2:off    3:off    4:off    5:off    6:off
firstboot          0:off    1:off    2:off    3:off    4:off    5:off    6:off
haldaemon          0:off    1:off    2:off    3:on    4:on    5:on    6:off
htcacheclean       0:off    1:off    2:off    3:off    4:off    5:off    6:off
httpd              0:off    1:off    2:off    3:off    4:off    5:off    6:off
ip6tables          0:off    1:off    2:on    3:on    4:on    5:on    6:off
iptables           0:off    1:off    2:on    3:on    4:on    5:on    6:off
irqbalance         0:off    1:off    2:off    3:on    4:on    5:on    6:off
kdump              0:off    1:off    2:on    3:on    4:on    5:off    6:off
lvm2-monitor       0:off    1:on    2:on    3:on    4:on    5:on    6:off
mdmonitor          0:off    1:off    2:on    3:on    4:on    5:on    6:off
messagebus         0:off    1:off    2:on    3:on    4:on    5:on    6:off
netconsole         0:off    1:off    2:off    3:off    4:off    5:off    6:off
netfs              0:off    1:off    2:off    3:on    4:on    5:on    6:off
network            0:off    1:off    2:on    3:on    4:on    5:on    6:off
nfs                0:off    1:off    2:off    3:off    4:off    5:off    6:off
nfs-rdma           0:off    1:off    2:off    3:off    4:off    5:off    6:off
nfslock            0:off    1:off    2:off    3:on    4:on    5:on    6:off
ntpd               0:off    1:off    2:off    3:off    4:off    5:off    6:off
ntpdate            0:off    1:off    2:off    3:off    4:off    5:off    6:off
oddjobd            0:off    1:off    2:off    3:off    4:off    5:off    6:off
portreserve        0:off    1:off    2:on    3:on    4:on    5:on    6:off
postfix            0:off    1:off    2:on    3:on    4:on    5:on    6:off
pppoe-server       0:off    1:off    2:off    3:off    4:off    5:off    6:off
psacct             0:off    1:off    2:off    3:off    4:off    5:off    6:off
quota_nld          0:off    1:off    2:off    3:off    4:off    5:off    6:off
rdisc              0:off    1:off    2:off    3:off    4:off    5:off    6:off
rdma               0:off    1:on    2:on    3:on    4:on    5:on    6:off
restorecond        0:off    1:off    2:off    3:off    4:off    5:off    6:off
rngd               0:off    1:off    2:off    3:off    4:off    5:off    6:off
rpcbind            0:off    1:off    2:on    3:on    4:on    5:on    6:off
rpcgssd            0:off    1:off    2:off    3:on    4:on    5:on    6:off
rpcsvcgssd         0:off    1:off    2:off    3:off    4:off    5:off    6:off
rsyslog            0:off    1:off    2:on    3:on    4:on    5:on    6:off
saslauthd          0:off    1:off    2:off    3:off    4:off    5:off    6:off
smartd             0:off    1:off    2:off    3:off    4:off    5:off    6:off
spice-vdagentd     0:off    1:off    2:off    3:off    4:off    5:on    6:off
sshd               0:off    1:off    2:on    3:on    4:on    5:on    6:off
sssd               0:off    1:off    2:off    3:off    4:off    5:off    6:off
sysstat            0:off    1:on    2:on    3:on    4:on    5:on    6:off
udev-post          0:off    1:on    2:on    3:on    4:on    5:on    6:off
wdaemon            0:off    1:off    2:off    3:off    4:off    5:off    6:off
winbind            0:off    1:off    2:off    3:off    4:off    5:off    6:off
wpa_supplicant     0:off    1:off    2:off    3:off    4:off    5:off    6:off
xinetd             0:off    1:off    2:off    3:on    4:on    5:on    6:off
ypbind             0:off    1:off    2:off    3:off    4:off    5:off    6:off

xinetd based services:        #显示建立在xinetd服务之上的服务,如果状态为off则表示不能被xinetd唤醒,若想要被xinetd唤醒,需要状态为on.
    chargen-dgram:     off
    chargen-stream:    off
    daytime-dgram:     off
    daytime-stream:    off
    discard-dgram:     off
    discard-stream:    off
    echo-dgram:        off
    echo-stream:       off
    rsync:             off
    tcpmux-server:     off
    telnet:            off
    time-dgram:        off
    time-stream:       off
[root@yinzhengjie ~]#
[root@yinzhengjie ~]#
[root@yinzhengjie ~]# ll /etc/xinetd.d/                #查看xinetd默认管理的服务,里面存放着被管理服务的状态信息
total 52
-rw-------. 1 root root 1157 May 11  2016 chargen-dgram
-rw-------. 1 root root 1159 May 11  2016 chargen-stream
-rw-------. 1 root root 1157 May 11  2016 daytime-dgram
-rw-------. 1 root root 1159 May 11  2016 daytime-stream
-rw-------. 1 root root 1157 May 11  2016 discard-dgram
-rw-------. 1 root root 1159 May 11  2016 discard-stream
-rw-------. 1 root root 1148 May 11  2016 echo-dgram
-rw-------. 1 root root 1150 May 11  2016 echo-stream
-rw-r--r--. 1 root root  332 Mar 28  2014 rsync
-rw-------. 1 root root 1212 May 11  2016 tcpmux-server
-rw-r--r--. 1 root root  305 May  5  2014 telnet
-rw-------. 1 root root 1149 May 11  2016 time-dgram
-rw-------. 1 root root 1150 May 11  2016 time-stream
[root@yinzhengjie ~]#
[root@yinzhengjie ~]# cat /etc/xinetd.d/telnet
# default: on
# description: The telnet server serves telnet sessions; it uses \
#    unencrypted username/password pairs for authentication.
service telnet
{
    flags        = REUSE
    socket_type    = stream
    wait        = no
    user        = root
    server        = /usr/sbin/in.telnetd
    log_on_failure    += USERID
    disable        = yes          #我们发现默认情况下,telnet服务是被禁用的,我们要将其改为yes
}

[root@yinzhengjie ~]#
[root@yinzhengjie ~]# vim /etc/xinetd.d/telnet       #修改tenlet服务被xinetd服务管理,将disable的值改为"no"
[root@yinzhengjie ~]#
[root@yinzhengjie ~]# cat /etc/xinetd.d/telnet
# default: on
# description: The telnet server serves telnet sessions; it uses \
#    unencrypted username/password pairs for authentication.
service telnet
{
    flags        = REUSE
    socket_type    = stream
    wait        = no
    user        = root
    server        = /usr/sbin/in.telnetd
    log_on_failure    += USERID
    disable        = no
}

[root@yinzhengjie ~]#
[root@yinzhengjie ~]# chkconfig --list                                    #注意观察xinetd服务管理的telnet服务状态
NetworkManager     0:off    1:off    2:on    3:on    4:on    5:on    6:off
abrt-ccpp          0:off    1:off    2:off    3:on    4:off    5:on    6:off
abrtd              0:off    1:off    2:off    3:on    4:off    5:on    6:off
acpid              0:off    1:off    2:on    3:on    4:on    5:on    6:off
atd                0:off    1:off    2:on    3:on    4:on    5:on    6:off
auditd             0:off    1:off    2:on    3:on    4:on    5:on    6:off
autofs             0:off    1:off    2:off    3:on    4:on    5:on    6:off
blk-availability    0:off    1:on    2:on    3:on    4:on    5:on    6:off
bluetooth          0:off    1:off    2:off    3:on    4:on    5:on    6:off
certmonger         0:off    1:off    2:off    3:on    4:on    5:on    6:off
cpuspeed           0:off    1:on    2:on    3:on    4:on    5:on    6:off
crond              0:off    1:off    2:on    3:on    4:on    5:on    6:off
cups               0:off    1:off    2:on    3:on    4:on    5:on    6:off
dnsmasq            0:off    1:off    2:off    3:off    4:off    5:off    6:off
firstboot          0:off    1:off    2:off    3:off    4:off    5:off    6:off
haldaemon          0:off    1:off    2:off    3:on    4:on    5:on    6:off
htcacheclean       0:off    1:off    2:off    3:off    4:off    5:off    6:off
httpd              0:off    1:off    2:off    3:off    4:off    5:off    6:off
ip6tables          0:off    1:off    2:on    3:on    4:on    5:on    6:off
iptables           0:off    1:off    2:on    3:on    4:on    5:on    6:off
irqbalance         0:off    1:off    2:off    3:on    4:on    5:on    6:off
kdump              0:off    1:off    2:on    3:on    4:on    5:off    6:off
lvm2-monitor       0:off    1:on    2:on    3:on    4:on    5:on    6:off
mdmonitor          0:off    1:off    2:on    3:on    4:on    5:on    6:off
messagebus         0:off    1:off    2:on    3:on    4:on    5:on    6:off
netconsole         0:off    1:off    2:off    3:off    4:off    5:off    6:off
netfs              0:off    1:off    2:off    3:on    4:on    5:on    6:off
network            0:off    1:off    2:on    3:on    4:on    5:on    6:off
nfs                0:off    1:off    2:off    3:off    4:off    5:off    6:off
nfs-rdma           0:off    1:off    2:off    3:off    4:off    5:off    6:off
nfslock            0:off    1:off    2:off    3:on    4:on    5:on    6:off
ntpd               0:off    1:off    2:off    3:off    4:off    5:off    6:off
ntpdate            0:off    1:off    2:off    3:off    4:off    5:off    6:off
oddjobd            0:off    1:off    2:off    3:off    4:off    5:off    6:off
portreserve        0:off    1:off    2:on    3:on    4:on    5:on    6:off
postfix            0:off    1:off    2:on    3:on    4:on    5:on    6:off
pppoe-server       0:off    1:off    2:off    3:off    4:off    5:off    6:off
psacct             0:off    1:off    2:off    3:off    4:off    5:off    6:off
quota_nld          0:off    1:off    2:off    3:off    4:off    5:off    6:off
rdisc              0:off    1:off    2:off    3:off    4:off    5:off    6:off
rdma               0:off    1:on    2:on    3:on    4:on    5:on    6:off
restorecond        0:off    1:off    2:off    3:off    4:off    5:off    6:off
rngd               0:off    1:off    2:off    3:off    4:off    5:off    6:off
rpcbind            0:off    1:off    2:on    3:on    4:on    5:on    6:off
rpcgssd            0:off    1:off    2:off    3:on    4:on    5:on    6:off
rpcsvcgssd         0:off    1:off    2:off    3:off    4:off    5:off    6:off
rsyslog            0:off    1:off    2:on    3:on    4:on    5:on    6:off
saslauthd          0:off    1:off    2:off    3:off    4:off    5:off    6:off
smartd             0:off    1:off    2:off    3:off    4:off    5:off    6:off
spice-vdagentd     0:off    1:off    2:off    3:off    4:off    5:on    6:off
sshd               0:off    1:off    2:on    3:on    4:on    5:on    6:off
sssd               0:off    1:off    2:off    3:off    4:off    5:off    6:off
sysstat            0:off    1:on    2:on    3:on    4:on    5:on    6:off
udev-post          0:off    1:on    2:on    3:on    4:on    5:on    6:off
wdaemon            0:off    1:off    2:off    3:off    4:off    5:off    6:off
winbind            0:off    1:off    2:off    3:off    4:off    5:off    6:off
wpa_supplicant     0:off    1:off    2:off    3:off    4:off    5:off    6:off
xinetd             0:off    1:off    2:off    3:on    4:on    5:on    6:off
ypbind             0:off    1:off    2:off    3:off    4:off    5:off    6:off

xinetd based services:            #我们发现虽然说有很多依赖于xinetd服务,但真正被xinetd管理的服务就telnet一个,这是由于我们将disable的值改为了"no"
    chargen-dgram:     off
    chargen-stream:    off
    daytime-dgram:     off
    daytime-stream:    off
    discard-dgram:     off
    discard-stream:    off
    echo-dgram:        off
    echo-stream:       off
    rsync:             off
    tcpmux-server:     off
    telnet:            on
    time-dgram:        off
    time-stream:       off
[root@yinzhengjie ~]#
[root@yinzhengjie ~]# chkconfig --list
NetworkManager     0:off    1:off    2:on    3:on    4:on    5:on    6:off
abrt-ccpp          0:off    1:off    2:off    3:on    4:off    5:on    6:off
abrtd              0:off    1:off    2:off    3:on    4:off    5:on    6:off
acpid              0:off    1:off    2:on    3:on    4:on    5:on    6:off
atd                0:off    1:off    2:on    3:on    4:on    5:on    6:off
auditd             0:off    1:off    2:on    3:on    4:on    5:on    6:off
autofs             0:off    1:off    2:off    3:on    4:on    5:on    6:off
blk-availability    0:off    1:on    2:on    3:on    4:on    5:on    6:off
bluetooth          0:off    1:off    2:off    3:on    4:on    5:on    6:off
certmonger         0:off    1:off    2:off    3:on    4:on    5:on    6:off
cpuspeed           0:off    1:on    2:on    3:on    4:on    5:on    6:off
crond              0:off    1:off    2:on    3:on    4:on    5:on    6:off
cups               0:off    1:off    2:on    3:on    4:on    5:on    6:off
dnsmasq            0:off    1:off    2:off    3:off    4:off    5:off    6:off
firstboot          0:off    1:off    2:off    3:off    4:off    5:off    6:off
haldaemon          0:off    1:off    2:off    3:on    4:on    5:on    6:off
htcacheclean       0:off    1:off    2:off    3:off    4:off    5:off    6:off
httpd              0:off    1:off    2:off    3:off    4:off    5:off    6:off
ip6tables          0:off    1:off    2:on    3:on    4:on    5:on    6:off
iptables           0:off    1:off    2:on    3:on    4:on    5:on    6:off
irqbalance         0:off    1:off    2:off    3:on    4:on    5:on    6:off
kdump              0:off    1:off    2:on    3:on    4:on    5:off    6:off
lvm2-monitor       0:off    1:on    2:on    3:on    4:on    5:on    6:off
mdmonitor          0:off    1:off    2:on    3:on    4:on    5:on    6:off
messagebus         0:off    1:off    2:on    3:on    4:on    5:on    6:off
netconsole         0:off    1:off    2:off    3:off    4:off    5:off    6:off
netfs              0:off    1:off    2:off    3:on    4:on    5:on    6:off
network            0:off    1:off    2:on    3:on    4:on    5:on    6:off
nfs                0:off    1:off    2:off    3:off    4:off    5:off    6:off
nfs-rdma           0:off    1:off    2:off    3:off    4:off    5:off    6:off
nfslock            0:off    1:off    2:off    3:on    4:on    5:on    6:off
ntpd               0:off    1:off    2:off    3:off    4:off    5:off    6:off
ntpdate            0:off    1:off    2:off    3:off    4:off    5:off    6:off
oddjobd            0:off    1:off    2:off    3:off    4:off    5:off    6:off
portreserve        0:off    1:off    2:on    3:on    4:on    5:on    6:off
postfix            0:off    1:off    2:on    3:on    4:on    5:on    6:off
pppoe-server       0:off    1:off    2:off    3:off    4:off    5:off    6:off
psacct             0:off    1:off    2:off    3:off    4:off    5:off    6:off
quota_nld          0:off    1:off    2:off    3:off    4:off    5:off    6:off
rdisc              0:off    1:off    2:off    3:off    4:off    5:off    6:off
rdma               0:off    1:on    2:on    3:on    4:on    5:on    6:off
restorecond        0:off    1:off    2:off    3:off    4:off    5:off    6:off
rngd               0:off    1:off    2:off    3:off    4:off    5:off    6:off
rpcbind            0:off    1:off    2:on    3:on    4:on    5:on    6:off
rpcgssd            0:off    1:off    2:off    3:on    4:on    5:on    6:off
rpcsvcgssd         0:off    1:off    2:off    3:off    4:off    5:off    6:off
rsyslog            0:off    1:off    2:on    3:on    4:on    5:on    6:off
saslauthd          0:off    1:off    2:off    3:off    4:off    5:off    6:off
smartd             0:off    1:off    2:off    3:off    4:off    5:off    6:off
spice-vdagentd     0:off    1:off    2:off    3:off    4:off    5:on    6:off
sshd               0:off    1:off    2:on    3:on    4:on    5:on    6:off
sssd               0:off    1:off    2:off    3:off    4:off    5:off    6:off
sysstat            0:off    1:on    2:on    3:on    4:on    5:on    6:off
udev-post          0:off    1:on    2:on    3:on    4:on    5:on    6:off
wdaemon            0:off    1:off    2:off    3:off    4:off    5:off    6:off
winbind            0:off    1:off    2:off    3:off    4:off    5:off    6:off
wpa_supplicant     0:off    1:off    2:off    3:off    4:off    5:off    6:off
xinetd             0:off    1:off    2:off    3:on    4:on    5:on    6:off
ypbind             0:off    1:off    2:off    3:off    4:off    5:off    6:off

xinetd based services:
    chargen-dgram:     off
    chargen-stream:    off
    daytime-dgram:     off
    daytime-stream:    off
    discard-dgram:     off
    discard-stream:    off
    echo-dgram:        off
    echo-stream:       off
    rsync:             off
    tcpmux-server:     off
    telnet:            on
    time-dgram:        off
    time-stream:       off
[root@yinzhengjie ~]#
[root@yinzhengjie ~]# chkconfig telnet off            #有了xinetd服务后,咱们就可以通过chkconfig命令来管理服务是否开机启动了,我们将telnet设置为开机不启动,注意观察xinted服务管理telnet的状态
[root@yinzhengjie ~]#
[root@yinzhengjie ~]# chkconfig --list
NetworkManager     0:off    1:off    2:on    3:on    4:on    5:on    6:off
abrt-ccpp          0:off    1:off    2:off    3:on    4:off    5:on    6:off
abrtd              0:off    1:off    2:off    3:on    4:off    5:on    6:off
acpid              0:off    1:off    2:on    3:on    4:on    5:on    6:off
atd                0:off    1:off    2:on    3:on    4:on    5:on    6:off
auditd             0:off    1:off    2:on    3:on    4:on    5:on    6:off
autofs             0:off    1:off    2:off    3:on    4:on    5:on    6:off
blk-availability    0:off    1:on    2:on    3:on    4:on    5:on    6:off
bluetooth          0:off    1:off    2:off    3:on    4:on    5:on    6:off
certmonger         0:off    1:off    2:off    3:on    4:on    5:on    6:off
cpuspeed           0:off    1:on    2:on    3:on    4:on    5:on    6:off
crond              0:off    1:off    2:on    3:on    4:on    5:on    6:off
cups               0:off    1:off    2:on    3:on    4:on    5:on    6:off
dnsmasq            0:off    1:off    2:off    3:off    4:off    5:off    6:off
firstboot          0:off    1:off    2:off    3:off    4:off    5:off    6:off
haldaemon          0:off    1:off    2:off    3:on    4:on    5:on    6:off
htcacheclean       0:off    1:off    2:off    3:off    4:off    5:off    6:off
httpd              0:off    1:off    2:off    3:off    4:off    5:off    6:off
ip6tables          0:off    1:off    2:on    3:on    4:on    5:on    6:off
iptables           0:off    1:off    2:on    3:on    4:on    5:on    6:off
irqbalance         0:off    1:off    2:off    3:on    4:on    5:on    6:off
kdump              0:off    1:off    2:on    3:on    4:on    5:off    6:off
lvm2-monitor       0:off    1:on    2:on    3:on    4:on    5:on    6:off
mdmonitor          0:off    1:off    2:on    3:on    4:on    5:on    6:off
messagebus         0:off    1:off    2:on    3:on    4:on    5:on    6:off
netconsole         0:off    1:off    2:off    3:off    4:off    5:off    6:off
netfs              0:off    1:off    2:off    3:on    4:on    5:on    6:off
network            0:off    1:off    2:on    3:on    4:on    5:on    6:off
nfs                0:off    1:off    2:off    3:off    4:off    5:off    6:off
nfs-rdma           0:off    1:off    2:off    3:off    4:off    5:off    6:off
nfslock            0:off    1:off    2:off    3:on    4:on    5:on    6:off
ntpd               0:off    1:off    2:off    3:off    4:off    5:off    6:off
ntpdate            0:off    1:off    2:off    3:off    4:off    5:off    6:off
oddjobd            0:off    1:off    2:off    3:off    4:off    5:off    6:off
portreserve        0:off    1:off    2:on    3:on    4:on    5:on    6:off
postfix            0:off    1:off    2:on    3:on    4:on    5:on    6:off
pppoe-server       0:off    1:off    2:off    3:off    4:off    5:off    6:off
psacct             0:off    1:off    2:off    3:off    4:off    5:off    6:off
quota_nld          0:off    1:off    2:off    3:off    4:off    5:off    6:off
rdisc              0:off    1:off    2:off    3:off    4:off    5:off    6:off
rdma               0:off    1:on    2:on    3:on    4:on    5:on    6:off
restorecond        0:off    1:off    2:off    3:off    4:off    5:off    6:off
rngd               0:off    1:off    2:off    3:off    4:off    5:off    6:off
rpcbind            0:off    1:off    2:on    3:on    4:on    5:on    6:off
rpcgssd            0:off    1:off    2:off    3:on    4:on    5:on    6:off
rpcsvcgssd         0:off    1:off    2:off    3:off    4:off    5:off    6:off
rsyslog            0:off    1:off    2:on    3:on    4:on    5:on    6:off
saslauthd          0:off    1:off    2:off    3:off    4:off    5:off    6:off
smartd             0:off    1:off    2:off    3:off    4:off    5:off    6:off
spice-vdagentd     0:off    1:off    2:off    3:off    4:off    5:on    6:off
sshd               0:off    1:off    2:on    3:on    4:on    5:on    6:off
sssd               0:off    1:off    2:off    3:off    4:off    5:off    6:off
sysstat            0:off    1:on    2:on    3:on    4:on    5:on    6:off
udev-post          0:off    1:on    2:on    3:on    4:on    5:on    6:off
wdaemon            0:off    1:off    2:off    3:off    4:off    5:off    6:off
winbind            0:off    1:off    2:off    3:off    4:off    5:off    6:off
wpa_supplicant     0:off    1:off    2:off    3:off    4:off    5:off    6:off
xinetd             0:off    1:off    2:off    3:on    4:on    5:on    6:off
ypbind             0:off    1:off    2:off    3:off    4:off    5:off    6:off

xinetd based services:
    chargen-dgram:     off
    chargen-stream:    off
    daytime-dgram:     off
    daytime-stream:    off
    discard-dgram:     off
    discard-stream:    off
    echo-dgram:        off
    echo-stream:       off
    rsync:             off
    tcpmux-server:     off
    telnet:            off
    time-dgram:        off
    time-stream:       off
[root@yinzhengjie ~]#
[root@yinzhengjie ~]# chkconfig telnet on          #通过chkconfig将telnet设置为开机自启动后交给xinetd服务管理
[root@yinzhengjie ~]#
[root@yinzhengjie ~]# chkconfig
NetworkManager     0:off    1:off    2:on    3:on    4:on    5:on    6:off
abrt-ccpp          0:off    1:off    2:off    3:on    4:off    5:on    6:off
abrtd              0:off    1:off    2:off    3:on    4:off    5:on    6:off
acpid              0:off    1:off    2:on    3:on    4:on    5:on    6:off
atd                0:off    1:off    2:on    3:on    4:on    5:on    6:off
auditd             0:off    1:off    2:on    3:on    4:on    5:on    6:off
autofs             0:off    1:off    2:off    3:on    4:on    5:on    6:off
blk-availability    0:off    1:on    2:on    3:on    4:on    5:on    6:off
bluetooth          0:off    1:off    2:off    3:on    4:on    5:on    6:off
certmonger         0:off    1:off    2:off    3:on    4:on    5:on    6:off
cpuspeed           0:off    1:on    2:on    3:on    4:on    5:on    6:off
crond              0:off    1:off    2:on    3:on    4:on    5:on    6:off
cups               0:off    1:off    2:on    3:on    4:on    5:on    6:off
dnsmasq            0:off    1:off    2:off    3:off    4:off    5:off    6:off
firstboot          0:off    1:off    2:off    3:off    4:off    5:off    6:off
haldaemon          0:off    1:off    2:off    3:on    4:on    5:on    6:off
htcacheclean       0:off    1:off    2:off    3:off    4:off    5:off    6:off
httpd              0:off    1:off    2:off    3:off    4:off    5:off    6:off
ip6tables          0:off    1:off    2:on    3:on    4:on    5:on    6:off
iptables           0:off    1:off    2:on    3:on    4:on    5:on    6:off
irqbalance         0:off    1:off    2:off    3:on    4:on    5:on    6:off
kdump              0:off    1:off    2:on    3:on    4:on    5:off    6:off
lvm2-monitor       0:off    1:on    2:on    3:on    4:on    5:on    6:off
mdmonitor          0:off    1:off    2:on    3:on    4:on    5:on    6:off
messagebus         0:off    1:off    2:on    3:on    4:on    5:on    6:off
netconsole         0:off    1:off    2:off    3:off    4:off    5:off    6:off
netfs              0:off    1:off    2:off    3:on    4:on    5:on    6:off
network            0:off    1:off    2:on    3:on    4:on    5:on    6:off
nfs                0:off    1:off    2:off    3:off    4:off    5:off    6:off
nfs-rdma           0:off    1:off    2:off    3:off    4:off    5:off    6:off
nfslock            0:off    1:off    2:off    3:on    4:on    5:on    6:off
ntpd               0:off    1:off    2:off    3:off    4:off    5:off    6:off
ntpdate            0:off    1:off    2:off    3:off    4:off    5:off    6:off
oddjobd            0:off    1:off    2:off    3:off    4:off    5:off    6:off
portreserve        0:off    1:off    2:on    3:on    4:on    5:on    6:off
postfix            0:off    1:off    2:on    3:on    4:on    5:on    6:off
pppoe-server       0:off    1:off    2:off    3:off    4:off    5:off    6:off
psacct             0:off    1:off    2:off    3:off    4:off    5:off    6:off
quota_nld          0:off    1:off    2:off    3:off    4:off    5:off    6:off
rdisc              0:off    1:off    2:off    3:off    4:off    5:off    6:off
rdma               0:off    1:on    2:on    3:on    4:on    5:on    6:off
restorecond        0:off    1:off    2:off    3:off    4:off    5:off    6:off
rngd               0:off    1:off    2:off    3:off    4:off    5:off    6:off
rpcbind            0:off    1:off    2:on    3:on    4:on    5:on    6:off
rpcgssd            0:off    1:off    2:off    3:on    4:on    5:on    6:off
rpcsvcgssd         0:off    1:off    2:off    3:off    4:off    5:off    6:off
rsyslog            0:off    1:off    2:on    3:on    4:on    5:on    6:off
saslauthd          0:off    1:off    2:off    3:off    4:off    5:off    6:off
smartd             0:off    1:off    2:off    3:off    4:off    5:off    6:off
spice-vdagentd     0:off    1:off    2:off    3:off    4:off    5:on    6:off
sshd               0:off    1:off    2:on    3:on    4:on    5:on    6:off
sssd               0:off    1:off    2:off    3:off    4:off    5:off    6:off
sysstat            0:off    1:on    2:on    3:on    4:on    5:on    6:off
udev-post          0:off    1:on    2:on    3:on    4:on    5:on    6:off
wdaemon            0:off    1:off    2:off    3:off    4:off    5:off    6:off
winbind            0:off    1:off    2:off    3:off    4:off    5:off    6:off
wpa_supplicant     0:off    1:off    2:off    3:off    4:off    5:off    6:off
xinetd             0:off    1:off    2:off    3:on    4:on    5:on    6:off
ypbind             0:off    1:off    2:off    3:off    4:off    5:off    6:off

xinetd based services:
    chargen-dgram:     off
    chargen-stream:    off
    daytime-dgram:     off
    daytime-stream:    off
    discard-dgram:     off
    discard-stream:    off
    echo-dgram:        off
    echo-stream:       off
    rsync:             off
    tcpmux-server:     off
    telnet:            on
    time-dgram:        off
    time-stream:       off
[root@yinzhengjie ~]#
[root@yinzhengjie ~]# chkconfig NetworkManager 0:off 1:off 2:on 3:on 4:on 5:on 6:off abrt-ccpp 0:off 1:off 2:off 3:on 4:off 5:on 6:off abrtd 0:off 1:off 2:off 3:on 4:off 5:on 6:off acpid 0:off 1:off 2:on 3:on 4:on 5:on 6:off atd 0:off 1:off 2:on 3:on 4:on 5:on 6:off auditd 0:off 1:off 2:on 3:on 4:on 5:on 6:off autofs 0:off 1:off 2:off 3:on 4:on 5:on 6:off blk-availability 0:off 1:on 2:on 3:on 4:on 5:on 6:off bluetooth 0:off 1:off 2:off 3:on 4:on 5:on 6:off certmonger 0:off 1:off 2:off 3:on 4:on 5:on 6:off cpuspeed 0:off 1:on 2:on 3:on 4:on 5:on 6:off crond 0:off 1:off 2:on 3:on 4:on 5:on 6:off cups 0:off 1:off 2:on 3:on 4:on 5:on 6:off dnsmasq 0:off 1:off 2:off 3:off 4:off 5:off 6:off firstboot 0:off 1:off 2:off 3:off 4:off 5:off 6:off haldaemon 0:off 1:off 2:off 3:on 4:on 5:on 6:off htcacheclean 0:off 1:off 2:off 3:off 4:off 5:off 6:off httpd 0:off 1:off 2:off 3:off 4:off 5:off 6:off ip6tables 0:off 1:off 2:on 3:on 4:on 5:on 6:off iptables 0:off 1:off 2:on 3:on 4:on 5:on 6:off irqbalance 0:off 1:off 2:off 3:on 4:on 5:on 6:off kdump 0:off 1:off 2:on 3:on 4:on 5:off 6:off lvm2-monitor 0:off 1:on 2:on 3:on 4:on 5:on 6:off mdmonitor 0:off 1:off 2:on 3:on 4:on 5:on 6:off messagebus 0:off 1:off 2:on 3:on 4:on 5:on 6:off netconsole 0:off 1:off 2:off 3:off 4:off 5:off 6:off netfs 0:off 1:off 2:off 3:on 4:on 5:on 6:off network 0:off 1:off 2:on 3:on 4:on 5:on 6:off nfs 0:off 1:off 2:off 3:off 4:off 5:off 6:off nfs-rdma 0:off 1:off 2:off 3:off 4:off 5:off 6:off nfslock 0:off 1:off 2:off 3:on 4:on 5:on 6:off ntpd 0:off 1:off 2:off 3:off 4:off 5:off 6:off ntpdate 0:off 1:off 2:off 3:off 4:off 5:off 6:off oddjobd 0:off 1:off 2:off 3:off 4:off 5:off 6:off portreserve 0:off 1:off 2:on 3:on 4:on 5:on 6:off postfix 0:off 1:off 2:on 3:on 4:on 5:on 6:off pppoe-server 0:off 1:off 2:off 3:off 4:off 5:off 6:off psacct 0:off 1:off 2:off 3:off 4:off 5:off 6:off quota_nld 0:off 1:off 2:off 3:off 4:off 5:off 6:off rdisc 0:off 1:off 2:off 3:off 4:off 5:off 6:off rdma 0:off 1:on 2:on 3:on 4:on 5:on 6:off restorecond 0:off 1:off 2:off 3:off 4:off 5:off 6:off rngd 0:off 1:off 2:off 3:off 4:off 5:off 6:off rpcbind 0:off 1:off 2:on 3:on 4:on 5:on 6:off rpcgssd 0:off 1:off 2:off 3:on 4:on 5:on 6:off rpcsvcgssd 0:off 1:off 2:off 3:off 4:off 5:off 6:off rsyslog 0:off 1:off 2:on 3:on 4:on 5:on 6:off saslauthd 0:off 1:off 2:off 3:off 4:off 5:off 6:off smartd 0:off 1:off 2:off 3:off 4:off 5:off 6:off spice-vdagentd 0:off 1:off 2:off 3:off 4:off 5:on 6:off sshd 0:off 1:off 2:on 3:on 4:on 5:on 6:off sssd 0:off 1:off 2:off 3:off 4:off 5:off 6:off sysstat 0:off 1:on 2:on 3:on 4:on 5:on 6:off udev-post 0:off 1:on 2:on 3:on 4:on 5:on 6:off wdaemon 0:off 1:off 2:off 3:off 4:off 5:off 6:off winbind 0:off 1:off 2:off 3:off 4:off 5:off 6:off wpa_supplicant 0:off 1:off 2:off 3:off 4:off 5:off 6:off xinetd 0:off 1:off 2:off 3:on 4:on 5:on 6:off ypbind 0:off 1:off 2:off 3:off 4:off 5:off 6:off xinetd based services: chargen-dgram: off chargen-stream: off daytime-dgram: off daytime-stream: off discard-dgram: off discard-stream: off echo-dgram: off echo-stream: off rsync: off tcpmux-server: off telnet: on #注意telnet服务被xinetd管理着 time-dgram: off time-stream: off [root@yinzhengjie ~]# [root@yinzhengjie ~]# ss -ntlp State Recv-Q Send-Q Local Address:Port Peer Address:Port LISTEN 0 128 :::38751 :::* users:(("rpc.statd",1689,11))LISTEN 0 128 :::111 :::* users:(("rpcbind",1629,11))LISTEN 0 128 *:111 *:* users:(("rpcbind",1629,8))LISTEN 0 128 *:48787 *:* users:(("rpc.statd",1689,9))LISTEN 0 128 :::22 :::* users:(("sshd",2084,4))LISTEN 0 128 *:22 *:* users:(("sshd",2084,3))LISTEN 0 128 127.0.0.1:631 *:* users:(("cupsd",1727,7))LISTEN 0 128 ::1:631 :::* users:(("cupsd",1727,6))LISTEN 0 100 ::1:25 :::* users:(("master",2170,13))LISTEN 0 100 127.0.0.1:25 *:* users:(("master",2170,12)) [root@yinzhengjie ~]# [root@yinzhengjie ~]# service xinetd start #启动xinetd服务,观察到telnet服务也跟着启动了 Starting xinetd: [ OK ] [root@yinzhengjie ~]# [root@yinzhengjie ~]# ss -ntlp #注意,telnet服务时23端口哟~ State Recv-Q Send-Q Local Address:Port Peer Address:Port LISTEN 0 128 :::38751 :::* users:(("rpc.statd",1689,11))LISTEN 0 128 :::111 :::* users:(("rpcbind",1629,11))LISTEN 0 128 *:111 *:* users:(("rpcbind",1629,8))LISTEN 0 128 *:48787 *:* users:(("rpc.statd",1689,9))LISTEN 0 128 :::22 :::* users:(("sshd",2084,4))LISTEN 0 128 *:22 *:* users:(("sshd",2084,3))LISTEN 0 64 :::23 :::* users:(("xinetd",5570,5))LISTEN 0 128 127.0.0.1:631 *:* users:(("cupsd",1727,7))LISTEN 0 128 ::1:631 :::* users:(("cupsd",1727,6))LISTEN 0 100 ::1:25 :::* users:(("master",2170,13))LISTEN 0 100 127.0.0.1:25 *:* users:(("master",2170,12)) [root@yinzhengjie ~]#
[root@yinzhengjie ~]# yum -y install telnet            #安装telnet客户端命令并连接到xinetd的服务器上
Loaded plugins: fastestmirror, refresh-packagekit, security
Setting up Install Process
Loading mirror speeds from cached hostfile
 * base: mirrors.huaweicloud.com
 * extras: mirrors.huaweicloud.com
 * updates: mirrors.huaweicloud.com
Resolving Dependencies
--> Running transaction check
---> Package telnet.x86_64 1:0.17-48.el6 will be installed
--> Finished Dependency Resolution

Dependencies Resolved

============================================================================================================================================================================
 Package                                 Arch                                    Version                                        Repository                             Size
============================================================================================================================================================================
Installing:
 telnet                                  x86_64                                  1:0.17-48.el6                                  base                                   58 k

Transaction Summary
============================================================================================================================================================================
Install       1 Package(s)

Total download size: 58 k
Installed size: 109 k
Downloading Packages:
telnet-0.17-48.el6.x86_64.rpm                                                                                                                        |  58 kB     00:00
Running rpm_check_debug
Running Transaction Test
Transaction Test Succeeded
Running Transaction
  Installing : 1:telnet-0.17-48.el6.x86_64                                                                                                                              1/1
  Verifying  : 1:telnet-0.17-48.el6.x86_64                                                                                                                              1/1

Installed:
  telnet.x86_64 1:0.17-48.el6

Complete!
[root@yinzhengjie ~]#
[root@yinzhengjie ~]# telnet 172.30.1.200      #使用telnet命令测试链接到咱们安装xinetd的服务器
Trying 172.30.1.200...
Connected to 172.30.1.200.
Escape character is '^]'.
CentOS release 6.10 (Final)
Kernel 2.6.32-754.el6.x86_64 on an x86_64
yinzhengjie login:
[root@yinzhengjie ~]# ps aux | grep telnet | grep -v grep      #使用telnet命令连接之前,发现telnetd进程并没有启动哟~
[root@yinzhengjie ~]#
[root@yinzhengjie ~]# ps aux | grep telnet | grep -v grep      #使用本地的telnet命令连接之后发现多出来一个"in.telnetd"进程。我们知道在unix操作系统瞬态服务叫inetd进程,而在linux操作系统瞬态服务叫做"xinted"服务,很明显,这个in是借鉴于unix名称的in,而in.telnetd进程则表示由xitend进程启动的。
root       5645  0.0  0.0  14796   976 pts/0    S+   08:18   0:00 telnet 172.30.1.200
root       5646  0.0  0.0  12528   936 ?        Ss   08:18   0:00 in.telnetd
[root@yinzhengjie ~]#
[root@yinzhengjie ~]# telnet 172.30.1.200                #等待telnet客户端命令连接超时
Trying 172.30.1.200...
Connected to 172.30.1.200.
Escape character is '^]'.
CentOS release 6.10 (Final)
Kernel 2.6.32-754.el6.x86_64 on an x86_64
yinzhengjie login: Connection closed by foreign host.
[root@yinzhengjie ~]#
[root@yinzhengjie ~]# ps aux | grep telnet | grep -v grep    #当本机的telnet进程结束后,我们发现"in.telnet"进程也没有啦~
[root@yinzhengjie ~]#
3>.tftp超级守护进程案例
[root@yinzhengjie ~]# yum -y install tftp-server
Loaded plugins: fastestmirror, refresh-packagekit, security
Setting up Install Process
Loading mirror speeds from cached hostfile
 * base: mirrors.huaweicloud.com
 * extras: mirrors.huaweicloud.com
 * updates: mirrors.huaweicloud.com
Resolving Dependencies
--> Running transaction check
---> Package tftp-server.x86_64 0:0.49-8.el6 will be installed
--> Finished Dependency Resolution

Dependencies Resolved

============================================================================================================================================================================
 Package                                     Arch                                   Version                                      Repository                            Size
============================================================================================================================================================================
Installing:
 tftp-server                                 x86_64                                 0.49-8.el6                                   base                                  39 k

Transaction Summary
============================================================================================================================================================================
Install       1 Package(s)

Total download size: 39 k
Installed size: 57 k
Downloading Packages:
tftp-server-0.49-8.el6.x86_64.rpm                                                                                                                    |  39 kB     00:00
Running rpm_check_debug
Running Transaction Test
Transaction Test Succeeded
Running Transaction
  Installing : tftp-server-0.49-8.el6.x86_64                                                                                                                            1/1
  Verifying  : tftp-server-0.49-8.el6.x86_64                                                                                                                            1/1

Installed:
  tftp-server.x86_64 0:0.49-8.el6

Complete!
[root@yinzhengjie ~]#
[root@yinzhengjie ~]# chkconfig --list                #观察tftp服务也是被xinetd服务管理的哟,我们在搭建PXE时会使用它~
NetworkManager     0:off    1:off    2:on    3:on    4:on    5:on    6:off
abrt-ccpp          0:off    1:off    2:off    3:on    4:off    5:on    6:off
abrtd              0:off    1:off    2:off    3:on    4:off    5:on    6:off
acpid              0:off    1:off    2:on    3:on    4:on    5:on    6:off
atd                0:off    1:off    2:on    3:on    4:on    5:on    6:off
auditd             0:off    1:off    2:on    3:on    4:on    5:on    6:off
autofs             0:off    1:off    2:off    3:on    4:on    5:on    6:off
blk-availability    0:off    1:on    2:on    3:on    4:on    5:on    6:off
bluetooth          0:off    1:off    2:off    3:on    4:on    5:on    6:off
certmonger         0:off    1:off    2:off    3:on    4:on    5:on    6:off
cpuspeed           0:off    1:on    2:on    3:on    4:on    5:on    6:off
crond              0:off    1:off    2:on    3:on    4:on    5:on    6:off
cups               0:off    1:off    2:on    3:on    4:on    5:on    6:off
dnsmasq            0:off    1:off    2:off    3:off    4:off    5:off    6:off
firstboot          0:off    1:off    2:off    3:off    4:off    5:off    6:off
haldaemon          0:off    1:off    2:off    3:on    4:on    5:on    6:off
htcacheclean       0:off    1:off    2:off    3:off    4:off    5:off    6:off
httpd              0:off    1:off    2:off    3:off    4:off    5:off    6:off
ip6tables          0:off    1:off    2:on    3:on    4:on    5:on    6:off
iptables           0:off    1:off    2:on    3:on    4:on    5:on    6:off
irqbalance         0:off    1:off    2:off    3:on    4:on    5:on    6:off
kdump              0:off    1:off    2:on    3:on    4:on    5:off    6:off
lvm2-monitor       0:off    1:on    2:on    3:on    4:on    5:on    6:off
mdmonitor          0:off    1:off    2:on    3:on    4:on    5:on    6:off
messagebus         0:off    1:off    2:on    3:on    4:on    5:on    6:off
netconsole         0:off    1:off    2:off    3:off    4:off    5:off    6:off
netfs              0:off    1:off    2:off    3:on    4:on    5:on    6:off
network            0:off    1:off    2:on    3:on    4:on    5:on    6:off
nfs                0:off    1:off    2:off    3:off    4:off    5:off    6:off
nfs-rdma           0:off    1:off    2:off    3:off    4:off    5:off    6:off
nfslock            0:off    1:off    2:off    3:on    4:on    5:on    6:off
ntpd               0:off    1:off    2:off    3:off    4:off    5:off    6:off
ntpdate            0:off    1:off    2:off    3:off    4:off    5:off    6:off
oddjobd            0:off    1:off    2:off    3:off    4:off    5:off    6:off
portreserve        0:off    1:off    2:on    3:on    4:on    5:on    6:off
postfix            0:off    1:off    2:on    3:on    4:on    5:on    6:off
pppoe-server       0:off    1:off    2:off    3:off    4:off    5:off    6:off
psacct             0:off    1:off    2:off    3:off    4:off    5:off    6:off
quota_nld          0:off    1:off    2:off    3:off    4:off    5:off    6:off
rdisc              0:off    1:off    2:off    3:off    4:off    5:off    6:off
rdma               0:off    1:on    2:on    3:on    4:on    5:on    6:off
restorecond        0:off    1:off    2:off    3:off    4:off    5:off    6:off
rngd               0:off    1:off    2:off    3:off    4:off    5:off    6:off
rpcbind            0:off    1:off    2:on    3:on    4:on    5:on    6:off
rpcgssd            0:off    1:off    2:off    3:on    4:on    5:on    6:off
rpcsvcgssd         0:off    1:off    2:off    3:off    4:off    5:off    6:off
rsyslog            0:off    1:off    2:on    3:on    4:on    5:on    6:off
saslauthd          0:off    1:off    2:off    3:off    4:off    5:off    6:off
smartd             0:off    1:off    2:off    3:off    4:off    5:off    6:off
spice-vdagentd     0:off    1:off    2:off    3:off    4:off    5:on    6:off
sshd               0:off    1:off    2:on    3:on    4:on    5:on    6:off
sssd               0:off    1:off    2:off    3:off    4:off    5:off    6:off
sysstat            0:off    1:on    2:on    3:on    4:on    5:on    6:off
udev-post          0:off    1:on    2:on    3:on    4:on    5:on    6:off
wdaemon            0:off    1:off    2:off    3:off    4:off    5:off    6:off
winbind            0:off    1:off    2:off    3:off    4:off    5:off    6:off
wpa_supplicant     0:off    1:off    2:off    3:off    4:off    5:off    6:off
xinetd             0:off    1:off    2:off    3:on    4:on    5:on    6:off
ypbind             0:off    1:off    2:off    3:off    4:off    5:off    6:off

xinetd based services:
    chargen-dgram:     off
    chargen-stream:    off
    daytime-dgram:     off
    daytime-stream:    off
    discard-dgram:     off
    discard-stream:    off
    echo-dgram:        off
    echo-stream:       off
    rsync:             off
    tcpmux-server:     off
    telnet:            on
    tftp:              off
    time-dgram:        off
    time-stream:       off
[root@yinzhengjie ~]#
[root@yinzhengjie ~]#
4>./etc/rc.d/rc.local脚本
[root@yinzhengjie ~]# ll /etc/rc*.d/*local
lrwxrwxrwx. 1 root root  11 Dec  1 07:29 /etc/rc2.d/S99local -> ../rc.local
lrwxrwxrwx. 1 root root  11 Dec  1 07:29 /etc/rc3.d/S99local -> ../rc.local
lrwxrwxrwx. 1 root root  11 Dec  1 07:29 /etc/rc4.d/S99local -> ../rc.local
lrwxrwxrwx. 1 root root  11 Dec  1 07:29 /etc/rc5.d/S99local -> ../rc.local
-rwxr-xr-x. 1 root root 220 Jun 20  2018 /etc/rc.d/rc.local
[root@yinzhengjie ~]#
[root@yinzhengjie ~]# cat /etc/rc.d/rc.local       #我们发现该脚本压根就不再"/etc/init.d/"目录下,因此不能使用service命令去管理,但是他的确又在2,3,4,5运行级别上启动开机自启动(以"S"开头)该脚本了,因此我们在2,3,4,5级别上有什么命令想开机自启动可以将命令写入该脚本文件中。该文件的好处就是不用在脚本中写"chkconfig"相关的注释信息了。
#!/bin/sh
#
# This script will be executed *after* all the other init scripts.
# You can put your own initialization stuff in here if you don't
# want to do the full Sys V style init stuff.

touch /var/lock/subsys/local
[root@yinzhengjie ~]#

温馨提示:
   正常级别下,最后启动一个服务S99local没有链接至/etc/rc.d/init.d一个服务脚本,而是指向了/etc/rc.d/rc.local脚本
   不便或不需写为服务脚本放置于/etc/rc.d/init.d/目录,且又想开机时自动运行的命令,可直接放置于/etc/rc.d/rc.local文件中
   /etc/rc.d/rc.local在指定运行级别脚本后运行,可以根据情况,进行自定义修改
五.grub legacy
1>.CentOS 6启动流程
启动次序及运行脚本如下所示:
  POST
  Boot Sequence(BIOS)
  Boot Loader
  Kernel(ramdisk)
  rootfs
  switchroot
  /sbin/init
  (/etc/inittab, /etc/init/*.conf)
  设定默认运行级别
  系统初始化脚本激活逻辑卷等(/etc/rc.d/rc.sysinit)
  关闭或启动对应级别的服务("/etc/rc*.d/K*" | "/etc/rc*.d/S*")
  启动终端
2>.grub(全称:"GRand Unified Bootloader)概述
grub 0.97(又称为grub legacy),它分为以下几个阶段:
  stage1:
    mbr记录占446字节对应的扇区。(需要注意的是mbr并不属于任何一个分区,因此我们再安装grub的时候指定的是/dev/sda,而不是/dev/sda1)
  stage1_5:
    mbr之后的扇区,让stage1中的bootloader能识别stage2所在的分区上的文件系统
  stage2:
    stage2及内核等通常放置于一个基本磁盘分区(/boot/grub),
    里面有一个很重要的配置文件:/boot/grub/grub.conf <-- /etc/grub.conf

grub 2.x:
  grub2
3>.grub安装
grub-install
  安装grub stage1和stage1_5到/dev/DISK磁盘上,并复制GRUB相关文件到 DIR/boot目录下
  例如:grub-install --root-directory=DIR /dev/DISK

grub
  grub> root (hd#,#)
  grub> setup (hd#)
4>.配置文件:/boot/grub/grub.conf
/boot/grub/grub.conf功能:
  提供启动菜单、并提供交互式接口
    a:内核参数
    e: 编辑模式,用于编辑菜单
    c: 命令模式,交互式接口
  加载用户选择的内核或操作系统
    允许传递参数给内核
    可隐藏启动菜单
  为菜单提供了保护机制
    为编辑启动菜单进行认证
    为启用内核或操作系统进行认证

/boot/grub/grub.conf相关参数说明如下:
  default=#:
    设定默认启动的菜单项;落单项(title)编号从0开始
  timeout=#:
    指定菜单项等待选项选择的时长
  splashimage=(hd#,#)/PATH/XPM_FILE:
    菜单背景图片文件路径
  password [--md5] STRING:
    启动菜单编辑认证
  hiddenmenu:
    隐藏菜单
  title TITLE:
    定义菜单项“标题”, 可出现多次
  root (hd#,#):
    查找stage2及kernel文件所在设备分区;为grub的根
  kernel /PATH/TO/VMLINUZ_FILE [PARAMETERS]:
    启动的内核
  initrd /PATH/TO/INITRAMFS_FILE:
    内核匹配的ramfs文件
  password [--md5|--encrypted ] STRING:
     启动选定的内核或操作系统时进行认证
5>.grub的命令行接口
  help:
    获取帮助列表
  help KEYWORD:
    详细帮助信息
  find (hd#,#)/PATH/TO/SOMEFILE:
  root (hd#,#)
  kernel /PATH/TO/KERNEL_FILE:
    设定本次启动时用到的内核文件;额外还可添加许多内核支持使用的cmdline参数
    例如:
      max_loop=100 selinux=0 init=/path/to/init
  initrd /PATH/TO/INITRAMFS_FILE:
    设定为选定的内核提供额外文件的ramdisk
  boot:
    引导启动选定的内核
[root@yinzhengjie ~]# cat /proc/cmdline      #查看内核参数
ro root=/dev/mapper/vg_node200-lv_root nomodeset rd_NO_LUKS LANG=en_US.UTF-8 rd_LVM_LV=vg_node200/lv_swap rd_NO_MD SYSFONT=latarcyrheb-sun16 cra
shkernel=128M rd_LVM_LV=vg_node200/lv_root  KEYBOARDTYPE=pc KEYTABLE=us rd_NO_DM
[root@yinzhengjie ~]#
6>.识别硬盘设备
(hd#,#)
  hd#:
    磁盘编号,用数字表示;从0开始编号
  #:
    分区编号,用数字表示; 从0开始编号
  例如:
    (hd0,0) 第一块硬盘,第一个分区
7>.手动在grub命令行接口启动系统
grub> root (hd#,#)
grub> kernel /vmlinuz-VERSION-RELEASE ro root=/dev/DEVICE
grub> initrd /initramfs-VERSION-RELEASE.img
grub> boot
8>.grub加密
生成grub口令
    grub-md5-crypt
    grub-crypt

破解root口令:
    启动系统时,设置其运行级别1

进入单用户模式:
    (1)编辑grub菜单(选定要编辑的title,而后使用a 或 e 命令)
    (2)在选定的kernel后附加
      1, s, S,single 都可以
    (3)在kernel所在行,键入“b”命令
9>.博主推荐阅读
Linux操作系统故障排除之Grub信息被删除:
  https://www.cnblogs.com/yinzhengjie/p/11909479.html

Linux操作系统之grub加密实战案例:
  https://www.cnblogs.com/yinzhengjie/p/11915217.html

Linux操作系统之更改启动菜单的背景图实战案例:
  https://www.cnblogs.com/yinzhengjie/p/11914677.html

Linux操作系统故障排除之/boot目录被删除恢复案例
  https://www.cnblogs.com/yinzhengjie/p/11921248.html
本文来自博客园,作者:尹正杰,转载请注明原文链接:https://www.cnblogs.com/yinzhengjie/p/11902331.html,个人微信: "JasonYin2020"(添加时请备注来源及意图备注,有偿付费)
当你的才华还撑不起你的野心的时候,你就应该静下心来学习。当你的能力还驾驭不了你的目标的时候,你就应该沉下心来历练。问问自己,想要怎样的人生。

 浙公网安备 33010602011771号