

vue2.0笔记《二》组件
主要内容:如何注册组件、如何使用组件、父组件子组件之间值的传递、具名插槽
1.如何注册组件
第一步:通过import将子组件载入父组件的js中
// 第一步:通过import将子组件载入父组件的js中
import child from './components/child.vue'
import childB from './components/childB.vue'
第二步:将子组件在父组件的componerts中注册
  components: {
    child,
    childB
  },
如果想给引入的组建重新命名,那么:
  components: {
    新名字:child
  },
2.如何使用组件
引入组件的第一种写法
<template>
  <div id="app">
    <!-- 如果注册的组建名中有大写字母,尽量改为 -小写字母,例如:
     childB,则在使用组件时,要用:<child-b></child-b>-->
    <child></child>
    <child-b></child-b>
  </div>
</template>
引入组件的第二种写法
<template>
  <div id="app">
    <div :is="comToRender" @my-event="onChildEvent"></div>
    <button @click="changeFun">切换组建</button>
  </div>
</template>
优点:
2.可以动态切换组建 通过v-bind:is
实例:
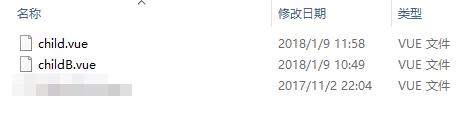
目录:
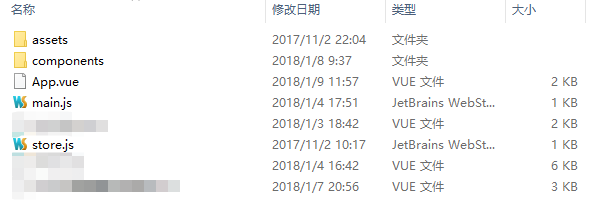
父组件:app.vue
<!-- 父组件如何加渲染子组 -->
<template>
  <div id="app">
    <!-- 第三步:使用组件 -->
    <!-- 引入组件的第一种写法 -->
    <!-- 如果注册的组建名中有大写字母,尽量改为 -小写字母,例如:
     childB,则在使用组件时,要用:<child-b></child-b>-->
    <!-- <child></child>
    <child-b></child-b> -->
    <!--引入组件的第二种写法-->
    <!-- 优点:
      1.https://cn.vuejs.org/v2/guide/components.html#DOM-%E6%A8%A1%E6%9D%BF%E8%A7%A3%E6%9E%90%E6%B3%A8%E6%84%8F%E4%BA%8B%E9%A1%B9
      2.可以动态切换组建 通过v-bind:is-->
    <div :is="comToRender" @my-event="onChildEvent"></div>
    <button @click="changeFun">切换组建</button>
  </div>
</template>
<script>
// 第一步:通过import将子组件载入父组件的js中
import child from './components/child.vue'
import childB from './components/childB.vue'
export default {
  name: 'app',
  // 第二步:将子组件在父组件的componerts中注册
  // 如果想给引入的组建重新命名,那么:
  // components: {
  //   新名字:child
  // },
  components: {
    child,
    childB
  },
  data() {
    return {
      comToRender: 'child',
      fatherString:'hello children',
      parameterNum:'1'
    }
  },
  mounted: function() {
    this.$nextTick(function() {});
  },
  methods: {
    onChildEvent(parmFromChild) {
      console.log(parmFromChild);
    },
    changeFun(){
      this.comToRender="childB";
    }
  }
}

</script>
<style>
* {
  margin: 0;
  padding: 0;
}

body {
  width: 100%;
  height: 100%;
  position: absolute;
}

#app {
  font-family: 'Avenir', Helvetica, Arial, sans-serif;
  -webkit-font-smoothing: antialiased;
  -moz-osx-font-smoothing: grayscale;
  text-align: center;
  color: #2c3e50;
  width: 100%;
  height: 100%;
}

</style>
子组件:child.vue
<template>
  <div class="child-conten">
    <p>{{msg}}</p>
    <button @click='emitMyEvent'>child-emit</button>
  </div>
</template>
<script>
export default {
  data() {
    return {
      msg: 'I am a components'
    }
  },
  methods: {
    emitMyEvent() {
      this.$emit('my-event', this.msg);
    }
  }
}

</script>
子组件:childB.vue
<template>
    <div class="child-conten">
        <p>{{msg}}</p>
        <button @click='emitMyEvent'>child-emit</button>
    </div>
</template>
<script>
export default {
    data(){
        return{
            msg: 'I am a components children B'
        }
    },
    methods:{
        emitMyEvent(){
            this.$emit('my-event',this.msg);
        }
    }
}

</script>
页面效果:

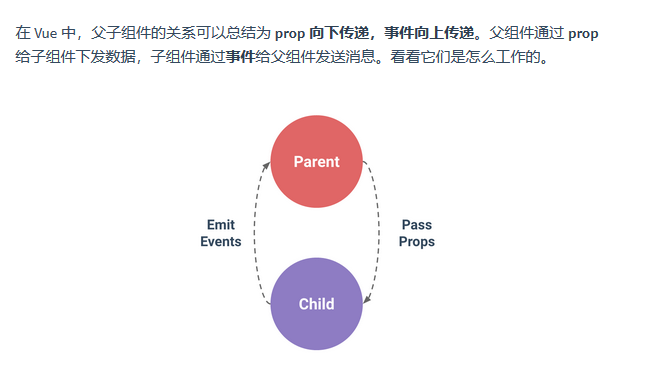
3.父组件子组件之间值的传递
1.传递固定值:
父组件:app.vue
<template>
  <div id="app">
    <child number="5" @my-event="onChildEvent"></child>
  </div>
</template>
<script>
// 第一步:通过import将子组件载入父组件的js中
import child from './components/child.vue'
export default {
  name: 'app',
  components: {
    child
  },
  data() {
    return {}
  },
  mounted: function() {
    this.$nextTick(function() {});
  },
  methods: {
    onChildEvent(parmFromChild) {
      console.log(parmFromChild);
    }
  }
}

</script>
子组件:child.vue
<template>
  <div class="child-conten">
    <p>{{msg}}</p>
    <p>我是父组件传递过来的值:{{number}}</p>
    <button @click='emitMyEvent'>child-emit</button>
  </div>
</template>
<script>
export default {
  // props属性内容的简写:
  props:['number'],
  data() {
    return {
      msg: 'I am a components'
    }
  },
  methods: {
    emitMyEvent() {
      this.$emit('my-event', this.msg);
    }
  }
}

</script>
注意:如果传递的参数存在大写字母
父组件:app.vue
<template>
  <div id="app">
    <child number-to-do="5" @my-event="onChildEvent"></child>
  </div>
</template>
子组件:child.vue
<template>
  <div class="child-conten">
    <p>{{msg}}</p>
    <p>我是父组件传递过来的值:{{numberToDo}}</p>
    <button @click='emitMyEvent'>child-emit</button>
  </div>
</template>
<script>
export default {
  // props属性内容的简写:
  props: ['number-to-do'],
  data() {
    return {
      msg: 'I am a components'
    }
  },
  // 注意 mounted 不会承诺所有的子组件也都一起被挂载。如果你希望等
  // 到整个视图都渲染完毕,可以用 vm.$nextTick 替换掉 mounted:
  mounted: function() {
    this.$nextTick(function() {
      console.log('this.numberToDo:' + this.numberToDo);
    })
  },
  methods: {
    emitMyEvent() {
      this.$emit('my-event', this.msg);
    }
  }
}

</script>
2.动态prop:
父组件:app.vue
<template>
  <div id="app">
    <input type="text" v-model="fatherString">
    <child :number-to-do='fatherNum' :string='fatherString' @my-event="onChildEvent"></child>
  </div>
</template>
<script>
// 第一步:通过import将子组件载入父组件的js中
import child from './components/child.vue'
export default {
  name: 'app',
  components: {
    child
  },
  data() {
    return {
      fatherNum:100,
      fatherString:'hello children'
    }
  },
  mounted: function() {
    this.$nextTick(function() {});
  },
  methods: {
    onChildEvent(parmFromChild) {
      console.log(parmFromChild);
    }
  }
}

</script>
子组件:child.vue
<template>
  <div class="child-conten">
    <p>{{msg}}</p>
    <p>我是父组件传递过来的值:{{numberToDo}}</p>
    <p>我是父组件传递过来的值:{{string}}</p>
    <button @click='emitMyEvent'>child-emit</button>
  </div>
</template>
<script>
export default {
  // props属性内容的简写:
  props: ['number-to-do', 'string'],
  data() {
    return {
      msg: 'I am a components'
    }
  },
  // 注意 mounted 不会承诺所有的子组件也都一起被挂载。如果你希望等
  // 到整个视图都渲染完毕,可以用 vm.$nextTick 替换掉 mounted:
  mounted: function() {
    this.$nextTick(function() {
      console.log('this.numberToDo:' + this.numberToDo);
    })
  },
  methods: {
    emitMyEvent() {
      this.$emit('my-event', this.msg);
    }
  }
}

</script>
页面效果:

3.Prop 验证
type 可以是下面原生构造器:
- String
- Number
- Boolean
- Function
- Object
- Array
- Symbol
type 也可以是一个自定义构造器函数,使用 instanceof 检测。
当 prop 验证失败,Vue 会抛出警告 (如果使用的是开发版本)。注意 prop 会在组件实例创建之前进行校验,所以在 default 或 validator 函数里,诸如 data、computed 或 methods 等实例属性还无法使用。
父组件:app.vue
<template>
  <div id="app">
    <!-- number-to-do不传,则子组件的使用默认值 -->
    <child @my-event="onChildEvent"></child>
    <!-- 子组件中定义number-to-do type: Number ,如果传入不是number类型的参数,则会报错-->
    <child :number-to-do='fatherNum' @my-event="onChildEvent"></child>
  </div>
</template>
<script>
// 第一步:通过import将子组件载入父组件的js中
import child from './components/child.vue'
export default {
  name: 'app',
  components: {
    child
  },
  data() {
    return {
      fatherNum: 2,
    }
  },
  mounted: function() {
    this.$nextTick(function() {});
  },
  methods: {
    onChildEvent(parmFromChild) {
      console.log(parmFromChild);
    }
  }
}

</script>
子组件:child.vue
<template>
  <div class="child-conten">
    <p>{{msg}}</p>
    <p>我是父组件传递过来的值:{{numberToDo}}</p>
    <button @click='emitMyEvent'>child-emit</button>
  </div>
</template>
<script>
export default {
    props: {
    'number-to-do': {
      type: Number,
      default: 100
    }
  },
  data() {
    return {
      msg: 'I am a components'
    }
  },
  methods: {
    emitMyEvent() {
      this.$emit('my-event', this.msg);
    }
  }
}

</script>
通过以上实例,发现子组件改变父组件的值是通过:子组件通过this.$emit监听父组件的 my-event,将子组件的值传递给父组件。
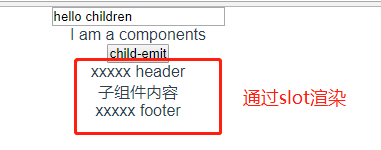
4.具名插槽
父组件:
<template>
  <div id="app">
    <input type="text" v-model="fatherString">
    <child :number-to-do='fatherNum' :string='fatherString' @my-event="onChildEvent">
      <p slot='header'>xxxxx header</p>
      <p slot='footer'>xxxxx footer</p>
    </child>
  </div>
</template>
子组件:
<template>
  <div class="child-conten">
    <p>{{msg}}</p>
    <!-- <p>我是父组件传递过来的值:{{numberToDo}}</p>
    <p>我是父组件传递过来的值:{{string}}</p> -->
    <button @click='emitMyEvent'>child-emit</button><br>
    <slot name='header'>no header</slot>
    <p>子组件内容</p>
    <slot name='footer'>no header</slot>
  </div>
</template>
页面效果:
git地址:vue2.0Demo

 浙公网安备 33010602011771号