【SpringBoot基础系列】手把手实现国际化支持实例开发
![]()
国际化的支持,对于app开发的小伙伴来说应该比价常见了;作为java后端的小伙伴,一般来讲接触国际化的机会不太多,毕竟业务开展到海外的企业并没有太多
SpringBoot提供了国际化的支持,网上也有相关的教程,然而实际体验的时候,发现并没有预期的那么顺利;本文将介绍一下SpringBoot如何支持国家化,以及在支持的过程中,一些注意事项
I. 项目环境
1. 项目依赖
本项目借助SpringBoot 2.2.1.RELEASE + maven 3.5.3 + IDEA进行开发
开一个web服务用于测试
<dependencies>
    <dependency>
        <groupId>org.springframework.boot</groupId>
        <artifactId>spring-boot-starter-web</artifactId>
    </dependency>

    <dependency>
        <groupId>org.springframework.boot</groupId>
        <artifactId>spring-boot-starter-thymeleaf</artifactId>
    </dependency>
</dependencies>
2. 配置文件
配置文件中,指定国际化的参数,thmeleaf的配置信息
application.yml
spring:
  messages:
    basename: i18n/messages/messages
    encoding: UTF-8
    fallbackToSystemLocale: false

  thymeleaf:
    mode: HTML
    encoding: UTF-8
    servlet:
      content-type: text/html
    cache: false
3. 国际化信息文件
上面的配置 spring.messages.basename 指定国际化配置文件的目录与前缀,取值为i18n/messages/messages
所以在资源目录下,新建文件 i18n/messages,国际化文件名为 messages-xxx.properties,项目结果如
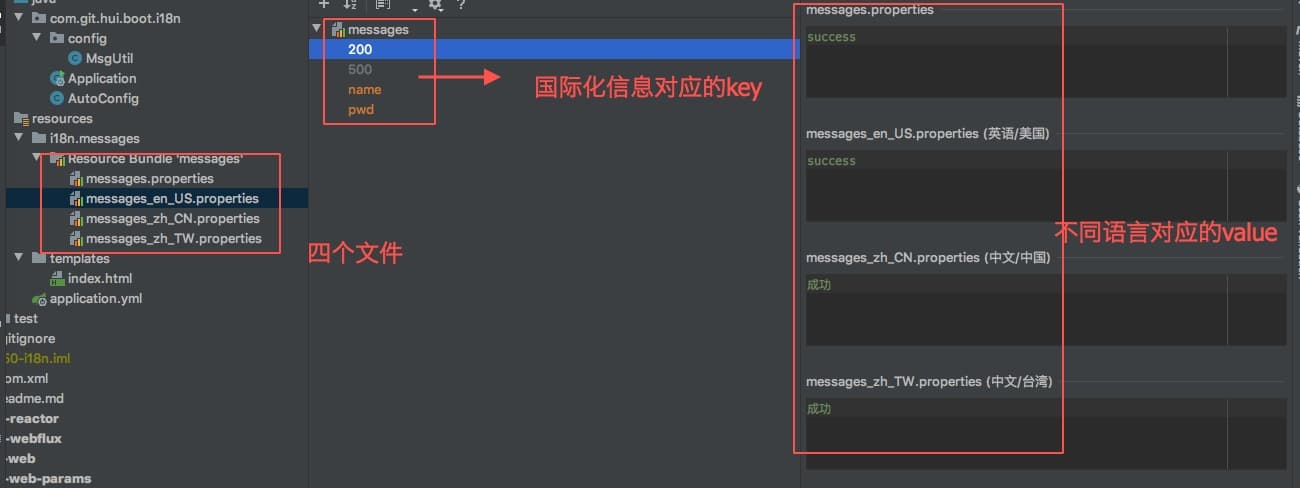
对应的信息如简体中文 messages_zh_CN.properties
200=成功
500=內部异常
name=用户名
pwd=密码
英文 messages_en_US.properties
200=success
500=unexpected exception
name=user name
pwd=password
繁体 messages_zh_TW.properties
200=成功
500=內部異常
name=用戶名
pwd=密碼
说明
注意spring.messages.basename 这个配置的取值为国际化文件的目录 + 文件名前缀,比如上面若少了最后一层的messages,会提示取不到配置
其次在IDEA中,选中国家化文件之后,点击下方的Resource Bundle,可以进入如上图中更友好的编辑框,支持一次修改多个语言的信息
II. 国际化支持
前面是国际化的基本配置,那么如何根据前面配置中的key,获取不同语言的value呢?
1. MessageSource
在SpringBoot中主要借助MessageSource来获取不同语言的value信息
如一个最基本的封装
public class MsgUtil {
    private static MessageSource messageSource;

    public static void inti(MessageSource messageSource) {
        MsgUtil.messageSource = messageSource;
    }

    /**
     * 获取单个国际化翻译值
     */
    public static String get(String msgKey) {
        try {
            return messageSource.getMessage(msgKey, null, LocaleContextHolder.getLocale());
        } catch (Exception e) {
            return msgKey;
        }
    }
}
2. 测试demo
接下来写一个基础的测试demo,根据传参来修改LocalContextHolder中的值,从而实现不同语言的切换
@Controller
@SpringBootApplication
public class Application {

    public Application(MessageSource messageSource) {
        MsgUtil.inti(messageSource);
    }

    public static void main(String[] args) {
        SpringApplication.run(Application.class);
    }

    @Data
    @Accessors(chain = true)
    public static class RspWrapper<T> {
        private int code;
        private String msg;
        private T data;
    }

    @GetMapping(path = "change")
    @ResponseBody
    public String changeLocal(String language) {
        String[] s = language.split("_");
        LocaleContextHolder.setLocale(new Locale(s[0], s[1]));
        RspWrapper res = new RspWrapper<>().setCode(200).setMsg(MsgUtil.get("200")).setData(true);
        return JSON.toJSONString(res);
    }
}
演示如下
3. 子线程支持
上面虽然可以根据请求参数来切换语言,但是有个问题,如果在子线程中进行国际化支持,则会不生效
@GetMapping(path = "change2")
@ResponseBody
public String changeLocal(String language) {
    String[] s = language.split("_");
    LocaleContextHolder.setLocale(new Locale(s[0], s[1]));

    RspWrapper res = new RspWrapper<>().setCode(200).setMsg(MsgUtil.get("200")).setData(true);
    return JSON.toJSONString(res);
}
如下图,即便修改了language,返回都是默认的中文

针对这种解决办法是在设置Locale时,指定第二个可继承参数为true
@GetMapping(path = "change3")
@ResponseBody
public String changeLocal(String language) {
    String[] s = language.split("_");
    LocaleContextHolder.setLocale(new Locale(s[0], s[1]));
    RspWrapper res = new RspWrapper<>().setCode(200).setMsg(MsgUtil.get("200")).setData(true);
    return JSON.toJSONString(res);
}
4. Cookies方式缓存国际化信息
上面虽说支持了根据传参来设置国际化,但是需要每次传参都带上这个参数language=zh_CN,还需要我们自己来解析这个请求参数,我们可以考虑借助拦截器来实现统一的Local设置
这个拦截器可以自己按照上面的方式写,当然更推荐的是直接使用已封装好的
@Configuration
public class AutoConfig implements WebMvcConfigurer {
    /**
     * 这个如果不存在,则会抛异常: nested exception is java.lang.UnsupportedOperationException: Cannot change HTTP accept header - use a different locale resolution strategy
     *
     * @return
     */
    @Bean
    public LocaleResolver localeResolver() {
        // 也可以换成 SessionLocalResolver, 区别在于国际化的应用范围
        CookieLocaleResolver localeResolver = new CookieLocaleResolver();
        localeResolver.setDefaultLocale(Locale.SIMPLIFIED_CHINESE);
        return localeResolver;
    }

    /**
     * 根据请求参数,来设置本地化
     *
     * @return
     */
    @Bean
    public LocaleChangeInterceptor localeChangeInterceptor() {
        LocaleChangeInterceptor localeChangeInterceptor = new LocaleChangeInterceptor();
        // Defaults to "locale" if not set
        localeChangeInterceptor.setParamName("language");
        return localeChangeInterceptor;
    }

    @Override
    public void addInterceptors(InterceptorRegistry interceptorRegistry) {
        interceptorRegistry.addInterceptor(localeChangeInterceptor());
    }
}
请注意上面的 localResolver, 当我们不注册这个bean的时候,运行则会抛出异常nested exception is java.lang.UnsupportedOperationException: Cannot change HTTP accept header - use a different locale resolution
上面的实例中,采用的是CookieLocaleResolver,因此会在cookie中缓存语言信息,一次修改,后续都会生效
测试如下
@GetMapping(path = "say")
@ResponseBody
public String say(String name) {
    RspWrapper res = new RspWrapper<>().setCode(200).setMsg(MsgUtil.get("200")).setData(MsgUtil.get("name") + ":" + name);
    return JSON.toJSONString(res);
}

@GetMapping(path = "say2")
@ResponseBody
public String say2(String name) {
    RspWrapper res = new RspWrapper<>().setCode(200).setMsg(MsgUtil.get("200")).setData(MsgUtil.get("name") + ":" + name);
    return JSON.toJSONString(res);
}

主要一个地方设置了语言,后续的访问不带语言参数时,都会复用之前设置的语言,这样使用来说就更简洁了
5. 页面元素国际化
上面介绍的是返回的json串支持国际化,另外一个场景就是我们返回的页面,希望渲染的数据也可以实现国际化支持
在上文的基础上实现这个也没什么难度了
在资源目录下,新建目录templates,新建模板文件 index.html
<!DOCTYPE html>
<html xmlns:th="http://www.thymeleaf.org">
<head>
    <meta charset="UTF-8">
    <meta name="viewport" content="width=device-width, initial-scale=1">
    <meta name="author" content="YiHui"/>
    <meta name="viewport" content="width=device-width, initial-scale=1.0"/>
    <title>一灰灰blog 国际化测试页面</title>
</head>
<body>

<div>
    <div class="title">hello world!</div>
    <br/>
    <div class="content" th:text="'name: ' + ${name}">默认用户名</div>
    <br/>
    <div class="sign" th:text="'pwd: ' + ${pwd}">默认密码</div>
    <br/>
</div>
</body>
</html>
对应的controller
@GetMapping(path = {"", "/", "/index"})
public String index(Model model) {
    model.addAttribute("name", MsgUtil.get("name"));
    model.addAttribute("pwd", MsgUtil.get("pwd"));
    return "index";
}

虽说上面这样实现了国家化的支持,但是看起来不太优雅,难道还需要后端接口进行转义一下么,没有更简单的方式么?
Themeleaf提供了更简单的支持方式,将上面的$改成#即可
<!DOCTYPE html>
<html xmlns:th="http://www.thymeleaf.org">
<head>
    <meta charset="UTF-8">
    <meta name="viewport" content="width=device-width, initial-scale=1">
    <meta name="author" content="YiHui"/>
    <meta name="viewport" content="width=device-width, initial-scale=1.0"/>
    <title>一灰灰blog 国际化测试页面</title>
</head>
<body>

<div>
    <div class="title">hello world!</div>
    <br/>
    <div class="content" th:text="'name: ' + #{name}">默认用户名</div>
    <br/>
    <div class="sign" th:text="'pwd: ' + #{pwd}">默认密码</div>
    <br/>
    <div class="content" th:text="'200: ' + #{200}">200</div>
    <br/>
    <div class="content" th:text="'500: ' + #{500}">500</div>
</div>
</body>
</html>
对应的rest
@GetMapping(path = "show")
public String show() {
    return "show";
}
6. 注意事项
在实现国际化的过程中,遇到了下面几个问题,特此记录一下
6.1 配置信息无法获取
在使用messageSource.getMessage(msgKey, null, LocaleContextHolder.getLocale())查询配置信息,结果提示org.springframework.context.NoSuchMessageException: No message found under code '200' for locale 'en_US'.
出现上面这个问题,当然优先判断是否真的配置了这个参数,其次确认spring.messages.basename是否准确,对应的value为目录 + 语言的前缀
- 如我的配置文件为
i18n/messages/messages_en_US.properties, 那么这个value就应该是i18n/messages/messages
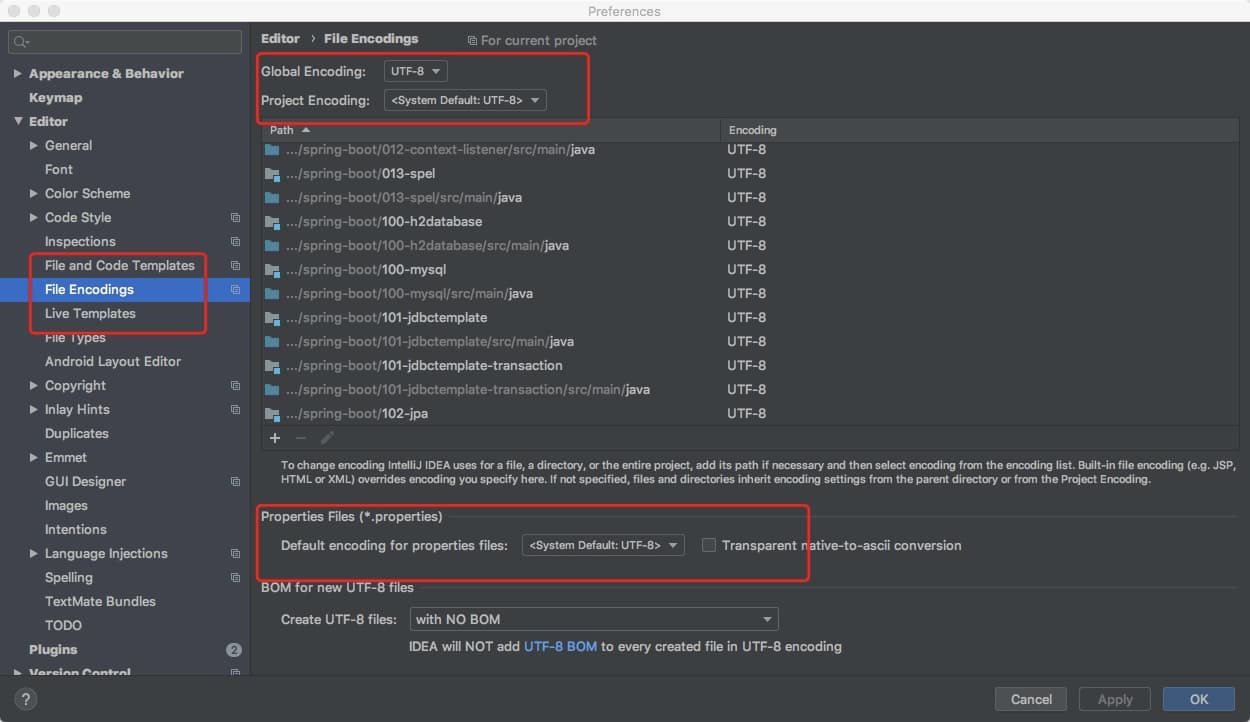
6.2 中文乱码问题
- 设置编码
spring.messages.encoding=utf-8
如果发现上面这个设置了依然没有生效,那么考虑一下配置文件是否为utf-8编码
6.3 根据请求支持国际化
需要添加本地化的拦截器LocaleChangeInterceptor,来实现根据请求参数,解析语言环境
其次需要注册LocaleResolver,比如demo中使用CookieLocaleResolver,来保存国际化信息 (如果不设置它会抛异常)
II. 其他
0. 项目
- 工程:https://github.com/liuyueyi/spring-boot-demo
- 项目源码: https://github.com/liuyueyi/spring-boot-demo/blob/master/spring-boot/150-i18n
1. 一灰灰Blog
尽信书则不如,以上内容,纯属一家之言,因个人能力有限,难免有疏漏和错误之处,如发现bug或者有更好的建议,欢迎批评指正,不吝感激
下面一灰灰的个人博客,记录所有学习和工作中的博文,欢迎大家前去逛逛
- 一灰灰Blog个人博客 https://blog.hhui.top
- 一灰灰Blog-Spring专题博客 http://spring.hhui.top


 浙公网安备 33010602011771号