5.SpringSecurity(安全)
SpringSecurity(安全)
- 为什么要做安全
- 在web开发中,安全第一位,过滤器,拦截器等
- 他不是一个功能性需求,做网站,安全什么时候去考虑?如果不考虑安全,就会有漏洞,用户隐式泄露等问题,假设架构一旦确定,在去考虑安全问题,将会改动大量代码,所以安全问题,应该在设计之初就考虑
- 当使用拦截器,过滤器解决这些问题,会使用大量的原生代码以及冗余
- SpringSecurity,shiro:这两个框架很相似,主要做认证,授权(比如V1,V2,V3的功能不一样)功能
- 权限分类
- 功能权限
- 菜单权限
- 访问权限
1.环境搭建
<dependency>
            <groupId>org.thymeleaf.extras</groupId>
            <artifactId>thymeleaf-extras-java8time</artifactId>
            <version>3.0.4.RELEASE</version>
        </dependency>

        <dependency>
            <groupId>org.thymeleaf</groupId>
            <artifactId>thymeleaf-spring5</artifactId>
            <version>3.0.11.RELEASE</version>
        </dependency>

        <dependency>
            <groupId>org.springframework.boot</groupId>
            <artifactId>spring-boot-starter-web</artifactId>
        </dependency>

        <dependency>
            <groupId>org.springframework.boot</groupId>
            <artifactId>spring-boot-starter-thymeleaf</artifactId>
        </dependency>

        <dependency>
            <groupId>org.springframework.boot</groupId>
            <artifactId>spring-boot-starter-test</artifactId>
            <scope>test</scope>
        </dependency>
@Controller
public class SerurityController {

    @RequestMapping({"/","/index"})
    public String index(){
        return "index";
    }
    @RequestMapping("/login")
    public String login(){
        return "views/login";
    }

    @RequestMapping("/view1/{id}")
    public String view1(@PathVariable("id") int id){
        return "views/view1/"+id;
    }
    @RequestMapping("/view2/{id}")
    public String view2(@PathVariable("id") int id){
        return "views/view2/"+id;
    }
    @RequestMapping("/view3/{id}")
    public String view3(@PathVariable("id") int id){
        return "views/view3/"+id;
    }
}
<!DOCTYPE html>
<html lang="en" xmlns:th="http://www.thymeleaf.org">
<head>
    <meta charset="UTF-8">
    <title>Title</title>
</head>
<body>
<h1>首页</h1>
<div id="div1" style="background-color: antiquewhite">
    <a th:href="@{/view1/1}">view1-1</a>
    <a th:href="@{/view1/2}">view1-2</a>
    <a th:href="@{/view1/3}">view1-3</a>
</div>

<div id="div2" style="background-color: burlywood">
    <a th:href="@{/view2/1}">view2-1</a>
    <a th:href="@{/view2/2}">view2-2</a>
    <a th:href="@{/view2/3}">view2-3</a>
</div>

<div id="div3" style="background-color: blueviolet">
    <a th:href="@{/view3/1}">view3-1</a>
    <a th:href="@{/view3/2}">view3-2</a>
    <a th:href="@{/view3/3}">view3-3</a>
</div>
<div>
    <a th:href="@{/login}">登录</a>
     <a th:href="@{/logout}">注销</a>
</div>
</body>
</html>
2.简介
- Spring Security是针对Spring项目的安全框架,也是spring boot底层安全模块默认的技术选型,它可以实现强大的web安全控制,对于安全控制,我们只需要引入spring-boot-starter-secyrity模块,进行少量配置,即可实现强大的安全管理功能
- 记住这几个类
- WebSecurityConfigurerAdapter:自定义Serurity策略
- AuthenticationManagerBuilder:自定义认证策略
- @EnableWebSecurity:开启WenSecurity模式
- Spring Saecurity的两个主要目标是“认证”和“授权”(访问控制)
- "认证"(Authentication)
- "授权"(Authorization)
- 这两个概念是通用的,而不是只在Spring Security
- 参考官网:https://spring.io/projects/spring-security
- 根据版本对应的帮助文档:https://docs.spring.io/spring-security/site/docs/5.2.8.BUILD-SNAPSHOT/reference/htmlsingle/
实现认证授权功能
1.引入启动器(依赖)
<!--        导入security启动器-->
        <dependency>
            <groupId>org.springframework.boot</groupId>
            <artifactId>spring-boot-starter-security</artifactId>
        </dependency>
2.编写配置类,实现授权认证功能
package com.cdl.config;

import org.springframework.security.config.annotation.authentication.builders.AuthenticationManagerBuilder;
import org.springframework.security.config.annotation.web.builders.HttpSecurity;
import org.springframework.security.config.annotation.web.configuration.EnableWebSecurity;
import org.springframework.security.config.annotation.web.configuration.WebSecurityConfigurerAdapter;
import org.springframework.security.crypto.bcrypt.BCryptPasswordEncoder;

/**
 * date:
 * Author:CDL
 * desc:
 * version:1.0
 */

//底层是Aop横切技术,不用改变越来的代码,就可以实现权限控制
@EnableWebSecurity
public class SecurityConfig extends WebSecurityConfigurerAdapter {

    //链式编程
    //授权
    @Override
    protected void configure(HttpSecurity http) throws Exception {//HttpSecurity http 属于http安全策略
        //首页任何人都可以访问,vip1只能访问view1下的页面,vip2只能访问view2下的页面
        //请求授权的规则
        http.authorizeRequests()
                .antMatchers("/").permitAll()
                .antMatchers("/view1/**").hasRole("vip1")
                .antMatchers("/view2/**").hasRole("vip2")
                .antMatchers("/view3/**").hasRole("vip3");
        //没有权限,会默认跳到登录也买你
        http.formLogin();//不需要定义任何连接去哪里,这句代码会直接定义到登录页面
    }

    //认证(赋予角色的访问权限)
    /**
     * 在springboot2.1 以及2.1之前,可以直接使用,2.1之后,会存在很多版本问题,例如:
     * 之前可以直接使用明文密码进行登录,现在使用明文密码就会报passwordEncoder错误,意思就是密码需要加密才可以,否则认为不安全的操作
     * 在是spring Security5+中,增加了很多密码的加密方式
     * @param auth
     * @throws Exception
     */
    @Override
    protected void configure(AuthenticationManagerBuilder auth) throws Exception {
        /**
         * auth.inMemoryAuthentication() 从内存中那数据进行认证
         * auth.jdbcAuthentication() 从数据库拿数据进行仍正
         */
        //这些数据正常情况下应该从数据库中读取,此次没有连接数据库,就直接从内存中获取,内存中的读取速度也比较快
        auth.inMemoryAuthentication().passwordEncoder(new BCryptPasswordEncoder())
                .withUser("cdl").password(new BCryptPasswordEncoder().encode("123")).roles("vip2","vip3")
                .and()
                .withUser("root").password(new BCryptPasswordEncoder().encode("123")).roles("vip1","vip2","vip3");
    }
}
3.实现注销功能
需要关闭csrf()功能,否者会注销失败,报403错误没有权限,因为登录使用的是get请求,给请求会把用户信息拼接在url后面,不安全,所以springboot默认开启csrf,防止网站被csrf攻击
 @Override
    protected void configure(HttpSecurity http) throws Exception {//HttpSecurity http 属于http安全策略
        //首页任何人都可以访问,vip1只能访问view1下的页面,vip2只能访问view2下的页面
        //请求授权的规则
        http.authorizeRequests()
                .antMatchers("/").permitAll()
                .antMatchers("/view1/**").hasRole("vip1")
                .antMatchers("/view2/**").hasRole("vip2")
                .antMatchers("/view3/**").hasRole("vip3");
        //没有权限,会默认跳到登录也买你
        http.formLogin();//不需要定义任何连接去哪里,这句代码会直接定义到登录页面

        //注销并跳转到首页
        //http.logout().deleteCookies("remove").invalidateHttpSession(true); 注销并清空所有的session和cookie
        http.csrf().disable();//关闭csrf功能,不认可能会出现登出失败
        http.logout().logoutSuccessUrl("/");

    }
什么是csrf?
以上代码实现的功能是将所有页面展示给所有用户看,对应的用户没有权限使用,现在需要修改代码,不同权限的用户只能看到自己能有权限操作的页面,通过thymeleaf与security结合
1.导入thymeleaf与security的结合包
 <!-- https://mvnrepository.com/artifact/org.thymeleaf.extras/thymeleaf-extras-springsecurity4 -->
        <dependency>
            <groupId>org.thymeleaf.extras</groupId>
            <artifactId>thymeleaf-extras-springsecurity4</artifactId>
            <version>3.0.4.RELEASE</version>
        </dependency>
2.通过thymeleaf与security的结合标签,sec:authorize,sec:authorize="!isAuthenticated()"等标签实现该功能
<!DOCTYPE html>
<html lang="en" xmlns:th="http://www.thymeleaf.org"  xmlns:sec="http://www.thymeleaf.org/extras/spring-security">
<head>
    <meta charset="UTF-8">
    <title>Title</title>
</head>
<body>
<h1>首页</h1>
<div id="div1" style="background-color: antiquewhite" sec:authorize="hasRole('vip1')">
    <a th:href="@{/view1/1}">view1-1</a>
    <a th:href="@{/view1/2}">view1-2</a>
    <a th:href="@{/view1/3}">view1-3</a>
</div>

<div id="div2" style="background-color: burlywood" sec:authorize="hasRole('vip2')">
    <a th:href="@{/view2/1}">view2-1</a>
    <a th:href="@{/view2/2}">view2-2</a>
    <a th:href="@{/view2/3}">view2-3</a>
</div>

<div id="div3" style="background-color: blueviolet" sec:authorize="hasRole('vip3')">
    <a th:href="@{/view3/1}">view3-1</a>
    <a th:href="@{/view3/2}">view3-2</a>
    <a th:href="@{/view3/3}">view3-3</a>
</div>
<div>
<!--    如果未登录,只显示登录按钮,不显示注销按钮,如果已经登录,则显示用户名和注销按钮-->
    <div sec:authorize="!isAuthenticated()">
     <a th:href="@{/login}">登录</a>
    </div>

    <div sec:authorize="isAuthenticated()">
        <a >
            用户名:<span sec:authentication="name"></span>
        </a>
    </div>
    <div sec:authorize="isAuthenticated()">
      <a th:href="@{/logout}">注销</a>
    </div>
</div>
</body>
</html>
该功能只有在springboot2.0.9及以下才可以实现,在2.0以上会有问题,报错
3.登录页面自定义,不使用security自带的页面,并实现记住我功能
 @Override
    protected void configure(HttpSecurity http) throws Exception {//HttpSecurity http 属于http安全策略
        //首页任何人都可以访问,vip1只能访问view1下的页面,vip2只能访问view2下的页面
        //请求授权的规则
        http.authorizeRequests()
                .antMatchers("/").permitAll()
                .antMatchers("/view1/**").hasRole("vip1")
                .antMatchers("/view2/**").hasRole("vip2")
                .antMatchers("/view3/**").hasRole("vip3");
        //没有权限,会默认跳到登录页面 跳转到自定义的前端页面loginPage("/Tologin") ,并实现security的功能 loginProcessingUrl("/login"),
        // 同时使用usernameParameter("user").passwordParameter("pwd")接受参数
        http.formLogin().loginPage("/Tologin").usernameParameter("user").passwordParameter("pwd").loginProcessingUrl("/login");//不需要定义任何连接去哪里,这句代码会直接定义到登录页面

        //注销并跳转到首页
        //http.logout().deleteCookies("remove").invalidateHttpSession(true); 注销并清空所有的session和cookie
        http.csrf().disable();//关闭csrf功能,不认可能会出现登出失败
        http.logout().logoutSuccessUrl("/");

        //开启记住我功能 底层原理:cookie  默认保存时间:14天  自定义记住我,接受前端的参数rememberMeParameter("remenber");需要和前端相匹配
        http.rememberMe().rememberMeParameter("remenber");
    }
<!DOCTYPE html>
<html lang="en" xmlns:th="http://www.thymeleaf.org">
<head>
    <meta charset="UTF-8">
    <title>Title</title>
</head>
<body>
<form th:action="@{/login}">
    <input name="user">用户名
    <input name="pwd">密码
    <input name="remember" type="checkbox">记住我
<h1>登录</h1>
</form>
<a th:href="@{/logout}">注销</a>
</body>
</html>
Shiro介绍
-
什么是Shiro
- Apache Shiro是一个java的安全(权限)框架
- Shiro可以非常容易的开发出足够好的应用,其不仅可以在JavaSE环境,也可以用在JavaEE环境
- Shiro可以完成认证,授权,加密,会话管理,Web集成,缓存等
- 官方网站:https://shiro.apache.org/
-
有哪些功能?
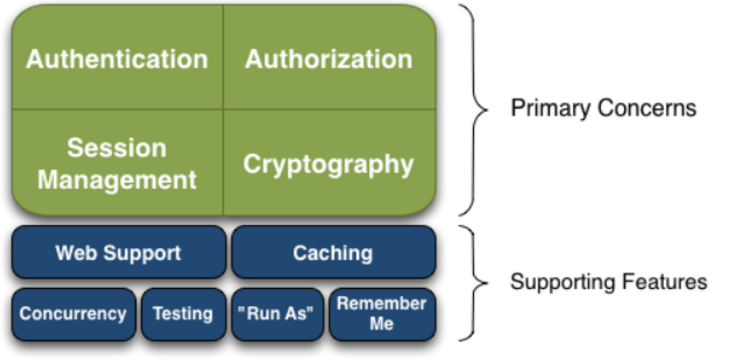
- Authentication:身份认证 / 登录,验证用户是不是拥有相应的身份;
- Authorization:授权,即权限验证,验证某个已认证的用户是否拥有某个权限;即判断用户是否能做事情,常见的如:验证某个用户是否拥有某个角色。或者细粒度的验证某个用户对某个资源是否具有某个权限;
- Session Management:会话管理,即用户登录后就是一次会话,在没有退出之前,它的所有信息都在会话中;会话可以是普通 JavaSE 环境的,也可以是如 Web 环境的;
- Cryptography:加密,保护数据的安全性,如密码加密存储到数据库,而不是明文存储;
- Web Support:Web 支持,可以非常容易的集成到 Web 环境;
- Caching:缓存,比如用户登录后,其用户信息、拥有的角色 / 权限不必每次去查,这样可以提高效率;
- Concurrency:shiro 支持多线程应用的并发验证,即如在一个线程中开启另一个线程,能把权限自动传播过去;
- Testing:提供测试支持;
- Run As:允许一个用户假装为另一个用户(如果他们允许)的身份进行访问;
- Remember Me:记住我,这个是非常常见的功能,即一次登录后,下次再来的话不用登录了。
-
记住一点,Shiro 不会去维护用户、维护权限;这些需要我们自己去设计 / 提供;然后通过相应的接口注入给 Shiro 即可。
-
Shiro结构
-
从外部来看Shiro,即从应用程序的角度来看Shiro如何完成工作
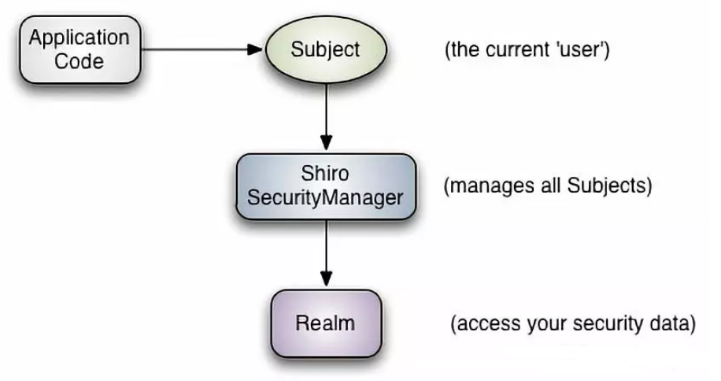
- subject:应用代码直接交互的对象是Subjiect,也就是说Shiro对外交互的核心Api就是Subject,Subject代表了当前用户,这个用户不一定是一个具体的人,与当前应用交互的任何东西都是Subject,如网络爬虫,机器人等,与Subject的所有交互都会委托给SecurityManager,Subject其实是一个门面,SecurityManager才是实际的执行者
- SecurityManager:安全管理器,即所有与安全的操作都会与SecurityManager有关,并且他管理着所有的Subject,可以看出他是shiro的核心,他负责与shiro的其他组件交互,相当于SpringMVC的DispatcherServlet的角色
- Realm:Shiro是从Realm获取安全数据(如用户,角色,权限),就是说SecurityManager要验证用户的身份,那么他需要从Realm获取相应的用户进行比较,来确定用户的身份是否合法,也需要从Realm得到用户相应的角色,权限,进行验证用户的操作是否能够进行,可以把Relam看成DataSource
-
从内部来看Shiro的结构
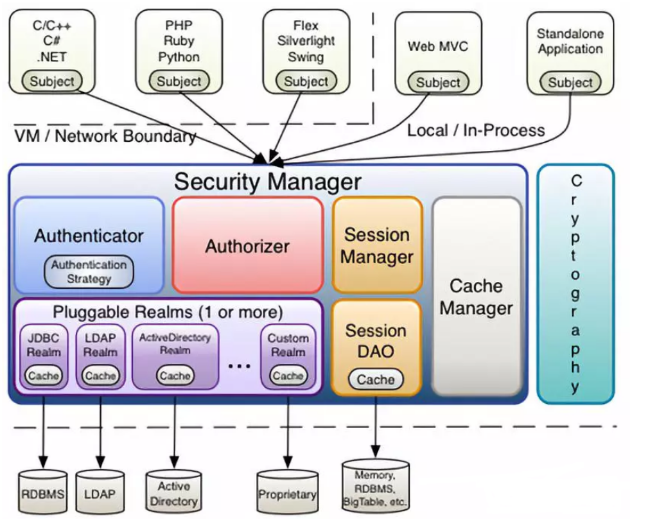
- Subject:任何可以与应用交互的"用户"
- Security Manager:相当于SpringMvc的DispatcherServlet,是shiro的心脏,所有具体的交互都通过Security Manager进行控制,他管理着所有的Subject,切负责认证,授权,会话以及缓存管理
- Authenticator:负责Subject的认证,是一个扩展点,可以自定义实现,可以使用认证策略(Authencitation Strategy),即实现什么情况下算用户认证通过了
- Authorizer:授权期,即访问控制器,用来决定主体是否有权限进行相应的操作,即控制着用户能访问相应的哪些功能
- Realm:可以有一个或者多个Relam,可以认为是安全实体数据源,及用于获取安全实体,可以用JDBC实现,也可以是内存实现等等,由用户提供,所以一般都是自己实现Relam
- SessionManager:管理session的生命周期组件,而Shiro并不仅仅可以用在web中,还可以用在javaSE环境中
- CacheManager:缓存控制器,来管理用户,角色,权限的缓存,因为这些数据基本很少改变,放在缓存中可以提高访问的性能
- Cryptography:密码模块,Shiro提供一些常用的密码组件用于密码加密解密等等
-
Shiro下常用的方法
- SecurityUtils.getSubject(); 获取当前用户对象
- currentUser.getSession(); 通过当前用户拿到session(该session不是http的session,是shiro的session)
- currentUser.isAuthenticated();判断当前用户是否被认证
- currentUser.getPrincipal(); 获得当前用户的认证
- currentUser.hasRole("schwartz");获取该用户是否用什么什么角色
- currentUser.isPermitted("lightsaber:wield") 获得当前用户的权限
- currentUser.logout(); 注销
呀,是丹龙呀!

 浙公网安备 33010602011771号