SSM详细整合教程-新手版
一、准备
工具:Eclispe Java EE 版
相关jar包及配置文件:
链接: https://pan.baidu.com/s/1iTvz-n7bwAV8uC7LRvCD2A 提取码: die9
二、步骤
1.创建Dynamic Web Project
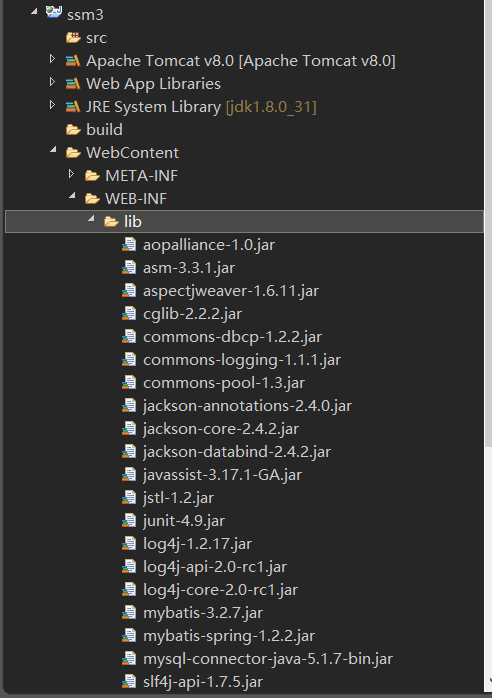
2.将下载好的jar包复制到 WebContent/WEB-INF/lib 目录下
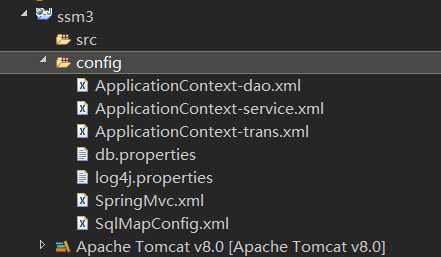
3.选中项目->右键创建一个Source Folder 文件夹,将下载好的配置文件复制进去
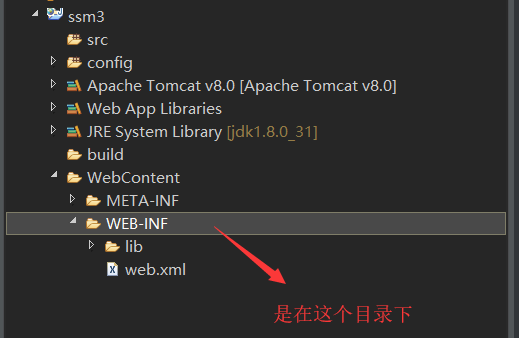
4.将下载好的web.xml文件复制到WEB-INF目录下
5.将测试页面按如下放置
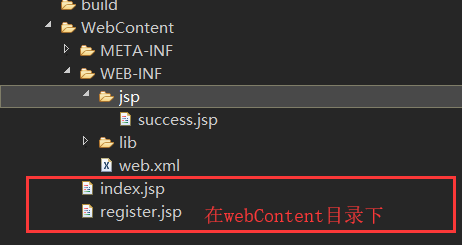
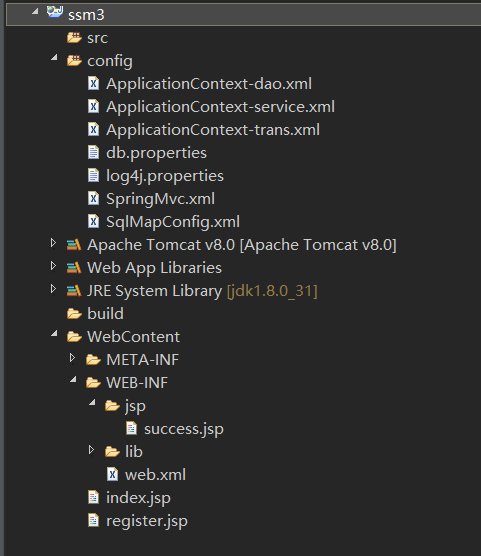
至此、项目的准备工作就结束了。有如下项目结构:
下面开始环境的配置
三、配置
1.打开web.xml文件,添加如下配置
Web程序整合SpringMvc框架
<?xml version="1.0" encoding="UTF-8"?>
<web-app
    xmlns:xsi="http://www.w3.org/2001/XMLSchema-instance"
    xmlns="http://java.sun.com/xml/ns/javaee"
    xsi:schemaLocation="
        http://java.sun.com/xml/ns/javaee
        http://java.sun.com/xml/ns/javaee/web-app_2_5.xsd" id="WebApp_ID" version="2.5">

      <!-- 加载spring容器 -->
      <context-param>
          <param-name>contextConfigLocation</param-name>
          <!-- 使用通配符*来引入所有的spring配置文件 -->
          <param-value>classpath:ApplicationContext-*.xml</param-value>
      </context-param>
      <listener>
          <listener-class>org.springframework.web.context.ContextLoaderListener</listener-class>
      </listener>


      <!-- 配置springmvc前端控制器 -->
      <servlet>
          <servlet-name>springMvc</servlet-name>
          <servlet-class>org.springframework.web.servlet.DispatcherServlet</servlet-class>
          <init-param>
              <!-- 配置初始化参数:指定SpringMvc核心配置文件的位置 -->
              <param-name>contextConfigLocation</param-name>
              <param-value>classpath:SpringMvc.xml</param-value>
          </init-param>
          <!-- tomcat启动时就加载这个servlet -->
          <load-on-startup>0</load-on-startup>
      </servlet>
      <servlet-mapping>
          <servlet-name>springMvc</servlet-name>
          <!-- / 表示拦截所有请求,不包括jsp     /* 表示拦截所有请求,包括jsp -->
          <url-pattern>/</url-pattern>
      </servlet-mapping>

      <!-- 配置post乱码过滤器 -->
      <filter>
          <filter-name>encodingFilter</filter-name>
          <filter-class>org.springframework.web.filter.CharacterEncodingFilter</filter-class>
          <init-param>
              <param-name>encoding</param-name>
              <param-value>utf-8</param-value>
          </init-param>
      </filter>
      <filter-mapping>
          <filter-name>encodingFilter</filter-name>
          <url-pattern>/</url-pattern>
      </filter-mapping>

</web-app>
2.打开config下的ApplicationContext-service.xml,添加如下配置
spring框架自身的配置
<?xml version="1.0" encoding="UTF-8"?>
<beans xmlns="http://www.springframework.org/schema/beans"
    xmlns:context="http://www.springframework.org/schema/context"
    xmlns:p="http://www.springframework.org/schema/p"
    xmlns:aop="http://www.springframework.org/schema/aop"
    xmlns:tx="http://www.springframework.org/schema/tx"
    xmlns:xsi="http://www.w3.org/2001/XMLSchema-instance"
    xsi:schemaLocation="
        http://www.springframework.org/schema/beans
        http://www.springframework.org/schema/beans/spring-beans-4.0.xsd
        http://www.springframework.org/schema/context
        http://www.springframework.org/schema/context/spring-context-4.0.xsd
        http://www.springframework.org/schema/aop
        http://www.springframework.org/schema/aop/spring-aop-4.0.xsd
        http://www.springframework.org/schema/tx
        http://www.springframework.org/schema/tx/spring-tx-4.0.xsd
        http://www.springframework.org/schema/util
        http://www.springframework.org/schema/util/spring-util-4.0.xsd">

    <!-- 添加@Service注解扫描 -->
    <context:component-scan base-package="cn.hpe.service"></context:component-scan>

</beans>
3.打开config下的ApplicationContext-dao.xml,添加如下配置
spring整合Mybatis框架
<?xml version="1.0" encoding="UTF-8"?>
<beans xmlns="http://www.springframework.org/schema/beans"
    xmlns:context="http://www.springframework.org/schema/context"
    xmlns:p="http://www.springframework.org/schema/p"
    xmlns:aop="http://www.springframework.org/schema/aop"
    xmlns:tx="http://www.springframework.org/schema/tx"
    xmlns:xsi="http://www.w3.org/2001/XMLSchema-instance"
    xsi:schemaLocation="
        http://www.springframework.org/schema/beans
        http://www.springframework.org/schema/beans/spring-beans-4.0.xsd
        http://www.springframework.org/schema/context
        http://www.springframework.org/schema/context/spring-context-4.0.xsd
        http://www.springframework.org/schema/aop
        http://www.springframework.org/schema/aop/spring-aop-4.0.xsd
        http://www.springframework.org/schema/tx
        http://www.springframework.org/schema/tx/spring-tx-4.0.xsd
        http://www.springframework.org/schema/util
        http://www.springframework.org/schema/util/spring-util-4.0.xsd">

    <!-- 引入db属性文件 -->
    <context:property-placeholder location="classpath:db.properties"/>

    <!-- 配置数据源 -->
    <bean id="dataSource" class="org.apache.commons.dbcp.BasicDataSource">
        <property name="driverClassName" value="${jdbc.driver}"/>
        <property name="url" value="${jdbc.url}"/>
        <property name="username" value="${jdbc.username}"/>
        <property name="password" value="${jdbc.password}"/>
        <property name="maxActive" value="20"/>
        <property name="maxIdle" value="5"/>
    </bean>

    <!-- 配置mbatis会话工厂 -->
    <bean class="org.mybatis.spring.SqlSessionFactoryBean">
        <property name="dataSource" ref="dataSource"/>
        <property name="configLocation" value="classpath:SqlMapConfig.xml"/>
    </bean>

    <!-- 配置mapper包扫描 -->
    <bean class="org.mybatis.spring.mapper.MapperScannerConfigurer">
        <property name="basePackage" value="cn.hpe.dao"></property>
    </bean>


</beans>
4.打开config下的ApplicationContext-trans.xml,添加如下配置:
将事务交给spring处理,这里使用的是注解的方式,也可以使用AOP的方式。
<?xml version="1.0" encoding="UTF-8"?>
<beans xmlns="http://www.springframework.org/schema/beans"
    xmlns:context="http://www.springframework.org/schema/context"
    xmlns:p="http://www.springframework.org/schema/p"
    xmlns:aop="http://www.springframework.org/schema/aop"
    xmlns:tx="http://www.springframework.org/schema/tx"
    xmlns:xsi="http://www.w3.org/2001/XMLSchema-instance"
    xsi:schemaLocation="
        http://www.springframework.org/schema/beans
        http://www.springframework.org/schema/beans/spring-beans-4.0.xsd
        http://www.springframework.org/schema/context
        http://www.springframework.org/schema/context/spring-context-4.0.xsd
        http://www.springframework.org/schema/aop
        http://www.springframework.org/schema/aop/spring-aop-4.0.xsd
        http://www.springframework.org/schema/tx
        http://www.springframework.org/schema/tx/spring-tx-4.0.xsd
        http://www.springframework.org/schema/util
        http://www.springframework.org/schema/util/spring-util-4.0.xsd">

    <!-- 配置事务管理器 -->
    <bean class="org.springframework.jdbc.datasource.DataSourceTransactionManager">
        <property name="dataSource" ref="dataSource"/>
    </bean>

    <!-- 配置@Transactional注解驱动 -->
    <tx:annotation-driven/>


</beans>
5.打开config下的SpringMvc.xml,添加如下配置:
SpringMvc框架自身配置
<?xml version="1.0" encoding="UTF-8"?>
<beans xmlns="http://www.springframework.org/schema/beans"
    xmlns:xsi="http://www.w3.org/2001/XMLSchema-instance"
    xmlns:p="http://www.springframework.org/schema/p"
    xmlns:context="http://www.springframework.org/schema/context"
    xmlns:dubbo="http://code.alibabatech.com/schema/dubbo"
    xmlns:mvc="http://www.springframework.org/schema/mvc"
    xsi:schemaLocation="
        http://www.springframework.org/schema/beans
        http://www.springframework.org/schema/beans/spring-beans-4.0.xsd
        http://www.springframework.org/schema/mvc
        http://www.springframework.org/schema/mvc/spring-mvc-4.0.xsd
        http://code.alibabatech.com/schema/dubbo
        http://code.alibabatech.com/schema/dubbo/dubbo.xsd
        http://www.springframework.org/schema/context
        http://www.springframework.org/schema/context/spring-context-4.0.xsd">

    <!-- 配置@Controller注解扫描 -->
    <context:component-scan base-package="cn.hpe.controller"></context:component-scan>

    <!-- 配置注解驱动,有了这个,就能自动配置HandlerMapping和HandlerAdapter -->
    <mvc:annotation-driven></mvc:annotation-driven>


    <!-- 配置视图解析器 -->
    <bean class="org.springframework.web.servlet.view.InternalResourceViewResolver">
        <property name="prefix" value="/WEB-INF/jsp/"/>
        <property name="suffix" value=".jsp"/>
        <property name="order" value="0"/>
    </bean>

</beans>
6..打开config下的db.properties,添加如下配置:
数据库、用户名密码根据自己情况修改
jdbc.driver=com.mysql.jdbc.Driver
jdbc.url=jdbc:mysql://localhost:3306/test?characterEncoding=utf-8
jdbc.username=lemodk
jdbc.password=lemodk
7.SqlMapConfig.xml不需要添加配置,但是不能没有
至此,配置就结束了,下面开始编写后台测试代码:
四、后台测试代码
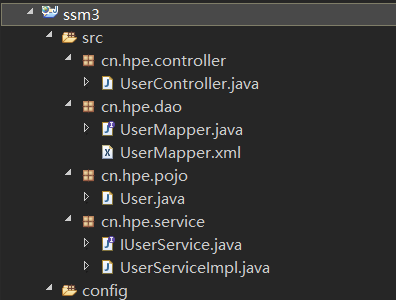
后台代码整体结构:
User.java
package cn.hpe.pojo;

public class User {

    private String username;
    private String password;
    public String getUsername() {
        return username;
    }
    public void setUsername(String username) {
        this.username = username;
    }
    public String getPassword() {
        return password;
    }
    public void setPassword(String password) {
        this.password = password;
    }
    @Override
    public String toString() {
        return "User [username=" + username + ", password=" + password + "]";
    }


}
UserMapper.java
package cn.hpe.dao;

import cn.hpe.pojo.User;

public interface UserMapper {

    /**
     * 登录验证
     * @param user 包含用户名和密码的user对象
     * @return user 存在,则返回一行记录的所有信息对象。否则为null
     */
    User getOneByLogin(User user);
}
UserMapper.xml
<?xml version="1.0" encoding="UTF-8"?>
<!DOCTYPE mapper
    PUBLIC "-//mybatis.org//DTD Mapper 3.0//EN"
    "http://mybatis.org/dtd/mybatis-3-mapper.dtd">
<mapper namespace="cn.hpe.dao.UserMapper">

    <select id="getOneByLogin" parameterType="cn.hpe.pojo.User" resultType="cn.hpe.pojo.User">
        select * from user where username=#{username} and password=#{password}
    </select>

</mapper>
IUserService.java-----------接口
package cn.hpe.service;

import cn.hpe.pojo.User;

public interface IUserService {

    User login(User user);
}
UserServiceImpl.java
package cn.hpe.service;

import org.springframework.beans.factory.annotation.Autowired;
import org.springframework.stereotype.Service;

import cn.hpe.dao.UserMapper;
import cn.hpe.pojo.User;

@Service(value="userService")
public class UserServiceImpl implements IUserService {


    @Autowired
    private UserMapper userMapper;

    @Override
    public User login(User user) {
        return userMapper.getOneByLogin(user);

    }

}
UserController.java
package cn.hpe.controller;

import javax.annotation.Resource;

import org.springframework.stereotype.Controller;
import org.springframework.ui.Model;
import org.springframework.web.bind.annotation.RequestMapping;

import cn.hpe.pojo.User;
import cn.hpe.service.IUserService;

@Controller
@RequestMapping("/user")
public class UserController {

    @Resource(name="userService")
    private IUserService userService;

    @RequestMapping("/login")
    public String login(User user,Model model) {

        User reUser = userService.login(user);
        if(reUser!=null){
            model.addAttribute("flag", "1");
        }
        return "success";
    }
}
最后附上测试项目源码:
链接: https://pan.baidu.com/s/11t-7Wj-moS5TNg2jeaZr_Q 提取码: xmqh
这是最原始的配置方式,所以下载解压,导入工作空间后,需要修改一些本测试项目的配置:jdk版本、tomcat等

 浙公网安备 33010602011771号