1、环境准备
1.1、准备主机
192.168.10.25
zabbix-agent

内存:2G
CPU:1核
1.2、配置zabbix仓库
# 官网仓库安装,下载速度慢,不建议,国内的
wget https://repo.zabbix.com/zabbix/6.0/ubuntu/pool/main/z/zabbix-release/zabbix-release_6.0-4+ubuntu22.04_all.deb
dpkg -i zabbix-release_6.0-4+ubuntu22.04_all.deb

# 手动配置清华源,安装快,给力
cat << 'CAT_END' > /etc/apt/sources.list.d/zabbix.list
# Zabbix main repository
deb https://mirror.tuna.tsinghua.edu.cn/zabbix/zabbix/6.4/ubuntu/ jammy main
deb-src https://mirror.tuna.tsinghua.edu.cn/zabbix/zabbix/6.4/ubuntu/ jammy main
CAT_END

cat << 'CAT_END' > /etc/apt/sources.list.d/zabbix-agent2-plugins.list
deb [arch=amd64] https://mirror.tuna.tsinghua.edu.cn/zabbix/zabbix-agent2-plugins/1/ubuntu/ jammy main
deb-src [arch=amd64] https://mirror.tuna.tsinghua.edu.cn/zabbix/zabbix-agent2-plugins/1/ubuntu/ jammy main
CAT_END
apt update
2、zabbix-agent
2.1、安装 zabbix-agent
apt install -y zabbix-agent
2.2、配置zabbix-agent配置文件
2.2.1、查询默认的配置
# grep -Env '#|^$' /etc/zabbix/zabbix_agentd.conf
13:PidFile=/run/zabbix/zabbix_agentd.pid
32:LogFile=/var/log/zabbix/zabbix_agentd.log
43:LogFileSize=0
117:Server=127.0.0.1
171:ServerActive=127.0.0.1
182:Hostname=Zabbix server
333:Include=/etc/zabbix/zabbix_agentd.d/*.conf
2.2.2、修改配置
# grep -Env '#|^$' /etc/zabbix/zabbix_agentd.conf
13:PidFile=/run/zabbix/zabbix_agentd.pid
32:LogFile=/var/log/zabbix/zabbix_agentd.log
43:LogFileSize=0
117:Server=192.168.10.21          # 指定zabbix服务端的地址
125:ListenPort=10050              # 默认的端口号,可以不用取消注释
182:Hostname=192.168.10.25        # zabbixserver监控当前主机的时候,客户端主机唯一的标识
333:Include=/etc/zabbix/zabbix_agentd.d/*.conf
ListenIP=0.0.0.0                  # 开启所有网口都可以访问
# ServerActive=127.0.0.1          # 另外一种指定zabbixserver主机的方式

注意:如果没有定义Hostname, 则服务器将使用agent的系统主机名命名主机。
2.2.3、启动服务
systemctl restart zabbix-agent.service
systemctl enable zabbix-agent.service
2.2.4、查看端口、查看服务进程
# 查看端口
# netstat -tunlp | grep zabbix
tcp        0      0 0.0.0.0:10050           0.0.0.0:*               LISTEN      1917/zabbix_agentd
tcp6       0      0 :::10050                :::*                    LISTEN      1917/zabbix_agentd

# 查看进程
# ps -aux | grep zabbix
zabbix      1917  0.0  0.1  21756  3652 ?        S    07:15   0:00 /usr/sbin/zabbix_agentd -c /etc/zabbix/zabbix_agentd.conf
zabbix      1918  0.0  0.1  21756  2768 ?        S    07:15   0:00 /usr/sbin/zabbix_agentd: collector [idle 1 sec]
zabbix      1919  0.0  0.2  21884  5072 ?        S    07:15   0:00 /usr/sbin/zabbix_agentd: listener #1 [waiting for connection]
zabbix      1920  0.0  0.2  21884  5072 ?        S    07:15   0:00 /usr/sbin/zabbix_agentd: listener #2 [waiting for connection]
zabbix      1921  0.0  0.2  21884  5072 ?        S    07:15   0:00 /usr/sbin/zabbix_agentd: listener #3 [waiting for connection]
2.2.5、查看日志
# cat /var/log/zabbix/zabbix_agentd.log
  1860:20230525:070934.085 Starting Zabbix Agent [Zabbix server]. Zabbix 6.4.2 (revision dbfe71773cf).
  1860:20230525:070934.085 **** Enabled features ****
  1860:20230525:070934.085 IPv6 support:          YES
  1860:20230525:070934.085 TLS support:           YES
  1860:20230525:070934.085 **************************
  1860:20230525:070934.085 using configuration file: /etc/zabbix/zabbix_agentd.conf
  1860:20230525:070934.085 agent #0 started [main process]
  1864:20230525:070934.087 agent #4 started [listener #3]
  1865:20230525:070934.088 agent #5 started [active checks #1]
  1865:20230525:070934.089 Unable to connect to [127.0.0.1]:10051 [cannot connect to [[127.0.0.1]:10051]: [111] Connection refused]
  1865:20230525:070934.089 Unable to send heartbeat message to [127.0.0.1]:10051 [cannot connect to [[127.0.0.1]:10051]: [111] Connection refused]
  1865:20230525:070934.089 Unable to connect to [127.0.0.1]:10051 [cannot connect to [[127.0.0.1]:10051]: [111] Connection refused]
  1865:20230525:070934.089 Active check configuration update started to fail
  1863:20230525:070934.089 agent #3 started [listener #2]
  1862:20230525:070934.090 agent #2 started [listener #1]
  1861:20230525:070934.093 agent #1 started [collector]
  1860:20230525:071541.795 Got signal [signal:15(SIGTERM),sender_pid:1913,sender_uid:103,reason:0]. Exiting ...
  1860:20230525:071541.797 Zabbix Agent stopped. Zabbix 6.4.2 (revision dbfe71773cf).
  1917:20230525:071541.808 Starting Zabbix Agent [192.168.10.25]. Zabbix 6.4.2 (revision dbfe71773cf).
  1917:20230525:071541.808 **** Enabled features ****
  1917:20230525:071541.808 IPv6 support:          YES
  1917:20230525:071541.808 TLS support:           YES
  1917:20230525:071541.808 **************************
  1917:20230525:071541.808 using configuration file: /etc/zabbix/zabbix_agentd.conf
  1917:20230525:071541.808 agent #0 started [main process]
  1921:20230525:071541.809 agent #4 started [listener #3]
  1920:20230525:071541.811 agent #3 started [listener #2]
  1919:20230525:071541.812 agent #2 started [listener #1]
  1918:20230525:071541.814 agent #1 started [collector]
3、资源创建
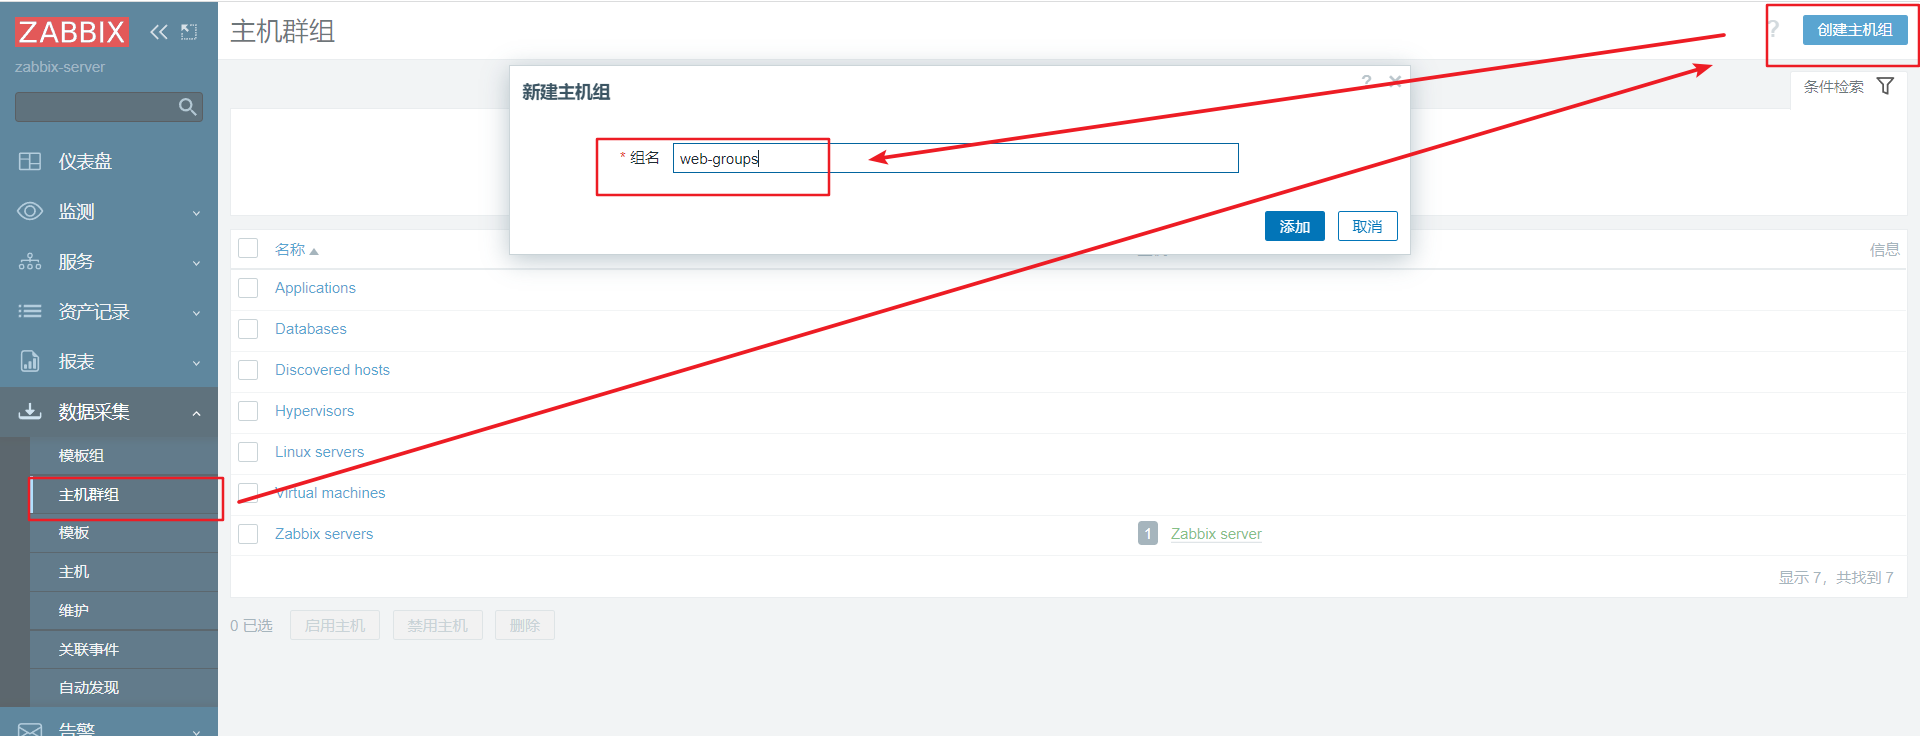
3.1、创建主机组资源
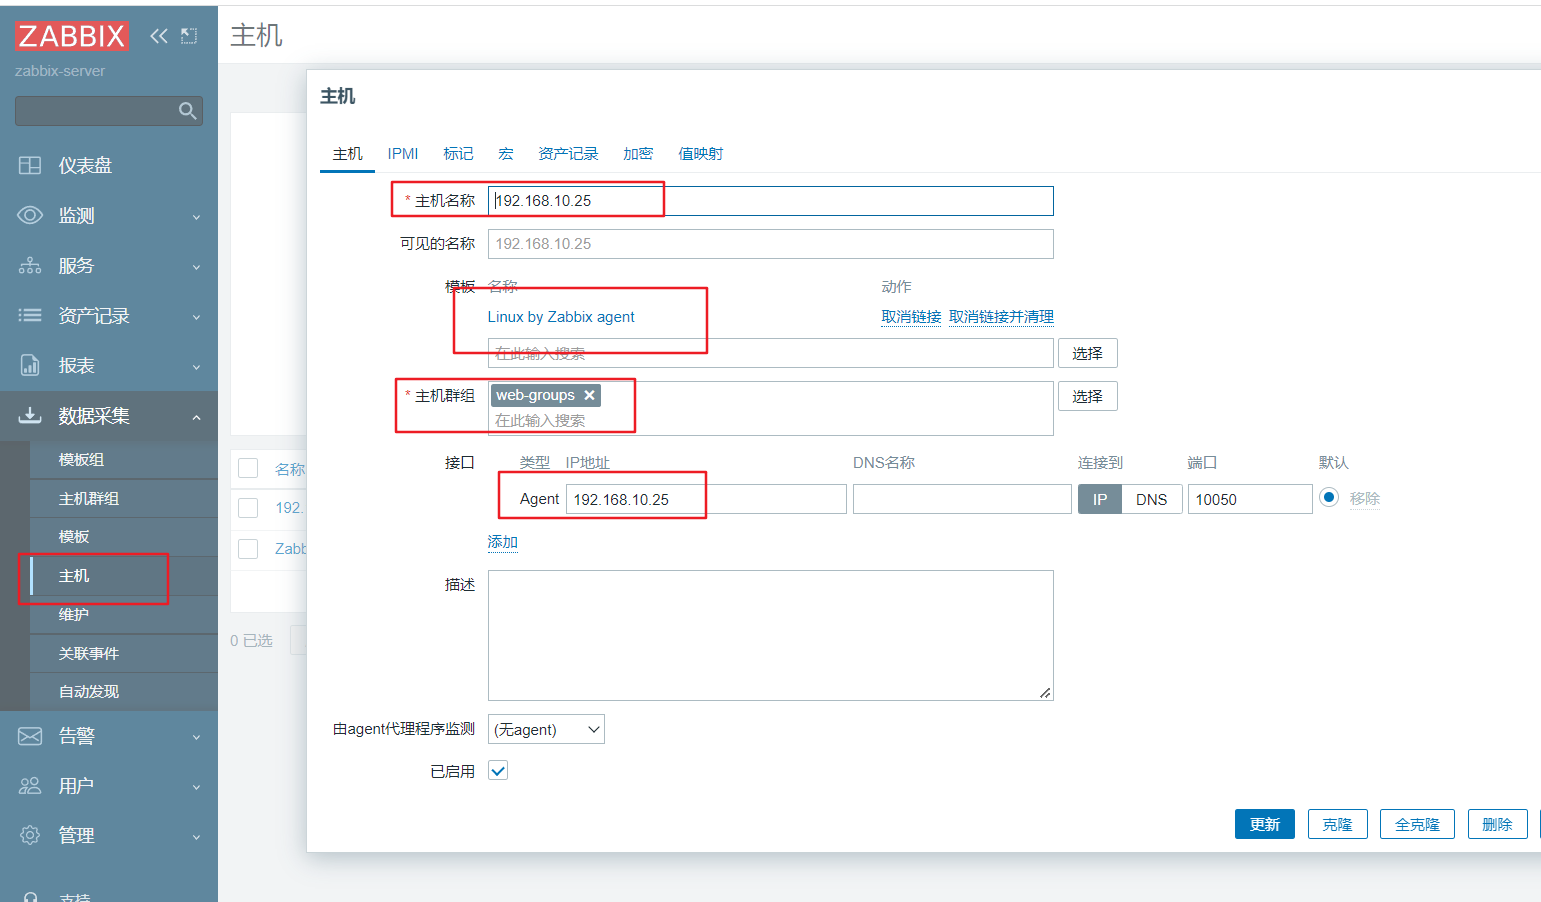
3.2、创建主机资源
点击 Interface 可以看到有四种方式增加主机,分别是:
 Agent interfaces 程序专用的客户端
 SNMP interfaces 网络设备的管理协议
 JMX interfaces java专用客户端
 IPMI interfaces 专用的硬件设备接口
3.3、检查可用性状态
注意:稍等一会,Availability下面的ZBX就会变绿,表示配置成功了

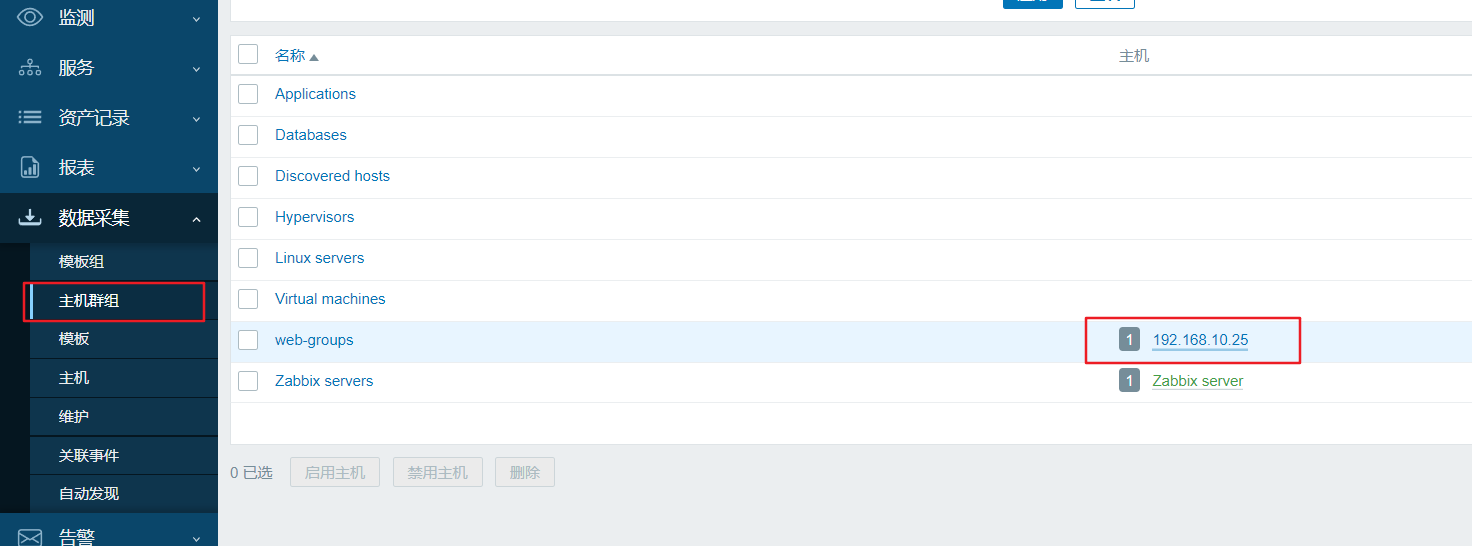
3.4、检查主机组
3.5、检查dashboard效果
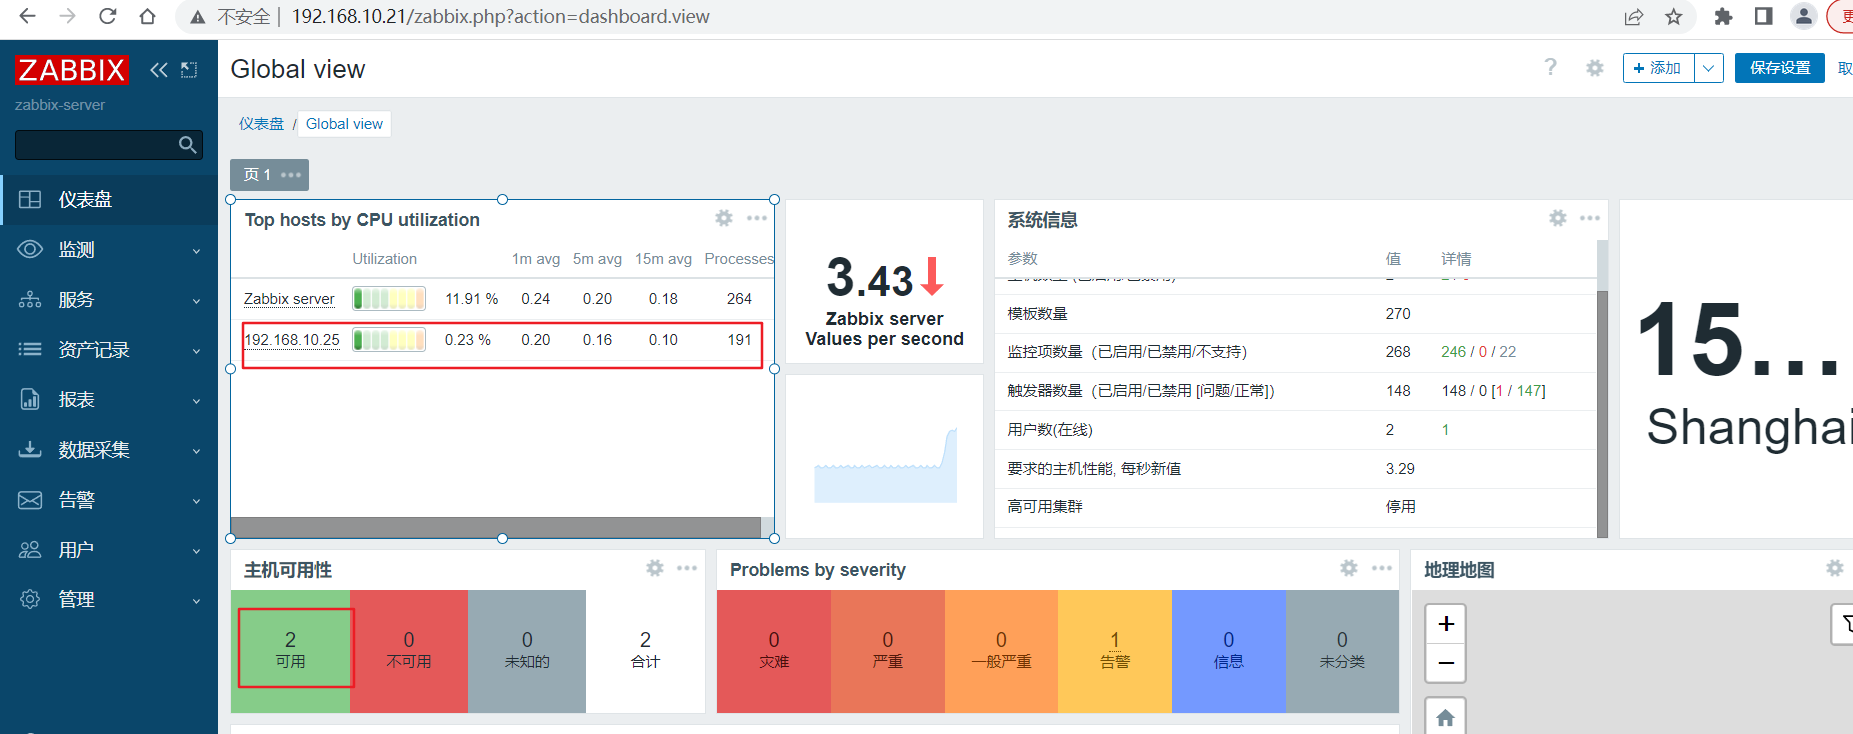
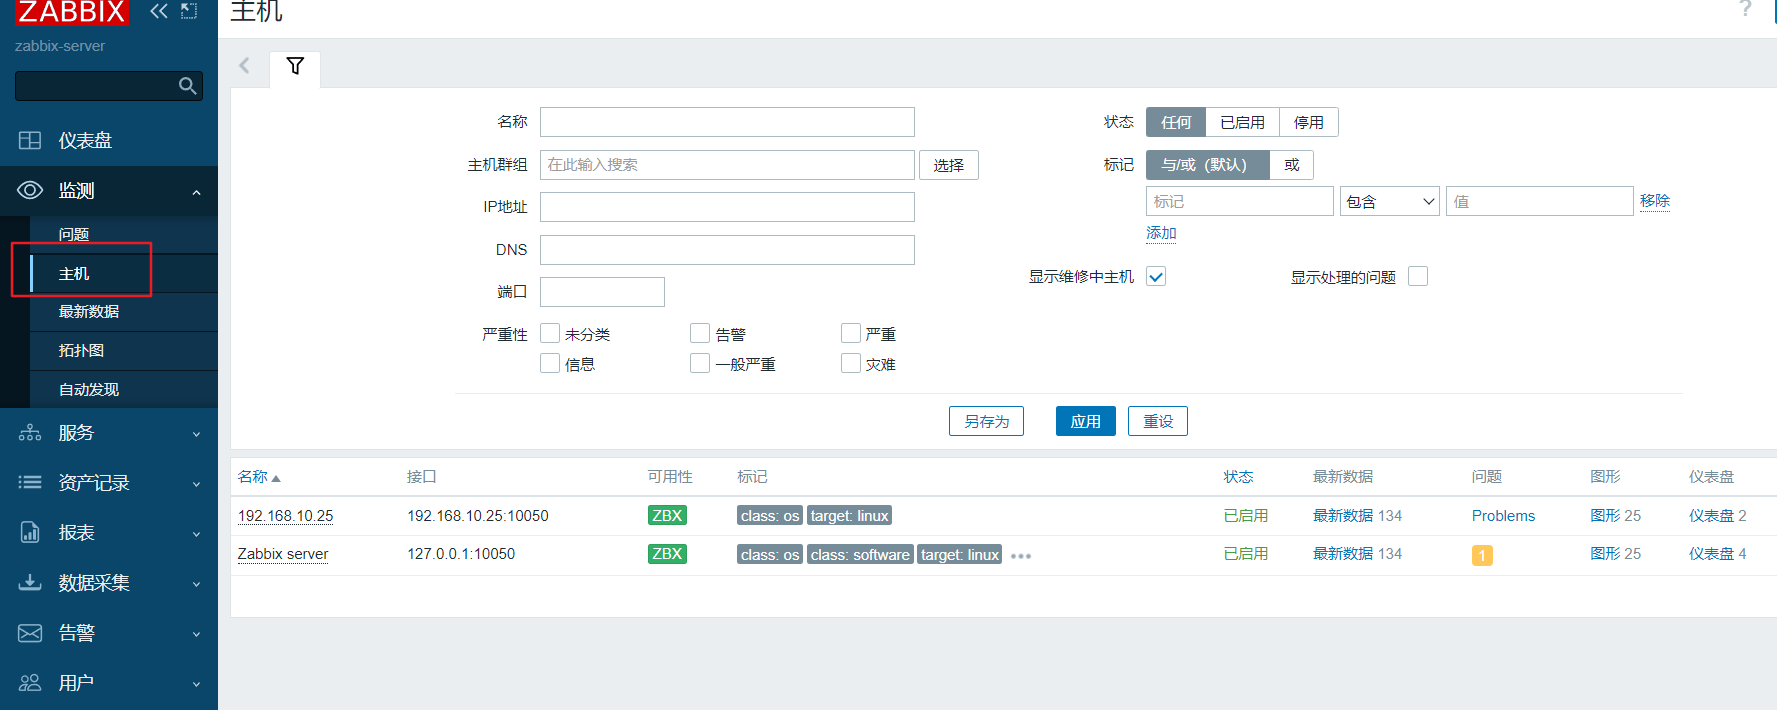
3.6、查看主机效果
4、总结
环境准备 - 软件安装,agent 配置
资源创建 - 创建Host Group + 创建 Host + 关联 Templates

 浙公网安备 33010602011771号