1、网关/路由概念
1.1、什么是路由
路由是指路由器从一个LAN接口上收到数据包,根据数据包“目的地址”进行定向并转发到另一个WAN接口的过程。(跨网络访问的路径选择)

路由工作包含两个基本的动作:
1、确定最佳路径
2、通过网络传输信息
在路由的过程中,后者也称为(数据)交换。交换相对来说比较简单,而选择路径很复杂。
1.2、为什么需要路由
如果没有路由,就没有办法实现,不同地域的主机互联互通了;
1.3、如何配置路由
linux系统配置路由使用route命令;可以使用route命令来显示和管理路由表
2、route
2.1、语法
route [add |del] [-host|-net|default] [address[/mask]][netmask] [gw][dev]
[add|del]  # 增加或删除路由条目;
-host      # 添加或删除主机路由;-net:添加或删除网络路由;default:添加或删除默认路由;
address    # 添加要去往的网段地址由ip+netmask 组成;
gw         # 指定下一跳地址,要求下一跳地址必须是能到达的,且一般是和本网段直连的接口。
dev        # 将添加路由与对应的接口关联,一般内核额会自动判断路由应该关联哪个接口;
2.2、示例
route add -host 1.1.1.1/32 dev eth0
route add -net 1.1.1.1/32 dev eth1
route add -net 1.1.1.1/32 gw 1.1.1.2
route add default gw 1.1.1.2
3、路由的分类
3.1、主机路由【按IP地址路由】
3.1.1、作用
主机路由作用:指明到某台主机具体应该怎么走;
Destination精确到某一台主机
3.1.2、配置
# 去往1.1.1.1主机,从eth0接口出
]# route add -host 1.1.1.1/32 dev eth0

# 去往1.1.1.1主机,都交给10.0.0.2转发
]# route add -host 1.1.1.1/32 gw 10.0.0.2
3.2、网络路由【按网段路由】
3.2.1、作用
指明到某类网络怎么走;
Destination精确到某一个网段的主机
3.2.2、配置
# 去往2.2.2.0/24网段,从eth0接口出
route add -net 2.2.2.0/24 dev eth0

# 去往2.2.2.0/24,都效给10.0.0.2转发
route add -net 2.2.2.0/24 gw 10.0.0.2
3.3、默认路由【设置默认路由】
3.3.1、作用
如果匹配不到主机路由、网络路由的,全部都走默认路由(网关)
3.3.2、配置
route add -net 0.0.0.0  gw 10.0.0.2
route add default gw 10.0.0.2
3.4、永久路由【开机自启动生效】
3.4.1、作用
使用route命令添加的路由,属于临时添加;

那如何添加永久路由条目?
在/etc/sysconfig/network-scripts目录下创建route-ethx的网卡名称,添加路由条目
3.4.2、配置
cat /etc/sysconfig/network-scripts/route-eth0
1.1.1.0/24 dev eth0
1.1.1.0/24 via 1.1.1.2

~]# route -n
Kernel IP routing table
Destination     Gateway         Genmask         Flags Metric Ref    Use Iface
1.1.1.0         0.0.0.0         255.255.255.0   U     100    0        0 eth0
1.1.1.0         1.1.1.2         255.255.255.0   UG    100    0        0 eth0
4、路由项目案例
4.1、环境准备
4.1.1、前提
一台Linux主机能够被当成路由器用需要三大前提:
1、至少有两块网卡分别连接两个不同的网段;
2、开启路由转发功能/proc/sys/net/ipv4/ip_forward
3、在linux主机添加网关指向该服务器;
4.1.2、实验流程图
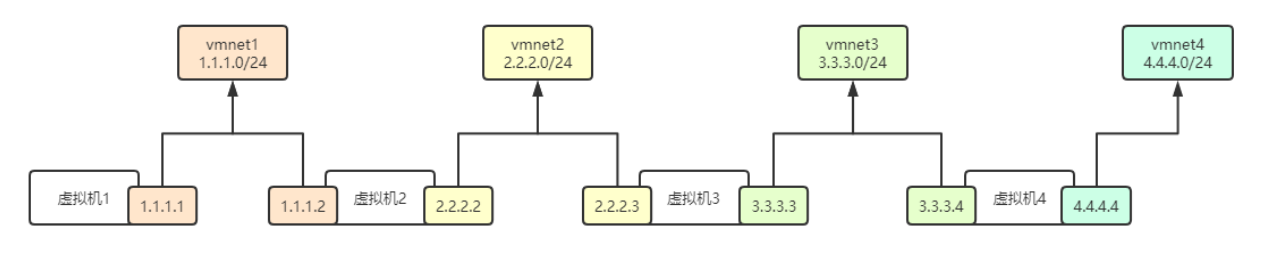
4.1.3、vm网口的规划
4.2、4台虚拟机网口的配置
4.2.1、虚拟机-1.1.1.0
]# ip addr | grep 'inet ' | grep -v '1/8'
    inet 1.1.1.2/24 brd 1.1.1.255 scope global noprefixroute ens36

]# route -n
Kernel IP routing table
Destination     Gateway         Genmask         Flags Metric Ref    Use Iface
1.1.1.0         0.0.0.0         255.255.255.0   U     100    0        0 ens36
4.2.2、虚拟机-2.2.2.0
]# ip addr | grep 'inet ' | grep -v '1/8'
    inet 1.1.1.131/24 brd 1.1.1.255 scope global noprefixroute dynamic ens33
    inet 2.2.2.2/24 brd 2.2.2.255 scope global noprefixroute ens36

]# route -n
Kernel IP routing table
Destination     Gateway         Genmask         Flags Metric Ref    Use Iface
1.1.1.0         0.0.0.0         255.255.255.0   U     100    0        0 ens33
2.2.2.0         0.0.0.0         255.255.255.0   U     101    0        0 ens36
4.2.3、虚拟机-3.3.3.0
]# ip addr | grep 'inet ' | grep -v '1/8'
    inet 2.2.2.131/24 brd 2.2.2.255 scope global noprefixroute dynamic ens33
    inet 3.3.3.3/24 brd 3.3.3.255 scope global noprefixroute ens36

]# route -n
Kernel IP routing table
Destination     Gateway         Genmask         Flags Metric Ref    Use Iface
2.2.2.0         0.0.0.0         255.255.255.0   U     100    0        0 ens33
3.3.3.0         0.0.0.0         255.255.255.0   U     101    0        0 ens36
4.2.4、虚拟机-4.4.4.0
]# ip addr | grep 'inet ' | grep -v '1/8'
    inet 3.3.3.130/24 brd 3.3.3.255 scope global noprefixroute dynamic ens33
    inet 4.4.4.4/24 brd 4.4.4.255 scope global noprefixroute ens36

]# route -n
Kernel IP routing table
Destination     Gateway         Genmask         Flags Metric Ref    Use Iface
3.3.3.0         0.0.0.0         255.255.255.0   U     100    0        0 ens33
4.4.4.0         0.0.0.0         255.255.255.0   U     101    0        0 ens36
4.3、示例1-【vm1】1.1.1.2地址能否与【vm2】1.1.1.131互通
4.3.1、能互通的解答
可以通,因为本机【vm1】1.1.1.2与目标主机【vm2】1.1.1.131两台机器处于一个LAN中,并且两台机器上的路由表里具有Destination指向对方的网段路由条目
4.3.2、【vm1】与【vm2】路由情况
vm1 ~]# route -n
Kernel IP routing table
Destination     Gateway         Genmask         Flags Metric Ref    Use Iface
1.1.1.0         0.0.0.0         255.255.255.0   U     100    0        0 ens36

vm2 ~]# route -n
Kernel IP routing table
Destination     Gateway         Genmask         Flags Metric Ref    Use Iface
1.1.1.0         0.0.0.0         255.255.255.0   U     100    0        0 ens33
2.2.2.0         0.0.0.0         255.255.255.0   U     101    0        0 ens36
4.4、示例2-【vm1】1.1.1.2地址能否与【vm2】2.2.2.2互通
4.4.1、不能互通的解答
不能,因为数据包只能送到1.1.1.2,而无法送达2.2.2.2
4.4.2、解决方法
# 需要添加一条去往2.2.2.0/24网段的路由,从eth1接口发出即可
vm1 ~]# route add -net 2.2.2.0/24 dev ens36

vm1 ~]# route -n
Kernel IP routing table
Destination     Gateway         Genmask         Flags Metric Ref    Use Iface
1.1.1.0         0.0.0.0         255.255.255.0   U     100    0        0 ens36
2.2.2.0         0.0.0.0         255.255.255.0   U     0      0        0 ens36

vm1 ~]# ping -c 1 2.2.2.2
64 bytes from 2.2.2.2: icmp_seq=1 ttl=64 time=0.530 ms
4.5、示例3-【vm1】1.1.1.2地址能否与【vm2】2.2.2.2互通
4.5.1、不能互通的解答
不能;因为数据包只能送到vmnet2交换机,送不到vmnet3交换机
4.5.2、【vm2】开启网络转发功能
echo "net.ipv4.ip_forward=1" >>/etc/sysctl.conf
echo "1" > /proc/sys/net/ipv4/ip_forward
sysctl -p
4.5.3、解决方法
# 将去往2.2.2.0/24网段的数据包交给1.1.1.2这台主机帮我们转发给2.2.2.131这台主机
route add -net 2.2.2.0/24 gw 1.1.1.131

]# ping 2.2.2.2
PING 2.2.2.2 (2.2.2.2) 56(84) bytes of data.
64 bytes from 2.2.2.2: icmp_seq=1 ttl=64 time=0.231 ms
4.6、示例4-【vm1】1.1.1.1地址能否与【vm3】3.3.3.3地址互通
4.6.1、不能互通的解答
因为数据包只能送到vmnet2交换机,送不到vmnet3交换机
4.6.2、【vm2】、【vm3】开启网络转发功能
echo "net.ipv4.ip_forward=1" >>/etc/sysctl.conf
echo "1" > /proc/sys/net/ipv4/ip_forward
sysctl -p
4.6.3、解决方法
1、在【vm1】主机上将去往3.3.3.0/24网段的数据包交给【vm2】1.1.1.131,由这台主机帮我们转发给3.3.3.3;
vm1 ~]# route add -net 3.3.3.0/24 gw 1.1.1.131
vm1 ~]# route -n
Kernel IP routing table
Destination     Gateway         Genmask         Flags Metric Ref    Use Iface
1.1.1.0         0.0.0.0         255.255.255.0   U     100    0        0 ens36
3.3.3.0         1.1.1.131       255.255.255.0   UG    0      0        0 ens36

2、在vm2上需要添加到3.3.3.0/24网段的路由,然后开启转发功能,否则数据包无法转发,会被丢弃;
vm2 ~]# route add -net 3.3.3.0/24 ens36
vm2 ~]# route -n
Kernel IP routing table
Destination     Gateway         Genmask         Flags Metric Ref    Use Iface
1.1.1.0         0.0.0.0         255.255.255.0   U     100    0        0 ens33
2.2.2.0         0.0.0.0         255.255.255.0   U     101    0        0 ens36
3.3.3.0         0.0.0.0         255.255.255.0   U     0      0        0 ens36

3、数据包到达vm3主机,但是无法送回来,所以还需要在【vm3】主机上添加去往1.1.1.0/24网段的数据包走2.2.2.2这台主机转发;
vm3 ~]# route add -net 1.1.1.0/24 gw 2.2.2.2
vm3 ~]# route -n
Kernel IP routing table
Destination     Gateway         Genmask         Flags Metric Ref    Use Iface
1.1.1.0         2.2.2.2         255.255.255.0   UG    0      0        0 ens33
2.2.2.0         0.0.0.0         255.255.255.0   U     100    0        0 ens33
3.3.3.0         0.0.0.0         255.255.255.0   U     101    0        0 ens36

4、测试是否通
vm1 ~]# ping 3.3.3.3
PING 3.3.3.3 (3.3.3.3) 56(84) bytes of data.
64 bytes from 3.3.3.3: icmp_seq=1 ttl=63 time=1.21 ms
4.7、示例5-【vm1】1.1.1.1地址能否与【vm3】3.3.3.3地址互通
4.7.1、在vm1主机上将去往3.3.3.0/24网段的数据包交给【vm2】1.1.1.131,由这台主机帮我们转发给【vm4】3.3.3.130
vm1 ]# route add -net 3.3.3.0/24 gw 1.1.1.131
vm1 ]# route -n
Kernel IP routing table
Destination     Gateway         Genmask         Flags Metric Ref    Use Iface
1.1.1.0         0.0.0.0         255.255.255.0   U     100    0        0 ens36
3.3.3.0         1.1.1.131       255.255.255.0   UG    0      0        0 ens36
4.7.2、在vm2、vm3上开启转发功能
echo "net.ipv4.ip_forward=1" >>/etc/sysctl.conf
echo "1" > /proc/sys/net/ipv4/ip_forward
sysctl -p
4.7.3、vm2上增加3.3.3.0/24网段的路由,由【vm3】2.2.2.131帮我们转发给【vm4】3.3.3.130
[root@vm2 ~]# route add -net 3.3.3.0/24 gw 2.2.2.131
[root@vm2 ~]# route -n
Kernel IP routing table
Destination     Gateway         Genmask         Flags Metric Ref    Use Iface
1.1.1.0         0.0.0.0         255.255.255.0   U     100    0        0 ens33
2.2.2.0         0.0.0.0         255.255.255.0   U     101    0        0 ens36
3.3.3.0         2.2.2.131       255.255.255.0   UG    0      0        0 ens36
4.7.4、在vm4主机上添加去往1.1.1.0/24网段的数据包走【vm3】3.3.3.3这台主机转发
数据包到达vm4主机,但是无法送回来,所以还需要如下配置
[root@vm4 ~]# route add -net 1.1.1.0/24 gw 3.3.3.3
[root@vm4 ~]# route -n
Kernel IP routing table
Destination     Gateway         Genmask         Flags Metric Ref    Use Iface
1.1.1.0         3.3.3.3         255.255.255.0   UG    0      0        0 ens33
3.3.3.0         0.0.0.0         255.255.255.0   U     100    0        0 ens33
4.4.4.0         0.0.0.0         255.255.255.0   U     101    0        0 ens36
4.7.5、测试
vm1 ~]# ping  3.3.3.130
PING 3.3.3.130 (3.3.3.130) 56(84) bytes of data.
64 bytes from 3.3.3.130: icmp_seq=1 ttl=62 time=1.90 ms
5、路由条目优化
5.1、如何优化
以虚拟机1为例,除了第一个路由条目外,其他的路由条目其实都需要由1.1.1.2来转发,所以我们可以统一用一条路由规则;(配置默认路由)
5.2、vm1清空之前的配置
vm1 ]#route del -net 2.2.2.0/24
vm1 ]#route del -net 3.3.3.0/24
vm1 ]#route del -net 4.4.4.0/24
5.3、增加默认路由
route add -net 0.0.0.0/0 gw 1.1.1.131
# 或
route add default gw 1.1.1.131

]# route -n
Kernel IP routing table
Destination     Gateway         Genmask         Flags Metric Ref    Use Iface
0.0.0.0         1.1.1.131       0.0.0.0         UG    0      0        0 ens36
1.1.1.0         0.0.0.0         255.255.255.0   U     100    0        0 ens36
5.4、小结

 浙公网安备 33010602011771号