第一篇、【Zabbix服务端的完整布署】
1、环境准备
服务器版本:
[root@filestore-v2 ~]# cat /etc/redhat-release
CentOS Linux release 7.5.1804 (Core)

内核版本:
[root@filestore-v2 ~]# uname -r
3.10.0-862.el7.x86_64
准备两个服务器:
IP地址:192.168.10.96 主机名:filestore-v2  (Zabbix服务端)
IP地址:192.168.10.95 主机名:sms-v2 (Zabbix客户端)
2、开始布署PHP+MySQL+Apache+Zabbix服务
(本人安装风格,核心程序源码安装,依赖库采用yum安装,请知悉)
2.1、安装MySQL服务(这里采用二进制包安装,简单,快速)
这里采用MySQL版是:mysql-5.7.25-linux-glibc2.12-x86_64.tar.gz(自行到官网下载,这里不再单独说)
2.1.1、MySQL软件安装
#解压MySQL
[root@filestore-v2 ~]# tar xvf mysql-5.7.25-linux-glibc2.12-x86_64.tar.gz -C /data/application/

#修改目录名字
[root@filestore-v2 ~]# mv /data/application/mysql-5.7.25-linux-glibc2.12-x86_64 /data/application/mysql-5.7.25

#删除软件包
[root@filestore-v2 ~]# rm -f mysql-5.7.25-linux-glibc2.12-x86_64.tar.gz
2.1.2、安装MySQL所需的依赖库
[root@filestore-v2 ~]# yum install gcc gcc-c++ cmake ncurses-devel autoconf zlib zlib-devel libaio -y
2.1.3、增加MySQL动态连链库让系统能检索到
#增加配置文件
[root@filestore-v2 ~]# vi /etc/ld.so.conf.d/mysql-5.7.25.conf
/data/application/mysql-5.7.25/lib/

#刷新让系统生效
[root@filestore-v2 ~]# ldconfig

#检查是否生效
[root@filestore-v2 ~]# ldconfig -v | grep  mysql-5.7.25
...
/data/application/mysql-5.7.25/lib: #这里表示生效
2.1.4、创建MySQL用户
#创建组
[root@filestore-v2 ~]# groupadd mysql

#创建用户
[root@filestore-v2 ~]# useradd -r -g mysql -s /bin/false mysql

#检查是否创建成功
[root@filestore-v2 ~]# id mysql
uid=988(mysql) gid=1002(mysql) 组=1002(mysql)
2.1.5、配置MySQL环境变量
cat >> /etc/profile <<EFO

MYSQL_HOME=/data/application/mysql-5.7.25 #目录按自己安装位置进行调整
PATH=\$PATH:\$MYSQL_HOME/bin
export MYSQL_HOME PATH
EFO


#重新加载环境变量
[root@filestore-v2 ~]# source /etc/profile

#检查是否生效
[root@filestore-v2 ~]# which mysql
/data/application/mysql-5.7.25/bin/mysql
2.1.6、配置MySQL服务启动脚本
#创建存放脚本的位置
[root@filestore-v2 ~]# mkdir /data/application/mysql-5.7.25/sbin

#复制服务脚本
[root@filestore-v2 ~]# cp /data/application/mysql-5.7.25/support-files/mysql.server /data/application/mysql-5.7.25/sbin/

#设置可执行权限
[root@filestore-v2 ~]# chmod 755 /data/application/mysql-5.7.25/sbin/mysql.server

#修改脚本参数
[root@filestore-v2 ~]# vi /data/application/mysql-5.7.25/sbin/mysql.server
    ...
     46 basedir=/data/application/mysql-5.7.25/
     47 datadir=/data/application/mysql-5.7.25/data
    ...
2.1.7、增加MySQL配置文件
[root@filestore-v2 ~]# vi /etc/my.cnf #目录位置自行修改
[mysqld]
port = 3306
symbolic-links=0
skip-name-resolve
slave-skip-errors = all

#针对数据库多实例
socket=/var/lib/mysql/mysql.sock
pid-file=/data/application/mysql-5.7.25/data/mysqld.pid
datadir=/data/application/mysql-5.7.25/data
basedir=/data/application/mysql-5.7.25

binlog_cache_size = 150M
max_binlog_cache_size = 200M
max_binlog_size = 100M
expire_logs_days = 20
key_buffer_size = 32M
read_buffer_size = 16M
read_rnd_buffer_size = 16M
bulk_insert_buffer_size = 16M

innodb_buffer_pool_size=4G
innodb_buffer_pool_instances=1

innodb_autoextend_increment=128M
innodb_log_file_size=512M
innodb_log_buffer_size=512M

innodb_flush_log_at_trx_commit=2

max_allowed_packet=512M

log-bin=mysqlLogBin
server-id=1

binlog_format="MIXED"
character-set-server=utf8
log_timestamps=SYSTEM

[mysql]
socket=/var/lib/mysql/mysql.sock
default-character-set=utf8

[mysqld_safe]
log-error=/data/application/mysql-5.7.25/data/mysql_safe.err
pid-file =/data/application/mysql-5.7.25/data/mysqld_safe.pid

#创建Sokcet通讯目录位置
[root@filestore-v2 ~]# mkdir /var/lib/mysql
[root@filestore-v2 ~]# chown mysql.mysql /var/lib/mysql
2.1.8、初始化数据库
[root@filestore-v2 ~]# /data/application/mysql-5.7.25/bin/mysqld --initialize --user=mysql --datadir=/data/application/mysql-5.7.25/data
...
2019-12-20T12:09:15.809440+08:00 0 [Warning] Gtid table is not ready to be used. Table 'mysql.gtid_executed' cannot be opened.
2019-12-20T12:09:15.812291+08:00 1 [Note] A temporary password is generated for root@localhost: j11qNeTC%iq6 #<这里是初始的root密码
...
2.1.10、启动MySQL服务
#开启服务
[root@filestore-v2 ~]# /data/application/mysql-5.7.25/sbin/mysql.server start
Starting MySQL..Logging to '/data/application/mysql-5.7.25/data/mysql_safe.err'.
. SUCCESS!

#检查端口是否开启
[root@filestore-v2 ~]# netstat -tunlp | grep mysql
tcp6       0      0 :::3306                 :::*                    LISTEN      84964/mysqld
2.1.9、修改MySQL默认的root密码
#修改默认的root密码,必须的,不然无法操作数据库
[root@filestore-v2 ~]# mysql -uroot -pj11qNeTC%iq6
...
#修改root密码
mysql> ALTER USER 'root'@'localhost' IDENTIFIED BY 'root';
Query OK, 0 rows affected (0.00 sec)

#为了安全考虑删除多余的账号
mysql> drop user 'mysql.sys'@'localhost';
Query OK, 0 rows affected (0.00 sec)

mysql> drop user 'mysql.session'@'localhost';
Query OK, 0 rows affected (0.00 sec)

mysql> flush privileges;
Query OK, 0 rows affected (0.00 sec)

mysql> select host,user from mysql.user;
+-----------+------+
| host      | user |
+-----------+------+
| localhost | root |
+-----------+------+
1 row in set (0.00 sec)
2.1.11、其它
Zabbix使用的账号创建和数据库的表结构初始化,具体在Zabbix服务布署时再做,请知悉
2.2、安装Apache Httpd
2.2.1、Apache Httpd版本
版本:httpd-2.4.41.tar.gz
下载地址:https://www.apache.org/dist/httpd/httpd-2.4.41.tar.gz
2.2.2、Apache Httpd安装
#解压软件
[root@filestore-v2 ~]# tar xvf httpd-2.4.41.tar.gz

#进入安装目录
[root@filestore-v2 ~]# cd httpd-2.4.41/

#删除压缩包
[root@filestore-v2 ~]# rm -f httpd-2.4.41.tar.gz

#安装Aapache httpd依赖库
[root@filestore-v2 httpd-2.4.41]# yum install apr-devel apr-util-devel pcre-devel autoconf automake -y

#编译httpd软件并且安装
[root@filestore-v2 httpd-2.4.41]# ./configure --prefix=/data/application/httpd-2.4.41 && make && make install

#检查httpd目录是否有编译好的程序
[root@filestore-v2 httpd-2.4.41]# ll /data/application/httpd-2.4.41/
总用量 36
drwxr-xr-x 2 root root 262 12月 20 13:45 bin
drwxr-xr-x 2 root root 167 12月 20 13:45 build
drwxr-xr-x 2 root root 78 12月 20 13:45 cgi-bin
drwxr-xr-x 4 root root 84 12月 20 13:45 conf
drwxr-xr-x 3 root root 4096 12月 20 13:45 error
drwxr-sr-x 2 root root 24 8月 9 21:36 htdocs
drwxr-xr-x 3 root root 8192 12月 20 13:45 icons
drwxr-xr-x 2 root root 4096 12月 20 13:45 include
drwxr-xr-x 2 root root 6 12月 20 13:45 logs
drwxr-xr-x 4 root root 30 12月 20 13:45 man
drwxr-sr-x 14 root root 8192 8月 9 21:36 manual
drwxr-xr-x 2 root root 4096 12月 20 13:45 modules
2.2.3、制作Apache Httpd启动服务脚本
#增加系统启动脚本
[root@filestore-v2 httpd-2.4.41]# vi /lib/systemd/system/httpd.service
[Unit]
Description=Httpd server daemon
Documentation=/data/application/httpd-2.4.41
After=network.target

[Service]
Type=forking
ExecStart=/data/application/httpd-2.4.41/bin/apachectl -k start
ExecReload=/data/application/httpd-2.4.41/bin/apachectl -k graceful
ExecStop=/data/application/httpd-2.4.41/bin/apachectl -k stop
Restart=/data/application/httpd-2.4.41/bin/apachectl -k restart
PrivateTmp=True

[Install]
WantedBy=multi-user.target

#设置开机自启动
[root@filestore-v2 httpd-2.4.41]# systemctl enable httpd.service

#启动httpd服务
[root@filestore-v2 httpd-2.4.41]# systemctl start httpd

#检查httpd端口是否开启
[root@filestore-v2 httpd-2.4.41]# netstat -tunlp | grep httpd
tcp6       0      0 :::80                   :::*                    LISTEN      118404/httpd

#暂时先关闭httpd,因为下面还需要编译安装php
[root@filestore-v2 httpd-2.4.41]# systemctl stop httpd
2.2.4、Apache Httpd安装完成
2.3、安装Php服务
2.3.1、php版本
版本:php-7.3.13.tar.gz
下载地址:https://www.php.net/distributions/php-7.3.13.tar.gz
2.3.2、必须确认
安装php前,必须确认Apache Httpd和Mysql安装成功
2.3.3、安装php所需的依赖库
yum install sqlite-devel gettext-devel gd-devel oniguruma-devel libmcrypt libmcrypt-devel mhash mcrypt libxml2 libxml2-devel openssl openssl-devel bzip2-devel bzip2 libjpeg-devel libjpeg libpng-devel libpng freetype freetype-devel -y
2.3.4、开始安装php
#解压软件
[root@filestore-v2 ~]# tar xvf php-7.3.13.tar.gz
[root@filestore-v2 ~]# rm -f php-7.3.13.tar.gz
#进入安装目录
[root@filestore-v2 ~]# cd php-7.3.13/

#编译php参数如下
[root@filestore-v2 ~]#
./configure \
--prefix=/data/application/php-7.3.13 \
--with-apxs2=/data/application/httpd-2.4.41/bin/apxs \
--with-config-file-path=/data/application/php-7.3.13/etc \
--with-libxml-dir \
--with-gd \
--with-jpeg-dir \
--with-png-dir \
--with-freetype-dir \
--with-iconv-dir \
--with-zlib-dir \
--with-bz2 \
--with-openssl \
--enable-soap \
--enable-mbstring \
--enable-sockets \
--enable-exif \
--disable-ipv6 \
--with-mysqli=mysqlnd \
--enable-bcmath \
--enable-ctype \
--enable-sockets \
--with-gettext
# 安装php
[root@filestore-v2 ~]# make && make install

#创建配置目录和复制php配置文件
[root@filestore-v2 php-7.4.1]# mkdir /data/application/7.3.13/etc
[root@filestore-v2 ~]# cp /root/php-7.3.13/php.ini-production /data/application/php-7.3.13/etc/php.ini

#检查配置文件是否生效
[root@filestore-v2 ~]# /data/application/php-7.3.13/bin/php --ini
Configuration File (php.ini) Path: /data/application/php-7.3.13/etc
Loaded Configuration File: /data/application/php-7.3.13/etc/php.ini
Scan for additional .ini files in: (none)
Additional .ini files parsed: (none)
2.3.5、此前php已经安装完成
2.5、Apache Http与 Php结合的配置
2.5.1、创建httpd运行的用户
#创建www用户
[root@filestore-v2 ~]# useradd -M -s /sbin/nologin www

#检查用户是否创建成功
[root@filestore-v2 ~]# id www
uid=1002(www) gid=1003(www) 组=1003(www)
2.5.2、编辑httpd配置文件
[root@filestore-v2 ~]# vi /data/application/httpd-2.4.41/conf/httpd.conf
...
    165 # running httpd, as with most system services.
    166 #
    167 User www
    168 Group www
    169
    170 </IfModule>
    171
    172 # 'Main' server configuration
...
    254 #
    255 <IfModule dir_module>
    256     DirectoryIndex index.html index.php
    257 </IfModule>
    258
    259 #
...
    370 <IfModule mime_module>
    371     #
    372     # TypesConfig points to the file containing the list of mappings from
    373     # filename extension to MIME-type.
    374     #
    375     TypesConfig conf/mime.types
    376     AddType application/x-httpd-php .php
    377     #
    378     # AddType allows you to add to or override the MIME configuration
    379     # file specified in TypesConfig for specific file types.
    380     #
    381     #AddType application/x-gzip .tgz
...

#检查配置文件是否有填写错误
[root@filestore-v2 ~]# /data/application/httpd-2.4.41/bin/apachectl -t
AH00558: httpd: Could not reliably determine the server's fully qualified domain name, using fe80::cb13:992e:9da7:8a08. Set the 'ServerName' directive globally to suppress this message
Syntax OK
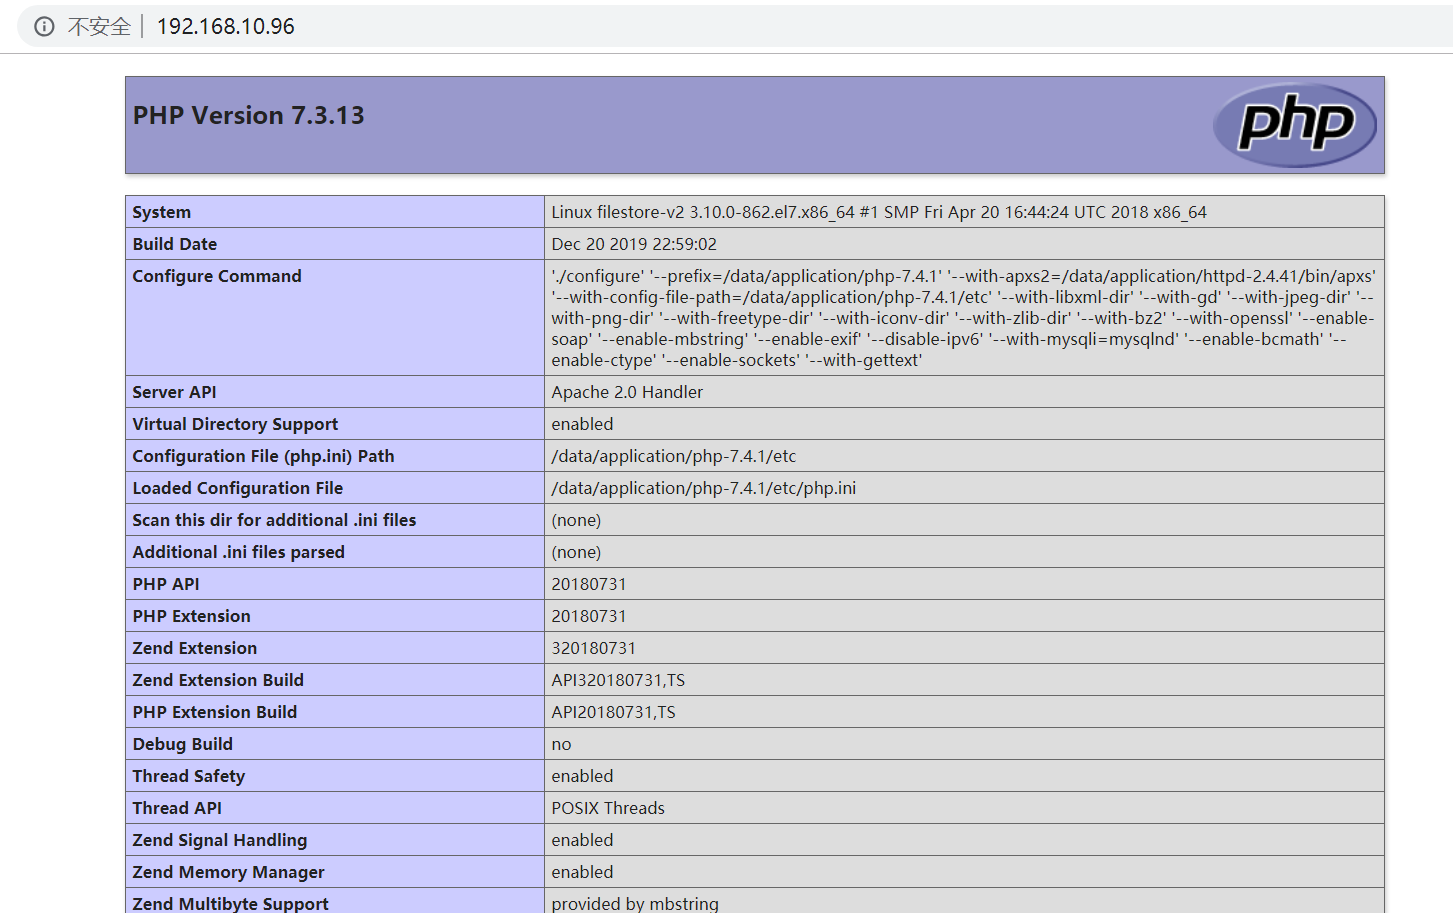
2.5.3、编写php脚本,测试配置是否生效
cat >/data/application/httpd-2.4.41/htdocs/index.php <<EOF
<?php
phpinfo()
?>
EOF

[root@filestore-v2 ~]# rm -f /data/application/httpd-2.4.41/htdocs/index.html
2.5.4、启动httpd的服务
#开启httpd服务
[root@filestore-v2 ~]# systemctl start httpd

#检查httpd端口是否开启
[root@filestore-v2 ~]# netstat -tunlp | grep httpd
tcp6       0      0 :::80                   :::*                    LISTEN      9597/httpd

#防火墙开放80端口
[root@filestore-v2 ~]# firewall-cmd --permanent --add-port=80/tcp
success

#重新加载防火墙,使配置生效
[root@filestore-v2 ~]# firewall-cmd --reload
success
2.5.5、用浏览器访问是否正常
2.4、安装Zabbix服务
2.4.1、Zabbix版本
版本:zabbix-4.4.3.tar.gz
下载地址:https://nchc.dl.sourceforge.net/project/zabbix/ZABBIX%20Latest%20Stable/4.4.3/zabbix-4.4.3.tar.gz
2.4.2、安装Zabbix依赖库
[root@filestore-v2 ~]# yum install net-snmp-devel libxml2-devel libcurl-devel libevent libevent-devel gcc gcc-c++ -y
2.4.3、解压软件
[root@filestore-v2 ~]# tar xvf zabbix-4.4.3.tar.gz
[root@filestore-v2 ~]# rm -f zabbix-4.4.3.tar.gz
2.4.4、开始安装软件
#进入目录
[root@filestore-v2 ~]# cd zabbix-4.4.3/

#编译软件
[root@filestore-v2 zabbix-4.4.3]# ./configure --prefix=/data/application/zabbix-4.4.3 --enable-server --enable-agent --with-mysql=/data/application/mysql-5.7.25/bin/mysql_config --enable-ipv6 --with-net-snmp --with-libcurl --with-libxml2

#安装
[root@filestore-v2 zabbix-4.4.3]# make && make install

#检查安装目录是否有文件
[root@filestore-v2 zabbix-4.4.3]# ll /data/application/zabbix-4.4.3/
总用量 0
drwxr-xr-x 2 root root 45 12月 20 15:48 bin
drwxr-xr-x 4 root root 114 12月 20 15:48 etc
drwxr-xr-x 3 root root 21 12月 20 15:48 lib
drwxr-xr-x 2 root root 48 12月 20 15:48 sbin
drwxr-xr-x 4 root root 31 12月 20 15:48 share
2.4.5、创建Zabbix用户
#创建zabbix组
[root@filestore-v2 zabbix-4.4.3]# groupadd zabbix

#创建zabbix用户
[root@filestore-v2 zabbix-4.4.3]# useradd -g zabbix -M -s /sbin/nologin zabbix
2.4.6、创建zabbix数据库
#创建zabbix库
[root@filestore-v2 zabbix-4.4.3]# mysql -uroot -proot -e "create database if not exists zabbix default character set utf8 collate utf8_general_ci;"
mysql: [Warning] Using a password on the command line interface can be insecure.

#查看数据库是否创建成功
[root@filestore-v2 zabbix-4.4.3]# mysql -uroot -proot -e "show databases;"
mysql: [Warning] Using a password on the command line interface can be insecure.
+--------------------+
| Database           |
+--------------------+
| information_schema |
| mysql              |
| performance_schema |
| sys                |
| zabbix             |
+--------------------+

#创建表结构(顺序不能变,不然会创建失败)
[root@filestore-v2 zabbix-4.4.3]# mysql -uroot -proot -e "use zabbix;source /root/zabbix-4.4.3/database/mysql/schema.sql;"

[root@filestore-v2 zabbix-4.4.3]# mysql -uroot -proot -e "use zabbix;source /root/zabbix-4.4.3/database/mysql/images.sql;"

[root@filestore-v2 zabbix-4.4.3]# mysql -uroot -proot -e "use zabbix;source /root/zabbix-4.4.3/database/mysql/data.sql;"

#查看数据库表
[root@filestore-v2 zabbix-4.4.3]# mysql -uroot -proot -e "use zabbix;show tables;"
+----------------------------+
| Tables_in_zabbix |
+----------------------------+
| acknowledges |
| actions |
...
2.4.7、创建Zabbix服务需要登陆MySQL的用户
#创建登陆的用户
[root@filestore-v2 zabbix-4.4.3]# mysql -uroot -proot -e "CREATE USER 'zabbix'@'%' IDENTIFIED BY 'zabbix_pwd';"

#授权给zabbix数据库
[root@filestore-v2 zabbix-4.4.3]# mysql -uroot -proot -e "GRANT ALL ON zabbix.* TO 'zabbix'@'%';"
2.4.8、创建存放zabbix日志的目录
[root@filestore-v2 ~]# mkdir /data/application/zabbix-4.4.3/log
[root@filestore-v2 ~]# chown zabbix.zabbix /data/application/zabbix-4.4.3/log -R
2.4.9、编辑zabbix服务的配置文件(标红需要修改)
[root@filestore-v2 ~]# vi /data/application/zabbix-4.4.3/etc/zabbix_server.conf
...
     31 ### Option: LogFile
     32 #       Log file name for LogType 'file' parameter.
     33 #
     34 # Mandatory: yes, if LogType is set to file, otherwise no
     35 # Default:
     36 # LogFile=
     37
     38 LogFile=/data/application/zabbix-4.4.3/log/zabbix_server.log
...
     63 ### Option: PidFile
     64 #       Name of PID file.
     65 #
     66 # Mandatory: no
     67 # Default:
     68 PidFile=/data/application/zabbix-4.4.3/log/zabbix_server.pid
     69
     78 ### Option: DBHost
     79 #       Database host name.
     80 #       If set to localhost, socket is used for MySQL.
     81 #       If set to empty string, socket is used for PostgreSQL.
     82 #
     83 # Mandatory: no
     84 # Default:
     85 DBHost=localhost
     86
     87 ### Option: DBName
     88 #       Database name.
     89 #
     90 # Mandatory: yes
     91 # Default:
     92 # DBName=
     93
     94 DBName=zabbix
     95
     96 ### Option: DBSchema
     97 #       Schema name. Used for IBM DB2 and PostgreSQL.
     98 #
     99 # Mandatory: no
    100 # Default:
    101 # DBSchema=
    102
    103 ### Option: DBUser
    104 #       Database user.
    105 #
    106 # Mandatory: no
    107 # Default:
    108 # DBUser=
    109
    110 DBUser=zabbix
    111
    112 ### Option: DBPassword
    113 #       Database password.
    114 #       Comment this line if no password is used.
    115 #
    116 # Mandatory: no
    117 # Default:
    118 DBPassword=zabbix_pwd
    119
    120 ### Option: DBSocket
    121 #       Path to MySQL socket.
    122 #
    123 # Mandatory: no
    124 # Default:
    125 DBSocket=/var/lib/mysql/mysql.sock
    126
    127 ### Option: DBPort
    128 #       Database port when not using local socket.
    129 #
    130 # Mandatory: no
    131 # Range: 1024-65535
    132 # Default:
    133 DBPort=3306
...
    612
    613 ### Option: Include
    614 #       You may include individual files or all files in a directory in the configuration file.
    615 #       Installing Zabbix will create include directory in /usr/local/etc, unless modified during the compile time.
    616 #
    617 # Mandatory: no
    618 # Default:
    619 # Include=
    620
    621 # Include=/usr/local/etc/zabbix_server.general.conf
    622 # Include=/usr/local/etc/zabbix_server.conf.d/
    623 # Include=/usr/local/etc/zabbix_server.conf.d/*.conf
    624
    625 Include=/data/application/zabbix-4.4.3/etc/zabbix_server.conf.d/*.conf
    626
    627 ### Option: SSLCertLocation
    628 #       Location of SSL client certificates.
    629 #       This parameter is used only in web monitoring.
    630 #       Default depends on compilation options.
    631 #       To see the default path run command "zabbix_server --help".
    632 #
    633 # Mandatory: no
...
2.4.10、去掉注释的配置文件
[root@filestore-v2 ~]# cat /data/application/zabbix-4.4.3/etc/zabbix_server.conf | egrep -v '^#|^$'
LogFile=/data/application/zabbix-4.4.3/log/zabbix_server.log
PidFile=/data/application/zabbix-4.4.3/log/zabbix_server.pid
DBHost=localhost
DBName=zabbix
DBUser=zabbix
DBPassword=zabbix_pwd
DBSocket=/var/lib/mysql/mysql.sock
DBPort=3306
Timeout=4
LogSlowQueries=3000
Include=/data/application/zabbix-4.4.3/etc/zabbix_server.conf.d/*.conf
StatsAllowedIP=127.0.0.1
2.4.11、制作zabbix服务启动脚本


[root@filestore-v2 ~]# cat /etc/init.d/zabbix_server
#!/bin/sh
SERVICE="Zabbix server"
DAEMON=/data/application/zabbix-4.4.3/sbin/zabbix_server
PIDFILE=/data/application/zabbix-4.4.3/log/zabbix_server.pid
Config=/data/application/zabbix-4.4.3/etc/zabbix_server.conf

case $1 in
  'start')
    if [ -x ${DAEMON} ]
    then
      $DAEMON -c $Config
      # Error checking here would be good...
      echo "${SERVICE} started."
    else
      echo "Can't find file ${DAEMON}."
      echo "${SERVICE} NOT started."
    fi
  ;;
  'stop')
    if [ -s ${PIDFILE} ]
    then
      if kill `cat ${PIDFILE}` >/dev/null 2>&1
      then
        echo "${SERVICE} terminated."
        rm -f ${PIDFILE}
      fi
    fi
  ;;
  'restart')
    $0 stop
    sleep 10
    $0 start
  ;;
  *)
    echo "Usage: $0 start|stop|restart"
    ;;
esac
测试运行
#配置可执行权限
[root@filestore-v2 ~]# chmod 755 /etc/init.d/zabbix_server

#启动zabbix服务
[root@filestore-v2 ~]# /etc/init.d/zabbix_server start
Zabbix server started.

#检查端口是否开启
[root@filestore-v2 ~]# netstat -tunlp | grep zabbix
tcp        0      0 0.0.0.0:10051           0.0.0.0:*               LISTEN      37487/zabbix_server
tcp6       0      0 :::10051                :::*                    LISTEN      37487/zabbix_server

#关闭zabbix服务
[root@filestore-v2 ~]# /etc/init.d/zabbix_server stop
Zabbix server terminated.

#检查端口是否关闭
[root@filestore-v2 ~]# netstat -tunlp | grep zabbix
[root@filestore-v2 ~]#
2.4.12、配置Zabbix Web端的管理界面
#复制zabbix php代码到httpd站点目录中
[root@filestore-v2 ~]# cp -r /root/zabbix-4.4.3/frontends/php/ /data/application/httpd-2.4.41/htdocs/zabbix
[root@filestore-v2 ~]# chown -R www.www /data/application/httpd-2.4.41/htdocs/zabbix
2.4.13、访问Zabbix Web端的管理界面(http://192.168.10.96/zabbix/setup.php)

2.4.13、点击Next setp
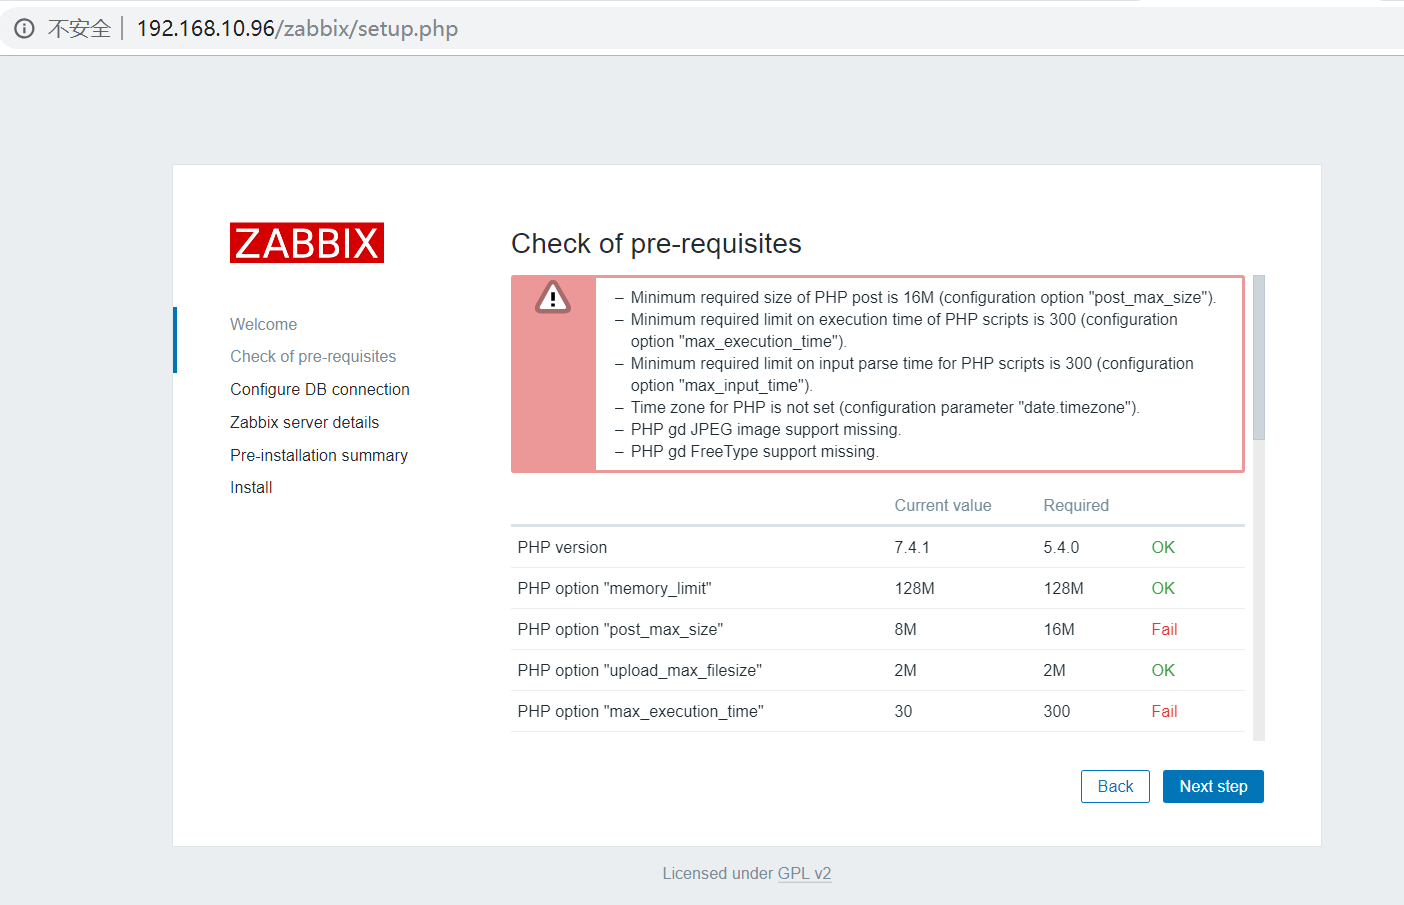
2.4.14、以上问题的解决
[root@filestore-v2 ~]# vi /data/application/php-7.4.1/etc/php.ini
...
    385 ; Maximum execution time of each script, in seconds
    386 ; http://php.net/max-execution-time
    387 ; Note: This directive is hardcoded to 0 for the CLI SAPI
    388 max_execution_time = 300
...
    393 ; Note: This directive is hardcoded to -1 for the CLI SAPI
    394 ; Default Value: -1 (Unlimited)
    395 ; Development Value: 60 (60 seconds)
    396 ; Production Value: 60 (60 seconds)
    397 ; http://php.net/max-input-time
    398 max_input_time = 300
...
    690 ; Maximum size of POST data that PHP will accept.
    691 ; Its value may be 0 to disable the limit. It is ignored if POST data reading
    692 ; is disabled through enable_post_data_reading.
    693 ; http://php.net/post-max-size
    694 post_max_size = 16M
    695
...
   958 [Date]
    959 ; Defines the default timezone used by the date functions
    960 ; http://php.net/date.timezone
    961 date.timezone = Asia/Shanghai
    962
    963 ; http://php.net/date.default-latitude
    964 ;date.default_latitude = 31.7667
...

#配置好,重启httpd服务
[root@filestore-v2 ~]# systemctl restart httpd
2.4.15、再次刷新尝试,发现有两个错误
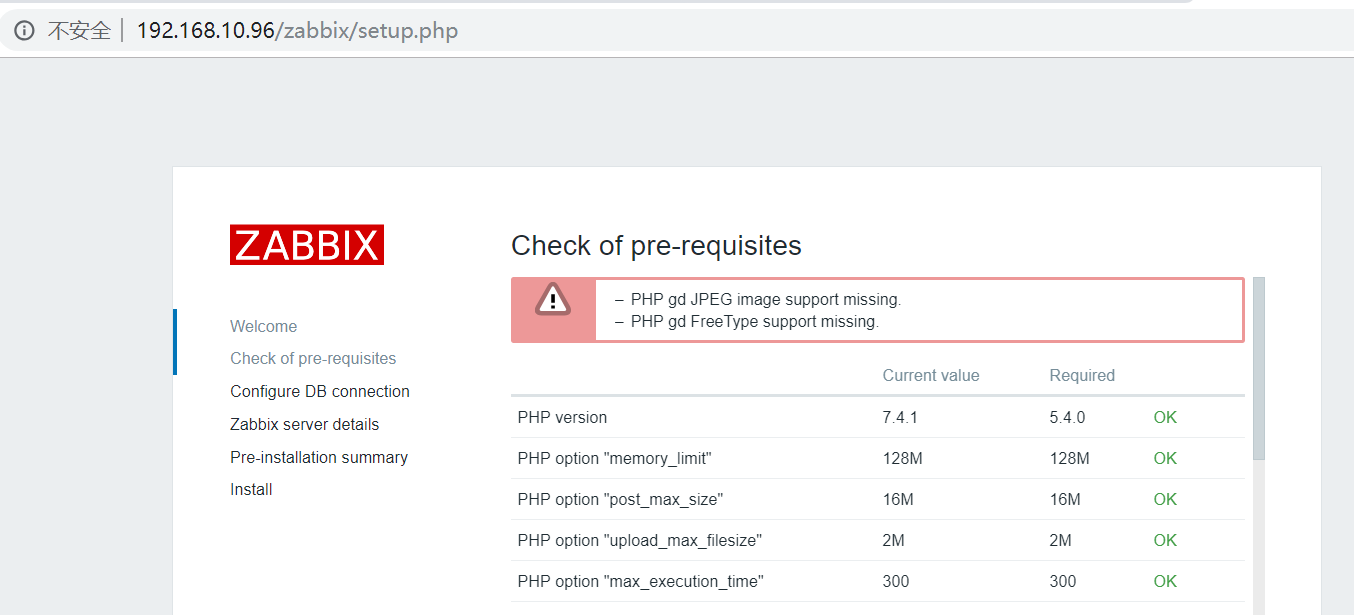
2.4.16、以上的解决方法
- PHP gd JPEG image support missing.
- PHP gd FreeType support missing.
出现这个问题由于php是php-7.4.1最新版,libjpeg包老是报找不到,导致该模块编译不成功,这里把php版本换成php-7.3.13则可成功,无报错
2.4.17、换成php-7.3.13版本后,问题已经解决
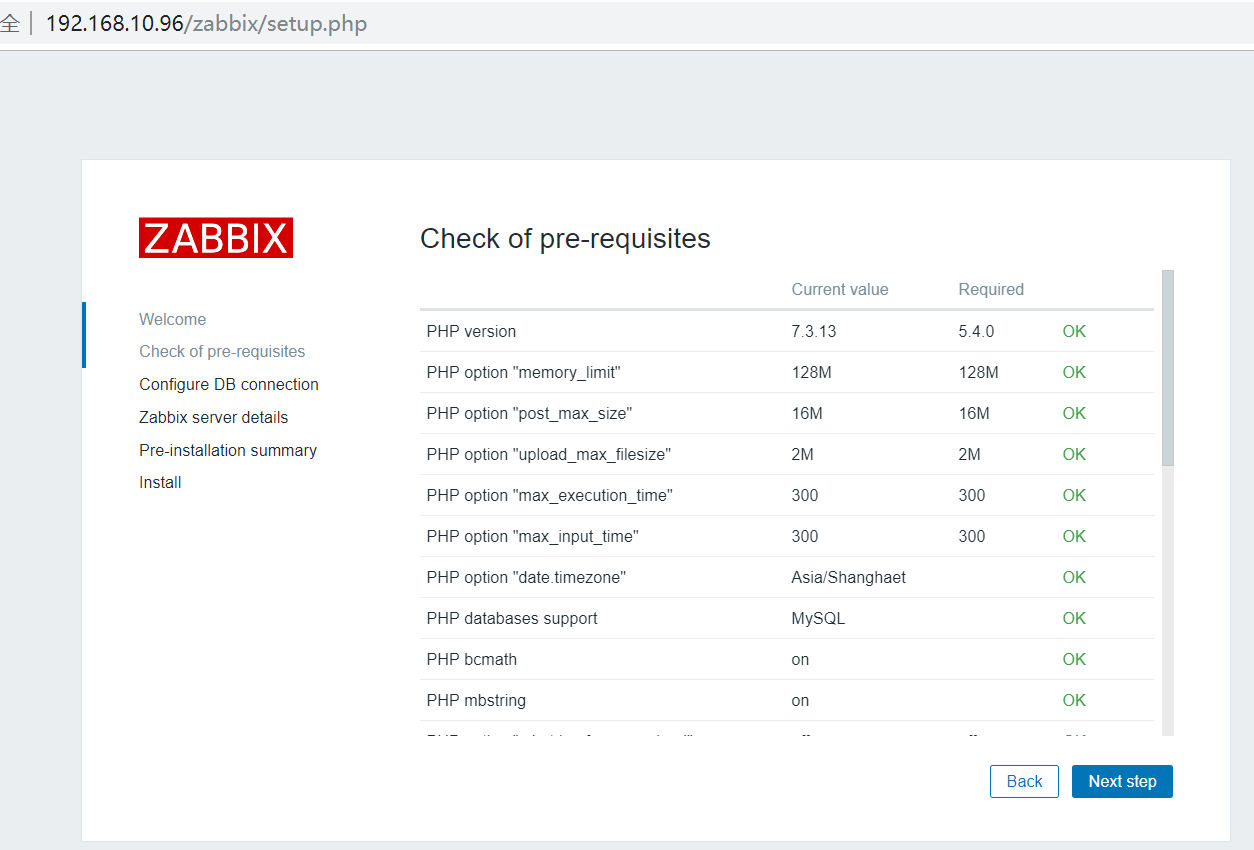
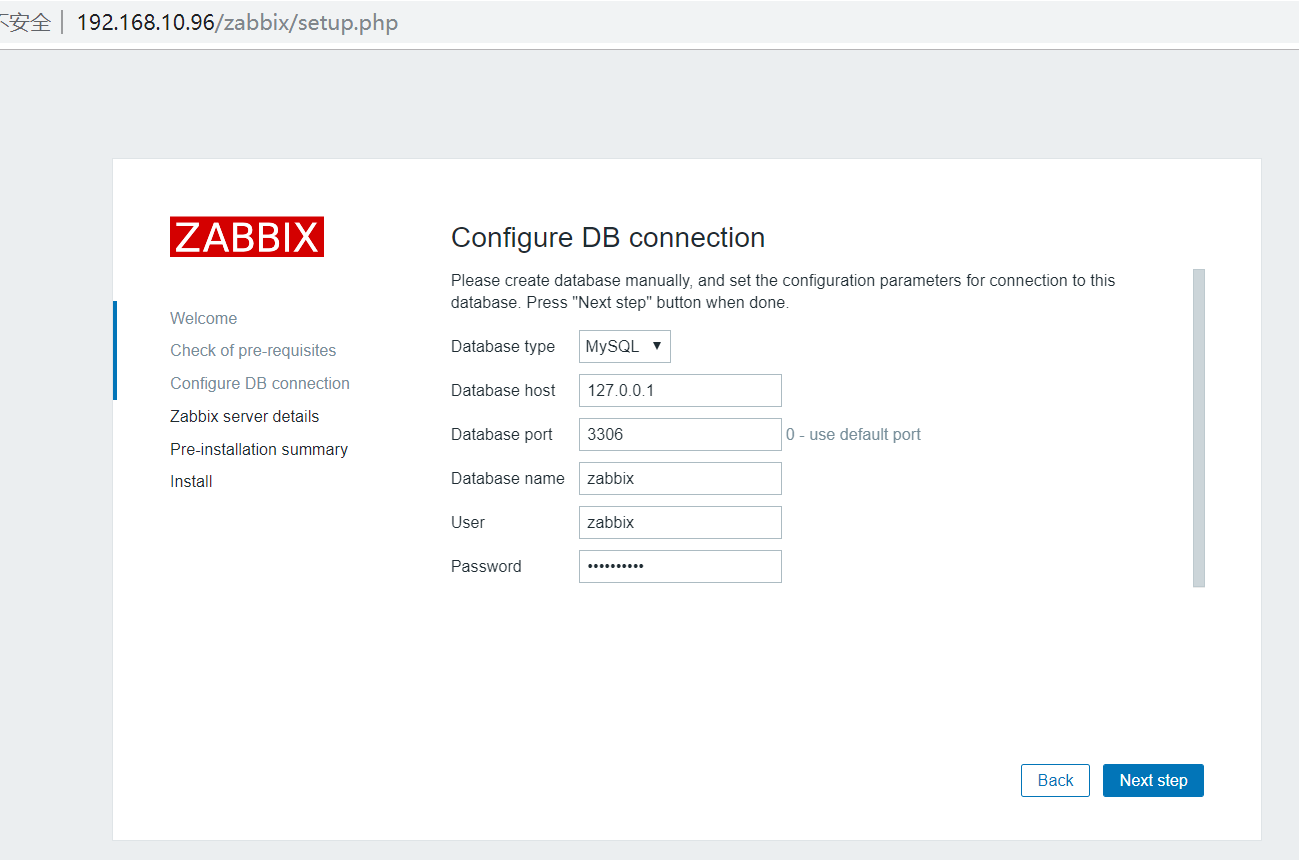
2.4.18、配置数据库连接信息
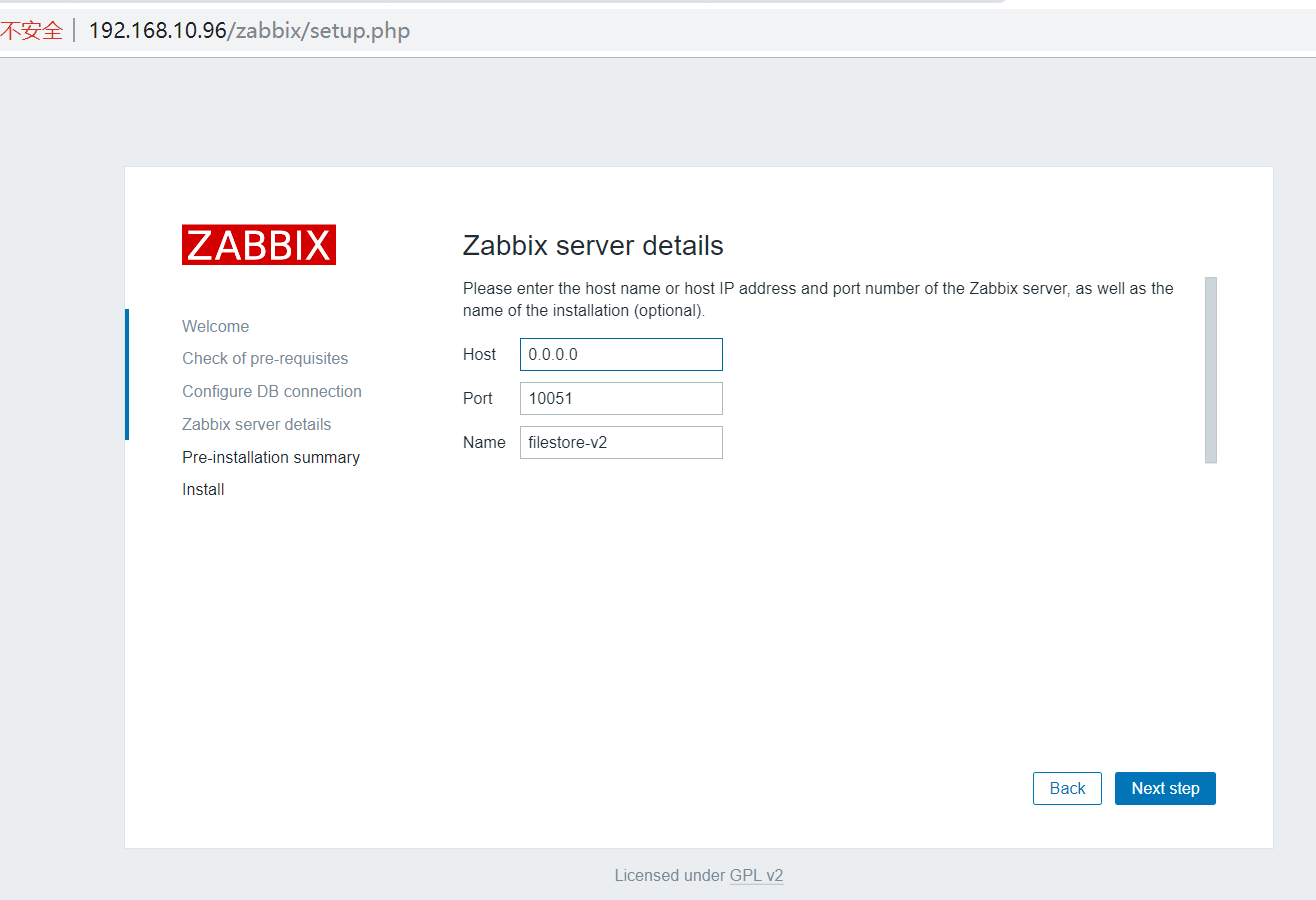
2.4.19、输入Zabbix服务器的主机名或主机IP地址和端口号
2.4.20、最后的配置信息的确认

2.4.21、默认的登陆账号和密码
默认账号:Admin
默认密码:zabbix
默认账号:guest
默认是禁用
2.4.22、登陆成功后的界面
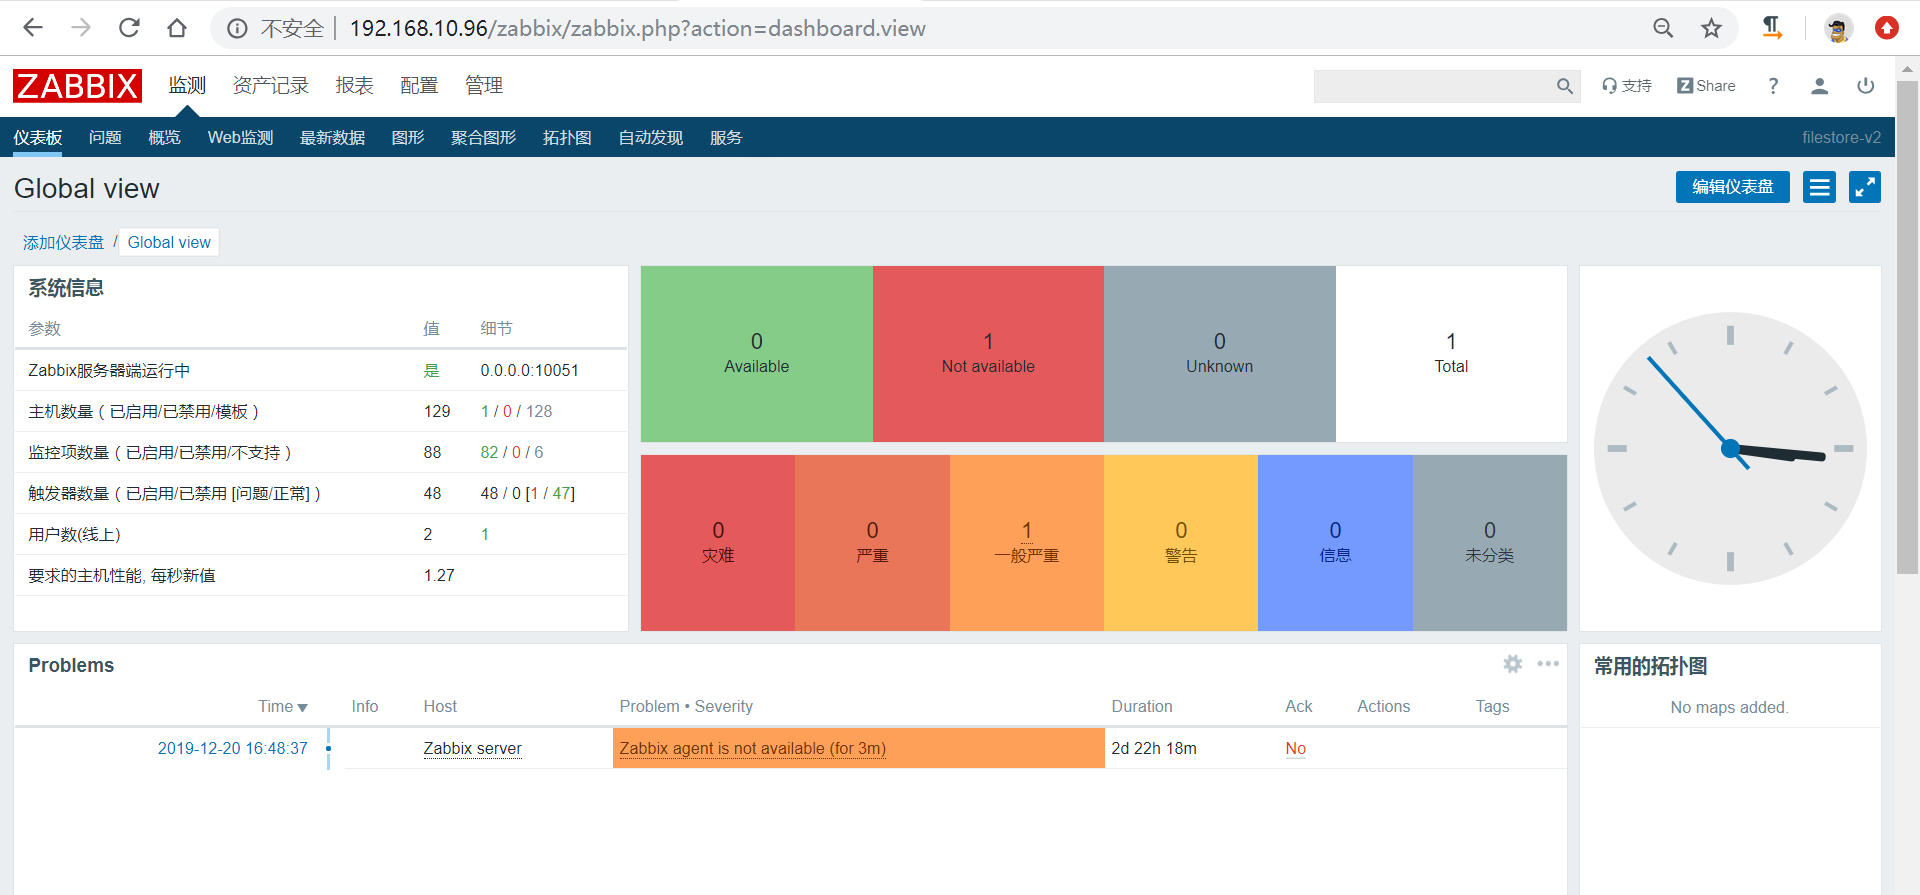
下一篇【Zabbix客户端的完整布署】请点击查看

 浙公网安备 33010602011771号