

SpringBoot学习
SpringBoot
一、SpringBoot介绍
1.1 引入
Spring是为了解决企业级应用开发的复杂性而创建的,简化开发。
- 基于POJO的轻量级和最小侵入性编程,所有东西都是bean
- 通过IOC,依赖注入(DI)和面向接口实现松耦合
- 基于切面(AOP)和惯例进行声明式编程
- 通过切面和模版减少样式代码,RedisTemplate,xxxTemplate
But!,随着 Spring 不断的发展,涉及的领域越来越多,项目整合开发需要配合各种各样的文件,慢慢变得不那么易用简单,违背了最初的理念,人称配置地狱。
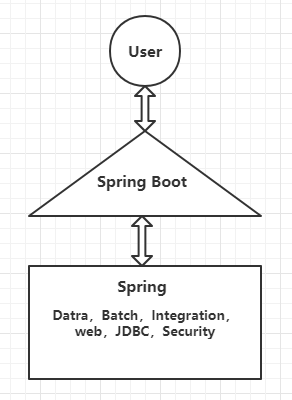
Spring Boot 正是在这样的一个背景下被抽象出来的开发框架,目的为了让大家更容易的使用 Spring 、更容易的集成各种常用的中间件、开源软件;
Spring Boot 基于 Spring 开发,Spirng Boot 本身并不提供 Spring 框架的核心特性以及扩展功能,只是用于快速、敏捷地开发新一代基于 Spring 框架的应用程序。
SpringBoot并不是用来替代 Spring 的解决方案,而是和 Spring 框架紧密结合用于提升 Spring 开发者体验的工具。
1.2 简介
Spring Boot 来简化Spring应用开发,约定大于配置,去繁从简,just run 就能创建一个独立的,产品级别的应用
背景
J2EE笨重的开发,繁多的配置,底下的开发效率、复杂的部署流程、第三方技术集成难度大。
解决
-
Spring全家桶时代
-
Spring Boot -> J2EE一站式解决方案
-
Spring Cloud -> 分布式整体解决方案
1.3 优点
- 快速创建独立运行的Spring项目以及与主流框架集成
- 使用嵌入式的Servlet容器,应用无需打成War包
- starters自动依赖与版本控制
- 大量的自动配置,简化开发,可以修改默认值
- 无需配置XML,无代码生成,开箱即用
- 准生产环境的运行时应用监控
- 与云计算的天然集成
1.4 微服务
微服务是一种风格、要求我们在开发一个应用时,这个应用必须构建成一系列小服务的组合,可以通过http的方式进行互通
单体应用架构
指我们将一个应用中的所有应用服务器都封装在一个应用中。
无论ERP、CRM、或其他系统,都把数据库访问、web访问,等等各个功能放到一个war包内。
- 好处是,易于开发和测试:也十分方便部署;当需要扩展时,只需要将war复制多份,然后放到多个服务器上,再做个负载均衡即可。
- 缺点是,修改一个小地方,都需要停掉整个服务,重新打包、部署这个应用war包。
微服务架构
all in one的架构方式,我们把所有的功能单元放在一个应用里面。然后我们把整个应用部署到服务器上。如果负载能力不行,我们将整个应用进行水平复制,进行扩展,然后在负载均衡。
所谓微服务架构,就是打破之前all in one的架构方式,把每个功能元素独立出来。把独立出来的功能元素的动态组合,需要的功能元素才去拿来组合,需要多一些时可以整合多个功能元素。所以微服务架构是对功能元素进行复制,而没有对整个应用进行复制。
这样做的好处是:
- 节省了调用资源。
- 每个功能元素的服务都是一个可替换的、可独立升级的软件代码。
构建微服务
一个大型系统的微服务架构,就像一个复杂交织的神经网络,每一个神经元就是一个功能元素,它们各自完成自己的功能,然后通过http相互请求调用。比如一个电商系统,查缓存、连数据库、浏览页面、结账、支付等服务都是一个个独立的功能服务,都被微化了,它们作为一个个微服务共同构建了一个庞大的系统。如果修改其中的一个功能,只需要更新升级其中一个功能服务单元即可。
但是这种庞大的系统架构给部署和运维带来很大的难度。于是,spring为我们带来了构建大型分布式微服务的全套、全程产品:
- 构建一个个功能独立的微服务应用单元,可以使用springboot,可以帮我们快速构建一个应用;
- 大型分布式网络服务的调用,这部分由spring cloud来完成,实现分布式;
- 在分布式中间,进行流式数据计算、批处理,我们有spring cloud data flow。
- spring为我们想清楚了整个从开始构建应用到大型分布式应用全流程方案。
二、Hello,SpringBoot
功能:浏览器发送Hello请求,服务器接收请求并处理,响应HelloWorld字符串
@Controller
public class HelloController {

    @ResponseBody
    @RequestMapping("/hello")
    public String hello() {
        return "Hello,World";
    }
}
简化部署(打包)

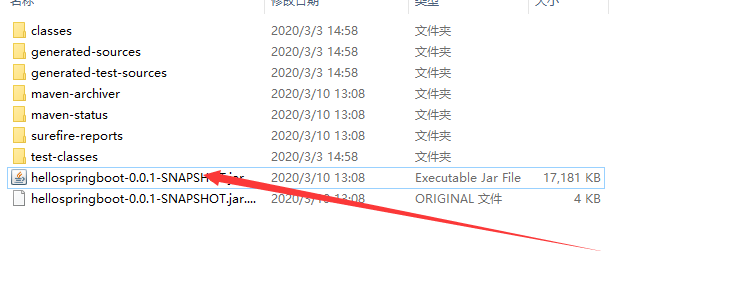
java -jar hellospringboot-0.0.1-SNAPSHOT.jar
2.1 Hello,Spring探究
父项目
<parent>
    <groupId>org.springframework.boot</groupId>
    <artifactId>spring-boot-starter-parent</artifactId>
    <version>2.2.5.RELEASE</version>
    <relativePath/> <!-- lookup parent from repository -->
</parent>

<!-- 真正管理SpringBoot应用里面所有依赖版本的地方,SpringBoot的版本控制中心-->
<parent>
    <groupId>org.springframework.boot</groupId>
    <artifactId>spring-boot-dependencies</artifactId>
    <version>2.2.5.RELEASE</version>
    <relativePath>../../spring-boot-dependencies</relativePath>
</parent>

它来真正的管理Spring boot应用里面所有依赖版本!
以后导入依赖不需要写版本;但是如果导入的包没有在依赖中管理着就需要手动配置版本了;
导入的依赖
<dependency>
    <groupId>org.springframework.boot</groupId>
    <artifactId>spring-boot-starter-web</artifactId>
</dependency>

<dependency>
    <groupId>org.springframework.boot</groupId>
    <artifactId>spring-boot-configuration-processor</artifactId>
    <optional>true</optional>
</dependency>
2.2 原理探究
1.启动器 spring-boot-starter
spring-boot-starter-web
spring-boot-starter:springboot场景启动器,帮助我们导入web模块正常运行所依赖的组件
Springboot将所有的功能场景都抽取出来,做成一个一个的starter(启动器),只需要在项目中引入starter相关场景的依赖都会导入进来。要用什么功能就导入什么场景启动器。
2.主程序类
@SpringBootApplication
public class HellospringbootApplication {
    public static void main(String[] args) {
        SpringApplication.run(HellospringbootApplication.class, args);
    }
}
@SpringBootApplication:Springboot应用标注在某个类上说明这个类是SpringBoot的主配置类,SpringBoot就应该运行这个类的main方法来启动SpringBoot应用
SpringApplication.run分析:一部分是SpringApplication的实例化,二是run方法的执行
主程序类完成了四件事情:
- 推断应用的类型是普通的项目还是Web项目
- 查找并加载所有可用初始化器 , 设置到initializers属性中
- 找出所有的应用程序监听器,设置到listeners属性中
- 推断并设置main方法的定义类,找到运行的主类
@Target(ElementType.TYPE)
@Retention(RetentionPolicy.RUNTIME)
@Documented
@Inherited
@SpringBootConfiguration
@EnableAutoConfiguration
@ComponentScan(excludeFilters = { @Filter(type = FilterType.CUSTOM, classes = TypeExcludeFilter.class),
		@Filter(type = FilterType.CUSTOM, classes = AutoConfigurationExcludeFilter.class) })
public @interface SpringBootApplication {
@ComponentScan:对应XML配置中的元素
@SpringBootConfiguration:Springboot的配置类,标注在某个类上,表示这是一个SpringBoot配置类
	**@Configuration**:配置类上标注这个注解,对应Spring中的xml文件

			**@Component:**启动类本身也是Spring中的一个组件而已,负责启动应用!
@EnableAutoConfiguration:开启自动配置功能
以前需要配置的东西,Springboot帮我们配置;@EnableAutoConfiguration告诉Springboot开启自动配置功能,这样自动配置才能生效。
@Target(ElementType.TYPE)
@Retention(RetentionPolicy.RUNTIME)
@Documented
@Inherited
@AutoConfigurationPackage
@Import(AutoConfigurationImportSelector.class)
public @interface EnableAutoConfiguration {
	**@AutoConfigurationPackage**:自动配置包

			@**Import**(AutoConfigurationPackages.Registrar.class):Spring的底层注解@Import,给容					器中导入一个组件;导入的组件由AutoConfigurationPackages.Registrar.class

			***将主配置类(@SpringBootConfiguration标注的类)的所在包及下面所有子包里面的所有						组件扫描到Spring容器。***

	**@Import(AutoConfigurationImportSelector.class)**:给容器中导入组件,导入哪些组件的选				择器

			将所有需要导入的组件以全类名的方式返回;这些组件就会被添加到容器中。

			会给容器中导入非常多的自动配置类(xxxAutoConfiguration);给容器中导入这个场景的所				有组件,并配置好这些组件

			有了自动配置类,免去了我们收到编写配置注入功能组件等工作

			SpringFactoriesLoader.loadFactoryNames(EnableAutoConfiguration.class, classLoader)
Spring Boot 在启动的时候从类路径下的META-INF/spring.factories中获取 EnableAutoConfiguration指定的值,将这些值作为自动配置类导入到容器中,
自动配置类就生效,帮我们进行自动配置工作
J2EE的整体整合解决方案和自动配置都在spring-boot-autoconfigure-2.2.5.RELEASE.jar下
3.总结
- SpringBoot在启动的时候从类路径下的META-INF/spring.factories中获取EnableAutoConfiguration指定的值
- 将这些值作为自动配置类导入容器 , 自动配置类就生效 , 帮我们进行自动配置工作
- 它会给容器中导入非常多的自动配置类 (xxxAutoConfiguration), 就是给容器中导入这个场景需要的所有组件 , 并配置好这些组件
2.3 使用Spring Initializer快速创建Spring Boot项目
选择我们需要的模块,会自动联网创建Spring Boot 项目
默认生成的Spring Boot项目:
- 主程序自动生成
- resources文件中的目录结构
- static:保存所有的静态资源:css,image
- templates:保存所有的模板页面(SpringBoot嵌入Tomcat,默认不支持jsp,可以使用模板引擎)
- application.properties:springboot应用的配置文件;可以修改一些默认设置
2.4 彩蛋
到项目下的 resources 目录下新建一个banner.txt 即可。
https://www.bootschool.net/ascii 可以生成
三、SpringBoot配置
3.1 配置文件
SpringBoot提供两个个全局的配置文件
-
application.properties
语法结构: key = value
-
application.yml
语法结构: key: 空格 value
配置文件的作用:修改SpringBoot自动配置的默认值,因为SpringBoot在底层都给我们自动配置好了
配置文件在src/main/resources目录或者类路径/config下
全局配置文件可以对一些默认配置值进行修改(Springboot将底层配置好了)
3.2 YAML介绍
yml是YAML(YAML Ain't Markup Language) 语言的文件,以数据为中心,比json、xml等更适合做配置文件
YAML(YAML Ain't Markup Language)
	YAML A Markup Language:是一个标记语言

	YAML isn't Markup Language:不是一个标记语言
eg
YAML==========

server:
  port: 8081

XML===========
<server>
	<port>8081<port>
</server>
这种语言以数据作为中心,而不是以标记语言为重点!
3.3 YAML语法
基本语法
k:(空格)v:表示一对键值对(空格必须有)
以空格的缩进来控制层级关系;只要是左对齐的一列数据,都是同一级的
server:
	port: 8081
	path: /hello
属性的值大小写敏感
值的写法
字面量:普通的值(数字,字符串,布尔)
k:v:字面直接来写;
	字符串默认不用加单引号或者双引号

	"":双引号,不会转义字符串里面的特殊字符;特殊字符会作为本身想表示的意思
			name: "zhangsan \n lisi"			输出:zhangsan 换行 list
	'':单引号,会转义特殊字符,特殊字符最终只是一个普通的字符串数据
			name: 'zhangsan \n lisi'			输出:zhangsan \n list
对象、Map(属性和值)(键值对):
k:v:在下一行来写对象的属性和值的关系;注意缩进
对象还是k: v的方式
friends:
	lastName: zhangsan
	age: 20
行内写法:
friends: {lastName: zhangsan, age: 22}
数组(List,set)
用- 值表示数组中的元素
pets:
	- cat
	- dog
	- pig
行内写法
pets: [cat, dog, pig]
3.4 配置文件值注入
IDEA提示
<!-- 导入配置文件处理器,配置文件进行绑定就会有提示,需要重启 -->
<dependency>
  <groupId>org.springframework.boot</groupId>
  <artifactId>spring-boot-configuration-processor</artifactId>
  <optional>true</optional>
</dependency>
配置文件
person:
  lastName: zhangsan
  age: 22
  boss: false
  birth: 2020/2/2
  maps: {k1: v1, k2: v2}
  lists:
    - lisi
    - zhaoliu
  dog:
    name: 小狗
    age: 2
person.last-name=张磊
person.age=22
person.birth=2020/2/2
person.boss=false
person.maps.k1=v1
person.maps.k2=v2
person.lists=a,b,c
person.dog.name=123
person.dog.age=123
JavaBean
package cn.imut.bean;

import org.springframework.boot.context.properties.ConfigurationProperties;
import org.springframework.stereotype.Component;

import java.util.Date;
import java.util.List;
import java.util.Map;

@Component
@ConfigurationProperties(prefix = "person")
public class Person {
    private String lastName;
    private Integer age;
    private Boolean boss;
    private Date birth;

    private Map<String,Object> maps;
    private List<Object> lists;
    private Dog dog;

    @Override
    public String toString() {
        return "Person{" +
                "lastName='" + lastName + '\'' +
                ", age=" + age +
                ", boss=" + boss +
                ", birth=" + birth +
                ", maps=" + maps +
                ", lists=" + lists +
                ", dog=" + dog +
                '}';
    }

    public String getLastName() {
        return lastName;
    }

    public void setLastName(String lastName) {
        this.lastName = lastName;
    }

    public Integer getAge() {
        return age;
    }

    public void setAge(Integer age) {
        this.age = age;
    }

    public Boolean getBoss() {
        return boss;
    }

    public void setBoss(Boolean boss) {
        this.boss = boss;
    }

    public Date getBirth() {
        return birth;
    }

    public void setBirth(Date birth) {
        this.birth = birth;
    }

    public Map<String, Object> getMaps() {
        return maps;
    }

    public void setMaps(Map<String, Object> maps) {
        this.maps = maps;
    }

    public List<Object> getLists() {
        return lists;
    }

    public void setLists(List<Object> lists) {
        this.lists = lists;
    }

    public Dog getDog() {
        return dog;
    }

    public void setDog(Dog dog) {
        this.dog = dog;
    }
}
package cn.imut.bean;

public class Dog {
    private String name;
    private Integer age;

    public String getName() {
        return name;
    }

    public void setName(String name) {
        this.name = name;
    }

    public Integer getAge() {
        return age;
    }

    public void setAge(Integer age) {
        this.age = age;
    }

    @Override
    public String toString() {
        return "Dog{" +
                "name='" + name + '\'' +
                ", age=" + age +
                '}';
    }
}
3.5 ConfigurationProperties与Value比较
| @ConfigurationProperties | @Value | |
|---|---|---|
| 功能 | 批量注入配置文件中的属性 | 一个个指定 |
| 松散绑定(松散语法) | 支持 | 不支持 |
| SpEL | 不支持 | 支持 |
| JSR303数据校验 | 支持 | 不支持 |
配置文件yml,prperties他们都能获取值
当某个业务逻辑中需要获取一下配置文件中的某项值,使用@Value
若我们专门编写了一个JavaBean来和配置文件进行映射,我们就直接使用@ConfigurationProperties
3.6 @PropertySource & @ImportResource
@PropertySource:加载指定的配置文件
@PropertySource(value = "classpath:Mybatis.properties")
@ImportResource:导入spring的配置文件,让配置文件中的内容生效;
springboot默认没有spring的配置文件,我们可以自己编写配置文件,但是还不能自动识别。
想要让其生效,加载进来;可以将@ImportResource标注在一个配置类上
@ImportResource(locations = {"classpath:beans.xml"})
导入spring中的配置文件,让其加载
不推荐使用!
Springboot推荐给容器中添加组件的方式:全注解方式
- 配置类
- 加注解@Component
- 方法上加@Bean
3.7 配置文件占位符
-
RandomValuePropertySource:配置文件中可以使用随机数
${random.value}、${andom.int}、${random.long} ${random.int(10)}、${random.int[1024,65536]} -
属性配置占位符
app.name = MyApp app.description = ${app.name}- 可以在配置文件中引用前面配置过的属性
3.8 Profile
Profile是Spring对不同环境提供不同配置功能的支持,可以通过激活、指定参数等方式快速切换环境
-
多profile文件形式
主配置文件编写时,文件名可以是 application-{profile}.properties/yml
默认使用application.properties的配置
-
yml支持多文档块方式
server: port: 8081 spring: profiles: #选择环境 active: dev --- # dev环境 server: port: 8082 spring: profiles: dev --- # prod 环境 server: port: 8083 spring: profiles: prod -
激活方式
- 命令行
- spring.profile.active = dev
- 配置文件
- spring.profile.active = dev
- jvm参数
- Dspring.profile.active = dev
- 命令行
3.9 配置文件加载
@PropertySource :加载指定的配置文件;
@configurationProperties:默认从全局配置文件中获取值;
Springboot启动会扫描以下位置的application.properties或者application.yml文件作为Springboot的默认配置文件
- file:./config/
- file:./
- classpath:/config/
- classpath:/
以上按照优先级从高到低顺序,所有位置的文件都会被加载,高优先级配置内容会覆盖低优先级配置内容
Springboot会从这四个位置全部加载主配置文件;互补配置
我们也可以通过配置spring.config.location来改变默认配置文件的位置
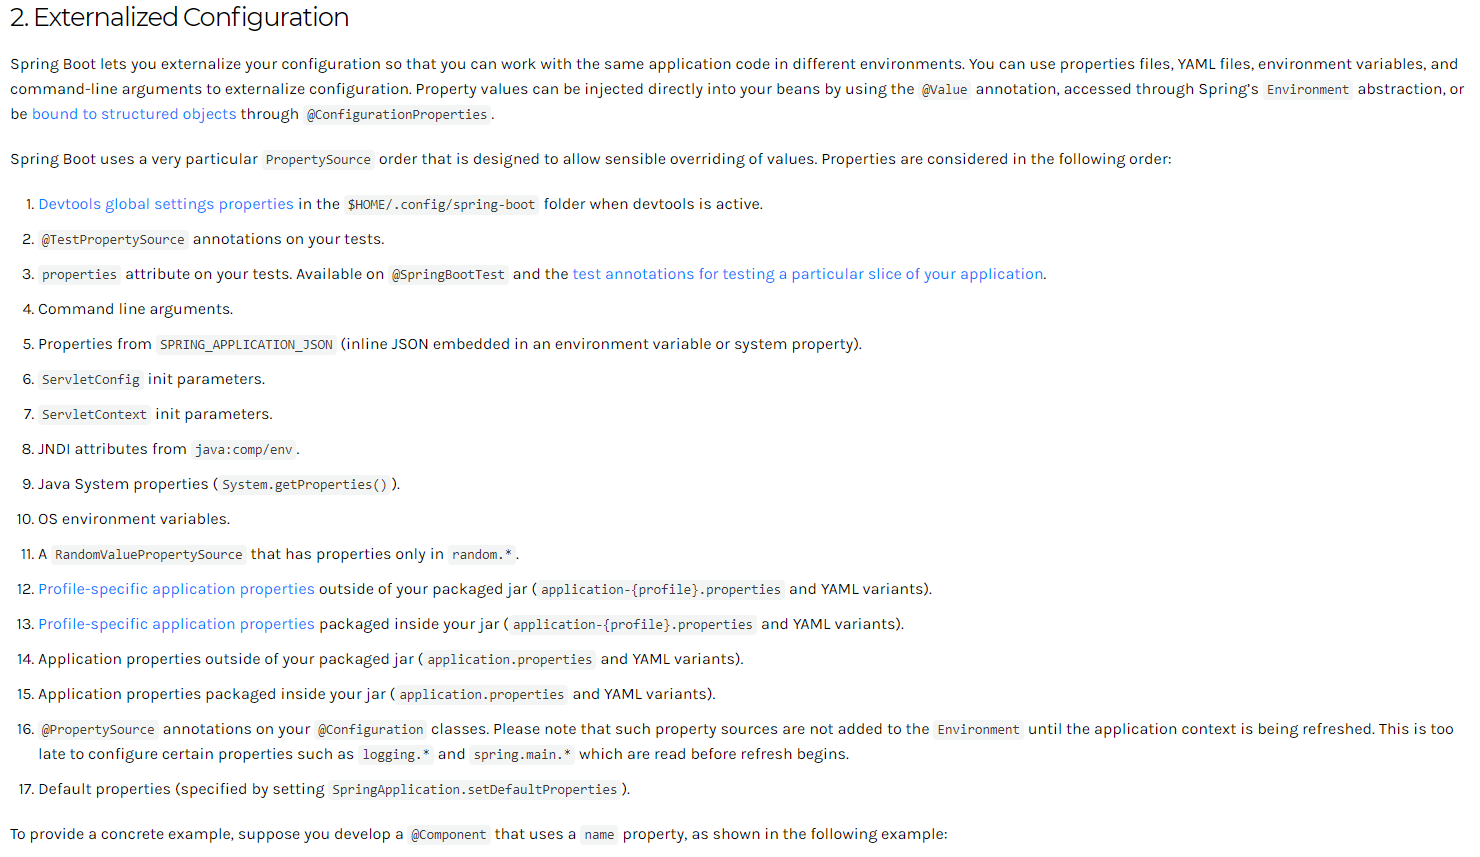
3.9 外部配置加载顺序
Springboot支持多种外部配置方式
四、JSR303数据校验及多环境切换
4.1 JSR303数据校验
Springboot中可以用@validated来校验数据,如果数据异常则会统一抛出异常,方便异常中心统一处理。
@Component
@ConfigurationProperties(prefix = "person")
@Validated  //数据校验
public class Person {
    @Email(message="邮箱格式错误")
    private String name;
}
常见参数
@NotNull(message="名字不能为空")
private String userName;
@Max(value=120,message="年龄最大不能查过120")
private int age;
@Email(message="邮箱格式错误")
private String email;

空检查
@Null       验证对象是否为null
@NotNull    验证对象是否不为null, 无法查检长度为0的字符串
@NotBlank   检查约束字符串是不是Null还有被Trim的长度是否大于0,只对字符串,且会去掉前后空格.
@NotEmpty   检查约束元素是否为NULL或者是EMPTY.

Booelan检查
@AssertTrue     验证 Boolean 对象是否为 true
@AssertFalse    验证 Boolean 对象是否为 false

长度检查
@Size(min=, max=) 验证对象(Array,Collection,Map,String)长度是否在给定的范围之内
@Length(min=, max=) string is between min and max included.

日期检查
@Past       验证 Date 和 Calendar 对象是否在当前时间之前
@Future     验证 Date 和 Calendar 对象是否在当前时间之后
@Pattern    验证 String 对象是否符合正则表达式的规则
4.2 多环境切换
- application-test.properties 代表测试环境配置
- application-dev.properties 代表开发环境配置
SpringBoot 默认使用application.properties主配置文件
spring.profiles.active=dev
server:
  port: 8081
#选择要激活那个环境块
spring:
  profiles:
    active: prod

---
server:
  port: 8083
spring:
  profiles: dev #配置环境的名称


---

server:
  port: 8084
spring:
  profiles: prod  #配置环境的名称
我们还可以通过spring.config.location来改变默认的配置文件位置
五、SprintBoot自动配置原理
-
SpringBoot启动时,加载主配置类,开启了自动配置功能@EnableAutoConfiguration
-
@EnableAutoConfiguration作用:
-
利用AutoConfigurationImportSelector给容器中导入组件
-
可以查看selectImports方法的内容
List<String> configurations = getCandidateConfigurations(annotationMetadata, attributes); 获取候选的配置-
SpringFactoriesLoader.loadFactoryNames(getSpringFactoriesLoaderFactoryClass(), getBeanClassLoader()); -
扫描所有jar包类路径下的 META-INF/spring.factories
-
然后把扫描到的文件的内容,包装成properties对象
-
从properties中获取到EnableAutoConfiguration.class类(类名)对应的值,然后把他们添加到容器中
-
-
将类路径下 META-INF/spring.factories 里面配置的所有EnableAutoConfiguration的值加入到了容器中
# Auto Configure
org.springframework.boot.autoconfigure.EnableAutoConfiguration=\
org.springframework.boot.autoconfigure.admin.SpringApplicationAdminJmxAutoConfiguration,\
org.springframework.boot.autoconfigure.aop.AopAutoConfiguration,\
org.springframework.boot.autoconfigure.amqp.RabbitAutoConfiguration,\
org.springframework.boot.autoconfigure.batch.BatchAutoConfiguration,\
org.springframework.boot.autoconfigure.cache.CacheAutoConfiguration,\
org.springframework.boot.autoconfigure.cassandra.CassandraAutoConfiguration,\
org.springframework.boot.autoconfigure.cloud.CloudServiceConnectorsAutoConfiguration,\
org.springframework.boot.autoconfigure.context.ConfigurationPropertiesAutoConfiguration,\
org.springframework.boot.autoconfigure.context.MessageSourceAutoConfiguration,\
org.springframework.boot.autoconfigure.context.PropertyPlaceholderAutoConfiguration,\
org.springframework.boot.autoconfigure.couchbase.CouchbaseAutoConfiguration,\
org.springframework.boot.autoconfigure.dao.PersistenceExceptionTranslationAutoConfiguration,\
org.springframework.boot.autoconfigure.data.cassandra.CassandraDataAutoConfiguration,\
org.springframework.boot.autoconfigure.data.cassandra.CassandraReactiveDataAutoConfiguration,\
org.springframework.boot.autoconfigure.data.cassandra.CassandraReactiveRepositoriesAutoConfiguration,\
org.springframework.boot.autoconfigure.data.cassandra.CassandraRepositoriesAutoConfiguration,\
org.springframework.boot.autoconfigure.data.couchbase.CouchbaseDataAutoConfiguration,\
org.springframework.boot.autoconfigure.data.couchbase.CouchbaseReactiveDataAutoConfiguration,\
org.springframework.boot.autoconfigure.data.couchbase.CouchbaseReactiveRepositoriesAutoConfiguration,\
org.springframework.boot.autoconfigure.data.couchbase.CouchbaseRepositoriesAutoConfiguration,\
org.springframework.boot.autoconfigure.data.elasticsearch.ElasticsearchAutoConfiguration,\
org.springframework.boot.autoconfigure.data.elasticsearch.ElasticsearchDataAutoConfiguration,\
org.springframework.boot.autoconfigure.data.elasticsearch.ElasticsearchRepositoriesAutoConfiguration,\
org.springframework.boot.autoconfigure.data.elasticsearch.ReactiveElasticsearchRepositoriesAutoConfiguration,\
org.springframework.boot.autoconfigure.data.elasticsearch.ReactiveRestClientAutoConfiguration,\
org.springframework.boot.autoconfigure.data.jdbc.JdbcRepositoriesAutoConfiguration,\
org.springframework.boot.autoconfigure.data.jpa.JpaRepositoriesAutoConfiguration,\
org.springframework.boot.autoconfigure.data.ldap.LdapRepositoriesAutoConfiguration,\
org.springframework.boot.autoconfigure.data.mongo.MongoDataAutoConfiguration,\
org.springframework.boot.autoconfigure.data.mongo.MongoReactiveDataAutoConfiguration,\
org.springframework.boot.autoconfigure.data.mongo.MongoReactiveRepositoriesAutoConfiguration,\
org.springframework.boot.autoconfigure.data.mongo.MongoRepositoriesAutoConfiguration,\
org.springframework.boot.autoconfigure.data.neo4j.Neo4jDataAutoConfiguration,\
org.springframework.boot.autoconfigure.data.neo4j.Neo4jRepositoriesAutoConfiguration,\
org.springframework.boot.autoconfigure.data.solr.SolrRepositoriesAutoConfiguration,\
org.springframework.boot.autoconfigure.data.redis.RedisAutoConfiguration,\
org.springframework.boot.autoconfigure.data.redis.RedisReactiveAutoConfiguration,\
org.springframework.boot.autoconfigure.data.redis.RedisRepositoriesAutoConfiguration,\
org.springframework.boot.autoconfigure.data.rest.RepositoryRestMvcAutoConfiguration,\
org.springframework.boot.autoconfigure.data.web.SpringDataWebAutoConfiguration,\
org.springframework.boot.autoconfigure.elasticsearch.jest.JestAutoConfiguration,\
org.springframework.boot.autoconfigure.elasticsearch.rest.RestClientAutoConfiguration,\
org.springframework.boot.autoconfigure.flyway.FlywayAutoConfiguration,\
org.springframework.boot.autoconfigure.freemarker.FreeMarkerAutoConfiguration,\
org.springframework.boot.autoconfigure.gson.GsonAutoConfiguration,\
org.springframework.boot.autoconfigure.h2.H2ConsoleAutoConfiguration,\
org.springframework.boot.autoconfigure.hateoas.HypermediaAutoConfiguration,\
org.springframework.boot.autoconfigure.hazelcast.HazelcastAutoConfiguration,\
org.springframework.boot.autoconfigure.hazelcast.HazelcastJpaDependencyAutoConfiguration,\
org.springframework.boot.autoconfigure.http.HttpMessageConvertersAutoConfiguration,\
org.springframework.boot.autoconfigure.http.codec.CodecsAutoConfiguration,\
org.springframework.boot.autoconfigure.influx.InfluxDbAutoConfiguration,\
org.springframework.boot.autoconfigure.info.ProjectInfoAutoConfiguration,\
org.springframework.boot.autoconfigure.integration.IntegrationAutoConfiguration,\
org.springframework.boot.autoconfigure.jackson.JacksonAutoConfiguration,\
org.springframework.boot.autoconfigure.jdbc.DataSourceAutoConfiguration,\
org.springframework.boot.autoconfigure.jdbc.JdbcTemplateAutoConfiguration,\
org.springframework.boot.autoconfigure.jdbc.JndiDataSourceAutoConfiguration,\
org.springframework.boot.autoconfigure.jdbc.XADataSourceAutoConfiguration,\
org.springframework.boot.autoconfigure.jdbc.DataSourceTransactionManagerAutoConfiguration,\
org.springframework.boot.autoconfigure.jms.JmsAutoConfiguration,\
org.springframework.boot.autoconfigure.jmx.JmxAutoConfiguration,\
org.springframework.boot.autoconfigure.jms.JndiConnectionFactoryAutoConfiguration,\
org.springframework.boot.autoconfigure.jms.activemq.ActiveMQAutoConfiguration,\
org.springframework.boot.autoconfigure.jms.artemis.ArtemisAutoConfiguration,\
org.springframework.boot.autoconfigure.groovy.template.GroovyTemplateAutoConfiguration,\
org.springframework.boot.autoconfigure.jersey.JerseyAutoConfiguration,\
org.springframework.boot.autoconfigure.jooq.JooqAutoConfiguration,\
org.springframework.boot.autoconfigure.jsonb.JsonbAutoConfiguration,\
org.springframework.boot.autoconfigure.kafka.KafkaAutoConfiguration,\
org.springframework.boot.autoconfigure.ldap.embedded.EmbeddedLdapAutoConfiguration,\
org.springframework.boot.autoconfigure.ldap.LdapAutoConfiguration,\
org.springframework.boot.autoconfigure.liquibase.LiquibaseAutoConfiguration,\
org.springframework.boot.autoconfigure.mail.MailSenderAutoConfiguration,\
org.springframework.boot.autoconfigure.mail.MailSenderValidatorAutoConfiguration,\
org.springframework.boot.autoconfigure.mongo.embedded.EmbeddedMongoAutoConfiguration,\
org.springframework.boot.autoconfigure.mongo.MongoAutoConfiguration,\
org.springframework.boot.autoconfigure.mongo.MongoReactiveAutoConfiguration,\
org.springframework.boot.autoconfigure.mustache.MustacheAutoConfiguration,\
org.springframework.boot.autoconfigure.orm.jpa.HibernateJpaAutoConfiguration,\
org.springframework.boot.autoconfigure.quartz.QuartzAutoConfiguration,\
org.springframework.boot.autoconfigure.rsocket.RSocketMessagingAutoConfiguration,\
org.springframework.boot.autoconfigure.rsocket.RSocketRequesterAutoConfiguration,\
org.springframework.boot.autoconfigure.rsocket.RSocketServerAutoConfiguration,\
org.springframework.boot.autoconfigure.rsocket.RSocketStrategiesAutoConfiguration,\
org.springframework.boot.autoconfigure.security.servlet.SecurityAutoConfiguration,\
org.springframework.boot.autoconfigure.security.servlet.UserDetailsServiceAutoConfiguration,\
org.springframework.boot.autoconfigure.security.servlet.SecurityFilterAutoConfiguration,\
org.springframework.boot.autoconfigure.security.reactive.ReactiveSecurityAutoConfiguration,\
org.springframework.boot.autoconfigure.security.reactive.ReactiveUserDetailsServiceAutoConfiguration,\
org.springframework.boot.autoconfigure.security.rsocket.RSocketSecurityAutoConfiguration,\
org.springframework.boot.autoconfigure.security.saml2.Saml2RelyingPartyAutoConfiguration,\
org.springframework.boot.autoconfigure.sendgrid.SendGridAutoConfiguration,\
org.springframework.boot.autoconfigure.session.SessionAutoConfiguration,\
org.springframework.boot.autoconfigure.security.oauth2.client.servlet.OAuth2ClientAutoConfiguration,\
org.springframework.boot.autoconfigure.security.oauth2.client.reactive.ReactiveOAuth2ClientAutoConfiguration,\
org.springframework.boot.autoconfigure.security.oauth2.resource.servlet.OAuth2ResourceServerAutoConfiguration,\
org.springframework.boot.autoconfigure.security.oauth2.resource.reactive.ReactiveOAuth2ResourceServerAutoConfiguration,\
org.springframework.boot.autoconfigure.solr.SolrAutoConfiguration,\
org.springframework.boot.autoconfigure.task.TaskExecutionAutoConfiguration,\
org.springframework.boot.autoconfigure.task.TaskSchedulingAutoConfiguration,\
org.springframework.boot.autoconfigure.thymeleaf.ThymeleafAutoConfiguration,\
org.springframework.boot.autoconfigure.transaction.TransactionAutoConfiguration,\
org.springframework.boot.autoconfigure.transaction.jta.JtaAutoConfiguration,\
org.springframework.boot.autoconfigure.validation.ValidationAutoConfiguration,\
org.springframework.boot.autoconfigure.web.client.RestTemplateAutoConfiguration,\
org.springframework.boot.autoconfigure.web.embedded.EmbeddedWebServerFactoryCustomizerAutoConfiguration,\
org.springframework.boot.autoconfigure.web.reactive.HttpHandlerAutoConfiguration,\
org.springframework.boot.autoconfigure.web.reactive.ReactiveWebServerFactoryAutoConfiguration,\
org.springframework.boot.autoconfigure.web.reactive.WebFluxAutoConfiguration,\
org.springframework.boot.autoconfigure.web.reactive.error.ErrorWebFluxAutoConfiguration,\
org.springframework.boot.autoconfigure.web.reactive.function.client.ClientHttpConnectorAutoConfiguration,\
org.springframework.boot.autoconfigure.web.reactive.function.client.WebClientAutoConfiguration,\
org.springframework.boot.autoconfigure.web.servlet.DispatcherServletAutoConfiguration,\
org.springframework.boot.autoconfigure.web.servlet.ServletWebServerFactoryAutoConfiguration,\
org.springframework.boot.autoconfigure.web.servlet.error.ErrorMvcAutoConfiguration,\
org.springframework.boot.autoconfigure.web.servlet.HttpEncodingAutoConfiguration,\
org.springframework.boot.autoconfigure.web.servlet.MultipartAutoConfiguration,\
org.springframework.boot.autoconfigure.web.servlet.WebMvcAutoConfiguration,\
org.springframework.boot.autoconfigure.websocket.reactive.WebSocketReactiveAutoConfiguration,\
org.springframework.boot.autoconfigure.websocket.servlet.WebSocketServletAutoConfiguration,\
org.springframework.boot.autoconfigure.websocket.servlet.WebSocketMessagingAutoConfiguration,\
org.springframework.boot.autoconfigure.webservices.WebServicesAutoConfiguration,\
org.springframework.boot.autoconfigure.webservices.client.WebServiceTemplateAutoConfiguration
每一个这样的 xxxAutoConfiguration类都是容器中的一个组件,都加入到容器中;用它们来做自动配置
- 每一个自动配置类进行自动配置的功能
5.1 以HttpEncodingAutoConfiguration为例解释自动配置原理
@Configuration(proxyBeanMethods = false)
@EnableConfigurationProperties(HttpProperties.class)
@ConditionalOnWebApplication(type = ConditionalOnWebApplication.Type.SERVLET)
@ConditionalOnClass(CharacterEncodingFilter.class)
@ConditionalOnProperty(prefix = "spring.http.encoding", value = "enabled", matchIfMissing = true)
public class HttpEncodingAutoConfiguration {
-
@Configuration:表示这是一个配置类,和之前写的配置文件一样,可以给容器中添加组件
-
@EnableConfigurationProperties:启用指定类的ConfigurationProperties功能,将配置文件中对应的值和httpEncodingProperties绑定起来
@ConfigurationProperties(prefix = "spring.http")
public class HttpProperties {
@ConfigurationProperties:从指定文件获取配置的值和bean的属性进行绑定
-
ConditionalOnWebApplication:spring底层@Conditional注解,根据不同的条件,如果满足指定的条件,整个配置类里面的配置就会生效;判断当前应用是否是web应用
-
ConditionalOnClass:判断当前项目有没有这个类
- CharacterEncodingFilter:springmvc中进行乱码解决的过滤器
-
ConditionalOnProperty:判断配置文件中是否存在某个配置
- spring.http.encoding:如果不存在,判断也是成立的
5.2 细节
- Conditional派生注解(Spring注解版原生的@Confition作用)
作用:必须是@Conditional指定的条件成立,才给容器中添加组件,配置里面的内容才生效
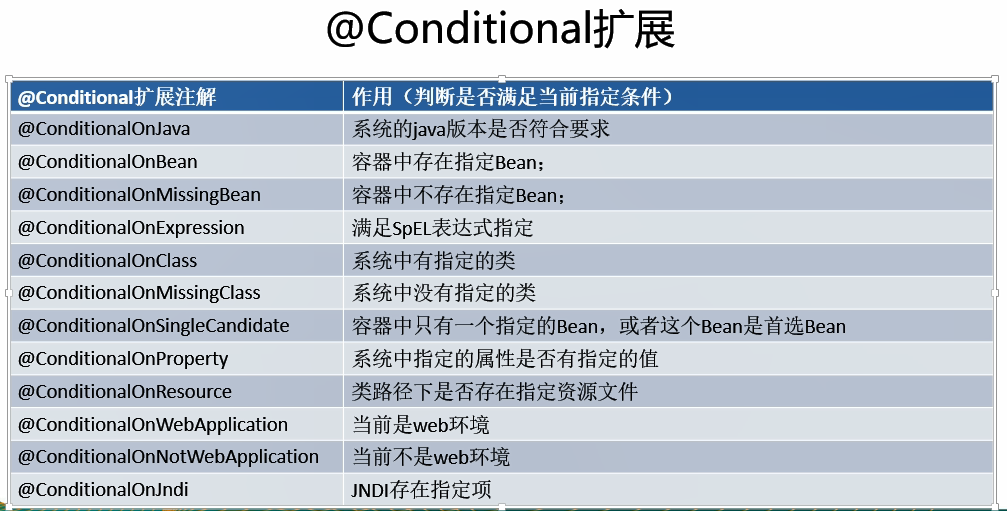
自动配置类必须在一端条件下才能生效
我们可与通过启用 debug = true属性,让控制台打印自动配置报告,这样我们就可以很方便的知道哪些自动配置类生效
5.3 总结精髓
- Spring Boot 启动会加载大量的自动配置类
- 我们查看需要的功能有没有Spring Boot 默认写好的自动配置类
- 我们再来看这个自动配置类中到底配置了哪些组件(只要用的组件有,就不需要配置)
- 给容器中自动配置类添加组件时,会从properties类中获取某些属性。我们就可以在配置文件之指定这些属性的值
xxxxAutoConfiguration:自动配置类,给容器中添加组件
xxxxProperties:封装配置文件中相关属性
六、SpringBoot与日志
6.1 日志框架
小张:开发一个大型系统
- System.out.printIn(""):将关键数据打印在控制台; -- 麻烦,还得注释掉
- 框架来记录系统的一些运行信息;日志框架:zhanglogging.jar
- 高大上的功能,异步模式、自动归档、:zhanglogging-good.jar
- 换一个新的框架,还得重新修改API:zhanglogging-prefect.jar
- jdbc--数据库驱动
- 写一个统一的接口层:日志门面(日志的一个抽象层):logging-abstract.jar
- 给项目中导入具体的日志实现就行了,我们之前的日志框架都是实现的抽象层
市场上的日志框架
-
JUL
-
JCL
-
JBoss-logging
-
log4j
-
log4j2
-
...
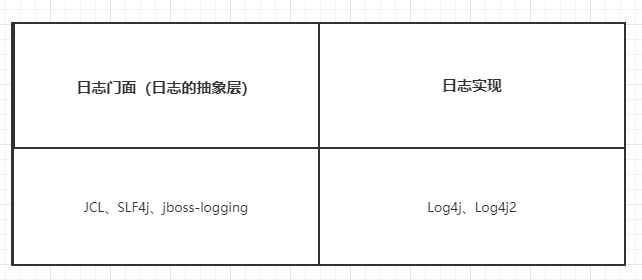
左边选一个门面,右面选一个实现
SpringBoot:底层是Spring框架,Spring框架默认是用JCL
SpringBoot选用SLF4j和logback
6.2 SLF4j使用
以后开发的时候,日志记录方法的调用,不应该来直接调用日志的实现类,而是调用日志抽象层里面的方法
给系统里面导入slf4j的jar和 logback的实现jar
import org.slf4j.Logger;
import org.slf4j.LoggerFactory;

public class HelloWorld {
  public static void main(String[] args) {
    Logger logger = LoggerFactory.getLogger(HelloWorld.class);
    logger.info("Hello World");
  }
}
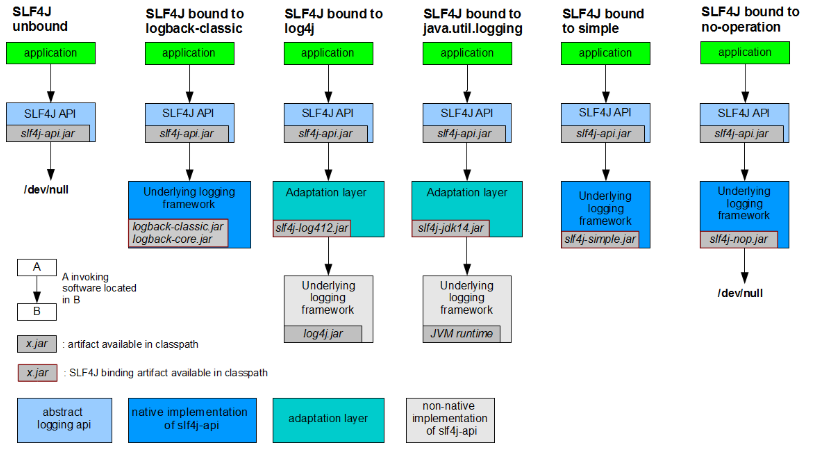
每一个日志的实现框架都有自己的配置文件。使用slf4j以后,配置文件还是做成日志实现框架自己本身的配置文件
6.3 遗留问题
a(slf4j + logback):Spring(commons-logging)、Mybatis
统一日志记录
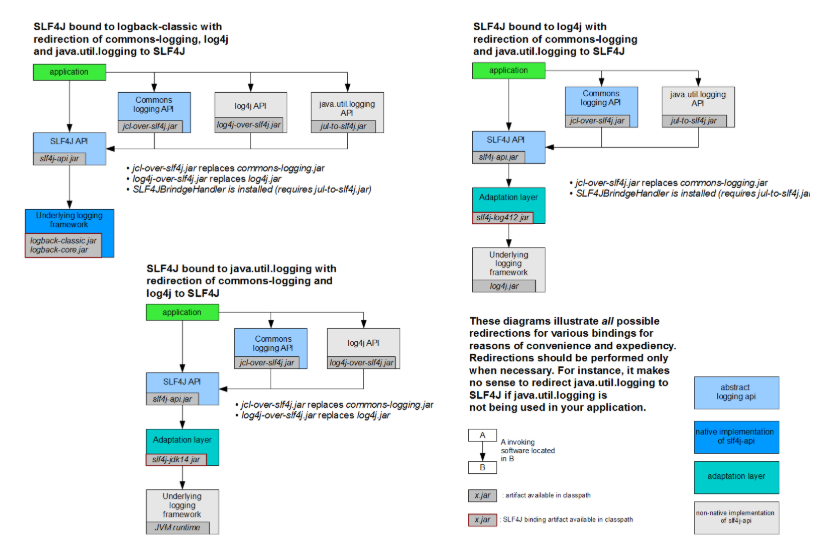
系统所有的日志都统一到slf4j
- 将系统中其他日志框架先排除出去
- 用中间包替换原有的日志框架
- 导入slf4j其他的实现
6.4 SpringBoot日志关系
<dependency>
    <groupId>org.springframework.boot</groupId>
    <artifactId>spring-boot-starter</artifactId>
    <version>2.2.5.RELEASE</version>
    <scope>compile</scope>
</dependency>
SpringBoot使用其做日志功能
<dependency>
    <groupId>org.springframework.boot</groupId>
    <artifactId>spring-boot-starter-logging</artifactId>
    <version>2.2.5.RELEASE</version>
    <scope>compile</scope>
</dependency>
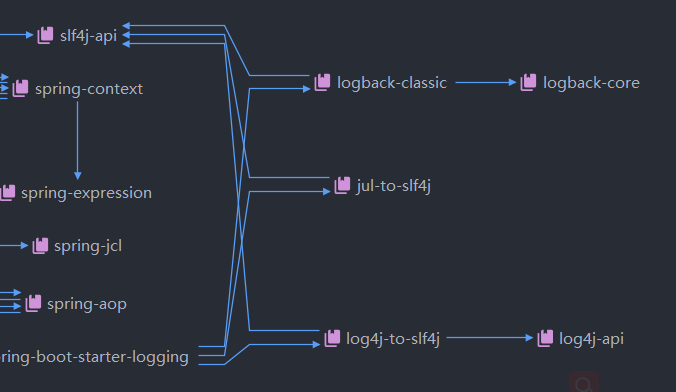
总结
- SpringBoot底层也是使用slf4j + logback的方式进行日志记录
- SpringBoot也把其他日志都替换成了slf4j
- 中间替换包
- 若我们要引入其他框架,一定要把这个框架的默认日志依赖移除掉
SpringBoot能自动适配所有的日志,而且底层使用slf4j+logback的方式记录日志,引入其他框架的时候,只需要把这个框架的日志框架排除掉
6.5 日志使用
默认配置
SpringBoot默认帮助我们配置好了日志
//记录器
Logger logger = LoggerFactory.getLogger(getClass());

@Test
void contextLoads() {
    //日志级别:从低到高
    //可以调整输出的日志级别
    logger.trace("这是trace日志...");
    logger.debug("这是debug日志...");
    logger.info("这是Info日志...");		//SpringBoot默认使用
    logger.warn("这是warn日志...");
    logger.error("这是error日志...");
}
日志输出格式:
    %d表示日期事件,
    %thread表示线程名
    %-5level:级别从左显示5个字符宽度
    %logger{50} 表示logger名字最长50个字符,否则按照句点分割
    %msg:日志消息
    %n:换行符

%d{yyyy-MM-dd HH:mm:ss.SSS} [%thread] %-5level %logger{50} - %msg%n
SpringBoot修改日志的默认配置
logging.level.cn.imut = trace

logging.file.path=/spring/log

#控制台输出日志格式
logging.pattern.console=%d{yyyy-MM-dd HH:mm:ss.SSS} [%thread] %-5level %logger{50} - %msg%n

#指定文件中日志输出格式
logging.pattern.file=%d{yyyy-MM-dd HH:mm:ss.SSS} === [%thread] === %-5level === %logger{50} === %msg%n
| logging.file | logging.path | Example | Description |
|---|---|---|---|
| (none) | (none) | 只在控制台输出 | |
| 指定文件名 | (none) | my.log | 输出日志到my.log文件 |
| (none) | 指定目录 | /var/log | 输出到指定目录的spring.log文件中 |
指定配置
给类路径下放上每个日志框架自己的配置文件即可;SpringBoot就不使用其默认配置的了
| Logging System | Customization |
|---|---|
| Logback | logback-spring.xml, logback-spring.groovy,logback.xml or logback.groovy |
| Log4j2 | log4j2-spring.xml or log4j2.xml |
| JDK(Java Util Logging) | logging.properties |
logback.xml:直接被框架识别
logback-spring.xml:日志框架就不直接加载日志的配置项,由springboot解析日志配置,可以使用SpringBoot的高级Profile功能
<springProfile name="staging">
	可以指定某段配置只在某个环境生效
</springProfile>
6.6 切换日志框架
切换为log4j2
<dependency>
    <groupId>org.springframework.boot</groupId>
    <artifactId>spring-boot-starter-web</artifactId>
    <exclusions><!-- 去掉默认log配置 -->
        <exclusion>
            <groupId>org.springframework.boot</groupId>
            <artifactId>spring-boot-starter-logging</artifactId>
        </exclusion>
    </exclusions>
</dependency>
<!-- 引入log4j2依赖 -->
<dependency>
    <groupId>org.springframework.boot</groupId>
    <artifactId>spring-boot-starter-log4j2</artifactId>
</dependency>
七、SpringBoot整合JDBC
7.1 SpringData简介
对于数据访问层,无论是 SQL(关系型数据库) 还是 NOSQL(非关系型数据库),Spring Boot 底层都是采用 Spring Data 的方式进行统一处理。
Spring Boot 底层都是采用 Spring Data 的方式进行统一处理各种数据库,Spring Data 也是 Spring 中与 Spring Boot、Spring Cloud 等齐名的知名项目。
官网:https://spring.io/projects/spring-data
7.2 整合JDBC
1.勾选 jdbc 选项
2.项目创建好之后,已经导入如下启动器
<dependency>
    <groupId>org.springframework.boot</groupId>
    <artifactId>spring-boot-starter-test</artifactId>
</dependency>

<dependency>
    <groupId>mysql</groupId>
    <artifactId>mysql-connector-java</artifactId>
</dependency>
3.编写yaml配置文件链接数据库
spring:
  datasource:
    driver-class-name: com.mysql.cj.jdbc.Driver
    url: jdbc:mysql://localhost:3306/zl?serverTimezone=UTC&useUnicode=true&characterEncoding=utf-8
    username: root
    password: 1870535196
4.测试
@SpringBootTest
class SpringbootjdbcApplicationTests {

    //注入数据源
    @Autowired
    DataSource dataSource;

    @Test
    void contextLoads() throws SQLException {
        //查看默认数据源
        System.out.println(dataSource.getClass());
        //获取连接
        Connection connection = dataSource.getConnection();
        System.out.println(connection);
        //关闭连接
        connection.close();
    }
}

HikariDataSource 号称 Java WEB 当前速度最快的数据源,相比于传统的 C3P0 、DBCP、Tomcat jdbc 等连接池更加优秀;
7.3 JDBCTemplate
- 若不使用第三方第数据库操作框架,如 MyBatis等,Spring 本身也对原生的JDBC 做了轻量级的封装,即JdbcTemplate。
- 数据库操作的所有 CRUD 方法都在 JdbcTemplate 中。
JdbcTemplate提供的方法
- execute方法:可以用于执行任何SQL语句,一般用于执行DDL语句;
- update方法及batchUpdate方法:update方法用于执行新增、修改、删除等语句;batchUpdate方法用于执行批处理相关语句;
- query方法及queryForXXX方法:用于执行查询相关语句;
- call方法:用于执行存储过程、函数相关语句。
7.4 CRUD测试
@RestController
public class JdbcController {

    @Autowired
    JdbcTemplate jdbcTemplate;

    @GetMapping("/list")
    public List<Map<String, Object>> userList() {
        String sql = "select * from jdbcTest";
        List<Map<String, Object>> maps = jdbcTemplate.queryForList(sql);
        return maps;
    }
}
八、SpringBoot整合Druid
8.1 Druid简介
Druid 是阿里巴巴开源平台上一个数据库连接池实现,结合了 C3P0、DBCP 等 DB 池的优点,同时加入了日志监控。
Druid 可以很好的监控 DB 池连接和 SQL 的执行情况,天生就是针对监控而生的 DB 连接池。
Github地址:https://github.com/alibaba/druid/
8.2 配置数据源
依赖
<!-- https://mvnrepository.com/artifact/com.alibaba/druid -->
<dependency>
    <groupId>com.alibaba</groupId>
    <artifactId>druid</artifactId>
    <version>1.1.21</version>
</dependency>
切换数据源
spring:
  datasource:
    driver-class-name: com.mysql.cj.jdbc.Driver
    type: com.alibaba.druid.pool.DruidDataSource
    url: jdbc:mysql://localhost:3306/zl?serverTimezone=UTC&useUnicode=true&characterEncoding=utf-8
    username: root
    password: 1870535196

8.3 配置Druid数据源监控
Druid 数据源具有监控的功能,并提供了一个 web 界面方便用户查看
第一步、设置 Druid 的后台管理页面
//配置 Druid 监控管理后台的Servlet;
//内置 Servlet 容器时没有web.xml文件,所以使用 Spring Boot 的注册 Servlet 方式
@Bean
public ServletRegistrationBean statViewServlet() {
    ServletRegistrationBean bean = new ServletRegistrationBean(new StatViewServlet(), "/druid/*");

    // 这些参数可以在 com.alibaba.druid.support.http.StatViewServlet
    // 的父类 com.alibaba.druid.support.http.ResourceServlet 中找到
    Map<String, String> initParams = new HashMap<>();
    initParams.put("loginUsername", "admin"); //后台管理界面的登录账号
    initParams.put("loginPassword", "123456"); //后台管理界面的登录密码

    //后台允许谁可以访问
    //initParams.put("allow", "localhost"):表示只有本机可以访问
    //initParams.put("allow", ""):为空或者为null时,表示允许所有访问
    initParams.put("allow", "");
    //deny:Druid 后台拒绝谁访问
    //initParams.put("kuangshen", "192.168.1.20");表示禁止此ip访问

    //设置初始化参数
    bean.setInitParameters(initParams);
    return bean;
}
配置完毕后,我们可以选择访问 :http://localhost:8080/druid/login.html
第二步、配置 Druid web 监控 filter 过滤器
//配置 Druid 监控 之  web 监控的 filter
//WebStatFilter:用于配置Web和Druid数据源之间的管理关联监控统计
@Bean
public FilterRegistrationBean webStatFilter() {
    FilterRegistrationBean bean = new FilterRegistrationBean();
    bean.setFilter(new WebStatFilter());

    //exclusions:设置哪些请求进行过滤排除掉,从而不进行统计
    Map<String, String> initParams = new HashMap<>();
    initParams.put("exclusions", "*.js,*.css,/druid/*,/jdbc/*");
    bean.setInitParameters(initParams);

    //"/*" 表示过滤所有请求
    bean.setUrlPatterns(Arrays.asList("/*"));
    return bean;
}
九、SpringBoot整合Mybatis
9.1 导入依赖
<dependency>
    <groupId>org.mybatis.spring.boot</groupId>
    <artifactId>mybatis-spring-boot-starter</artifactId>
    <version>2.1.1</version>
</dependency>
9.2 配置数据库连接信息
9.3 三层架构编写、测试
略
十、SpringBoot与Web开发
10.1 简介
使用SpringBoot
- 创建SpringBoot应用,选中我们需要的模块
- SpringBoot已经默认将这些场景配置好了,只需要在配置文件中指定少量配置,就可以运行
- 自己编写代码
自动配置原理?
这个场景SpringBoot帮我们配置什么?能不能修改?能修改哪些位置?能不能扩展?xxx
xxxxAutoConfiguration:帮我们给容器中自动配置
xxxxProperties:配置类来封装配置文件的内容
10.2 SpringBoot对静态资源的映射规则
@Override
public void addResourceHandlers(ResourceHandlerRegistry registry) {
    if (!this.resourceProperties.isAddMappings()) {
        logger.debug("Default resource handling disabled");
        return;
    }
    Duration cachePeriod = this.resourceProperties.getCache().getPeriod();
    CacheControl cacheControl = this.resourceProperties.getCache().getCachecontrol().toHttpCacheControl();
    if (!registry.hasMappingForPattern("/webjars/**")) {
        customizeResourceHandlerRegistration(registry.addResourceHandler("/webjars/**")
                                             .addResourceLocations("classpath:/META-INF/resources/webjars/")
                                             .setCachePeriod(getSeconds(cachePeriod)).setCacheControl(cacheControl));
    }
    String staticPathPattern = this.mvcProperties.getStaticPathPattern();
    if (!registry.hasMappingForPattern(staticPathPattern)) {
        customizeResourceHandlerRegistration(registry.addResourceHandler(staticPathPattern)
                                             .addResourceLocations(getResourceLocations(this.resourceProperties.getStaticLocations()))
                                             .setCachePeriod(getSeconds(cachePeriod)).setCacheControl(cacheControl));
    }
}
-
Webjars本质就是以jar包的方式引入我们的静态资源 , 我们以前要导入一个静态资源文件,直接导入即可
-
所有的 /webjars/** ,都去classpath:/META-INF/resources/webjars/ 找资源
webjars:以jar的方式引入静态资源https://www.webjars.org/
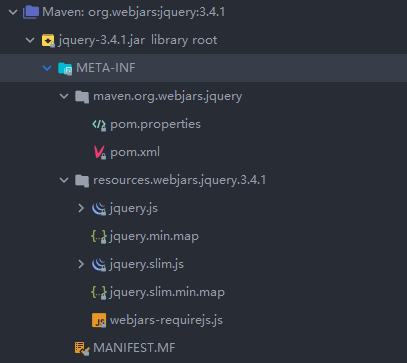
<dependency>
    <groupId>org.webjars</groupId>
    <artifactId>jquery</artifactId>
    <version>3.4.1</version>
</dependency>
在访问时,只须写webjars下面的资源的名称即可
- "/**" 访问当前项目的任何资源
"classpath:/META-INF/resources/"
"classpath:/resources/"
"classpath:/static/"
"classpath:/public/"
"/":当前项目的根路径
-
欢迎页:静态资源文件夹下所有的index.html页面;被“/**”映射
localhost:8080/ 找index页面
-
所有的 **/favicon.ico 都是在静态资源文件下找
10.3 首页处理
欢迎页,静态资源文件夹下的所有 index.html 页面;被 /** 映射。
访问 http://localhost:8080/ ,就会找静态资源文件夹下的 index.html
关于网页图标
1.关闭默认图标
#关闭默认图标
spring.mvc.favicon.enabled=false
2、自己放一个图标在静态资源目录下,放在 public 目录下
10.4 SpringMVC 自动配置
-
**Spring MVC auto-configuration **
SpringBoot自动配置好了SpringMVC
SpringBoot对SpringMVC的默认配置:(WebMvcAutoConfiguration)
- Inclusion of ContentNegotiatingViewResolver and BeanNameViewResolver beans.
-
自动配置了ViewResolver(视图解析器:根据方法的返回值得到视图对象(View),视图对象决定如何 渲染(转发?重定向?))
-
ContentNegotiatingViewResolver:组合所有的视图解析器的;
-
如何定制:我们可以自己给容器中添加一个视图解析器;自动的将其组合进来
-
Support for serving static resources, including support for WebJars (see below).静态资源文件夹路 径,webjars
-
Static index.html support. 静态首页访问
-
Custom Favicon support (see below). favicon.ico
-
自动注册了 of Converter , GenericConverter , Formatter beans.
- Converter:转换器; public String hello(User user):类型转换使用Converter
- Formatter 格式化器; 2020.03.11===Date
-
@Bean
@ConditionalOnMissingBean
@ConditionalOnProperty(prefix = "spring.mvc", name = "locale")
public LocaleResolver localeResolver() {
自己添加的格式化器转换器,我们只需要放在容器中即可
- Support for HttpMessageConverters (see below)
- HttpMessageConverter:SpringMVC用来转换Http请求和响应的;User---Json
- HttpMessageConverters 是从容器中确定;获取所有的HttpMessageConverter
- 自己给容器中添加HttpMessageConverter,只需要将自己的组件注册容器中 (@Bean,@Component)
- Automatic registration of MessageCodesResolver (see below).定义错误代码生成规则
- Automatic use of a ConfigurableWebBindingInitializer bean (see below).
org.springframework.boot.autoconfigure.web:web的所有自动场景
If you want to keep Spring Boot MVC features, and you just want to add additional MVC configuration (interceptors, formatters, view controllers etc.) you can add your own @Configuration class of type WebMvcConfigurerAdapterbut without @EnableWebMvc .
If you wish to provide custom instances of RequestMappingHandlerMapping , RequestMappingHandlerAdapter or ExceptionHandlerExceptionResolver you can declare a WebMvcRegistrationsAdapter instance providing such components.
If you want to take complete control of Spring MVC, you can add your own @Configuration annotated with @EnableWebMvc .
- Inclusion of ContentNegotiatingViewResolver and BeanNameViewResolver beans.
-
扩展SpringMVC
<mvc:view‐controller path="/hello" view‐name="success"/>
<mvc:interceptors>
    <mvc:interceptor>
        <mvc:mapping path="/hello"/>
        <bean></bean>
    </mvc:interceptor>
</mvc:interceptors>
编写一个配置类(@Configuration)是WebMvcConfigurerAdapter类型,不能标注@EnableWebMCV
既保留了所有的自动配置,也能用我们扩展的配置;//使用WebMvcConfigurerAdapter可以来扩展SpringMVC的功能 @Configuration public class MyMvcConfig extends WebMvcConfigurerAdapter { @Override public void addViewControllers(ViewControllerRegistry registry) { // super.addViewControllers(registry) // 浏览器发送 /atguigu 请求来到 success registry.addViewController("/atguigu").setViewName("success"); } } -
全面接管SpringMVC
SpringBoot对SpringMVC的自动配置不需要了,所有都是我们自己配置;所有的SpringMVC的自动配置都失效了
我们需要在配置类中添加@EnableWebMvc即可;
-
修改SpringBoot默认配置
模式:
-
SpringBoot在自动配置很多组件的时候,先看容器中有没有用户自己配置的(@Bean、@Component)如 果有就用用户配置的,如果没有,才自动配置;如果有些组件可以有多个
(ViewResolver)将用户配置的和自己默 认的组合起来;
-
在SpringBoot中会有非常多的xxxConfigurer帮助我们进行扩展配置
-
在SpringBoot中会有很多的xxxCustomizer帮助我们进行定制配置
-
十一、Thymeleaf模板引擎
11.1 模板引擎介绍
前端交给我们的页面,是html页面。之前我们把他们转成jsp页面,jsp好处就是当我们查出一些数据转发到JSP页面以后,我们可以用jsp轻松实现数据的显示,及交互等。
但是呢,SpringBoot这个项目首先是以jar的方式,不是war,其次,我们用的还是嵌入式的Tomcat,所以默认是不支持jsp的。
常用的模板引擎
jsp、Velocty、Freemarker、Thymeleaf
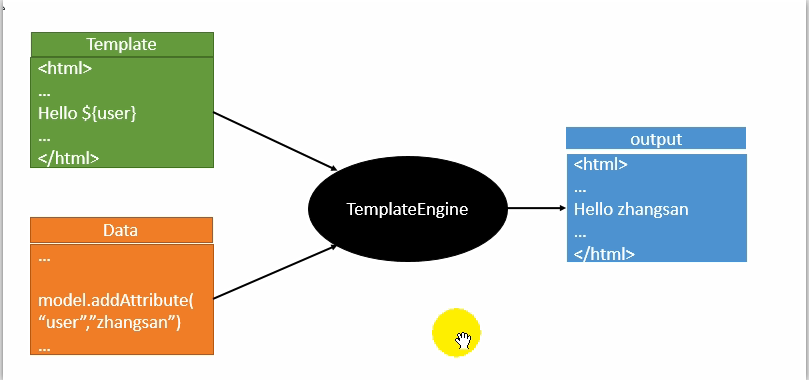
模板引擎的作用:
在后台封装一些数据,然后把这个模板和这个数据交给模板引擎,模板引擎按照这个数据帮你把这表达式解析、填充到我们指定的位置,然后把这个数据最终生成一个我们想要的内容给我们写出去,这就是我们这个模板引擎,不管是jsp还是其他模板引擎,都是这个思想。
SpringBoot推荐使用Thymeleaf
语法简单、功能强大
11.2 引入Thymeleaf
<dependency>
    <groupId>org.springframework.boot</groupId>
    <artifactId>spring-boot-starter-thymeleaf</artifactId>
</dependency>
11.3 Thymeleaf使用&语法
只要把HTML页面放在classpath:/templates/,thymeleaf就能自动渲染
使用:
-
导入thymeleaf的名称空间
<html lang="en" xmlns:th="http://www.thymeleaf.org"> -
使用thymeleaf语法
<!DOCTYPE html> <html lang="en" xmlns:th="http://www.thymeleaf.org"> <head> <meta charset="UTF-8"> <title>Title</title> </head> <body> <h1>成功!</h1> <div th:text="${hello}"></div> </body> </html> -
语法规则
-
th:text 改变当前元素里面的文本内容
-
th: 任意html属性,可以替换原生属性的值
-

-
表达式
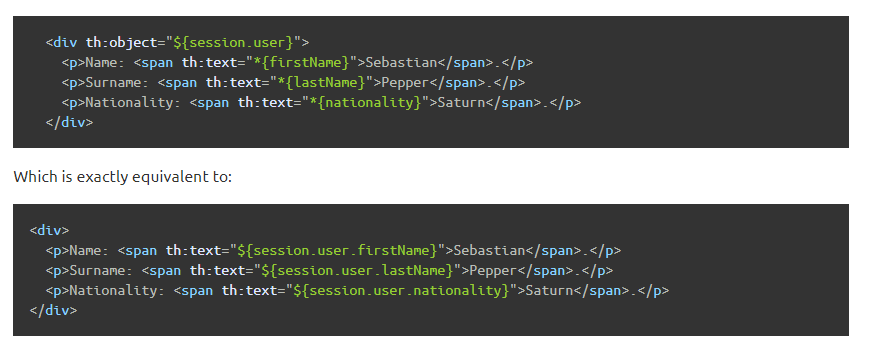
Simple expressions:(表达式语法)
    Variable Expressions: ${...}	:获取变量值;OGNL
    	1.获取对象的属性、调用方法
    	2.使用内置的基本对象
    		#ctx: the context object.
            #vars: the context variables.
            #locale: the context locale.
            #request: (only in Web Contexts) the HttpServletRequest object.
            #response: (only in Web Contexts) the HttpServletResponse object.
            #session: (only in Web Contexts) the HttpSession object.
            #servletContext: (only in Web Contexts) the ServletContext object.

            ${session.foo}

		3.内置的一些工具对象
			#execInfo: information about the template being processed.
            #messages: methods for obtaining externalized messages inside variables expressions, in the same way as they would be obtained using #{…} syntax.
            #uris: methods for escaping parts of URLs/URIs
            #conversions: methods for executing the configured conversion service (if any).
            #dates: methods for java.util.Date objects: formatting, component extraction, etc.
            #calendars: analogous to #dates, but for java.util.Calendar objects.
            #numbers: methods for formatting numeric objects.
            #strings: methods for String objects: contains, startsWith, prepending/appending, etc.
            #objects: methods for objects in general.
            #bools: methods for boolean evaluation.
            #arrays: methods for arrays.
            #lists: methods for lists.
            #sets: methods for sets.
            #maps: methods for maps.
            #aggregates: methods for creating aggregates on arrays or collections.
            #ids: methods for dealing with id attributes that might be repeated (for example, as a result of an iteration).


    Selection Variable Expressions: *{...}	:变量的选择表示:和${}在功能上一样
    	补充:配合 th:object="${session.user}"

    Message Expressions: #{...}		:获取国际化命名
    Link URL Expressions: @{...}	:定义url链接
    		@{/order/details(orderId=${o.id})}
    Fragment Expressions: ~{...}	:片段引用表达式
    		<div th:insert="~{commons :: main}">...</div>

Literals(字面量)
            Text literals: 'one text', 'Another one!',…
            Number literals: 0, 34, 3.0, 12.3,…
            Boolean literals: true, false
            Null literal: null
            Literal tokens: one, sometext, main,…
Text operations:(文本操作)
            String concatenation: +
            Literal substitutions: |The name is ${name}|
Arithmetic operations:(数学运算)
            Binary operators: +, -, *, /, %
            Minus sign (unary operator): -
Boolean operations:(布尔运算)
            Binary operators: and, or
            Boolean negation (unary operator): !, not
Comparisons and equality:(比较运算)
            Comparators: >, <, >=, <= (gt, lt, ge, le)
            Equality operators: ==, != (eq, ne)
Conditional operators:(条件运算)
            If-then: (if) ? (then)
            If-then-else: (if) ? (then) : (else)
            Default: (value) ?: (defaultvalue)
Special tokens:(特殊操作)
			No-Operation: _
十二、页面国际化
12.1 准备
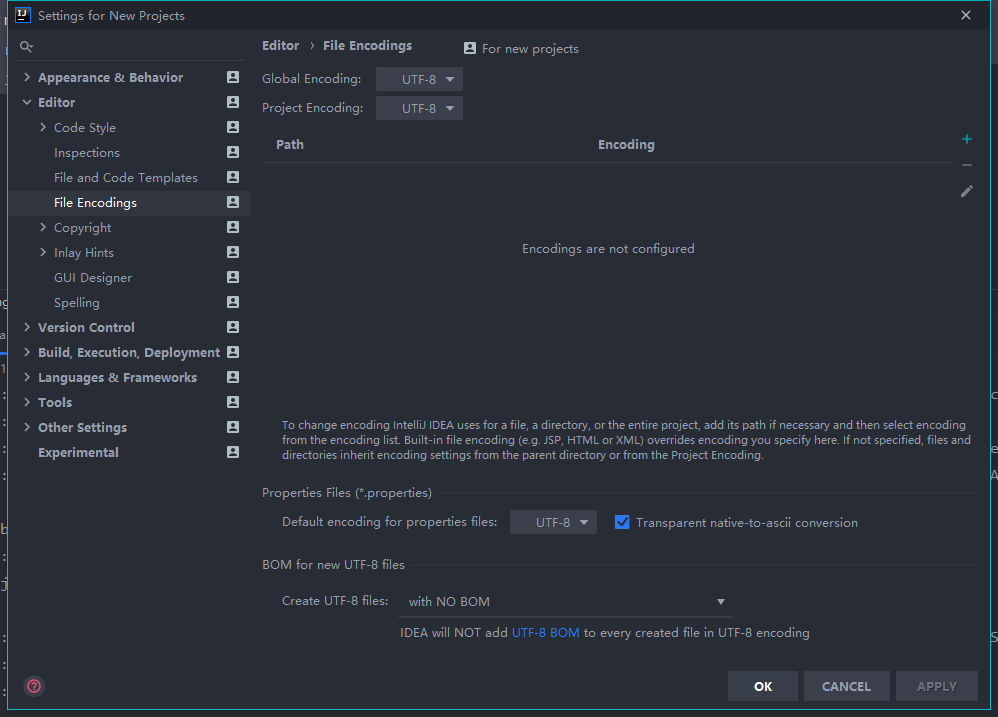
在idea中统一设置properties的编码问题
12.2 编写国际化配置文件
- 使用ResourceBundleMessageSource管理国际化资源文件
- 在页面使用fmt:message取出国际化内容
步骤
-
编写国际化配置文件,抽取页面需要显示的国际化消息
login.btn=登录~ login.password=密码~ login.remember=记住我~ login.tip=请登录~ login.username=用户名~ -
SpringBoot自动配置好了管理国际化资源文件的组件
@Configuration(proxyBeanMethods = false)
@ConditionalOnMissingBean(name = AbstractApplicationContext.MESSAGE_SOURCE_BEAN_NAME, search = SearchStrategy.CURRENT)
@AutoConfigureOrder(Ordered.HIGHEST_PRECEDENCE)
@Conditional(ResourceBundleCondition.class)
@EnableConfigurationProperties
public class MessageSourceAutoConfiguration {

@Bean
public MessageSource messageSource(MessageSourceProperties properties) {
    ResourceBundleMessageSource messageSource = new ResourceBundleMessageSource();
    if (StringUtils.hasText(properties.getBasename())) {
        messageSource.setBasenames(StringUtils
                                   .commaDelimitedListToStringArray(StringUtils.trimAllWhitespace(properties.getBasename())));
    }
    if (properties.getEncoding() != null) {
        messageSource.setDefaultEncoding(properties.getEncoding().name());
    }
    messageSource.setFallbackToSystemLocale(properties.isFallbackToSystemLocale());
    Duration cacheDuration = properties.getCacheDuration();
    if (cacheDuration != null) {
        messageSource.setCacheMillis(cacheDuration.toMillis());
    }
    messageSource.setAlwaysUseMessageFormat(properties.isAlwaysUseMessageFormat());
    messageSource.setUseCodeAsDefaultMessage(properties.isUseCodeAsDefaultMessage());
    return messageSource;
}
spring.messages.basename=i18n.login -
去页面获取国际化的值
<label class="sr-only" th:text="#{login.username}">Username</label>
<input type="text" class="form-control" placeholder="Username" th:placeholder="#{login.username}" required="" autofocus="">
<label class="sr-only" th:text="#{login.password}">Password</label>
<input type="password" class="form-control" placeholder="Password" th:placeholder="#{login.password}" required="">
<div class="checkbox mb-3">
    <label>
        <input type="checkbox" value="remember-me"> [[#{login.remember}]]
    </label>
</div>
<button class="btn btn-lg btn-primary btn-block" type="submit" th:text="#{login.btn}">Sign in</button>
默认情况中文为乱码
-
根据按钮切换语言
原理:国际化Locale(区域信息对象);LocaleResolver(获取区域信息对象)
@Bean
@ConditionalOnMissingBean
@ConditionalOnProperty(prefix = "spring.mvc", name = "locale")
public LocaleResolver localeResolver() {
    if (this.mvcProperties.getLocaleResolver() == WebMvcProperties.LocaleResolver.FIXED) {
        return new FixedLocaleResolver(this.mvcProperties.getLocale());
    }
    AcceptHeaderLocaleResolver localeResolver = new AcceptHeaderLocaleResolver();
    localeResolver.setDefaultLocale(this.mvcProperties.getLocale());
    return localeResolver;
}
默认根据请求头带来的区域信息获取Locale进行国际化
<a class="btn btn-sm" th:href="@{/login.html(l='zh_CN')}">中文</a> <a class="btn btn-sm" th:href="@{/login.html(l='en_US')}">English</a>@Override public Locale resolveLocale(HttpServletRequest httpServletRequest) { String l = httpServletRequest.getParameter("1"); Locale locale = Locale.getDefault(); if(!StringUtils.isEmpty(l)) { String[] s = l.split("_"); locale = new Locale(s[0], s[1]); } return locale; }@Bean public LocaleResolver localeResolver() { return new MyLocaleResolver(); }
十三、总结
知识回顾
三层架构  +  MVC
  架构  --->解耦

开发框架
    Spring
    	IOC:控制反转
    		泡温泉:找人 --- 开车 --- 脱衣服 --- 泡温泉

    		浴场(容器):泡温泉

    		直接交给容器!
    	AOP:切面(本质,动态代理)
    		解决不影响业务的情况下,实现动态增加功能,大量应用在日志,事务...

    SpringBoot
    	新一代JavaEE标准,开箱即用!
    	SpringBoot并不是新的东西,它是Spring的升级!
    	约定大于配置!

But!随着公司体系越来越大

微服务架构 --- 新架构
    模块化、功能化
    用户模块
    支付模块
    签单模块
    娱乐模块...

    增加服务器,		--- 横向
    A服务器占用 98%          B服务器占用 10%         --- 负载均衡

    使用模块化,将A减少,B增加!

微服务架构问题
    分布式架构会遇到的四个核心问题
    	1.这么多服务,客户如何访问?
    	2.这么多服务,互相如何通信?
    	3.这么多服务,如何治理?
    	4.服务挂了,怎么办?

解决方案:
    SpringCloud:一套生态,解决分布式的问题

    1.Spring Cloud NetFlix
    2.Apache Dubbo zookeeper
    3.SpringCloud Alibaba 一站式解决方案

万变不离其宗
    1.API网关,服务路由
    2.HTTP,RPC框架,异步调用
    3.服务注册与发现,高可用
    4.熔断机制,服务降级

 浙公网安备 33010602011771号