


完整教程:WPF 参数设置界面按模型字段自动生成设置界面
目录
有时候程序在做参数界面时,需要对参数模型中的字段一一定义控件,来做数据绑定,再进行参数设置的保存。每当新增参数字段时,都需要去修改参数界面的控件。
实现按参数字段自动生成界面元素的思路是:类的反射机制,再通过特性来标定参数的类型,再返回对应的数据控件,加载到数据表格中。这样当我修改参数模型时,界面加载时也会自动的按数据模型来生成控件,就不需要再去修改界面的样式了。
目前支持的控件模式,可扩展:
///
/// 配置输入类型
/// 按类型动态添加控件
///
public enum ConfigInputType
{
TextBox = 0,
Combox = 1,
CheckBox = 2,
IP = 3,
Int=4,
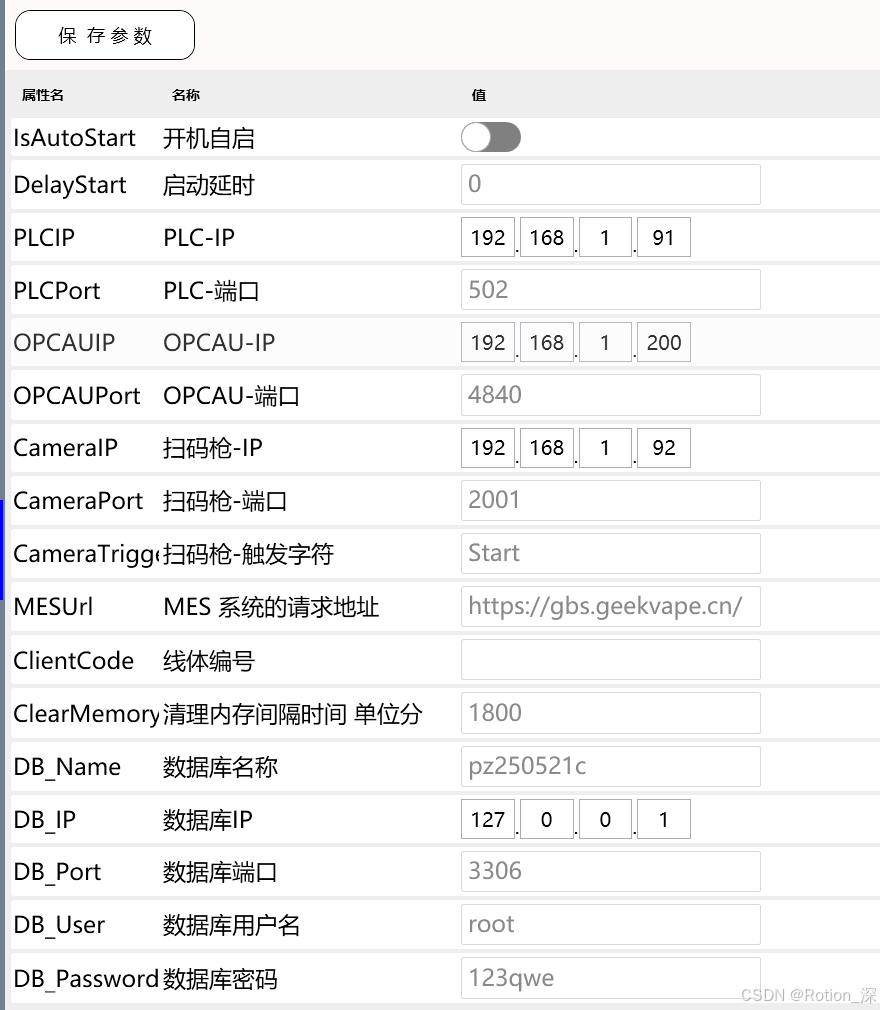
}界面的样子:
期间使用到的一个控件包:
Nuget 搜索 Rotion 就都可以找到


1.定义参数数据模型
首先,定义数据特性和支持的控件类型:
有参数名,是否隐藏(隐藏的话就不再界面显示出来),还有就是输入类型
public class ConfigDescribeAttribute : ValidationAttribute
{
private ConfigAttributeModel _model = new ConfigAttributeModel();
public ConfigDescribeAttribute(string name, bool isHidden = false, ConfigInputType inputType = ConfigInputType.TextBox)
{
_model.Name = name;
_model.IsHidden = isHidden;
_model.InputType = inputType;
}
public ConfigAttributeModel GetConfigAttribute()
{
return _model;
}
public class ConfigAttributeModel
{
///
/// 名称
///
public string Name { get; set; }
///
/// 是否隐藏
///
public bool IsHidden { get; set; } = false;
///
/// 数据输入类型
///
public ConfigInputType InputType { get; set; } = ConfigInputType.TextBox;
}
}
///
/// 配置输入类型
/// 按类型动态添加控件
///
public enum ConfigInputType
{
TextBox = 0,
Combox = 1,
CheckBox = 2,
IP = 3,
Int=4,
}
再来定义参数对应的数据模型:
///
/// 配置文件
///
public class P_Environment
{
///
/// 主题色  十六进制
///
[ConfigDescribe("主题色", true)]
public string ThemeColor { get; set; }
///
/// 是否开机自启
///
[ConfigDescribe("开机自启", inputType: ConfigInputType.CheckBox)]
public bool IsAutoStart { get; set; } = false;
///
/// 延时启动
///
[ConfigDescribe("启动延时", inputType: ConfigInputType.Int)]
public int DelayStart { get; set; } = 0;
///
/// 产品配方
///
[ConfigDescribe("ProductSpec", true, inputType: ConfigInputType.Combox)]
public string ProductSpec { get; set; }
///
/// PLC IP
///
[ConfigDescribe("PLC-IP", inputType: ConfigInputType.IP)]
public string PLCIP { get; set; } = "";
///
/// PLC 端口
///
[ConfigDescribe("PLC-端口", inputType: ConfigInputType.Int)]
public int PLCPort { get; set; } = 502;
///
/// OPCAU IP
///
[ConfigDescribe("OPCAU-IP", inputType: ConfigInputType.IP)]
public string OPCAUIP { get; set; } = "192.168.3.1";
///
/// OPCAU 端口
///
[ConfigDescribe("OPCAU-端口", inputType: ConfigInputType.Int)]
public int OPCAUPort { get; set; } = 4840;
///
/// Camera IP
///
[ConfigDescribe("扫码枪-IP", inputType: ConfigInputType.IP)]
public string CameraIP { get; set; } = "192.168.1.92";
///
/// Camera 端口
///
[ConfigDescribe("扫码枪-端口", inputType: ConfigInputType.Int)]
public int CameraPort { get; set; } = 2001;
///
/// Camera Trigger
///
[ConfigDescribe("扫码枪-触发字符")]
public string CameraTrigger { get; set; } = "Start";
///
/// MES 系统的请求地址
///
[ConfigDescribe("MES 系统的请求地址")]
public string MESUrl { get; set; }
///
/// 线体编号
///
[ConfigDescribe("线体编号")]
public string ClientCode { get; set; }
///
/// 清理内存间隔时间 单位分
///
[ConfigDescribe("清理内存间隔时间 单位分", inputType: ConfigInputType.Int)]
public int ClearMemoryTime { get; set; } = 1800;
///
/// 数据库名称
///
[ConfigDescribe("数据库名称")]
public string DB_Name { get; set; } = "pz250521c";
///
/// 数据库连接的IP
///
[ConfigDescribe("数据库IP", inputType: ConfigInputType.IP)]
public string DB_IP { get; set; } = "127.0.0.1";
///
/// 数据库连接的端口
///
[ConfigDescribe("数据库端口")]
public string DB_Port { get; set; } = "3306";
///
/// 数据库连接的用户名
///
[ConfigDescribe("数据库用户名")]
public string DB_User { get; set; } = "root";
///
/// 数据库连接的用户名
///
[ConfigDescribe("数据库密码")]
public string DB_Password { get; set; } = "123qwe";
}
还需要再定义一个 特性对应的数据模型,也就是设置界面表格对应的ItemSource,就是在读取特性数据后,保存下来进行显示的。按需自行扩展,就比如我增加了一个Combox类型的输入控件,那它需要有个数据源字段,就又增加了Combox_ItemSource,然后再赋值的时候,需要给下拉数据源添加上(下面代码会介绍)
public class ConfigSettingModel
{
///
/// 属性名称
///
public string PropertyName { get; set; }
///
/// 显示名称
///
public string Name { get; set; }
///
/// 值
///
public object Value { get; set; }
///
/// 数据输入类型
///
public ConfigInputType InputType { get; set; } = ConfigInputType.TextBox;
///
/// 下拉框类型的话,需要赋值下拉数据源
///
public ObservableCollection Combox_ItemSource { get; set; } = new ObservableCollection();
}
2.定义按类型返回控件的转换类
数据类型定义好后,界面需要一个转换器,根据不同的输入类型,返回不同的控件类型
比如 ConfigInputType.TextBox 就显示MetroTextBox控件来显示
ConfigInputType.CheckBox 就显示 LSCheckBox
所以在扩展了ConfigInputType的时候,这个转换器也需要添加对应的返回控件的实现代码,否则默认使用文本的方式显示(MetroTextBox)
using AduSkin.Controls.Metro;
using LS.WPFControlLibrary;
using System;
using System.Collections.Generic;
using System.Globalization;
using System.Linq;
using System.Text;
using System.Threading.Tasks;
using System.Windows;
using System.Windows.Controls;
using System.Windows.Controls.Primitives;
using System.Windows.Data;
using WPFClient.Models.Configs;
namespace WPFClient.UCControls
{
public class InputTypeToControlConverter : IValueConverter
{
public object Convert(object value, Type targetType, object parameter, CultureInfo culture)
{
//if (value == null) return null;
ConfigInputType inputType = (ConfigInputType)value;
FrameworkElement control = null;
switch (inputType)
{
case ConfigInputType.Int:
case ConfigInputType.TextBox:
default:
var textBox = new MetroTextBox(); // 替换为实际MetroTextBox控件
textBox.Width = 300;
textBox.SetBinding(TextBox.TextProperty, new Binding("Value")
{
Mode = BindingMode.TwoWay,
UpdateSourceTrigger = UpdateSourceTrigger.PropertyChanged
});
control = textBox;
break;
case ConfigInputType.CheckBox:
var checkBox = new LSCheckBox(); // 替换为实际LSCheckBox控件
checkBox.SetBinding(CheckBox.IsCheckedProperty, new Binding("Value")
{
Mode = BindingMode.TwoWay,
UpdateSourceTrigger = UpdateSourceTrigger.PropertyChanged
});
control = checkBox;
break;
case ConfigInputType.IP:
var ipControl = new IPControl(); // 替换为实际IPControl控件
ipControl.SetBinding(IPControl.IPProperty, new Binding("Value")
{
Mode = BindingMode.TwoWay,
UpdateSourceTrigger = UpdateSourceTrigger.PropertyChanged
});
control = ipControl;
break;
case ConfigInputType.Combox:
var combox = new CommonCombox(); // 替换为实际CommonCombox控件
combox.DisplayMemberPath = "Name";
combox.SelectedValuePath = "Code";
combox.Width = 300;
combox.SetBinding(ItemsControl.ItemsSourceProperty, new Binding("Combox_ItemSource"));
combox.SetBinding(Selector.SelectedValueProperty, new Binding("Value")
{
Mode = BindingMode.TwoWay,
UpdateSourceTrigger = UpdateSourceTrigger.PropertyChanged
});
control = combox;
break;
}
// 统一设置控件对齐方式
if (control is Control ctrl)
{
ctrl.HorizontalAlignment = HorizontalAlignment.Left;
ctrl.VerticalAlignment = VerticalAlignment.Center;
}
return control;
}
public object ConvertBack(object value, Type targetType, object parameter, CultureInfo culture)
{
// 单向转换无需实现(控件通过绑定直接更新Value)
throw new NotImplementedException();
}
}
}
3.按数据模型来生成自定义表格列
接下来就是参数设置界面了
首先添加DataGrid作为参数数据的呈现:
先引入InputTypeConverter
然后再添加Metro:AduDataGrid 数据表格
最后再添加输入列 ,使用模板列
<DataGridTemplateColumn Width="*" Header="值">
<DataGridTemplateColumn.CellTemplate>
<DataTemplate>
<ContentPresenter Content="{Binding InputType, Converter={StaticResource InputTypeConverter}}" />
</DataTemplate>
</DataGridTemplateColumn.CellTemplate>
</DataGridTemplateColumn>
下面就是VM中的数据绑定实现:
DataGrid 的数据源为: ItemsSource="{Binding ConfigList}" =》 ConfigList
页面加载后,把特性数据和对应的值加载出来
通过反射的方式,获取特性内容和数据模型的值
下拉框的输入方式的话,需要在GetComboxItemSource根据属性名返回对应的下拉数据源
public override void LoadData()
{
try
{
var cfg = GlobalData.ConfigParams;
ConfigList.Clear();
foreach (var propertyInfo in cfg.GetType().GetProperties())
{
if (propertyInfo.IsDefined(typeof(ConfigDescribeAttribute)))//如果属性上有定义该属性,此步没有构造出实例
{
var attribute = propertyInfo.GetCustomAttributes(typeof(ConfigDescribeAttribute))?.FirstOrDefault();
if (attribute != null)
{
var cfgAb = attribute as ConfigDescribeAttribute;
var model = cfgAb.GetConfigAttribute();
if (model != null && !model.IsHidden)
{
ConfigSettingModel item = new ConfigSettingModel();
item.PropertyName = propertyInfo.Name;
item.Value = propertyInfo.GetValue(cfg, null);
item.Name = model.Name;
item.InputType = model.InputType;
if (item.InputType == ConfigInputType.Combox)
{
item.Combox_ItemSource = GetComboxItemSource(item.PropertyName);
}
ConfigList.Add(item);
}
}
}
}
OnPropertyChanged(nameof(ConfigList));
}
catch (Exception ex)
{
LogOperate.Error("LoadData 发生异常", ex);
}
}
///
/// 根据属性名返回相应的下拉框数据源
///
///
///
private ObservableCollection GetComboxItemSource(string propertyName)
{
ObservableCollection source = new ObservableCollection();
try
{
switch (propertyName)
{
case "ProductSpec":
foreach (var p in GlobalData.FormulaDatas)
{
source.Add(new DropDownModel()
{
//自由定义和赋值  Name对应的就是下拉显示的值  Code对应就是保存到配置文件的值
Name = p.Name,//显示文本
Code = p.ID, //实际保存的值
});
}
break;
default:
break;
}
}
catch (Exception ex)
{
LogOperate.Error("GetComboxItemSource", ex);
}
return source;
}
保存数据:
数据源ConfigList 在界面修改数据时,双向绑定后,也会更新到ConfigList对象中
所以还是根据反射的方式,将ConfigList中的数据保存到参数对象中,
pro.SetValue(cfg, prop.Value);
private void Save(object obj)
{
try
{
var cfg = GlobalData.ConfigParams;
var pros = cfg.GetType().GetProperties().ToList();
foreach (var prop in ConfigList)
{
var pro = pros.Find(x => x.Name == prop.PropertyName);
if (pro != null)
{
var attribute = pro.GetCustomAttributes(typeof(ConfigDescribeAttribute))?.FirstOrDefault();
if (attribute != null)
{
var cfgAb = attribute as ConfigDescribeAttribute;
var model = cfgAb.GetConfigAttribute();
if (model != null)
{
if (model.InputType == ConfigInputType.Int)
{
pro.SetValue(cfg, Convert.ToInt32(prop.Value));
}
else
{
pro.SetValue(cfg, prop.Value);
}
}
}
else
{
try
{
pro.SetValue(cfg, prop.Value);
}
catch (Exception ex)
{
VM_MainWindow.Popup($"保存异常,{ex.Message}");
}
}
}
}
GlobalData.ConfigParams = cfg;
//开机自启操作
if (GlobalData.ConfigParams.IsAutoStart)
{
StartupManager startupManager = new StartupManager();
if (!startupManager.IsStartupEnabled())
{
startupManager.EnableStartup();
}
}
else
{
StartupManager startupManager = new StartupManager();
if (startupManager.IsStartupEnabled())
{
startupManager.DisableStartup();
}
}
var res = ConfigParamOperation.SaveConfigParam(GlobalData.ConfigParams);
if (res)
{
VM_MainWindow.Popup("保存成功");
}
else
{
VM_MainWindow.Popup($"保存失败,{res.Message}");
}
}
catch (Exception ex)
{
VM_MainWindow.Popup($"保存失败,{ex.Message}");
LogOperate.Error("SaveCommand", ex);
}
}
下面是完整的VM代码:
using AduSkin.Controls.Metro;
using LS.WPF.MVVM;
using LS.WPF.MVVM.Command;
using LS.WPF.MVVM.StandardModel;
using LS.WPFControlLibrary;
using System;
using System.Collections.ObjectModel;
using System.Linq;
using System.Reflection;
using System.Runtime.InteropServices;
using System.Threading.Tasks;
using System.Windows;
using WPFClient.Models.Configs;
using WPFClient.Operation;
using WPFClient.Tools;
using WPFClient.Views.Setting;
namespace WPFClient.ViewModels.Setting
{
public class VM_SettingPage : BaseViewModel
{
public VM_SettingPage() : base(typeof(SettingPage)) { }
protected override void Page_Loaded(object sender, RoutedEventArgs e)
{
base.Page_Loaded(sender, e);
}
protected override void Page_Unloaded(object sender, RoutedEventArgs e)
{
base.Page_Unloaded(sender, e);
}
public override void LoadData()
{
try
{
var cfg = GlobalData.ConfigParams;
ConfigList.Clear();
foreach (var propertyInfo in cfg.GetType().GetProperties())
{
if (propertyInfo.IsDefined(typeof(ConfigDescribeAttribute)))//如果属性上有定义该属性,此步没有构造出实例
{
var attribute = propertyInfo.GetCustomAttributes(typeof(ConfigDescribeAttribute))?.FirstOrDefault();
if (attribute != null)
{
var cfgAb = attribute as ConfigDescribeAttribute;
var model = cfgAb.GetConfigAttribute();
if (model != null && !model.IsHidden)
{
ConfigSettingModel item = new ConfigSettingModel();
item.PropertyName = propertyInfo.Name;
item.Value = propertyInfo.GetValue(cfg, null);
item.Name = model.Name;
item.InputType = model.InputType;
if (item.InputType == ConfigInputType.Combox)
{
item.Combox_ItemSource = GetComboxItemSource(item.PropertyName);
}
ConfigList.Add(item);
}
}
}
}
OnPropertyChanged(nameof(ConfigList));
}
catch (Exception ex)
{
LogOperate.Error("LoadData 发生异常", ex);
}
}
///
/// 根据属性名返回相应的下拉框数据源
///
///
///
private ObservableCollection GetComboxItemSource(string propertyName)
{
ObservableCollection source = new ObservableCollection();
try
{
switch (propertyName)
{
case "ProductSpec":
foreach (var p in GlobalData.FormulaDatas)
{
source.Add(new DropDownModel()
{
//自由定义和赋值  Name对应的就是下拉显示的值  Code对应就是保存到配置文件的值
Name = p.Name,//显示文本
Code = p.ID, //实际保存的值
});
}
break;
default:
break;
}
}
catch (Exception ex)
{
LogOperate.Error("GetComboxItemSource", ex);
}
return source;
}
public DelegateCommand SaveCommand
{
get { return new DelegateCommand(Save); }
}
private void Save(object obj)
{
try
{
var cfg = GlobalData.ConfigParams;
var pros = cfg.GetType().GetProperties().ToList();
foreach (var prop in ConfigList)
{
var pro = pros.Find(x => x.Name == prop.PropertyName);
if (pro != null)
{
var attribute = pro.GetCustomAttributes(typeof(ConfigDescribeAttribute))?.FirstOrDefault();
if (attribute != null)
{
var cfgAb = attribute as ConfigDescribeAttribute;
var model = cfgAb.GetConfigAttribute();
if (model != null)
{
if (model.InputType == ConfigInputType.Int)
{
pro.SetValue(cfg, Convert.ToInt32(prop.Value));
}
else
{
pro.SetValue(cfg, prop.Value);
}
}
}
else
{
try
{
pro.SetValue(cfg, prop.Value);
}
catch (Exception ex)
{
VM_MainWindow.Popup($"保存异常,{ex.Message}");
}
}
}
}
GlobalData.ConfigParams = cfg;
//开机自启操作
if (GlobalData.ConfigParams.IsAutoStart)
{
StartupManager startupManager = new StartupManager();
if (!startupManager.IsStartupEnabled())
{
startupManager.EnableStartup();
}
}
else
{
StartupManager startupManager = new StartupManager();
if (startupManager.IsStartupEnabled())
{
startupManager.DisableStartup();
}
}
var res = ConfigParamOperation.SaveConfigParam(GlobalData.ConfigParams);
if (res)
{
VM_MainWindow.Popup("保存成功");
}
else
{
VM_MainWindow.Popup($"保存失败,{res.Message}");
}
}
catch (Exception ex)
{
VM_MainWindow.Popup($"保存失败,{ex.Message}");
LogOperate.Error("SaveCommand", ex);
}
}
private ObservableCollection _cfgList = new ObservableCollection();
///
/// 配置数据集
///
public ObservableCollection ConfigList
{
get { return _cfgList; }
set { _cfgList = value; OnPropertyChanged(); }
}
}
}
 浙公网安备 33010602011771号