
【IOS开发笔记03-视图相关】简单计算器的实现
UIView
经过前几天的快速学习,我们初步了解的IOS开发的一些知识,中间因为拉的太急,忽略了很多基础知识点,这些知识点单独拿出来学习太过枯燥,我们在今后的项目中再逐步补齐,今天我们来学习APP视图相关知识。
视图即UIView对象,我们上次用的按钮UIButton、UILabel或者UITableView皆是其子类;视图知道如何绘制自己与前端一致有一个层次的概念。
任何一个应用都会有一个UIWindow对象,与浏览器对象一致,他作为容器角色而存在,负责装载所有的视图控件,每个加入的视图便是一个子视图:subview,视图嵌套便形成了我们看到的APP界面,这点类似与html的dom结构。
视图的绘制分为两步:
① 层次结构上的每个视图(包括根视图UIWindow)分别绘制自身,视图将自己绘制到图层(layer)上,每个UIView都拥有一个layer属性,指向一个CALayer对象
② 所有视图的图像最终组成为一幅图像,绘制到屏幕上
为了更好的了解UIView的相关知识,我们这里做一个简单的计算器来说明其知识点吧。
其实说明这个知识点我可以选择很多项目之所以会选择计算器是因为内部会碰到数字与字符串转换,四则运算问题,也会遇到控件绑定事件等行为,帮助我们巩固基础吧。
这里新建一个单页应用:Calculator-app,自从昨天我知道了拖控件居然需要以拖动的方式建立关联后,我便决定不再使用拖的方式,我们这里使用代码生成界面,所以今天的目的是:
① 了解OC的数据类型转换
② 了解UIView的知识
③ 了解如何代码构建视图并且绑定事件
至于计算器的逻辑,不必太过在意
画圆
首先,我们在我们的UIView中画一个同心圆来了解UIView的相关知识,因为OC并没有提供绘制同心圆的视图对象,该知识点可以帮助我们更好的了解UIView。
新建一个UIView的子类:MyUICircle
每个UIView的子类有两个方法需要我们关注,第一个为初始化方法:
MyUICircle *circle = [MyUICircle alloc] initWithFrame:<#(CGRect)#>
其中initWithFrame是继承下来的初始化方法,带有一个CGRect类型的参数,该参数会赋予UIView的frame属性:
@property (nonatomic) CGRect frame;
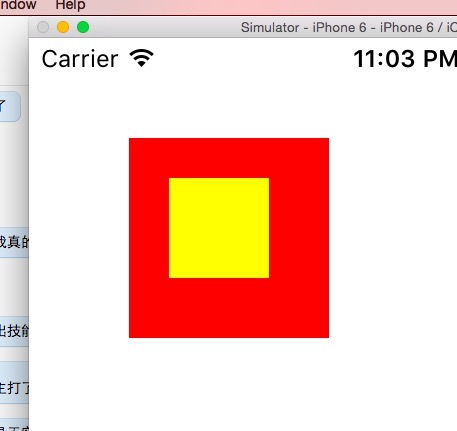
CGRect包含另外两个结构,origin=>x, y; size=>width, height。四个都是float的基本结构,我们在全局控制器中试试其作用:
 1 #import "ViewController.h"
 2 #import "MyUICircle.h"
 3
 4 @interface ViewController ()
 5
 6 @end
 7
 8 @implementation ViewController
 9
10 - (void)viewDidLoad {
11     [super viewDidLoad];
12
13    //因为CGRect不是OC对象,所以不能接收OC的消息,也没有必要接收消息,一般这样建立一个OCRect对象
14     //注意,这里不是指针
15     CGRect frame = CGRectMake(10, 10, 100, 100);
16
17     //创建基本视图对象
18     //这里已经确定好了坐标与尺寸
19     MyUICircle *circle = [[MyUICircle alloc] initWithFrame:frame];
20
21     //给一个背景,这里使用了颜色类的静态方法
22     circle.backgroundColor = [UIColor redColor];
23
24     //将视图加入主视图中
25     [self.view addSubview:circle];
26
27 }
28
29 - (void)didReceiveMemoryWarning {
30     [super didReceiveMemoryWarning];
31     // Dispose of any resources that can be recreated.
32 }
33
34 @end
因为MyUICircle是一个空类,什么都没有做便没有贴代码了,这个是视图对应的主控制器,其与视图如何建立关联我们暂不关注,他提供一个方法viewDidLoad处理视图准备好的初始化动作,我们便将创建好的视图加入了其中,大家请看这块红斑:

这个时候的层次结构是
UIWIndow包含多个UIView,这里主UIView还包含一个MyUICircle对象,每个UIView可以根据superview属性找到自己的父对象
drawRect
drawRect为从UIView继承下来的第二个需要关注的方法,他负责在页面上绘图,我们可以重写drawRect达到自定义绘图的功能。
1 // Only override drawRect: if you perform custom drawing.
2 // An empty implementation adversely affects performance during animation.
3 - (void)drawRect:(CGRect)rect {
4     // Drawing code
5 }
UIView的子类具有两个相似的属性,bounds与frame,我们都知道frame是用于视图本身布局用的,而bounds定义了一个矩形范围,表示视图的绘制区域。
视图在绘制时,会参考一个坐标系,bounds表示矩形位于自己的坐标系,而frame表示矩形位于父视图的坐标系,两个矩形大小是相等的。
1 -(CGRect)frame{
2     return CGRectMake(self.frame.origin.x,self.frame.origin.y,self.frame.size.width,self.frame.size.height);
3 }
4 -(CGRect)bounds{
5     return CGRectMake(0,0,self.frame.size.width,self.frame.size.height);
6 }
bounds是相对于左上角位置的,不太好理解就写demo,我这里新建了一个子View帮助理解
 1 - (void)viewDidLoad {
 2     [super viewDidLoad];
 3
 4    //因为CGRect不是OC对象,所以不能接收OC的消息,也没有必要接收消息,一般这样建立一个OCRect对象
 5     //注意,这里不是指针
 6    CGRect frame = CGRectMake(50, 50, 100, 100);
 7
 8     //创建基本视图对象
 9     //这里已经确定好了坐标与尺寸
10     MyUICircle *circle = [[MyUICircle alloc] initWithFrame:frame];
11
12     //给一个背景,这里使用了颜色类的静态方法
13     circle.backgroundColor = [UIColor redColor];
14
15     //circle.bounds = CGRectMake(200, 200, 100, 100);
16
17     UIView *view2 = [[UIView alloc] initWithFrame:CGRectMake(20, 20, 50, 50)];
18     view2.backgroundColor = [UIColor yellowColor];
19     [circle addSubview: view2];
20
21     //将视图加入主视图中
22     [self.view addSubview:circle];
23
24 }
可以看到,子view是相对于父View布局的,这里与我们的absolute一致,如果改变父View的bounds呢:
 1 - (void)viewDidLoad {
 2     [super viewDidLoad];
 3
 4    //因为CGRect不是OC对象,所以不能接收OC的消息,也没有必要接收消息,一般这样建立一个OCRect对象
 5     //注意,这里不是指针
 6    CGRect frame = CGRectMake(50, 50, 100, 100);
 7
 8     //创建基本视图对象
 9     //这里已经确定好了坐标与尺寸
10     MyUICircle *circle = [[MyUICircle alloc] initWithFrame:frame];
11
12     //给一个背景,这里使用了颜色类的静态方法
13     circle.backgroundColor = [UIColor redColor];
14
15     //父类设置该参数造成的影响
16     circle.bounds = CGRectMake(10, 0, 100, 100);
17
18     UIView *view2 = [[UIView alloc] initWithFrame:CGRectMake(20, 20, 50, 50)];
19     view2.backgroundColor = [UIColor yellowColor];
20     [circle addSubview: view2];
21
22     //与view2参照物
23     UIView *view3 = [[UIView alloc] initWithFrame:CGRectMake(20, 200, 50, 50)];
24     view3.backgroundColor = [UIColor grayColor];
25     [self.view  addSubview: view3];
26
27     //将视图加入主视图中
28     [self.view addSubview:circle];
29
30 }
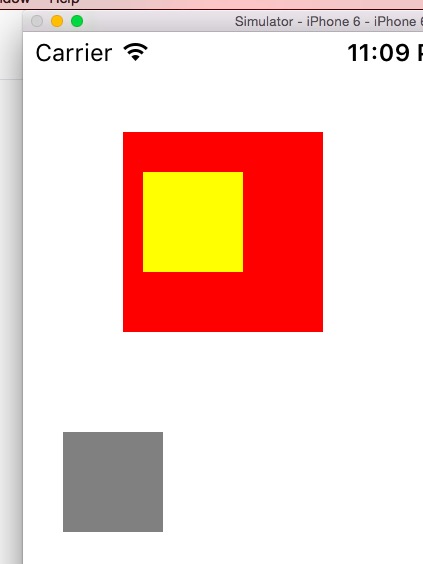
可以看到,view2相对于父元素最初位置左移了10像素,所以修改了一个view的bounds边上修改了本地坐标的原点位置,最初的原点是0, 0。
那里view1修改了原点坐标让其右偏移了10像素,所以对应的子view便需要左偏,我理解下来是设置后将当前右上角的坐标变成了10像素,大概是这样吧。
这里为什么要强调这个bounds本地坐标呢,因为以后拖动相关的需求都会根据他做计算,这块有点绕,我们后续真实项目遇到再来纠结他吧,现在也说不清。
正式画圆
如果我们期待画一个铺满屏幕最大的圆,便需要通过bounds属性找到中心点:
 1 - (void)drawRect:(CGRect)rect {
 2
 3     CGRect bounds = self.bounds;
 4
 5     //计算中心点
 6     CGPoint center;
 7     center.x = bounds.origin.x + bounds.size.width / 2.0;
 8     center.y = bounds.origin.y + bounds.size.height / 2.0;
 9
10     //根据宽高计算较小值的半径
11     float radius = (MIN(bounds.size.width, bounds.size.height) / 2.0);
12
13 }
有了中心点与半径便可以画圆了,这里使用UIBezierPath类绘制圆形:
 1 - (void)drawRect:(CGRect)rect {
 2
 3     CGRect bounds = self.bounds;
 4
 5     //计算中心点
 6     CGPoint center;
 7     center.x = bounds.origin.x + bounds.size.width / 2.0;
 8     center.y = bounds.origin.y + bounds.size.height / 2.0;
 9
10     //根据宽高计算较小值的半径
11     float radius = (MIN(bounds.size.width, bounds.size.height) / 2.0);
12
13     UIBezierPath *path = [[UIBezierPath alloc] init];
14
15     //这里去看api吧,他们都说ios门槛高,原来什么都是英文啊
16     [path addArcWithCenter:center radius:radius startAngle:0.0 endAngle:M_PI * 2.0 clockwise:YES];
17
18     //开始绘制
19     [path stroke];
20 }

于是到此圆基本就出来了,至此我们对UIView有了一个基本的了解,接下来就让我们开始真实的计算器逻辑了吧
计算器
最简单的计算器拥有10个数字,+-*/,小数点,重置键,一个显示结果的文本框,并不复杂,我们这里便使用代码设计其UI。
首先,我们将数字画出来,根据前端的经验,数字按钮肯定是一个循环组成,dom上会留下一些标识,并且给父元素绑定事件即可,但是ios我们并不熟悉,所以先用最土的方法是画10个数字,在此之前,我们先简单研究下UIButton控件。
UIButton
这一小节参考了:http://justcoding.iteye.com/blog/1467999
UIButton是一个标准的UIController,所谓UI控件便是对UIView的的增强,也就是说UI控件一般继承至UIView,所以View的一些统一特性都被继承了下来了。
继承下来的属性
enabled,控件是否可用,与html控件一致,禁用后仍然可见,只是不可点击。
selected,当用户选中控件时,控件的selected属性便为YES。
contentVerticalAlignment,控件在垂直方向布置自身内容的方式,以下是可设置的值:
① UIControlContentVerticalAlignmentCenter
② UIControlContentVerticalAlignmentTop
③ UIControlContentVerticalAlignmentBottom
④ UIControlContentVerticalAlignmentFill
contentHorizontalAligment,为水平对齐的方式,可设置的值为:
① UIControlContentHorizontalAlignmentCenter
② UIControlContentHorizontalAlignmentTop
③ UIControlContentHorizontalAlignmentBottom
④ UIControlContentHorizontalAlignmentFill
事件通知
UIControll提供一个标准机制,来进行事件订阅和发布,当控件触发特定事件后,便会触发对应回调。
[myControl addTarget: myDelegate action:@selector(myActionmethod:) forControlEvents:UIControlEventValueChanged ];
可以使用addTarget绑定多个事件,这类事件一般来说都是标准的,比如js中的click事件,move等事件
UIControlEventTouchDown,点击事件,类似与js中的click
UIControlEventTouchDownRepeat,当点击数大于1时触发,类似doubleclick
UIControlEventTouchDraglnside,当触摸控件在窗口滚动时触发
UIControlEventTouchChanged,当控件的值发生变化时触发
UIControlEventEditingDidBegin,当开始编辑时触发,类似获取焦点吧
UIControlEventEditingChanged,当文本控件中的文本被改变时发送通知。
UIControlEventEditingDidEnd,当文本控件中编辑结束时发送通知。
......
与addTarget方法对应的是removeTarget,表达的是删除事件
使用allTargets获取一个控件的所有事件列表
之前是关于UIButton父类的事件,这里我们回到UIButton,首先说下两种初始化方法:
initWithFrame
1 UIButton *tmp;
2 CGRect frame;
3
4 frame = CGRectMake(50, 50, 100, 40);
5 tmp = [[UIButton alloc] initWithFrame:frame];
buttonWithType
这个是UIButton一个特有的类方法
 1 UIButton *btn2 = [UIButton buttonWithType:UIButtonTypeRoundedRect];
 2
 3 typedef enum {
 4     UIButtonTypeCustom = 0,           // no button type   自定义,无风格
 5     UIButtonTypeRoundedRect,          // rounded rect, flat white button, like in address card 白色圆角矩形,类似偏好设置表格单元或者地址簿卡片
 6     UIButtonTypeDetailDisclosure,//蓝色的披露按钮,可放在任何文字旁
 7     UIButtonTypeInfoLight,//微件(widget)使用的小圆圈信息按钮,可以放在任何文字旁
 8     UIButtonTypeInfoDark,//白色背景下使用的深色圆圈信息按钮
 9     UIButtonTypeContactAdd,//蓝色加号(+)按钮,可以放在任何文字旁
10 } UIButtonType;
属性
这种方法创建是没有位置信息的,所以需要设置frame值:
CGRect btn2Frame = CGRectMake(10.0, 10.0, 60.0, 44.0);
btn2.frame =btn2Frame;
除此之外,我们需要设置按钮的文字,采用setTitle,带一个字符串和一个当前按钮的状态:
[btn1 setTitle:@"BTN1" forState:UIControlStateNormal];
我们也可以使用一个图片作为按钮:
[btn2 setImage:[UIImage imageNamed:@"pic"] forState:UIControlStateNormal];
最后可以为每种按钮设置标题的颜色和阴影,以及背景,
[btn1 setTitleColor:[UIColor redColor] forState:UIControlStateNormal];//设置标题颜色
[btn1 setTitleShadowColor:[UIColor grayColor] forState:UIControlStateNormal ];//阴影
[btn1 setBackgroundImage:[UIImage imageNamed:@"PIC"] forState:UIControlStateHighlighted];//背景图像
forstate决定了按钮将在何种状态下显示:
enum {
    UIControlStateNormal       = 0,  //常态
    UIControlStateHighlighted  = 1 << 0,                  // used when UIControl isHighlighted is set 高亮
    UIControlStateDisabled     = 1 << 1,  //禁用
    UIControlStateSelected     = 1 << 2,                  // flag usable by app (see below) 选中
    UIControlStateApplication  = 0x00FF0000,              // additional flags available for application use 当应用程序标志使用时
    UIControlStateReserved     = 0xFF000000               // flags reserved for internal framework use  为内部框架预留的
};
typedef NSUInteger UIControlState;
当按钮高亮或者禁用,UIButton可以调整自己的样式
添加事件(动作)
按钮还是需要绑定事件,他的事件绑定直接继承自UIView:
-(void)btnPressed:(id)sender{
    UIButton* btn = (UIButton*)sender;
    //开始写你自己的动作
}
[btn1 addTarget:self action:@selector(btnPressed:) forControlEvents:UIControlEventTouchUpInside];
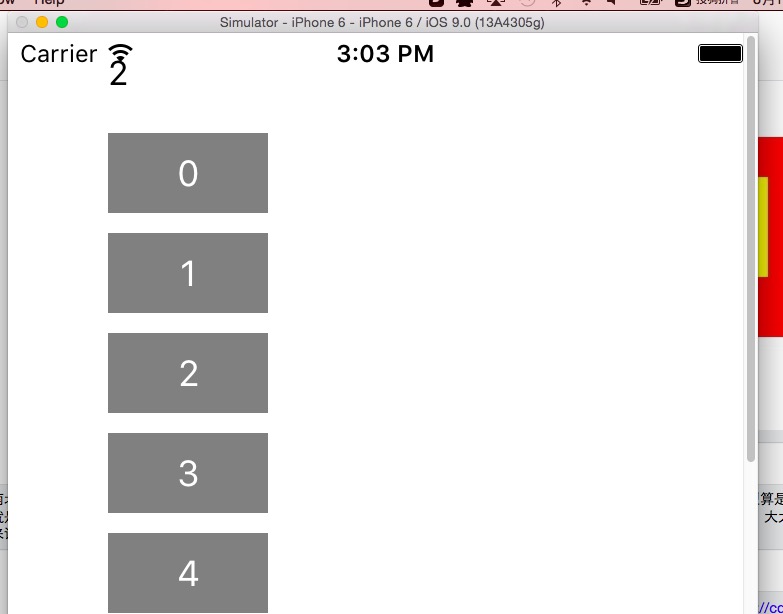
这里我们再次回到计算器,我们首先生成数字的UI,然后为数字绑定事件,点击每个按钮在后台打印出数字:
 1 - (void)onNumClick:(id)sender
 2 {
 3     self.msg.text = [sender currentTitle];
 4 }
 5
 6 - (void)viewDidLoad {
 7     [super viewDidLoad];
 8
 9     //生成10个数字先,一行4个,一字排开
10     UIButton *tmp;
11     CGRect frame;
12     self.msg = [[UILabel alloc] initWithFrame:CGRectMake(50, 0, 100, 40)];
13     [self.view addSubview:self.msg];
14
15     self.msg.text = @"数字";
16
17     for (int i = 0; i < 10; i++) {
18         frame = CGRectMake(50, 50 + 50 * i, 80, 40);
19         tmp = [[UIButton alloc] initWithFrame:frame];
20         [tmp setTitle:[NSString stringWithFormat:@"%d", i]  forState:UIControlStateNormal];
21
22         //不设置背景就是白色就看不到啦
23         tmp.backgroundColor = [UIColor grayColor];
24
25         //这里绑定事件,点击每个数字便重置msg
26         [tmp addTarget:self action:@selector(onNumClick:) forControlEvents:UIControlEventTouchDown];
27
28         [self.view addSubview:tmp];
29     }
30 }
如此一来,我们简陋的界面就出来了:
其中事件绑定的回调函数的sender参数,应该对应js函数中的e,在此我们知道了如何布局以及绑定事件,于是我们将界面稍微美化点,因为我这里用到了OC的字典,这里先插一段字典的知识吧。
NSDictionary
NSDictionary对应JS中的对象字面量,自从json对象出来后,这个对象非常重要,估计是逃不掉的啦。
NSDictionary代表不可变字典,意思是一旦初始化结束就不能增删元素了,这是其初始化的方法:
 1 //创建多个字典
 2 NSDictionary *dic = [NSDictionary dictionaryWithObjectsAndKeys:
 3                       @"value1", @"key1",
 4                       @"value2", @"key2",
 5                       @"value3", @"key3",
 6                       @"value4", @"key4",
 7                       nil];
 8
 9 //根据现有的字典创建字典
10 NSDictionary *dic2 = [NSDictionary dictionaryWithDictionary:dic];
11 NSLog(@"dic2 :%@", dic2);
12
13 //根据key获取value
14 NSLog(@"key3 value :%@", [dic objectForKey:@"key3"]);
15
16 //获取字典数量
17 NSLog(@"dic count :%d", [dic count]);
18
19 //所有的键集合
20 NSArray *keys = [dic allKeys];
21 NSLog(@"keys :%@", keys);
22
23 //所有值集合
24 NSArray *values = [dic allValues];
25 NSLog(@"values :%@", values);
2015-08-16 17:52:35.540 Calculator-app[1266:121201] dic2 :{
    key1 = value1;
    key2 = value2;
    key3 = value3;
    key4 = value4;
}
2015-08-16 17:52:35.540 Calculator-app[1266:121201] key3 value :value3
2015-08-16 17:52:35.540 Calculator-app[1266:121201] dic count :4
2015-08-16 17:52:35.541 Calculator-app[1266:121201] keys :(
    key3,
    key1,
    key4,
    key2
)
2015-08-16 17:52:35.541 Calculator-app[1266:121201] values :(
    value3,
    value1,
    value4,
    value2
)
NSMutableDictionay
NSMutableDictionary是NSDictionary的子类,所以继承了NSDictionary的所有特性,并且可以使用方法动态添加:
[dictionary setObject:@"value" forKey:@"key"];
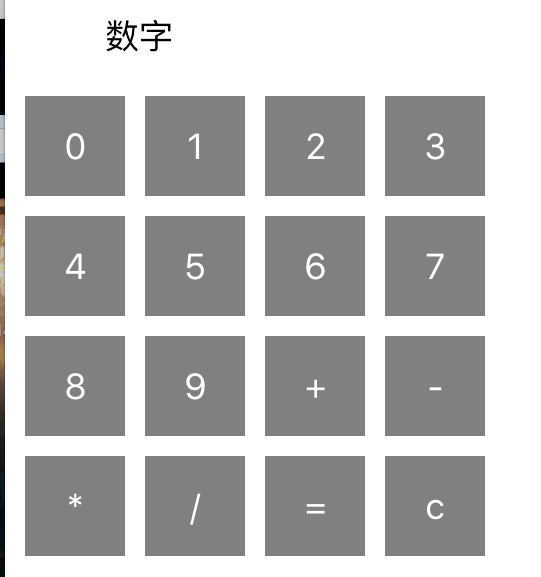
这里我们回到我们的计算器,因为我们知道到底有多少字符,所以这里直接使用不可变字典即可,但是最后转念一想好像数组也是可行的,所以就数组吧......
因为这里是学习ios开发,各位就不要在意小数点之类的细节了,至此基本UI便出来了,虽然很丑:


 1 #import <UIKit/UIKit.h>
 2
 3 @interface ViewController : UIViewController
 4
 5 @property(retain,nonatomic) UILabel *msg;
 6
 7 -(void) initLayout;
 8
 9 @end
10
11 #import "ViewController.h"
12 #import "MyUICircle.h"
13
14 @interface ViewController ()
15
16 @end
17
18 @implementation ViewController
19
20 //计算机布局
21 //思考,感觉这里没有做到很好的分离
22 -(void) initLayout{
23     //生成10个数字先,一行4个,一字排开
24     UIButton *tmp;
25     CGRect frame;
26     self.msg = [[UILabel alloc] initWithFrame:CGRectMake(50, 50, 100, 40)];
27     [self.view addSubview:self.msg];
28     self.msg.text = @"数字";
29
30     NSMutableArray *array = [[NSMutableArray alloc] init];
31
32     //插入5个数字,这里发生了装箱
33     for (int i = 0; i < 10; i++) {
34         NSString *n = [NSString stringWithFormat:@"%d", i];
35         [array addObject:n];
36     }
37
38     [array addObject: @"+"];
39     [array addObject: @"-"];
40     [array addObject: @"*"];
41     [array addObject: @"/"];
42     [array addObject: @"="];
43     [array addObject: @"c"];
44
45     for(int i = 0; i < 5; i++) {
46         for(int j = 0; j < 4; j++){
47             if(i * 4 + j > [array count] - 1) break;
48
49             frame = CGRectMake(10 + j * 60, 100 + 60 * i, 50, 50);
50
51             tmp = [[UIButton alloc] initWithFrame:frame];
52             [tmp setTitle: [array objectAtIndex:(i * 4 + j)] forState:UIControlStateNormal];
53
54             //不设置背景就是白色就看不到啦
55             tmp.backgroundColor = [UIColor grayColor];
56
57             //这里绑定事件,点击每个数字便重置msg
58             [tmp addTarget:self action:@selector(onNumClick:) forControlEvents:UIControlEventTouchDown];
59
60             [self.view addSubview:tmp];
61
62         }
63     }
64 }
65
66 - (void)onNumClick:(id)sender {
67     self.msg.text = [sender currentTitle];
68 }
69
70 - (void)viewDidLoad {
71     [super viewDidLoad];
72     [self initLayout];
73 }
74
75 - (void)didReceiveMemoryWarning {
76     [super didReceiveMemoryWarning];
77     // Dispose of any resources that can be recreated.
78 }
79
80 @end
这个时候我们来简单写一下其业务逻辑,逻辑肯定有问题,简单看功能就好:
  1 #import <UIKit/UIKit.h>
  2
  3 @interface ViewController : UIViewController
  4
  5 @property(retain,nonatomic) UILabel *msg;
  6
  7 //存取字符串显示的字符串
  8 @property(retain,nonatomic) NSMutableString *resultStr;
  9
 10 //存储最近一次有效的指令
 11 @property(retain,nonatomic) NSMutableString *commondStr;
 12
 13 @property(assign, nonatomic) int num1;
 14 @property(assign,nonatomic) int num2;
 15
 16 -(void) initLayout;
 17
 18 -(void) calculatorNum;
 19
 20 @end
 21
 22
 23 #import "ViewController.h"
 24 #import "MyUICircle.h"
 25
 26 @interface ViewController ()
 27
 28 @end
 29
 30 @implementation ViewController
 31
 32 //计算机布局
 33 //思考,感觉这里没有做到很好的分离
 34 -(void) initLayout{
 35     //生成10个数字先,一行4个,一字排开
 36     UIButton *tmp;
 37     CGRect frame;
 38     self.msg = [[UILabel alloc] initWithFrame:CGRectMake(50, 50, 100, 40)];
 39     [self.view addSubview:self.msg];
 40
 41     _resultStr = [[NSMutableString alloc]initWithString:@"0"];
 42     _commondStr = [[NSMutableString alloc]initWithString:@""];
 43
 44     self.msg.text = _resultStr;
 45
 46     NSMutableArray *array = [[NSMutableArray alloc] init];
 47
 48     //插入5个数字,这里发生了装箱
 49     for (int i = 0; i < 10; i++) {
 50         NSString *n = [NSString stringWithFormat:@"%d", i];
 51         [array addObject:n];
 52     }
 53
 54     [array addObject: @"+"];
 55     [array addObject: @"-"];
 56     [array addObject: @"*"];
 57     [array addObject: @"/"];
 58     [array addObject: @"="];
 59     [array addObject: @"c"];
 60
 61     for(int i = 0; i < 5; i++) {
 62         for(int j = 0; j < 4; j++){
 63             if(i * 4 + j > [array count] - 1) break;
 64
 65             frame = CGRectMake(10 + j * 60, 100 + 60 * i, 50, 50);
 66
 67             tmp = [[UIButton alloc] initWithFrame:frame];
 68             [tmp setTitle: [array objectAtIndex:(i * 4 + j)] forState:UIControlStateNormal];
 69
 70             //不设置背景就是白色就看不到啦
 71             tmp.backgroundColor = [UIColor grayColor];
 72
 73             //这里绑定事件,点击每个数字便重置msg
 74             [tmp addTarget:self action:@selector(onNumClick:) forControlEvents:UIControlEventTouchDown];
 75
 76             [self.view addSubview:tmp];
 77
 78         }
 79     }
 80 }
 81
 82 - (void)onNumClick:(id)sender {
 83
 84     NSString *tmp = [sender currentTitle];
 85     int flag = 0;
 86
 87     //此处监控输入,适合使用switch
 88     if([tmp isEqualToString:@"c"]){
 89         _resultStr = [[NSMutableString alloc]initWithString:@"0"];
 90         //点击数字则重置
 91         _commondStr = [[NSMutableString alloc]initWithString:@""];
 92
 93     } else if ([tmp isEqualToString:@"+"] || [tmp isEqualToString:@"-"] || [tmp isEqualToString:@"*"] || [tmp isEqualToString:@"/"]){
 94         flag = 1;
 95         //如果之前已经有了命令,需要先显示计算结果,再给予新的命令
 96         if([_commondStr isEqualToString:@""]) {
 97             _commondStr = tmp;
 98         } else {
 99             _num2 = [_resultStr intValue];
100             [self calculatorNum ];
101             _num1 = 0;
102             _num2 = 0;
103         }
104
105     } else if ([tmp isEqualToString:@"="]){
106         _num2 = [_resultStr intValue];
107         [self calculatorNum ];
108         _num1 = 0;
109         _num2 = 0;
110     } else {
111         //这个时候是输入数字的情况
112         if([_resultStr isEqualToString:@"0"]) {
113             _resultStr = [[NSMutableString alloc]initWithString:@""];
114         }
115         [_resultStr appendString:tmp];
116     }
117
118     //第一次输入命令,便记录为第一个数字
119     if(flag == 1) {
120         _num1 = [_resultStr intValue];
121         _resultStr = [[NSMutableString alloc]initWithString:@""];
122     }
123
124     self.msg.text = _resultStr;
125
126 }
127
128 - (void)calculatorNum {
129     int r;
130     if ([_commondStr isEqualToString:@"+"]){
131         r = _num1 + _num2;
132     } else if([_commondStr isEqualToString:@"-"]) {
133         r = _num1 - _num2;
134     } else if([_commondStr isEqualToString:@"*"]) {
135         r = _num1 * _num2;
136     } else if([_commondStr isEqualToString:@"/"]) {
137         //不要在意那些逻辑了
138         r = _num1 / _num2;
139     }
140
141     _commondStr = [[NSMutableString alloc]initWithString:@""];
142     _resultStr = [NSString stringWithFormat:@"%d", r];
143
144 }
145
146
147 - (void)viewDidLoad {
148     [super viewDidLoad];
149     [self initLayout];
150 }
151
152 - (void)didReceiveMemoryWarning {
153     [super didReceiveMemoryWarning];
154     // Dispose of any resources that can be recreated.
155 }
156
157 @end


 浙公网安备 33010602011771号