

fullCalendar日历插件玩法解析
fullCalendar日历
1、在用之前我先介绍为啥要用这个fullcalendar日历插件,首先我在用之前是用的Ant Design of Vue框架的日历,这个框架的日历就比较单调没有很灵活的能操作日历里面的日历日程,而fullcalendar日历就能很灵活的进行日历方面的操作。
2、在刚开始用的时候还是有太多坑的,fullCalendar日历插件在我现在发现的有(vue-full-calendar 、vue-fullcalendar 、 calendar),凡是看到npm install以上三个的就不要去下载了,虽然vue-fullcalendar是可以使用的,但想要使用下载fullCalendar里面的其它包是不可以的。
Fullcalendar安装
- 安装所需要的npm包
npm install --save @fullcalendar/vue
下面包是日历的周视图、日视图等插件包:
npm install --save @fullcalendar/core @fullcalendar/daygrid @fullcalendar/interaction @fullcalendar/list @fullcalendar/timegrid

安装后的fullcalendar源码和其它插件都会在@fullcalendar - 导入HTML
<template> <div> <FullCalendar ref="myCalendar" :options="calendarOptions"/> </div> </template> - 导入JS
import FullCalendar from '@fullcalendar/vue'
import dayGridPlugin from '@fullcalendar/daygrid'
import timeGridPlugin from '@fullcalendar/timegrid'
import interactionPlugin from '@fullcalendar/interaction'
import listPlugin from '@fullcalendar/list'
![复制代码]()
export default { name: 'MaintenanceCalendarview', components: { FullCalendar }, data () { return { calendarOptions: { // 引入的插件,比如fullcalendar/daygrid,fullcalendar/timegrid引入后才可显示月,周,日 plugins: [ dayGridPlugin, interactionPlugin, timeGridPlugin, listPlugin ], initialView: 'dayGridMonth', // 默认为那个视图(月:dayGridMonth,周:timeGridWeek,日:timeGridDay) firstDay: 1, // 设置一周中显示的第一天是哪天,周日是0,周一是1,类推 locale: 'zh-cn', // 切换语言,当前为中文 eventColor: '#3BB2E3', // 全部日历日程背景色 themeSystem: 'bootstrap', // 主题色(本地测试未能生效) initialDate: moment().format('YYYY-MM-DD'), // 自定义设置背景颜色时一定要初始化日期时间 timeGridEventMinHeight: '20', // 设置事件的最小高度 aspectRatio: 1.65, // 设置日历单元格宽度与高度的比例。 // displayEventTime: false, // 是否显示时间 // allDaySlot: false, // 周,日视图时,all-day 不显示 eventLimit: true, // 设置月日程,与all-day slot的最大显示数量,超过的通过弹窗显示 headerToolbar: { // 日历头部按钮位置 left: '', center: 'prevYear,prev title next,nextYear', right: 'today dayGridMonth,timeGridWeek,timeGridDay' }, buttonText: { today: '今天', month: '月', week: '周', day: '日' }, slotLabelFormat: { hour: '2-digit', minute: '2-digit', meridiem: false, hour12: false // 设置时间为24小时 }, eventLimitNum: { // 事件显示数量限制(本地测试未能生效) dayGrid: { eventLimit: 5 }, timeGrid: { eventLimit: 2 // adjust to 6 only for timeGridWeek/timeGridDay } }, // 事件 // eventClick: this.handleEventClick, // 点击日历日程事件 eventDblClick: this.handleEventDblClick, // 双击日历日程事件 (这部分是在源码中添加的) eventClickDelete: this.eventClickDelete, // 点击删除标签事件 (这部分是在源码中添加的) eventDrop: this.eventDrop, // 拖动日历日程事件 eventResize: this.eventResize, // 修改日历日程大小事件 select: this.handleDateSelect, // 选中日历格事件 eventDidMount: this.eventDidMount, // 安装提示事件 // loading: this.loadingEvent, // 视图数据加载中、加载完成触发(用于配合显示/隐藏加载指示器。) // selectAllow: this.selectAllow, //编程控制用户可以选择的地方,返回true则表示可选择,false表示不可选择 eventMouseEnter: this.eventMouseEnter, // 鼠标滑过 allowContextMenu: false, editable: true, // 是否可以进行(拖动、缩放)修改 eventStartEditable: true, // Event日程开始时间可以改变,默认true,如果是false其实就是指日程块不能随意拖动,只能上下拉伸改变他的endTime eventDurationEditable: true, // Event日程的开始结束时间距离是否可以改变,默认true,如果是false则表示开始结束时间范围不能拉伸,只能拖拽 selectable: true, // 是否可以选中日历格 selectMirror: true, selectMinDistance: 0, // 选中日历格的最小距离 dayMaxEvents: true, weekends: true, navLinks: true, // 天链接 selectHelper: false, slotEventOverlap: false // 相同时间段的多个日程视觉上是否允许重叠,默认true允许 } } }, methods: { eventMouseEnter (event, jsEvent, view) { // 鼠标划过的事件 if (event.event.classNames.length) { // console.log(event) } }, eventDrop (event, dayDelta, minuteDelta, allDay, revertFunc, jsEvent, ui, view) { console.log(event) } } }![复制代码]()
(以上日历事件以及event事件差不多这些都是我个人感觉能用到的我才加进去了)
- event: [ ] ==>(event能否进行操作真正取决于开始日期和结束日期的格式,即使是设置了editable,时间还是会影响 ,一共有四种情况,当日期时间为00:00到23:59时为全天)
![复制代码]()
    events: [
      {
        title : '可以拖动但不能缩放',
        start : '2019-07-01 12:30',
        end : '2019-07-01 13:30',
       editable: true
      },//可以拖动但不能缩放,但在周、日视图中是可以进行缩放的
      {
        title : '可以拖动、缩放',
        start : '2019-07-02 00:00',
        end : '2019-07-02 23:59',
        color:'red',
        editable: true
      }, //可以拖动、缩放
{ title : 'event 2', start : '2019-07-02', end : '2019-07-02', color:'red',
editable: true },{ title: 'event 1', date: '2020-06-01', classNames:['cal'],
editable: true }, { start: '2020-07-24', end: '2020-07-28', overlap: false, display: 'background', color: '#ff9f89' },//背景色 (添加相同时间的背景色时颜色会重叠) 一点要初始化日期时间 initialDate: '2020-07-10', ],![复制代码]()
- 添加约束(日程只能在设置了 groupId: 'availableForMonthStart' 中进行拖动以及缩放功能)
![复制代码]()
{ id: '添加约束', title: '添加约束', start: '2020-07-11 00:00', end: '2020-07-11 12:00', classNames: ['continuousClass'], color: '#75a7c8', editable: true, constraint: 'availableForMonthStart' }, { id: 'constraintDom', groupId: 'availableForMonthStart', start: '2020-07-11 00:00', end: '2020-07-11 23:59', display: 'background', color: '#ff9f89' }![复制代码]()
自定义事件方法(dblClick)
在日历事件方法看来难免还是会缺少部分方法的
这里我在日历源码中根据原先的点击方法中复制了一个双击事件:

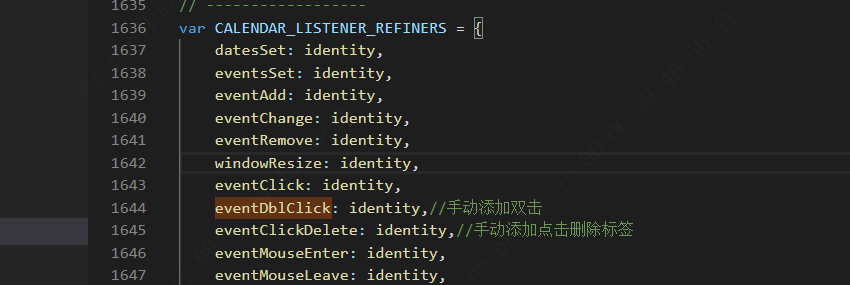
(这里根据原先的点击事件添加dblclick就可以了)

// 添加双击事件
var EventDblClicking = /** @class */ (function (_super) {
    __extends(EventDblClicking, _super);
    function EventDblClicking(settings) {
        var _this = _super.call(this, settings) || this;
        _this.handleSegClick = function (ev, segEl) {
            var component = _this.component;
            var context = component.context;
            var seg = getElSeg(segEl);
            if (seg && // might be the <div> surrounding the more link
                component.isValidSegDownEl(ev.target)) {
                // our way to simulate a link dblclick for elements that can't be <a> tags
                // grab before trigger fired in case trigger trashes DOM thru rerendering
                var hasUrlContainer = elementClosest(ev.target, '.fc-event-forced-url');
                var url = hasUrlContainer ? hasUrlContainer.querySelector('a[href]').href : '';
                context.emitter.trigger('eventDblClick', {
                    el: segEl,
                    event: new EventApi(component.context, seg.eventRange.def, seg.eventRange.instance),
                    jsEvent: ev,
                    view: context.viewApi
                });
                if (url && !ev.defaultPrevented) {
                    window.location.href = url;
                }
            }
        };
        _this.destroy = listenBySelector(settings.el, 'dblclick', '.fc-event', // on both fg and bg events
        _this.handleSegClick);
        return _this;
    }
    return EventDblClicking;
}(Interaction));
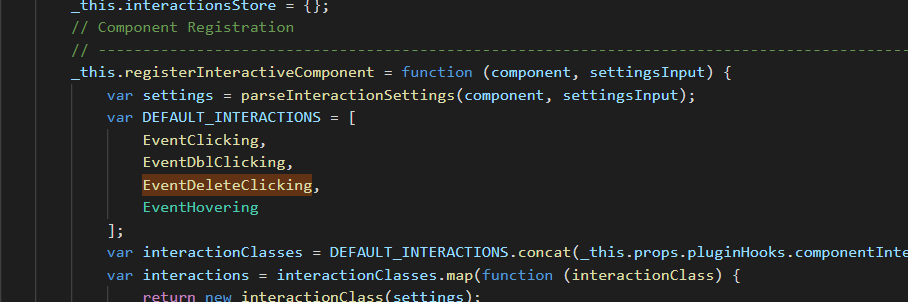
(自定义方法添加就这三个地方)
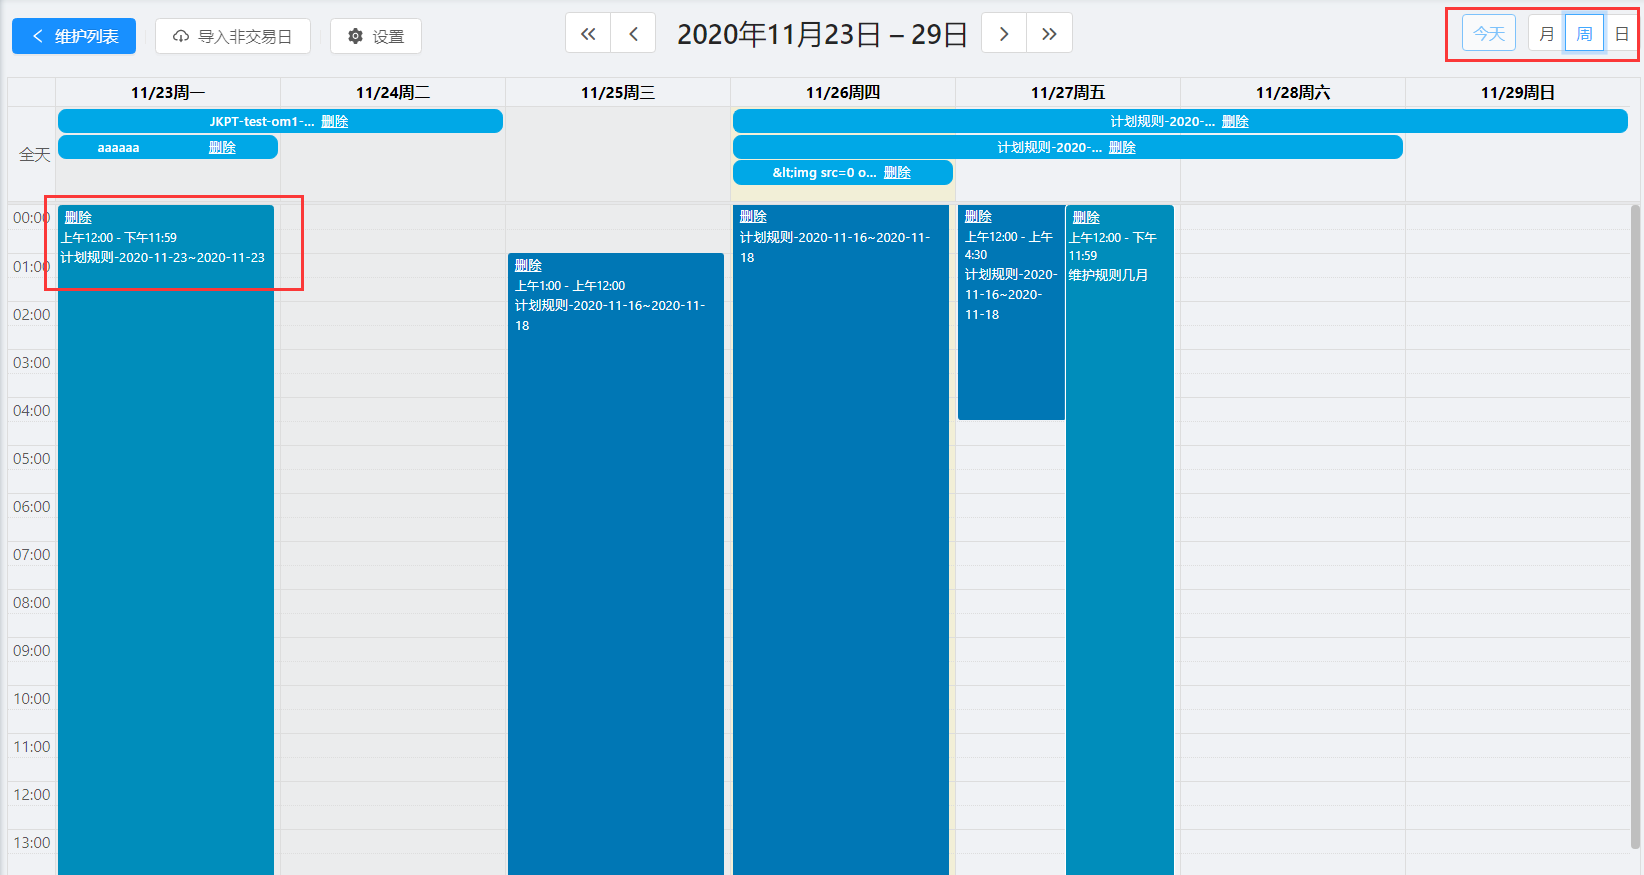
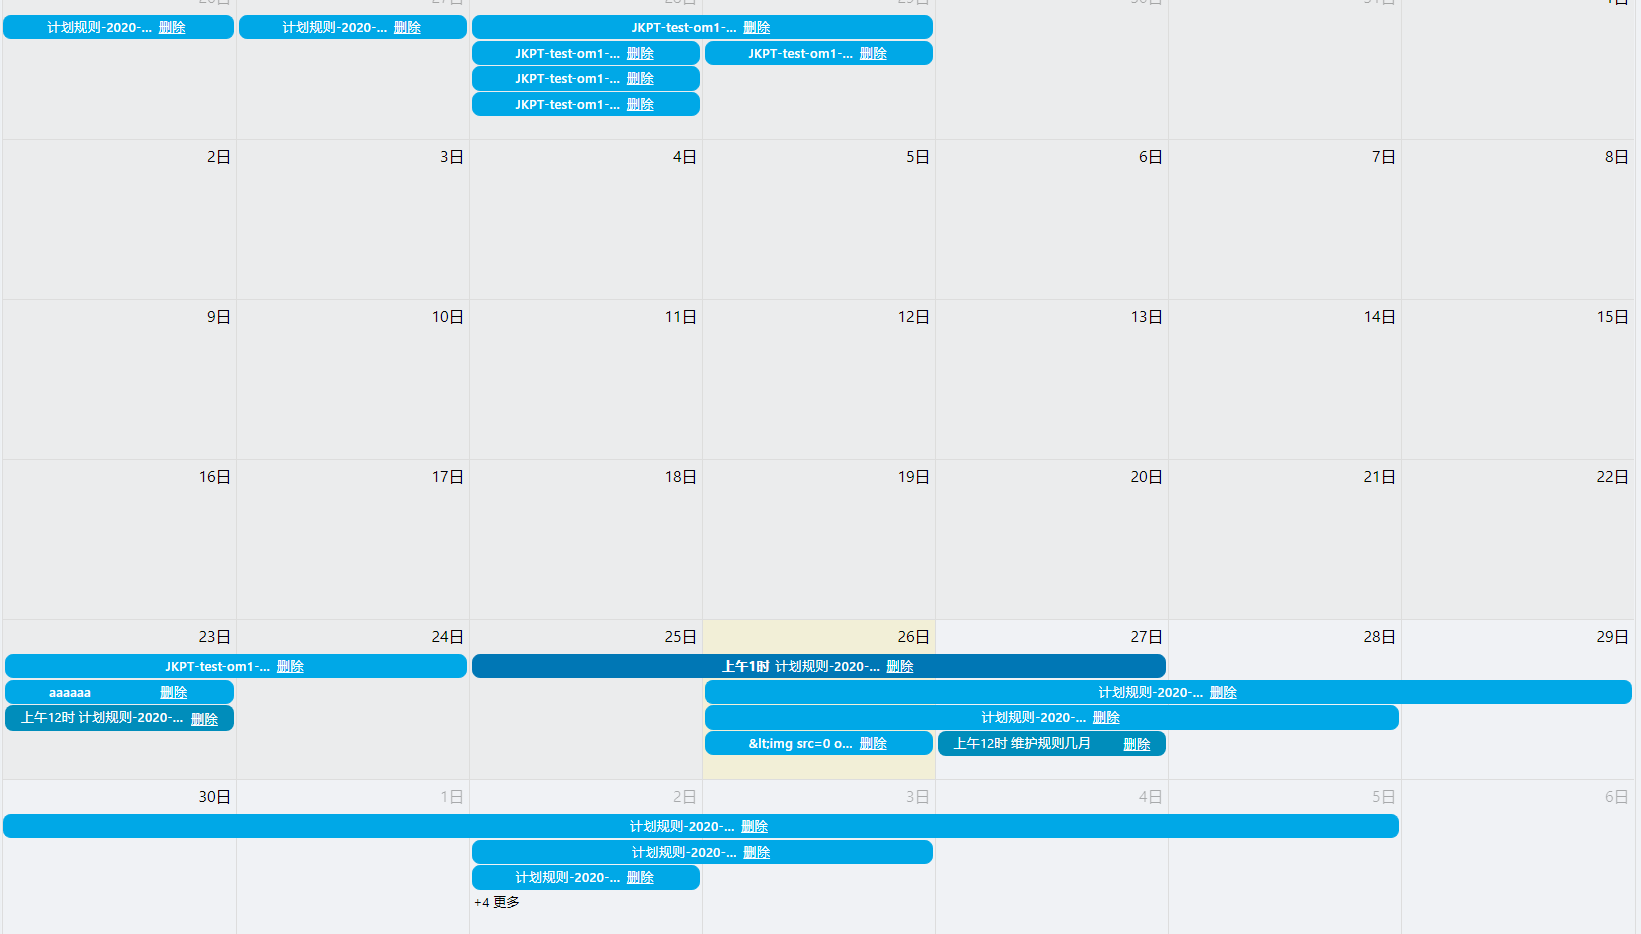
自定义删除标签:
考虑到日历日程都是遍历出来的,想通过在遍历中添加标签这方法实属麻烦
这边采用的方法是修改源码内部添加删除标签
(这边添加后唯一的问题就是这个删除标签的样式,因为他拖动或者缩放的时候还会有这个删除按钮,至于样式处理我这边就不详细弄了,因为我忘了我改了啥样式)
修改第一处(月视图):
var StandardEvent = /** @class */ (function (_super) {
    __extends(StandardEvent, _super);
    function StandardEvent() {
        return _super !== null && _super.apply(this, arguments) || this;
    }
    StandardEvent.prototype.render = function () {
        var _a = this, props = _a.props, context = _a.context;
        var seg = props.seg;
        var timeFormat = context.options.eventTimeFormat || props.defaultTimeFormat;
        var timeText = buildSegTimeText(seg, timeFormat, context, props.defaultDisplayEventTime, props.defaultDisplayEventEnd);
        return (createElement(EventRoot, { seg: seg, timeText: timeText, disableDragging: props.disableDragging, disableResizing: props.disableResizing, defaultContent: props.defaultContent || renderInnerContent, isDragging: props.isDragging, isResizing: props.isResizing, isDateSelecting: props.isDateSelecting, isSelected: props.isSelected, isPast: props.isPast, isFuture: props.isFuture, isToday: props.isToday }, function (rootElRef, classNames, innerElRef, innerContent, hookProps) { return (createElement("a", __assign({ className: props.extraClassNames.concat(classNames).join(' '), style: {
                borderColor: hookProps.borderColor,
                backgroundColor: hookProps.backgroundColor
            }, ref: rootElRef }, getSegAnchorAttrs(seg)),
            // 手动添加了删除标签
            createElement("div", { className: 'fc-eventTooltip' }),
            createElement("a", { className: 'fc-eventDeleteClick' }, '删除'),
            createElement("div", { className: 'fc-event-main', ref: innerElRef, style: { color: hookProps.textColor } }, innerContent,),

            hookProps.isStartResizable &&
                createElement("div", { className: 'fc-event-resizer fc-event-resizer-start' }),
            hookProps.isEndResizable &&
                createElement("div", { className: 'fc-event-resizer fc-event-resizer-end' },))); }));
    };
    return StandardEvent;
}(BaseComponent));
找到这部分代码,然后替换掉
修改第二处(这部分是周、日视图中的删除,本来我想把删除标签放到日程内容下面,但周视图中的样式有点搞笑,会被撑下去,至于放那里,取决你们自己了):
// 手动添加了删除标签
function renderInnerContent(innerProps) {
    return (createElement(Fragment, null,
        // createElement("div", { className: 'fc-daygrid-event-dot', style: { borderColor: innerProps.borderColor || innerProps.backgroundColor } }),
        innerProps.timeText &&
        createElement("div", { className: 'fc-eventTooltip' }),
        createElement("a", { className: 'fc-eventDeleteClick' }, '删除'),
        createElement("div", { className: 'fc-event-title' }, innerProps.event.title || createElement(Fragment, null, "\u00A0")),
            createElement("div", { className: 'fc-event-time' }, innerProps.timeText)));
}
(替换掉后,是没有点击事件的,同上方自定义点击事件一样自己自定义就好了,这边提示一下:不是所有随便一个标签添加自定义事件都能成功的)
效果图:
这边我推荐几个方法来修改样式(这几个方法都可以操作日程中的样式 ):
eventDidMount: this.eventDidMount,// 渲染时
eventDragStart: this.eventDragStart, // 日程开始拖拽时触发
eventDragStop: this.eventDragStop, // 日程拖拽结束时触发
eventResizeStart: this.eventResizeStart, // 日程大小调整开始时触发
eventResizeStop: this.eventResizeStop, // 日程大小调整结束时触发
日历选中方法(这里添加了一个选中日历格后再次点击日历个后新增<双击日历格>):
select: this.handleDateSelect
// 选中日历格快速新增
    handleDateSelect (selectInfo) {
      console.log(selectInfo)
      console.log(selectInfo.jsEvent.timeStamp)
      // 当点击两次同日历格时判断(要第一次点击选中之后在点击才会生效)
      if ((moment(selectInfo.endStr).valueOf() - moment(selectInfo.startStr).valueOf() === 86400000 &&
        moment(selectInfo.startStr).valueOf() >= moment(moment().format('YYYY-MM-DD')).valueOf() &&
        selectInfo.view.type === 'dayGridMonth') ||
        ((selectInfo.view.type === 'timeGridWeek' || selectInfo.view.type === 'timeGridDay') &&
          moment(selectInfo.startStr).valueOf() >= moment(moment().format('YYYY-MM-DD')).valueOf() &&
          (selectInfo.allDay ? (moment(selectInfo.endStr).valueOf() - moment(selectInfo.startStr).valueOf() === 86400000)
            : (moment(selectInfo.end).valueOf() - moment(selectInfo.start).valueOf() > 1800000))
        )) {
        let temporaryTime = {}
        temporaryTime = {
          timeStamp: selectInfo.jsEvent.timeStamp,
          timeString: moment(selectInfo.start).format('YYYY-MM-DD')
        }
        // 第一次点击时获取选中
        if (this.selectTimeStamp.length === 0) {
          this.selectTimeStamp.push({
            timeStamp: selectInfo.jsEvent.timeStamp,
            timeString: moment(selectInfo.start).format('YYYY-MM-DD')
          })
        } else {
          // 第二次点击时判断是否和第一次一样,不一样就删除第一次的,添加第二次的
          this.selectTimeStamp.forEach(item => {
            if (item.timeString === temporaryTime.timeString) {
              //内容
            } else {
              this.selectTimeStamp.splice(this.selectTimeStamp.findIndex(event => event.timeString === item.timeString), 1)
              this.selectTimeStamp.push({
                timeStamp: selectInfo.jsEvent.timeStamp,
                timeString: moment(selectInfo.start).format('YYYY-MM-DD')
              })
            }
          })
        }
      }
      // 判断过去时间不能新增
      if ((moment(selectInfo.endStr).valueOf() - moment(selectInfo.startStr).valueOf() > 86400000 &&
        moment(selectInfo.startStr).valueOf() < moment(moment().format('YYYY-MM-DD')).valueOf() &&
        selectInfo.view.type === 'dayGridMonth') ||
        ((selectInfo.view.type === 'timeGridWeek' || selectInfo.view.type === 'timeGridDay') &&
          moment(selectInfo.startStr).valueOf() < moment(moment().format('YYYY-MM-DD')).valueOf() &&
          (selectInfo.allDay ? (moment(selectInfo.endStr).valueOf() - moment(selectInfo.startStr).valueOf() > 86400000)
            : (moment(selectInfo.end).valueOf() - moment(selectInfo.start).valueOf() > 1800000))
        )) {
        this.$confirm({
          title: '提示',
          content: '过去时间不能进行新增!',
          okText: '确定',
          cancelText: '取消',
          onOk () {
          }
        })
      }
      // 判断获取的时间大于当前、以及两天以上
      if ((moment(selectInfo.endStr).valueOf() - moment(selectInfo.startStr).valueOf() > 86400000 &&
        moment(selectInfo.startStr).valueOf() >= moment(moment().format('YYYY-MM-DD')).valueOf() &&
        selectInfo.view.type === 'dayGridMonth') ||
        ((selectInfo.view.type === 'timeGridWeek' || selectInfo.view.type === 'timeGridDay') &&
          moment(selectInfo.startStr).valueOf() >= moment(moment().format('YYYY-MM-DD')).valueOf() &&
          (selectInfo.allDay ? (moment(selectInfo.endStr).valueOf() - moment(selectInfo.startStr).valueOf() > 86400000)
            : (moment(selectInfo.end).valueOf() - moment(selectInfo.start).valueOf() > 1800000))
        )) {
        //内容
      }
    },
效果图:
这里我给到一个文档的参考event事件钩子:
Events and Hooks
- event-selected(event, jsEvent, view) - Triggered on eventClick()
- event-mouseover(event, jsEvent, view) - Triggered on eventMouseover()
- event-mouseout(event, jsEvent, view) - Triggered on eventMouseout()
- event-drop(event) - Triggered on eventDrop()
- event-resize(event) - Triggered on eventResize()
- event-created(event) - Triggered on select()
- event-receive(event) - Triggered on eventReceive()
- event-render(event) - Triggered on eventRender()
- view-render(view, element) - Triggered on viewRender()
- day-click(date, jsEvent, view) - Triggered on dayClick()
扩展--------------------------------------------
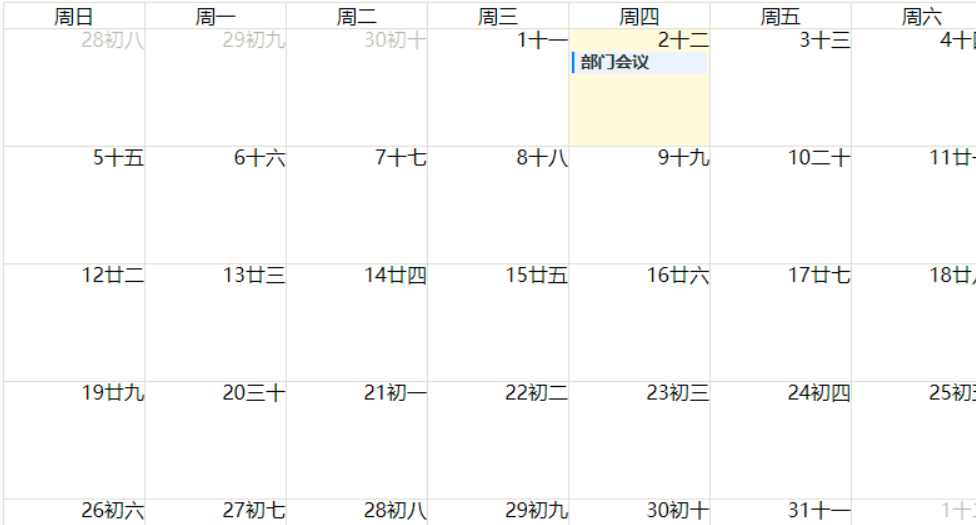
1、月视图增加农历
calendarOptions中增加views数据;
通过dayCellContent来设置日期里显示的数据;
引入calendar.js计算农历 https://github.com/jjonline/calendar.js;
import calenderFormate from "../utils/calendar" //农历计算方法
import {formatDate} from "../utils/index" //将日期对象转换成 2020-01-01 格式的日期

//data中calendarOptions修改:
calendarOptions: {
    views:{
        //对应月视图
        dayGridMonth:{
            displayEventTime:false,//是否显示时间
            dayCellContent(item){
              let _date=formatDate(item.date).split('-')
              let _dateF=calenderFormate.solar2lunar(_date[0],_date[1],_date[2])
              return {html:`<p><label>${_dateF.cDay}</label><span>${_dateF.IDayCn}</span></p>`}
        },
    }
   },
}
2、周视图增加农历
在前面的基础上修改views;
在dayHeaderContent中设置显示数据;
views: {
    //对应周视图调整
     timeGridWeek:{
     slotMinTime:"09:00",//周视图开始时间
     slotMaxTime:"20:00",//周视图结束时间
     displayEventTime:false,//是否显示时间
     dayHeaderContent(item){
         let _date=formatDate(item.date).split('-')
         let _dateF=calenderFormate.solar2lunar(_date[0],_date[1],_date[2])
         return {html:`<h3>${_dateF.ncWeek.slice(2)}</h3><p><label>${_dateF.cDay}</label><span>${_dateF.IDayCn}</span></p>`}
     }
  }
}
效果图:
推荐参考的文档:
https://fullcalendar.io/
https://www.npmjs.com/package/vue-full-calendar
https://blog.csdn.net/supingemail/article/details/48371927
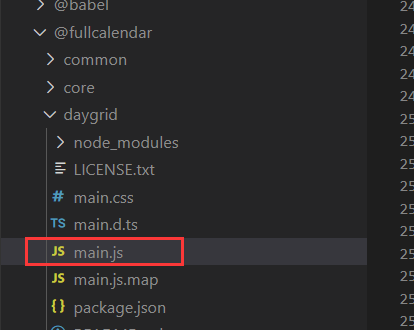
(这里我提一下,一般在git提交代码的时候,修改的源码是不能提上去的,要手动打包过去)
(这边我暂时就添加了我个人觉得够用的,只是部分没详细解释,我想起来的话会更新的,如果有什么问题可以在下面留言)
全中文API翻译:https://www.cnblogs.com/zhangruisoldier/p/7985202.html

 浙公网安备 33010602011771号