实用指南:鸿蒙NEXT系列之鸿蒙NDK UI 初探
鸿蒙NDK UI初探
〇、前言
如果屏幕前的你经常前往华为鸿蒙开发者官网查询资料,就不难发现最新的开发指南的目录中,ArkUI(方舟UI框架) 一节出现如下图的新变化: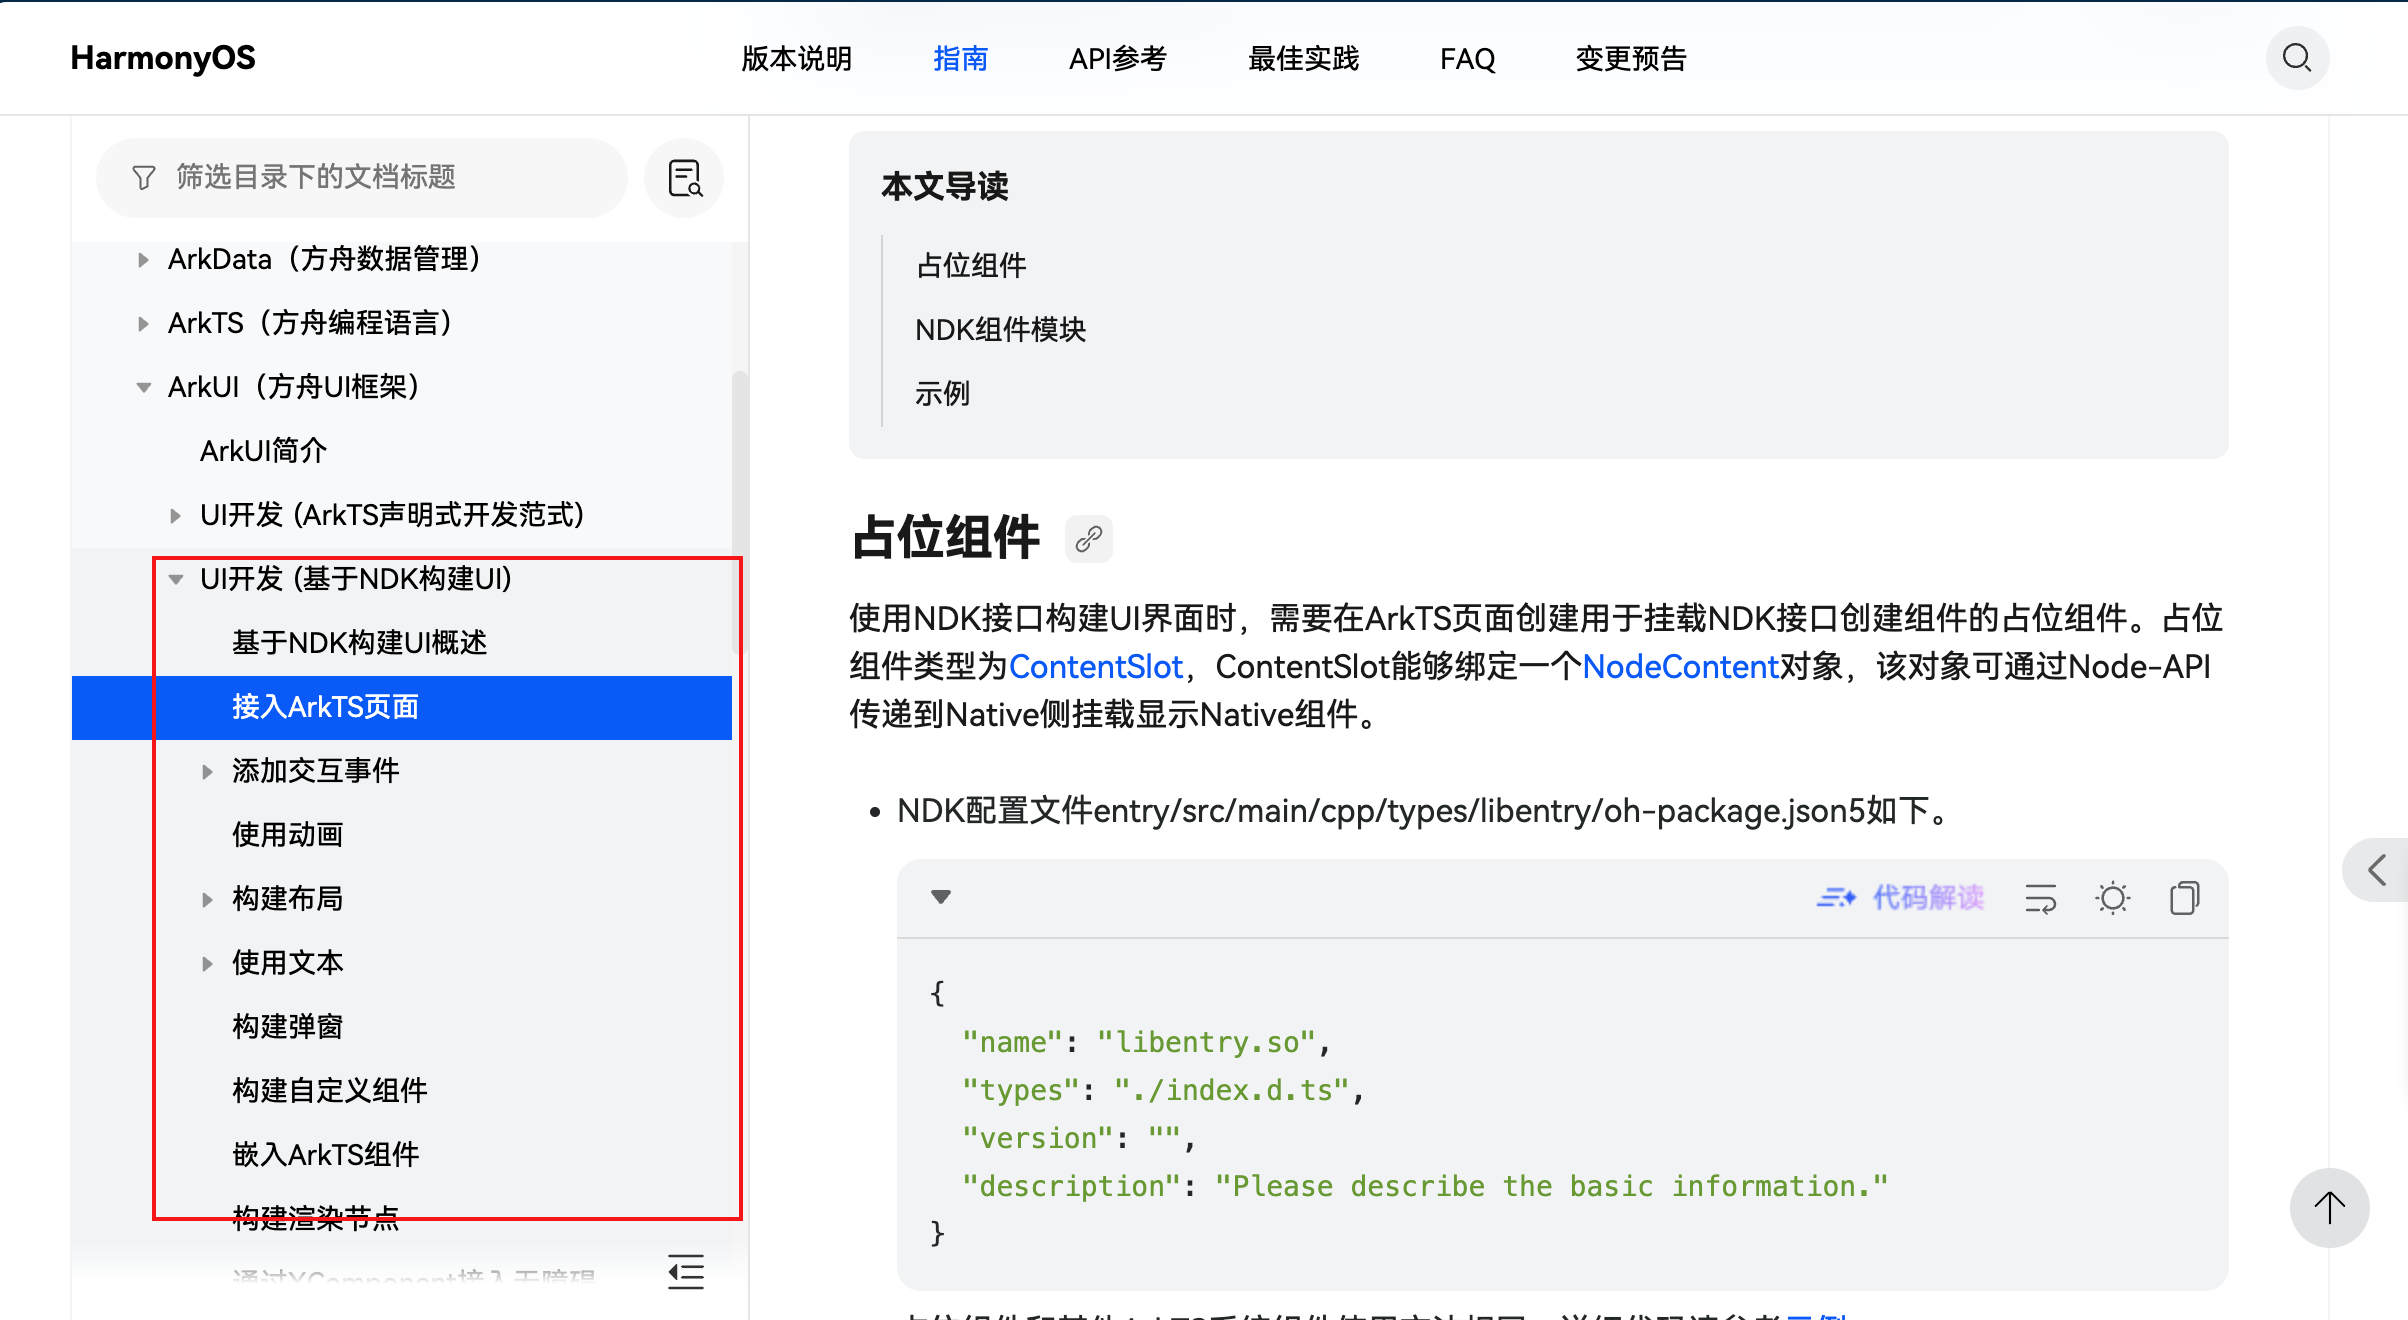
在此之前,鸿蒙应用的UI 主要用 ArkTS 代码,或者是兼容JS的类 Web 开发,这两种方式,并不支持使用 C++ 代码去实现鸿蒙 UI,也就是说,在之前的原生开发方式中,并不包含 UI 的构建,仅仅只是不涉及用户视图界面的功能性API的封装。
现在,随着鸿蒙生态的逐渐完善,以及 API 的更新迭代,已经支持使用 C++ 代码去构建应用界面,这使得鸿蒙原生开发能力进一步加强,而构建UI的灵活度也进一步得到释放,总的来说,鸿蒙API的这种新特性,是每个想成为优秀的鸿蒙开发工程师的开发者所必需了解和掌握的,刚好,本人最近入手了鸿蒙PC,接下来,就以鸿蒙PC 为适配设备,进行鸿蒙NDK UI 的实践。
一、NDK UI 整体架构
如何创建一个用于原生开发的鸿蒙项目,这里就不进行展开了,因为只需在用 DevEco Studio 创建项目时,选择 Native C++ 项目模板即可: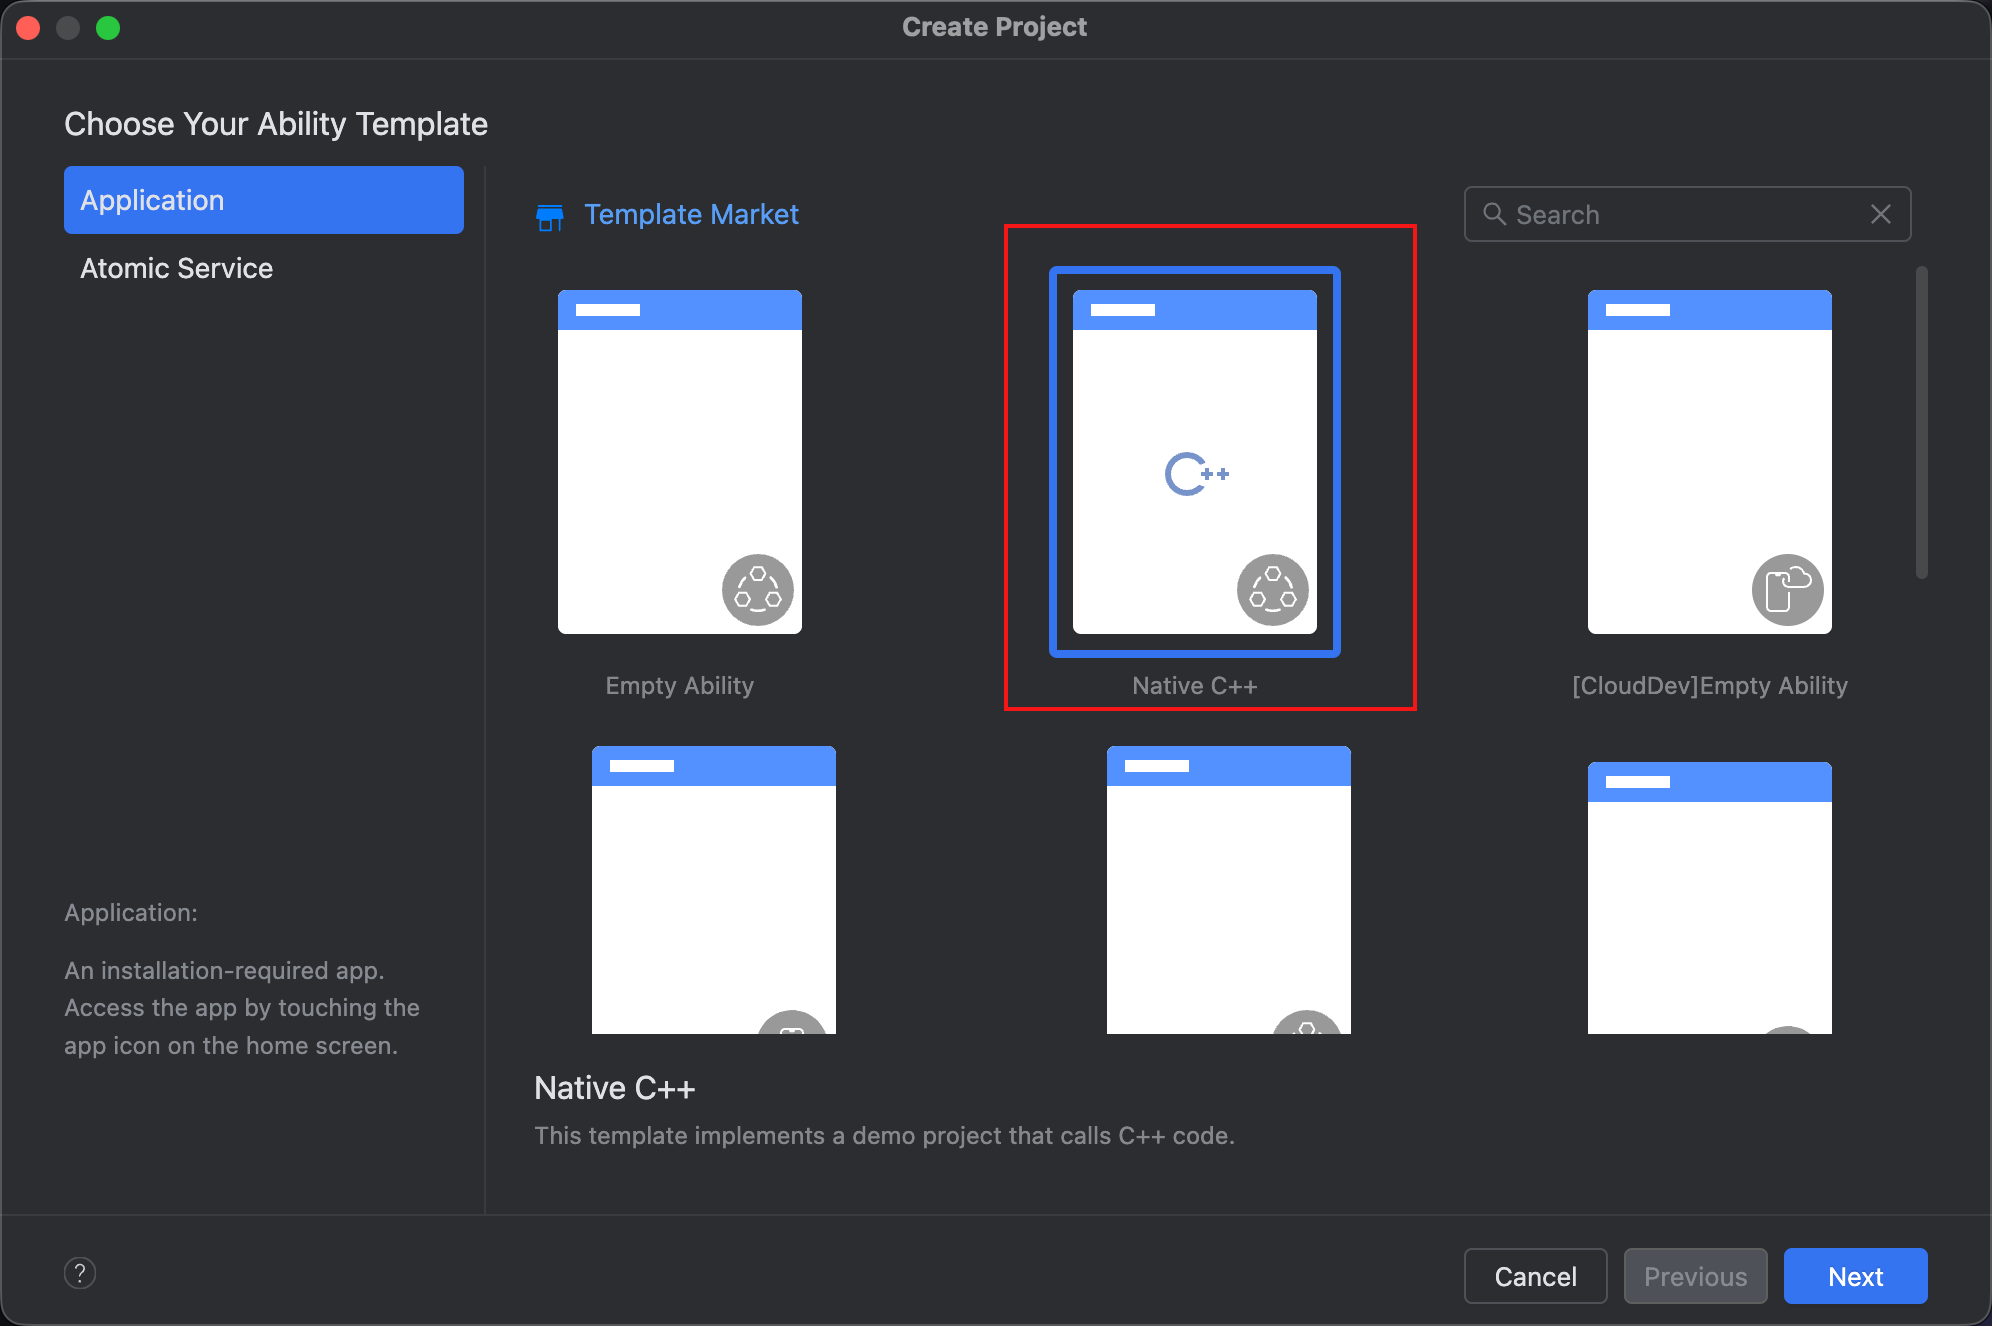
NDK UI 的具体运作,离不开 ArkTS 层的配合,具体配合详见下面的架构图: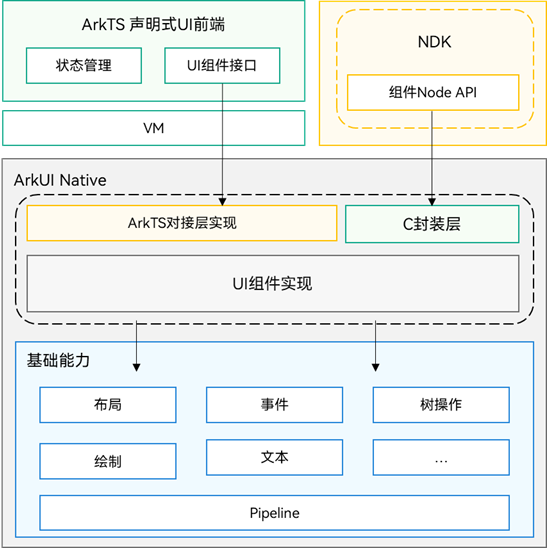
与 ArkUI 一样,NDK UI 的实现过程中,也是逐个组件拼装出完整的页面,而每个 NDK UI 组件需要通过接口挂载到UI渲染实例中,并且,NDK UI 组件可以直接挂载到现有的 ArkUI 界面中。
ArkTS声明式UI前端和NDK接口都是针对ArkUI底层实现的接口暴露,NDK接口相比于ArkTS声明式UI前端,除了剥离状态管理等声明式UI语法外,还精简了组件能力,将ArkUI组件核心功能通过C接口进行封装暴露。
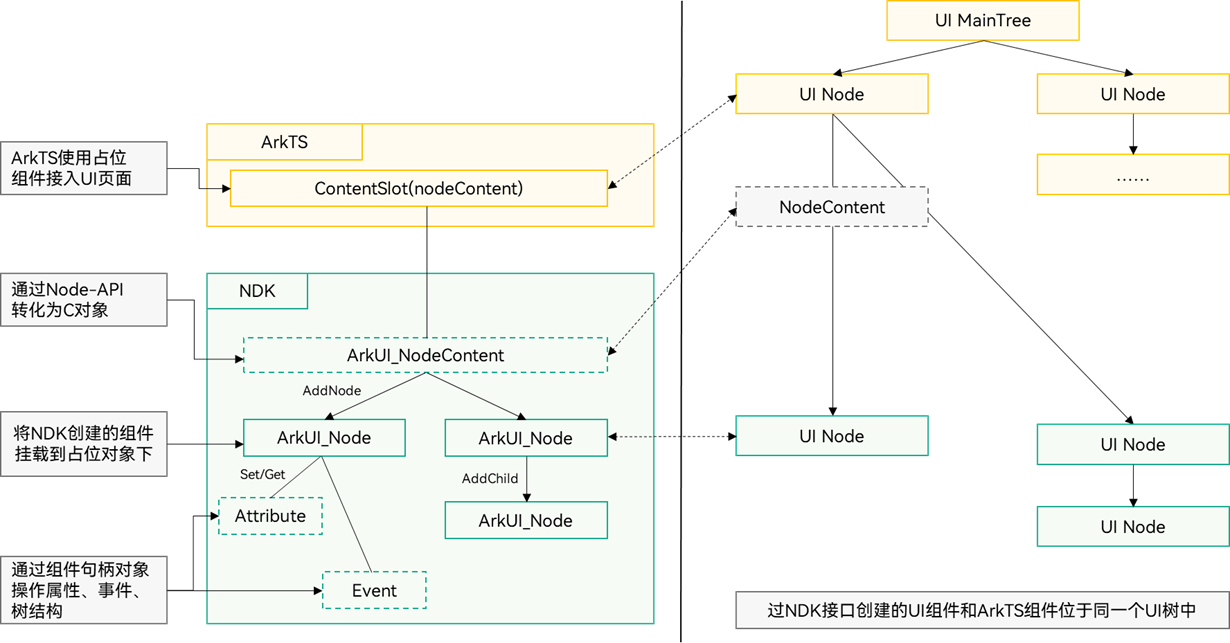
NDK创建的UI组件需要通过ArkTS层的占位组件进行挂载显示,挂载后,NDK创建的组件和ArkTS创建的组件位于同一个UI树上,相关布局渲染和事件处理遵循相同规则。
二、实现 NDK UI 组件(节点)
下面,开始用 C++ 代码封装一个 NDK UI 组件,也即是用于挂载到 UI 树上的节点,相应的源码文件包含如下:
.
|——cpp
|    |——types
|    |      |——libentry
|    |      |       |——index.d.ts 提供Native和ArkTS侧的桥接方法。
|    |——napi_init.cpp 与index.d.ts对应的桥接方法对接Native侧的定义处。
|    |——NativeEntry.cpp 桥接方法的Native侧实现。
|    |——NativeEntry.h 桥接方法的Native侧定义。
|    |——CMakeList.txt C语言库引用文件。
|    |——ArkUIBaseNode.h 节点封装扩展类。
|    |——ArkUINode.h 节点封装扩展类。
|    |——ArkUIListNode.h 节点封装扩展类。
|    |——ArkUIListItemNode.h 节点封装扩展类。
|    |——ArkUITextNode.h 节点封装扩展类。
|    |——NormalTextListExample.h 示例代码文件。
|
|——ets
|    |——pages
|         |——Index.ets 应用起始页,用于放置按钮跳转到演示页。
|         |——NativeListPage.ets NDK UI 组件演示页,加载承载Native的容器。
|
1、注册并实现接口
UI 节点,能挂到 UI 树上,就也要能从UI树上摘除,类似于一个文件必然有打开和关闭两种动作,所以,我们需要两个接口去分别实现节点挂载和摘除:
export const createNativeRoot: (content: Object) => void;
export const destroyNativeRoot: () => void;
将上述接口声明代码,添加到 C++ 模块的 src/main/cpp/types/libentry/Index.d.ts 文件中,同时,打开 src/main/cpp/napi_init.cpp 文件,修改 napi_property_descriptor 数组,将上面的新接口关联起来:
EXTERN_C_START
static napi_value Init(napi_env env, napi_value exports)
{
napi_property_descriptor desc[] = {
{ "add", nullptr, Add, nullptr, nullptr, nullptr, napi_default, nullptr },
{"createNativeRoot", nullptr, NativeModule::CreateNativeRoot, nullptr, nullptr, nullptr, napi_default, nullptr},
{"destroyNativeRoot", nullptr, NativeModule::DestroyNativeRoot, nullptr, nullptr, nullptr, napi_default, nullptr}
};
napi_define_properties(env, exports, sizeof(desc) / sizeof(desc[0]), desc);
return exports;
}
EXTERN_C_END
在 C++ 模块的源码目录 cpp 下面新建一个 NativeEntry.h 和 NativeEntry.cpp 文件:
1.1、NativeEntry.h
/*
* Copyright (c) 2025 彭友聪
* nativePC is licensed under Mulan PSL v2.
* You can use this software according to the terms and conditions of the Mulan PSL v2.
* You may obtain a copy of Mulan PSL v2 at:
http://license.coscl.org.cn/MulanPSL2
* THIS SOFTWARE IS PROVIDED ON AN "AS IS" BASIS, WITHOUT WARRANTIES OF ANY KIND,
* EITHER EXPRESS OR IMPLIED, INCLUDING BUT NOT LIMITED TO NON-INFRINGEMENT,
* MERCHANTABILITY OR FIT FOR A PARTICULAR PURPOSE.
* See the Mulan PSL v2 for more details.
*
* Author: 彭友聪
* email:2923616405@qq.com
* date: 2025/10/8 08:46
* file: ${FILE_NAME}
* product: DevEco Studio
* LICENSE: MulanPSL-2.0
* */
//
// Created on 2025/10/8.
//
// Node APIs are not fully supported. To solve the compilation error of the interface cannot be found,
// please include "napi/native_api.h".
#ifndef NATIVEPC_NATIVEENTRY_H
#define NATIVEPC_NATIVEENTRY_H
#include "napi/native_api.h"
#include <ArkUIBaseNode.h>
  #include <arkui/native_node.h>
    #include <arkui/native_type.h>
      #include <js_native_api_types.h>
        namespace NativeModule {
        napi_value CreateNativeRoot(napi_env env, napi_callback_info info);
        napi_value DestroyNativeRoot(napi_env env, napi_callback_info info);
        }
        class NativeEntry {
        private:
        std::shared_ptr<NativeModule::ArkUIBaseNode> root_;
          ArkUI_NodeContentHandle handle_;
          public:
          static NativeEntry *GetInstance() {
          static NativeEntry nativeEntry;
          return &nativeEntry;
          }
          void SetContentHandle(ArkUI_NodeContentHandle handle) {
          handle_ = handle;
          }
          void SetRootNode(const std::shared_ptr<NativeModule::ArkUIBaseNode> &root) {
            root_ = root;
            // 添加 Native 组件到 NodeContent 上用于挂载显示
            OH_ArkUI_NodeContent_AddNode(handle_, root_->GetHandle());
            }
            void DisposeRootNode() {
            OH_ArkUI_NodeContent_RemoveNode(handle_, root_->GetHandle());
            root_.reset();
            }
            };
            #endif //NATIVEPC_NATIVEENTRY_H
1.2、NativeEntry.cpp
/*
* Copyright (c) 2025 彭友聪
* nativePC is licensed under Mulan PSL v2.
* You can use this software according to the terms and conditions of the Mulan PSL v2.
* You may obtain a copy of Mulan PSL v2 at:
http://license.coscl.org.cn/MulanPSL2
* THIS SOFTWARE IS PROVIDED ON AN "AS IS" BASIS, WITHOUT WARRANTIES OF ANY KIND,
* EITHER EXPRESS OR IMPLIED, INCLUDING BUT NOT LIMITED TO NON-INFRINGEMENT,
* MERCHANTABILITY OR FIT FOR A PARTICULAR PURPOSE.
* See the Mulan PSL v2 for more details.
*
* Author: 彭友聪
* email:2923616405@qq.com
* date: 2025/10/8 09:27
* file: ${FILE_NAME}
* product: DevEco Studio
* LICENSE: MulanPSL-2.0
* */
//
// Created on 2025/10/8.
//
// Node APIs are not fully supported. To solve the compilation error of the interface cannot be found,
// please include "napi/native_api.h".
#include "napi/native_api.h"
#include <arkui/native_node_napi.h>
  #include <js_native_api.h>
    #include "NativeEntry.h"
    #include "NormalTextListExample.h"
    namespace NativeModule {
    napi_value CreateNativeRoot(napi_env env, napi_callback_info info) {
    size_t argc = 1;
    napi_value args[1] = {nullptr};
    napi_get_cb_info(env, info, &argc, args, nullptr, nullptr);
    // 获取 NodeContent
    ArkUI_NodeContentHandle contentHandle;
    OH_ArkUI_GetNodeContentFromNapiValue(env, args[0], &contentHandle);
    NativeEntry::GetInstance()->SetContentHandle(contentHandle);
    // 创建文本列表
    auto list = CreateTextListExample();
    NativeEntry::GetInstance()->SetRootNode(list);
    return nullptr;
    }
    napi_value DestroyNativeRoot(napi_env env, napi_callback_info info) {
    NativeEntry::GetInstance()->DisposeRootNode();
    return nullptr;
    }
    }
这里使用到 namespace 关键字,是为了简化方法的引用,不同源码文件下的方法,可以凭借通过命名空间关联起来,具体的,参见后文中的代码。
NativeEntry 类的主要作用就是实现根节点的挂载和摘除,从而起到一个入口作用,有点类似于 ArkTS 代码中的 @Entry 装饰器的功能。
2、实现 NDK UI 节点
在这里,就是一个列表组件,即代码 auto list = CreateTextListExample(); 所引用的具体实现。
不过,在实现 CreateTextListExample() 之前,必须先将对应的组件属性方法实现一下,否则就无法进行样式,如对齐方式、背景色等进行自定义设置。
梳理一下,本文案例所使用到的 NDK UI 节点有:
1)文本节点
2)列表节点
3)列表项节点
这三类节点对应的UI组件,有些属性是共同的,比如宽高,在事件方面也是如此,比如子节点的添加和移除,总之,在具体的编码中,定义一个基类是有必要的。
2.1、定义基类 ArkUIBaseNode
定义一个 ArkUIBaseNode 类,用于实现子节点的管理:
// ArkUIBaseNode.h
#ifndef NATIVEPC_ARKUIBASENODE_H
#define NATIVEPC_ARKUIBASENODE_H
#include <arkui/native_type.h>
  #include <list>
    #include "NativeModule.h"
    namespace NativeModule {
    class ArkUIBaseNode {
    protected:
    // 针对父容器子类需要重载下面的函数,实现组件挂载和卸载。
    virtual void OnAddChild(const std::shared_ptr<ArkUIBaseNode> &child) {}
      virtual void OnRemoveChild(const std::shared_ptr<ArkUIBaseNode> &child) {}
        virtual void OnInsertChild(const std::shared_ptr<ArkUIBaseNode> &child, int32_t index) {}
          ArkUI_NodeHandle handle_;
          ArkUI_NativeNodeAPI_1 *nativeModule_ = nullptr;
          private:
          std::list<std::shared_ptr<ArkUIBaseNode>> children_;
            public:
            explicit ArkUIBaseNode(ArkUI_NodeHandle handle)
            : handle_(handle), nativeModule_(NativeModuleInstance::GetInstance()->GetNativeNodeAPI()) {}
            virtual ~ArkUIBaseNode() {
            // 封装析构函数,实现子节点移除功能
            if (!children_.empty()) {
            for (const auto &child : children_) {
            nativeModule_->removeChild(handle_, child->GetHandle());
            }
            children_.clear();
            }
            // 封装析构函数,统一回收节点资源
            nativeModule_->disposeNode(handle_);
            }
            void AddChild(const std::shared_ptr<ArkUIBaseNode> &child){
              children_.emplace_back(child);
              OnAddChild(child);
              }
              void RemoveChild(const std::shared_ptr<ArkUIBaseNode> &child) {
                children_.remove(child);
                OnRemoveChild(child);
                }
                void InsertChild(const std::shared_ptr<ArkUIBaseNode> &child, int32_t index) {
                  if (index >= children_.size()) {
                  AddChild(child);
                  } else {
                  auto iter = children_.begin();
                  std::advance(iter, index);
                  children_.insert(iter, child);
                  OnInsertChild(child, index);
                  }
                  }
                  ArkUI_NodeHandle GetHandle() const { return handle_; }
                  };
                  } // namespace NativeModule
                  #endif // NATIVEPC_ARKUIBASENODE_H
ArkUIBaseNode 的构造函数所引用的 NativeModuleInstance,是通过如下代码实现的:
//NativeModule.h
#ifndef NATIVEPC_NATIVEMODULE_H
#define NATIVEPC_NATIVEMODULE_H
#include <arkui/native_node.h>
  #include <cassert>
    #include <arkui/native_interface.h>
      namespace NativeModule {
      class NativeModuleInstance {
      public:
      static NativeModuleInstance *GetInstance() {
      static NativeModuleInstance instance;
      return &instance;
      }
      NativeModuleInstance() {
      // 获取NDK接口的函数指针结构体对象,用于后续操作。
      OH_ArkUI_GetModuleInterface(ARKUI_NATIVE_NODE, ArkUI_NativeNodeAPI_1, arkUINativeNodeApi_);
      assert(arkUINativeNodeApi_);
      }
      // 暴露给其他模块使用。
      ArkUI_NativeNodeAPI_1 *GetNativeNodeAPI() { return arkUINativeNodeApi_; }
      private:
      ArkUI_NativeNodeAPI_1 *arkUINativeNodeApi_ = nullptr;
      };
      }
      #endif //NATIVEPC_NATIVEMODULE_H
主要用于获取原生模块示例,从而进行原生模块API的调用。
2.2、定义UI属性基类
通过继承 ArkUIBaseNode 类的方式,再定一个实现公共属性设置方法的属性基类 ArkUINode:
// ArkUINode.h
ifndef NATIVEPC_ARKUINODE_H
#define NATIVEPC_ARKUINODE_H
#include "ArkUIBaseNode.h"
#include "NativeModule.h"
#include <arkui/native_node.h>
  #include <arkui/native_type.h>
    namespace NativeModule {
    class ArkUINode : public ArkUIBaseNode {
    protected:
    // 组件树操作的实现类对接。
    void OnAddChild(const std::shared_ptr<ArkUIBaseNode> &child) override {
      nativeModule_->addChild(handle_, child->GetHandle());
      }
      void OnRemoveChild(const std::shared_ptr<ArkUIBaseNode> &child) override {
        nativeModule_->removeChild(handle_, child->GetHandle());
        }
        void OnInsertChild(const std::shared_ptr<ArkUIBaseNode> &child, int32_t index) override {
          nativeModule_->insertChildAt(handle_, child->GetHandle(), index);
          }
          public:
          explicit ArkUINode(ArkUI_NodeHandle handle) : ArkUIBaseNode(handle){}
          ~ArkUINode() override {};
          // NDK 相关通用属性调用封装
          void SetWidth(float width) {
          assert(handle_);
          ArkUI_NumberValue value[] = {{.f32 = width}};
          ArkUI_AttributeItem item = {value, 1};
          nativeModule_->setAttribute(handle_, NODE_WIDTH, &item);
          }
          void SetPercentWidth(float percent) {
          assert(handle_);
          ArkUI_NumberValue value[] = {{.f32 = percent}};
          ArkUI_AttributeItem item = {value, 1};
          nativeModule_->setAttribute(handle_, NODE_WIDTH_PERCENT, &item);
          }
          void SetHeight(float height) {
          assert(handle_);
          ArkUI_NumberValue value[] = {{.f32 = height}};
          ArkUI_AttributeItem item = {value, 1};
          nativeModule_->setAttribute(handle_, NODE_HEIGHT, &item);
          }
          void SetPercentHeight(float percent) {
          assert(handle_);
          ArkUI_NumberValue value[] = {{.f32 = percent}};
          ArkUI_AttributeItem item = {value, 1};
          nativeModule_->setAttribute(handle_, NODE_HEIGHT_PERCENT, &item);
          }
          void SetBackgroundColor(uint32_t color) {
          assert(handle_);
          ArkUI_NumberValue value[] = {{.u32 = color}};
          ArkUI_AttributeItem item = {value, 1};
          nativeModule_->setAttribute(handle_, NODE_BACKGROUND_COLOR, &item);
          }
          void SetItemAlign(ArkUI_ItemAlignment align) {
          assert(handle_);
          ArkUI_NumberValue value[] = {{.i32 = align}};
          ArkUI_AttributeItem item = {value, 1};
          nativeModule_->setAttribute(handle_, NODE_ALIGN_RULES, &item);
          }
          void SetListItemAlign(ArkUI_ListItemAlignment align) {
          assert(handle_);
          ArkUI_NumberValue value[] = {{.i32 = align}};
          ArkUI_AttributeItem item = {value, 1};
          nativeModule_->setAttribute(handle_, NODE_LIST_ALIGN_LIST_ITEM, &item);
          }
          };
          }
          #endif //NATIVEPC_ARKUINODE_H
2.3、实现文本节点
用于演示的 NDK UI 组件——list 组件,列表项中用到了文本,所以,需要一个文本节点去展示对应文本:
//ArkUITextNode.h
#ifndef NATIVEPC_ARKUITEXTNODE_H
#define NATIVEPC_ARKUITEXTNODE_H
#include "ArkUINode.h"
#include <string>
  namespace NativeModule {
  class ArkUITextNode : public ArkUINode {
  public:
  ArkUITextNode()
  : ArkUINode((NativeModuleInstance::GetInstance()->GetNativeNodeAPI())->createNode(ARKUI_NODE_TEXT)) {}
  // 文本属性NDK接口封装。
  void SetFontSize(float fontSize) {
  assert(handle_);
  ArkUI_NumberValue value[] = {{.f32 = fontSize}};
  ArkUI_AttributeItem item = {value, 1};
  nativeModule_->setAttribute(handle_, NODE_FONT_SIZE, &item);
  }
  void SetFontColor(uint32_t color) {
  assert(handle_);
  ArkUI_NumberValue value[] = {{.u32 = color}};
  ArkUI_AttributeItem item = {value, 1};
  nativeModule_->setAttribute(handle_, NODE_FONT_COLOR, &item);
  }
  void SetTextContent(const std::string &content) {
  assert(handle_);
  ArkUI_AttributeItem item = {nullptr, 0, content.c_str()};
  nativeModule_->setAttribute(handle_, NODE_TEXT_CONTENT, &item);
  }
  void SetTextAlign(ArkUI_TextAlignment align) {
  assert(handle_);
  ArkUI_NumberValue value[] = {{.i32 = align}};
  ArkUI_AttributeItem item = {value, 1};
  nativeModule_->setAttribute(handle_, NODE_TEXT_ALIGN, &item);
  }
  };
  }
  #endif //NATIVEPC_ARKUITEXTNODE_H
2.4、实现列表节点
这里为了体现父子节点的关系,实现了一个列表节点:
//ArkUIListNode.h
#ifndef NATIVEPC_ARKUILISTNODE_H
#define NATIVEPC_ARKUILISTNODE_H
#include "ArkUINode.h"
namespace NativeModule {
class ArkUIListNode : public ArkUINode {
public:
ArkUIListNode()
: ArkUINode((NativeModuleInstance::GetInstance()->GetNativeNodeAPI())->createNode(ARKUI_NODE_LIST)) {}  // 创建ArkUI的列表组件。
// List 组件的属性NDK接口封装
void SetScrollBarState(bool isShow) {
assert(handle_);
ArkUI_ScrollBarDisplayMode displayMode =
isShow ? ARKUI_SCROLL_BAR_DISPLAY_MODE_ON : ARKUI_SCROLL_BAR_DISPLAY_MODE_OFF;
ArkUI_NumberValue value[] = {{.i32 = displayMode}};
ArkUI_AttributeItem item = {value, 1};
nativeModule_->setAttribute(handle_, NODE_SCROLL_BAR_DISPLAY_MODE, &item);
}
};
}
#endif //NATIVEPC_ARKUILISTNODE_H
列表的内容是通过其子组件列表项进行体现的,所以,定义列表节点就必须相应的定义列表项节点:
//ArkUIListItemNode.h
#ifndef NATIVEPC_ARKUILISTITEMNODE_H
#define NATIVEPC_ARKUILISTITEMNODE_H
#include "ArkUINode.h"
namespace NativeModule {
class ArkUIListItemNode: public ArkUINode {
public:
ArkUIListItemNode()
: ArkUINode((NativeModuleInstance::GetInstance()->GetNativeNodeAPI())->createNode(ARKUI_NODE_LIST_ITEM)) {}
};
}
#endif //NATIVEPC_ARKUILISTITEMNODE_H
从上面的代码可以看到,文本节点、列表节点以及列表项节点,都是直接继承 ArkUINode 类,从而间接继承 ArkUIBaseNode 类。
2.5、实现 CreateTextListExample()
CreateTextListExample() 依赖代码都准备好之后,便可以开始它本身的实现代码的编辑了:
// NormalTextListExample.h
#ifndef NATIVEPC_NORMALTEXTLISTEXAMPLE_H
#define NATIVEPC_NORMALTEXTLISTEXAMPLE_H
#include "ArkUIBaseNode.h"
#include "ArkUIListItemNode.h"
#include "ArkUIListNode.h"
#include "ArkUITextNode.h"
namespace NativeModule {
std::shared_ptr<ArkUIBaseNode> CreateTextListExample() {
  // 创建组件并挂载
  // 1:使用智能指针创建List组件。
  auto list = std::make_shared<ArkUIListNode>();
    list->SetPercentWidth(1);
    list->SetPercentHeight(1);
    list->SetScrollBarState(true);
    list->SetItemAlign(ARKUI_ITEM_ALIGNMENT_CENTER);
    list->SetListItemAlign(ARKUI_LIST_ITEM_ALIGNMENT_CENTER);
    // 2:创建ListItem子组件并挂载到List上。
    for (int32_t i = 0; i < 30; ++i) {
    auto listItem = std::make_shared<ArkUIListItemNode>();
      auto textNode = std::make_shared<ArkUITextNode>();
        textNode->SetTextContent(std::to_string(i));
        textNode->SetFontSize(16);
        textNode->SetFontColor(0xFFff00ff);
        textNode->SetPercentWidth(1);
        textNode->SetWidth(300);
        textNode->SetHeight(100);
        textNode->SetBackgroundColor(0xFFfffacd);
        textNode->SetTextAlign(ARKUI_TEXT_ALIGNMENT_CENTER);
        listItem->InsertChild(textNode, i);
        list->AddChild(listItem);
        }
        return list;
        }
        }
        #endif //NATIVEPC_NORMALTEXTLISTEXAMPLE_H
三、使用 NDK UI 组件
1、修改 CMakeLists.txt
在开始使用 NDK UI 组件之前,有个收尾工作必须完成的就是修改 CMakeLists.txt 文件:
# the minimum version of CMake.
cmake_minimum_required(VERSION 3.5.0)
project(nativePC)
set(NATIVERENDER_ROOT_PATH ${CMAKE_CURRENT_SOURCE_DIR})
if(DEFINED PACKAGE_FIND_FILE)
    include(${PACKAGE_FIND_FILE})
endif()
include_directories(${NATIVERENDER_ROOT_PATH}
                    ${NATIVERENDER_ROOT_PATH}/include)
add_library(entry SHARED napi_init.cpp NativeEntry.h NativeEntry.cpp ArkUIBaseNode.h NativeModule.h NormalTextListExample.h ArkUINode.h ArkUIListNode.h ArkUIListItemNode.h ArkUITextNode.h)
target_link_libraries(entry PUBLIC libace_napi.z.so libace_ndk.z.so)必须提醒的是,libace_ndk.z.so 一定不要忘记加上,否则就会报很多 undefined symbol,如 d.lld: error: undefined symbol: OH_ArkUI_NodeContent_AddNode。
2、NativeListPage.ets
在 src/main/ets/pages/ 目录下创建一个名称如是的文件,并编辑如下内容:
import nativeNode from 'libentry.so'
import { NodeContent, router } from '@kit.ArkUI'
@Entry
@Component
struct NativeListPage {
// 初始化 NodeContent 对象
private rootSlot = new NodeContent();
@State @Watch('changeNativeFlag') showNative: boolean = false;
changeNativeFlag() {
if(this.showNative) {
// 传递 NodeContent 对象用于 Native 创建组件的挂载显示
nativeNode.createNativeRoot(this.rootSlot)
} else {
// 销毁 NativeModule 组件
nativeNode.destroyNativeRoot()
}
}
build() {
Column({space: 15}){
Button("Back")
.height(80)
.width("30%")
.backgroundColor(Color.Black)
.fontColor(Color.White)
.onClick(() => {
router.back()
})
Button(this.showNative ? "HideNativeUI" : "showNativeUI")
.height(80)
.width("30%")
.backgroundColor(Color.Black)
.fontColor(Color.White)
.onClick(() => {
this.showNative = !this.showNative;
})
Row() {
ContentSlot(this.rootSlot)
}.width("100%")
.height("70%")
.alignItems(VerticalAlign.Center)
.justifyContent(FlexAlign.Center)
}
.width("100%")
.height("100%")
.alignItems(HorizontalAlign.Center)
.justifyContent(FlexAlign.Center)
}
}
其中,比较关键的代码是:
1)private rootSlot = new NodeContent();
2)ContentSlot(this.rootSlot)
ContentSlot 是专门用于渲染并管理Native层使用C-API创建的组件。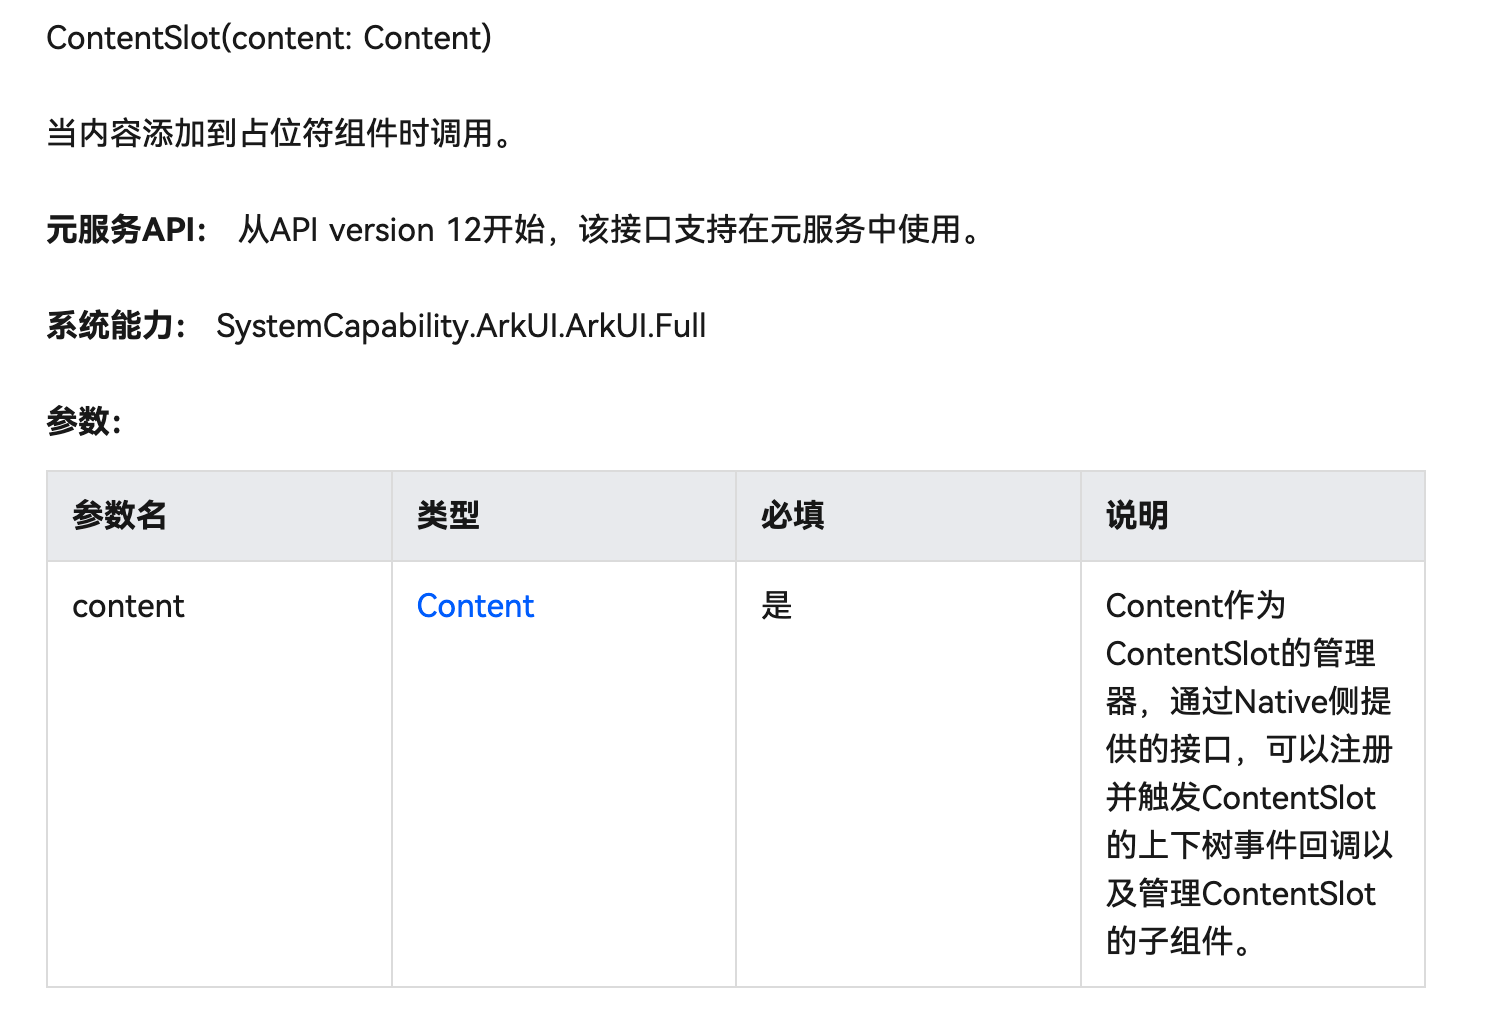
下一步,是将这个演示页的路由注册一下,就是在 src/main/resources/base/profile/main_pages.json 添加上 "pages/NativeListPage",这个路由就可以在 Index.ets 即应用入口页的跳转按钮中使用:
import { hilog } from '@kit.PerformanceAnalysisKit';
import testNapi from 'libentry.so';
import { router } from '@kit.ArkUI';
const DOMAIN = 0x0000;
@Entry
@Component
struct Index {
@State message: string = 'Hello World';
build() {
Row() {
Column({ space: 15 }) {
Text(this.message)
.fontSize($r('app.float.page_text_font_size'))
.fontWeight(FontWeight.Bold)
.onClick(() => {
this.message = 'Welcome';
hilog.info(DOMAIN, 'testTag', 'Test NAPI 2 + 3 = %{public}d', testNapi.add(2, 3));
})
Button("NativeListPage")
.height(80)
.width("30%")
.backgroundColor(Color.Black)
.fontColor(Color.White)
.onClick(() => {
router.push({ url: 'pages/NativeListPage' });
})
}
.width('100%')
}
.height('100%')
}
}
3、PC 运行效果
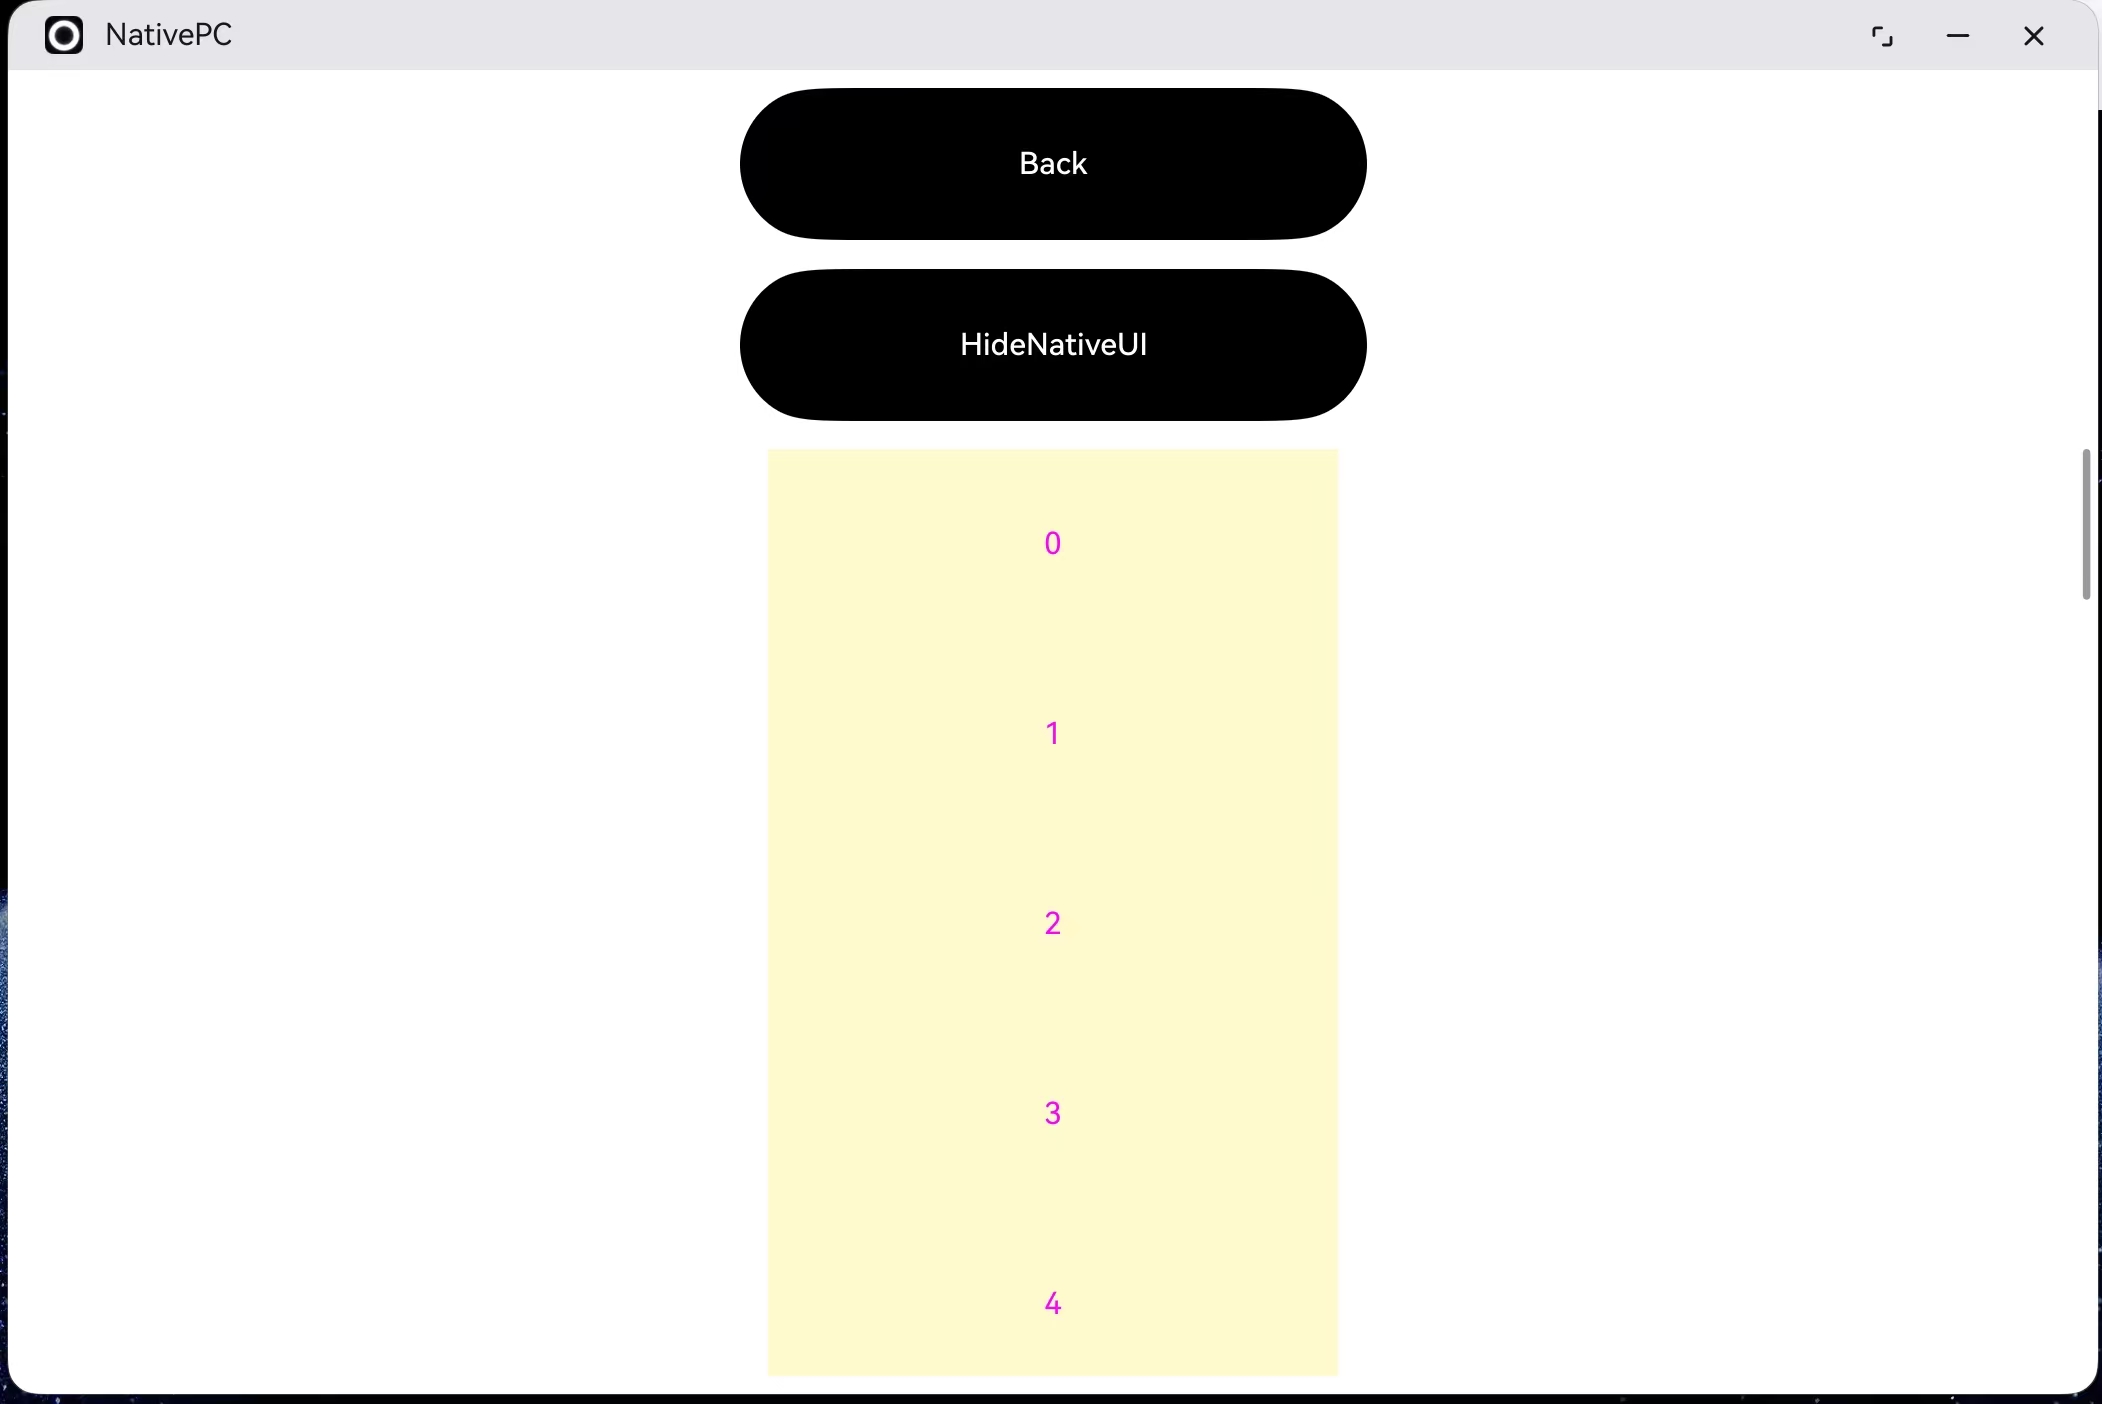
最终,部署到鸿蒙PC上的运行效果如上。
四、总结
本文主要介绍如何实现 NDK UI 并进行使用,NDK UI 是近期推出的鸿蒙 API 特性,旨在进一步强化鸿蒙平台的原生开发能力,提高UI实现的灵活度,详细阅读本文将对你的鸿蒙开发能力形成助力。

 浙公网安备 33010602011771号