

PicoContainer基础介绍
基础
这是一篇PicoContainer最重要特性的快速介绍。读完你能对PicoContainer是什么和不是什么有一个概念。
PicoContainer最重要的特性是实例化任意对象。这些通过它的API完成,这些API类似于HashTable。你向PicoContainer指定java.lang.Class对象,之后能够获得对象实例。
例子:
1. MutablePicoContainer pico = new DefaultPicoContainer();
2. pico.addComponent(ArrayList.class);
3. List list = (List) pico.getComponent(ArrayList.class);
这段代码做的事情类似如下代码:
1. List list = new ArrayList();
像这样的小例子并未展示PicoContainer的特性。只是展示了最基本的API。PicoContainer只有当大量类和接口之间存在负责依赖关系时,才能体现它的用处。
复杂依赖Juicer的例子
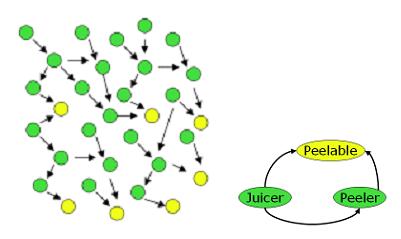
(绿色代表类,黄色代表接口)。PicoContainer通过注册类的构造方法指定依赖关系,PicoContainer可以被理解为一个通用工厂,并且可以被动态配置。PicoContainer能够实例化多个相互关联对象的复杂图关系。
写一些简单对象和接口的关联关系
上面Juicer的例子可以被转换成下述代码(我们增加了一个实现了Peelable接口的实例):

1. public interface Peelable {
2. void peel();
3. }
1. public class Apple implements Peelable {
2. public void peel() {
3. }
4. }
1. public class Peeler implements Startable {
2. private final Peelable peelable;
3.
4. public Peeler(Peelable peelable) {
5. this.peelable = peelable;
6. }
7.
8. public void start() {
9. peelable.peel();
10. }
11.
12. public void stop() {
13.
14. }
15.}
1. public class Juicer {
2. private final Peelable peelable;
3. private final Peeler peeler;
4.
5. public Juicer(Peelable peelable, Peeler peeler) {
6. this.peelable = peelable;
7. this.peeler = peeler;
8. }
9. }
装配组件
通过像这样注册类,PicoContainer对其进行了管理(注册顺序没有特别要求):
1. MutablePicoContainer pico = new DefaultPicoContainer();
2. pico.addComponent(Apple.class);
3. pico.addComponent(Juicer.class);
4. pico.addComponent(Peeler.class);
实例化组件:
通过指定,可以从PicoContainer获得指定类的实例(获得的对象之前已经注册过):
1. Juicer juicer = (Juicer) pico.getComponent(Juicer.class);
这将导致PicoContainer在这个情景下做如下事情:
1. Peelable peelable = new Apple();
2. Peeler peeler = new Peeler(peelable);
3. Juicer juicer = new Juicer(peelable, peeler);
4. return juicer;
注意PicoContainer识别出Apple是Peelable接口的实现,所以它可以被传递给Peeler和Juicer的构造函数。
容器层次结构
PicoContainer提供了对Singleton模式的一个有力替代物。通过容器层次结构,在对象实例的可见范围内,你能够创建类似Singleton的对象,并对其进行合适粒度的控制。(Singleton模式是静态和全局的。它不允许在全局范围内有多于一个的实例,并且它在全局任意地方均可见。当你试图通过它构建大型企业级应用时,这并不是非常理想。)

一个容器(和它的注册组件)能够访问其父类容器,但相反则不行。思考下面的例子,这个例子使用了上面的类:
这个例子只是为了说明问题,并不能工作!
1. // Create x hierarchy of containers
2. MutablePicoContainer x = new DefaultPicoContainer();
3. MutablePicoContainer y = new DefaultPicoContainer( x );
4. MutablePicoContainer z = new DefaultPicoContainer( y );
5.
6. // Assemble components
7. x.addComponent(Apple.class);
8. y.addComponent(Juicer.class);
9. z.addComponent(Peeler.class);
10.
11.// Instantiate components
12.Peeler peeler = (Peeler) z.getComponent(Peeler.class);
13.// WON'T WORK! peeler will be null
14.peeler = (Peeler) x.getComponent(Peeler.class);
15.// WON'T WORK! This will throw an exception
16.Juicer juicer = (Juicer) y.getComponent(Juicer.class);
这段代码可以被如下图示:

分析一下原因:
- 12行工作正常。Z能够从父容器中解析Peeler的依赖关系(Apple水果类的对象)
- 14行返回null,因为x找不到Peeler
- 16行抛出异常,因为Juicer的依赖关系Peeler不能够满足(y容器访问不到z容器)
当然上述代码显然不能工作,这只是一个说明容器层次结构如何工作的示例。
生命周期
PicoContainer支持生命周期。如果你定义的类实现了Startable接口,那么就能够通过在容器上的简单方法调用,控制这些对象的生命周期。容器的start()和stop()方法能够完成所有其所管理对象的start()和stop()方法的激活顺序。
调用容器的start()方法将调用所有容器管理对象的start()方法,用于实例化。
这意味着开始这些对象没有依赖关系,并且结束时他们拥有对其他对象的依赖。

生命周期还能作用于容器的层次结构。调用含有子容器的容器,将按广度优先顺序启动所有子容器,每个子容器启动其自己的调用。同样,调用stop()方法将导致容器层次结构中的容器按深度优先顺序依次调用其stop()过程。下图显示了当含有子容器的容器在调用其start()和stop()方法时,发生的情况。
MutablePicoContainer.start()

MutablePicoContainer.stop()

为了层次结构相关的生命周期能够工作,子容器必须被注册为其父容器的组件。仅仅创建容器时指定其父容器不能够导致父容器了解子容器。
例子:
1. MutablePicoContainer parent = new DefaultPicoContainer(new Caching());
2. MutablePicoContainer child = new DefaultPicoContainer(parent);
3. // We must let the parent container know about the child container.
4. parent.addComponent(child);
5. // This will start the parent, which will start the child.
6. parent.start();
比较使用风格
使用PicoContainer,你添加组件和获得实例可以有两种风格:
经典bean风格:
1. pico = new DefaultPicoContainer();
2. pico.addComponent(ComponentOneImpl.class) // by type
3. pico.addComponent(ComponentTwoImpl.class) // by type
4. pico.addComponent(new ComponentThreeImpl()) // by instance
5. pico.addComponent(ComponentFourImpl.class) // by type
6.
7. ComponentFourImpl four = pico.getComponent(ComponentFourImpl.class);
根据习惯,你也可以使用流畅的风格:
ComponentFour four = new DefaultPicoContainer()
.addComponent(ComponentOne.class)
.addComponent(ComponentTwo.class)
.addComponent(new ComponentThree())
.addComponent(ComponentFour.class)
.getComponent(ComponentFour.class);
说明:本文是对PicoContainer网站基础介绍原文的翻译,可能存在翻译不到位或不完整的地方,请谅解。

 浙公网安备 33010602011771号