第十七节:Vuex4.x 之Module详解(局部状态、命名空间、辅助函数等) 和 补充nexttick用法
一. Module说明
1. 什么是Module?
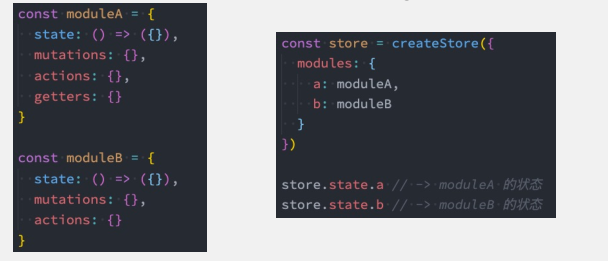
由于使用单一状态树,应用的所有状态会集中到一个比较大的对象,当应用变得非常复杂时,store 对象就有可能变得相当臃肿;
为了解决以上问题,Vuex 允许我们将 store 分割成模块(module);
每个模块拥有自己的 state、mutation、action、getter、甚至是嵌套子模块;
2. Module的命名空间
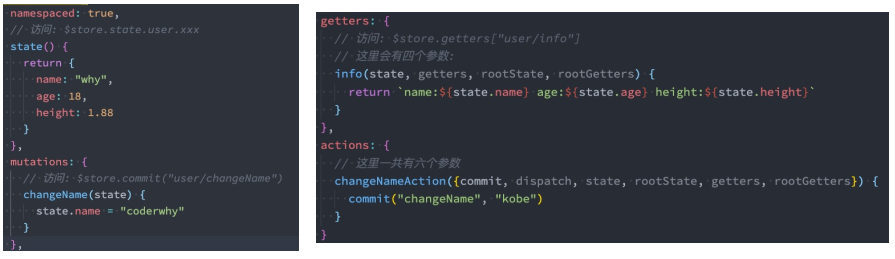
(1). 默认情况下,模块内部的action和mutation仍然是注册在全局的命名空间中的:
这样使得多个模块能够对同一个 action 或 mutation 作出响应;
getters 同样也默认注册在全局命名空间;
注:上述默认情况下,显然是不合理的,我们想达到的目的是各个模块单独调用自己的模块类的对象。
(2). 如果我们希望模块具有更高的封装度和复用性,可以添加 namespaced: true (注意是 namespaced)的方式使其成为带命名空间的模块:当模块被注册后,它的所有 getter、action 及 mutation 都会自动根据模块注册的路径调整命名;
3. 快速入门-基于$store/store用法
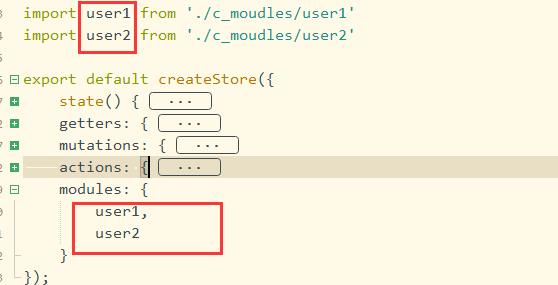
(1). 准备三个vuex文件,分别是index.js、user1.js、user2.js,其中user1.js 和 user2.js是子模块,需要在index.js中进行导入。
user1.js


const user1Module = {
    namespaced: true, //所有 getter、action 及 mutation 都会自动根据模块注册的路径调整命名
    state() {
        return {
            userCounter1: 1000
        }
    },
    getters: {
        // 访问: $store.getters['user1/getInfo'],这里的user1是指被导入的时候,modules中的命名
        // 四个参数如下
        getInfo(state, getters, rootState, rootGetters) {
            return `userCounter1:${state.userCounter1}`;
        }
    },
    mutations: {
        // 调用:$store.commit('user1/increase')
        // 第一个参数是模块的局部状态对象state
        increase(state) {
            state.userCounter1++;
        },
    },
    actions: {
        // 调用$store.dispatch('user1/increaseAction')
        // 6个参数如下
        increaseAction({ commit, dispatch, state, rootState, getters, rootGetters }) {
            setTimeout(() => {
                commit('increase')
            }, 1000);
        },
        // 子module中调用根module中的方法
        fIncrease({ commit, dispatch, state, rootState, getters, rootGetters }) {
            commit('increase', null, { root: true });
            // 或
            // dispatch('increaseAction', null, { root: true });
        }
    }
}

export default user1Module
user2.js
const user2Module = {
    namespaced: true,
    state() {
        return {
            userCounter2: 2000
        }
    },
    getters: {
        // 访问: $store.getters['user2/getInfo'],这里的user2是指被导入的时候,modules中的命名
        // 四个参数如下
        getInfo(state, getters, rootState, rootGetters) {
            return `userCounter2:${state.userCounter2}`;
        }
    },
    mutations: {
        // 调用:$store.commit('user2/increase')
        // 第一个参数是模块的局部状态对象state
        increase(state) {
            state.userCounter2++;
        }
    },
    actions: {
        // 调用$store.dispatch('user2/increaseAction')
        // 6个参数如下
        increaseAction({ commit, dispatch, state, rootState, getters, rootGetters }) {
            setTimeout(() => {
                commit('increase')
            }, 1000);
        }
    }

}

export default user2Module
index.js
import { createStore } from 'vuex';
// 导入子modules
import user1 from './c_moudles/user1'
import user2 from './c_moudles/user2'

export default createStore({
    state() {
        return {
            rootCounter: 100
        }
    },
    getters: {
        getInfo(state) {
            return `rootCounter:${state.rootCounter}`;
        }
    },
    mutations: {
        increase(state) {
            state.rootCounter++;
        }
    },
    actions: {
        increaseAction({ commit, dispatch, state, rootState, getters, rootGetters }) {
            setTimeout(() => {
                commit('increase')
            }, 1000);
        }
    },
    modules: {
        user1,
        user2
    }
});
剖析补充:
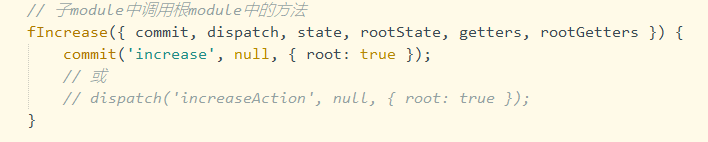
A. 子模块中增加namespaced: true,代表所有 getter、action 及 mutation 都会自动根据模块注册的路径调整命名
B. 子模块,getters中的参数为:state, getters, rootState, rootGetters;mutations中的参数为:state;actions中的参数为:{ commit, dispatch, state, rootState, getters, rootGetters }
C. 子模块中调用父模块中的 mutations 或 getters,需要增加 {root:true},如下图,其中null的位置,表示可穿参数位置。
(2). 基于$store对象进行子模块的state、getters、mutations、actions的调用。
剖析补充:
A. 子模块state的调用:$store.state.user1.userCounter1
B. 子模块getters的调用:$store.getters['user1/getInfo']
C. 子模块mutations的调用:this.$store.commit('user1/increase');
D. 子模块actions的调用:this.$store.dispatch('user1/increaseAction');
特别注意:这里的user1代表的是父模块导入子模块时,modules里注册的名称。
上述写法同样是适用于CompositionApi,只不过这里的$store对象要换成store 【 const store = useStore() 】即可。
代码分享:
<template>
    <div>
        <p>1.根模块</p>
        <h4>rootCounter:{{$store.state.rootCounter}}</h4>

        <p>2.子模块</p>
        <h4>userCounter1:{{$store.state.user1.userCounter1}}</h4>
        <h4>userCounter2:{{$store.state.user2.userCounter2}}</h4>

        <p>3.调用子模块的getters</p>
        <h4>{{$store.getters['user1/getInfo']}}</h4>
        <h4>{{$store.getters['user2/getInfo']}}</h4>

        <p>4.调用父模块的方法</p>
        <h4><button @click="fAdd()">加1</button></h4>
        <h4><button @click="fAddAction()">加1(延迟1s)</button></h4>

        <p>5.调用子模块的方法</p>
        <h4><button  @click="user1Add()">userCounter1加1</button></h4>
        <h4><button  @click="user1AddAction()">userCounter1加1(延迟1s)</button></h4>
        <h4><button  @click="user2Add()">userCounter2加1</button></h4>
        <h4><button  @click="user2AddAction()">userCounter2加1(延迟1s)</button></h4>

        <p>6.子module中调用父module的方法</p>
        <h4><button @click="test()">Test</button></h4>

    </div>
</template>

<script>
    import {mapState} from 'vuex';

    export default {
        methods:{
            fAdd(){
                this.$store.commit('increase');
            },
            fAddAction(){
                this.$store.dispatch('increaseAction');
            },
            user1Add(){
                this.$store.commit('user1/increase');
            },
            user1AddAction(){
                this.$store.dispatch('user1/increaseAction');
            },
            user2Add(){
                this.$store.commit('user2/increase');
            },
            user2AddAction(){
                this.$store.dispatch('user2/increaseAction');
            },
            test(){
                this.$store.dispatch('user1/fIncrease');
            }
        }
    }
</script>

<style scoped>
    p{
        color: #2E8B57;
        font-weight: bold;
    }
</style>
二. OptionsApi_辅助函数用法
1. 说明
通过辅助函数进行子模块的调用,主要有三种方案:
写法1:通过完整的模块空间名称来查找;(写法繁琐,不推荐)
写法2:第一个参数传入模块空间名称,后面写上要使用的属性;(推荐)
写法3:通过 createNamespacedHelpers 生成一个模块的辅助函数;
2. 实操
公用的template代码
<template>
    <div>
        <h4>userCounter1:{{userCounter1}}</h4>
        <h4>{{getInfo}}</h4>
        <h4><button @click="increase">user1加1</button></h4>
        <h4><button @click="increaseAction">user1加1(延迟1s)</button></h4>
    </div>
</template>
写法1:
    import { mapState, mapGetters, mapMutations, mapActions } from "vuex";
    export default {
        computed: {
            ...mapState({
                userCounter1: state => state.user1.userCounter1
            }),
            ...mapGetters({
                getInfo: "user1/getInfo"
            })
        },
        methods: {
            ...mapMutations({
                increase: "user1/increase"
            }),
            ...mapActions({
                increaseAction: "user1/increaseAction"
            }),
        }
    }
写法2:
        import { mapState, mapGetters, mapMutations, mapActions } from "vuex";
        export default {
            computed: {
                ...mapState('user1', ['userCounter1']),
                ...mapGetters('user1', ['getInfo'])
            },
            methods: {
                ...mapMutations('user1',['increase']),
                ...mapActions('user1',['increaseAction'])
            }
        }
写法3:
    import { createNamespacedHelpers } from "vuex";
    const { mapState, mapGetters, mapMutations, mapActions } = createNamespacedHelpers("user1")
    export default {
        computed: {
            ...mapState(['userCounter1']),
            ...mapGetters(['getInfo'])
        },
        methods: {
            ...mapMutations(['increase']),
            ...mapActions(['increaseAction'])
        }
    }
三. CompositionApi_辅助函数用法
1. 说明
这里统一采用上述的写法2(写法2:第一个参数传入模块空间名称,后面写上要使用的属性),其中useState、useGetters需要自己封装(即:传入模块名称,则调用的是子模块中的对象,如果不传,则调用的是父模块),useMutations 和 useActions直接调用返回即可。
useMapper.js
import { useStore } from 'vuex'
import {computed} from 'vue'

/*
   抽离useState和useGetters中的通用逻辑
   ①:params: 需要获取的参数名, 可以是数组,也可以是对象
   分别对应两种调用方式
   ②:fn:可以是mapGetters 或 mapState
 */
export function useMapper(params,fn) {
    const store = useStore();
    const storeStateFns = fn(params);
    const storeState={};
    Object.keys(storeStateFns).forEach(fnKey=>{
        const fn = storeStateFns[fnKey].bind({$store:store});
        storeState[fnKey]=computed(fn);
    })
    return storeState;
}
useState.js
import { mapState, createNamespacedHelpers } from 'vuex'
import { useMapper } from './useMapper'

// 下面的封装兼容了模块的写法哦,如果不兼容,直接一句调用即可
export function useState(moduleName, mapper) {
  let mapperFn = mapState
  if (typeof moduleName === 'string' && moduleName.length > 0) {
    mapperFn = createNamespacedHelpers(moduleName).mapState
  } else {
    mapper = moduleName
  }
  return useMapper(mapper, mapperFn)
}
useGetters.js
import { mapGetters, createNamespacedHelpers } from 'vuex'
import { useMapper } from './useMapper'


export function useGetters(moduleName, mapper) {
  let mapperFn = mapGetters
  if (typeof moduleName === 'string' && moduleName.length > 0) {
    mapperFn = createNamespacedHelpers(moduleName).mapGetters
  } else {
    mapper = moduleName
  }
  return useMapper(mapper, mapperFn)
}
index.js(统一出口)
// 统一出口文件
import { useGetters } from './useGetters';
import { useState } from './useState';

export {
  useGetters,
  useState
}
2. 实操
代码分享
<template>
    <div>
        <h4>rootCounter:{{rootCounter}}</h4>
        <h4>userCounter1:{{userCounter1}}</h4>
        <h4>{{getInfo}}</h4>
        <h4><button @click="increase">user1加1</button></h4>
        <h4><button @click="increaseAction">user1加1(延迟1s)</button></h4>
        <h4><button @click="myIncrement">根module加1</button></h4>
    </div>
</template>

<script>
    import { mapMutations, mapActions } from "vuex";
    import { useState, useGetters } from '../../hooks/version3'

    export default {
        setup() {
            //state 和 getters 需要调用自己的封装--子modules
            const state1 = useState('user1', ['userCounter1']);
            const getters1 = useGetters('user1', ['getInfo']);
            // state 调用自己的封装--根modules
            const fState=useState(['rootCounter']);

            // mutations 和 actions 调用直接返回即可
            const mutations1 = mapMutations('user1', ['increase']);
            const actions1 = mapActions('user1', ['increaseAction']);

            // mutations --根modules
            const result2 = mapMutations({
                myIncrement: 'increase',
            });

            return {
                ...state1,
                ...getters1,
                ...fState,
                ...mutations1,
                ...actions1,
                ...result2
            }

        }
    }
</script>
四. 补充nextTick用法
(建议看最新总结:https://www.cnblogs.com/yaopengfei/p/16267007.html)
1. 说明
官方解释:将回调推迟到下一个 DOM 更新周期之后执行。在更改了一些数据以等待 DOM 更新后立即使用它。
(2). 比如我们有下面的需求:
A. 点击一个按钮,我们会修改在h3中显示的msg;
B. msg被修改后,获取h3的高度;
(3). 实现上面的案例我们有三种方式:
方式一:在点击按钮后立即获取到h3的高度(错误的做法,因为点击的时候,h3可能还没渲染完)
方式二:在updated生命周期函数中获取h3的高度(但是其他数据更新,也会执行该updated回调)
方式三:使用nextTick函数;
2. 实操
代码分享:
<template>
    <div>
        <h2>counter: {{counter}}</h2>
        <h4><button @click="Add">增加1</button></h4>

        <h3 ref="msgRef">msg:{{msg}}</h3>
        <h4><button @click="addMsgContent">增加Msg</button></h4>
    </div>
</template>

<script>
    import { ref, onUpdated, nextTick } from 'vue';

    export default {
        setup() {
            const counter = ref(100);
            const Add = () => counter.value++;

            const msg = ref("hello nextTick");

            const msgRef = ref(null);
            const addMsgContent = () => {
                msg.value += "  123456  ";
                // 更新DOM
                nextTick(() => {
                    console.log(msgRef.value.offsetHeight)
                })
            }

            return {
                counter,
                msg,
                msgRef,
                addMsgContent
            }
        }
    }
</script>
!
- 作 者 : Yaopengfei(姚鹏飞)
- 博客地址 : http://www.cnblogs.com/yaopengfei/
- 声 明1 : 如有错误,欢迎讨论,请勿谩骂^_^。
- 声 明2 : 原创博客请在转载时保留原文链接或在文章开头加上本人博客地址,否则保留追究法律责任的权利。

 浙公网安备 33010602011771号