第十二节:Spring注解用法剖析、整合MyBatis和Junit、自定义用法(过滤器、导入器、注册器等等)
一. Spring注解用法剖析
1. 开启注解扫描
(1). 通过XML的形式
<?xml version="1.0" encoding="UTF-8"?>
<beans xmlns="http://www.springframework.org/schema/beans"
       xmlns:xsi="http://www.w3.org/2001/XMLSchema-instance"
       xmlns:p="http://www.springframework.org/schema/p"
       xmlns:context="http://www.springframework.org/schema/context"
       xsi:schemaLocation="http://www.springframework.org/schema/beans
       http://www.springframework.org/schema/beans/spring-beans.xsd
       http://www.springframework.org/schema/context
       https://www.springframework.org/schema/context/spring-context.xsd">

      <!--1. 启动注解驱动,指定对应扫描的路径,也就是资源所在的包-->
      <context:component-scan base-package="com.ypf"/>
</beans>
使用:
    ApplicationContext ctx = new ClassPathXmlApplicationContext("applicationContext.xml");
    UserService uS1 = (UserService) ctx.getBean("userService1");
    uS1.save();
剖析:
在进行包所扫描时,会对配置的包及其子包中所有文件进行扫描
扫描过程是以文件夹递归迭代的形式进行的
扫描过程仅读取合法的java文件
扫描时仅读取spring可识别的注解
扫描结束后会将可识别的有效注解转化为spring对应的资源加入IoC容器
注意:
无论是注解格式还是XML配置格式,最终都是将资源加载到IoC容器中,差别仅仅是数据读取方式不同
从加载效率上来说注解优于XML配置文件
(2). 借助一个类加注解
@Configuration
@ComponentScan("com.ypf")
public class SpringConfig0 {
}
使用
   ApplicationContext ctx = new AnnotationConfigApplicationContext(SpringConfig0.class);
   UserService uS1 = (UserService) ctx.getBean("userService1");
   uS1.save();
2. bean相关
(1). bean定义
相关注解:@Component @Controller @Service @Repository,作用在类上;@Controller、@Service 、@Repository是@Component的衍生注解,功能同@Component。
A. 可以设置参数,即定义bean的访问id
@Component("userDao1")
public class UserDaoImpl implements UserDao{}
注入的写法:
    @Autowired
    @Qualifier("userDao1")
    private UserDao userDao;
B. 也可以不设置参数
@Component
@Primary   //提高优先级(当@Component不指定id的时候,提高优先级)
public class UserDaoImpl2 implements UserDao2 {}

@Component
public class UserDaoImpl21 implements UserDao2{}
剖析:
当同一个接口的两个实现类定义bean的注解上都没有指定bean的id,那么在注入的时候则不知道要注入哪个了,这个时候可以通过添加@Primary提高优先级,即哪个实现类加了@Primary,则注入就是哪个。
注入的写法(@Autowired默认按类型装配,指定@Qualifier后可以指定自动装配的bean的id)
    @Autowired
    private UserDao2 userDao2;
(2). bean作用域
相关注解:@Scope
@Component("userService1")
@Scope("singleton")    //默认是singleton,也可以设置非单例prototype
public class UserServiceImpl implements UserService {}
(3). bean生命周期
作用在方法上,相关注解:@PostConstruct、@PreDestroy
@PostConstruct
public void init() { System.out.println("init..."); }
3. 注入相关
(1). 引用类型注入
A. 通过定义bean的id值识别注入,使用注解为:@Autowired、@Qualifier
    @Autowired
    @Qualifier("userDao1")
    private UserDao userDao;
PS:可以通过 @Autowired(required = false) 来配置该属性是否允许为null
B. 默认通过类型进行装配,使用注解为:@Autowired
   @Autowired
    private UserDao2 userDao2;
扩展:@Primary优先装配的问题,详见上面定义bean出的说明。
(2). 非引用类型注入
使用注解@Value进行注入,可以作用在属性 和 方法上。
注:@value注解如果添加在属性上方,可以省略set方法(set方法的目的是为属性赋值)
    @Value("66666")
    private int num;
    @Value("V1.2.1")
    private String version;
补充:加载properties文件,使用 @PropertySource注解,注:该注解不支持*通配格式,一旦加载,所有spring控制的bean中均可使用对应属性值,可以通过逗号写多个配置文件。
-
value(默认):设置加载的properties文件名
-
@Component
@PropertySource(value={"classpath:jdbc.properties","classpath:xxx.properties"},ignoreResourceNotFound = true)   //可以关联多个配置文件
public class UserDaoImpl2 implements UserDao2 {

    @Value("${jdbc.userName}")
    private String userName;
    @Value("${jdbc.password}")
    private String password;

    @Override
    public void save() {
        System.out.println("UserDaoImpl2 is running....");
        System.out.println("userName:"+userName);
        System.out.println("password:"+password);
    }
}
jdbc.properties代码如下:
jdbc.userName=root
jdbc.password=123456
4. 扩展 @Inject、@Named、@Resource
@Inject与@Named是JSR330规范中的注解,功能与@Autowired和@Qualifier完全相同,适用于不同架构场景
@Resource是JSR250规范中的注解,可以简化书写格式
@Resource相关属性
name:设置注入的bean的id
type:设置注入的bean的类型,接收的参数为Class类型
5. 纯注解格式-干掉xml
可以通过@Configuration、@ComponentScan 纯注解的形式设置Spring核心配置类,从而干掉xml配置
作用:设置当前类为spring核心配置加载类。
说明:
配置类:
@Configuration
@ComponentScan("com.ypf")
public class SpringConfig0 {}
调用:
   ApplicationContext ctx = new AnnotationConfigApplicationContext(SpringConfig0.class);
   UserService uS1 = (UserService) ctx.getBean("userService1");
   uS1.save();
6. 加载第三方资源
使用@Bean注解,加在方法定义上方,从而该方法的返回值作为spring管理的bean,可以直接调用该方法,获得返回值。
参数:value(默认),定义bean的访问id。
说明:
-
-
该注解用于替代XML配置中的静态工厂与实例工厂创建bean,不区分方法是否为静态或非静态
-
@Configuration @ComponentScan("com.ypf")
public class JDBCConfig {

    @Bean("dataSource")
    public static DruidDataSource getDataSource(){
        DruidDataSource ds = new DruidDataSource();
        ds.setDriverClassName("com.mysql.jdbc.Driver");
        ds.setUrl("jdbc:mysql://localhost:3306/spring_db");
        ds.setUsername("root");
        ds.setPassword("123456");
        return ds;
    }
}
调用:
            ApplicationContext ctx = new AnnotationConfigApplicationContext(JDBCConfig.class);
            //相当于直接调用 getDataSource 方法
            DruidDataSource dataSource = (DruidDataSource) ctx.getBean("dataSource");
            System.out.println(dataSource);
7. 类导入模式 @Import
使用@Import注解,加载类上面,导入第三方bean作为spring控制的资源。(通俗的将:把类A导入到类B中,那么在加载类B的时候,就可以使用类A中的方法)
说明:
-
-
在被导入的类中可以继续使用@Import导入其他资源(了解)
-
样例:下面是把JDBCConfig导入到SpringConfig1和SpringConfig2中。
public class JDBCConfig {
    @Bean("dataSource")
    public static DruidDataSource getDataSource(){
        DruidDataSource ds = new DruidDataSource();
        ds.setDriverClassName("com.mysql.jdbc.Driver");
        ds.setUrl("jdbc:mysql://localhost:3306/spring_db");
        ds.setUsername("root");
        ds.setPassword("123456");
        return ds;
    }
}

@Configuration
@ComponentScan("com.ypf")
@Import({JDBCConfig.class})
public class SpringConfig1 {
    @Bean("b1")
    public String getB1(){
        System.out.println("b1 is  running");
        return "";
    }
}

@Configuration
@ComponentScan("com.ypf")
@Import({JDBCConfig.class})
public class SpringConfig2 {
    @Bean("b2")
    public String getB2(){
        System.out.println("b2 is running");
        return "";
    }
}
调用:


  ApplicationContext ctx = new AnnotationConfigApplicationContext(SpringConfig1.class, SpringConfig2.class);
            //直接调用方法
            DruidDataSource dataSource = (DruidDataSource) ctx.getBean("dataSource");
            System.out.println(dataSource);
            String result1=(String)ctx.getBean("b1");
            String result2=(String)ctx.getBean("b2");
            System.out.println(result1);
            System.out.println(result2);

8. 依赖加载
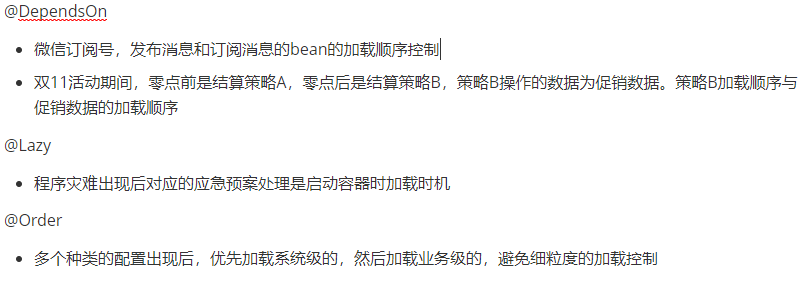
(1). @DependsOn
-
-
类型:类注解、方法注解
-
位置:bean定义的位置(类上或方法上)
-
作用:控制bean的加载顺序,使其在指定bean加载完毕后再加载
-
范例:
-
说明:
-
配置在方法上,使@DependsOn指定的bean优先于@Bean配置的bean进行加载
-
配置在类上,使@DependsOn指定的bean优先于当前类中所有@Bean配置的bean进行加载
-
配置在类上,使@DependsOn指定的bean优先于@Component等配置的bean进行加载
-
-
相关属性
-
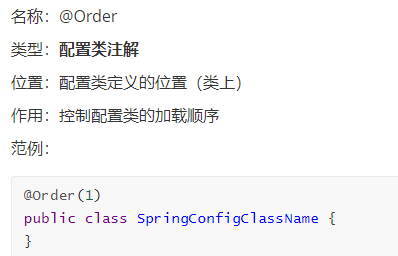
(2). @Order
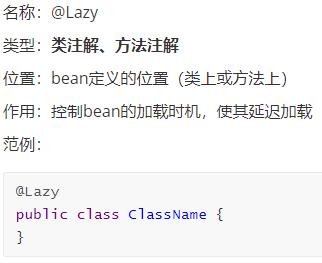
(3). @Lazy
场景应用:
二. 整合MyBatis
1. 整体剖析
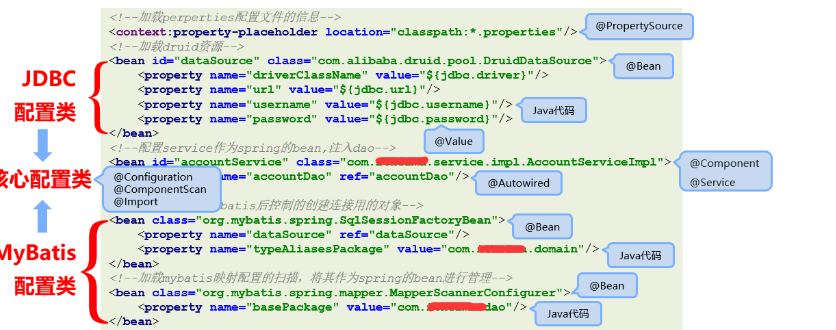
(2). 建立独立的配置管理类,分类管理外部资源,根据功能进行分类,并提供对应的方法获取bean
(3). 使用注解形式启动bean扫描,加载所有注解配置的资源(bean)
2. 案例实操
(1). 在pom.xml导入相应的坐标
   <dependencies>
        <dependency>
            <groupId>mysql</groupId>
            <artifactId>mysql-connector-java</artifactId>
            <version>5.1.6</version>
        </dependency>
        <dependency>
            <groupId>org.mybatis</groupId>
            <artifactId>mybatis</artifactId>
            <version>3.5.7</version>
        </dependency>
        <dependency>
            <groupId>org.springframework</groupId>
            <artifactId>spring-context</artifactId>
            <version>5.3.7</version>
        </dependency>
        <dependency>
            <groupId>com.alibaba</groupId>
            <artifactId>druid</artifactId>
            <version>1.2.6</version>
        </dependency>
        <dependency>
            <groupId>org.springframework</groupId>
            <artifactId>spring-jdbc</artifactId>
            <version>5.3.7</version>
        </dependency>
        <dependency>
            <groupId>org.mybatis</groupId>
            <artifactId>mybatis-spring</artifactId>
            <version>2.0.6</version>
        </dependency>
        <!-- Spring整合Junit -->
        <dependency>
            <groupId>junit</groupId>
            <artifactId>junit</artifactId>
            <version>4.13.2</version>
        </dependency>
        <dependency>
            <groupId>org.springframework</groupId>
            <artifactId>spring-test</artifactId>
            <version>5.3.7</version>
        </dependency>

    </dependencies>
(2). 新建JDBCConfig配置类,在里面注入连接数据库的相关方法属性,如:url、userName、password。 最后以方法的形式+@Bean的展示。
public class JDBCConfig {

    @Value("${jdbc.driver}")
    private String driver;
    @Value("${jdbc.url}")
    private String url;
    @Value("${jdbc.username}")
    private String userName;
    @Value("${jdbc.password}")
    private String password;

    @Bean("dataSource")
    public DataSource getDataSource(){
        DruidDataSource ds = new DruidDataSource();
        ds.setDriverClassName(driver);
        ds.setUrl(url);
        ds.setUsername(userName);
        ds.setPassword(password);
        return ds;
    }
}
jdbc.properties文件如下(注:该文件需要在核心配置类中配置路径识别,否则找不到)
#远程链接
jdbc.driver=com.mysql.jdbc.Driver
jdbc.url=jdbc:mysql://xxx:3306/db1?useSSL=false&useUnicode=true&characterEncoding=utf8&rewriteBatchedStatements=true
jdbc.username=root
jdbc.password=xxx
(3). 新建MyBatisConfig类, 在里面配置spring连接用的对象、和spring对bean的管理
public class MyBatisConfig {

    //spring整合mybatis后控制的创建连接用的对象
    @Bean
    public SqlSessionFactoryBean getSqlSessionFactoryBean(@Autowired DataSource dataSource){
        SqlSessionFactoryBean ssfb = new SqlSessionFactoryBean();
        ssfb.setTypeAliasesPackage("com.ypf.domain");    //通用的设置别名
        ssfb.setDataSource(dataSource);                  //设置数据源
        return ssfb;
    }

    //加载mybatis映射配置的扫描,将其作为spring的bean进行管理
    // 所以 StudentServiceImpl中的 @Autowired 直接就可以注入userDao,userDao本身不需要实现@Compontent
    @Bean
    public MapperScannerConfigurer getMapperScannerConfigurer(){
        MapperScannerConfigurer msc = new MapperScannerConfigurer();
        msc.setBasePackage("com.ypf.dao");
        return msc;
    }

}
(4). 新建Student、StudenDao、StudentServie及其实现类。
代码1
public class Student {

    private Integer id;
    private String name;
    private Integer age;

    public Student(){

    }

    public Student(Integer id, String name, Integer age) {
        this.id = id;
        this.name = name;
        this.age = age;
    }

    public Integer getId() {
        return id;
    }

    public void setId(Integer id) {
        this.id = id;
    }

    public String getName() {
        return name;
    }

    public void setName(String name) {
        this.name = name;
    }

    public Integer getAge() {
        return age;
    }

    public void setAge(Integer age) {
        this.age = age;
    }

    @Override
    public String toString() {
        return "Student{" +
                "id=" + id +
                ", name='" + name + '\'' +
                ", age=" + age +
                '}';
    }


}
public interface StudentDao {
    //查询全部
    @Select("SELECT * FROM student")
    public abstract List<Student> selectAll();

    //新增操作
    @Insert("INSERT INTO student VALUES (#{id},#{name},#{age})")
    public abstract Integer insert(Student stu);

    //修改操作
    @Update("UPDATE student SET name=#{name},age=#{age} WHERE id=#{id}")
    public abstract Integer update(Student stu);

    //删除操作
    @Delete("DELETE FROM student WHERE id=#{id}")
    public abstract Integer delete(Integer id);


}
代码2
public interface StudentService {

    //查询全部
    public abstract List<Student> selectAll();
    //新增数据
    public abstract Integer insert(Student stu);
    //修改数据
    public abstract Integer update(Student stu);
    //删除数据
    public abstract Integer delete(Integer id);

}
@Component("StudentService1")
public class StudentServiceImpl  implements  StudentService{

    //注入
    @Autowired
    private StudentDao studentDao;

    @Override
    public List<Student> selectAll() {
        return studentDao.selectAll();
    }
    @Override
    public Integer insert(Student stu) {
        return studentDao.insert(stu);
    }

    @Override
    public Integer update(Student stu) {
        return studentDao.update(stu);
    }

    @Override
    public Integer delete(Integer id) {
        return studentDao.delete(id);
    }

}
(5). 代码测试
public class Test1 {
    public static void main(String[] args) {

        ApplicationContext ctx = new AnnotationConfigApplicationContext(SpringConfig1.class);
        StudentService studentService = (StudentService) ctx.getBean("StudentService1");
        //1.测试 查询
        List<Student> list=studentService.selectAll();
        for (Student stu : list) {
            System.out.println(stu);
        }

    }
}
三. 整合Junit
1. 说明
(2). 为Junit测试用例设定对应的spring容器:
-
从Spring5.0以后,要求Junit的版本必须是4.12及以上
-
2. 案例实操
(1). 在Pom.xml中导入相关坐标, sping-context、junit、spring-test。
    <dependencies>
        <!--Spring标准库-->
        <dependency>
            <groupId>org.springframework</groupId>
            <artifactId>spring-context</artifactId>
            <version>5.3.7</version>
        </dependency>
        <!-- Spring整合Junit -->
        <dependency>
            <groupId>junit</groupId>
            <artifactId>junit</artifactId>
            <version>4.13.2</version>
        </dependency>
        <dependency>
            <groupId>org.springframework</groupId>
            <artifactId>spring-test</artifactId>
            <version>5.3.7</version>
        </dependency>
    </dependencies>
(2). 准备Spring配置类
PS:如果测试中不涉及注入,仅仅是单独的业务测试,@ComponentScan("com.ypf") 扫描注册bean可以省略。
//该类主要用于测试Spring整合Junit
@Configuration
@ComponentScan("com.ypf")
public class SpringConfig2 {}
(3). 测试调用
A. 测试类上必须加标签 @RunWith(SpringJUnit4ClassRunner.class),表示Spring接管Junit
B. @ContextConfiguration(classes = SpringConfig2.class),表示加载Spring核心配置。 (此处可以换成加载xml文件)
C. 测试方法上需要加@Test
@RunWith(SpringJUnit4ClassRunner.class)
@ContextConfiguration(classes = SpringConfig2.class)
public class Test2Junit {

    @Autowired
    @Qualifier("StudentService1")
    private StudentService studentService;

    @Test
    public void testSave(){
        //1.测试 查询
        List<Student> list=studentService.selectAll();
        for (Student stu : list) {
            System.out.println(stu);
        }
    }

    @Test
    public void testSave2(){
        System.out.println("hello testsave2");
    }

}
扩展:
也可以用xml代替SpringConfig2类,如下applicationContext.xml,同样道理,如果不需要注入,则可以省略下面的开启注解扫描那一句。
<?xml version="1.0" encoding="UTF-8"?>
<beans xmlns="http://www.springframework.org/schema/beans"
       xmlns:xsi="http://www.w3.org/2001/XMLSchema-instance"
       xmlns:aop="http://www.springframework.org/schema/aop"
       xmlns:context="http://www.springframework.org/schema/context"
       xsi:schemaLocation="
       http://www.springframework.org/schema/beans http://www.springframework.org/schema/beans/spring-beans.xsd
       http://www.springframework.org/schema/aop http://www.springframework.org/schema/aop/spring-aop.xsd
       http://www.springframework.org/schema/context http://www.springframework.org/schema/context/spring-context.xsd
">
    <!--开启注解——组件扫描-->
    <context:component-scan base-package="com.ypf.aop"/>
</beans>
调用:
@RunWith(SpringJUnit4ClassRunner.class)
@ContextConfiguration("classpath:applicationContext.xml")
public class AopAnnoTest {

    @Autowired
    @Qualifier("UserService1")
    public UserService userService;

    @Test
    public  void test1(){
        userService.save();
    }
}
四. 过滤器、导入器、注册器等等
1. 自定义过滤器
(1). 排除规则为注解
@Configuration
//1.设置排除bean,排除规则为注解修饰,具体的注解喂@Service修饰
//excludeFilters表示排除
//FilterType.ANNOTATION ,表示排除规则为注解
//Service.class,表示注解的形式为 @Service
//结果:No qualifying bean of type 'com.ypf.service.UserService' available, 说明成功的被排除了
@ComponentScan(value = "com.ypf", excludeFilters = @ComponentScan.Filter(type = FilterType.ANNOTATION, classes = Service.class))
public class SpringConfig1 {}
(2). 自定义排除规则
@Configuration
//2.设置排除bean,自定义类排除规则
//结果:No qualifying bean of type 'com.ypf.service.UserService' available, 说明成功的被排除了
@ComponentScan(value = "com.ypf", excludeFilters = @ComponentScan.Filter(type = FilterType.CUSTOM, classes = MyTypeFilter.class))
public class SpringConfig1 {}
自定义过滤类
public class MyTypeFilter implements TypeFilter {
    @Override
    //加载的类满足要求,匹配成功
    public boolean match(MetadataReader metadataReader, MetadataReaderFactory metadataReaderFactory) throws IOException {
        //通过参数获取加载的类的元数据
        ClassMetadata classMetadata = metadataReader.getClassMetadata();
        //通过类的元数据获取类的名称
        String className = classMetadata.getClassName();
        //如果加载的类名满足过滤器要求,返回匹配成功
        if(className.equals("com.ypf.service.UserServiceImpl")){
            //返回true表示匹配成功,返回false表示匹配失败。此处仅确认匹配结果,不会确认是排除还是加入,排除/加入由配置项决定,与此处无关
            return true;
        }
        return false;
    }
}
2. 自定义导入器
//3.自定义导入器
//一种快速高效配置大量bean的方式,不需要写xml和在类上加注解即可
// 效果就是:AccountDaoImpl、BookDaoImpl上面不需要加任何注解,就可以被识别,被注入
// 运行 testsave2方法进行测试
@ComponentScan("com.ypf")
@Import(MyImportSelector.class)
public class SpringConfig1 {}
自定义导入类:
public class MyImportSelector implements ImportSelector {
    @Override
    public String[] selectImports(AnnotationMetadata importingClassMetadata) {
//      1.编程形式加载一个类
//      return new String[]{"com.ypf.dao.impl.AccountDaoImpl","com.ypf.dao.impl.BookDaoImpl"};

//      2.加载import.properties文件中的单个类名
//      ResourceBundle bundle = ResourceBundle.getBundle("import");
//      String className = bundle.getString("className");

//      3.加载import.properties文件中的多个类名
        ResourceBundle bundle = ResourceBundle.getBundle("import");
        String className = bundle.getString("className");
        return className.split(",");
    }
}
配置文件
#1.加载import.properties文件中的单个类名
#className=com.ypf.dao.impl.AccountDaoImpl

#2.加载import.properties文件中的多个类名
className=com.ypf.dao.impl.AccountDaoImpl,com.ypf.dao.impl.BookDaoImpl

path=com.ypf.test.impl.*
3. 自定义注册器
@Configuration
//4.自定义注册器
//结果:UserService is Running,正常运行
@Import(MyImportBeanDefinitionRegistrar.class)
public class SpringConfig1 {}
自定义类:
public class MyImportBeanDefinitionRegistrar implements ImportBeanDefinitionRegistrar {
    @Override
    public void registerBeanDefinitions(AnnotationMetadata importingClassMetadata, BeanDefinitionRegistry registry) {
        //自定义注册器
        //1.开启类路径bean定义扫描器,需要参数bean定义注册器BeanDefinitionRegistry,需要制定是否使用默认类型过滤器
        ClassPathBeanDefinitionScanner scanner = new ClassPathBeanDefinitionScanner(registry,false);
        //2.添加包含性加载类型过滤器(可选,也可以设置为排除性加载类型过滤器)
        scanner.addIncludeFilter(new TypeFilter() {
            @Override
            public boolean match(MetadataReader metadataReader, MetadataReaderFactory metadataReaderFactory) throws IOException {
                //所有匹配全部成功,此处应该添加实际的业务判定条件
                return true;
            }
        });
        //设置扫描路径
        scanner.scan("com.ypf");
    }
}
4. 自定义工厂后处理bean,bean定义前处理后处理bean
//5.自定义工厂后处理bean,bean定义前处理后处理bean
//运行testsave1测试
@ComponentScan("com.ypf")
@Import({CustomeImportBeanDefinitionRegistrar.class, MyBeanFactory.class, MyBean.class})
public class SpringConfig1 {}
自定义类:
public class CustomeImportBeanDefinitionRegistrar implements ImportBeanDefinitionRegistrar {

    private String expression;

    public CustomeImportBeanDefinitionRegistrar(){
        try {
            //初始化时指定加载的properties文件名
            Properties loadAllProperties = PropertiesLoaderUtils.loadAllProperties("import.properties");
            //设定加载的属性名
            expression = loadAllProperties.getProperty("path");
        } catch (IOException e) {
            e.printStackTrace();
        }
    }

    @Override
    public void registerBeanDefinitions(AnnotationMetadata importingClassMetadata, BeanDefinitionRegistry registry) {
        //1.定义扫描包的名称
        String[] basePackages = null;
        //2.判断有@Import注解的类上是否有@ComponentScan注解
        if (importingClassMetadata.hasAnnotation(ComponentScan.class.getName())) {
            //3.取出@ComponentScan注解的属性
            Map<String, Object> annotationAttributes = importingClassMetadata.getAnnotationAttributes(ComponentScan.class.getName());
            //4.取出属性名称为basePackages属性的值
            basePackages = (String[]) annotationAttributes.get("basePackages");
        }
        //5.判断是否有此属性(如果没有ComponentScan注解则属性值为null,如果有ComponentScan注解,则basePackages默认为空数组)
        if (basePackages == null || basePackages.length == 0) {
            String basePackage = null;
            try {
                //6.取出包含@Import注解类的包名
                basePackage = Class.forName(importingClassMetadata.getClassName()).getPackage().getName();
            } catch (ClassNotFoundException e) {
                e.printStackTrace();
            }
            //7.存入数组中
            basePackages = new String[] {basePackage};
        }
        //8.创建类路径扫描器
        ClassPathBeanDefinitionScanner scanner = new ClassPathBeanDefinitionScanner(registry, false);
        //9.创建类型过滤器(此处使用切入点表达式类型过滤器)
        TypeFilter typeFilter = new AspectJTypeFilter(expression,this.getClass().getClassLoader());
        //10.给扫描器加入类型过滤器
        scanner.addIncludeFilter(typeFilter);
        //11.扫描指定包
        scanner.scan(basePackages);
    }
}

public class MyBean implements BeanPostProcessor {
    @Override
    //所有bean初始化前置操作
    public Object postProcessBeforeInitialization(Object bean, String beanName) throws BeansException {
        System.out.println("-----------bean之前-----------");
        System.out.println(beanName);
        return bean;
    }

    @Override
    //所有bean初始化后置操作
    public Object postProcessAfterInitialization(Object bean, String beanName) throws BeansException {
        System.out.println("-----------bean之后-----------");
        return bean;
    }
}


public class MyBeanFactory implements BeanFactoryPostProcessor {
    @Override
    //工厂后处理bean接口核心操作
    public void postProcessBeanFactory(ConfigurableListableBeanFactory beanFactory) throws BeansException {
        System.out.println("----------------bean工厂制作好了,还有什么事情需要处理----------------");
    }
}
!
- 作 者 : Yaopengfei(姚鹏飞)
- 博客地址 : http://www.cnblogs.com/yaopengfei/
- 声 明1 : 如有错误,欢迎讨论,请勿谩骂^_^。
- 声 明2 : 原创博客请在转载时保留原文链接或在文章开头加上本人博客地址,否则保留追究法律责任的权利。

 浙公网安备 33010602011771号