linux运维、架构之路-git版本管理

一、常见版本管理系统
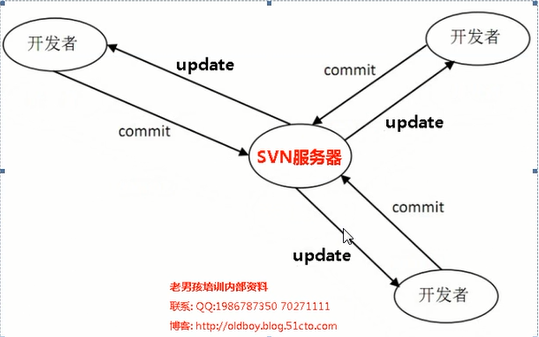
1、SVN
集中式的版本控制系统,只有一个中央数据仓库,如果中央数据仓库挂了或者不能访问,所有的使用者无法使用svn,无法进行提交或者备份文件
2、Git
分布式的版本控制系统,在每个使用者电脑上就有一个完整的数据仓,没有网络依然可以使用Git,当然为了习惯及团队协作,会将本地数据同步到Git服务器或者GitHub等代码仓库

二、Git的工作模式
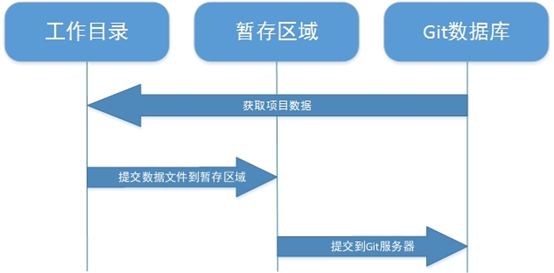
1、在工作目录中修改数据文件。
2、将文件的快照放入暂存区域。
3、将暂存区域的文件快照提交到Git仓库中
三、Git安装部署
1、环境准备
[root@gitlab ~]# cat /etc/redhat-release
CentOS Linux release 7.2.1511 (Core)
[root@gitlab ~]# uname -r
3.10.0-327.el7.x86_64
[root@gitlab ~]# systemctl status firewalld.service
● firewalld.service - firewalld - dynamic firewall daemon
   Loaded: loaded (/usr/lib/systemd/system/firewalld.service; disabled; vendor preset: enabled)
   Active: inactive (dead)
[root@gitlab ~]# getenforce
Disabled
[root@gitlab ~]# hostname -I
172.19.5.63 172.16.1.63
2、Git安装配置
①安装Git、全局配置
yum install git -y
[root@gitlab ~]# git config --global user.name "yan xinjiang"      # 配置git使用用户
[root@gitlab ~]# git config --global user.email "774181401@qq.com" # 配置git使用邮箱
[root@gitlab ~]# git config --global color.ui true                 # 语法高亮
[root@gitlab ~]# git config --list                                 # 查看全局配置
user.name=yan xinjiang
user.email=774181401@qq.com
color.ui=true
②新建并初始化Git工作目录
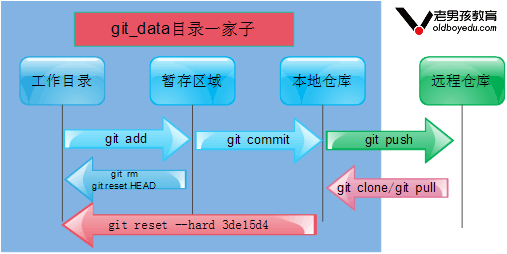
[root@gitlab ~]# mkdir git_data
[root@gitlab ~]# cd git_data/
[root@gitlab git_data]# git init
初始化空的 Git 版本库于 /root/git_data/.git/
[root@gitlab git_data]# git status
# 位于分支 master
#
# 初始提交
#
无文件要提交(创建/拷贝文件并使用 "git add" 建立跟踪)
③Git基本使用
④创建数据、提交数据
[root@gitlab git_data]# touch README
[root@gitlab git_data]# git status
# 位于分支 master
#
# 初始提交
#
# 未跟踪的文件:
#   (使用 "git add <file>..." 以包含要提交的内容)
#
#    README
提交为空,但是存在尚未跟踪的文件(使用 "git add" 建立跟踪)
[root@gitlab git_data]# git add README #添加文件到暂存区域
[root@gitlab git_data]# git status #查看git状态
# 位于分支 master
#
# 初始提交
#
# 要提交的变更:
#   (使用 "git rm --cached <file>..." 撤出暂存区)
#
#    新文件:    README
#
[root@gitlab git_data]# git commit -m "README first commit" #git commit 提交暂存区文件README到git仓库
[master(根提交) 86bc282] README first commit
 1 file changed, 0 insertions(+), 0 deletions(-)
 create mode 100644 README
⑤删除暂存区数据
[root@gitlab git_data]# touch database
[root@gitlab git_data]# git add database
[root@gitlab git_data]# git status
# 位于分支 master
# 要提交的变更:
#   (使用 "git reset HEAD <file>..." 撤出暂存区)
#
#    新文件:    database
#
[root@gitlab git_data]# git reset HEAD database #将git暂存区的追踪列表删除,并不会删除工作目录的数据文件
[root@gitlab git_data]# git rm --cached database#撤出暂存区文件的另一种写法,-f参数git暂存区和工作目录数据一起删除
[root@gitlab git_data]# git status
# 位于分支 master
# 未跟踪的文件:
#   (使用 "git add <file>..." 以包含要提交的内容)
#
#    database
提交为空,但是存在尚未跟踪的文件(使用 "git add" 建立跟踪)
3、Git历史记录
①查看历史记录相关命令
git log        #查看提交历史记录
git log -2     #查看最近几条记录
git log -p -1  #显示每次提交的内容差异,例如仅查看最近一次差异
git log --stat -2 #简要显示数据增改行数,这样能够看到提交中修改过的内容,对文件添加或移动的行数,并在最后列出所有增减行的概要信息
git log --pretty=oneline         #根据不同的格式展示提交的历史信息
git log --pretty=fuller -2       #以更详细的模式输出提交的历史记录
git log --pretty=fomat:"%h %cn"  #查看当前所有提交记录的简短SHA-1哈希字串与提交者的姓名,其他格式见备注
format参数指定具体输出格式
%s  提交说明。
%cd 提交日期。
%an 作者的名字。
%cn 提交者的姓名。
%ce 提交者的电子邮件。
%H  提交对象的完整SHA-1哈希字串。
%h  提交对象的简短SHA-1哈希字串。
%T  树对象的完整SHA-1哈希字串。
%t  树对象的简短SHA-1哈希字串。
%P  父对象的完整SHA-1哈希字串。
%p  父对象的简短SHA-1哈希字串。
%ad 作者的修订时间
②还原历史数据
#模拟提交了三次数据
[root@gitlab git_data]# git log
commit e92dc47b6e2d4972e45fb7be557a6bcfebd3fd2e
Author: yan xinjiang <774181401@qq.com>
Date:   Mon Dec 18 13:57:35 2017 +0800

    README three commit

commit a3950f561fc74803d8a4dba7e4980f19a87a85e9
Author: yan xinjiang <774181401@qq.com>
Date:   Mon Dec 18 13:56:14 2017 +0800

    README second commit

commit 86bc282a6c90e332e516a289c7c92282bdc425ac
Author: yan xinjiang <774181401@qq.com>
Date:   Mon Dec 18 13:24:51 2017 +0800

    README first commit
此时查看README数据内容
[root@gitlab git_data]# cat README
heoll
word
还原历史提交版本到上一次
[root@gitlab git_data]# git reset --hard HEAD^ #还原历史提交版本上一次
[root@gitlab git_data]# git reset --hard a3950f #根据SHA-1值,还原
HEAD 现在位于 a3950f5 README second commit
[root@gitlab git_data]# cat README #查看数据文件已经还原到上一次
heoll

HEAD^ 还原到上次
HEAD^^还原到上上次
HEAD^^^
HEAD~5还原到上5次
说明:上面的操作实际上就是改变了一个HEAD版本指针的位置,你将HEAD指针放在哪里,你的当前工作版本就会定位在哪里,要想把内容再还原到最新提交的版本,先查看提交版本号
③还原未来数据
未来数据指的是还原到历史数据了,突然后悔了,想撤销更改,但是git log已经找不到这个版本了
#查看未来历史更新点
[root@gitlab git_data]# git reflog
a3950f5 HEAD@{0}: reset: moving to a3950f
e92dc47 HEAD@{1}: reset: moving to e92dc4
a3950f5 HEAD@{2}: reset: moving to HEAD^
e92dc47 HEAD@{3}: commit: README three commit
a3950f5 HEAD@{4}: commit: README second commit
86bc282 HEAD@{5}: commit (initial): README first commit
4、标签使用
#前面回滚使用的是一串字符串,又长又难记
git tag v1.0     #当前提交内容打一个标签(方便快速回滚),每次提交都可以打个tag。
git tag          #查看当前所有的标签
git show v1.0    #查看当前1.0版本的详细信息
git tag v1.2 -m "version 1.2 release is test"  #创建带有说明的标签,-a指定标签名字,-m指定说明文字
git tag -d v1.0  #我们为同一个提交版本设置了两次标签,删除之前的v1.0
[root@gitlab git_data]# git tag v20171218
[root@gitlab git_data]# git tag
v20171218
#这样还原起来方便很多,根据tag标记即可以还原#
[root@gitlab git_data]# git reset --hard v20171218
HEAD 现在位于 a3950f5 README second commit
[root@gitlab git_data]# cat README
heoll
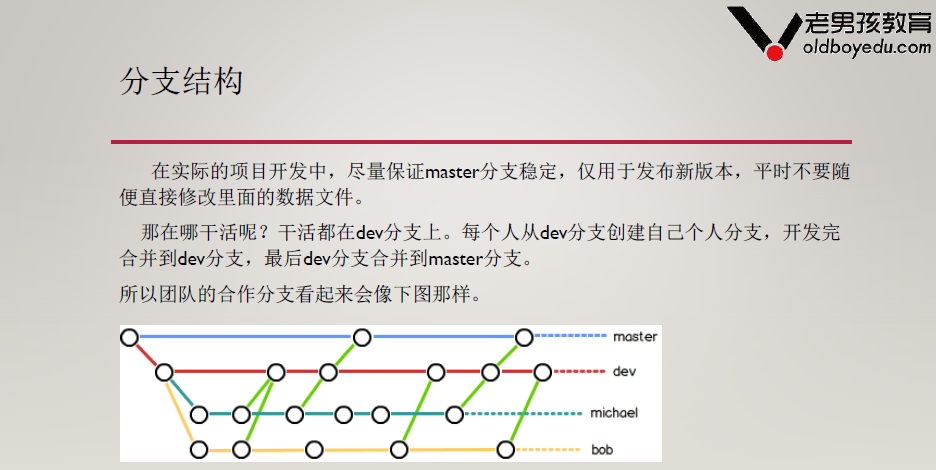
四、Git分支结构管理
1、分支结构
2、创建分支
[root@gitlab git_data]# git branch linux #创建分支
[root@gitlab git_data]# git status
# 位于分支 master
无文件要提交,干净的工作区
[root@gitlab git_data]# git checkout linux #切换分支
切换到分支 'linux'
[root@gitlab git_data]# git branch #查看当前分支情况,当前分支前面有*
* linux
  master
3、合并分支
[root@gitlab git_data]# git checkout master #把分支linux的工作成果合并到master上,先切换到master
已经位于 'master'
[root@gitlab git_data]# git merge linux #合并linux分支到master
Already up-to-date.
[root@gitlab git_data]# git branch -d linux #查看合并文件,确认合并完成后,可以删除分支linux
已删除分支 linux(曾为 b578156)。
4、合并分支冲突
①自动合并:文件没有冲突,就可以自动合并
②合并失败:文件冲突——文件的同一行有不同的内容
5、Windows客户端使用
①安装Git-2.10.0-64-bit
②windows的git,本质是window上的linux系统

五、Git服务器
1、常见Git仓库
①使用GitHub或者码云等公共代码仓库
②使用GitLab私有仓库
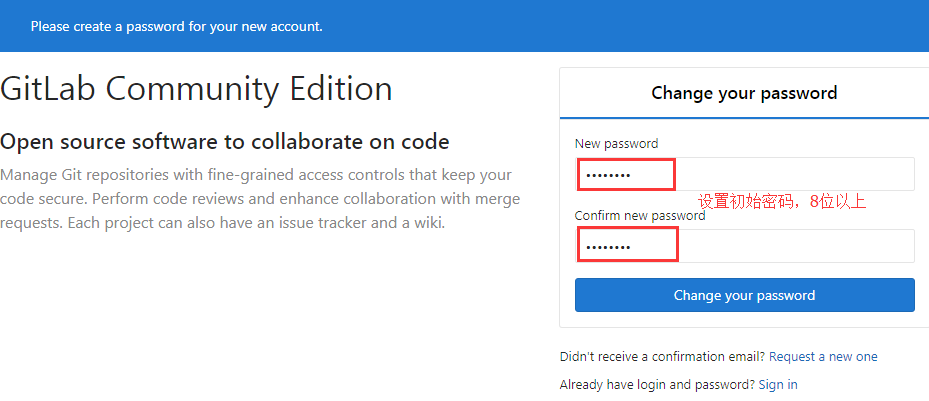
2、搭建私有仓库GitLab
安装文档  https://about.gitlab.com/downloads/#centos7
https://mirrors.tuna.tsinghua.edu.cn/gitlab-ce/yum/
①安装
[root@gitlab ~]# cd /server/tools/
[root@gitlab tools]# rz #上传gitlab-ce-9.1.4-ce.0.el7.x86_64.rpm
[root@gitlab tools]# ls
gitlab-ce-9.1.4-ce.0.el7.x86_64.rpm
[root@gitlab tools]# rpm -ivh gitlab-ce-9.1.4-ce.0.el7.x86_64.rpm
准备中...                          ################################# [100%]
正在升级/安装...
   1:gitlab-ce-9.1.4-ce.0.el7         ################################# [100%]
[root@gitlab tools]# gitlab-ctl reconfigure #初始化,执行一次即可
②启动服务,浏览器输入172.19.5.63访问
gitlab-ctl status/stop/start
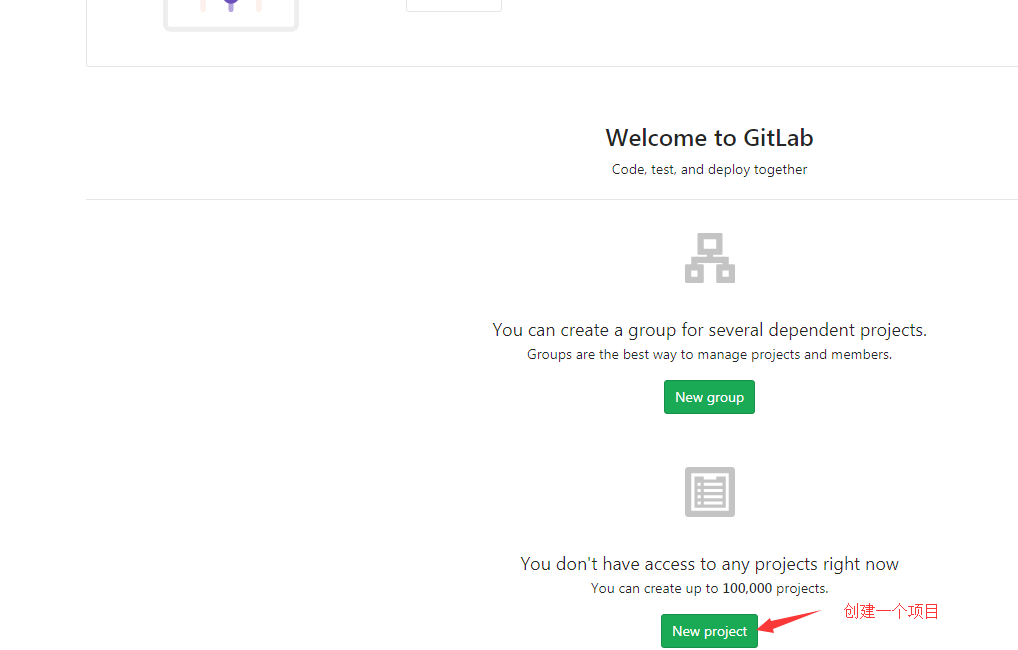
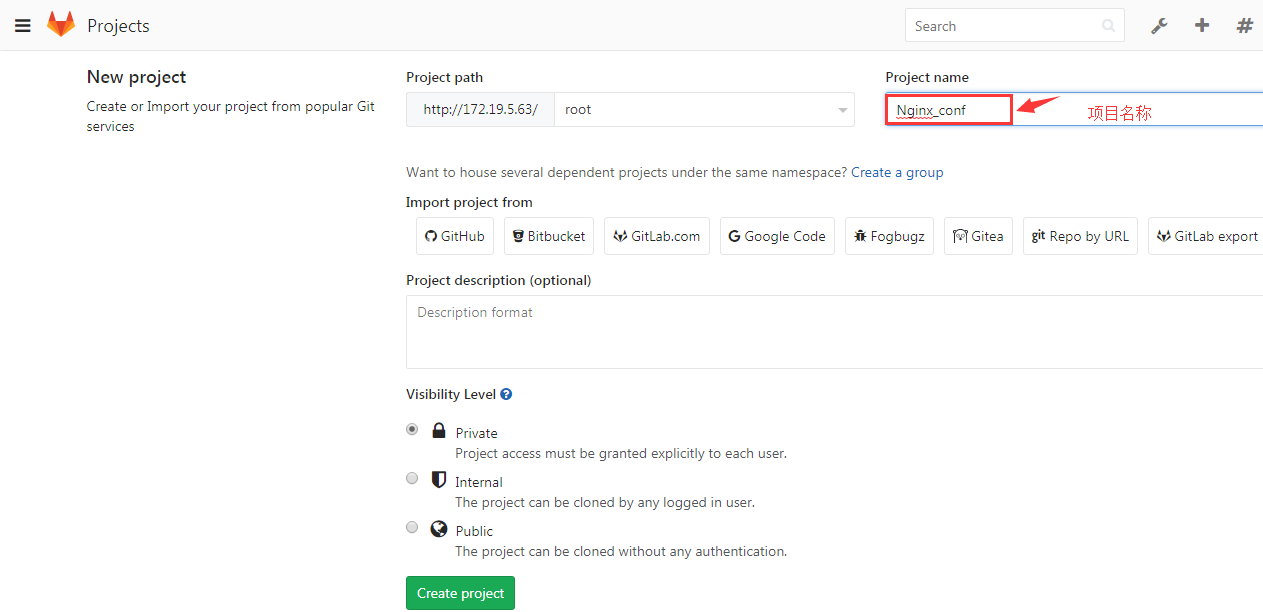
创建项目
项目名称
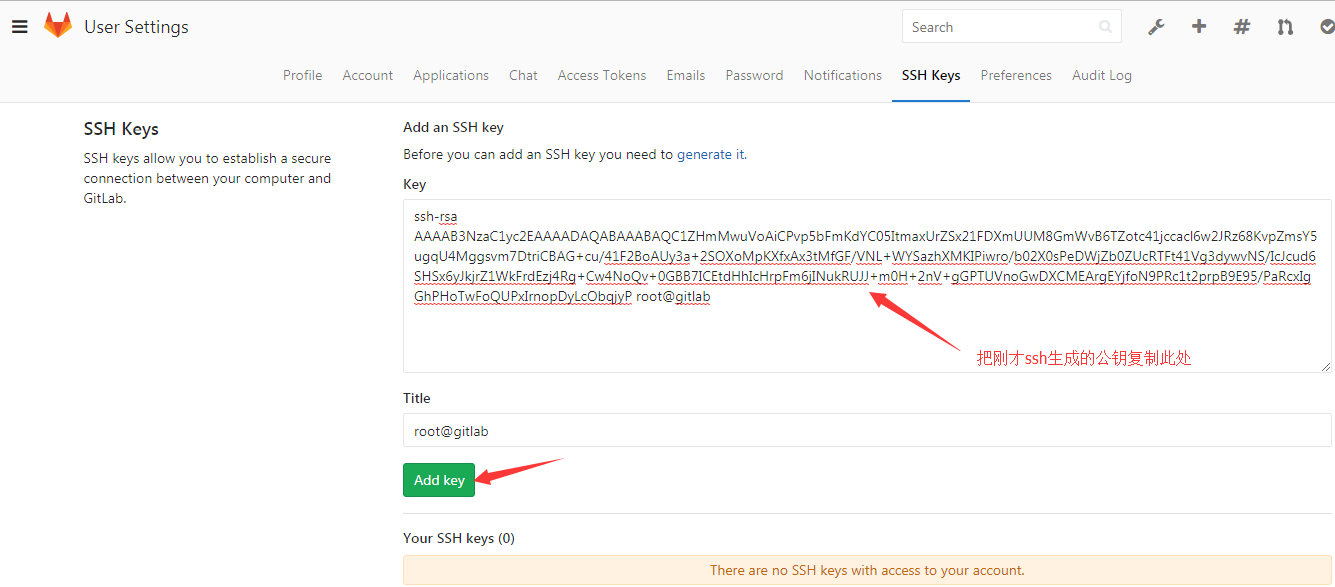
创建SSH秘钥认证
[root@gitlab git_data]# ssh-keygen
[root@gitlab git_data]# cat /root/.ssh/id_rsa.pub
ssh-rsa AAAAB3NzaC1yc2EAAAADAQABAAABAQC1ZHmMwuVoAiCPvp5bFmKdYC05ItmaxUrZSx21FDXmUUM8GmWvB6TZotc41jccacl6w2JRz68KvpZmsY5ugqU4Mggsvm7DtriCBAG+cu/41F2BoAUy3a+2SOXoMpKXfxAx3tMfGF/VNL+WYSazhXMKIPiwro/b02X0sPeDWjZb0ZUcRTFt41Vg3dywvNS/IcJcud6SHSx6yJkjrZ1WkFrdEzj4Rg+Cw4NoQv+0GBB7ICEtdHhIcHrpFm6jINukRUJJ+m0H+2nV+gGPTUVnoGwDXCMEArgEYjfoN9PRc1t2prpB9E95/PaRcxIgGhPHoTwFoQUPxIrnopDyLcObqjyP root@gitlab
命令使用说明
Command line instructions
#Git global setup#
git config --global user.name "Administrator"
git config --global user.email "admin@example.com"

#Create a new repository#
git clone git@gitlab.example.com:root/Nginx_conf.git
cd Nginx_conf
touch README.md
git add README.md
git commit -m "add README"
git push -u origin master

#Existing folder#
cd existing_folder
git init
git remote add origin git@gitlab.example.com:root/Nginx_conf.git
git add .
git commit
git push -u origin master

#Existing Git repository#
cd existing_repo
git remote add origin git@gitlab.example.com:root/Nginx_conf.git
git push -u origin --all
git push -u origin --tags
③同步Gitlab服务器项目到本地工作目录
[root@gitlab git_data]# git clone git@172.19.5.63:root/Nginx_conf.git#克隆服务端项目到本地
正克隆到 'Nginx_conf'...
The authenticity of host '172.19.5.63 (172.19.5.63)' can't be established.
ECDSA key fingerprint is 9c:aa:0b:01:a4:48:3f:50:0a:2d:50:41:57:e2:5a:7d.
Are you sure you want to continue connecting (yes/no)? yes
Warning: Permanently added '172.19.5.63' (ECDSA) to the list of known hosts.
warning: 您似乎克隆了一个空版本库。
[root@gitlab git_data]# ls
linux.txt  Nginx_conf  README
④推送本地数据到Gitlab服务器
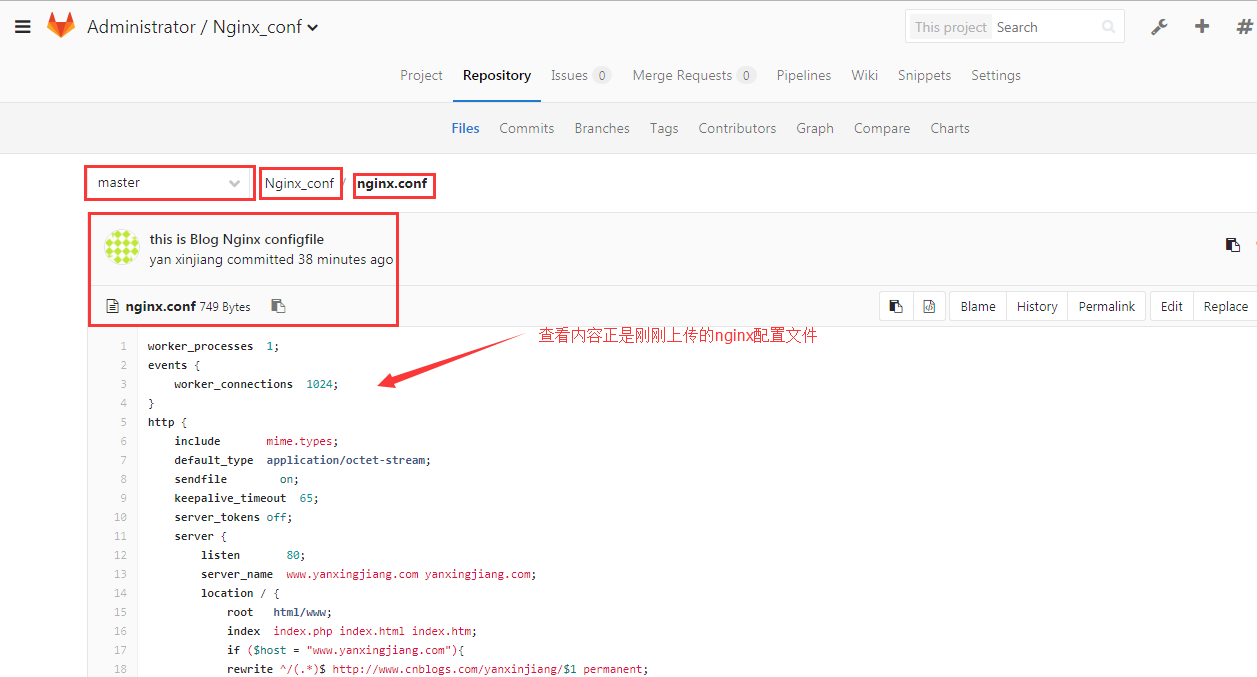
[root@gitlab git_data]# cd Nginx_conf/ #进入Nginx_conf项目下
[root@gitlab Nginx_conf]# git add nginx.conf #把Nginx配置文件放于此处
[root@gitlab Nginx_conf]# git commit -m "this is Blog Nginx configfile" #提交nginx.conf到git仓库
[master(根提交) 9478a0f] this is Blog Nginx configfile
 1 file changed, 28 insertions(+)
 create mode 100644 nginx.conf
[root@gitlab Nginx_conf]# git push -u origin master #将本地代码仓库推送到gitlab服务器master分支下,第一次加上参数-u,代表关联本地与远程
Counting objects: 3, done.
Compressing objects: 100% (2/2), done.
Writing objects: 100% (3/3), 582 bytes | 0 bytes/s, done.
Total 3 (delta 0), reused 0 (delta 0)
To git@172.19.5.63:root/Nginx_conf.git
 * [new branch]      master -> master
分支 master 设置为跟踪来自 origin 的远程分支 master。
Gitlab服务端查看
⑤服务端创建测试数据,拉取到本地工作目录
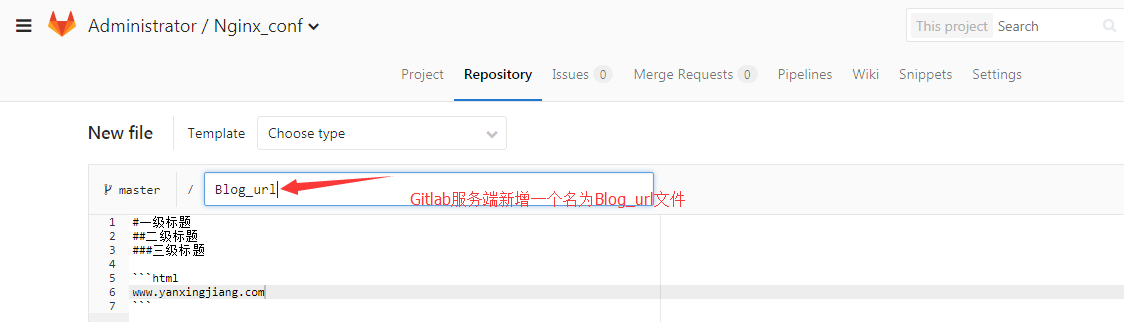
[root@gitlab Nginx_conf]# git pull #拉取服务端数据到本地
remote: Counting objects: 3, done.
remote: Compressing objects: 100% (3/3), done.
remote: Total 3 (delta 0), reused 0 (delta 0)
Unpacking objects: 100% (3/3), done.
来自 172.19.5.63:root/Nginx_conf
   9478a0f..af55ef9  master     -> origin/master
更新 9478a0f..af55ef9
Fast-forward
 Blog_url | 7 +++++++
 1 file changed, 7 insertions(+)
 create mode 100644 Blog_url
[root@gitlab Nginx_conf]# ls #查看刚才拉取服务端的数据
Blog_url  nginx.conf

 浙公网安备 33010602011771号