

SpringCloud----基础
概述
目前市场上主流的 第一套微服务架构解决方案:Spring Boot + Spring Cloud Netflix
Spring Cloud 为开发人员提供了快速构建分布式系统中一些常见模式的工具(例如配置管理,服务发现,断路器,智能路由,微代理,控制总线)。分布式系统的协调导致了样板模式, 使用 Spring Cloud 开发人员可以快速地支持实现这些模式的服务和应用程序。他们将在任何分布式环境中运行良好,包括开发人员自己的笔记本电脑,裸机数据中心,以及 Cloud Foundry 等托管平台。
Spring Cloud 项目部是基于Spring Boot进行开发,并且都是使用Maven做项目管理工具。在实际开发中,我们一般都会创建一依赖管理项目作为Maven的Parent项目使用,这样做可以极大的方便我们对Jar 包版本的统一管理。
注意:sprint Cloud Netfix 在2018年12月进入维护期
市场上主流的 第一套微服务架构解决方案:Apache Dubbo ZooKeeper(不完善)
目前市场上主流的 第三套微服务架构解决方案:Spring Boot + Spring Cloud Alibaba
我们采用Spring Boot + Spring Cloud Alibaba来学习
Spring Boot是框架,Spring Cloud Alibaba是技术手段,解决微服务中的注意问题
Spring Cloud Alibaba 解决 微服务需要主要问题
Api网关:服务路由
服务之间通讯:http,RPC,异步调用
服务注册与发现-->高可用
熔断,限流,服务降级
分布式开发中根本问题就是网络不可靠
主要功能
- 服务限流降级:默认支持 Servlet、Feign、RestTemplate、Dubbo 和 RocketMQ 限流降级功能的接入,可以在运行时通过控制台实时修改限流降级规则,还支持查看限流降级 Metrics 监控。
- 服务注册与发现:适配 Spring Cloud 服务注册与发现标准,默认集成了 Ribbon 的支持。
- 分布式配置管理:支持分布式系统中的外部化配置,配置更改时自动刷新。
- 消息驱动能力:基于 Spring Cloud Stream 为微服务应用构建消息驱动能力。
- 阿里云对象存储:阿里云提供的海量、安全、低成本、高可靠的云存储服务。支持在任何应用、任何时间、任何地点存储和访问任意类型的数据。
- 分布式任务调度:提供秒级、精准、高可靠、高可用的定时(基于 Cron 表达式)任务调度服务。同时提供分布式的任务执行模型,如网格任务。网格任务支持海量子任务均匀分配到所有 Worker(schedulerx-client)上执行。
组件
- Sentinel:把流量作为切入点,从流量控制、熔断降级、系统负载保护等多个维度保护服务的稳定性。
- Nacos:一个更易于构建云原生应用的动态服务发现、配置管理和服务管理平台。
- RocketMQ:一款开源的分布式消息系统,基于高可用分布式集群技术,提供低延时的、高可靠的消息发布与订阅服务。
- Alibaba Cloud ACM:一款在分布式架构环境中对应用配置进行集中管理和推送的应用配置中心产品。
- Alibaba Cloud OSS: 阿里云对象存储服务(Object Storage Service,简称 OSS),是阿里云提供的海量、安全、低成本、高可靠的云存储服务。您可以在任何应用、任何时间、任何地点存储和访问任意类型的数据。
- Alibaba Cloud SchedulerX: 阿里中间件团队开发的一款分布式任务调度产品,提供秒级、精准、高可靠、高可用的定时(基于 Cron 表达式)任务调度服务。
使用
1、创建统一的依赖管理
温馨提示
当前 Spring Cloud Alibaba 的 0.2.1.RELEASE 版本基于 Spring Cloud Finchley(F)开发,故在选择 Spring Boot 版本时不要使用 2.1.0 及以上版本(因为 2.1.x 版本必须使用 Spring Cloud Greenwich,俗称 G 版),请使用官方 Demo 中使用的 2.0.6.RELEASE,以免发生意想不到的问题(比如服务无法注册到服务器)
Spring Cloud Alibaba 项目都是基于 Spring Cloud,而 Spring Cloud 项目又是基于 Spring Boot 进行开发,并且都是使用 Maven 做项目管理工具。在实际开发中,我们一般都会创建一个依赖管理项目作为 Maven 的 Parent 项目使用,这样做可以极大的方便我们对 Jar 包版本的统一管理。
创建依赖管理项目
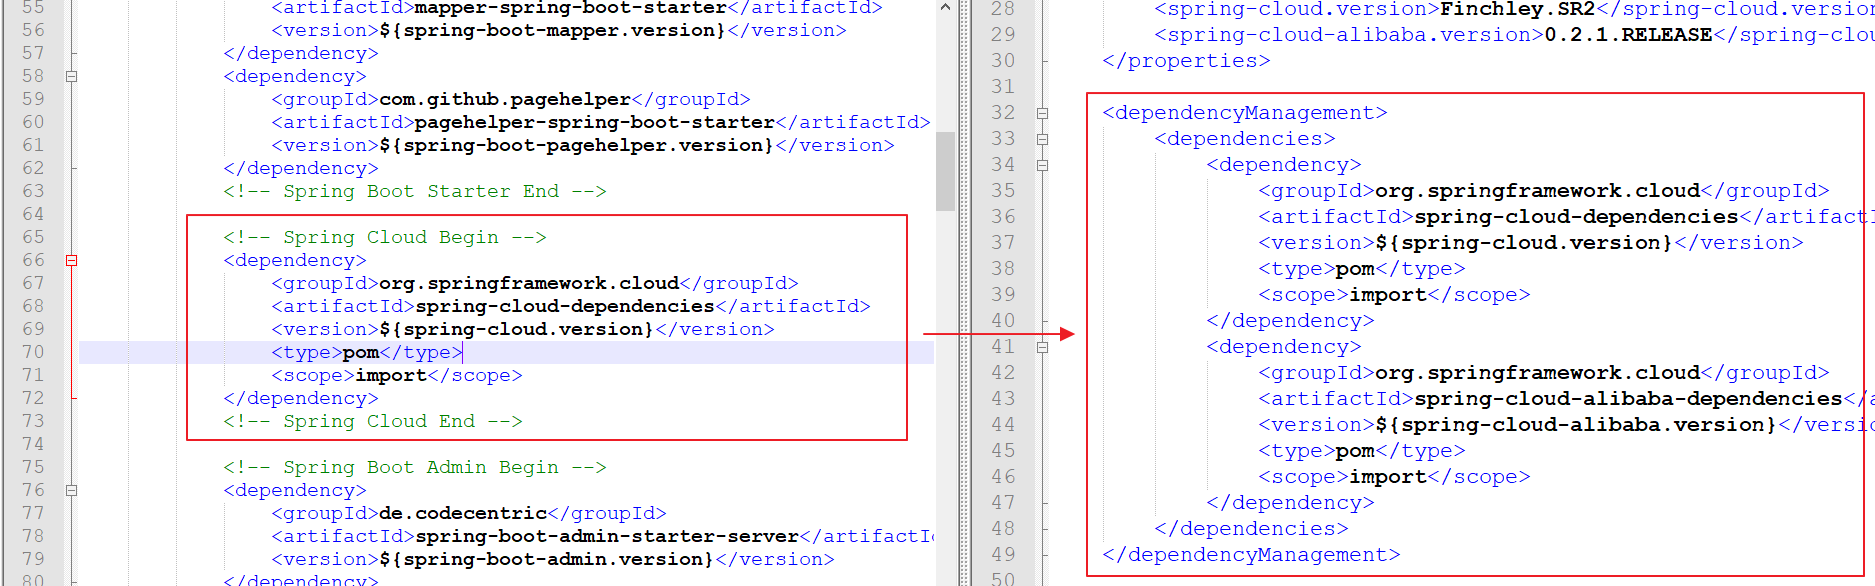
创建一个工程名为 hello-spring-cloud-alibaba-dependencies 的项目,pom.xml 配置文件如下:
<?xml version="1.0" encoding="UTF-8"?>
<project xmlns="http://maven.apache.org/POM/4.0.0" xmlns:xsi="http://www.w3.org/2001/XMLSchema-instance"
         xsi:schemaLocation="http://maven.apache.org/POM/4.0.0 http://maven.apache.org/xsd/maven-4.0.0.xsd">
    <modelVersion>4.0.0</modelVersion>

    <parent>
        <groupId>org.springframework.boot</groupId>
        <artifactId>spring-boot-starter-parent</artifactId>
        <version>2.0.6.RELEASE</version>
    </parent>

    <groupId>com.funtl</groupId>
    <artifactId>hello-spring-cloud-alibaba-dependencies</artifactId>
    <version>1.0.0-SNAPSHOT</version>
    <packaging>pom</packaging>

    <name>hello-spring-cloud-alibaba-dependencies</name>
    <url>http://www.funtl.com</url>
    <inceptionYear>2018-Now</inceptionYear>

    <properties>
        <!-- Environment Settings -->
        <java.version>1.8</java.version>
        <project.build.sourceEncoding>UTF-8</project.build.sourceEncoding>
        <project.reporting.outputEncoding>UTF-8</project.reporting.outputEncoding>

        <!-- Spring Settings -->
        <spring-cloud.version>Finchley.SR2</spring-cloud.version>
        <spring-cloud-alibaba.version>0.2.1.RELEASE</spring-cloud-alibaba.version>
    </properties>

    <dependencyManagement>
        <dependencies>
            <dependency>
                <groupId>org.springframework.cloud</groupId>
                <artifactId>spring-cloud-dependencies</artifactId>
                <version>${spring-cloud.version}</version>
                <type>pom</type>
                <scope>import</scope>
            </dependency>
            <dependency>
                <groupId>org.springframework.cloud</groupId>
                <artifactId>spring-cloud-alibaba-dependencies</artifactId>
                <version>${spring-cloud-alibaba.version}</version>
                <type>pom</type>
                <scope>import</scope>
            </dependency>
        </dependencies>
    </dependencyManagement>

    <build>
        <plugins>
            <!-- Compiler 插件, 设定 JDK 版本 -->
            <plugin>
                <groupId>org.apache.maven.plugins</groupId>
                <artifactId>maven-compiler-plugin</artifactId>
                <configuration>
                    <showWarnings>true</showWarnings>
                </configuration>
            </plugin>

            <!-- 打包 jar 文件时,配置 manifest 文件,加入 lib 包的 jar 依赖 -->
            <plugin>
                <groupId>org.apache.maven.plugins</groupId>
                <artifactId>maven-jar-plugin</artifactId>
                <configuration>
                    <archive>
                        <addMavenDescriptor>false</addMavenDescriptor>
                    </archive>
                </configuration>
                <executions>
                    <execution>
                        <configuration>
                            <archive>
                                <manifest>
                                    <!-- Add directory entries -->
                                    <addDefaultImplementationEntries>true</addDefaultImplementationEntries>
                                    <addDefaultSpecificationEntries>true</addDefaultSpecificationEntries>
                                    <addClasspath>true</addClasspath>
                                </manifest>
                            </archive>
                        </configuration>
                    </execution>
                </executions>
            </plugin>

            <!-- resource -->
            <plugin>
                <groupId>org.apache.maven.plugins</groupId>
                <artifactId>maven-resources-plugin</artifactId>
            </plugin>

            <!-- install -->
            <plugin>
                <groupId>org.apache.maven.plugins</groupId>
                <artifactId>maven-install-plugin</artifactId>
            </plugin>

            <!-- clean -->
            <plugin>
                <groupId>org.apache.maven.plugins</groupId>
                <artifactId>maven-clean-plugin</artifactId>
            </plugin>

            <!-- ant -->
            <plugin>
                <groupId>org.apache.maven.plugins</groupId>
                <artifactId>maven-antrun-plugin</artifactId>
            </plugin>

            <!-- dependency -->
            <plugin>
                <groupId>org.apache.maven.plugins</groupId>
                <artifactId>maven-dependency-plugin</artifactId>
            </plugin>
        </plugins>

        <pluginManagement>
            <plugins>
                <!-- Java Document Generate -->
                <plugin>
                    <groupId>org.apache.maven.plugins</groupId>
                    <artifactId>maven-javadoc-plugin</artifactId>
                    <executions>
                        <execution>
                            <phase>prepare-package</phase>
                            <goals>
                                <goal>jar</goal>
                            </goals>
                        </execution>
                    </executions>
                </plugin>

                <!-- YUI Compressor (CSS/JS压缩) -->
                <plugin>
                    <groupId>net.alchim31.maven</groupId>
                    <artifactId>yuicompressor-maven-plugin</artifactId>
                    <version>1.5.1</version>
                    <executions>
                        <execution>
                            <phase>prepare-package</phase>
                            <goals>
                                <goal>compress</goal>
                            </goals>
                        </execution>
                    </executions>
                    <configuration>
                        <encoding>UTF-8</encoding>
                        <jswarn>false</jswarn>
                        <nosuffix>true</nosuffix>
                        <linebreakpos>30000</linebreakpos>
                        <force>true</force>
                        <includes>
                            <include>**/*.js</include>
                            <include>**/*.css</include>
                        </includes>
                        <excludes>
                            <exclude>**/*.min.js</exclude>
                            <exclude>**/*.min.css</exclude>
                        </excludes>
                    </configuration>
                </plugin>
            </plugins>
        </pluginManagement>

        <!-- 资源文件配置 -->
        <resources>
            <resource>
                <directory>src/main/java</directory>
                <excludes>
                    <exclude>**/*.java</exclude>
                </excludes>
            </resource>
            <resource>
                <directory>src/main/resources</directory>
            </resource>
        </resources>
    </build>

    <repositories>
        <repository>
            <id>aliyun-repos</id>
            <name>Aliyun Repository</name>
            <url>http://maven.aliyun.com/nexus/content/groups/public</url>
            <releases>
                <enabled>true</enabled>
            </releases>
            <snapshots>
                <enabled>false</enabled>
            </snapshots>
        </repository>

        <repository>
            <id>sonatype-repos</id>
            <name>Sonatype Repository</name>
            <url>https://oss.sonatype.org/content/groups/public</url>
            <releases>
                <enabled>true</enabled>
            </releases>
            <snapshots>
                <enabled>false</enabled>
            </snapshots>
        </repository>
        <repository>
            <id>sonatype-repos-s</id>
            <name>Sonatype Repository</name>
            <url>https://oss.sonatype.org/content/repositories/snapshots</url>
            <releases>
                <enabled>false</enabled>
            </releases>
            <snapshots>
                <enabled>true</enabled>
            </snapshots>
        </repository>

        <repository>
            <id>spring-snapshots</id>
            <name>Spring Snapshots</name>
            <url>https://repo.spring.io/snapshot</url>
            <snapshots>
                <enabled>true</enabled>
            </snapshots>
        </repository>
        <repository>
            <id>spring-milestones</id>
            <name>Spring Milestones</name>
            <url>https://repo.spring.io/milestone</url>
            <snapshots>
                <enabled>false</enabled>
            </snapshots>
        </repository>
    </repositories>

    <pluginRepositories>
        <pluginRepository>
            <id>aliyun-repos</id>
            <name>Aliyun Repository</name>
            <url>http://maven.aliyun.com/nexus/content/groups/public</url>
            <releases>
                <enabled>true</enabled>
            </releases>
            <snapshots>
                <enabled>false</enabled>
            </snapshots>
        </pluginRepository>
    </pluginRepositories>
</project>
- parent:继承了 Spring Boot 的 Parent,表示我们是一个 Spring Boot 工程
- package:
pom,表示该项目仅当做依赖项目,没有具体的实现代码 spring-cloud-alibaba-dependencies:在properties配置中预定义了版本号为0.2.1.RELEASE,表示我们的 Spring Cloud Alibaba 对应的是 Spring Cloud Finchley 版本- build:配置了项目所需的各种插件
- repositories:配置项目下载依赖时的第三方库
依赖版本说明
在2019 年 01 月 05 日之前,项目的最新版本是 0.2.1.RELEASE 和 0.1.1.RELEASE,版本 0.2.1.RELEASE 对应的是 Spring Cloud Finchley 版本,版本 0.1.1.RELEASE 对应的是 Spring Cloud Edgware 版本。项目还处在孵化阶段,故所有版本号都以 0 开头;后续肯定会有很多强大的功能帮助我们更好的实现分布式应用的开发;
通过https://maven.aliyun.com/mvn/search 可以浏览项目版本
与 Spring Cloud Netflix 的区别
主要增加了 org.springframework.cloud:spring-cloud-alibaba-dependencies
2、服务注册与发现
Spring Cloud Netflix 采用 Eureka 做作为我们的服务注册与发现服务器,现利用 Spring Cloud Alibaba 提供的 Nacos 组件替代该方案。
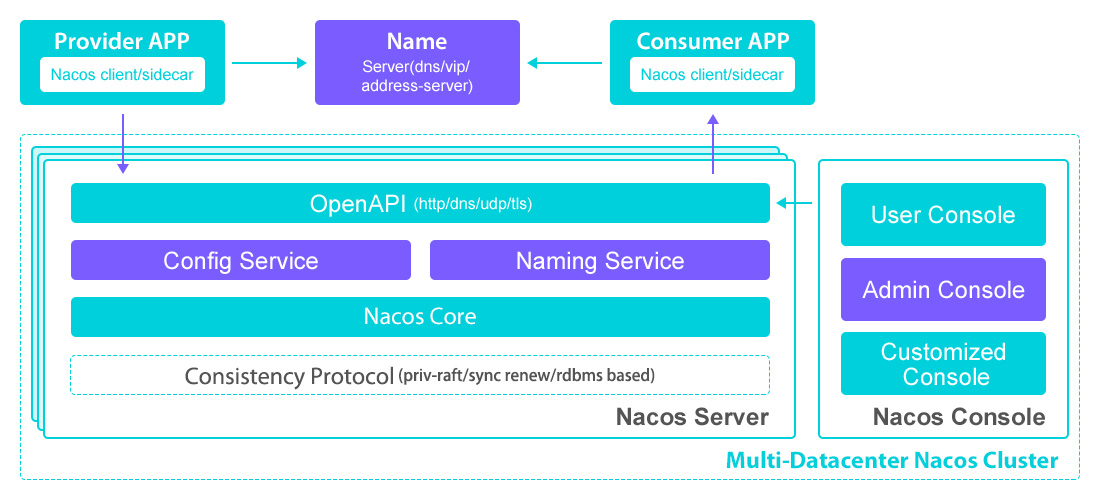
什么是 Nacos
Nacos 致力于帮助您发现、配置和管理微服务。Nacos 提供了一组简单易用的特性集,帮助您快速实现动态服务发现、服务配置、服务元数据及流量管理。
Nacos 帮助您更敏捷和容易地构建、交付和管理微服务平台。 Nacos 是构建以“服务”为中心的现代应用架构 (例如微服务范式、云原生范式) 的服务基础设施。
基本架构及概念
服务 (Service)
服务是指一个或一组软件功能(例如特定信息的检索或一组操作的执行),其目的是不同的客户端可以为不同的目的重用(例如通过跨进程的网络调用)。Nacos 支持主流的服务生态,如 Kubernetes Service、gRPC|Dubbo RPC Service 或者 Spring Cloud RESTful Service.
服务注册中心 (Service Registry)
服务注册中心,它是服务,其实例及元数据的数据库。服务实例在启动时注册到服务注册表,并在关闭时注销。服务和路由器的客户端查询服务注册表以查找服务的可用实例。服务注册中心可能会调用服务实例的健康检查 API 来验证它是否能够处理请求。
服务元数据 (Service Metadata)
服务元数据是指包括服务端点(endpoints)、服务标签、服务版本号、服务实例权重、路由规则、安全策略等描述服务的数据
服务提供方 (Service Provider)
是指提供可复用和可调用服务的应用方
服务消费方 (Service Consumer)
是指会发起对某个服务调用的应用方
配置 (Configuration)
在系统开发过程中通常会将一些需要变更的参数、变量等从代码中分离出来独立管理,以独立的配置文件的形式存在。目的是让静态的系统工件或者交付物(如 WAR,JAR 包等)更好地和实际的物理运行环境进行适配。配置管理一般包含在系统部署的过程中,由系统管理员或者运维人员完成这个步骤。配置变更是调整系统运行时的行为的有效手段之一。
配置管理 (Configuration Management)
在数据中心中,系统中所有配置的编辑、存储、分发、变更管理、历史版本管理、变更审计等所有与配置相关的活动统称为配置管理。
名字服务 (Naming Service)
提供分布式系统中所有对象(Object)、实体(Entity)的“名字”到关联的元数据之间的映射管理服务,例如 ServiceName -> Endpoints Info, Distributed Lock Name -> Lock Owner/Status Info, DNS Domain Name -> IP List, 服务发现和 DNS 就是名字服务的2大场景。
配置服务 (Configuration Service)
在服务或者应用运行过程中,提供动态配置或者元数据以及配置管理的服务提供者。
下载安装
准备环境
Nacos 依赖 Java 环境来运行。如果您是从代码开始构建并运行 Nacos,还需要为此配置 Maven 环境,请确保是在以下版本环境中安装使用:
- 64 bit OS,支持 Linux/Unix/Mac/Windows,推荐选用 Linux/Unix/Mac。
- 64 bit JDK 1.8+
- Maven 3.2.x+
下载并安装
# 下载源码
git clone https://github.com/alibaba/nacos.git

# 安装到本地仓库
cd nacos/
mvn -Prelease-nacos clean install -U
注:下载依赖时间较长,请耐心等待...
启动服务
cd distribution/target/nacos-server-0.7.0/nacos/bin

# Linux
./startup.sh -m standalone

# Windows
startup.cmd
访问服务
打开浏览器访问:http://localhost:8848/nacos
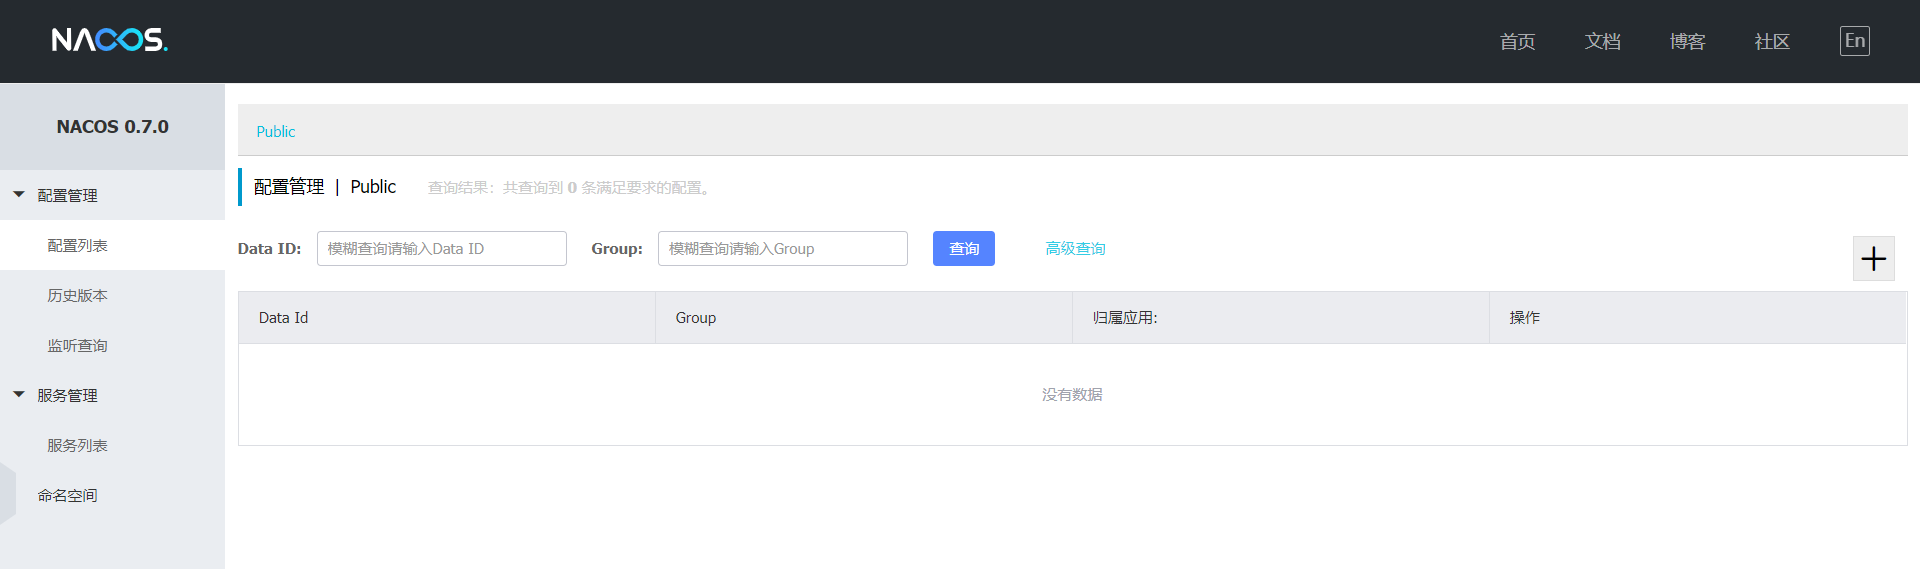
注:从 0.8.0 版本开始,需要登录才可访问,默认账号密码为 nacos/nacos
3、创建服务提供者
概述
通过一个简单的示例来感受一下如何将服务注册到 Nacos,其实和 Eureka 没有太大差别。
创建一个工程名为 hello-spring-cloud-alibaba-nacos-provider 的服务提供者项目,pom.xml 配置如下:
POM.xml
<?xml version="1.0" encoding="UTF-8"?>
<project xmlns="http://maven.apache.org/POM/4.0.0" xmlns:xsi="http://www.w3.org/2001/XMLSchema-instance"
         xsi:schemaLocation="http://maven.apache.org/POM/4.0.0 http://maven.apache.org/xsd/maven-4.0.0.xsd">
    <modelVersion>4.0.0</modelVersion>

    <parent>
        <groupId>com.funtl</groupId>
        <artifactId>hello-spring-cloud-alibaba-dependencies</artifactId>
        <version>1.0.0-SNAPSHOT</version>
        <relativePath>../hello-spring-cloud-alibaba-dependencies/pom.xml</relativePath>
    </parent>

    <artifactId>hello-spring-cloud-alibaba-nacos-provider</artifactId>
    <packaging>jar</packaging>

    <name>hello-spring-cloud-alibaba-nacos-provider</name>
    <url>http://www.funtl.com</url>
    <inceptionYear>2018-Now</inceptionYear>

    <dependencies>
        <!-- Spring Boot Begin -->
        <dependency>
            <groupId>org.springframework.boot</groupId>
            <artifactId>spring-boot-starter-web</artifactId>
        </dependency>
        <dependency>
            <groupId>org.springframework.boot</groupId>
            <artifactId>spring-boot-starter-actuator</artifactId>
        </dependency>
        <dependency>
            <groupId>org.springframework.boot</groupId>
            <artifactId>spring-boot-starter-test</artifactId>
            <scope>test</scope>
        </dependency>
        <!-- Spring Boot End -->

        <!-- Spring Cloud Begin -->
        <dependency>
            <groupId>org.springframework.cloud</groupId>
            <artifactId>spring-cloud-starter-alibaba-nacos-discovery</artifactId>
        </dependency>
        <!-- Spring Cloud End -->
    </dependencies>

    <build>
        <plugins>
            <plugin>
                <groupId>org.springframework.boot</groupId>
                <artifactId>spring-boot-maven-plugin</artifactId>
                <configuration>
                    <mainClass>com.funtl.hello.spring.cloud.alibaba.nacos.provider.NacosProviderApplication</mainClass>
                </configuration>
            </plugin>
        </plugins>
    </build>
</project>
Application
package com.funtl.hello.spring.cloud.alibaba.nacos.provider;

import org.springframework.boot.SpringApplication;
import org.springframework.boot.autoconfigure.SpringBootApplication;
import org.springframework.cloud.client.discovery.EnableDiscoveryClient;
import org.springframework.web.bind.annotation.GetMapping;
import org.springframework.web.bind.annotation.PathVariable;
import org.springframework.web.bind.annotation.RestController;

@SpringBootApplication
@EnableDiscoveryClient
public class NacosProviderApplication {
    public static void main(String[] args) {
        SpringApplication.run(NacosProviderApplication.class, args);
    }

    @RestController
    public class EchoController {
        @GetMapping(value = "/echo/{message}")
        public String echo(@PathVariable String message) {
            return "Hello Nacos Discovery " + message;
        }
    }
}
application.yml
spring:
  application:
    name: nacos-provider
  cloud:
    nacos:
      discovery:
        server-addr: 127.0.0.1:8848

server:
  port: 8081

management:
  endpoints:
    web:
      exposure:
        include: "*"
启动工程
打开nacos,你会发现一个服务已经注册在服务中了,服务名为 nacos-provider

这时打开 http://localhost:8081/echo/hi ,你会在浏览器上看到:
Hello Nacos Discovery hi
服务的端点检查
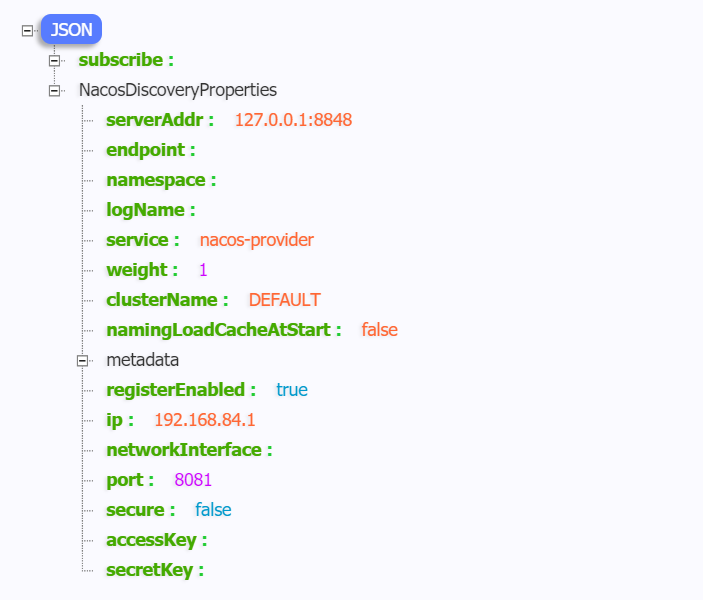
spring-cloud-starter-alibaba-nacos-discovery 在实现的时候提供了一个 EndPoint, EndPoint 的访问地址为 http://ip:port/actuator/nacos-discovery
目的:每一个往nacos服务器注册的服务器都会有这一个服务。nacos定时向每一个服务器发送http://ip:port/actuator/nacos-discovery请求,来判断该服务器是否还处于健康状态;
通过浏览器访问 http://localhost:8081/actuator/nacos-discovery 你会在浏览器上看到
附:Nacos Starter 更多配置项信息
| 配置项 | Key | 默认值 | 说明 |
|---|---|---|---|
| 服务端地址 | spring.cloud.nacos.discovery.server-addr | 无 | Nacos Server 启动监听的ip地址和端口 |
| 服务名 | spring.cloud.nacos.discovery.service | ${spring.application.name} | 给当前的服务命名 |
| 权重 | spring.cloud.nacos.discovery.weight | 1 | 取值范围 1 到 100,数值越大,权重越大 |
| 网卡名 | spring.cloud.nacos.discovery.network-interface | 无 | 当IP未配置时,注册的IP为此网卡所对应的IP地址,如果此项也未配置,则默认取第一块网卡的地址 |
| 注册的IP地址 | spring.cloud.nacos.discovery.ip | 无 | 优先级最高 |
| 注册的端口 | spring.cloud.nacos.discovery.port | -1 | 默认情况下不用配置,会自动探测 |
| 命名空间 | spring.cloud.nacos.discovery.namespace | 无 | 常用场景之一是不同环境的注册的区分隔离,例如开发测试环境和生产环境的资源(如配置、服务)隔离等。 |
| AccessKey | spring.cloud.nacos.discovery.access-key | 无 | 当要上阿里云时,阿里云上面的一个云账号名 |
| SecretKey | spring.cloud.nacos.discovery.secret-key | 无 | 当要上阿里云时,阿里云上面的一个云账号密码 |
| Metadata | spring.cloud.nacos.discovery.metadata | 无 | 使用 Map 格式配置,用户可以根据自己的需要自定义一些和服务相关的元数据信息 |
| 日志文件名 | spring.cloud.nacos.discovery.log-name | 无 | |
| 接入点 | spring.cloud.nacos.discovery.enpoint | UTF-8 | 地域的某个服务的入口域名,通过此域名可以动态地拿到服务端地址 |
| 是否集成 Ribbon | ribbon.nacos.enabled | true | 一般都设置成 true 即可 |
4、创建服务消费者
概述
服务消费者的创建与服务提供者大同小异,这里采用最原始的一种方式,即显示的使用 LoadBalanceClient 和 RestTemplate 结合的方式来访问。
POM
创建一个工程名为 hello-spring-cloud-alibaba-nacos-consumer 的服务消费者项目,pom.xml 配置如下:
<?xml version="1.0" encoding="UTF-8"?>
<project xmlns="http://maven.apache.org/POM/4.0.0" xmlns:xsi="http://www.w3.org/2001/XMLSchema-instance"
         xsi:schemaLocation="http://maven.apache.org/POM/4.0.0 http://maven.apache.org/xsd/maven-4.0.0.xsd">
    <modelVersion>4.0.0</modelVersion>

    <parent>
        <groupId>com.funtl</groupId>
        <artifactId>hello-spring-cloud-alibaba-dependencies</artifactId>
        <version>1.0.0-SNAPSHOT</version>
        <relativePath>../hello-spring-cloud-alibaba-dependencies/pom.xml</relativePath>
    </parent>

    <artifactId>hello-spring-cloud-alibaba-nacos-consumer</artifactId>
    <packaging>jar</packaging>

    <name>hello-spring-cloud-alibaba-nacos-consumer</name>
    <url>http://www.funtl.com</url>
    <inceptionYear>2018-Now</inceptionYear>

    <dependencies>
        <!-- Spring Boot Begin -->
        <dependency>
            <groupId>org.springframework.boot</groupId>
            <artifactId>spring-boot-starter-web</artifactId>
        </dependency>
        <dependency>
            <groupId>org.springframework.boot</groupId>
            <artifactId>spring-boot-starter-actuator</artifactId>
        </dependency>
        <dependency>
            <groupId>org.springframework.boot</groupId>
            <artifactId>spring-boot-starter-test</artifactId>
            <scope>test</scope>
        </dependency>
        <!-- Spring Boot End -->

        <!-- Spring Cloud Begin -->
        <dependency>
            <groupId>org.springframework.cloud</groupId>
            <artifactId>spring-cloud-starter-alibaba-nacos-discovery</artifactId>
        </dependency>
        <!-- Spring Cloud End -->
    </dependencies>

    <build>
        <plugins>
            <plugin>
                <groupId>org.springframework.boot</groupId>
                <artifactId>spring-boot-maven-plugin</artifactId>
                <configuration>
                    <mainClass>com.funtl.hello.spring.cloud.alibaba.nacos.consumer.NacosConsumerApplication</mainClass>
                </configuration>
            </plugin>
        </plugins>
    </build>
</project>
Application
package com.funtl.hello.spring.cloud.alibaba.nacos.consumer;

import org.springframework.boot.SpringApplication;
import org.springframework.boot.autoconfigure.SpringBootApplication;
import org.springframework.cloud.client.discovery.EnableDiscoveryClient;

@SpringBootApplication
@EnableDiscoveryClient
public class NacosConsumerApplication {
    public static void main(String[] args) {
        SpringApplication.run(NacosConsumerApplication.class, args);
    }
}
Configuration
创建一个名为 NacosConsumerConfiguration 的 Java 配置类,主要作用是为了注入 RestTemplate
package com.funtl.hello.spring.cloud.alibaba.nacos.consumer.config;

import org.springframework.context.annotation.Bean;
import org.springframework.context.annotation.Configuration;
import org.springframework.web.client.RestTemplate;

@Configuration                                //该注解相当于spring-context.mxl
public class NacosConsumerConfiguration {

    @Bean                                     //相当于在xml中写入<bean id="RestTemplate" class="org.springframework.web.client"></beam>
    public RestTemplate restTemplate() {
        return new RestTemplate();
    }
}
Controller
创建一个名为 NacosConsumerController 测试用的 Controller
package com.funtl.hello.spring.cloud.alibaba.nacos.consumer.controller;

import org.springframework.beans.factory.annotation.Autowired;
import org.springframework.beans.factory.annotation.Value;
import org.springframework.cloud.client.ServiceInstance;
import org.springframework.cloud.client.loadbalancer.LoadBalancerClient;
import org.springframework.web.bind.annotation.GetMapping;
import org.springframework.web.bind.annotation.RestController;
import org.springframework.web.client.RestTemplate;

@RestController
public class NacosConsumerController {

    @Autowired
    private LoadBalancerClient loadBalancerClient;

    @Autowired
    private RestTemplate restTemplate;

    @Value("${spring.application.name}")     //可以直接读取到配置文件中的属性
    private String appName;

    @GetMapping(value = "/echo/app/name")
    public String echo() {
        //使用 LoadBalanceClient 和 RestTemplate 结合的方式来访问
        ServiceInstance serviceInstance = loadBalancerClient.choose("nacos-provider");   //nacos服务器中注册的服务器名字
        String url = String.format("http://%s:%s/echo/%s", serviceInstance.getHost(), serviceInstance.getPort(), appName); //nacos-provider服务器的ip:端口
        return restTemplate.getForObject(url, String.class);
    }
}
application.yml
spring:
  application:
    name: nacos-consumer
  cloud:
    nacos:
      discovery:
        server-addr: 127.0.0.1:8848

server:
  port: 9091

management:
  endpoints:
    web:
      exposure:
        include: "*"
启动工程
通过浏览器访问 http://localhost:8848/nacos,即 Nacos Server 网址
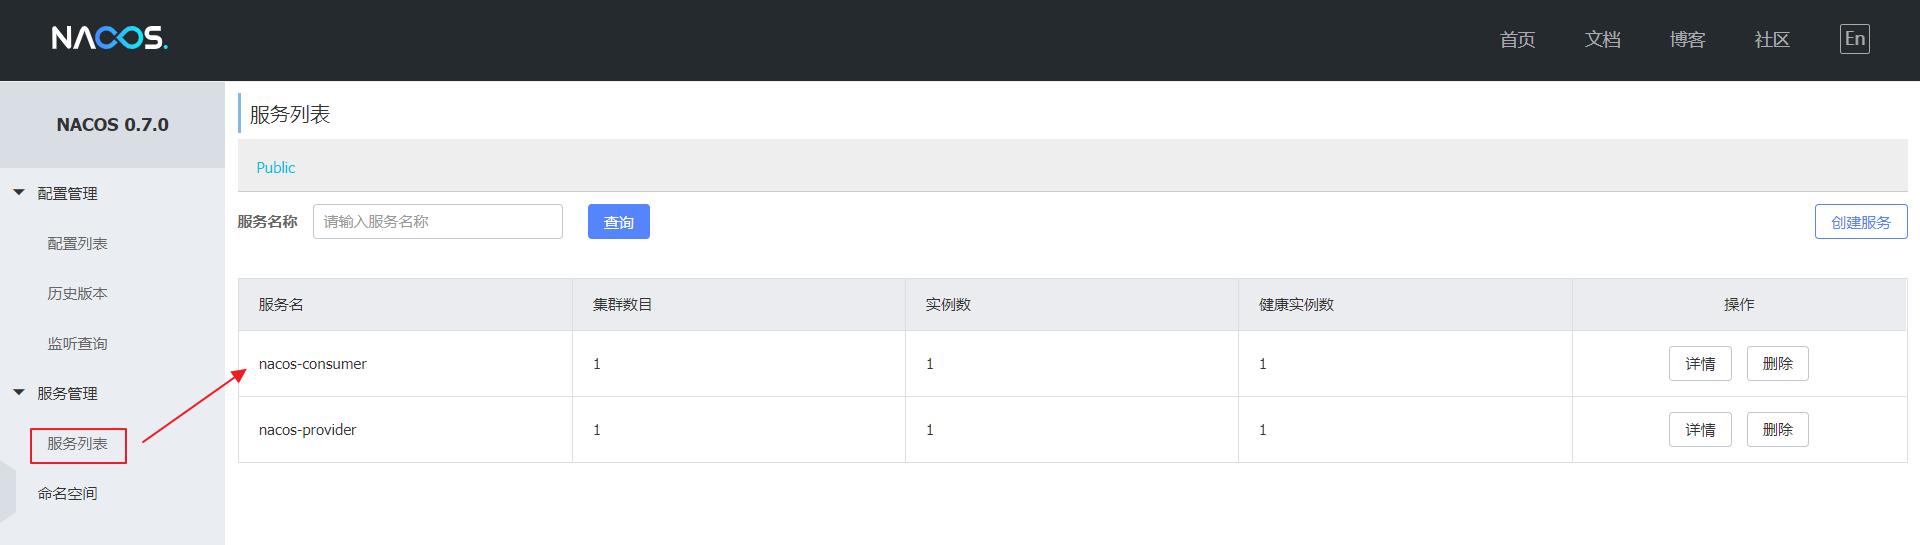
你会发现多了一个名为 nacos-consumer 的服务
这时打开 http://localhost:9091/echo/app/name ,你会在浏览器上看到:
Hello Nacos Discovery nacos-consumer
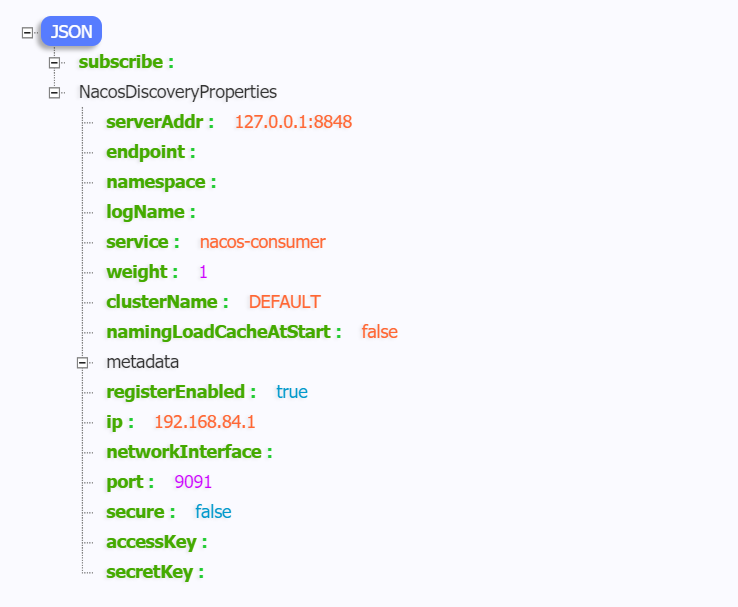
服务的端点检查测试
通过浏览器访问 http://localhost:9091/actuator/nacos-discovery 你会在浏览器上看到:
5、创建服务消费者(Feign)
POM
创建一个工程名为 hello-spring-cloud-alibaba-nacos-consumer-feign 的服务消费者项目,pom.xml 配置如下:
<?xml version="1.0" encoding="UTF-8"?>
<project xmlns="http://maven.apache.org/POM/4.0.0" xmlns:xsi="http://www.w3.org/2001/XMLSchema-instance"
         xsi:schemaLocation="http://maven.apache.org/POM/4.0.0 http://maven.apache.org/xsd/maven-4.0.0.xsd">
    <modelVersion>4.0.0</modelVersion>

    <parent>
        <groupId>com.funtl</groupId>
        <artifactId>hello-spring-cloud-alibaba-dependencies</artifactId>
        <version>1.0.0-SNAPSHOT</version>
        <relativePath>../hello-spring-cloud-alibaba-dependencies/pom.xml</relativePath>
    </parent>

    <artifactId>hello-spring-cloud-alibaba-nacos-consumer-feign</artifactId>
    <packaging>jar</packaging>

    <name>hello-spring-cloud-alibaba-nacos-consumer-feign</name>
    <url>http://www.funtl.com</url>
    <inceptionYear>2018-Now</inceptionYear>

    <dependencies>
        <!-- Spring Boot Begin -->
        <dependency>
            <groupId>org.springframework.boot</groupId>
            <artifactId>spring-boot-starter-web</artifactId>
        </dependency>
        <dependency>
            <groupId>org.springframework.boot</groupId>
            <artifactId>spring-boot-starter-actuator</artifactId>
        </dependency>
        <dependency>
            <groupId>org.springframework.boot</groupId>
            <artifactId>spring-boot-starter-test</artifactId>
            <scope>test</scope>
        </dependency>
        <!-- Spring Boot End -->

        <!-- Spring Cloud Begin -->
        <dependency>
            <groupId>org.springframework.cloud</groupId>
            <artifactId>spring-cloud-starter-alibaba-nacos-discovery</artifactId>
        </dependency>
        <dependency>
            <groupId>org.springframework.cloud</groupId>
            <artifactId>spring-cloud-starter-openfeign</artifactId>
        </dependency>
        <!-- Spring Cloud End -->
    </dependencies>

    <build>
        <plugins>
            <plugin>
                <groupId>org.springframework.boot</groupId>
                <artifactId>spring-boot-maven-plugin</artifactId>
                <configuration>
                    <mainClass>com.funtl.hello.spring.cloud.alibaba.nacos.consumer.feign.NacosConsumerFeignApplication</mainClass>
                </configuration>
            </plugin>
        </plugins>
    </build>
</project>
主要增加了 org.springframework.cloud:spring-cloud-starter-openfeign 依赖
Application
通过 @EnableFeignClients 注解开启 Feign 功能
package com.funtl.hello.spring.cloud.alibaba.nacos.consumer.feign;

import org.springframework.boot.SpringApplication;
import org.springframework.boot.autoconfigure.SpringBootApplication;
import org.springframework.cloud.client.discovery.EnableDiscoveryClient;
import org.springframework.cloud.openfeign.EnableFeignClients;

@SpringBootApplication
@EnableDiscoveryClient
@EnableFeignClients
public class NacosConsumerFeignApplication {
    public static void main(String[] args) {
        SpringApplication.run(NacosConsumerFeignApplication.class, args);
    }
}
创建 Feign 接口
通过 @FeignClient("服务名") 注解来指定调用哪个服务。代码如下:
package com.funtl.hello.spring.cloud.alibaba.nacos.consumer.feign.service;

import org.springframework.cloud.openfeign.FeignClient;
import org.springframework.web.bind.annotation.GetMapping;
import org.springframework.web.bind.annotation.PathVariable;

@FeignClient(value = "nacos-provider")
public interface EchoService {

    @GetMapping(value = "/echo/{message}")       //调用provide提供的接口
    String echo(@PathVariable("message") String message);
}
Controller
package com.funtl.hello.spring.cloud.alibaba.nacos.consumer.feign.controller;

import com.funtl.hello.spring.cloud.alibaba.nacos.consumer.feign.service.EchoService;
import org.springframework.beans.factory.annotation.Autowired;
import org.springframework.web.bind.annotation.GetMapping;
import org.springframework.web.bind.annotation.RestController;

@RestController
public class NacosConsumerFeignController {

    @Autowired
    private EchoService echoService;

    @GetMapping(value = "/echo/hi")
    public String echo() {
        return echoService.echo("Hi Feign");
    }
}
application.yml
spring:
  application:
    name: nacos-consumer-feign
  cloud:
    nacos:
      discovery:
        server-addr: 127.0.0.1:8848

server:
  port: 9092

management:
  endpoints:
    web:
      exposure:
        include: "*"
启动工程
通过浏览器访问 http://localhost:8848/nacos,即 Nacos Server 网址
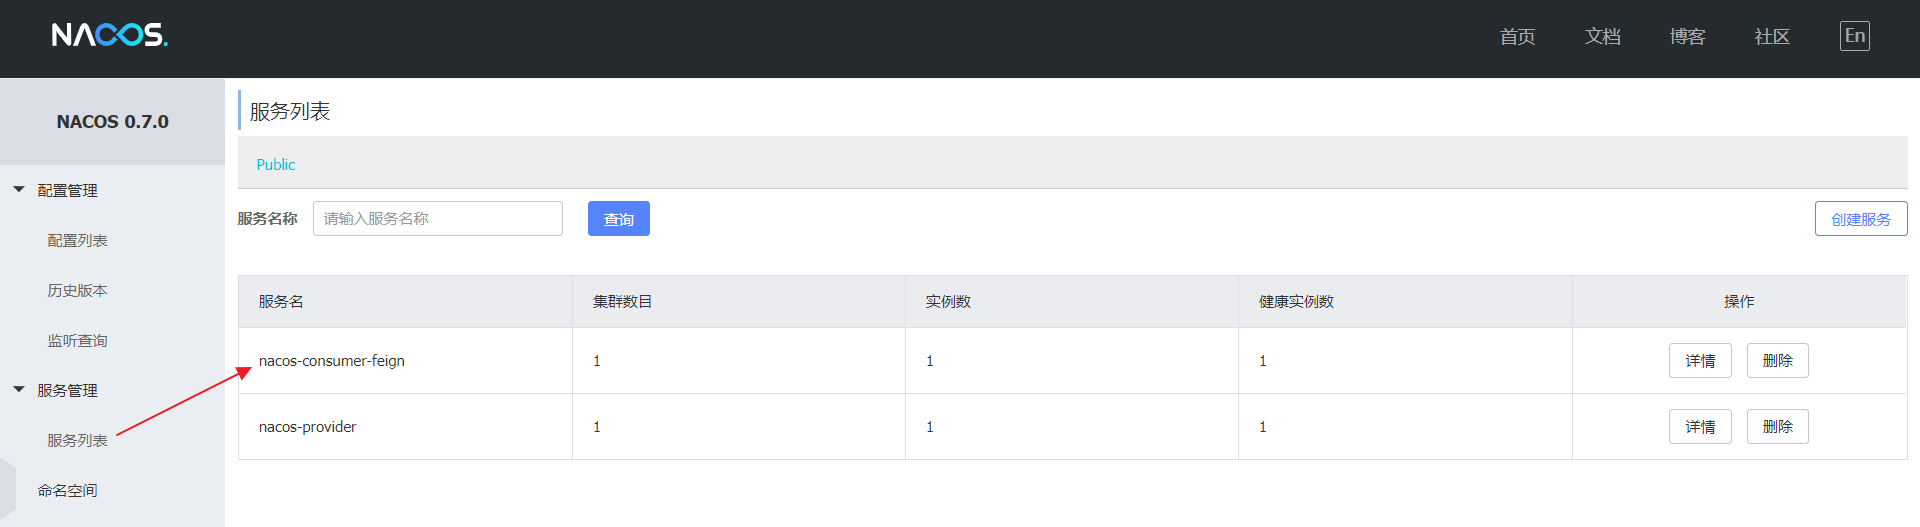
你会发现多了一个名为 nacos-consumer-feign 的服务
这时打开 http://localhost:9092/echo/hi ,你会在浏览器上看到:
Hello Nacos Discovery Hi Feign
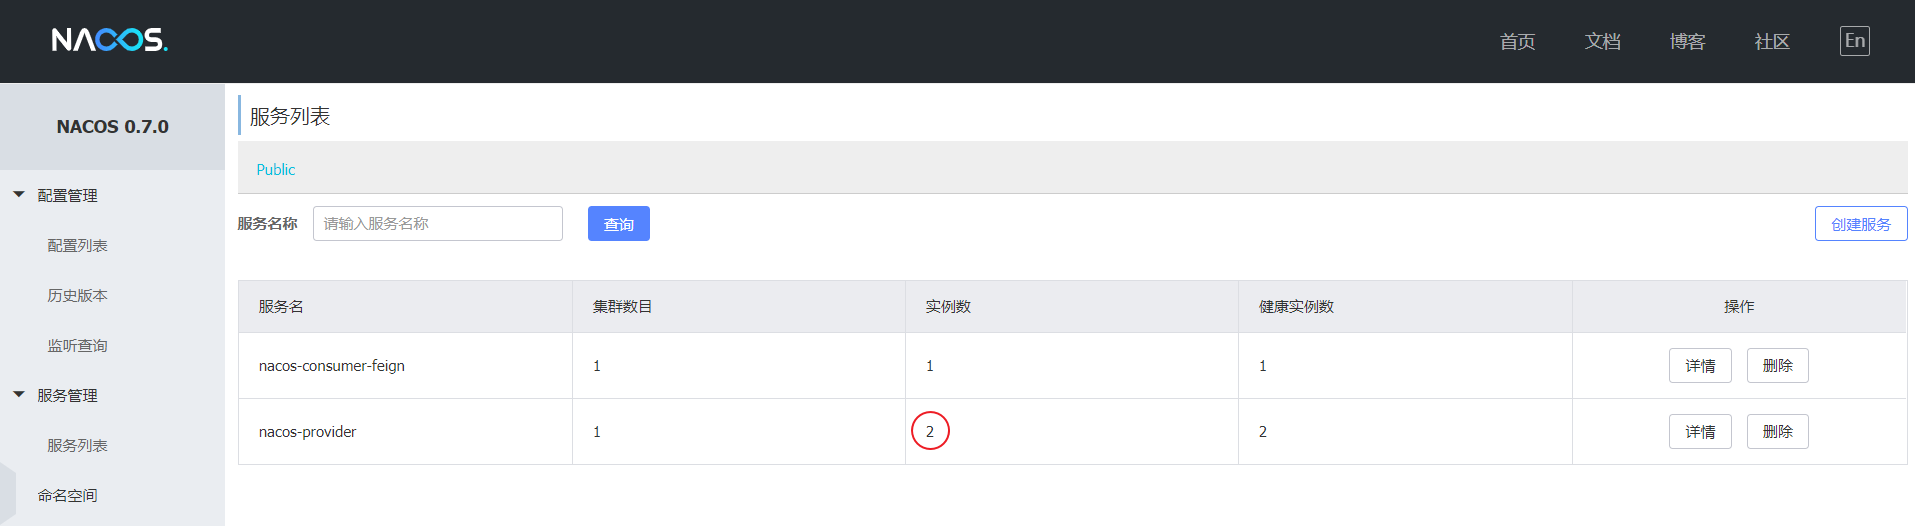
测试负载均衡
- 启动多个
consumer-provider实例,效果图如下:
- 修改
consumer-provider项目中的Controller代码,用于确定负载均衡生效
package com.funtl.hello.spring.cloud.alibaba.nacos.provider;

import org.springframework.beans.factory.annotation.Value;
import org.springframework.boot.SpringApplication;
import org.springframework.boot.autoconfigure.SpringBootApplication;
import org.springframework.cloud.client.discovery.EnableDiscoveryClient;
import org.springframework.web.bind.annotation.GetMapping;
import org.springframework.web.bind.annotation.PathVariable;
import org.springframework.web.bind.annotation.RestController;

@SpringBootApplication
@EnableDiscoveryClient
public class NacosProviderApplication {
    public static void main(String[] args) {
        SpringApplication.run(NacosProviderApplication.class, args);
    }

    @Value("${server.port}")
    private String port;

    @RestController
    public class EchoController {
        @GetMapping(value = "/echo/{message}")
        public String echo(@PathVariable String message) {
            return "Hello Nacos Discovery " + message + " i am from port " + port;
        }
    }
}
- 在浏览器上多次访问
http://localhost:9092/echo/hi,浏览器交替显示:
Hello Nacos Discovery Hi Feign i am from port 8081
Hello Nacos Discovery Hi Feign i am from port 8082

 浙公网安备 33010602011771号