

Spring Boot----静态资源映射以及集成 Thymeleaf 模板引擎
静态资源映射:
1、静态资源映射规则
查看 org.springframework.boot.autoconfigure.web.servlet.WebMvcAutoConfiguration 添加资源映射这段代码
@Override
        public void addResourceHandlers(ResourceHandlerRegistry registry) {
            if (!this.resourceProperties.isAddMappings()) {
                logger.debug("Default resource handling disabled");
                return;
            }
            Duration cachePeriod = this.resourceProperties.getCache().getPeriod();
            CacheControl cacheControl = this.resourceProperties.getCache().getCachecontrol().toHttpCacheControl();
            //第一种映射规则("/webjars")
              if (!registry.hasMappingForPattern("/webjars/**")) {
                customizeResourceHandlerRegistration(registry.addResourceHandler("/webjars/**")
                        .addResourceLocations("classpath:/META-INF/resources/webjars/")
                        .setCachePeriod(getSeconds(cachePeriod)).setCacheControl(cacheControl));
            }
            String staticPathPattern = this.mvcProperties.getStaticPathPattern();
            //第二种映射规则("/")
              if (!registry.hasMappingForPattern(staticPathPattern)) {
                customizeResourceHandlerRegistration(registry.addResourceHandler(staticPathPattern)
                        .addResourceLocations(getResourceLocations(this.resourceProperties.getStaticLocations()))
                        .setCachePeriod(getSeconds(cachePeriod)).setCacheControl(cacheControl));
            }
        }
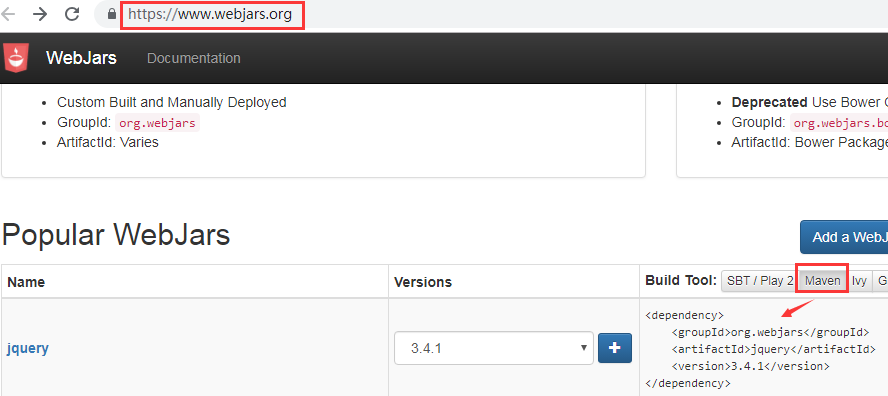
1.1第一种映射规则:以/webjars/的请求
比如 http://localhost:8080/webjars/jquery/3.4.1/jquery.js,springboot会去/META-INF/resources/webjars/获取资源
1.1.1我们需要通过maven来添加静态资源

1.1第二种映射规则:以/**的请求
如果没有被处理(RequestMapping),就会去这些目录去找资源
classpath:/META-INF/resources/     //目录需要自己建
classpath:/resources/              //目录需要自己建
classpath:/static/                 //spring boot 帮我们建好了
classpath:/public/                 //目录需要自己建
/                                  //当前项目的根路径
1.2 对于localhost:8080/ 是如何映射到 index.html?
源码
@Bean
public WelcomePageHandlerMapping welcomePageHandlerMapping(ApplicationContext applicationContext) {
    WelcomePageHandlerMapping welcomePageHandlerMapping = new WelcomePageHandlerMapping(
            new TemplateAvailabilityProviders(applicationContext), applicationContext, getWelcomePage(),
            this.mvcProperties.getStaticPathPattern());
    welcomePageHandlerMapping.setInterceptors(getInterceptors());
    return welcomePageHandlerMapping;
}
1.3 所有的**/favicon.ioc 都是在静态资源找
1.4 修改默认的静态资源路径配置(application.properties)
spring.resources.static-locations=classpath:/,classpath:/hellow/
模板引擎:
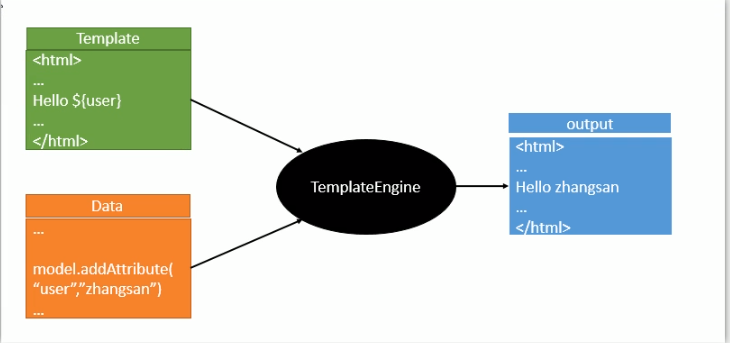
Thymeleaf 是一个跟 Velocity、FreeMarker 类似的模板引擎,它可以完全替代 JSP 。相较与其他的模板引擎,它有如下三个极吸引人的特点
- Thymeleaf 在有网络和无网络的环境下皆可运行,即它可以让美工在浏览器查看页面的静态效果,也可以让程序员在服务器查看带数据的动态页面效果。这是由于它支持 html 原型,然后在 html 标签里增加额外的属性来达到模板 + 数据的展示方式。浏览器解释 html 时会忽略未定义的标签属性,所以 thymeleaf 的模板可以静态地运行;当有数据返回到页面时,Thymeleaf 标签会动态地替换掉静态内容,使页面动态显示。
- Thymeleaf 开箱即用的特性。它提供标准和 Spring 标准两种方言,可以直接套用模板实现 JSTL、 OGNL 表达式效果,避免每天套模板、改 JSTL、改标签的困扰。同时开发人员也可以扩展和创建自定义的方言。
- Thymeleaf 提供 Spring 标准方言和一个与 SpringMVC 完美集成的可选模块,可以快速的实现表单绑定、属性编辑器、国际化等功能。
如果希望以 Jar 形式发布模块则尽量不要使用 JSP 相关知识,这是因为 JSP 在内嵌的 Servlet 容器上运行有一些问题 (内嵌 Tomcat、 Jetty 不支持 Jar 形式运行 JSP,Undertow 不支持 JSP)。所以需要使用Thymeleaf类似的模板引擎。
Spring Boot 提供了大量模板引擎,包括:
- FreeMarker
- Groovy
- Mustache
- Thymeleaf
- Velocity
- Beetl
1.使用
源码:org.springframework.boot.autoconfigure.thymeleaf
1.1 意思叫我们将html页面放到templates目录下
@ConfigurationProperties(prefix = "spring.thymeleaf")
public class ThymeleafProperties {
	private static final Charset DEFAULT_ENCODING = StandardCharsets.UTF_8;
	public static final String DEFAULT_PREFIX = "classpath:/templates/";
     //只用将.html文件放到classpath:/templates/目录下,thymeleaf就能解析了
	public static final String DEFAULT_SUFFIX = ".html";
}
2.1 创建项目
1、创建项目的时候添加 Thymeleaf 配置
如果已经创建完成项目(创建项目的时候没有导入thymeleaf),在pom.xml 手动添加依赖
<dependency>
            <groupId>org.springframework.boot</groupId>
            <artifactId>spring-boot-starter-thymeleaf</artifactId>
</dependency>
2、在pom.xml 添加依赖(不知道干嘛的,不添加也没事)
<dependency>
    <groupId>net.sourceforge.nekohtml</groupId>
    <artifactId>nekohtml</artifactId>
    <version>1.9.22</version> //可以删除
</dependency>
3、在 application.yml 中配置 Thymeleaf
spring:
  thymeleaf:
    cache: false #开发时关闭缓存,不然没法看到实时页面
    mode: LEGACYHTML5 #用非严格的 HTML5
    encoding: UTF-8
    servlet:
      content-type: text/html
4、添加 thymeleaf 命名空间
<html xmlns:th="http://www.thymeleaf.org">
5、测试
controller
@RequestMapping(value = "",method = RequestMethod.GET)
public String index(Model model){
        model.addAttribute("user","zy");
        return "index";
}
html
<!DOCTYPE html SYSTEM "http://www.thymeleaf.org/dtd/xhtml1-strict-thymeleaf-spring4-4.dtd">
<html xmlns="http://www.w3.org/1999/xhtml" xmlns:th="http://www.thymeleaf.org">
<head>
    <meta charset="UTF-8">
    <title>Title</title>
</head>
<body>
<span th:text="${user}">姓名</span>
</body>
</html>
2.Thymeleaf语法
注意,使用thymeleaf必须经过模板解析才可以,如果直接访问的静态资源(html),在里面使用thymeleaf语法不生效
参考:https://www.thymeleaf.org/doc/tutorials/3.0/usingthymeleaf.html
1、th:text 可以用于替换原来的值
<div id="1" th:id="${id}" th:text="${text}">文本</div>
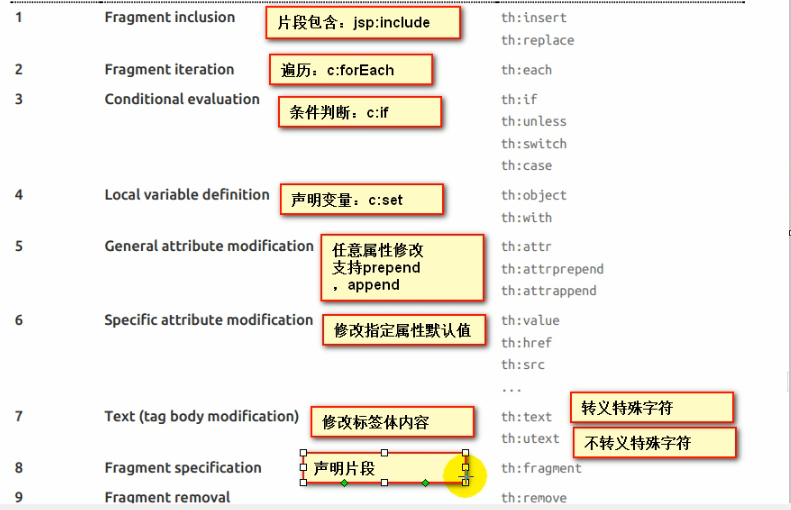
th全部语法
2、表达式语法
Simple expressions:
  Variable Expressions: ${...}              变量表达式
  Selection Variable Expressions: *{...}    选择表达式,功能上和${}一样,可以配合th:object="${session.user}使用,具体可以看官方文档中的例子
  Message Expressions: #{...}               获取国际化内容
  Link URL Expressions: @{...}              定义url,使用@{/x/xx} / 前面会自动补全项目名字
  Fragment Expressions: ~{...}              片段引用表达式
Literals(字面量)
  Text literals: 'one text', 'Another one!',…
  Number literals: 0, 34, 3.0, 12.3,…
  Boolean literals: true, false
  Null literal: null
  Literal tokens: one, sometext, main,…
Text operations:(文本操作)
  String concatenation: +
  Literal substitutions: |The name is ${name}|
Arithmetic operations:(数学运算)
  Binary operators: +, -, *, /, %
  Minus sign (unary operator): -
Boolean operations:(布尔运算)
  Binary operators: and, or
  Boolean negation (unary operator): !, not
Comparisons and equality:(比较运算)
  Comparators: >, <, >=, <= (gt, lt, ge, le)
  Equality operators: ==, != (eq, ne)
Conditional operators:(条件运算)
  If-then: (if) ? (then)
  If-then-else: (if) ? (then) : (else)
  Default: (value) ?: (defaultvalue)
Special tokens:(特殊操作)
  No-Operation: _
3.thymeleaf公共元素抽取
参考:https://www.thymeleaf.org/doc/tutorials/3.0/usingthymeleaf.html#template-layout
抽取公共片段,任何thml页面
    <div th:fragment="copy">
      © 2011 The Good Thymes Virtual Grocery
    </div>
引入公共片段方式1(footer是模板名字(从 footer.html 抽取的))
模板名:: 片段名
根据实际情况选择下面的哪一种,具体区别参考官方文档(最好写成这中方法~{footer :: #copy-section}",在行类写法中[[~{}]],一定需要带上~{})
<body>

  <div th:insert="footer :: copy"></div>

  <div th:replace="footer :: copy"></div>

  <div th:include="footer :: copy"></div>

</body>
引入公共片段方式2(footer是模板名字(从 footer.html 抽取的))
模板名:: 选择器
<body>
  <div th:insert="~{footer :: #copy-section}"></div>  //引入id是copy-section的一个标签,不需要定义 th:fragment="copy"
</body>
4.点击不同的侧边栏,会出现高亮
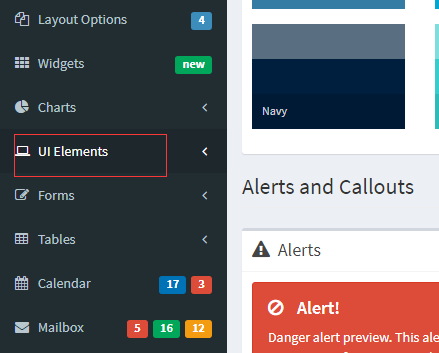
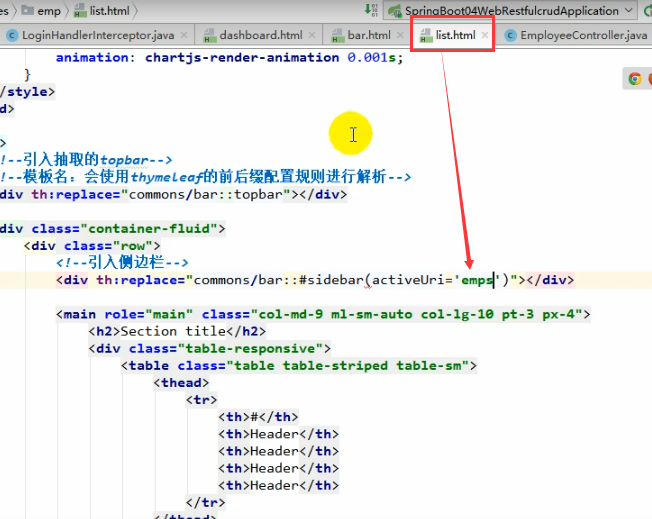
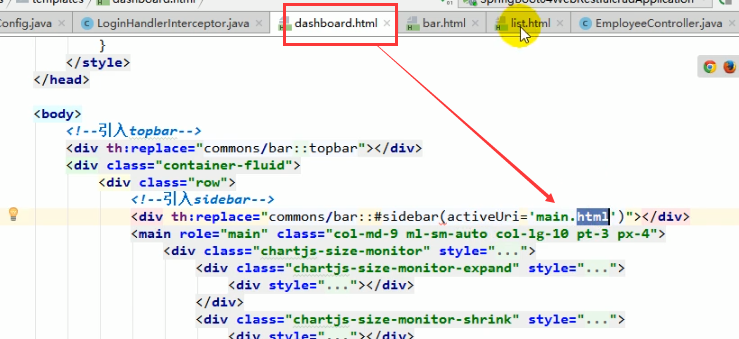
1、将公共的部分抽取出来单独放到一个html里面(bar.html)
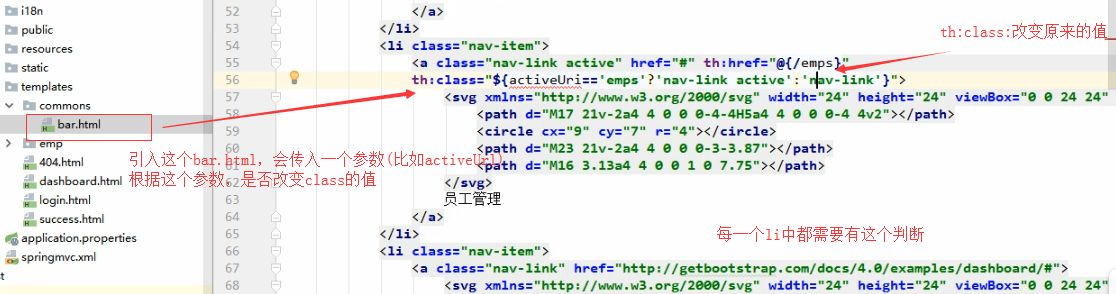
2、引入这个bar.htmtl的时候传入参数(引入的bar,看到有emps,就会在某一个li中高亮)
4.格式化日期
${#dates.format(date, 'dd/MMM/yyyy HH:mm')}
5、url拼接
<a href="" th:href="@{/userdelete/}+${user.value.id}">
<a th:attr="href=@{/userdelete/}+${user.value.id}">
6、表单回显
<form>
    <!--普通值的替换-->
    <input type="text" name="username" th:value="${user.username}">
    <!--单选按钮,注意user.gender的类型-->
    <input type="radio" name="gender" value="1" th:checked="${user.gender=='1'}">
    <input type="radio" name="gender" value="0" th:checked="${user.gender}=='0'">
    <!--单选框-->
    <select name="select">
        <option th:each="dept:${departments}" th:text="${dept.value.name}" th:selected="${dept.key==user.department.id}"></option>
    </select>
    <!--日期-->
    <input type="text"  name="date" th:value="${#dates.format(user.birth, 'yyyy/MM/dd')}">
</form>
注意,如果取不到值,就会报错,所以配置@ModelAttribute 使用
@ModelAttribute
    public void init(@RequestParam(value = "id",required = false) Integer  id, Model model){
        User user = null;
        if (id!=null){
            user = userService.selectUserByid(id);
        }else{
            user = new User();
            Department department = new Department();
            user.setDepartment(department);
        }
        model.addAttribute("user",user);
        HashMap<Integer, Department> department = userService.selectalldepartment();
        model.addAttribute("departments",department);
    }
7、内联表达式
https://www.thymeleaf.org/doc/tutorials/3.0/usingthymeleaf.html#expression-inlining
javascript中使用
	<script type="text/javascript" th:inline="javascript">
		$(".in li[class='"+[[${activeUrl}]]+"']").addClass("active");
	</script>
css使用
<style th:inline="css">
  ...
</style>
8、条件判断
如果要实现if else if else 判断表达式,在thymeleaf要使用th:switch代替,th:case="*"表示默认,需写在最后
9、在html中获取数据session、request参数的值
Request参数
假设请求的url为:/user/get?id=12
1、访问参数id可以使用param前缀,例如:${param.id!=null}检查是否有参数id;
2、参数是一个数组,因为它可以多值比如?id=a&name=test,所以可以采用下标的方式访问,例如:
<p th:text="${param.q[0]}" th:unless="${param.q == null}">11</p>
3、还有一种访问方式是使用#httpServletRequest对象,可以直接进入javax.servlet.http.HttpServletRequest对象,例如:
<p th:text="${#httpServletRequest.getParameter('id')} th:unless="${#httpServletRequest.getParameter('id') == null}">11</p>
Session属性
比如后台为session添加了一个sessionValue属性,和Request参数访问方式类似,这里使用session前缀:
<div th:text="${session.sessionValue}">[...]</div>
同样的,还可以使用#httpSession方式访问,它直接进入javax.servlet.http.HttpSession对象。
ServletContext属性
1、ServletContext属性可以在request和session中共享,未来访问ServletContext属性,可以使用application前缀:
比如后台为ServletContext添加了一个myContextAttribute属性,那么我们可以这样访问:<div th:text="${application.myContextAttribute}">[...]</div>
2、<div th:text="${application.size()}">33</div> 将返回application的数量;
3、输出其所有键值对:
<div th:each="attr:${application.keySet()}">
    <span th:text="${attr}">key</span>
    <span th:text="${application.get(attr)}">value</span>
</div>
Spring beans
Thymeleaf可以通过@beanName访问Spring应用上下文中注册的bean,如<div th:text="${@urlService.getApplicationUrl()}">...</div>
在这个例子中,@urlService就是在上下文中注册的Spring Bean的名字:
10、数字格式化
https://www.thymeleaf.org/doc/tutorials/3.0/usingthymeleaf.html#numbers

 浙公网安备 33010602011771号