

pytest框架入门
一、pytest基本使用
1.1 安装
使用pip命令安装
pip install pytest
1.2 运行方式
方式一:命令行运行(推荐使用)
- 示例代码:
# jbsy.py
class TestSample(object):
    """测试类"""
    def test_f1(self):
        # 测试方法,必须以“test”开头
        print("---- in test_f1 ----")
        assert 1

    def test_f2(self):
        # 测试方法,必须以“test”开头
        print("---- in test_f2 ----")
        assert 1
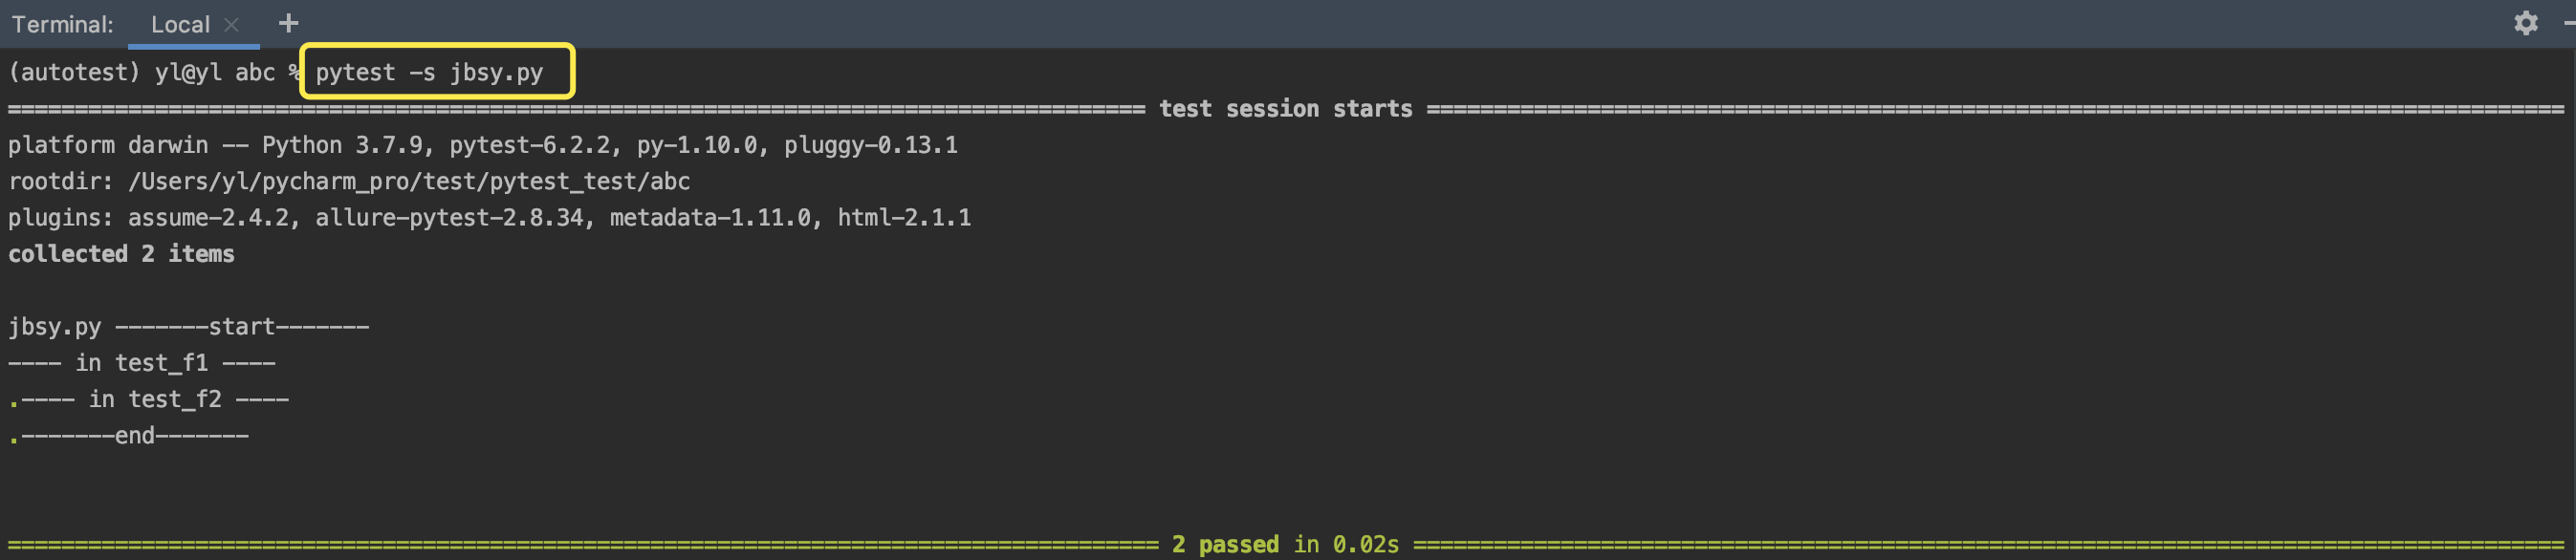
- 在terminal中输入命令运行文件:
pytest -s jbsy.py - 运行结果:
方式二:mian方法运行
- 示例代码:
# jbsy.py
import pytest


class TestSample(object):
    """测试类"""
    def test_f1(self):
        # 测试方法
        print("---- in test_f1 ----")
        assert 1

    def test_f2(self):
        # 测试方法
        print("---- in test_f2 ----")
        assert 1


if __name__ == "__main__":
    pytest.main(["-s", "jbsy.py"])  # 使用main方法,传入执行的参数以及需要执行的py文件
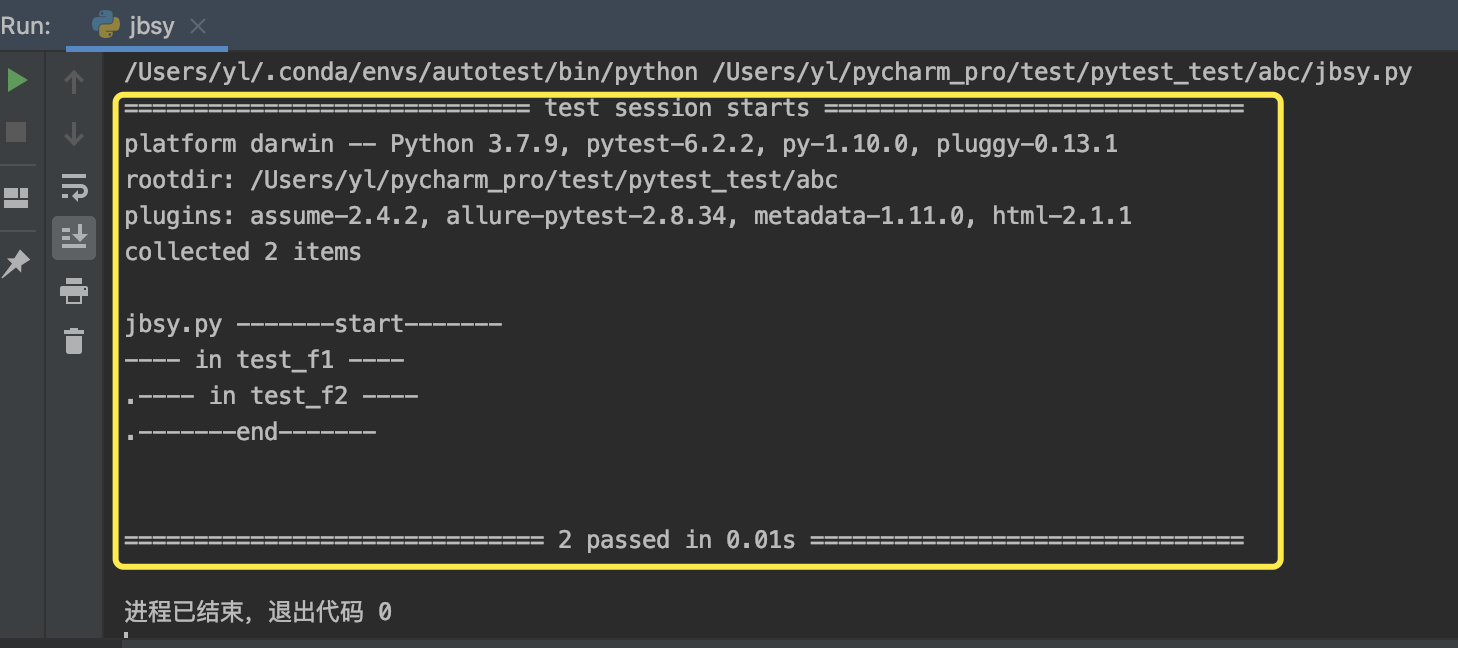
- 直接运行py文件,查看结果:
1.3 setup和teardown
应用场景
在pytest运行自动化脚本前会执行setup方法,在执行完脚本后会运行teardown方法。例如在运行脚本前先连接到数据库,在执行完脚本后关闭数据库连接。
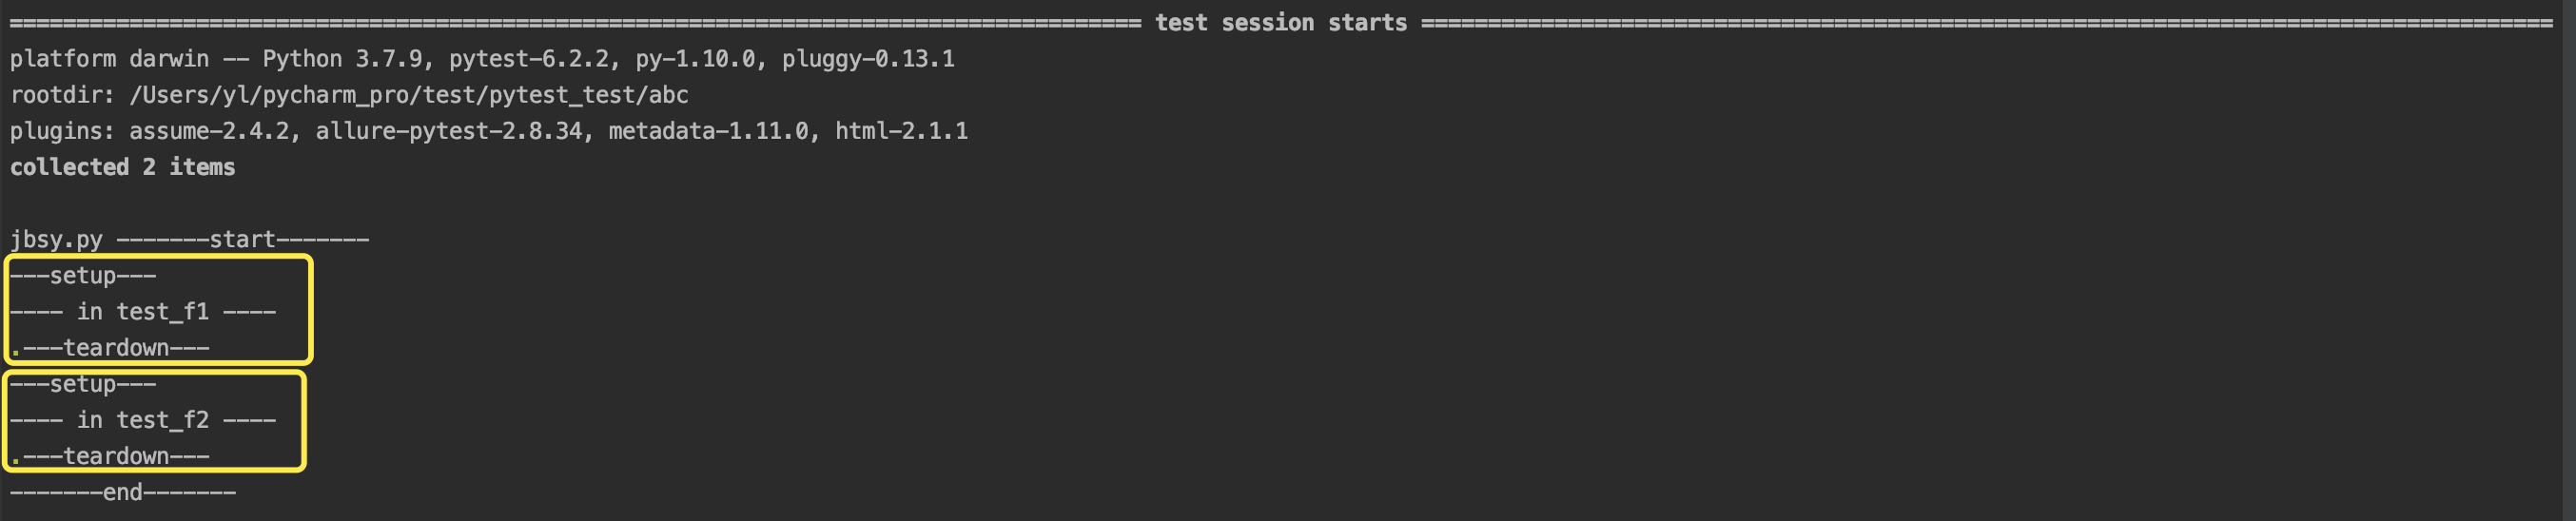
函数级别方法
运行每个测试方法的始末运行一次setup和teardown。
- 示例代码:
# jbsy.py
import pytest


class TestSample(object):
    """测试类"""

    def setup(self):
        print("---setup---")

    def teardown(self):
        print("---teardown---")

    def test_f1(self):
        # 测试方法
        print("---- in test_f1 ----")
        assert 1

    def test_f2(self):
        # 测试方法
        print("---- in test_f2 ----")
        assert 1
- 运行查看结果:
pytest -s jbsy.py
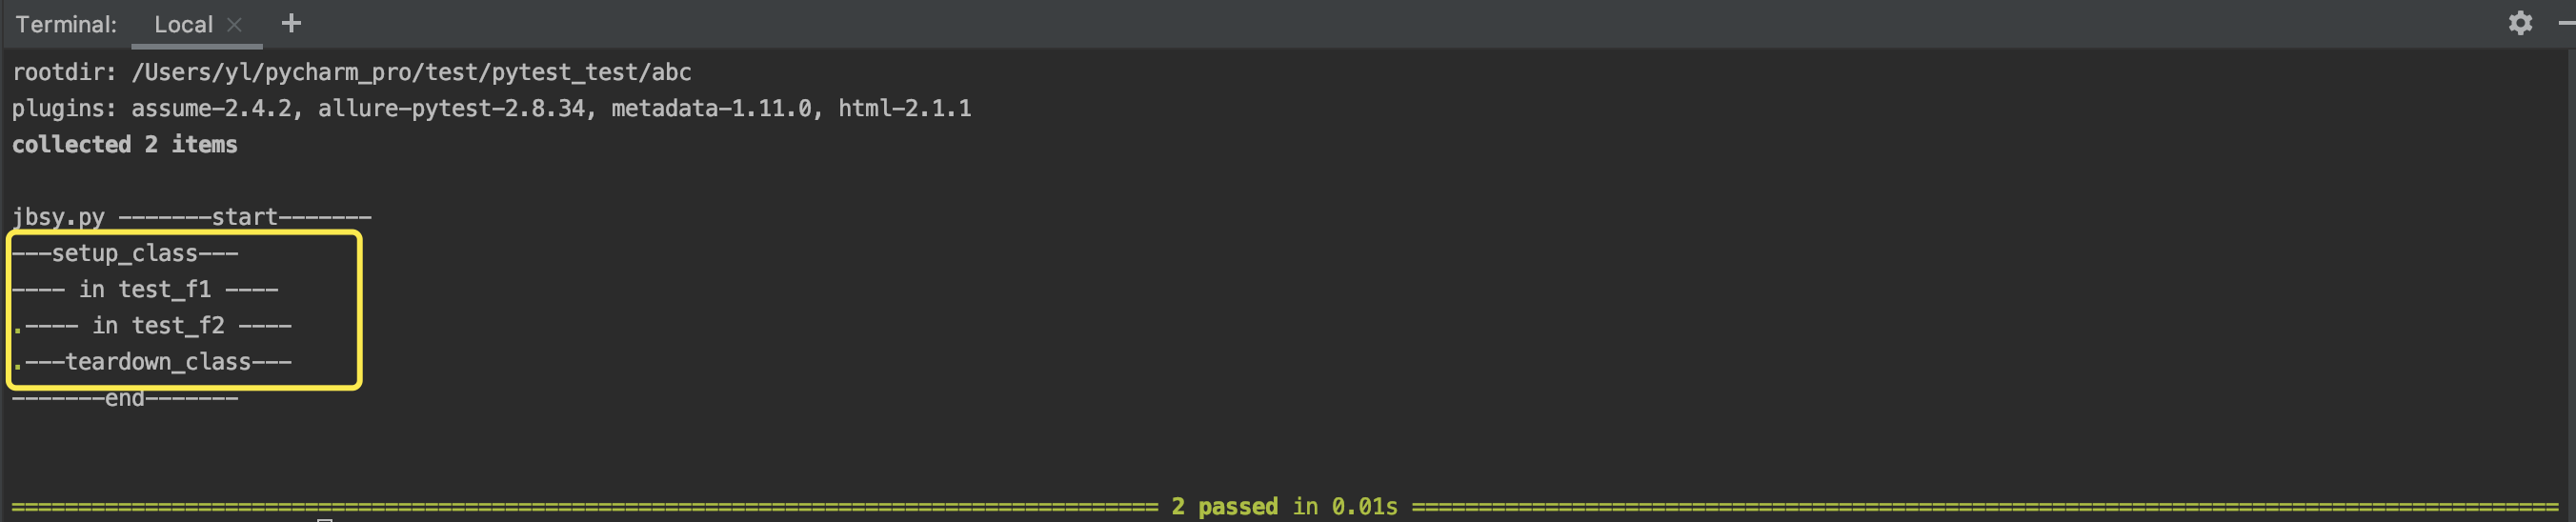
类级别方法
在每个测试类的始末运行一次setup_class和teardown_class。
- 示例代码:
# jbsy.py
import pytest


class TestSample(object):
    """测试类"""

    def setup_class(self):
        print("---setup_class---")

    def teardown_class(self):
        print("---teardown_class---")

    def test_f1(self):
        # 测试方法
        print("---- in test_f1 ----")
        assert 1

    def test_f2(self):
        # 测试方法
        print("---- in test_f2 ----")
        assert 1
- 运行结果:
1.4 配置文件
使用场景
使用配置文件,可以快速的使用配置项来决定测试哪些脚本,更集中、灵活的管理。
使用方法
1、在项目根目录创建名为 pytest.ini 的文件
2、文件第一行内容为 [pytest]
3、命令行运行时会使用该文件中的相关配置
示例代码:
文件目录:

例如:指定运行scripts目录下,文件名以“test_g”开头、类名以“TestG”开头、方法命名以“test_a”开头的测试脚本
# test_goods.py
class TestGoods(object):
    def test_add(self):
        print("test_add")
        assert 1

    def test_add1(self):
        print("test_add1")
        assert 1

    def test_del(self):
        print("test_del")
        assert 1


class TestEmployee(object):
    def test_modify(self):
        print("test_modify")
        assert 1
[pytest]

# 添加命令行参数
addopts = -s

# 文件搜索路径
testpaths = ./scripts

# 指定运行某些模块
python_files = test_g*.py

# 指定运行的类
python_classes = TestG*

# 执行运行的方法
python_functions = test_a*
在terminal输入
pytest,运行结果,只执行了满足条件的test_add和test_add1两个方法:

二、pytest常用插件
2.1 测试报告
应用场景
在测试脚本执行完成后,可以通过测试报告来体现执行情况。
安装
pip install pytest-html
使用
在 pytest.ini 文件的命令行参数配置中新增 --html=存储路径/report.html
[pytest]

# 添加命令行参数
addopts = -s --html=report/report.html

# 文件搜索路径
testpaths = ./scripts
测试脚本:
# test_login.py


class TestLogin(object):
    """测试类"""

    def test_f1(self):
        # 测试方法
        print("---- in test_f1 ----")
        assert 1

    def test_f2(self):
        # 测试方法
        print("---- in test_f2 ----")
        assert 1
在terminal运行
pytest:
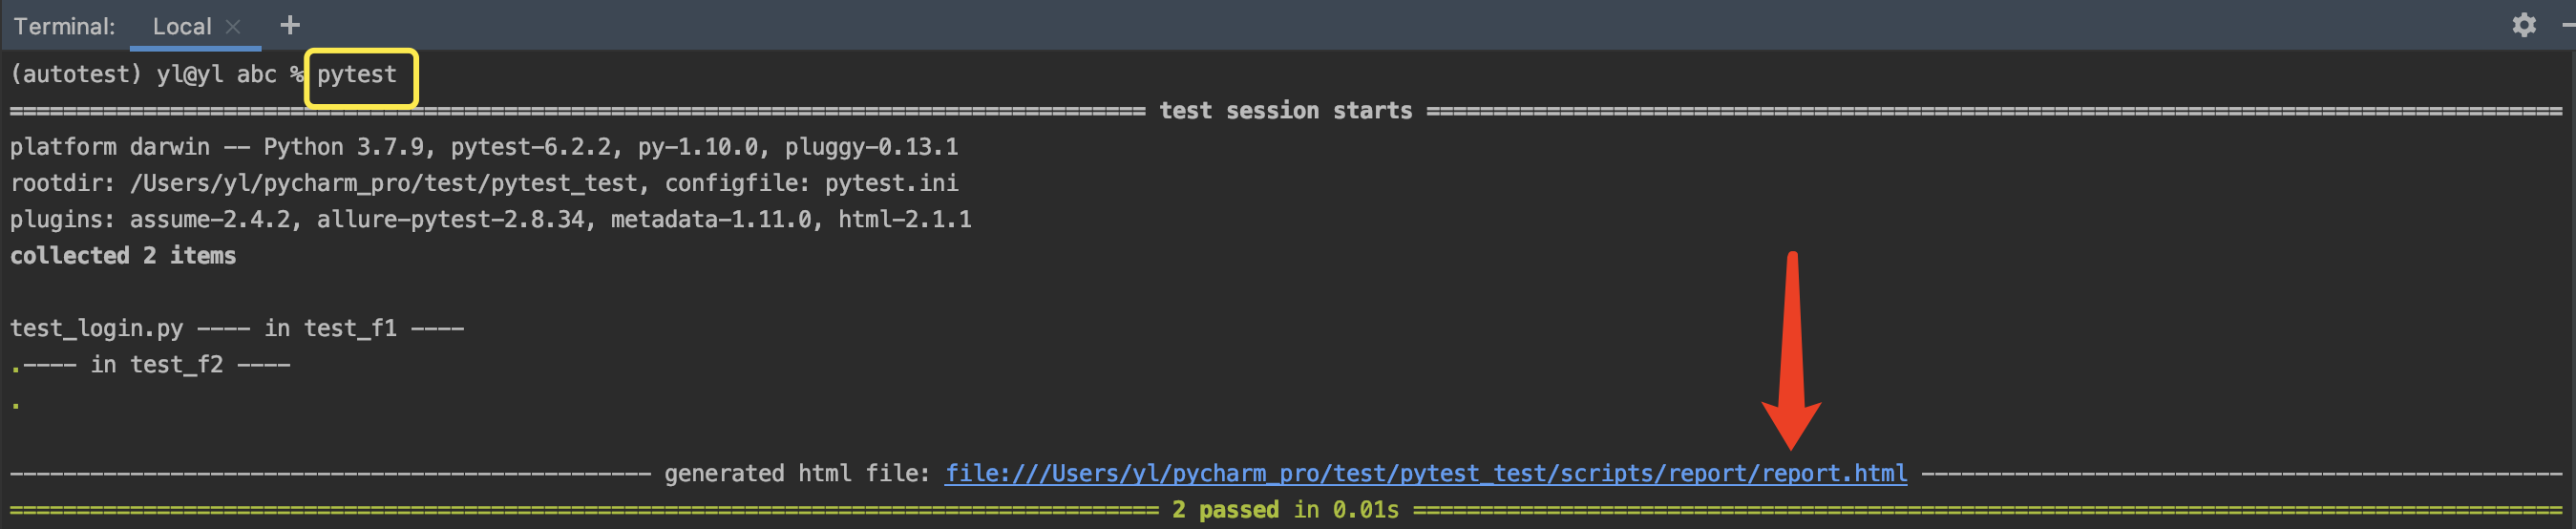
在report目录下生成了一个html文件:

在浏览器中打开:

2.2 控制函数执行顺序
应用场景
默认情况下pytest脚本的执行顺序是由上到下顺序执行,通过插件可以控制脚本的执行顺序,比如支付功能,需要先登录才能执行。
安装
pip install pytest-ordering
使用
1、给被测试函数加上装饰器 @pytest.mark.run(order=x)
2、根据order传入的参数决定执行顺序
3、order值全为正数或全为负数时,按照由小到大的顺序执行
例1: 不使用插件
# test_login.py


class TestLogin(object):
    """测试类"""

    def test_f2(self):
        # 测试方法
        print("---- in test_f2 ----")
        assert 1

    def test_f1(self):
        # 测试方法
        print("---- in test_f1 ----")
        assert 1

    def test_f3(self):
        # 测试方法
        print("---- in test_f3 ----")
        assert 1
运行 pytest -s test_login.py,按照脚本书写顺序,从上到下执行:

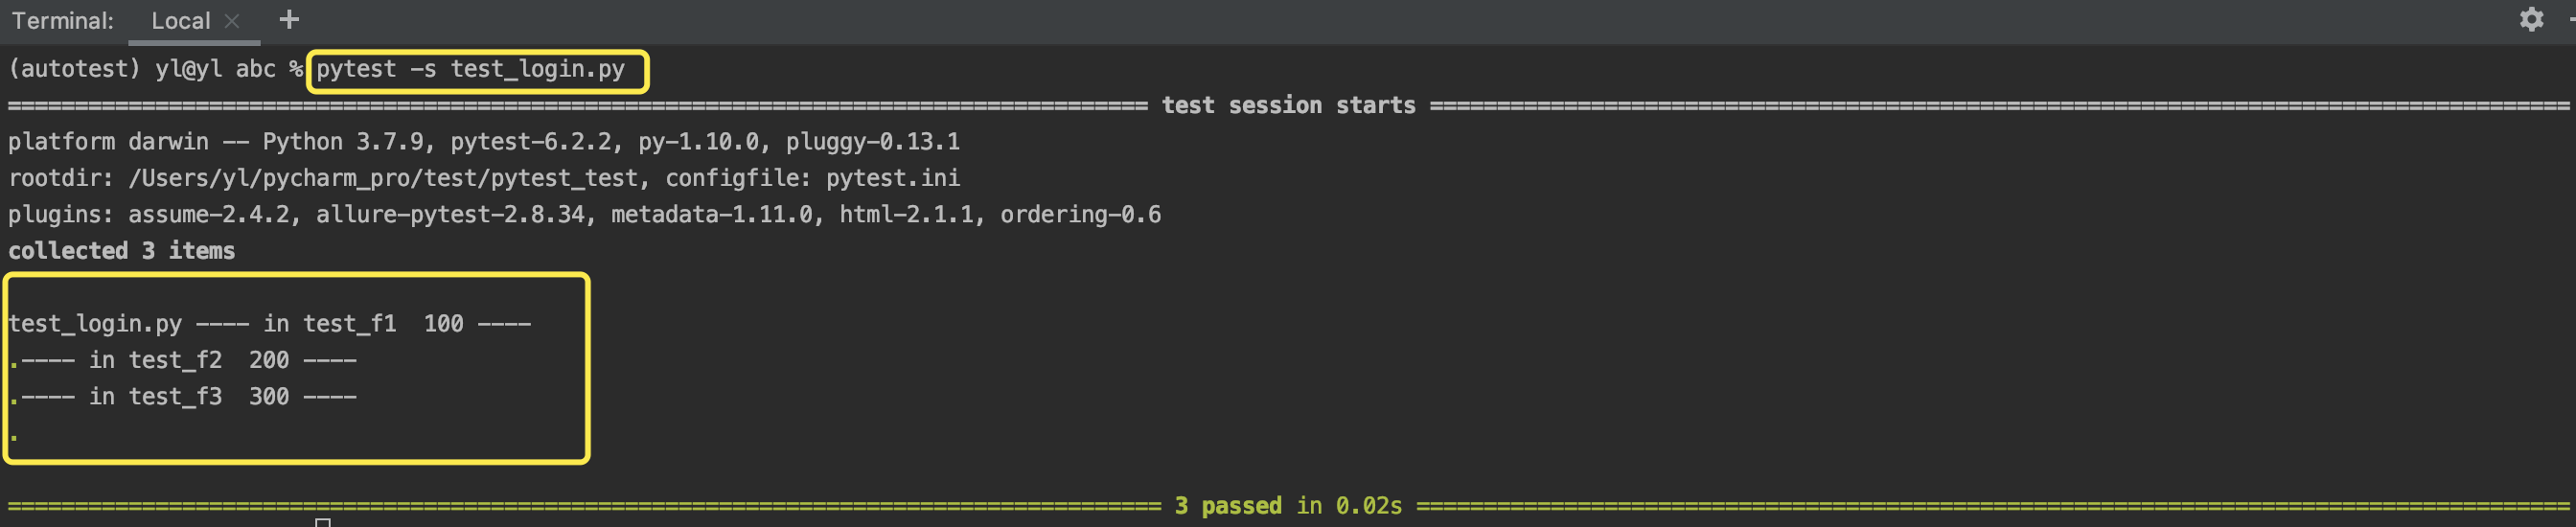
例2: 使用插件
# test_login.py
import pytest


class TestLogin(object):
    """测试类"""

    @pytest.mark.run(order=200)
    def test_f2(self):
        # 测试方法
        print("---- in test_f2  200 ----")
        assert 1

    @pytest.mark.run(order=100)
    def test_f1(self):
        # 测试方法
        print("---- in test_f1  100 ----")
        assert 1

    @pytest.mark.run(order=300)
    def test_f3(self):
        # 测试方法
        print("---- in test_f3  300 ----")
        assert 1
在terminal执行 pytest -s test_login.py,按照数字由小到大依次执行:
例3: 各种情况的优先级顺序
# test_login.py
import pytest


class TestLogin(object):
    """测试类"""

    @pytest.mark.run(order=200)
    def test_f2(self):
        # 测试方法
        print("---- 200 ----")
        assert 1

    @pytest.mark.run(order=100)
    def test_f1(self):
        # 测试方法
        print("---- 100 ----")
        assert 1

    @pytest.mark.run(order=101.5)
    def test_f3(self):
        # 测试方法
        print("---- 101.5 ----")
        assert 1

    @pytest.mark.run(order=0)
    def test_f4(self):
        # 测试方法
        print("---- 0 ----")
        assert 1

    @pytest.mark.run(order=-200)
    def test_f5(self):
        # 测试方法
        print("---- -200 ----")
        assert 1

    @pytest.mark.run(order=-100)
    def test_f6(self):
        # 测试方法
        print("---- -100 ----")
        assert 1

    @pytest.mark.run(order=-101.5)
    def test_f7(self):
        # 测试方法
        print("---- -101.5 ----")
        assert 1

    def test_f8(self):
        # 测试方法
        print("---- 不使用插件 ----")
        assert 1
运行 pytest -s test_login.py ,结果:
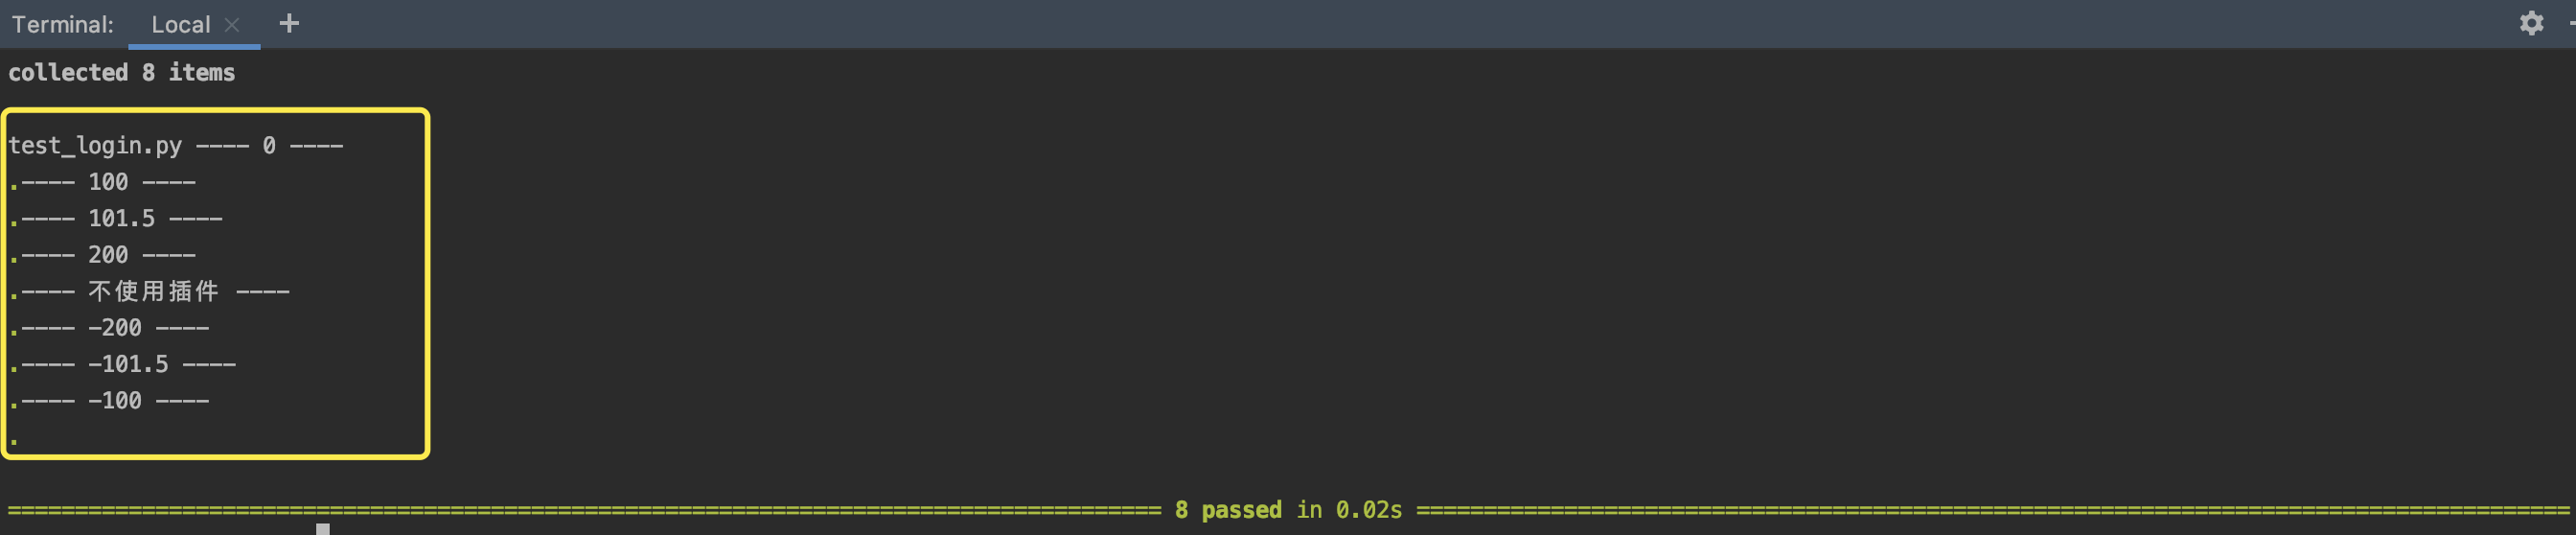
优先级:0 > 正数 > 不使用插件 > 负数
2.3 失败重试
应用场景
一般在运行脚本失败后久不会再次执行该脚本,使用失败重试插件,可以在特殊情况下(如可能存在网络问题导致脚本执行失败时)对失败的脚本进行多次执行
安装
pip install pytest-rerunfailures
使用
在 pytest.ini 文件的命令行参数配置中添加 --reruns n (n表示重新执行的次数)
例1: 当发生失败后,重试3次
# test_login.py
import pytest


class TestLogin(object):
    """测试类"""

    def test_f2(self):
        # 测试方法
        print("---- f2 ----")
        assert 1

    def test_f1(self):
        # 测试方法
        print("---- f1 ----")
        assert 0

    def test_f3(self):
        # 测试方法
        print("---- f3 ----")
        assert 1
[pytest]

# 添加命令行参数
addopts = -s --html=report/report.html --reruns 3

# 文件搜索路径
testpaths = ./scripts
在terminal中执行 pytest,查看结果:


三、pytest高级用法
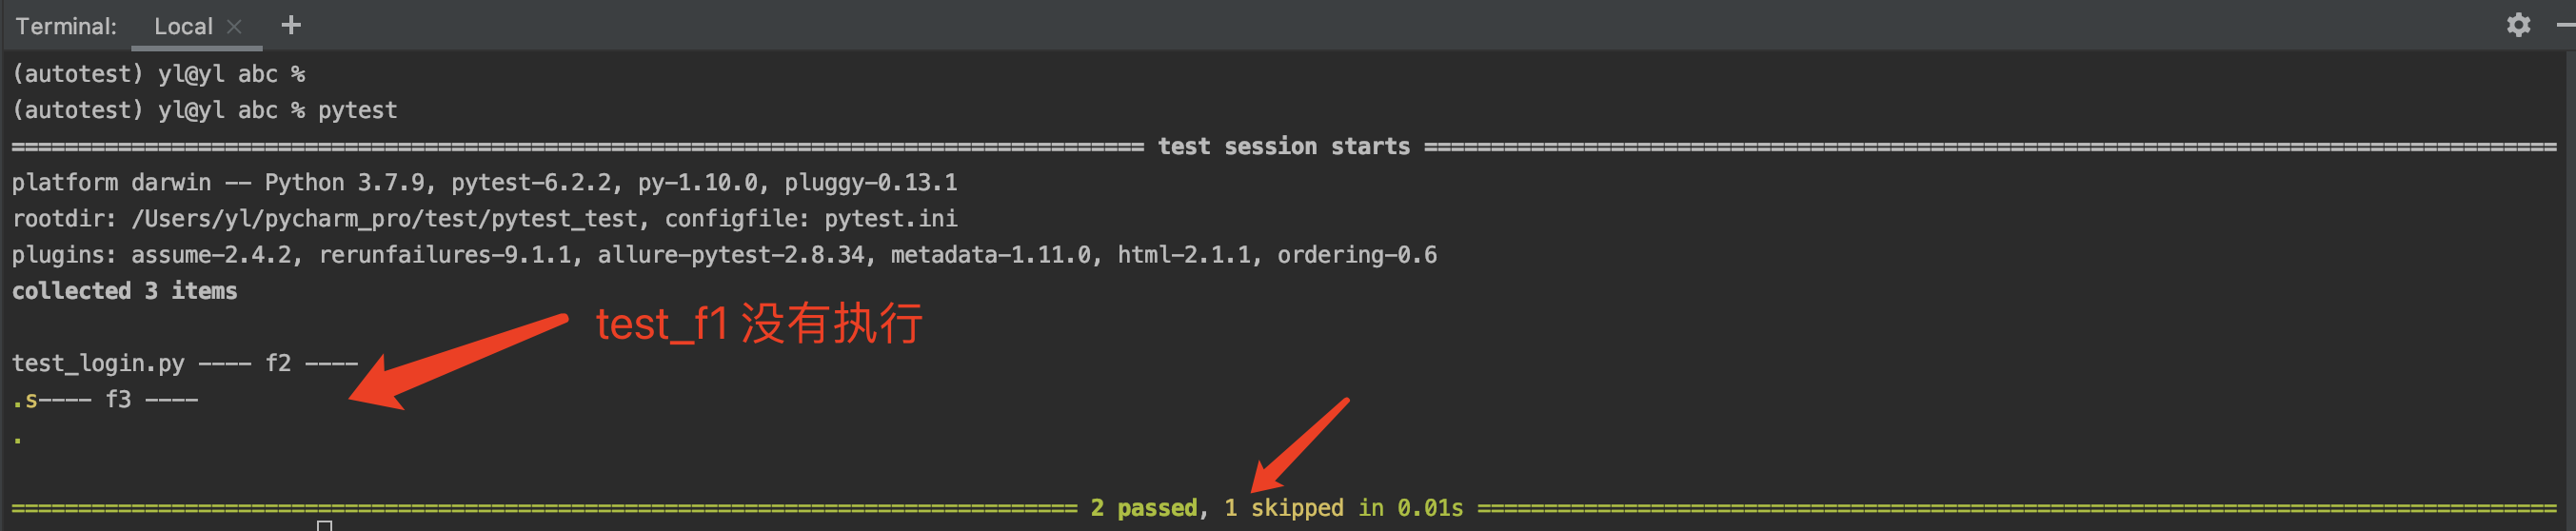
3.1 跳过测试函数
应用场景
在某些特定情况下,不需要执行的脚本,可以进行跳过。如有些功能是给更高版本的系统使用的,当在测试低版本的功能时,我们就可以跳过这些低版本不具备的功能。
使用
给需要执行跳过的方法添加装饰器 @pytest.mark.skipif(condition, reason)
condition 是是否跳过的条件,当condition=True时,跳过;当condition=False时,不跳过
reason 表示跳过的原因,传入字符串
例:当版本低于4.0时,不执行某个方法
# test_login.py
import pytest


class TestLogin(object):
    """测试类"""
    VERSION = 3.0

    def test_f2(self):
        # 测试方法
        print("---- f2 ----")
        assert 1

    @pytest.mark.skipif(VERSION < 4.0, reason="123") # 当版本低于 4.0 时不执行此方法
    def test_f1(self):
        # 测试方法
        print("---- f1 ----")
        assert 1

    def test_f3(self):
        # 测试方法
        print("---- f3 ----")
        assert 1
[pytest]

# 添加命令行参数
addopts = -s

# 文件搜索路径
testpaths = ./scripts
执行 pytest ,查看运行结果:
3.2 预期失败
应用场景
应用于反向测试,如注册时,要求用户名为6-8个字符,实际输入的是10个字符。
使用
在预期失败的方法上加上装饰器 @pytest.mark.xfail(condition, reason)
condition=True 表示预期失败;condition=False 表示预期成功
reason 表示原因,传入字符串
例:
# test_login.py
import pytest


class TestLogin(object):
    """测试类"""

    @pytest.mark.xfail(condition=False, reason="")
    def test_f1(self):
        # 预期成功,实际成功
        print("---- f1 ----")
        assert 1

    @pytest.mark.xfail(condition=False, reason="")
    def test_f2(self):
        # 预期成功,实际失败
        print("---- f2 ----")
        assert 0

    @pytest.mark.xfail(condition=True, reason="")
    def test_f3(self):
        # 预期失败,实际成功
        print("---- f3 ----")
        assert 1

    @pytest.mark.xfail(condition=True, reason="")
    def test_f4(self):
        # 预期失败,实际失败
        print("---- f4 ----")
        assert 0
[pytest]

# 添加命令行参数
addopts = -s --html=report/report.html

# 文件搜索路径
testpaths = ./scripts
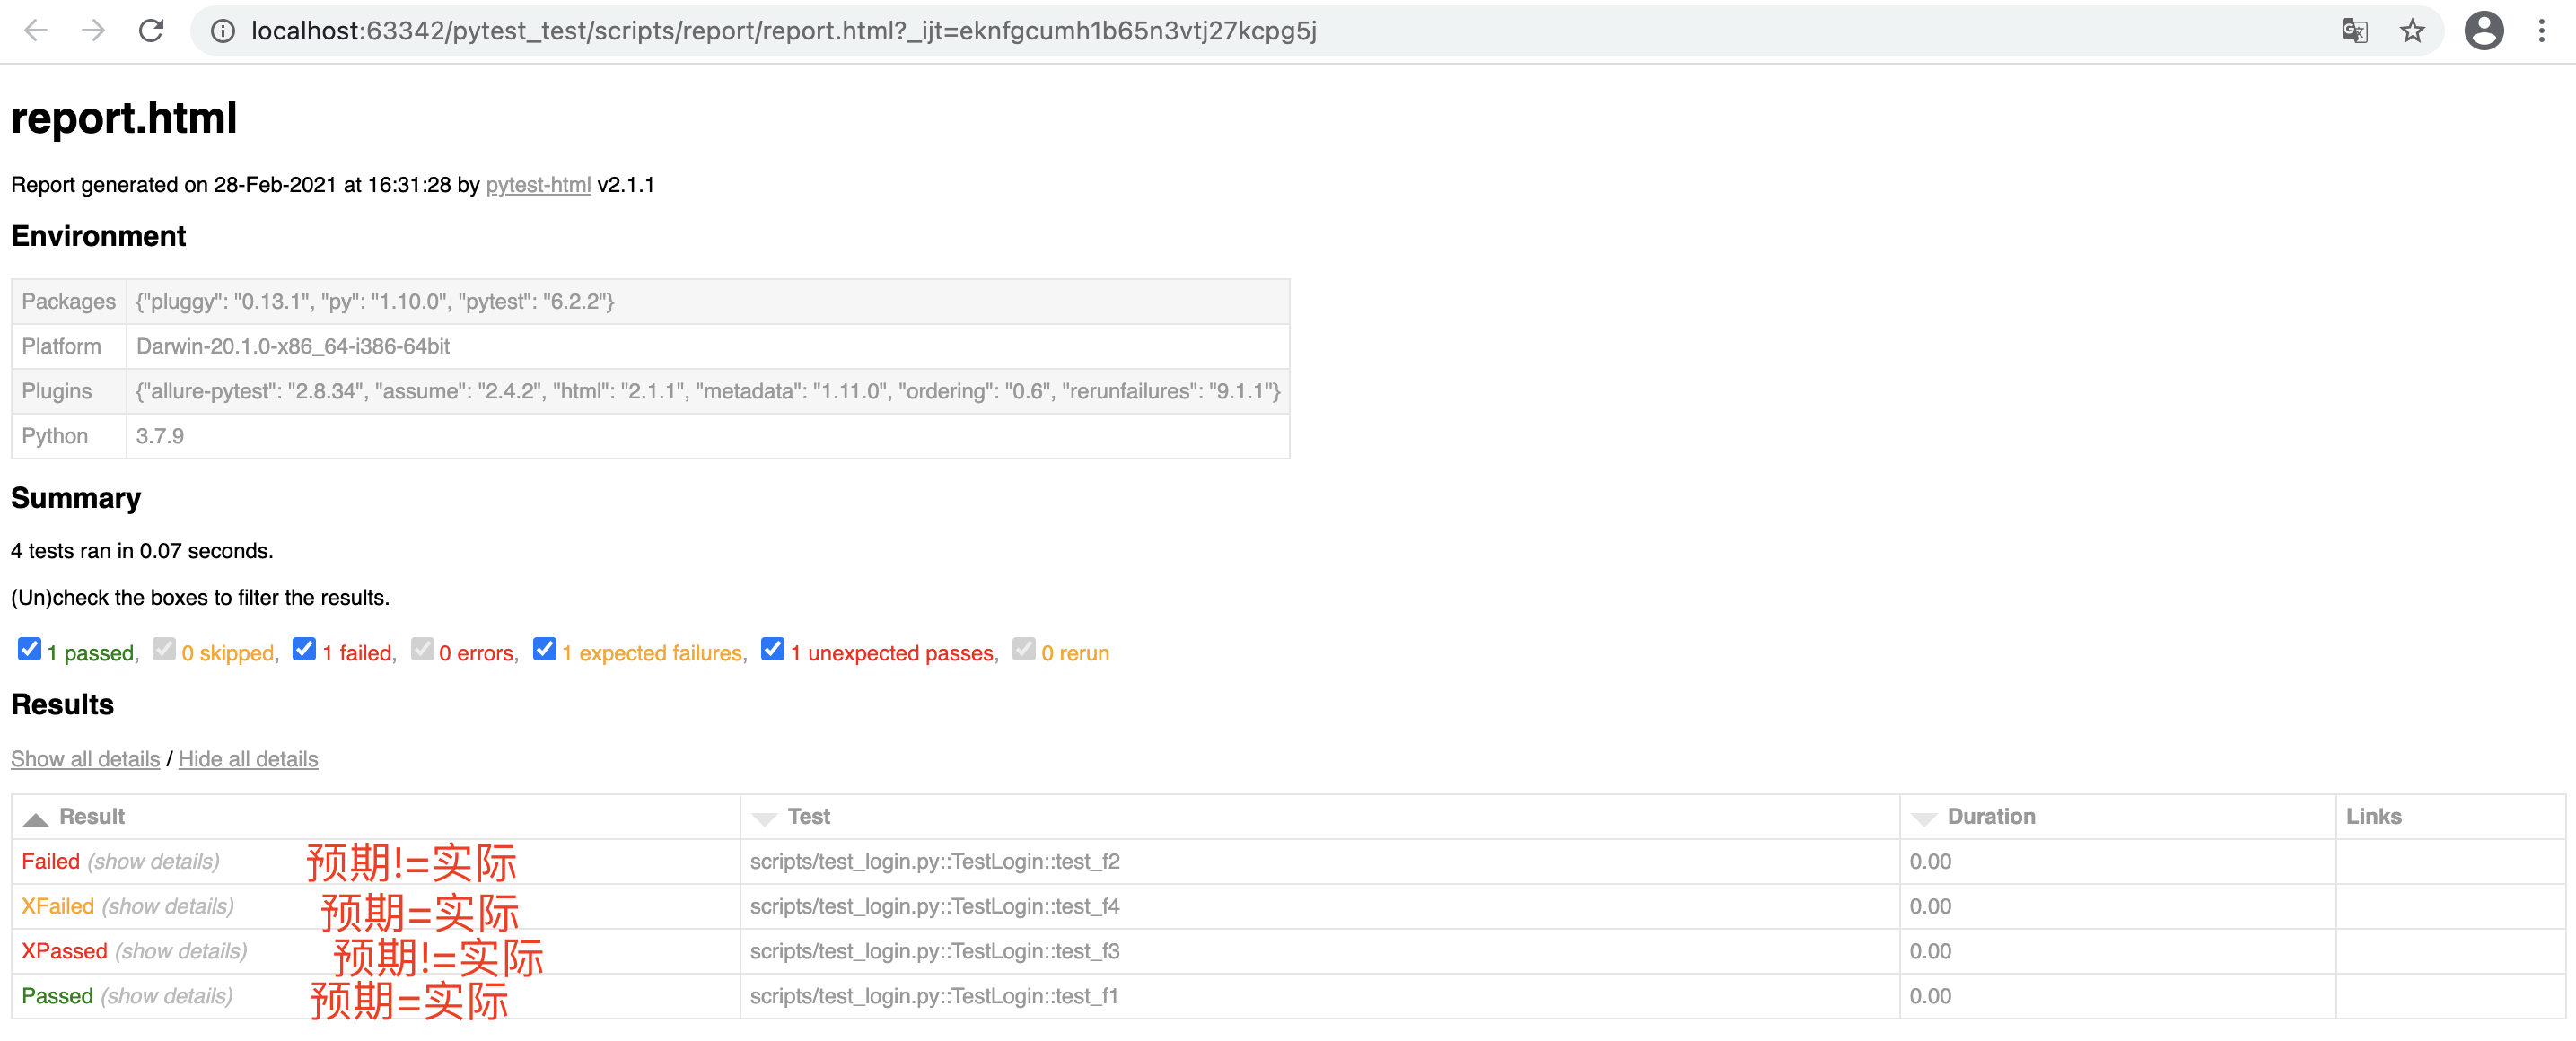
执行 pytest, 查看结果:

测试报告:
3.3 数据参数化
应用场景
对于流程相同,只是数据不同的测试用例,可以使用参数化的方法,简化代码编写。
使用
给需要参数化的方法加装饰器 @pytest.mark.parametrize(key, value)
- 传入单个参数:key 表示参数名,字符串格式;value 表示参数值,列表格式;
- 传入多个参数:key 表示参数名,元组格式或字符串格式(参数名之间用逗号分割);value 表示参数值,列表格式,每组值用一个元组表示;
例1: 传入单个参数
# test_login.py
import pytest
class TestLogin(object):
"""测试类"""
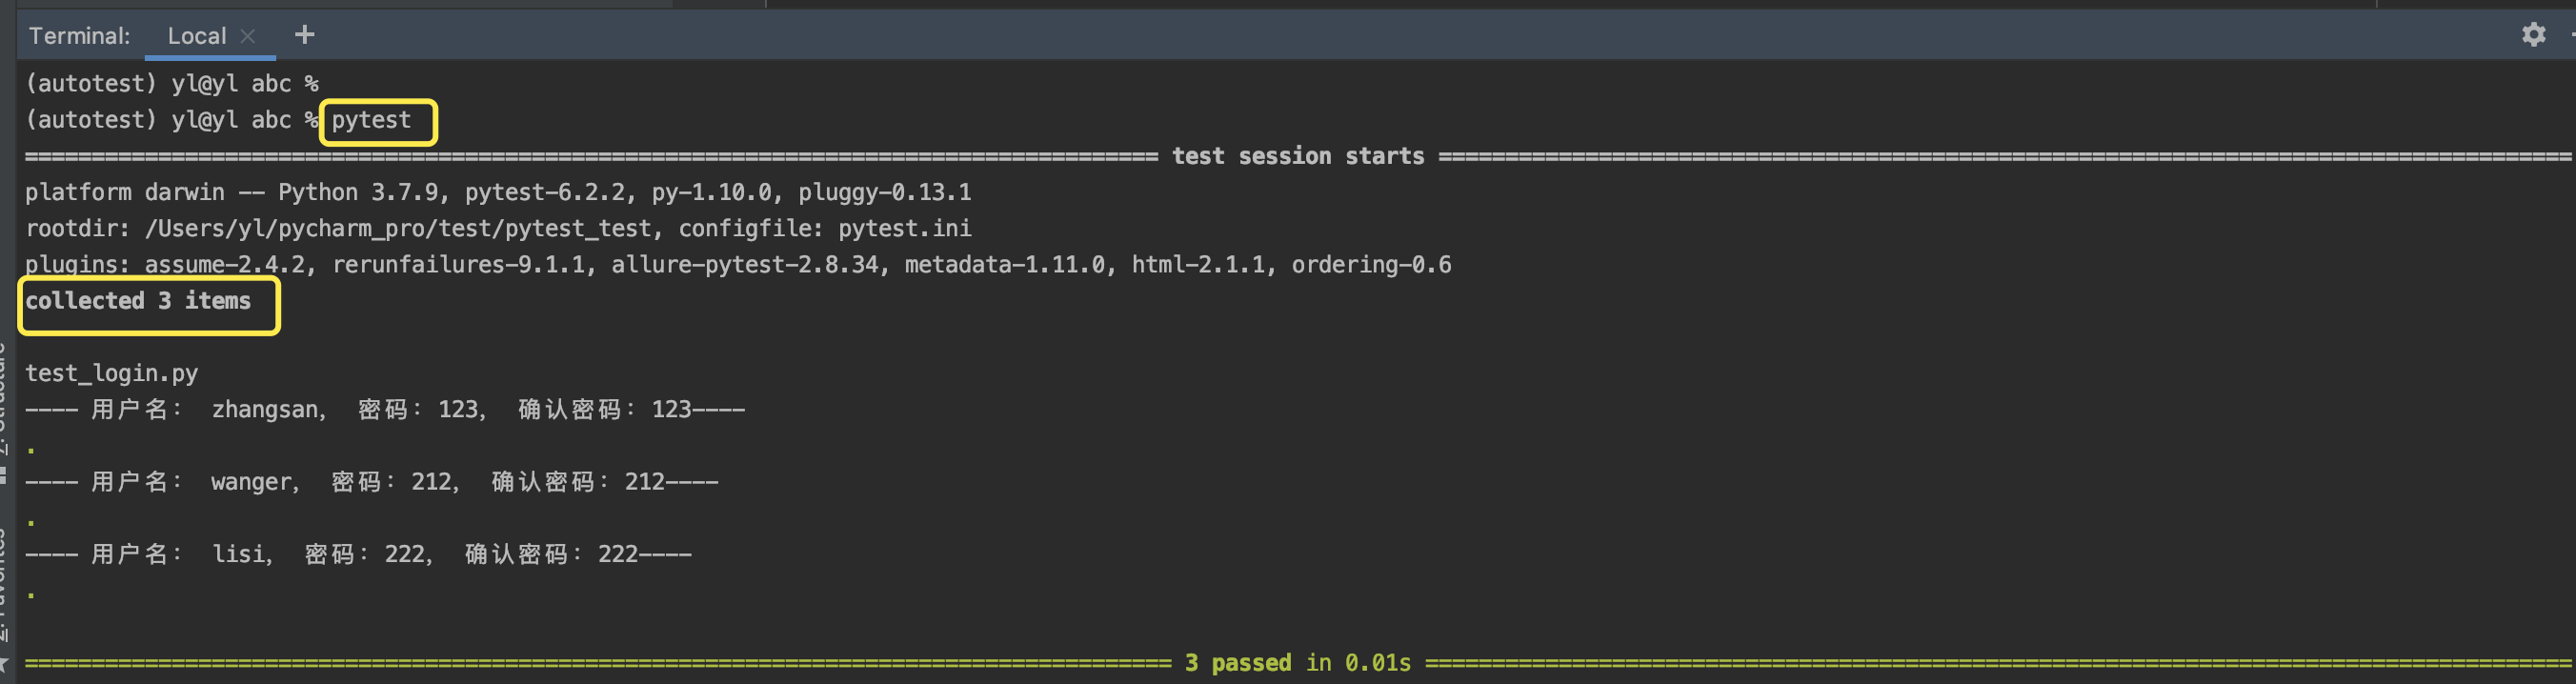
@pytest.mark.parametrize("num", [17246538765, 17987654321])
def test_f1(self, num):
print("---- 输入手机号为 {} ----".format(num))
assert 1
[pytest]

# 添加命令行参数
addopts = -s

# 文件搜索路径
testpaths = ./scripts
执行 pytest , 查看结果:

例2: 传入多个参数(方式一)
# test_login.py
import pytest


class TestLogin(object):
    """测试类"""

    # 用元组分割参数名
    @pytest.mark.parametrize(("username", "pwd", "re_pwd"), [("zhangsan", "123", "123"),
                                                             ("wanger", "212", "212"),
                                                             ("lisi", "222", "222")])
    def test_f1(self, username, pwd, re_pwd):
        print("\n---- 用户名: {}, 密码:{}, 确认密码:{}----".format(username, pwd, re_pwd))
        assert 1
[pytest]

# 添加命令行参数
addopts = -s

# 文件搜索路径
testpaths = ./scripts
运行 pytest,查看结果:
例3: 传入多个参数(方式二)
# test_login.py
import pytest


class TestLogin(object):
    """测试类"""

    # 用逗号分割参数名
    @pytest.mark.parametrize("username,pwd,re_pwd", [("zhangsan", "123", "123"),
                                                             ("wanger", "212", "212"),
                                                             ("lisi", "222", "222")])
    def test_f1(self, username, pwd, re_pwd):
        print("\n---- 用户名: {}, 密码:{}, 确认密码:{}----".format(username, pwd, re_pwd))
        assert 1
[pytest]

# 添加命令行参数
addopts = -s

# 文件搜索路径
testpaths = ./scripts
运行 pytest,查看结果:

四、pytest-fixture
应用场景
fixture是一种自定义的工厂函数,用于完成预置处理或者可重复操作,如动态的获取数据等。如果某个测试方法引用了fixture函数,则它会在这个测试函数执行之前做一些相关的准备工作。
如调用新增人员接口,前提是要先登录获取到token,新增人员接口需要携带token才能进行新增操作,此时可以定义一个fixture,专门用于登录获取token的操作。
4.1 使用方式
4.1.1 通过参数引用(即 直接在方法中当作参数使用)
# test_employee.py
import pytest
class TestEmployee(object):
"""测试类"""
# 定义fixture
@pytest.fixture()
def login(self):
print("--- login ---")
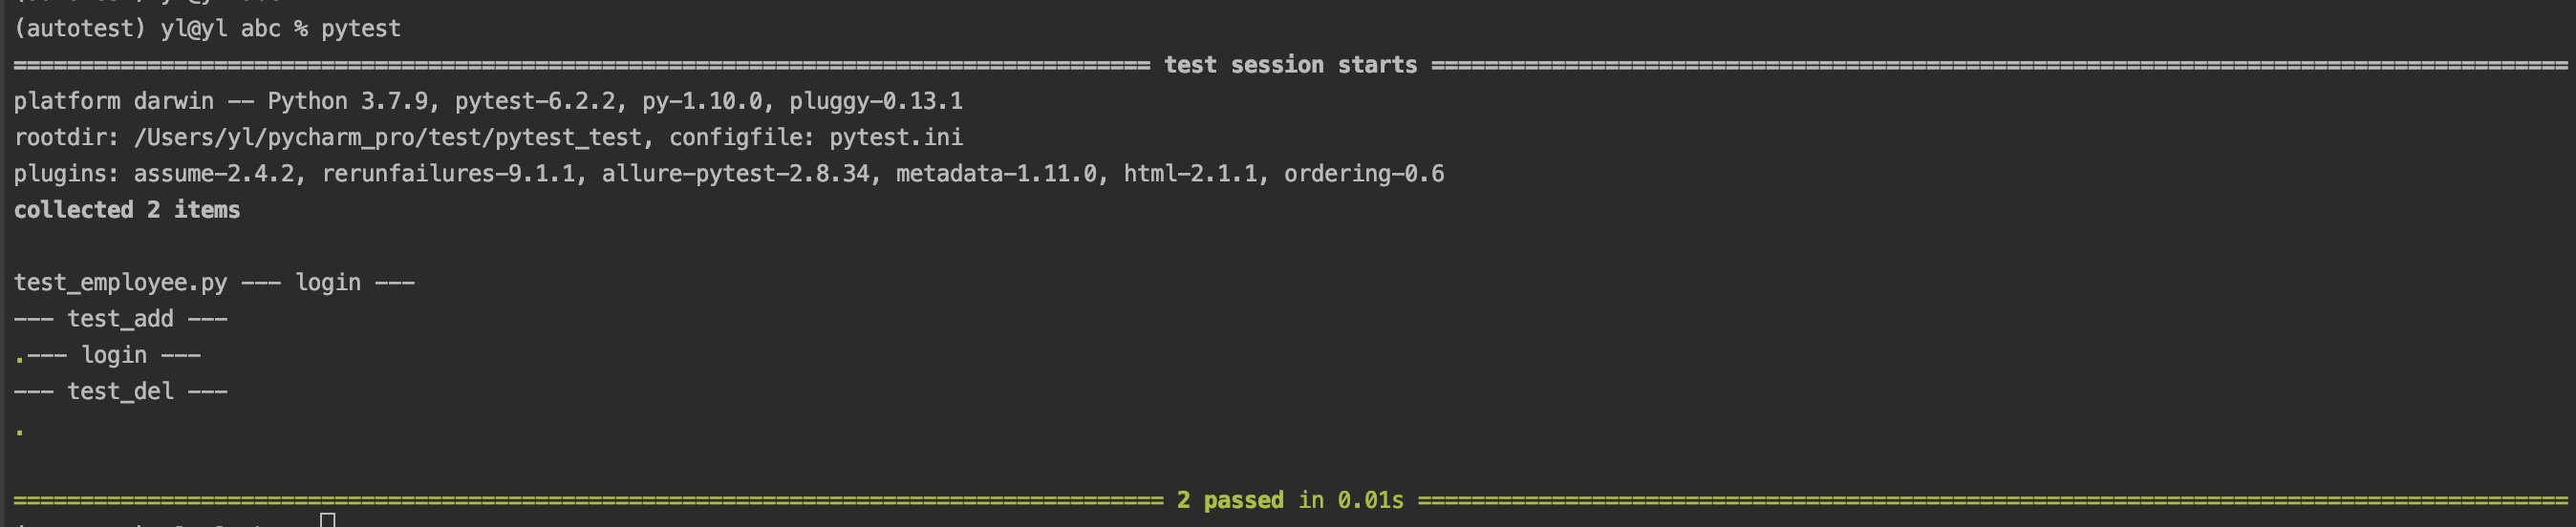
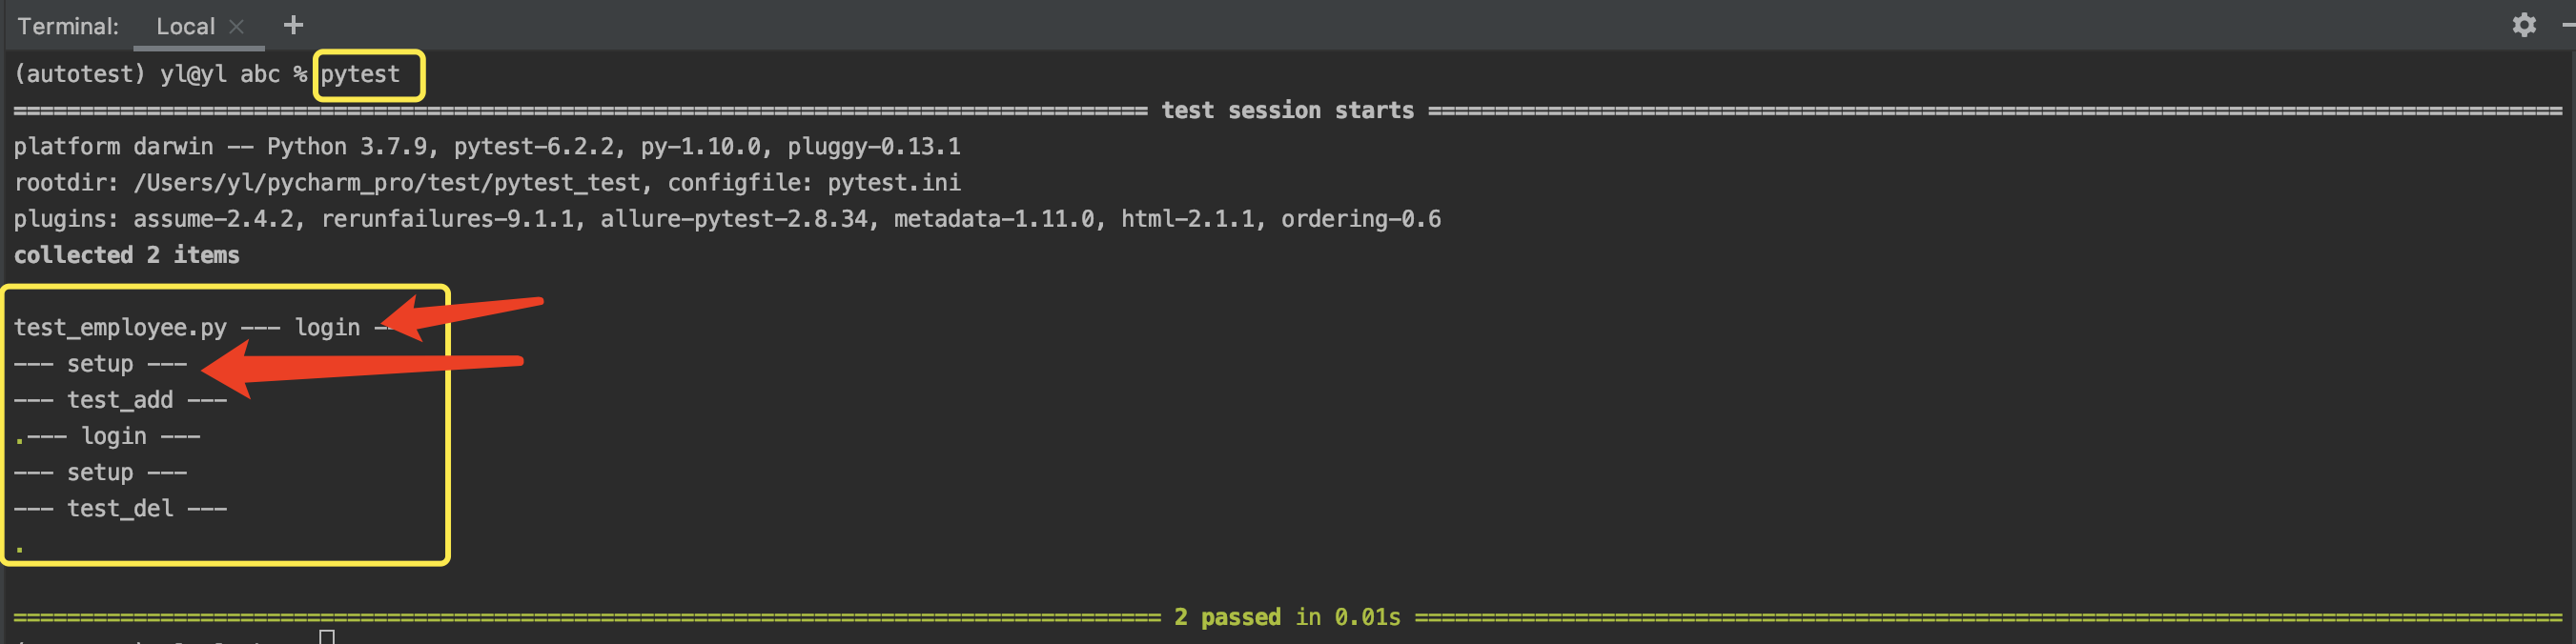
def test_add(self, login):
print("--- test_add ---")
assert 1
def test_del(self, login):
print("--- test_del ---")
assert 1
[pytest]

# 添加命令行参数
addopts = -s

# 文件搜索路径
testpaths = ./scripts
运行 pytest, 查看结果:
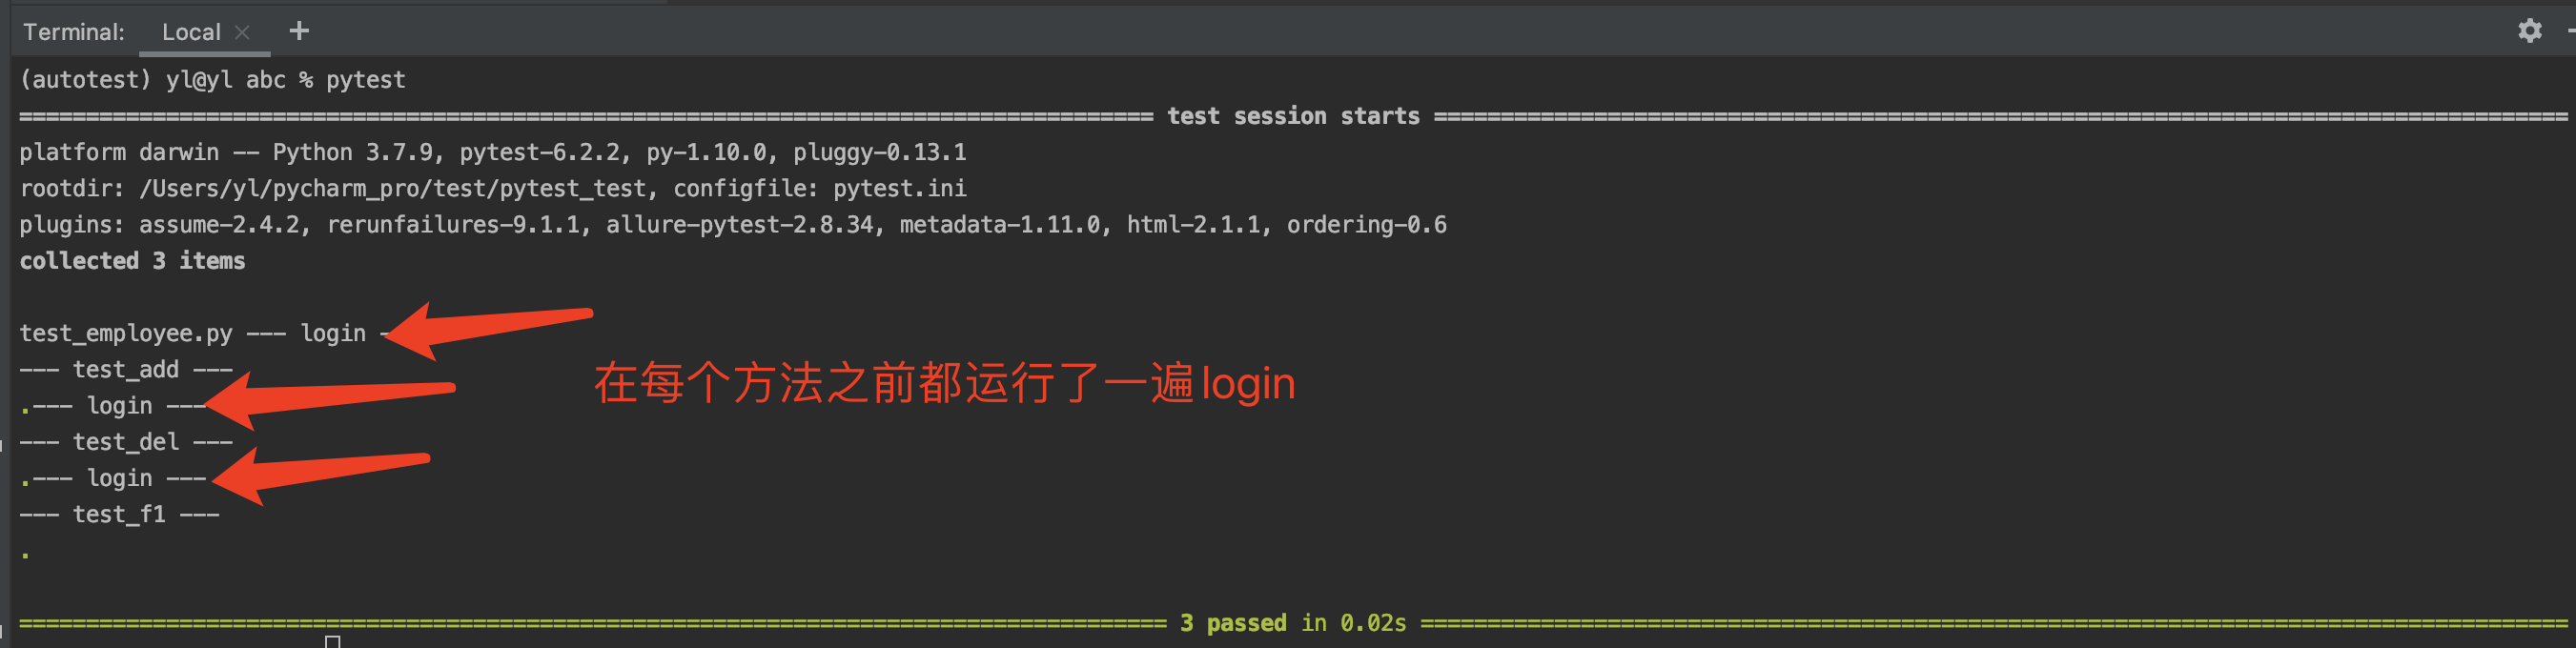
4.1.2 通过函数引用(即 使用装饰器)
# test_employee.py
import pytest
class TestEmployee(object):
"""测试类"""
# 定义fixture
@pytest.fixture()
def login(self):
print("--- login ---")
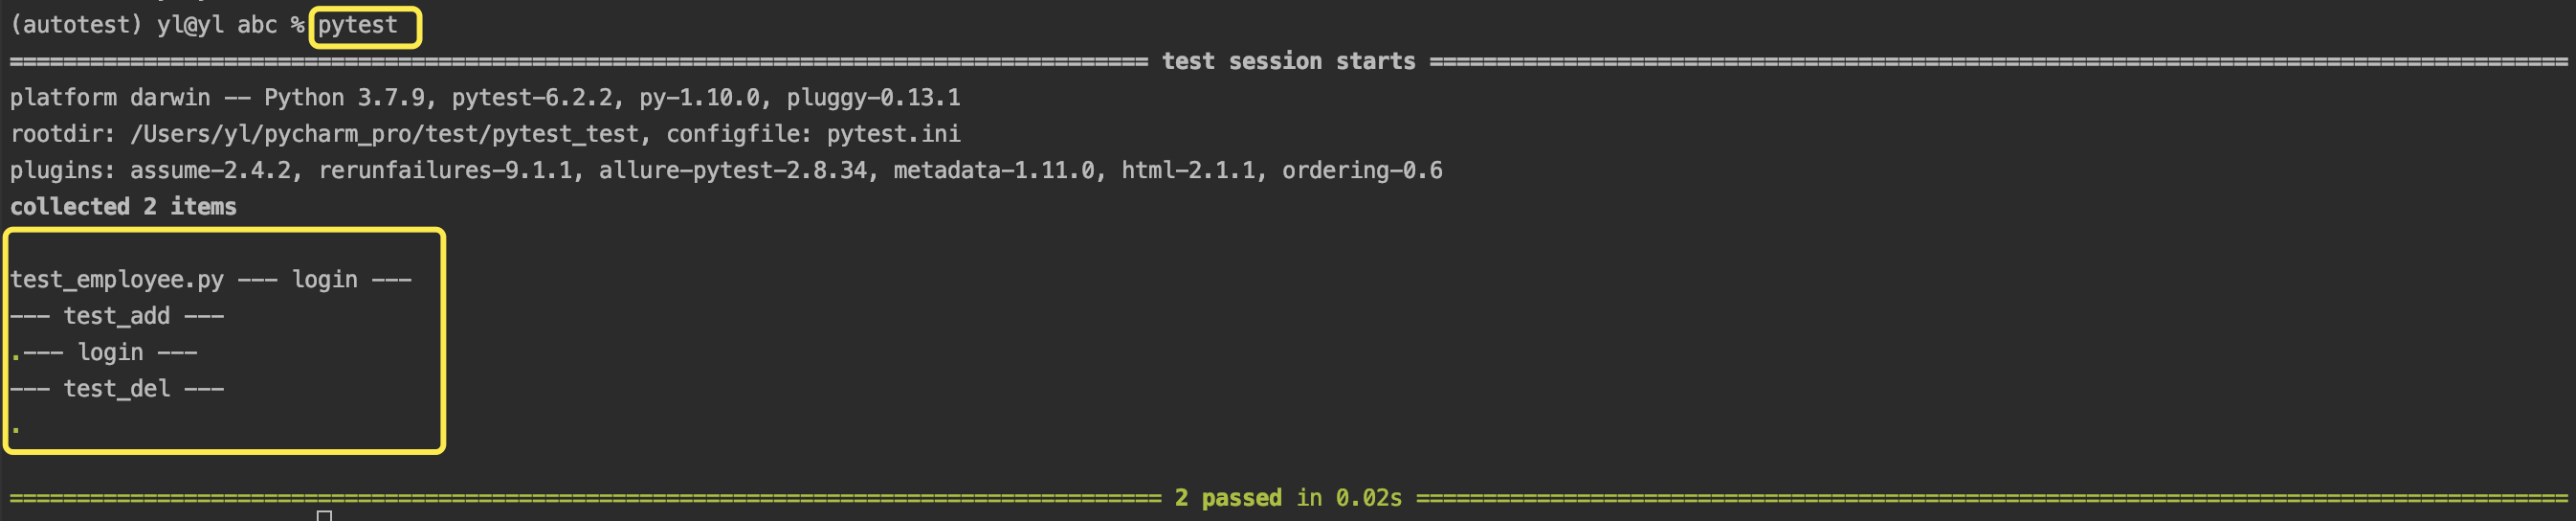
@pytest.mark.usefixtures("login")
def test_add(self):
print("--- test_add ---")
assert 1
@pytest.mark.usefixtures("login")
def test_del(self):
print("--- test_del ---")
assert 1
[pytest]

# 添加命令行参数
addopts = -s

# 文件搜索路径
testpaths = ./scripts
运行 pytest, 查看结果:

使用fixture的好处是,只要引用就可以使用它,如果想不用的话就不引用,比setup灵活。
4.2 参数
4.2.1 默认运行
只需给装饰器添加autouse=True,即使不显示的应用,也可在脚本运行时,使每个测试用例运行之前都运行一次fixture
# test_employee.py
import pytest


class TestEmployee(object):
    """测试类"""

    # 定义fixture
    @pytest.fixture(autouse=True)
    def login(self):
        print("--- login ---")

    def test_add(self):
        print("--- test_add ---")
        assert 1

    def test_del(self):
        print("--- test_del ---")
        assert 1
[pytest]

# 添加命令行参数
addopts = -s

# 文件搜索路径
testpaths = ./scripts
运行 pytest ,查看结果:
此时类似于使用setup。当fixture与setup同时使用时,优先级:fixture > setup
# test_employee.py
import pytest


class TestEmployee(object):
    """测试类"""

    def setup(self):
        print("--- setup ---")

    # 定义fixture
    @pytest.fixture(autouse=True)
    def login(self):
        print("--- login ---")

    def test_add(self):
        print("--- test_add ---")
        assert 1

    def test_del(self):
        print("--- test_del ---")
        assert 1
4.2.2 作用域
fixture里面有个scope参数可以控制fixture的作用范围:session>module>class>function
-function:每一个函数或方法都会调用
-class:每一个类调用一次,一个类中可以有多个方法
-module:每一个.py文件调用一次,该文件内又有多个function和class
-session:是多个文件调用一次,可以跨.py文件调用,每个.py文件就是module
默认作用域为函数级别
# test_employee.py
import pytest


# 定义fixture
@pytest.fixture(autouse=True, scope="function")  # 默认就是function级别
def login():
    print("--- login ---")


class TestEmployee(object):
    """测试类"""

    def test_add(self):
        print("--- test_add ---")
        assert 1

    def test_del(self):
        print("--- test_del ---")
        assert 1


class Test001(object):
    def test_f1(self):
        print("--- test_f1 ---")
[pytest]

# 添加命令行参数
addopts = -s

# 文件搜索路径
testpaths = ./scripts
运行 pytest, 查看结果:
类级别的fixture
# test_employee.py
import pytest


# 定义fixture
@pytest.fixture(autouse=True, scope="class")  # 定义为类级别
def login():
    print("--- login ---")


class TestEmployee(object):
    """测试类"""

    def test_add(self):
        print("--- test_add ---")
        assert 1

    def test_del(self):
        print("--- test_del ---")
        assert 1


class Test001(object):
    def test_f1(self):
        print("--- test_f1 ---")
[pytest]

# 添加命令行参数
addopts = -s

# 文件搜索路径
testpaths = ./scripts
运行 pytest, 查看结果:

setup_class 和 类级别的fixture的优先级:
# test_employee.py
import pytest


# 定义fixture
@pytest.fixture(autouse=True, scope="class")  # 定义为class级别
def login():
    print("--- login ---")


class TestEmployee(object):
    """测试类"""

    def setup_class(self):
        print("--- setup_class ---")

    def test_add(self):
        print("--- test_add ---")
        assert 1

    def test_del(self):
        print("--- test_del ---")
        assert 1
运行 pytest, 查看结果:
4.2.3 参数化
@pytest.fixture(params=None)
params为列表,列表中有多少个元素,脚本就会执行多少次。
如果想要获取params中的数据,需要在 fixture 中加 request 参数,这个参数名必须叫 request , 通过这个参数的 .param 属性获取值。
例:
# test_employee.py
import pytest


# 定义fixture
@pytest.fixture(autouse=True, params=[3, 11])
def add(request):
    # 将参数统一加 5
    print("--- 处理后的数值: ---", request.param + 5)


class TestEmployee(object):
    """测试类"""

    def test_add(self):
        print("--- test_add ---")
        assert 1

    def test_del(self):
        print("--- test_del ---")
        assert 1
[pytest]

# 添加命令行参数
addopts = -s

# 文件搜索路径
testpaths = ./scripts
运行 pytest, 查看结果:

4.3 返回值
使用参数的形式引用fixture,可以直接使用fixture的返回值。
例:
# test_employee.py
import pytest


# 定义fixture
@pytest.fixture(params=[3, 11])
def add(request):
    # 将参数统一加 5
    return request.param + 5


class TestEmployee(object):
    """测试类"""

    def test_add(self, add):  # 引用fixture
        print(add)  # 打印fixture返回的结果
        assert 1
[pytest]

# 添加命令行参数
addopts = -s

# 文件搜索路径
testpaths = ./scripts
运行 pytest, 查看结果:
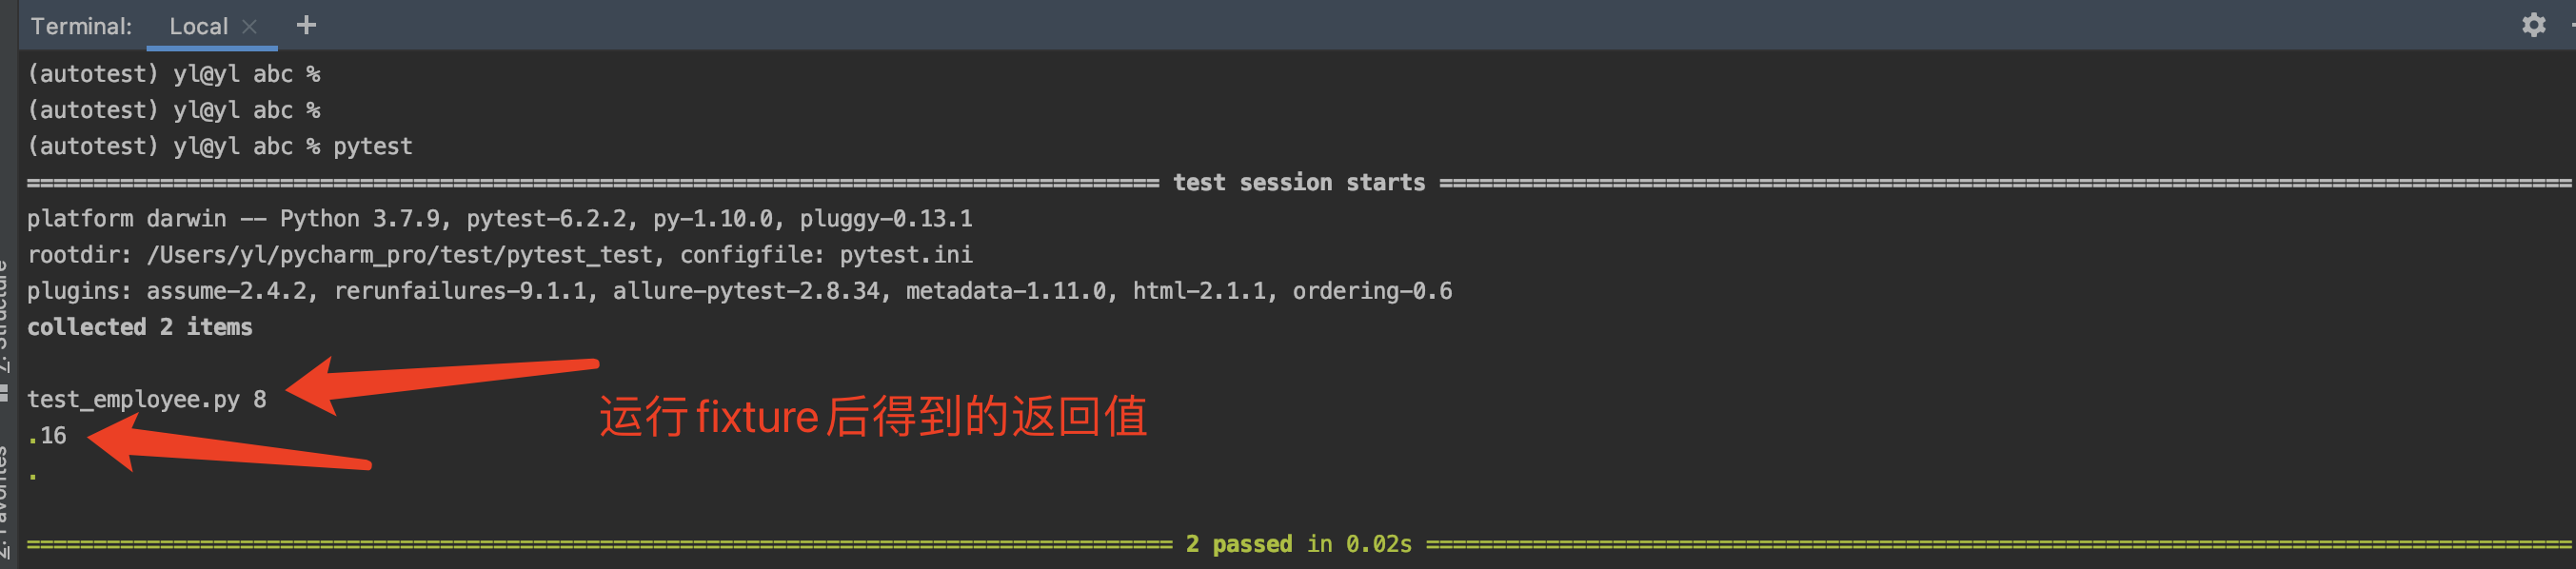
即 使用fixture 的名称就相当于是使用fixture的返回值。
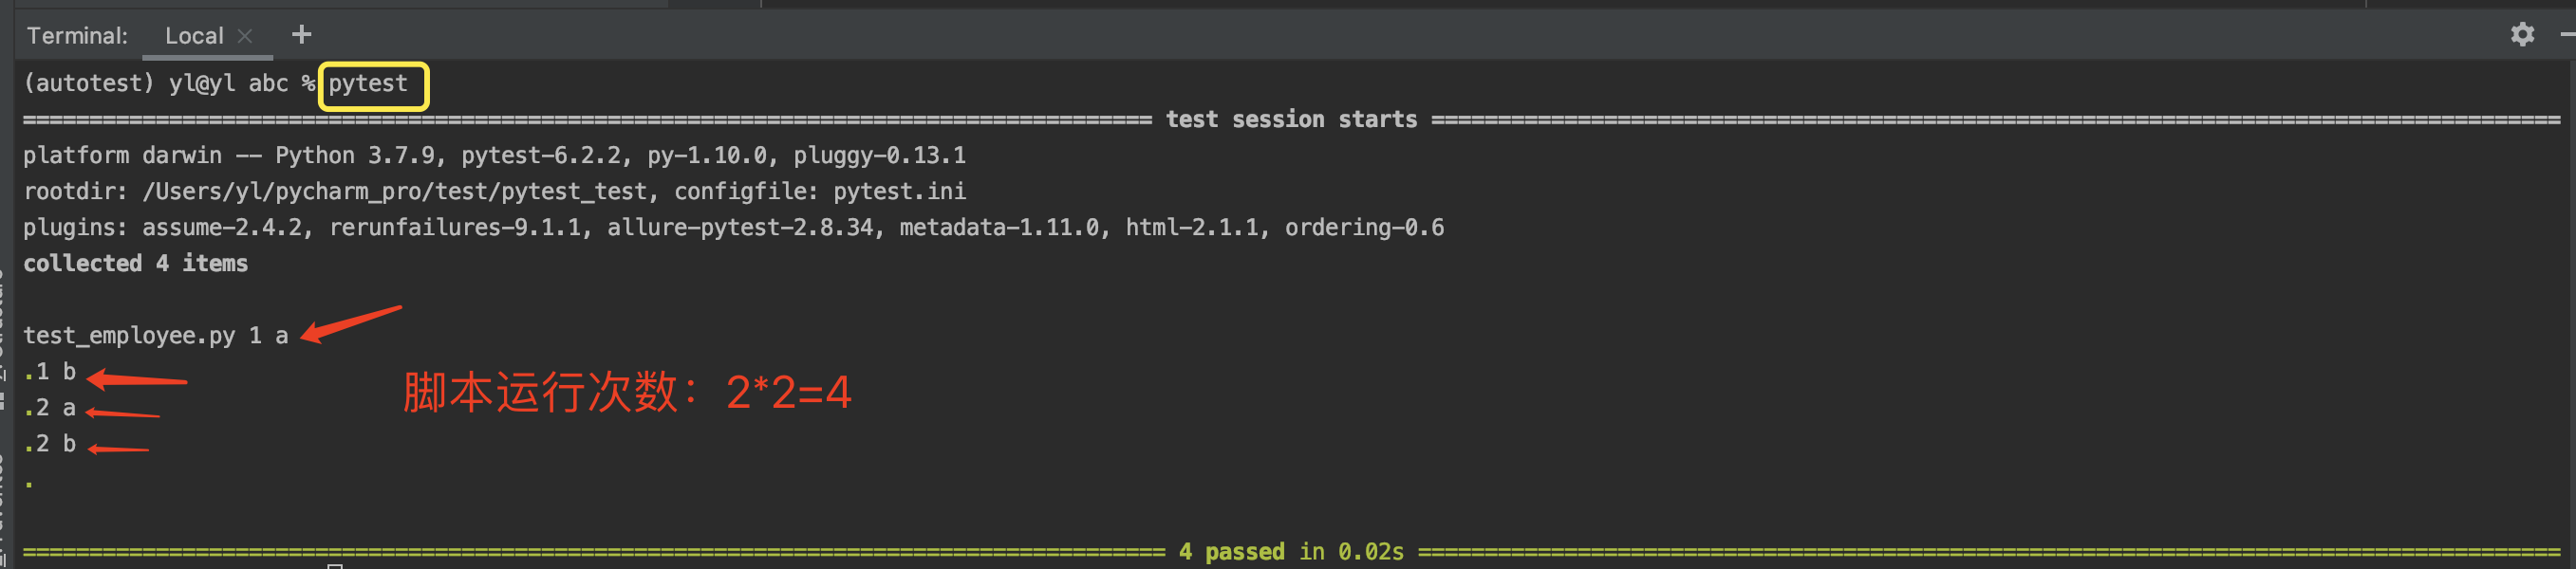
当fixture和测试用例脚本同时使用参数时,脚本执行次数 = fixture的参数个数 * 测试脚本的参数个数
# test_employee.py
import pytest


# 定义fixture
@pytest.fixture(params=[1, 2])
def add(request):
    return request.param


class TestEmployee(object):
    """测试类"""

    @pytest.mark.parametrize("num", ["a", "b"])
    def test_add(self, add, num):  # 引用fixture
        print(add, num)  # 打印fixture返回的结果
        assert 1
[pytest]

# 添加命令行参数
addopts = -s

# 文件搜索路径
testpaths = ./scripts
运行 pytest,结果:

 浙公网安备 33010602011771号