使用docker安装fastDFS
1.安装fastdfs必要组件 tracker 什么都不用改
docker run -d --network=host --name tracker -v /var/fdfs/tracker:/var/fdfs delron/fastdfs tracker
2.安装fastdfs存储地址 storage 除了ip其他的都不用改
docker run -d --network=host --name storage -e TRACKER_SERVER=你服务器自己的ip:22122 -v /var/fdfs/storage:/var/fdfs -e GROUP_NAME=group1 delron/fastdfs storage
3.进入容器修改配置 一定要,要不然链接不上
docker exec -it tracker bash
4.修改配置
vi /etc/fdfs/client.conf
将配置 tracker_server=你自己的ip:22122
到这其实fastDFS就配好了
创建项目测试
我这里用的是**springBoot**进行整合。**swagger-ui**进行图片上传
1.pom依赖
 1         <!-- FastDFS依赖 -->
 2         <dependency>
 3             <groupId>com.github.tobato</groupId>
 4             <artifactId>fastdfs-client</artifactId>
 5             <version>1.26.5</version>
 6         </dependency>
 7         <!-- Swagger2 核心依赖 -->
 8         <dependency>
 9             <groupId>io.springfox</groupId>
10             <artifactId>springfox-swagger2</artifactId>
11             <version>2.6.1</version>
12         </dependency>
13         <dependency>
14             <groupId>io.springfox</groupId>
15             <artifactId>springfox-swagger-ui</artifactId>
16             <version>2.6.1</version>
17         </dependency>
2.配置 yml **需要修改ip**
 1 spring:
 2   servlet:
 3     multipart:
 4       max-file-size: 100MB # 最大支持文件大小
 5       max-request-size: 100MB # 最大支持请求大小
 6 # 分布式文件系统FDFS配置
 7 fdfs:
 8   # 链接超时
 9   connect-timeout: 600
10   # 读取时间
11   so-timeout: 600
12   # 生成缩略图参数
13   thumb-image:
14     width: 150
15     height: 150
16   tracker-list: 你自己的ip:22122
3.配置文件(两个)
SwaggerConfig.java **一定要改成你自己项目的controller包路径,这里会扫描你的接口**
 1 @Configuration
 2 public class SwaggerConfig {
 3     @Bean
 4     public Docket createRestApi() {
 5         return new Docket(DocumentationType.SWAGGER_2)
 6                 .apiInfo(apiInfo())
 7                 .select()
 8                 .apis(RequestHandlerSelectors.basePackage("top.mail.email.controller"))
 9                 .paths(PathSelectors.any())
10                 .build();
11     }
12     private ApiInfo apiInfo() {
13         return new ApiInfoBuilder()
14                 .title("SpringBoot利用Swagger构建API文档")
15                 .description("使用RestFul风格, 创建人:知了一笑")
16                 .termsOfServiceUrl("https://github.com/cicadasmile")
17                 .version("version 1.0")
18                 .build();
19     }
20 }
DfsConfig.java
1 @Configuration
2 @Import(FdfsClientConfig.class)
3 // Jmx重复注册bean的问题
4 @EnableMBeanExport(registration = RegistrationPolicy.IGNORE_EXISTING)
5 public class DfsConfig {
6 }
4.工具类
FileDfsUtil.java
 1 @Component
 2 public class FileDfsUtil {
 3     private static final Logger LOGGER = LoggerFactory.getLogger(FileDfsUtil.class);
 4     @Resource
 5     private FastFileStorageClient storageClient ;
 6     /**
 7      * 上传文件
 8      */
 9     public String upload(MultipartFile file) throws Exception{
10         StorePath storePath = storageClient.uploadFile(file.getInputStream(),file.getSize(), FilenameUtils.getExtension(file.getOriginalFilename()),null);
11         return storePath.getFullPath() ;
12     }
13     /**
14      * 删除文件
15      */
16     public void deleteFile(String fileUrl) {
17         if (StringUtils.isEmpty(fileUrl)) {
18             LOGGER.info("fileUrl == >>文件路径为空...");
19             return;
20         }
21         try {
22             StorePath storePath = StorePath.parseFromUrl(fileUrl);
23             storageClient.deleteFile(storePath.getGroup(), storePath.getPath());
24         } catch (Exception e) {
25             LOGGER.info(e.getMessage());
26         }
27     }
28 }
5.controller接口
FileController.java
 1 @RestController
 2 public class FileController {
 3     @Resource
 4     private FileDfsUtil fileDfsUtil ;
 5     /**
 6      * 文件上传
 7      */
 8     @ApiOperation(value="上传文件", notes="测试FastDFS文件上传")
 9     @RequestMapping(value = "/uploadFile",headers="content-type=multipart/form-data", method = RequestMethod.POST)
10     public ResponseEntity<String> uploadFile (@RequestParam("file") MultipartFile file){
11         String result ;
12         try{
13             String path = fileDfsUtil.upload(file) ;
14             if (!StringUtils.isEmpty(path)){
15                 result = path ;
16             } else {
17                 result = "上传失败" ;
18             }
19         } catch (Exception e){
20             e.printStackTrace() ;
21             result = "服务异常" ;
22         }
23         return ResponseEntity.ok(result);
24     }
25     /**
26      * 文件删除
27      */
28     @RequestMapping(value = "/deleteByPath", method = RequestMethod.GET)
29     public ResponseEntity<String> deleteByPath (){
30         String filePathName = "group1/M00/00/00/wKhIgl0n4AKABxQEABhlMYw_3Lo825.png" ;
31         fileDfsUtil.deleteFile(filePathName);
32         return ResponseEntity.ok("SUCCESS") ;
33     }
34 }
6.springBoot启动类
1 @SpringBootApplication
2 @EnableSwagger2
3 public class EmailApplication {
4
5     public static void main(String[] args) {
6         SpringApplication.run(EmailApplication.class, args);
7     }
8
9 }
启动项目
访问::::
http://localhost:8080/swagger-ui.html
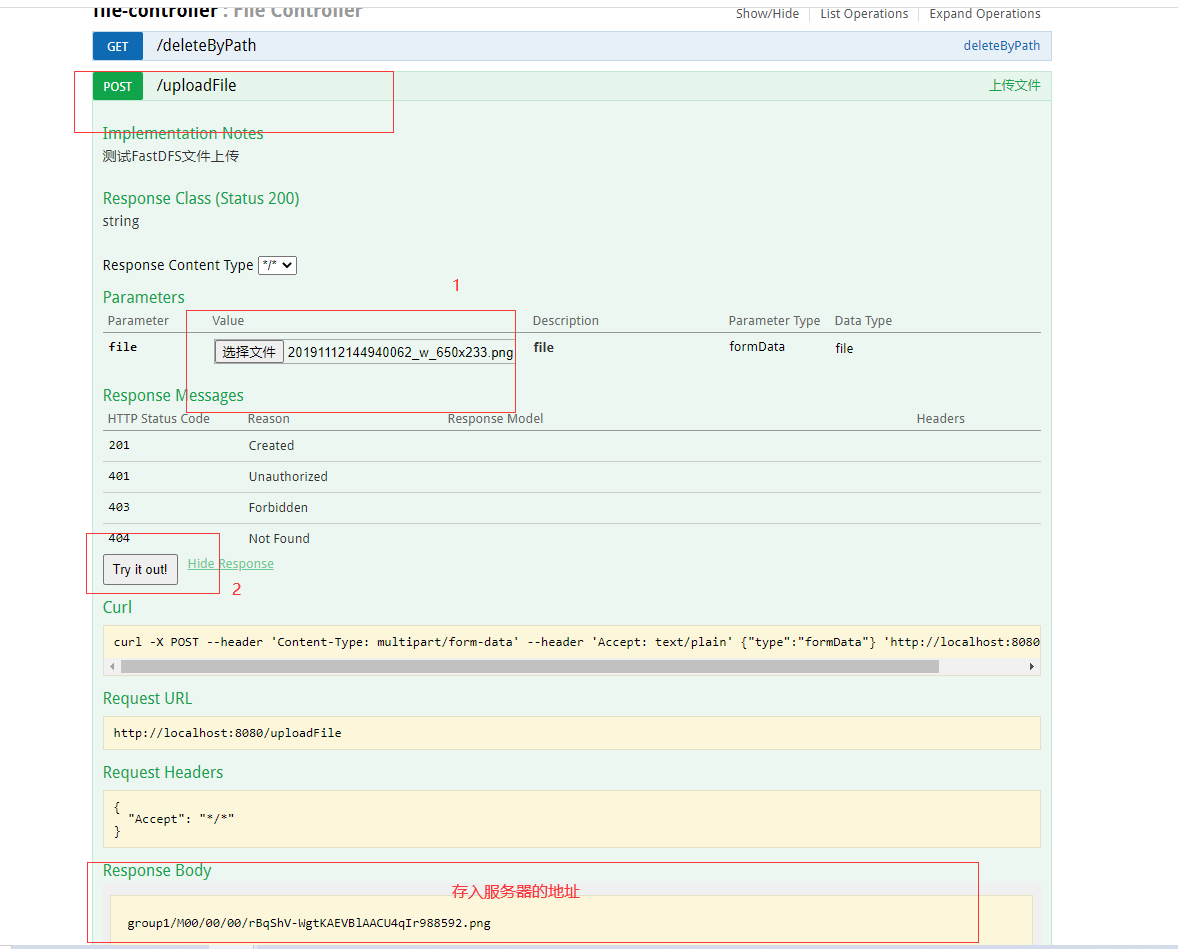
返回地址表示上传成功。
怎么访问呢?
默认的话,是通过你的 ip:8888/上面返回的地址 如果你是阿里云服务就要手动开放 8888、22122、23000 这三个端口

 浙公网安备 33010602011771号