
Flash与3D编程探秘(五)- 摄像机旋转和移动
日期:2008年10月
上一篇讨论了关于旋转摄像机的一些基础知识,在这篇文章中我将介绍如何在程序中使用这些知识定点旋转摄像机,以及把移动和旋转摄像机结合在一起。当只运用旋转摄像机时,在屏幕上看到物体围绕着摄像机旋转,动画并不是那么的"3D",不过这个是必经之路,等你完全的明白了旋转这个概念后,再添加上摄像机在3D空间移动,那样你就不会觉得乏味了。首先来看一个定点旋转摄像机的例子当作热身。这个例子,还是使用我们的小P,不过是很多的小P,这样使的场景看起来更加的有层次感。运行程序(效果如下),所有的物体都在围绕摄像机旋转,我想你会有摄像机在不停的旋转的错觉(或者没有...)。
(非常抱歉,下面的Flash文件不再支持)
定点旋转摄像机
动画制作步骤:
1. 一开始还是一些老步骤,设定原点,建立一个舞台,还有定义摄像机,这些都是前几篇所讨论过的,就不再过多解释了。
var origin = new Object();
origin.x = stage.stageWidth/2;
origin.y = stage.stageHeight/2;
origin.z = 0;
var scene = new Sprite();
scene.x = origin.x;
scene.y = origin.y;
this.addChild(scene);
var camera = new Object();
camera.x = 0;
camera.y = 0;
camera.z = 0;
camera.panning = 0;
var focal_length = 300;
2. 下面定义一些常量,比如物体的总数量,PI和物体z间距。
var MAX_OBJ = 100;
var PI = 3.1415926535897932384626433832795;
var DISTANCE_Z = 20; // the distance to your camera
3. 下面是初始化所有的物体,运用随机数产生小P所在的角度(对于摄像机),递增小P所在点到摄像机的距离(3D空间的),使用三角函数就可以得到小P的x和z,同样使用随机数产生它的y,最后把它添加到舞台上。
for (var i = 0; i < MAX_OBJ; i++)
{
var ball = new Sphere();
ball.angle = Math.random()*(0-PI*2) + PI*2; // this is the rotate angle on the xz plane
ball.dist_center = 140 + (MAX_OBJ-i)* DISTANCE; // the distance to your camera
ball.x_3d = Math.cos(ball.angle) * ball.dist_center; // then we use trig to get x
ball.z_3d = Math.sin(ball.angle) * ball.dist_center; // and z
ball.y_3d = Math.random()*(-240-240) + 240; // now put the ball at random y
scene.addChild(ball); // add the ball to the collection
}
4. 对于每一个物体,在摄像机转动角度时刷新它的大小和位置。于是下一步写一个函数来达到目的,首先要确定小P相对于摄像机的旋转角度。然后根据这个角度和摄像机和小P之间的垂直距离,算出它到摄像机的x,z和y的距离。最后,还是运用之前学过的算法,缩放和移动物体。
function update(obj)
{
// get the angle relative to your camera panning angle
var angle = obj.angle - camera.panning;
var x_pos = Math.cos(angle)*obj.dist_center - camera.x; // use trig calculate the x
var z_pos = Math.sin(angle)*obj.dist_center - camera.z; // and z
var y_pos = obj.y_3d - camera.y; // calculate the relative y
if (z_pos > 0) // if the ball isin front of the camera
{
if (!obj.visible)
obj.visible = true; // make the ball visible anyway
var scale = focal_length/(focal_length+z_pos); // cal the scale of the ball
obj.x = x_pos*scale; // calcualte the x position in a camera view
obj.y = y_pos*scale; // and y position
obj.scaleX = obj.scaleY = scale; // scale the ball to a proper state
}
else
{
obj.visible = false;
}
}
5. 写一个循环函数,在每一次执行时,递增摄像机的角度,并且刷新舞台上的所有的物体。
{
camera.panning += 0.01; // increase the panning angle
if (camera.panning > 2*PI)
camera.panning -= 2*PI;
if (camera.panning < -1*2*PI)
camera.panning += 2*PI;
for (var i = 0; i < scene.numChildren; i++) // update all the balls on the screen
{
update(scene.getChildAt(i));
}
}
// add loop event listener
this.addEventListener(Event.ENTER_FRAME, run);
注意:
这里提到的旋转,都是在保持y不变的情况下,横向旋转摄像机,换句话说,让摄像机绕着y轴旋转,当然同理也可以写出摄像机围绕着x轴旋转的函数。不过如何同时进行上述两种旋转,我将在后面的文章里进行介绍。
移动和旋转的组合
现在你已经知道如何横向旋转摄像机,同时前几篇文章中也已经介绍了如何移动摄像机,如果把这两个操作结合在一起,那一定很棒。我想你应该觉得不会很 困难,因为前面已经把两个分开操作学会了,下面所要做的只是把这两种操作组合在一起。来看一个动画,其中发灰的摄像机是运动前的位置,另外一个是向后(沿摄像机镜头的反方向)移动后位置(当摄像机镜头垂直向上看得时候移动得到),从动画中可以看到,对于摄像机镜头来说,景物的位置是不一样的。
(非常抱歉,下面的Flash文件不再支持)
移动加旋转摄像机
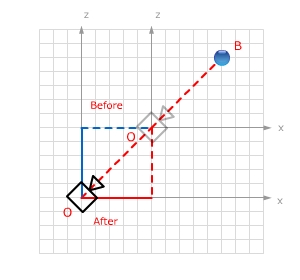
再来看一个图例,在这个图片中,摄像机沿BO方向向后移动,我们可以看出,摄像机的转角是不变的。那么就可以结合摄像机移动的位置和三角函数就可以算出它的x移动量(图中红色实线)和y移动量(图中蓝色实线),进而便可以算出对于移动后摄像机而言,小P的x和y。
需要注意的是,当你首先旋转摄像机,然后向后或者向前移动摄像机,那么摄像机是沿着摄像机旋转过后的角度运动的,至于移动量和物体到现在摄像机的距离,一样可以使用三角函数得到(三角函数!Nice!)。下面就看一个应用的例子:
(非常抱歉,下面的Flash文件不再支持)
定点旋转摄像机,WS前后移动摄像机,AD旋转
动画制作步骤:
1. 重复前面的3步。
var MAX_OBJ = 100;
var PI = 3.1415926535897932384626433832795;
var DISTANCE_Z = 20; // the z distance to your camera
// same as usual
var origin = new Object();
origin.x = stage.stageWidth/2;
origin.y = stage.stageHeight/2;
origin.z = 0;
var scene = new Sprite();
scene.x = origin.x;
scene.y = origin.y;
this.addChild(scene);
var camera = new Object();
camera.x = 0;
camera.y = 0;
camera.z = 0;
camera.panning = 0;
var movement = 0;
var focal_length = 300;
var pan_left;
var pan_right;
var move_forward;
var move_backward;
// now create lots of balls around your camera
for (var i = 0; i < MAX_OBJ; i++)
{
var ball = new Sphere();
ball.angle = Math.random()*(0-PI*2) + PI*2; // this is the rotate angle on the xz plane
ball.dist_center = (MAX_OBJ-i)* DISTANCE_Z; // the z distance to your camera
ball.x_3d = Math.cos(ball.angle) * ball.dist_center; // then we use trig to get x
ball.z_3d = Math.sin(ball.angle) * ball.dist_center; // and z
ball.y_3d = Math.random()*(-300-300) + 300; // now put the ball at random y
scene.addChild(ball); // add the ball to the collection
}
2. 下面这个函数是和上面例子中不同的主要部分。首先要得到物体和摄像机的x,y和z距离,然后使用反三角函数就可以得出物体所在的角度,同时使用勾股定理得到物体和摄像机的距离(注意y距离为0),同理使用三角函数便可以得到在摄像机移动之后物体的x和z。然后再根据物体的x和z对物体进行2D空间的缩放和移动。
function display(obj)
{
var x_pos = obj.x_3d - camera.x; // calculate the x distance from obbject to the camera
var y_pos = obj.y_3d - camera.y; // and y distance
var z_pos = obj.z_3d - camera.z; // and z distance
var angle = Math.atan2(z_pos, x_pos); // caculate the relative angle
// now get the actual object radius around camera
var radius = Math.sqrt(z_pos*z_pos + x_pos*x_pos);
x_pos = Math.cos(angle+camera.panning)*radius; // get the x position after panning
z_pos = Math.sin(angle+camera.panning)*radius; // and y position
if (z_pos > 0) // if the ball isin front of the camera
{
if (!obj.visible)
obj.visible = true; // make the ball visible anyway
var scale = focal_length/(focal_length+z_pos); // cal the scale of the ball
obj.x = x_pos*scale; // calcualte the x position in a camera view
obj.y = y_pos*scale; // and y position
obj.scaleX = obj.scaleY = scale; // scale the ball to a proper state
}
else
{
obj.visible = false;
}
txt_z.text = int(camera.z)+"";
txt_panning.text = Number(camera.panning*(180/Math.PI)).toFixed(1) + "";
}
3. 写一个循环函数,在每一次执行时刷新舞台上的所有的物体。
{
if (camera.panning > 2*PI)
camera.panning -= 2*PI;
if (camera.panning < -1*2*PI)
camera.panning += 2*PI;
for (var i = 0; i < scene.numChildren; i++) // update all the balls on the screen
{
display(scene.getChildAt(i));
}
}
4. 下面设置一些键盘相应事件,使用WS可以使摄像机前进和后退,AD旋转摄像机。键盘事件在前面提到过,就不多说了,如果有什么问题的话可以查看一下前面的例子。
{
if (camera.panning > 2*PI)
camera.panning -= 2*PI;
if (camera.panning < -1*2*PI)
camera.panning += 2*PI;
for (var i = 0; i < scene.numChildren; i++) // update all the balls on the screen
{
display(scene.getChildAt(i));
}
}
function key_down(e:KeyboardEvent):void
{
if (e.keyCode == 65)
pan_left = true;
if (e.keyCode == 68)
pan_right = true;
if (e.keyCode == 87)
move_forward = true;
if (e.keyCode == 83)
move_backward = true;
}
function key_up(e:KeyboardEvent):void
{
if (e.keyCode == 65)
pan_left = false;
if (e.keyCode == 68)
pan_right = false;
if (e.keyCode == 87)
move_forward = false;
if (e.keyCode == 83)
move_backward = false;
}
function key_response(e:Event):void
{
if (pan_left)
camera.panning += 0.015; // increase the panning angle
if (pan_right)
camera.panning -= 0.015; // decrease the panning angle
if (move_forward)
{
movement = 20;
}
if (move_backward)
{
movement = -20;
}
if (move_forward || move_backward)
{
camera.x += Math.sin(camera.panning)*movement;
camera.z += Math.cos(camera.panning)*movement;
}
}
// add loop event listener
this.addEventListener(Event.ENTER_FRAME, run);
this.addEventListener(Event.ENTER_FRAME, key_response);
stage.addEventListener(KeyboardEvent.KEY_DOWN, key_down);
stage.addEventListener(KeyboardEvent.KEY_UP, key_up);
基本的阴影效果
当舞台上的物体非常多的时候,我们希望能够让物体层次分明。你应该还记得第一篇文章里是怎样给物体加上层次感的,是根据物体在舞台上的z来进行排序,离摄像机最近的物体的层次就最高。当然还有其他的技巧还给物体添加层次感,比如可以利用阴影效果来给舞台上的物体加上层次感,还比如可以利用光源,日出日落等等因素给物体分层次,使场景变得更真实。光源这个课题相对来说比较复杂,需要加进大量的数学运算,将在后面的物体篇介绍。在这篇文章里,我将给你介绍如何在3D空间里使用简单雾的效果。
(非常抱歉,下面的Flash文件不再支持)
雾影效果
制作步骤
下面把前面的旋转摄像机的例子加工一下来达成雾影效果。添加雾的原理是这样的,离摄像机越远的物体,那么它的亮度就越大(因为场景是白色),大部分步骤都是和这篇文章的第一个例子的相同,只需要在每一次刷新物体缩放和位置的函数里添加如下代码。首先求出物体和摄像机的z距离,然后算出物体RGB的值,并对物体着色。非常的简单,就把这个例子当作是小练习。
var color_trans:ColorTransform = new ColorTransform();
color_trans.redOffset = tint;
color_trans.greenOffset = tint;
color_trans.blueOffset = tint;
obj.transform.colorTransform = color_trans;
注意:
在这两个些例子里,并没有涉及到物体层次,你在开发的时候,最好加上一个层次排序。这个算法在第一篇文章里就已经实现,你可以试着把那个函数添加到这两个例子里。
建议:
在开发的时候,我建议你使用面向对象的书写方式,这样便于你的管理。我一直没有使用OO的写法,是因为我不想给读者的阅读造成不必要的困惑,你可以试着把例子中的代码写成类,然后从.fla文件调用。例如你可以把例子中的小P写成一个类,它可以具有x_3d,y_3d,z_3d等属性。
非常抱歉,文中暂时不提供源文件下载,如果你需要源文件,请来信或者留言给我。
|
|
作者:Yang Zhou 出处:http://yangzhou1030.cnblogs.com 本文版权归作者和博客园共有,转载未经作者同意必须保留此段声明。请在文章页面明显位置给出原文连接,作者保留追究法律责任的权利。 |
posted on 2008-11-05 10:46 yangzhou1030 阅读(6069) 评论(16) 编辑 收藏 举报


