
详细介绍:SpringBoot应用回顾
约定优于配置
概念:约定优于配置,又称为按约定编程,是一种软件设计规范。
例如你有一个实体类为User,数据中的表名也是user,这样就无需做额外的配置,只有在偏离这种约定的时候才需要做额外的配置(数据库为t_user时候,要额外写关于整个名字的配置)。
简单来说就是假如你的配置和约定一致,那么就不需要做额外的任何配置,约定不符合期待时才需要对约定进行替换配置。
好处:大大减少了配置项。
Spring Boot 概念
官方网站:https://spring.io/projects/spring-boot
主要特性:
- 创建独立的 Spring 应用程序
- 直接嵌入 Tomcat、Jetty 或 Undertow(无需部署 WAR 文件)
- 提供预设的“初始”依赖项,以简化构建配置。
- 尽可能自动配置 Spring 和第三方库。
- 提供可用于生产环境的功能,例如指标、健康检查和外部配置。
- 完全无需生成代码,也无需 XML 配置。
SpringBoot案例实现
创建SpringBoot项目
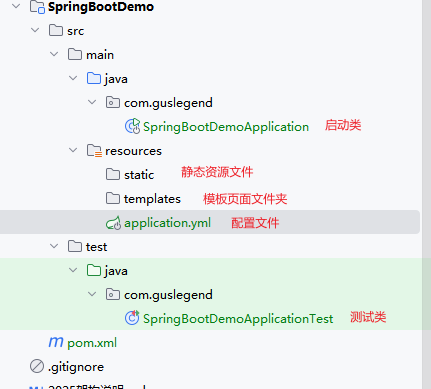
在项目的的文件下创建contoller包
@RestController //组合式注解,等价于@Controller + @ResponseBody
public class DemoController {
    @RequestMapping("/hello")
    public String demo() {
        return "Hello World!";
    }
}运行主类,访问http://localhost:8080/hello

至此SpringBoot项目构建完成
中文乱码问题
解决方法1:
@RequestMapping(value = "/hello",produces = "application/json;charset = utf-8")解决方法2:
server:
  port: 8080
  #设置响应为utf-8
  servlet:
    encoding:
      force-response: true
疑问
- starter是什么?我们应该如何取使用这些start?
- 为什么包扫描只会扫描核心启动类所在的包?
- 在springBoot启动的过程中,是如何完成自动装配的?
- 内嵌Tomcat是如何被创建及启动的?
- 使用了web场景对应的starter,springmvc是如何自动装配?
热部署
实现演示
在开发项目的过程中,当项目修改了某些代码后需要本地验证,需要重写启动本地服务进行验证,我们可以使用spring-boot-devtools可以很好的解决本地验证缓慢的问题。
首先我们需要引入热部署maven依赖
            org.springframework.boot
            spring-boot-devtools
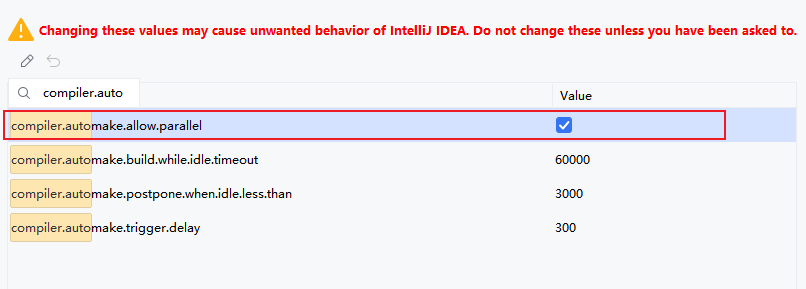
还需要再idea里面开启支持热部署设置
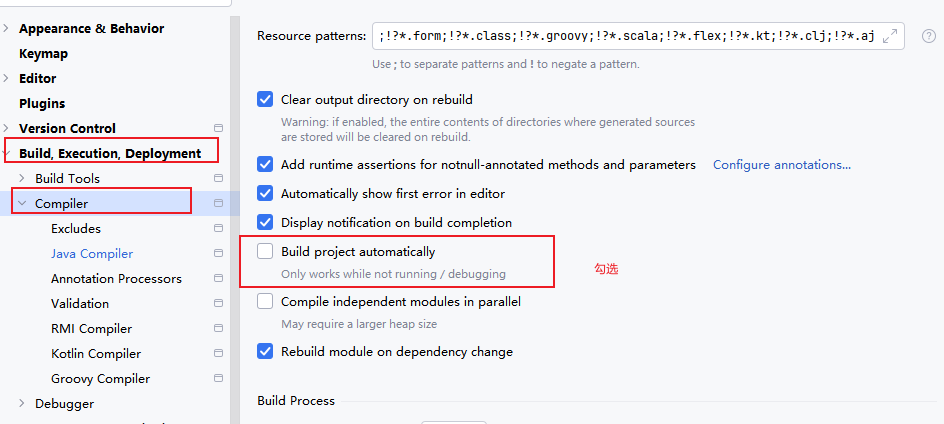
然后在idea页面下使用Ctrl+Shift+Alt+/,勾选以下选择
原理分析
当我们在编译器上启动项目,改动了相关的代码,然后编译器自动触发编译替换历史的.class文件,其会自动重启Spring-boot项目。
排除资源依赖
在某些资源改动后不需要触发重启启动,我们可以用以下设置
spring:
  devtools:
    restart:
      enabled: static/**, templates/**
全局配置文件
SpringBoot使用一个application.properties或者application.yml的文件作为全局配置文件。

顺序如下

SpringBoot会从这四个位置去加载全部的配置文件,如果高优先级配置文件属性与低有限级配置文件不冲突的属性,则会共同存在-互补配置。
如果在同一个目录下有application.properties也有application.yml。application.properties会先执行。
如果自定义配置名称
java -jar myproject.jar --spring.config.name=myproject如果自定义配置文件位置
java -jar run-0.0.1-SNAPSHOT.jar --spring.config.location=D:/application.propertiesapplication.properties配置文件
首先我们创建一个Pet类
@Data
public class Pet {
    private String type;
    private String name;
}
然后在创建一个Person类
@Data
@Component
@ConfigurationProperties(prefix = "person") //将配置文件中的person开头的属性映射到该类中
public class Person {
    private int id;
    private String name;
    private List hobby;
    private String[] family;
    private Map map;
    private Pet pet;
}
配置文件中添加
person.id=1
person.name=xiaozhangzhang
person.hobby=吃饭,睡觉,打豆豆
person.family=sister,mather,brother
person.map.k1=v1
person.map.k2=v2
person.pet.type=dag
person.pet.name=小狗狗@Component是将当前注入属性值的Person类对象作为Bean组件放到Spring容器中,只有这样才可以被@ConfigurationProperties注解给赋值。
在编写application.properties配置文件时,由于要配置Person对象属性是我们自定义的,SpringBoot无法自动识别,没有书写提示,可以添加maven依赖处理
            org.springframework.boot
            spring-boot-configuration-processor
            true

application.yml
person:
  id: 1
  name: Jon
  hobby: ["Cooking", "Coding"]
  family: ["Mom", "Dad"]
  map: {"key1": "value1", "key2": "value2"}
  pet: {type: "Dog", name: "Bobby"}
属性注入
属性注入常见注解
- @Configuration:声明一个类作为配置类。
- @Bean:声明在方法上,将方法的返回值加入Bean容器。
- @Value:属性注入
- @ConfigurationProperties(prefix="jdbc"):批量属性注入。
- @PropertySource("classpath:/jdbc.properties")指定外部属性文件。在类上添加。
@Value属性注入
首先我们需要添加数据库连接依赖
            com.github.drtrang
            druid-spring-boot2-starter
            1.1.10
在application.yml中添加依赖
jdbc:
  driverClassName: com.mysql.jdbc.Driver
  url: jdbc:mysql://localhost:3307/springboot
  username: root
  password: 123456
@Configuration
public class JdbcConfig {
@Value("${jdbc.url}")
private String jdbcUrl;
@Value("${jdbc.username}")
private String jdbcUsername;
@Value("${jdbc.password}")
private String jdbcPassword;
@Value("${jdbc.driverClassName}")
private String jdbcDriverClassName;
@Bean
public DataSource dataSource(){
DruidDataSource dataSource = new DruidDataSource();
dataSource.setUrl(jdbcUrl);
dataSource.setUsername(jdbcUsername);
dataSource.setPassword(jdbcPassword);
dataSource.setDriverClassName(jdbcDriverClassName);
return dataSource;
}
}@ConfigurationProperties批量注入
@Configuration
@ConfigurationProperties(prefix = "jdbc")
public class JdbcConfig {
    private String jdbcUrl;
    private String jdbcUsername;
    private String jdbcPassword;
    private String jdbcDriverClassName;
    public void setJdbcDriverClassName(String jdbcDriverClassName) {
        this.jdbcDriverClassName = jdbcDriverClassName;
    }
    public void setJdbcPassword(String jdbcPassword) {
        this.jdbcPassword = jdbcPassword;
    }
    public void setJdbcUsername(String jdbcUsername) {
        this.jdbcUsername = jdbcUsername;
    }
    public void setJdbcUrl(String jdbcUrl) {
        this.jdbcUrl = jdbcUrl;
    }
}此外还要添加@EnableConfigurationProperties(JdbcConfig.class),表示支持@ConfigurationProperties。
第三方配置
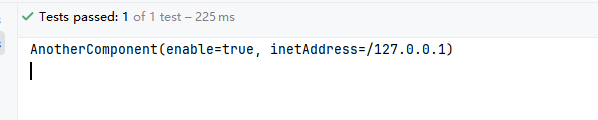
除了@ConfigurationProperties用于注释类之外,还可以在公用@Bean方法上使用它,当要将属性绑定到控制之外的第三方组件。
@Data
public class AnotherComponent {
    private boolean enable;
    private InetAddress inetAddress;
}
@Configuration
public class MyService {
@ConfigurationProperties("another")
@Bean
public AnotherComponent anotherComponent() {
return new AnotherComponent();
}
}another:
enable: true
inet-address: 127.0.0.1测试类
    @Test
    public void test2() {
        System.out.println(anotherComponent);
    }
松散绑定
Spring Boot 中@ConfigurationProperties绑定环境属性时,环境属性名与 Bean 属性名不需要完全匹配,支持多种命名格式的自动映射。
@Data
@Component
@ConfigurationProperties("acme.my-person.person")
public class OwnerProperties {
    private String firstName;
}
acme:
my-person:
person:
first-name: 泰森属性文件中配置 | 说明 |
| 羊肉串模式(kebab-case),推荐使用 |
| 标准驼峰模式 |
| 下划线模式 |
| 大写下划线,系统环境变量场景推荐 |
SpringBoot日志框架
日志框架介绍
通常情况下我们使用日志是由一个抽象层+实现层的组合来搭建的。
日志抽象层 | 日志实现层 |
JCL(Jakarta Commons Logging)、SLF4J(Simple Logging Facade for Java)、jboss-logging | jul(java.util.logging)、log4j、logback、log4j2 |
- pring 框架:默认使用 JCL 作为日志输出。
- Spring Boot:默认选择 SLF4J 结合 LogBack 作为日志方案。
SLF4J的使用
官方文档:https://www.slf4j.org/manual.html
import org.slf4j.Logger;
import org.slf4j.LoggerFactory;
public class HelloWorld {
public static void main(String[] args) {
    logger.info("Hello World");
    }
}
SpringBoot的日志关系
首先我们需要排除其他日志的框架
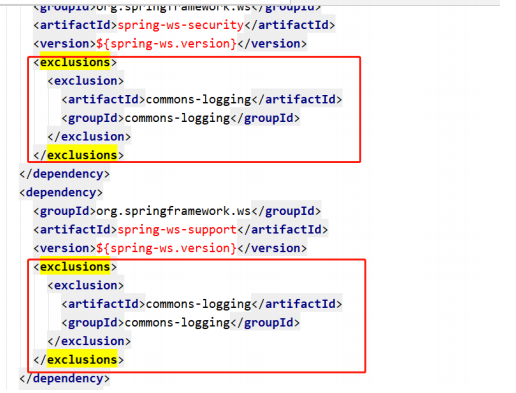
然后引入统一框架替换包
  org.springframework.boot
  spring-boot-starter-logging
  2.4.0.RELEASE
测试输出
@Slf4j
@RestController //组合式注解,等价于@Controller + @ResponseBody
public class DemoController {
    @RequestMapping(value = "/hello",produces = "application/json;charset = utf-8")
    public String demo() {
        log.info("DemoController.demo()");
        return "Hello World!,你好呀";
    }
}
自定义日志输出
我们需要在配置文件中添加日志输出的格式
logging:
  level:
    com:
      guslegend: debug
  pattern:
    console: '%d{yyyy-MM-dd HH:mm:ss.SSS} [%thread] %-5level %logger{50} - %msg%n'
    file: '%d{yyyy-MM-dd HH:mm:ss.SSS} [%thread] %-5level %logger{50} - %msg%n'
  file:
    path: springboot.log
测试结果
2025-12-10 16:15:19.976 [main] INFO  com.guslegend.SpringBootDemoApplication - Starting SpringBootDemoApplication using Java 11 on School with PID 42084 (C:\Users\Administrator\Desktop\arcfor2025\SpringBootDemo\target\classes started by Administrator in C:\Users\Administrator\Desktop\Arcfor2025)
2025-12-10 16:15:19.979 [main] DEBUG com.guslegend.SpringBootDemoApplication - Running with Spring Boot v2.4.0, Spring v5.3.1
2025-12-10 16:15:19.980 [main] INFO  com.guslegend.SpringBootDemoApplication - No active profile set, falling back to default profiles: default
2025-12-10 16:15:20.418 [main] INFO  org.springframework.boot.web.embedded.tomcat.TomcatWebServer - Tomcat initialized with port(s): 8080 (http)
2025-12-10 16:15:20.423 [main] INFO  org.apache.catalina.core.StandardService - Starting service [Tomcat]
2025-12-10 16:15:20.423 [main] INFO  org.apache.catalina.core.StandardEngine - Starting Servlet engine: [Apache Tomcat/9.0.39]
2025-12-10 16:15:20.455 [main] INFO  org.apache.catalina.core.ContainerBase.[Tomcat].[localhost].[/] - Initializing Spring embedded WebApplicationContext
2025-12-10 16:15:20.455 [main] INFO  org.springframework.boot.web.servlet.context.ServletWebServerApplicationContext - Root WebApplicationContext: initialization completed in 457 ms
2025-12-10 16:15:20.555 [main] INFO  org.springframework.scheduling.concurrent.ThreadPoolTaskExecutor - Initializing ExecutorService 'applicationTaskExecutor'
2025-12-10 16:15:20.672 [main] INFO  org.springframework.boot.web.embedded.tomcat.TomcatWebServer - Tomcat started on port(s): 8080 (http) with context path ''
2025-12-10 16:15:20.679 [main] INFO  com.guslegend.SpringBootDemoApplication - Started SpringBootDemoApplication in 0.938 seconds (JVM running for 1.368)
2025-12-10 16:15:26.619 [http-nio-8080-exec-1] INFO  org.apache.catalina.core.ContainerBase.[Tomcat].[localhost].[/] - Initializing Spring DispatcherServlet 'dispatcherServlet'
2025-12-10 16:15:26.619 [http-nio-8080-exec-1] INFO  org.springframework.web.servlet.DispatcherServlet - Initializing Servlet 'dispatcherServlet'
2025-12-10 16:15:26.620 [http-nio-8080-exec-1] INFO  org.springframework.web.servlet.DispatcherServlet - Completed initialization in 1 ms
2025-12-10 16:15:26.628 [http-nio-8080-exec-1] INFO  com.guslegend.controller.DemoController - DemoController.demo()
 浙公网安备 33010602011771号