
Springboot基础教程(8)--Shiro - 指南
Shiro简介
什么是Shiro
- Apache Shiro 是一个Java 的安全(权限)框架。
- Shiro 可以非常容易的开发出足够好的应用,其不仅可以用在JavaSE环境,也可以用在JavaEE环境。
- Shiro可以完成,认证,授权,加密,会话管理,Web集成,缓存等。
- 下载地址:https://shiro.apache.org
Shiro有哪些功能
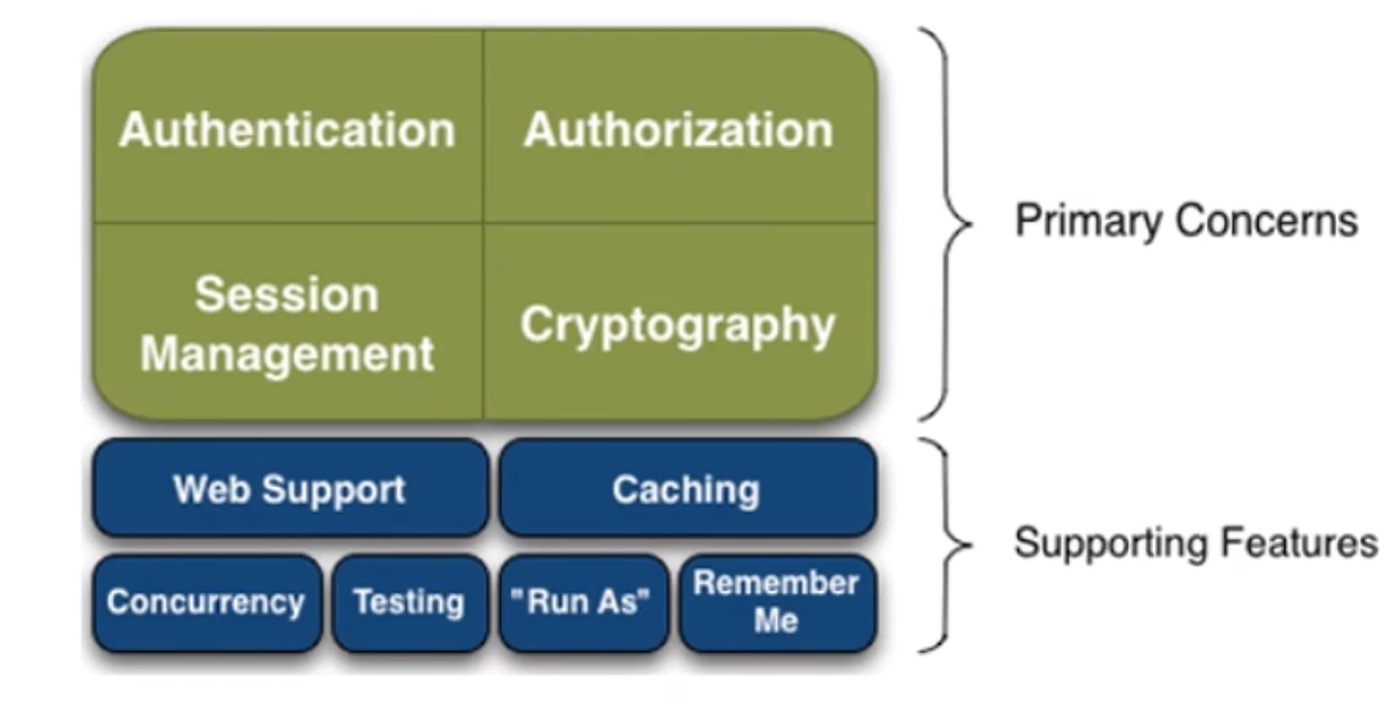
- Authentication:身份认证、登录,验证用户是不是拥有相应的身份;
- Authorization:授权,即权限验证,验证某个已认证的用户是否拥有某个权限,即判断用户能否进行什么操作,如:验证某个用户是否拥有某个角色,或者细粒度的验证某个用户对某个资源是否具有某个权限!
- Session Management:会话管理,即用户登录后就是第一次会话,在没有退出之前,它的所有信息都在会话中;会话可以是普通的JavaSE环境,也可以是Web环境;
- Cryptography:加密,保护数据的安全性,如密码加密存储到数据库中,而不是明文存储;
- Web Support:Web支持,可以非常容易的集成到Web环境;
- Caching:缓存,比如用户登录后,其用户信息,拥有的角色、权限不必每次去查,这样可以提高效率
- Concurrency:并发,shiro支持多线程应用的并发验证,即,如在一个线程中开启另一个线程,能把权限自动的传播过去
- Testing:提供测试支持;
- Run As:允许一个用户假装为另一个用户(如果他们允许)的身份进行访问;
- Remember Me:记住我,这个是非常常见的功能,即一次登录后,下次再来的话不用登录了
Shiro架构(外部)
从外部来看Shiro,即从应用程序角度来观察如何使用Shiro完成工作: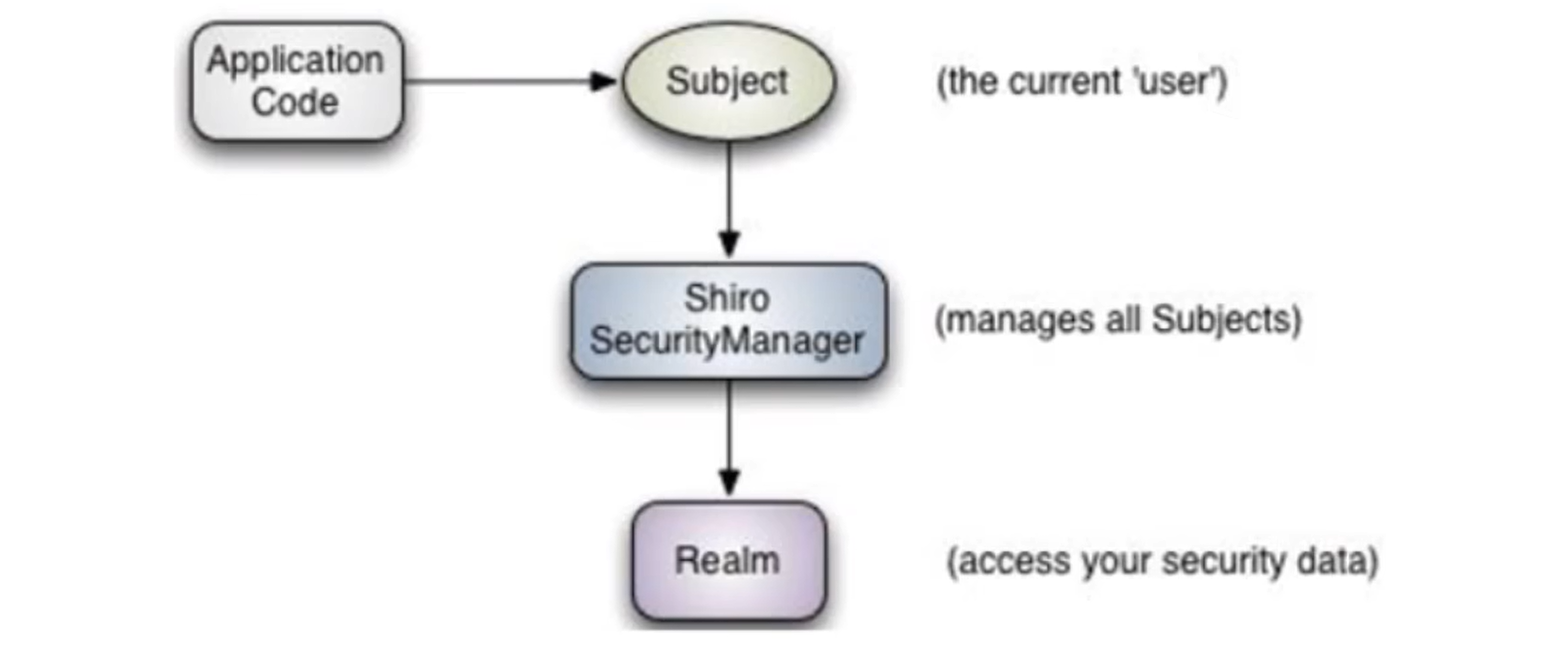
- Subject:应用代码直接交互的对象是Subject,也就是说Shiro的对外API核心就是Subject,Subject代表了当前的用户,这个用户不一定是一个具体的人,与当前应用交互的任何东西都是subiect,如网络爬虫,机器人等,与Subject的所有交互都会委托给SecurityManager;Subject其实是一个门面,SecurityManageer 才是实际的执行者
- SecurityManager:安全管理器,即所有与安全有关的操作都会与SercurityManager交互,并且它管理着所有的Subject,可以看出它是Shiro的核心,它负责与Shiro的其他组件进行交互,它相当于SpringMVC的Dispatcherservlet的角色
- Realm:Shiro从Realm获取安全数据(如用户,角色,权限),就是说SecurityManager 要验证用户身份那么它需要从Realm 获取相应的用户进行比较,来确定用户的身份是否合法;也需要从Realm得到用户相应的角色、权限,进行验证用户的操作是否能够进行,可以把Realm看成DataSource;
Shiro架构(内部)
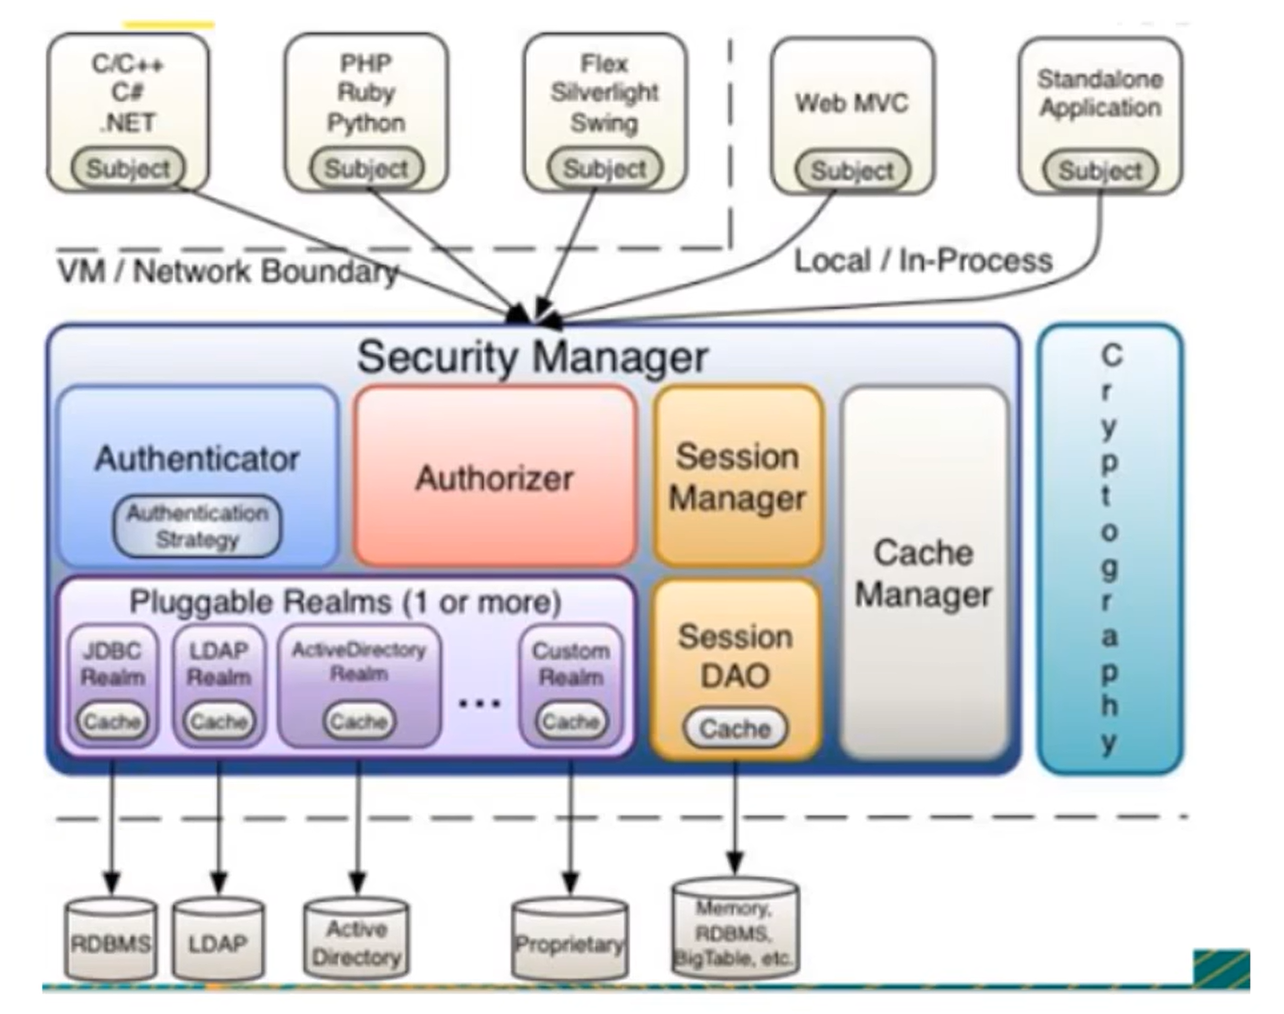
- Subject:任何可以与应用交互的“用户”;
- Security Manager:相当于SpringMVC中的Dispatcherservlet;是Shiro的心脏,所有具体的交互都通过Security Manager进行控制,它管理者所有的Subject,且负责进行认证,授权,会话,及缓存的管理。
- Authenticator:负责subject认证,是一个扩展点,可以自定义实现;可以使用认证策略(AuthenticationStrategy),即什么情况下算用户认证通过了;
- Authorizer:授权器,即访问控制器,用来决定主体是否有权限进行相应的操作:即控制着用户能访问应用中的那些功能;
- Realm:可以有一个或者多个的realm,可以认为是安全实体数据源,即用于获取安全实体的,可以用JDBC实现,也可以是内存实现等等,由用户提供;所以一般在应用中都需要实现自己的realm
- SessionManager:管理Session生命周期的组件,而Shiro并不仅仅可以用在Web环境,也可以用在普通的JavaSE环境中
- CacheManager:缓存控制器,来管理如用户,角色,权限等缓存的;因为这些数据基本上很少改变,放到缓存中后可以提高访问的性能;
- Cryptography:密码模块,Shiro 提高了一些常见的加密组件用于密码加密,解密等
HelloWorld
快速实践
查看官方文档:https://shiro.apache.org/10-minute-tutorial.html
官方的quickstart:https://github.com/apache/shiro/blob/1.4.x/samples/quickstart
- 创建一个maven父工程,用于学习Shiro,删掉不必要的东西
- 创建一个普通的Maven子工程:shiro-01-helloworld
- 根据官方文档,我们来导入Shiro的依赖
<!-- https://mvnrepository.com/artifact/org.apache.shiro/shiro-core -->
  <dependency>
  <groupId>org.apache.shiro</groupId>
  <artifactId>shiro-core</artifactId>
  <version>1.4.1</version>
  </dependency>
  <dependency>
  <groupId>org.slf4j</groupId>
  <artifactId>jcl-over-slf4j</artifactId>
  <version>1.7.21</version>
  </dependency>
  <dependency>
  <groupId>org.slf4j</groupId>
  <artifactId>slf4j-log4j12</artifactId>
  <version>1.7.21</version>
  </dependency>
  <dependency>
  <groupId>log4j</groupId>
  <artifactId>log4j</artifactId>
  <version>1.2.17</version>
  </dependency>
编写log4j的配置文件
log4j.propertieslog4j.rootLogger=INFO, stdout log4j.appender.stdout=org.apache.log4j.ConsoleAppender log4j.appender.stdout.layout=org.apache.log4j.PatternLayout log4j.appender.stdout.layout.ConversionPattern=%d %p 【%c】 - %m %n # General Apache libraries log4j.logger.org.apache=WARN # Spring log4j.logger.org.springframework=WARN # Default Shiro logging log4j.logger.org.apache.shiro=INFO # Disable verbose logging log4j.logger.org.apache.shiro.util.ThreadContext=WARN log4j.logger.org.apache.shiro.cache.ehcache.EhCache=WARN配置文件
shiro.ini[users] # user 'root' with password 'secret' and the 'admin' role root = secret, admin # user 'guest' with the password 'guest' and the 'guest' role guest = guest, guest # user 'presidentskroob' with password '12345' ("That's the same combination on # my luggage!!!" ;)), and role 'president' presidentskroob = 12345, president # user 'darkhelmet' with password 'ludicrousspeed' and roles 'darklord' and 'schwartz' darkhelmet = ludicrousspeed, darklord, schwartz # user 'lonestarr' with password 'vespa' and roles 'goodguy' and 'schwartz' lonestarr = vespa, goodguy, schwartz # ----------------------------------------------------------------------------- # Roles with assigned permissions # # Each line conforms to the format defined in the # org.apache.shiro.realm.text.TextConfigurationRealm#setRoleDefinitions JavaDoc # ----------------------------------------------------------------------------- [roles] # 'admin' role has all permissions, indicated by the wildcard '*' admin = * # The 'schwartz' role can do anything (*) with any lightsaber: schwartz = lightsaber:* # The 'goodguy' role is allowed to 'drive' (action) the winnebago (type) with # license plate 'eagle5' (instance specific id) goodguy = winnebago:drive:eagle5复制官方
Quickstart.java文件/* * Licensed to the Apache Software Foundation (ASF) under one * or more contributor license agreements. See the NOTICE file * distributed with this work for additional information * regarding copyright ownership. The ASF licenses this file * to you under the Apache License, Version 2.0 (the * "License"); you may not use this file except in compliance * with the License. You may obtain a copy of the License at * * http://www.apache.org/licenses/LICENSE-2.0 * * Unless required by applicable law or agreed to in writing, * software distributed under the License is distributed on an * "AS IS" BASIS, WITHOUT WARRANTIES OR CONDITIONS OF ANY * KIND, either express or implied. See the License for the * specific language governing permissions and limitations * under the License. */ import org.apache.shiro.SecurityUtils; import org.apache.shiro.authc.*; import org.apache.shiro.config.IniSecurityManagerFactory; import org.apache.shiro.mgt.SecurityManager; import org.apache.shiro.session.Session; import org.apache.shiro.subject.Subject; import org.apache.shiro.util.Factory; import org.slf4j.Logger; import org.slf4j.LoggerFactory; /** * Simple Quickstart application showing how to use Shiro's API. * * @since 0.9 RC2 */ public class Quickstart { private static final transient Logger log = LoggerFactory.getLogger(Quickstart.class); public static void main(String[] args) { // The easiest way to create a Shiro SecurityManager with configured // realms, users, roles and permissions is to use the simple INI config. // We'll do that by using a factory that can ingest a .ini file and // return a SecurityManager instance: // Use the shiro.ini file at the root of the classpath // (file: and url: prefixes load from files and urls respectively): Factory<SecurityManager> factory = new IniSecurityManagerFactory("classpath:shiro.ini"); SecurityManager securityManager = factory.getInstance(); // for this simple example quickstart, make the SecurityManager // accessible as a JVM singleton. Most applications wouldn't do this // and instead rely on their container configuration or web.xml for // webapps. That is outside the scope of this simple quickstart, so // we'll just do the bare minimum so you can continue to get a feel // for things. SecurityUtils.setSecurityManager(securityManager); // Now that a simple Shiro environment is set up, let's see what you can do: // get the currently executing user: Subject currentUser = SecurityUtils.getSubject(); // Do some stuff with a Session (no need for a web or EJB container!!!) Session session = currentUser.getSession(); session.setAttribute("someKey", "aValue"); String value = (String) session.getAttribute("someKey"); if (value.equals("aValue")) { log.info("Retrieved the correct value! [" + value + "]"); } // let's login the current user so we can check against roles and permissions: if (!currentUser.isAuthenticated()) { UsernamePasswordToken token = new UsernamePasswordToken("lonestarr", "vespa"); token.setRememberMe(true); try { currentUser.login(token); } catch (UnknownAccountException uae) { log.info("There is no user with username of " + token.getPrincipal()); } catch (IncorrectCredentialsException ice) { log.info("Password for account " + token.getPrincipal() + " was incorrect!"); } catch (LockedAccountException lae) { log.info("The account for username " + token.getPrincipal() + " is locked. " + "Please contact your administrator to unlock it."); } // ... catch more exceptions here (maybe custom ones specific to your application? catch (AuthenticationException ae) { //unexpected condition? error? } } //say who they are: //print their identifying principal (in this case, a username): log.info("User [" + currentUser.getPrincipal() + "] logged in successfully."); //test a role: if (currentUser.hasRole("schwartz")) { log.info("May the Schwartz be with you!"); } else { log.info("Hello, mere mortal."); } //test a typed permission (not instance-level) if (currentUser.isPermitted("lightsaber:wield")) { log.info("You may use a lightsaber ring. Use it wisely."); } else { log.info("Sorry, lightsaber rings are for schwartz masters only."); } //a (very powerful) Instance Level permission: if (currentUser.isPermitted("winnebago:drive:eagle5")) { log.info("You are permitted to 'drive' the winnebago with license plate (id) 'eagle5'. " + "Here are the keys - have fun!"); } else { log.info("Sorry, you aren't allowed to drive the 'eagle5' winnebago!"); } //all done - log out! currentUser.logout(); System.exit(0); } }启动测试,有日志输出即可。

带有中文注释版本的Quickstart
public class Quickstart {
private static final transient Logger log = LoggerFactory.getLogger(Quickstart.class);
public static void main(String[] args) {
Factory<SecurityManager> factory = new IniSecurityManagerFactory("classpath:shiro.ini");
  SecurityManager securityManager = factory.getInstance();
  SecurityUtils.setSecurityManager(securityManager);
  // 获取当前的用户对象:Subject
  Subject currentUser = SecurityUtils.getSubject();
  // 通过当前用户拿到Session
  Session session = currentUser.getSession();
  session.setAttribute("someKey", "aValue");
  String value = (String) session.getAttribute("someKey");
  if (value.equals("aValue")) {
  log.info("Subject=>session [" + value + "]");
  }
  // 判断当前用户是否被认证
  if (!currentUser.isAuthenticated()) {
  // Token:令牌
  UsernamePasswordToken token = new UsernamePasswordToken("lonestarr", "vespa");
  token.setRememberMe(true);// 设置记住我
  try {
  currentUser.login(token);// 执行登录操作
  } catch (UnknownAccountException uae) {
  log.info("There is no user with username of " + token.getPrincipal());
  } catch (IncorrectCredentialsException ice) {
  log.info("Password for account " + token.getPrincipal() + " was incorrect!");
  } catch (LockedAccountException lae) {
  log.info("The account for username " + token.getPrincipal() + " is locked.  " +
  "Please contact your administrator to unlock it.");
  }
  // ... catch more exceptions here (maybe custom ones specific to your application?
  catch (AuthenticationException ae) {
  //unexpected condition?  error?
  }
  }
  //say who they are:
  //print their identifying principal (in this case, a username):
  log.info("User [" + currentUser.getPrincipal() + "] logged in successfully.");
  //test a role:
  if (currentUser.hasRole("schwartz")) {
  log.info("May the Schwartz be with you!");
  } else {
  log.info("Hello, mere mortal.");
  }
  //粗粒度
  //test a typed permission (not instance-level)
  if (currentUser.isPermitted("lightsaber:wield")) {
  log.info("You may use a lightsaber ring.  Use it wisely.");
  } else {
  log.info("Sorry, lightsaber rings are for schwartz masters only.");
  }
  //细粒度
  //a (very powerful) Instance Level permission:
  if (currentUser.isPermitted("winnebago:drive:eagle5")) {
  log.info("You are permitted to 'drive' the winnebago with license plate (id) 'eagle5'.  " +
  "Here are the keys - have fun!");
  } else {
  log.info("Sorry, you aren't allowed to drive the 'eagle5' winnebago!");
  }
  //注销
  //all done - log out!
  currentUser.logout();
  //结束
  System.exit(0);
  }
  }
Springboot整合Shiro
项目搭建
导入正确的Maven依赖:
<dependency>
<groupId>org.springframework.boot</groupId>
<artifactId>spring-boot-starter-web</artifactId>
</dependency>
<dependency>
<groupId>org.springframework.boot</groupId>
<artifactId>spring-boot-starter-thymeleaf</artifactId>
</dependency>
<!--Shiro整合Spring的包-->
  <dependency>
  <groupId>org.apache.shiro</groupId>
  <artifactId>shiro-spring</artifactId>
  <version>1.4.1</version>
  </dependency>
编写前端页面:
/user/update.html
<!DOCTYPE html>
    <html lang="en">
    <head>
        <meta charset="UTF-8">
      <title>Title</title>
      </head>
      <body>
      <h1>update</h1>
      </body>
    </html>
/user/add.html
<!DOCTYPE html>
    <html lang="en">
    <head>
        <meta charset="UTF-8">
      <title>Title</title>
      </head>
      <body>
      <h1>add</h1>
      </body>
    </html>
index.html
<!DOCTYPE html>
    <html lang="en" xmlns:th="http://www.thymeleaf.org">
    <head>
        <meta charset="UTF-8">
      <title>Title</title>
      </head>
      <body>
      <h1>首页</h1>
      <p th:text="${msg}"></p>
        <hr>
        <a th:href="@{/user/add}">add</a> | <a th:href="@{/user/update}">update</a>
        </body>
</html>编写MyController.java
@Controller
public class MyController {
@RequestMapping({"/","/index"})
public String toIndex(Model model){
model.addAttribute("msg","Hello World");
return "index";
}
@RequestMapping("/user/add")
public String add(){
return "user/add";
}
@RequestMapping("/user/update")
public String update(){
return "user/update";
}
}
配置Shiro
自定义Realm
package com.lingbo.config;
import org.apache.shiro.authc.AuthenticationException;
import org.apache.shiro.authc.AuthenticationInfo;
import org.apache.shiro.authc.AuthenticationToken;
import org.apache.shiro.authz.AuthorizationInfo;
import org.apache.shiro.realm.AuthorizingRealm;
import org.apache.shiro.subject.PrincipalCollection;
//自定义的 realm
public class UserRealm extends AuthorizingRealm {
//授权
@Override
protected AuthorizationInfo doGetAuthorizationInfo(PrincipalCollection principalCollection) {
System.out.println("执行了=>授权doGetAuthorizationInfo");
return null;
}
//认证
@Override
protected AuthenticationInfo doGetAuthenticationInfo(AuthenticationToken authenticationToken) throws AuthenticationException {
System.out.println("执行了=>认证doGetAuthenticationInfo");
return null;
}
}
Realm 是 Shiro 的“安全数据源”——“谁可以登录、登录后能干啥”这两件事,Shiro 自己不保存,全权委托给 Realm 去查。
主要工作为:
- 认证(doGetAuthenticationInfo)→ 把用户传来的账号/密码和数据库(或任何数据源)比对,比对成功就返回一个
AuthenticationInfo,Shiro 自动做密码校验。 - 授权(doGetAuthorizationInfo)→ 登录成功后,Shiro 把用户身份再传给你,让你把该用户的角色、权限字符串查出来并包成
AuthorizationInfo,后面@RequiresRoles、@RequiresPermissions都靠这里返回的数据。
配置ShiroConfig
package com.lingbo.config;
import org.apache.shiro.spring.web.ShiroFilterFactoryBean;
import org.apache.shiro.web.mgt.DefaultWebSecurityManager;
import org.springframework.beans.factory.annotation.Qualifier;
import org.springframework.context.annotation.Bean;
import org.springframework.context.annotation.Configuration;
@Configuration
public class ShiroConfig {
//ShiroFilterFactoryBean
@Bean
public ShiroFilterFactoryBean getShiroFilterFactoryBean(@Qualifier("securityManager") DefaultWebSecurityManager defaultWebSecurityManager) {
ShiroFilterFactoryBean bean = new ShiroFilterFactoryBean();
//设置安全管理器
bean.setSecurityManager(defaultWebSecurityManager);
return bean;
}
//DefaultWebSecurityManager
@Bean(name = "securityManager")
public DefaultWebSecurityManager getDefaultWebSecurityManager(@Qualifier("userRealm") UserRealm userRealm) {
DefaultWebSecurityManager securityManager = new DefaultWebSecurityManager();
// 关联UserRealm
securityManager.setRealm(userRealm);
return securityManager;
}
//创建 realm 对象,需要自定义类:1
@Bean
public UserRealm userRealm() {
return new UserRealm();
}
}
ShiroConfig 就是 “告诉 Spring 如何把 Shiro 的各个核心组件装配起来” 的一个普通 Java 配置类。
它只做 3 件事,却缺一不可:
- 把 自定义 Realm(你的
UserRealm)注册成 Spring Bean → 让 Spring 能注入给 SecurityManager。 - 把 SecurityManager(
DefaultWebSecurityManager)注册成 Spring Bean,并把自己刚创建的 Realm 设进去 → 这是 Shiro 的总闸门。 - 把 ShiroFilterFactoryBean 注册成 Spring Bean,并指向上面的 SecurityManager → 这样 Spring Boot 启动时会自动把它包装成
Filter并注册到 Servlet 容器,所有请求都会被 Shiro 拦截。
Shiro实现登录拦截
//ShiroFilterFactoryBean
@Bean
public ShiroFilterFactoryBean getShiroFilterFactoryBean(@Qualifier("securityManager") DefaultWebSecurityManager defaultWebSecurityManager) {
ShiroFilterFactoryBean bean = new ShiroFilterFactoryBean();
//设置安全管理器
bean.setSecurityManager(defaultWebSecurityManager);
//添加Shiro的内置过滤器
/*
anon: 无需认证即可访问
authc: 必须认证了才能访问
user: 必须拥有 记住我 功能才能用
perms: 拥有对某个资源的权限才能访问
role: 拥有某个角色权限才能访问
*/
//拦截
Map<String, String> filterMap = new LinkedHashMap<>();
  //filterMap.put("/user/add", "authc");
  //filterMap.put("/user/update", "anon");
  filterMap.put("/user/*", "authc");
  bean.setFilterChainDefinitionMap(filterMap);
  bean.setLoginUrl("/toLogin");
  return bean;
}其中的LinkedHashMap 按插入顺序匹配,先放宽松规则,再放严格规则。
典型错误示范:
filterMap.put("/**", "authc");   // 1. 所有请求都要登录
filterMap.put("/login", "anon"); // 2. 登录页放行 —— 永远不会执行到!
正确写法:
filterMap.put("/login", "anon"); //登录页放行
filterMap.put("/static/**", "anon");//静态资源放行
filterMap.put("/**", "authc");//其他页面都要求登录
Shiro实现用户认证
在MyController中封装前端传来的用户名和密码为userToken
@RequestMapping("/login")
public String login(String username, String password,Model model){
//获取当前用户
Subject subject = SecurityUtils.getSubject();
//封装用户的登录数据
UsernamePasswordToken token = new UsernamePasswordToken(username, password);
try {
subject.login(token);//执行登录方法,如果没有异常,就说明OK了
return "index";
} catch (UnknownAccountException uae) {//用户名不存在
model.addAttribute("msg","用户名错误");
return "login";
} catch (IncorrectCredentialsException ice) {//密码错误
model.addAttribute("msg","密码错误");
return "login";
}
}
subject.login(token) 的整个实现路线就是:
subject.login(token)
→ SecurityManager.login(this, token)
→ Authenticator.authenticate(token)
→ 遍历所有 Realm,调用 realm.getAuthenticationInfo(token)
→ 最终进到自己写的 UserRealm.doGetAuthenticationInfo(...)在UserRealm中编写认证代码
//认证
@Override
protected AuthenticationInfo doGetAuthenticationInfo(AuthenticationToken authenticationToken) throws AuthenticationException {
System.out.println("执行了=>认证doGetAuthenticationInfo");
//用户名,密码 数据中取
String name = "root";
String password = "123456";
UsernamePasswordToken userToken = (UsernamePasswordToken) authenticationToken;
if (!name.equals(userToken.getUsername())) {
return null;    //抛出UnknownAccountException异常
}
//密码认证,Shiro做
return new SimpleAuthenticationInfo("", password, "");
}前端login.html
<!DOCTYPE html>
    <html lang="en" xmlns:th="http://www.thymeleaf.org">
    <head>
        <meta charset="UTF-8">
      <title>Title</title>
      </head>
      <body>
      <h1>登录</h1>
        <hr>
        <p th:text="${msg}" style="color: red;"></p>
            <form th:action="@{/login}" method="post">
          <p>用户名:<input type="text" name="username"></p>
          <p>密码:<input type="text" name="password"></p>
          <p><input type="submit"></p>
          </form>
        </body>
      </html>
Shiro整合Mybatis
导入数据库需要的相关依赖:
<dependency>
<groupId>org.projectlombok</groupId>
<artifactId>lombok</artifactId>
<version>1.18.36</version>
</dependency>
<dependency>
<groupId>mysql</groupId>
<artifactId>mysql-connector-java</artifactId>
</dependency>
<dependency>
<groupId>log4j</groupId>
<artifactId>log4j</artifactId>
<version>1.2.17</version>
</dependency>
<dependency>
<groupId>com.alibaba</groupId>
<artifactId>druid</artifactId>
<version>1.1.24</version>
</dependency>
<dependency>
<groupId>org.mybatis.spring.boot</groupId>
<artifactId>mybatis-spring-boot-starter</artifactId>
<version>2.1.3</version>
</dependency>
配置数据源文件:
spring:
datasource:
driver-class-name: com.mysql.cj.jdbc.Driver
username: root
password: 123456
# 假如时区报错,就增加一个时区的配置
url: jdbc:mysql://localhost:3306/mybatis?serverTimezone=UTC&useUnicode=true&characterEncoding=utf-8
# 自定义数据源
type: com.alibaba.druid.pool.DruidDataSource
#Spring Boot 默认是不注入这些属性值的,需要自己绑定
#druid 数据源专有配置
initialSize: 5
minIdle: 5
maxActive: 20
maxWait: 60000
timeBetweenEvictionRunsMillis: 60000
minEvictableIdleTimeMillis: 300000
validationQuery: SELECT 1 FROM DUAL
testWhileIdle: true
testOnBorrow: false
testOnReturn: false
poolPreparedStatements: true
#配置监控统计拦截的filters,stat:监控统计、log4j:日志记录、wall:防御sql注入
#如果允许时报错  java.lang.ClassNotFoundException: org.apache.log4j.Priority
#则导入 log4j 依赖即可,Maven 地址:https://mvnrepository.com/artifact/log4j/log4j
filters: stat,wall,log4j
maxPoolPreparedStatementPerConnectionSize: 20
useGlobalDataSourceStat: true
connectionProperties: druid.stat.mergeSql=true;druid.stat.slowSqlMillis=500
配置Mybatis:
mybatis.type-aliases-package=com.lingbo.pojo
mybatis.mapper-locations=classpath:mapper/*.xml
编写User实体类:
@Data
@AllArgsConstructor
@NoArgsConstructor
public class User {
private Integer id;
private String name;
private String pwd;
}
编写Dao层Mapper接口和xml文件:
@Repository
@Mapper
public interface UserMapper {
public User queryUserByName(String name);
}
<?xml version="1.0" encoding="UTF-8" ?>
<!DOCTYPE mapper
PUBLIC "-//mybatis.org//DTD Mapper 3.0//EN"
"http://mybatis.org/dtd/mybatis-3-mapper.dtd">
<mapper namespace="com.lingbo.mapper.UserMapper">
<select id="queryUserByName" resultType="User" parameterType="String">
select *
from mybatis.user
where name = #{name};
</select>
</mapper>编写Service接口和实现类
public interface UserService {
public User queryUserByName(String name);
}
@Service
public class UserServiceImpl implements UserService {
@Autowired
UserMapper userMapper;
@Override
public User queryUserByName(String name) {
User user = userMapper.queryUserByName(name);
return user;
}
}在UserRealm中连接数据库
//自定义的 realm
public class UserRealm extends AuthorizingRealm {
@Autowired
UserService userService;
//授权
@Override
protected AuthorizationInfo doGetAuthorizationInfo(PrincipalCollection principalCollection) {
System.out.println("执行了=>授权doGetAuthorizationInfo");
return null;
}
//认证
@Override
protected AuthenticationInfo doGetAuthenticationInfo(AuthenticationToken authenticationToken) throws AuthenticationException {
System.out.println("执行了=>认证doGetAuthenticationInfo");
//用户名,密码 数据中取
//String name = "root";
//String password = "123456";
UsernamePasswordToken userToken = (UsernamePasswordToken) authenticationToken;
//连接真实数据库
User user = userService.queryUserByName(userToken.getUsername());
if (user==null) {//没有这个人
return null;
}
//密码认证,Shiro做
return new SimpleAuthenticationInfo("", user.getPwd(), "");
}
}
Shiro实现请求授权
为数据库中的user表和User实体类新增字段:perm
//ShiroFilterFactoryBean
@Bean
public ShiroFilterFactoryBean getShiroFilterFactoryBean(@Qualifier("securityManager") DefaultWebSecurityManager defaultWebSecurityManager) {
ShiroFilterFactoryBean bean = new ShiroFilterFactoryBean();
//设置安全管理器
bean.setSecurityManager(defaultWebSecurityManager);
//添加Shiro的内置过滤器
/*
anon: 无需认证即可访问
authc: 必须认证了才能访问
user: 必须拥有 记住我 功能才能用
perms: 拥有对某个资源的权限才能访问
role: 拥有某个角色权限才能访问
*/
//拦截
Map<String, String> filterMap = new LinkedHashMap<>();
  //正常情况下,未授权会跳转到未授权页面
  filterMap.put("/user/add","perms[user:add]");
  filterMap.put("/user/update","perms[user:update]");
  filterMap.put("/user/*", "authc");
  bean.setFilterChainDefinitionMap(filterMap);
  bean.setUnauthorizedUrl("/noauth");
  bean.setLoginUrl("/toLogin");
  return bean;
}过滤器中增加对add和update权限的控制。
//授权
@Override
protected AuthorizationInfo doGetAuthorizationInfo(PrincipalCollection principalCollection) {
System.out.println("执行了=>授权doGetAuthorizationInfo");
SimpleAuthorizationInfo authorizationInfo = new SimpleAuthorizationInfo();
//拿到当前登录的对象
Subject subject = SecurityUtils.getSubject();
User currentUser = (User) subject.getPrincipal();
//设置当前用户的权限
//若user在数据库中字段perm的值为user:add则增加访问add页面权限
//authorizationInfo.addStringPermission("user:add");
authorizationInfo.addStringPermission(currentUser.getPerm());
return authorizationInfo;
}
//认证
@Override
protected AuthenticationInfo doGetAuthenticationInfo(AuthenticationToken authenticationToken) throws AuthenticationException {
System.out.println("执行了=>认证doGetAuthenticationInfo");
UsernamePasswordToken userToken = (UsernamePasswordToken) authenticationToken;
//连接真实数据库
User user = userService.queryUserByName(userToken.getUsername());
if (user==null) {//没有这个人
return null;
}
//密码认证,Shiro做
//将当前用户信息存入Subject对象中
return new SimpleAuthenticationInfo(user, user.getPwd(), "");
}
 浙公网安备 33010602011771号