

SpringColudAlibaba - 详解
1.微服务架构
将项目所有模块(功能)打成jar或者war,然后部署一个进程
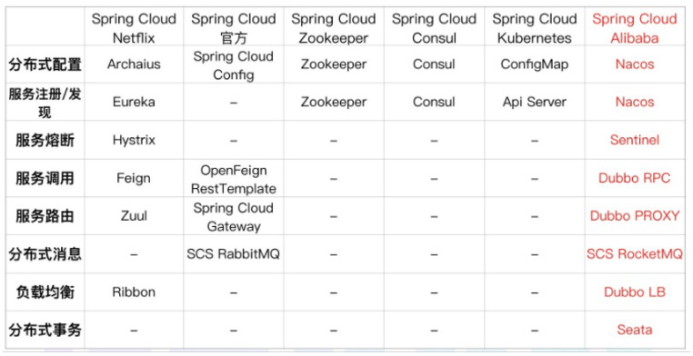
SpringCloud与SpringCloudAlibaba组件
Cloud alibaba
核心组件
服务发现/注册: Eureka Nacos
路由: Zuul Gateway
熔断器/断路由: hystrix sentinel
配置中心: config nacos
负载均衡: Ribbon loadbalancer
调用: feign openfeign
分布式事务: seata(@GlobalTransactional)
问题:
1.这么小服务,如何管理他们
(服务治理 注册中心[服务注册 发现 剔除]):nacos
服务治理就是进行服务的自动化管理,其核心是服务的自动注册与发现。
服务注册:服务实例将自身服务信息注册到注册中心。
服务发现:服务实例通过注册中心,获取到注册到其中的服务实例的信息,通过这些信息去请求它们提 供的服务
服务剔除:服务注册中心将出问题的服务自动剔除到可用列表之外,使其不会被调用到
2.这么多小服务,它们之间如何通讯
Openfeign/dubbo 远程调用
3.这么多小服务,客户端怎么访问他们
(网关 GateWay)
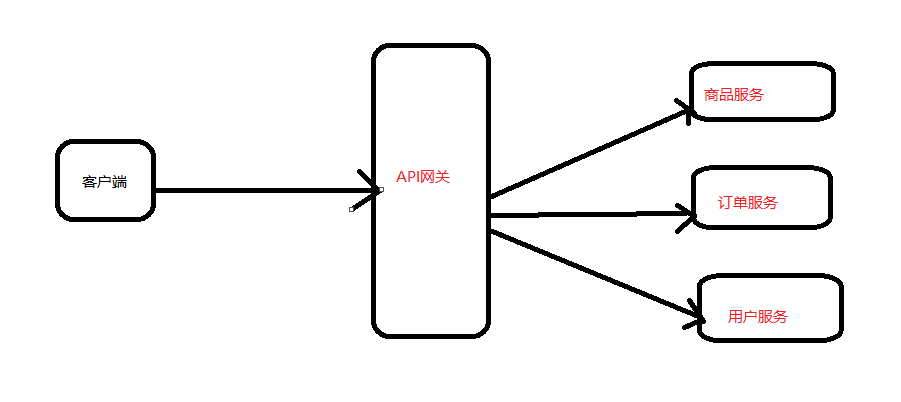
随着微服务的不断增多,不同的微服务一般会有不同的网络地址,而外部客户端可能需要调用多个 服务的接口才能完成一个业务需求,如果让客户端直接与各个微服务通信可能出现:
- 客户端需要调用不同的url地址,增加难度
- 在一定的场景下,存在跨域请求的问题
- 每个微服务都需要进行单独的身份认证
针对这些问题,API网关顺势而生。 API网关直面意思是将所有API调用统一接入到API网关层,由网关层统一接入和输出。一个网关的 基本功能有:统一接入、安全防护、协议适配、流量管控、长短链接支持、容错能力。有了网关之后, 各个API服务提供团队可以专注于自己的的业务逻辑处理,而API网关更专注于安全、流量、路由等问 题
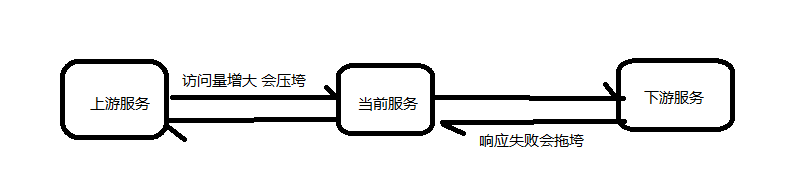
4.这么多小服务,一旦出现问题了,应该如何自处理?
服务熔断sentinel
有兜底的措施 (容错)fallback
比如服务之间调用A->B->C->D D出了问题,那么C就会一直发会挤压过多导致C也崩了,B一直发请求,跟雪崩一样
在微服务当中,一个请求经常会涉及到调用几个服务,如果其中某个服务不可用,没有做服务容错 的话,极有可能会造成一连串的服务不可用,这就是雪崩效应。 我们没法预防雪崩效应的发生,只能尽可能去做好容错。
服务容错的两个核心思想是:
- 不被上游请求压垮---比如服务器请求只能接收300,但是来了5000个请求---sentinel(限流上限等待)
- 不被下游响应拖垮---响应失败---sentinel熔断(兜底措施)
5.这么多小服务,一旦出现问题,应该如何排错
(链路追踪) sluth zipkin
随着微服务架构的流行,服务按照不同的维度进行拆分,一次请求往往需要涉及到多个服务。互联 网应用构建在不同的软件模块集上,这些软件模块,有可能是由不同的团队开发、可能使用不同的编程 语言来实现、有可能布在了几千台服务器,横跨多个不同的数据中心。因此,就需要对一次请求涉及的 多个服务链路进行日志记录,性能监控即链路追踪
2.微服务环境搭建
2.1 微服务环境搭建
版本依赖
最新的版本对应关系可以参考网址:
版本说明 · alibaba/spring-cloud-alibaba Wiki
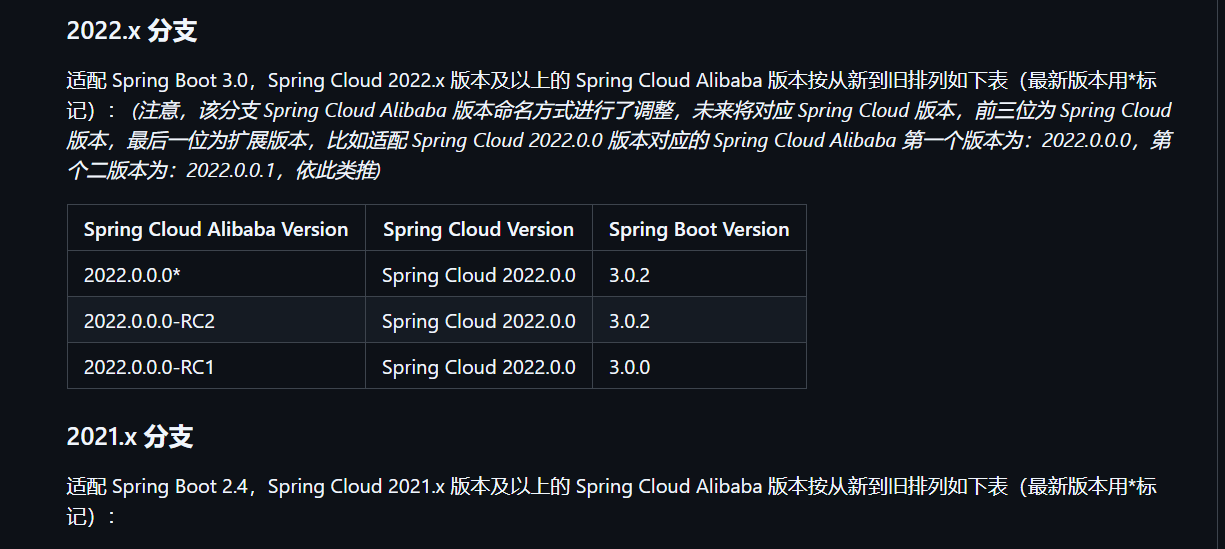
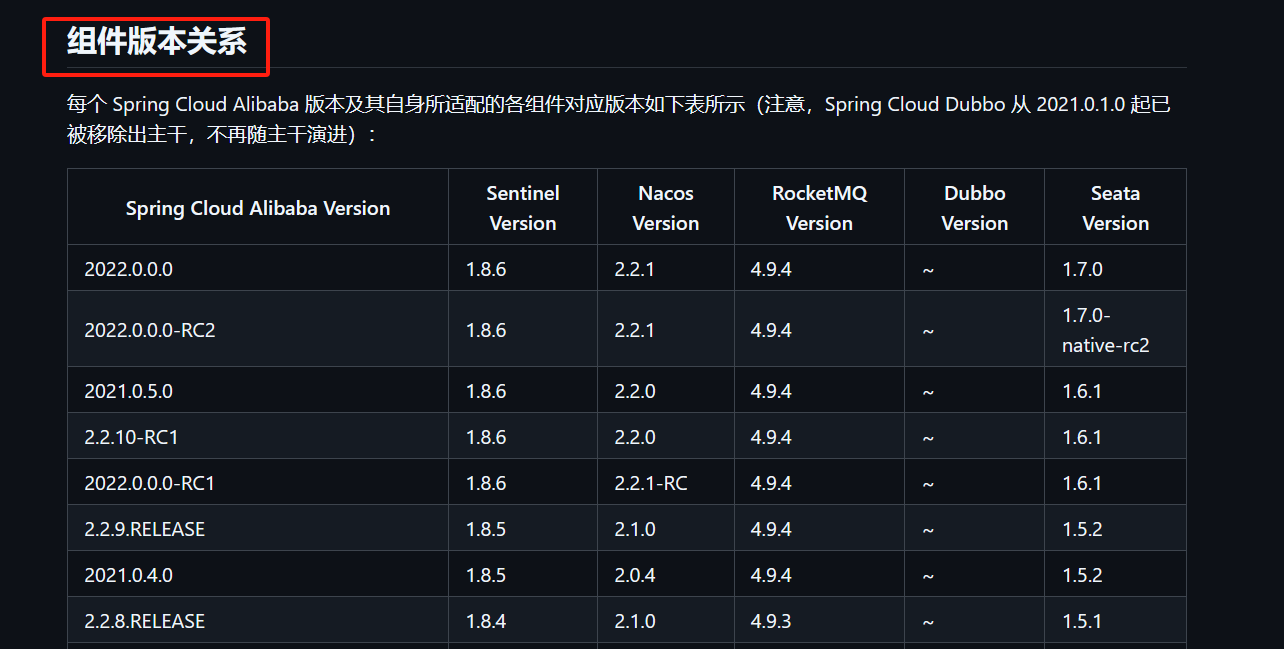
组件版本关系
每个 Spring Cloud Alibaba 版本及其自身所适配的各组件对应版本(注意,Spring Cloud Dubbo 从 2021.0.1.0 起已被移除出主干,不再随主干演进)
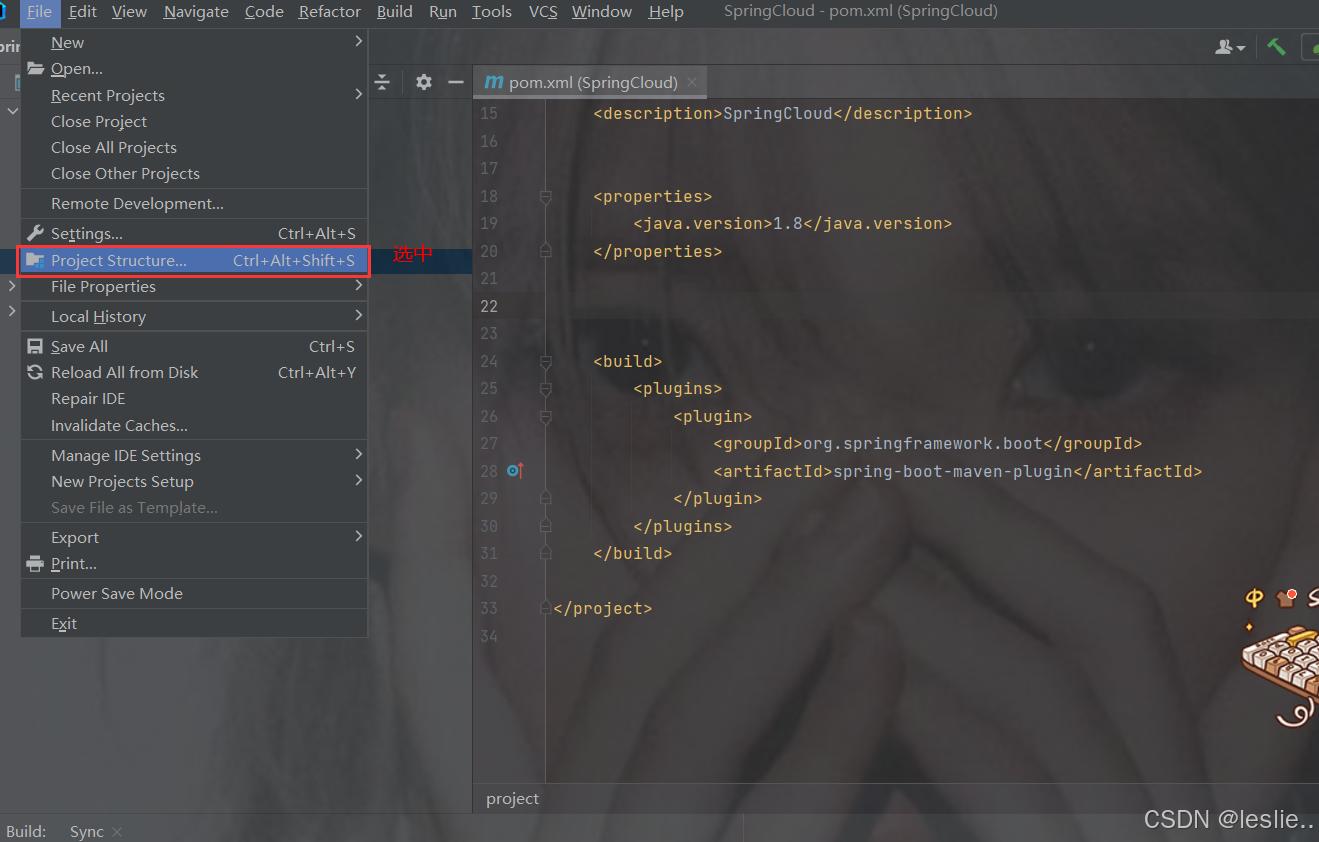
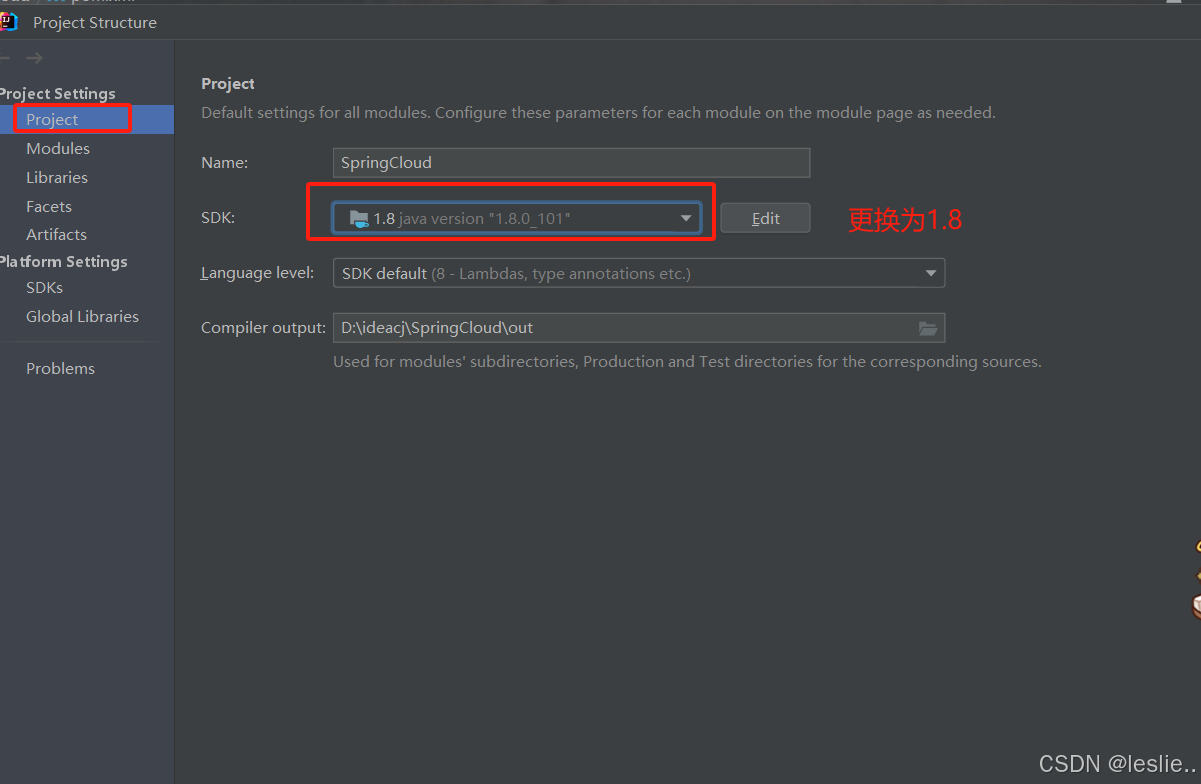
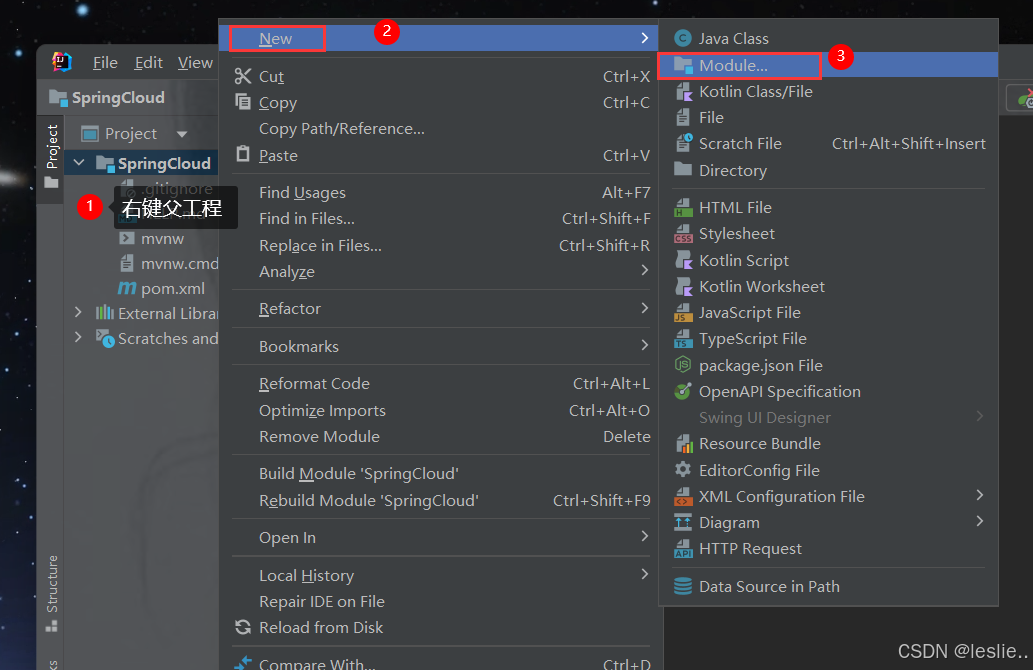
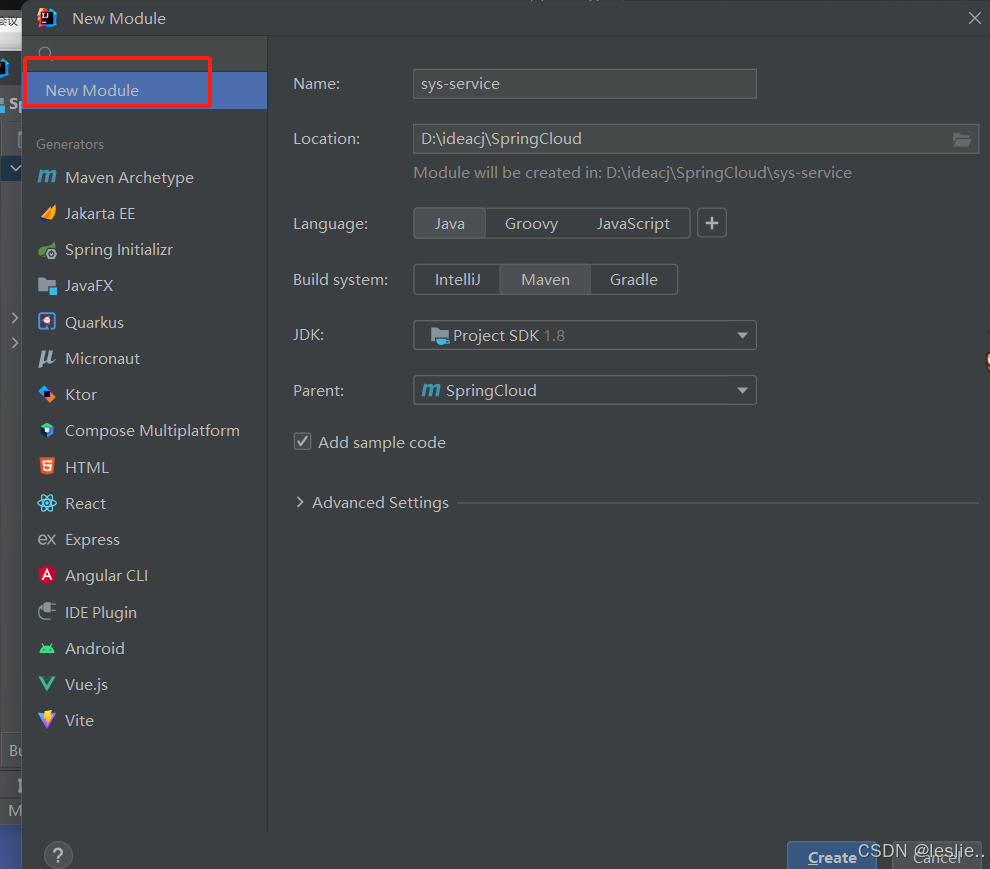
2.2 创建父工程

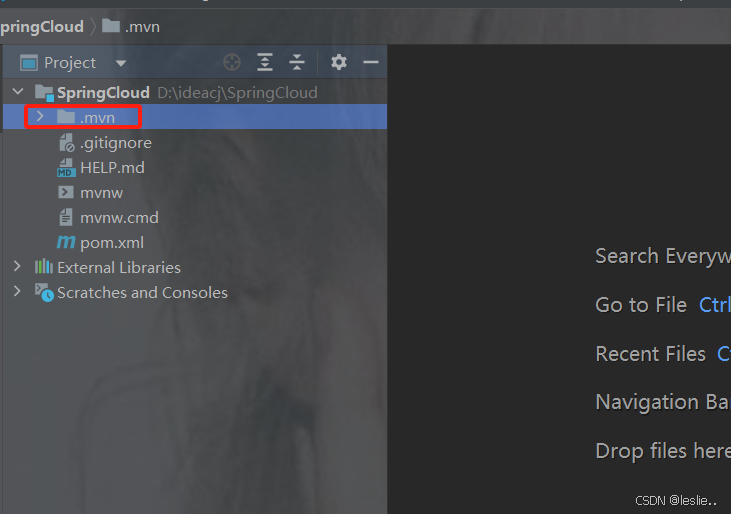
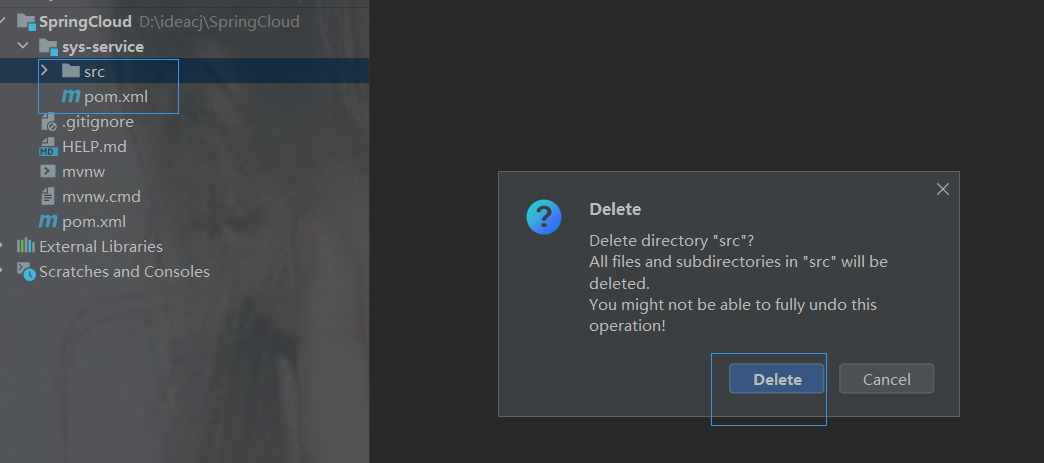
删除src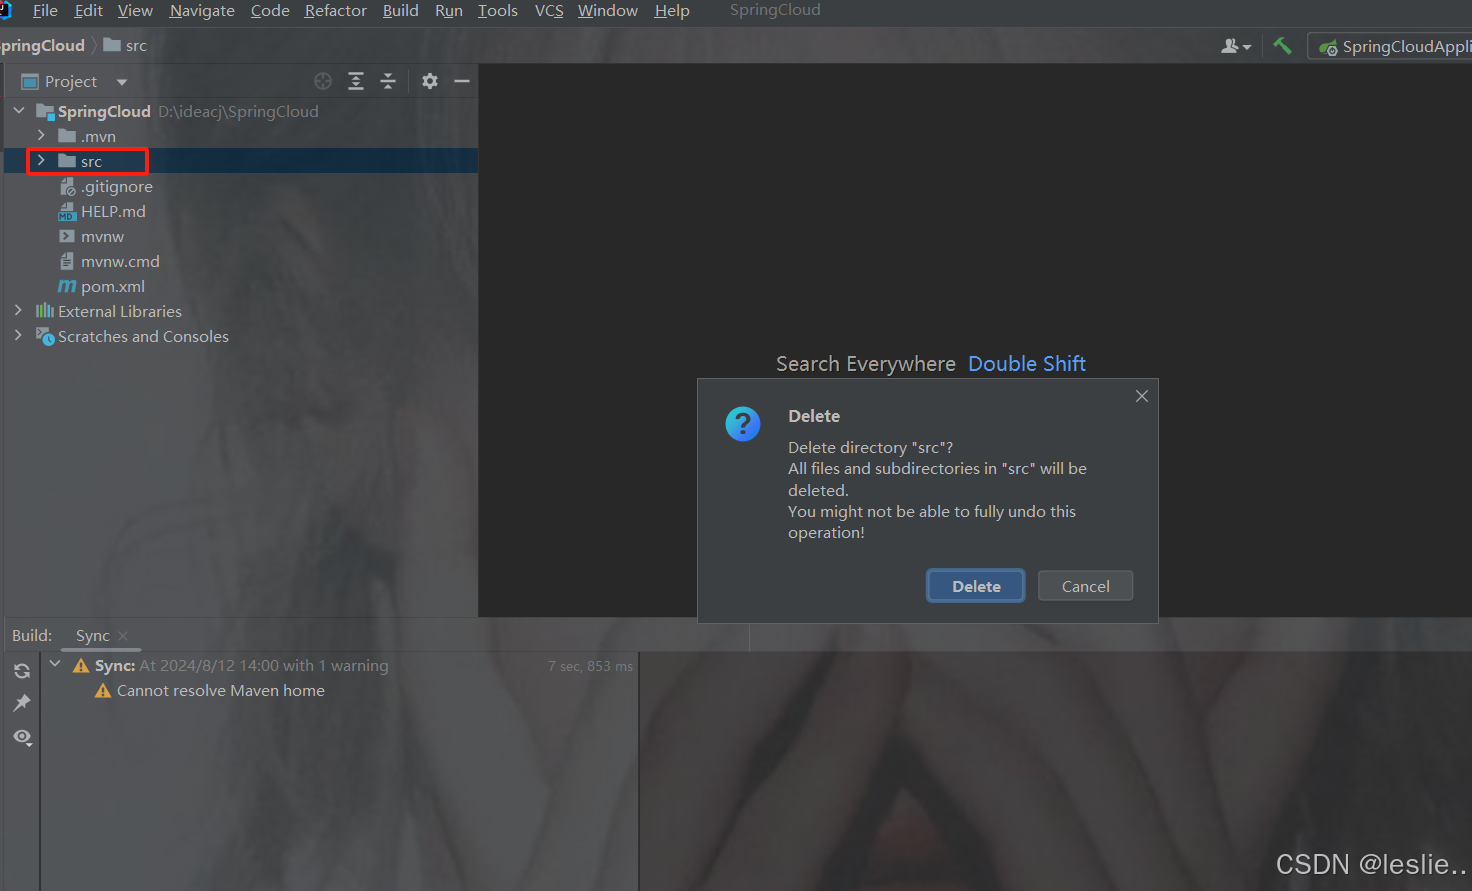
删除.mvn
pom.xml里更换springboot的版本
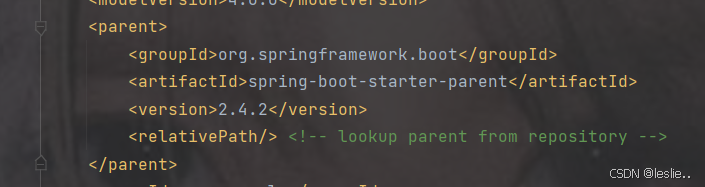
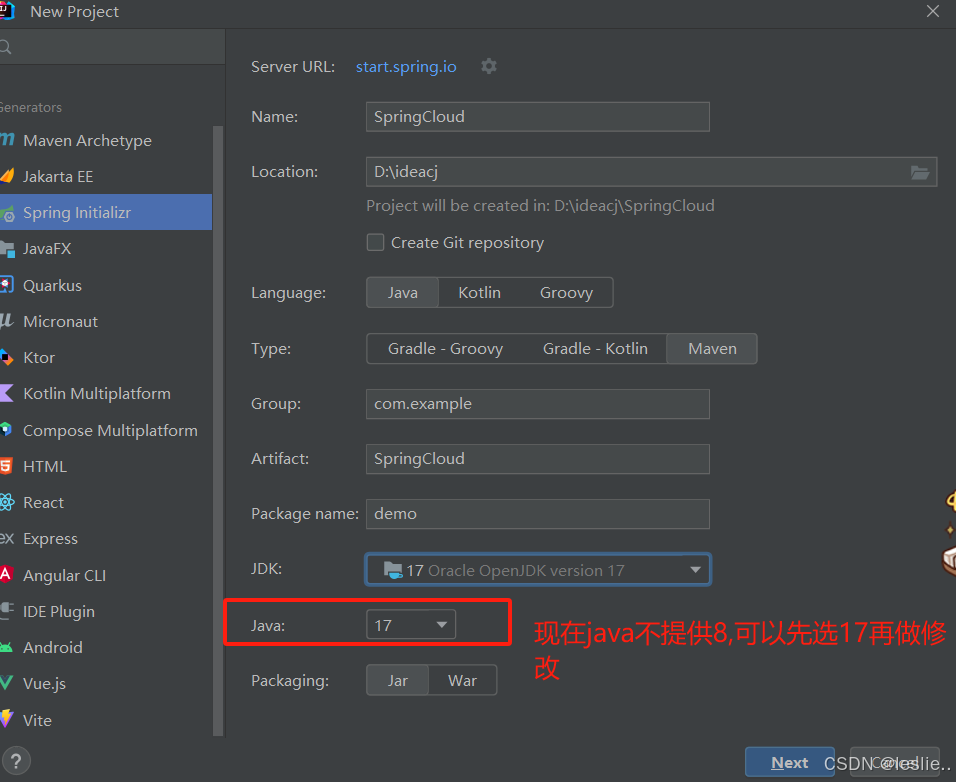
更换java版本

选中的删掉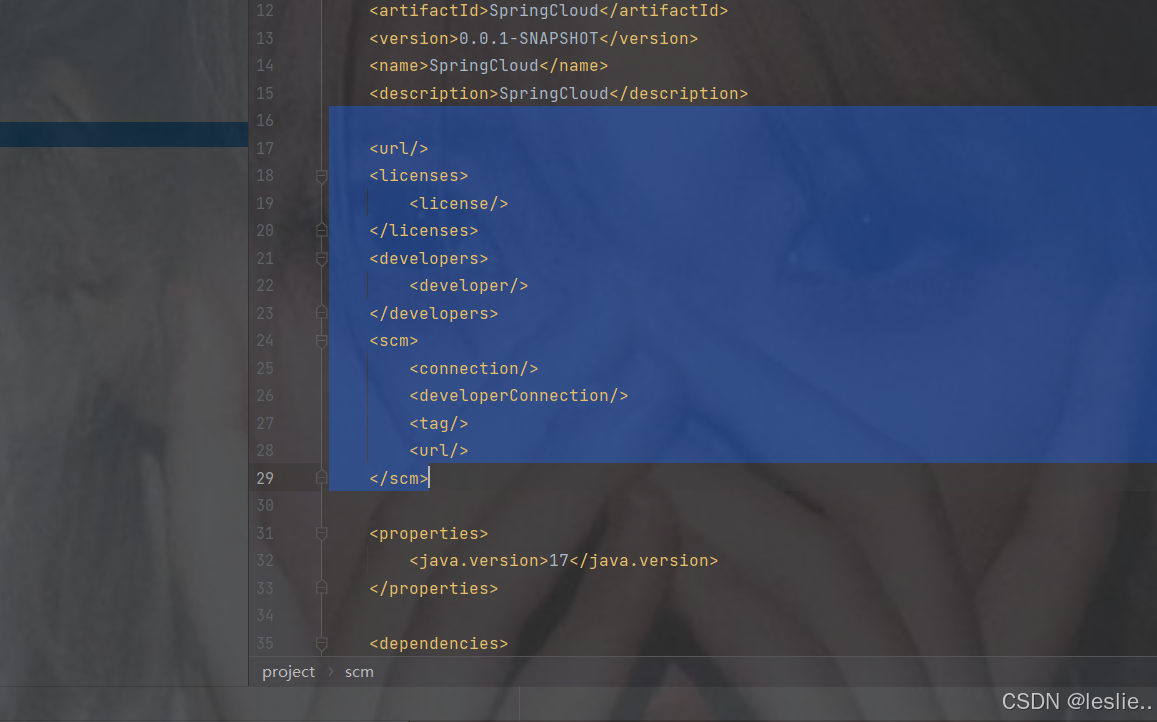
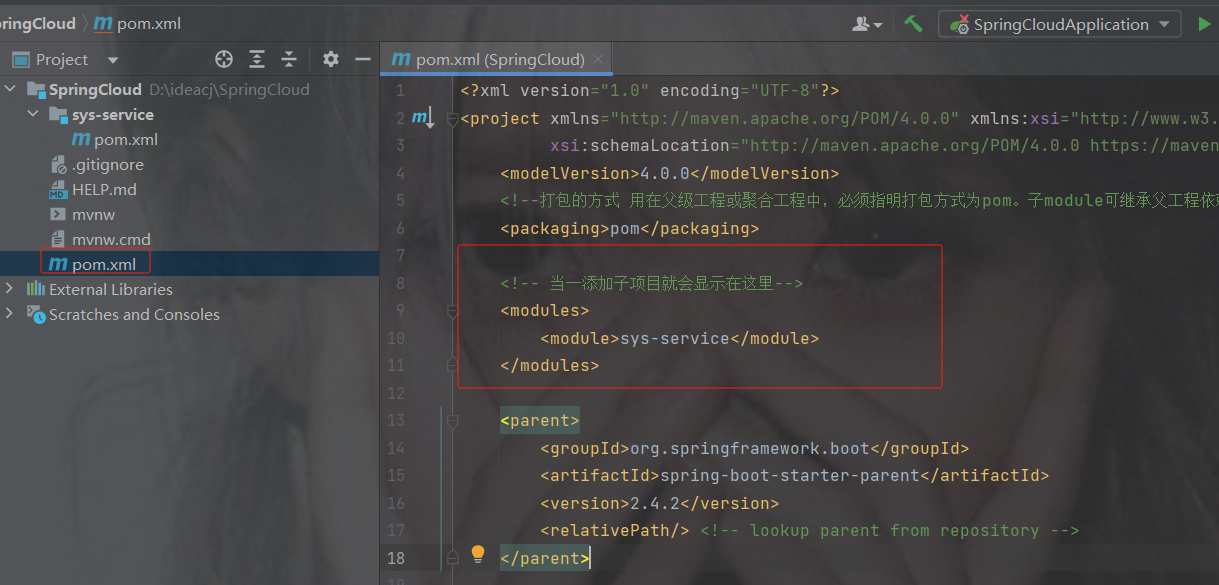
如果是cloud项目,那么打包方式
pom:用在父级工程或聚合工程中,必须指明打包方式为pom。子module可继承父工程依赖。

dependencyManagement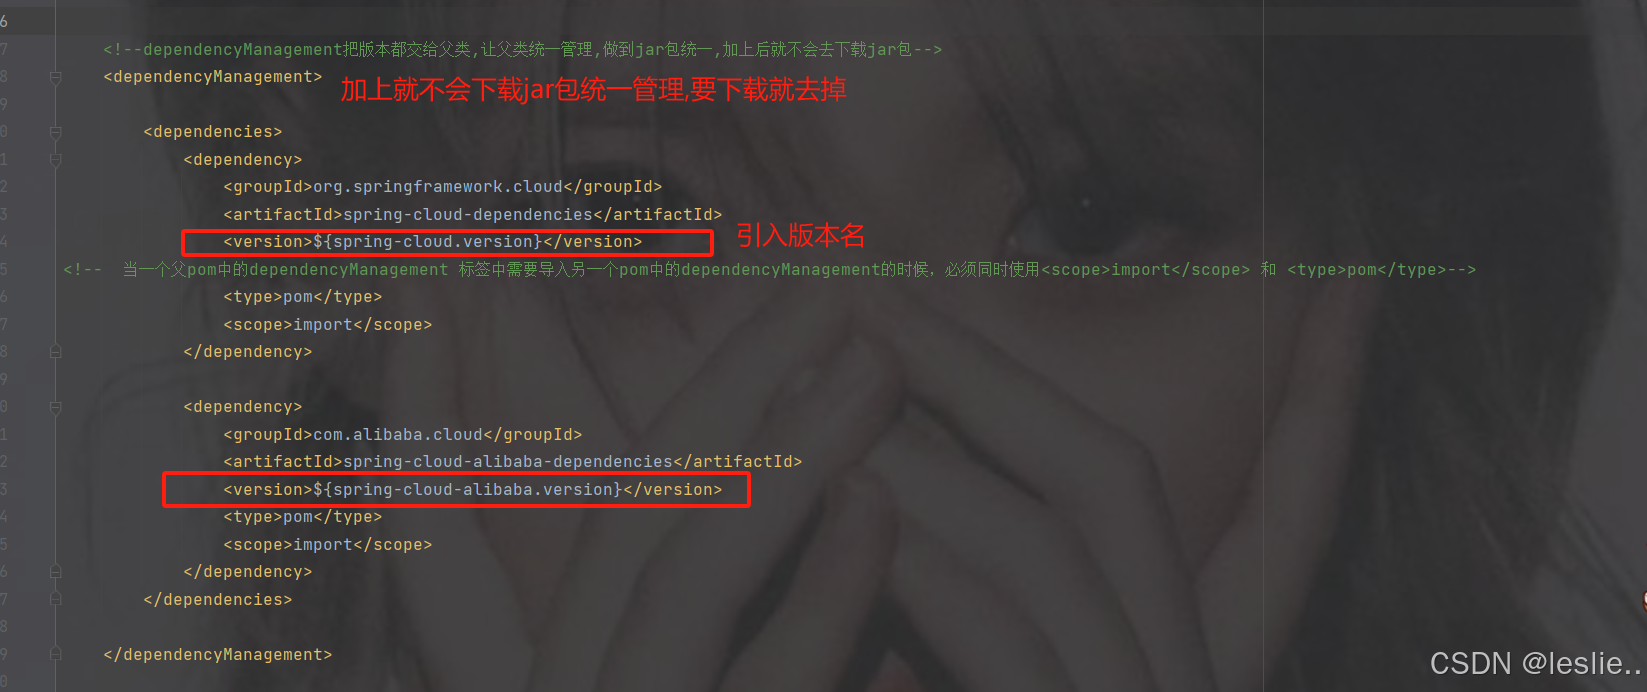
完整依赖
4.0.0
pom
org.springframework.boot
spring-boot-starter-parent
2.4.2
com.example
SpringCloud
0.0.1-SNAPSHOT
SpringCloud
SpringCloud
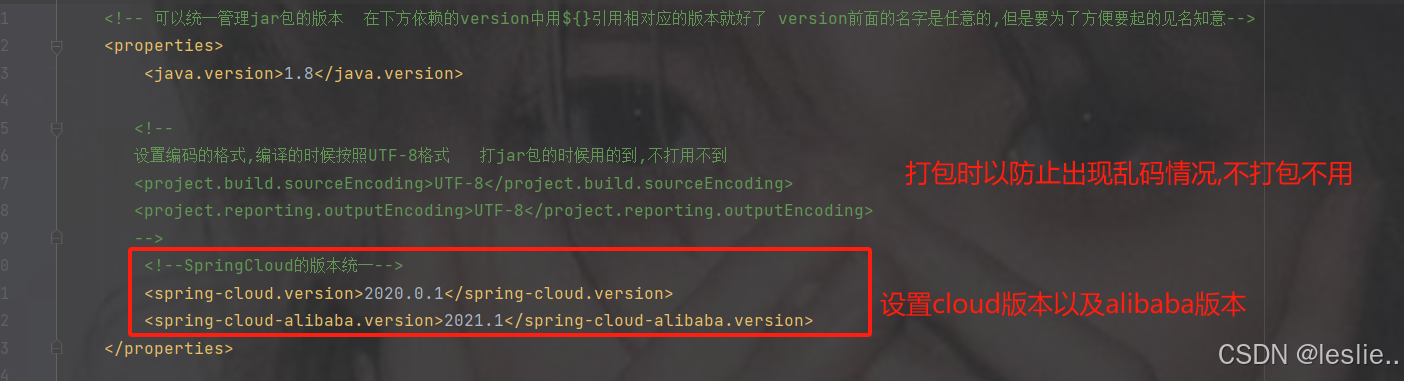
1.8
2020.0.1
2021.1
org.springframework.cloud
spring-cloud-dependencies
${spring-cloud.version}
pom
import
com.alibaba.cloud
spring-cloud-alibaba-dependencies
${spring-cloud-alibaba.version}
pom
import
org.springframework.boot
spring-boot-maven-plugin
注意:设置父工程的打包方式为pom打包。
<packaging>pom</packaging>
建议: 删除src日录。
2.3 创建子项目
SSO(单点登录)
Sys-common (公共模块)
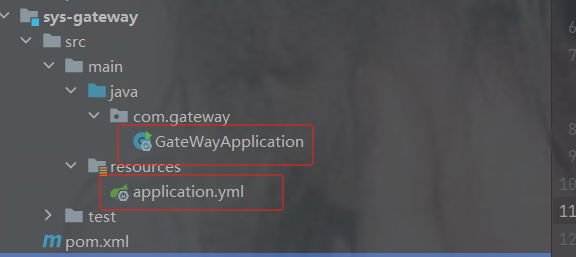
Sys-gateway(网关):
Sys-system(系统管理提供接口):
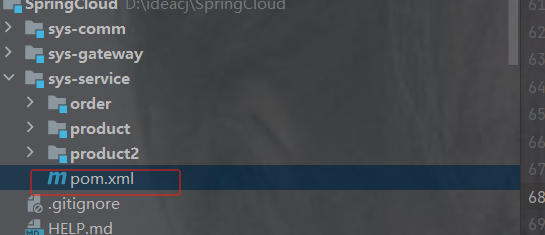
Sys-service:{
Sys-order:
Sys-product:
}
删除src
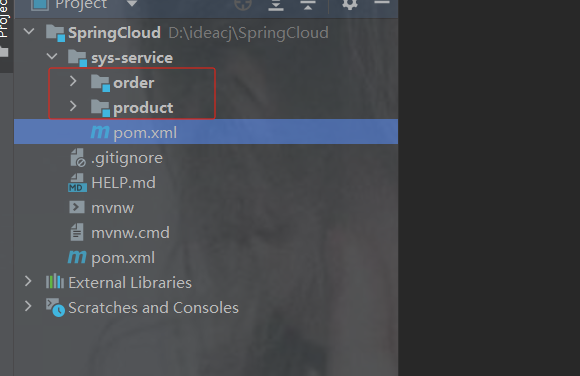
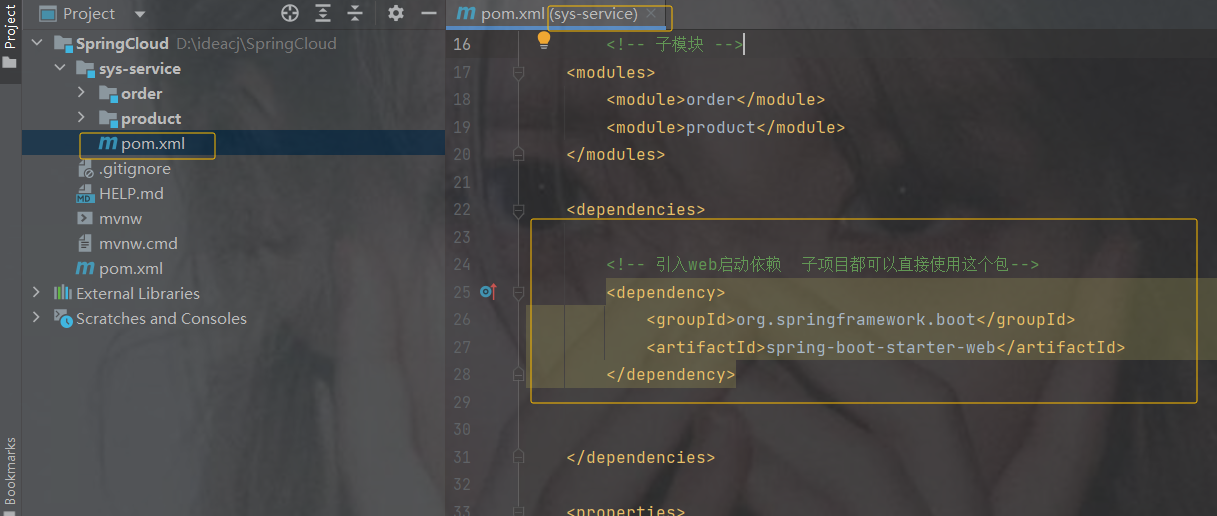
当一创建子项目后,父模块的pom.xml会有子模块
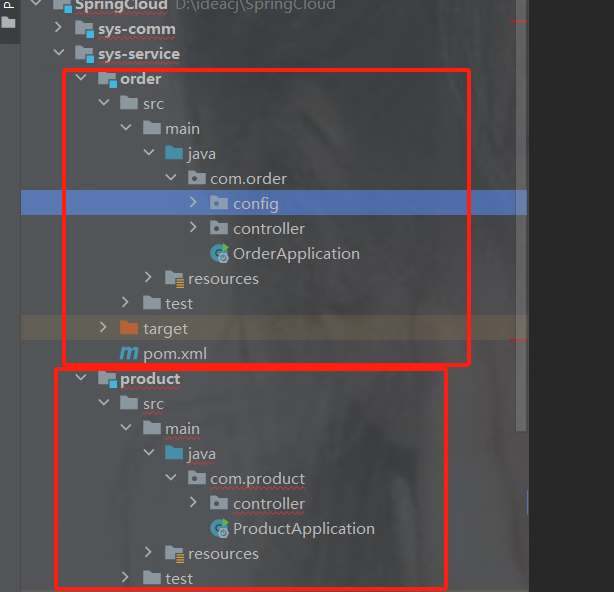
2.4 在子工程下创建订单以及商品模块
创建订单模块
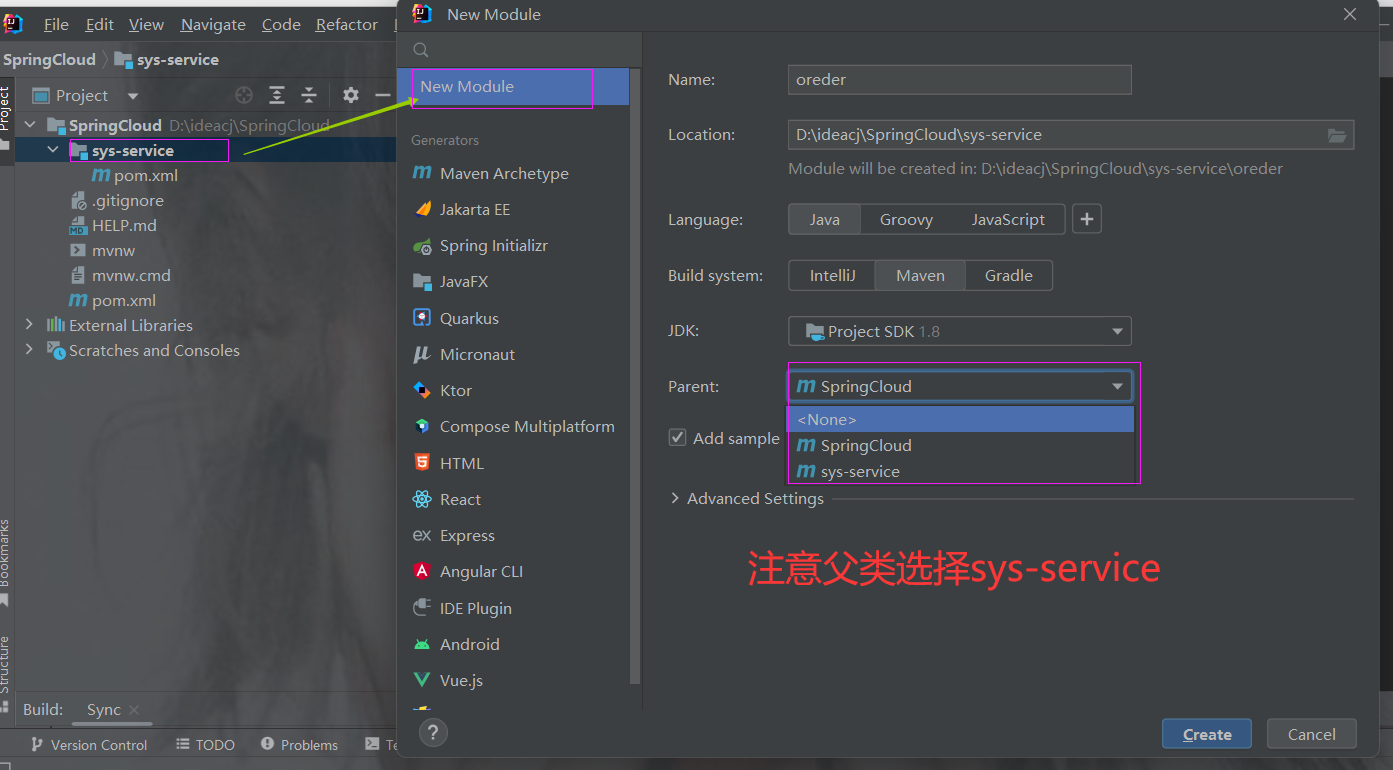
创建商品模块

示例
加依赖,注意是sys-service的pom.xml里,它的子模块可以使用父模块里的依赖
4.0.0
com.example
SpringCloud
0.0.1-SNAPSHOT
sys-service
pom
order
product
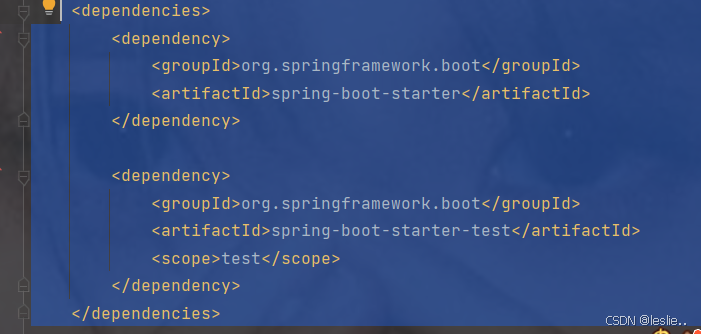
org.springframework.boot
spring-boot-starter-web
org.projectlombok
lombok
8
8
UTF-8
2.5 实现功能 商品模块
根据商品 id 商品的信息返回,这里为了方便先不连接数据库,后边会连接
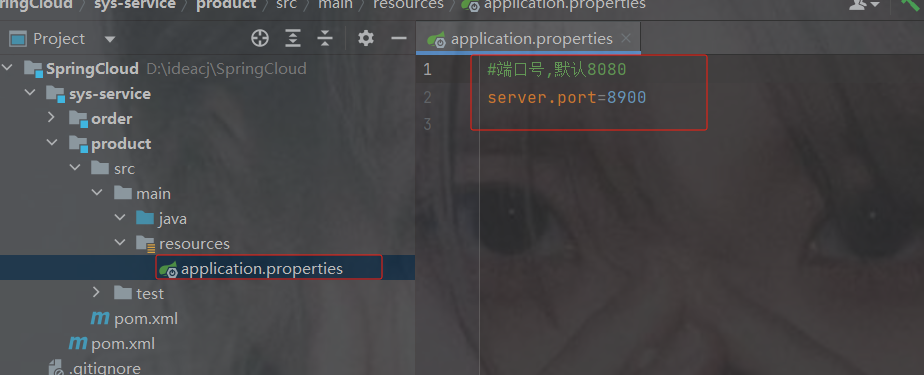
创建application.properties
指定端口号,否则后边服务多了端口号重复,不要用8080
商品端口号
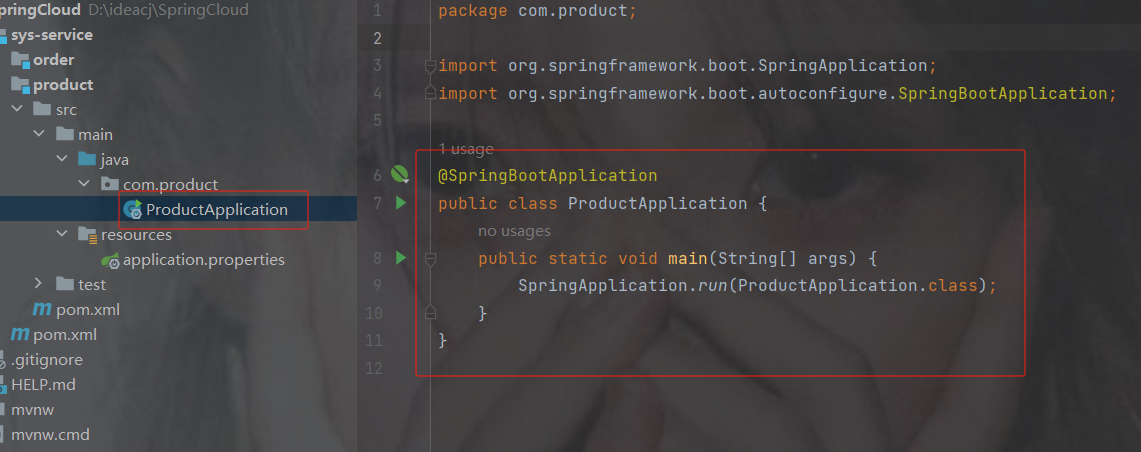
创建启动类
商品启动类
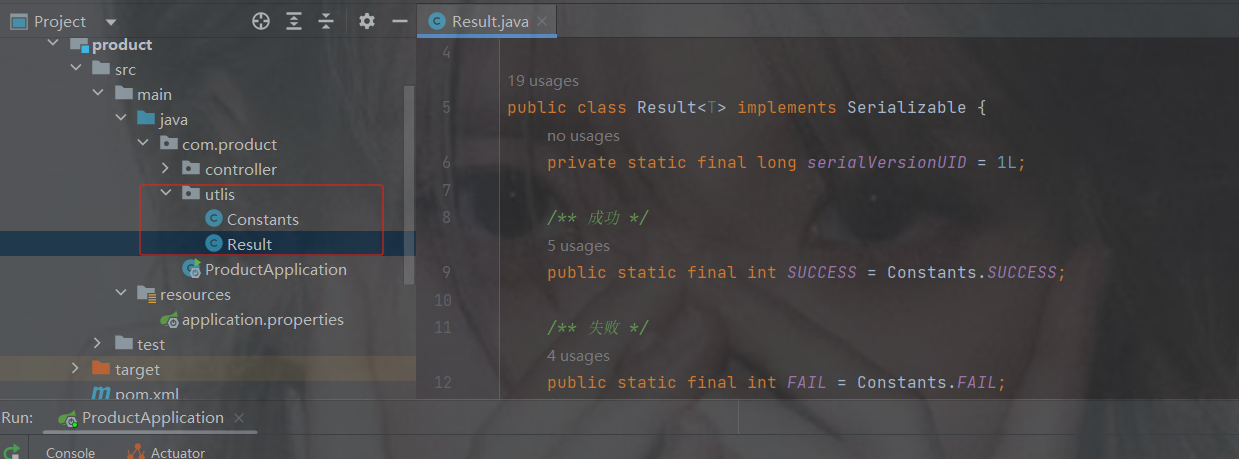
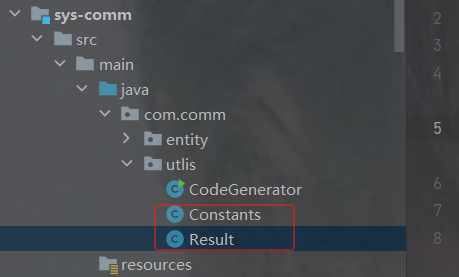
工具类响应
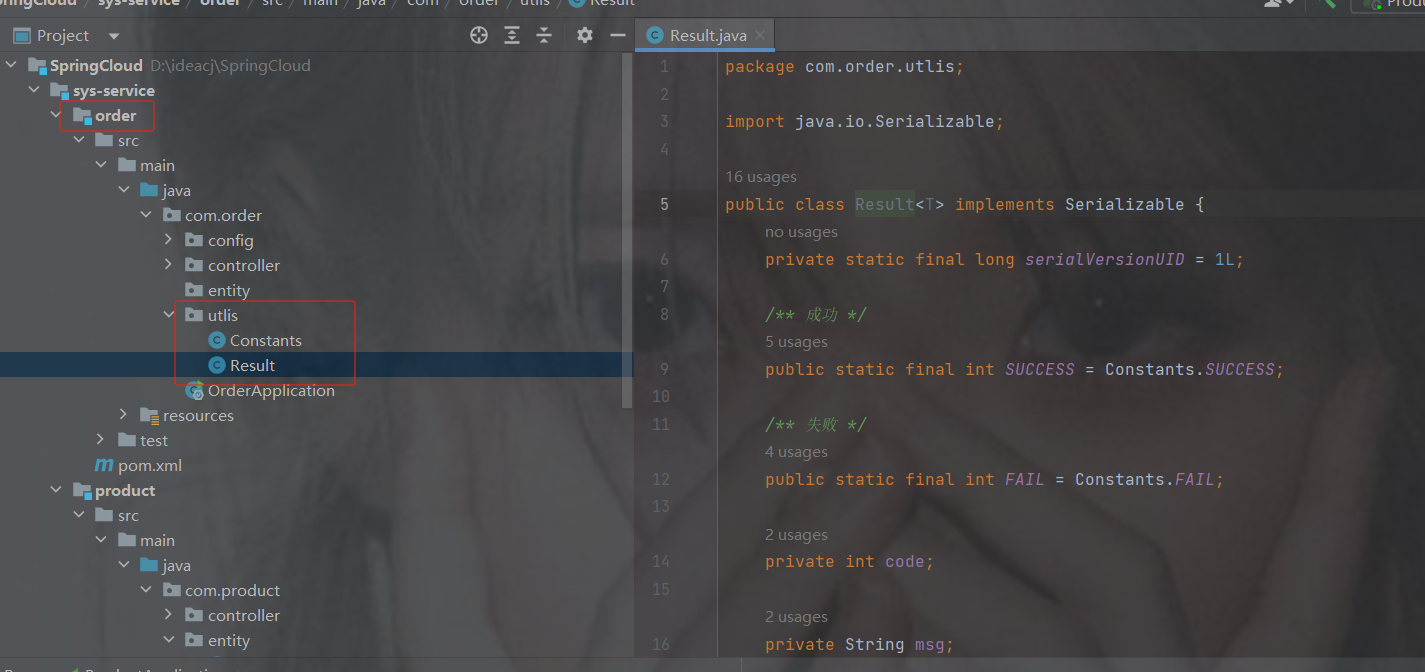
package com.product.utlis;
import java.io.Serializable;
public class Result implements Serializable {
    private static final long serialVersionUID = 1L;
    /** 成功 */
    public static final int SUCCESS = Constants.SUCCESS;
    /** 失败 */
    public static final int FAIL = Constants.FAIL;
    private int code;
    private String msg;
    private T data;
    private Long timestamp;
    public static  Result ok()
    {
        return restResult(null, SUCCESS, null);
    }
    public static  Result ok(T data)
    {
        return restResult(data, SUCCESS, null);
    }
    public static  Result ok(T data,long timestamp)
    {
        Result r = restResult(data, SUCCESS, null);
        r.timestamp = timestamp;
        return r;
    }
    public static  Result ok(T data, String msg)
    {
        return restResult(data, SUCCESS, msg);
    }
    public static  Result fail()
    {
        return restResult(null, FAIL, null);
    }
    public static  Result fail(String msg)
    {
        return restResult(null, FAIL, msg);
    }
    public static  Result fail(T data)
    {
        return restResult(data, FAIL, null);
    }
    public static  Result fail(T data, String msg)
    {
        return restResult(data, FAIL, msg);
    }
    public static  Result fail(int code, String msg)
    {
        return restResult(null, code, msg);
    }
    public Long getTimestamp() {
        return timestamp;
    }
    public void setTimestamp(Long timestamp) {
        this.timestamp = timestamp;
    }
    private static  Result restResult(T data, int code, String msg)
    {
        Result apiResult = new Result<>();
        apiResult.setCode(code);
        apiResult.setData(data);
        apiResult.setMsg(msg);
        return apiResult;
    }
    public int getCode()
    {
        return code;
    }
    public void setCode(int code)
    {
        this.code = code;
    }
    public String getMsg()
    {
        return msg;
    }
    public void setMsg(String msg)
    {
        this.msg = msg;
    }
    public T getData()
    {
        return data;
    }
    public void setData(T data)
    {
        this.data = data;
    }
    public static  Boolean isError(Result ret)
    {
        return !isSuccess(ret);
    }
    public static  Boolean isSuccess(Result ret)
    {
        return Result.SUCCESS == ret.getCode();
    }
}
package com.product.utlis;
public class Constants {
/**
* UTF-8 字符集
*/
public static final String UTF8 = "UTF-8";
/**
* GBK 字符集
*/
public static final String GBK = "GBK";
/**
* www主域
*/
public static final String WWW = "www.";
/**
* RMI 远程方法调用
*/
public static final String LOOKUP_RMI = "rmi:";
/**
* LDAP 远程方法调用
*/
public static final String LOOKUP_LDAP = "ldap:";
/**
* LDAPS 远程方法调用
*/
public static final String LOOKUP_LDAPS = "ldaps:";
/**
* http请求
*/
public static final String HTTP = "http://";
/**
* https请求
*/
public static final String HTTPS = "https://";
/**
* 成功标记
*/
public static final Integer SUCCESS = 200;
/**
* 失败标记
*/
public static final Integer FAIL = 500;
/**
* 登录成功状态
*/
public static final String LOGIN_SUCCESS_STATUS = "0";
/**
* 登录失败状态
*/
public static final String LOGIN_FAIL_STATUS = "1";
/**
* 登录成功
*/
public static final String LOGIN_SUCCESS = "Success";
/**
* 注销
*/
public static final String LOGOUT = "Logout";
/**
* 注册
*/
public static final String REGISTER = "Register";
/**
* 注销
*/
public static final String LOGOFF = "Logoff";
/**
* 登录失败
*/
public static final String LOGIN_FAIL = "Error";
/**
* 当前记录起始索引
*/
public static final String PAGE_NUM = "pageNum";
/**
* 每页显示记录数
*/
public static final String PAGE_SIZE = "pageSize";
/**
* 排序列
*/
public static final String ORDER_BY_COLUMN = "orderByColumn";
/**
* 排序的方向 "desc" 或者 "asc".
*/
public static final String IS_ASC = "isAsc";
/**
* 验证码有效期(分钟)
*/
public static final long CAPTCHA_EXPIRATION = 2;
/**
* 资源映射路径 前缀
*/
public static final String RESOURCE_PREFIX = "/profile";
/**
* 自动识别json对象白名单配置(仅允许解析的包名,范围越小越安全)
*/
public static final String[] JSON_WHITELIST_STR = { "org.springframework", "com.ruoyi" };
/**
* 定时任务白名单配置(仅允许访问的包名,如其他需要可以自行添加)
*/
public static final String[] JOB_WHITELIST_STR = { "com.ruoyi" };
/**
* 定时任务违规的字符
*/
public static final String[] JOB_ERROR_STR = { "java.net.URL", "javax.naming.InitialContext", "org.yaml.snakeyaml",
"org.springframework", "org.apache", "com.ruoyi.common.core.utils.file" };
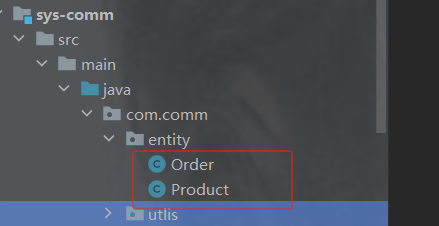
}商品实体
package com.product.entity;
import lombok.AllArgsConstructor;
import lombok.Data;
import lombok.NoArgsConstructor;
import java.math.BigDecimal;
@Data //自动生成 get set
@AllArgsConstructor //自动生成 有参构造
@NoArgsConstructor //自动生成 无参构造
public class Product {
/**
* 商品id
*/
private Integer id;
/**
* 商品名称
*/
private String pName;
/**
* 商品价格
*/
private BigDecimal price;
/**
* 商品库存
*/
private Integer inventory;
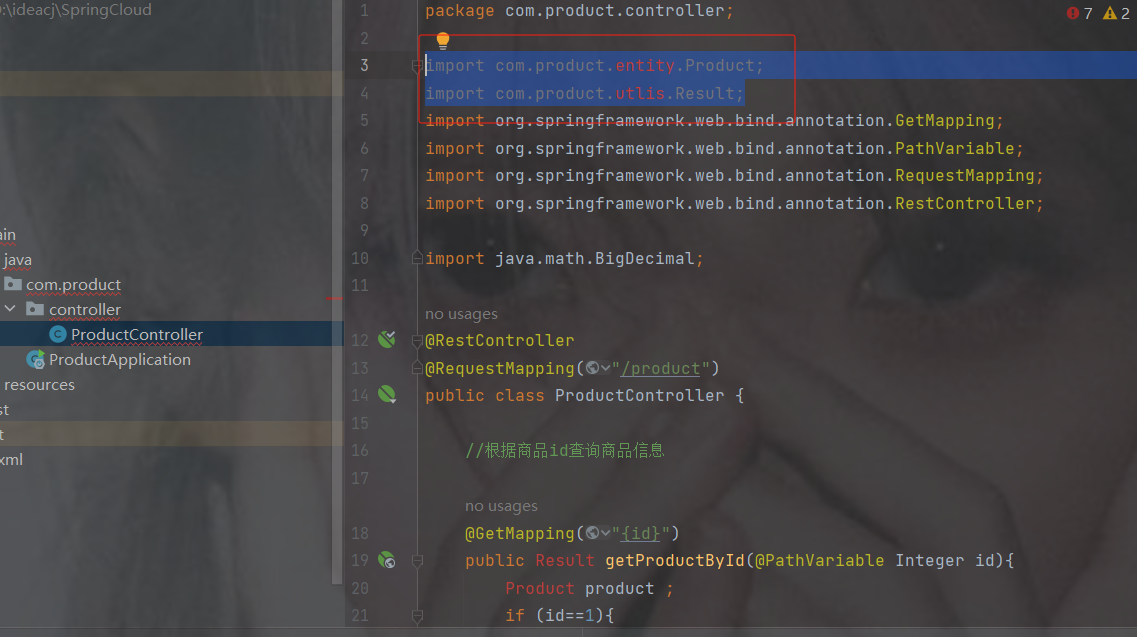
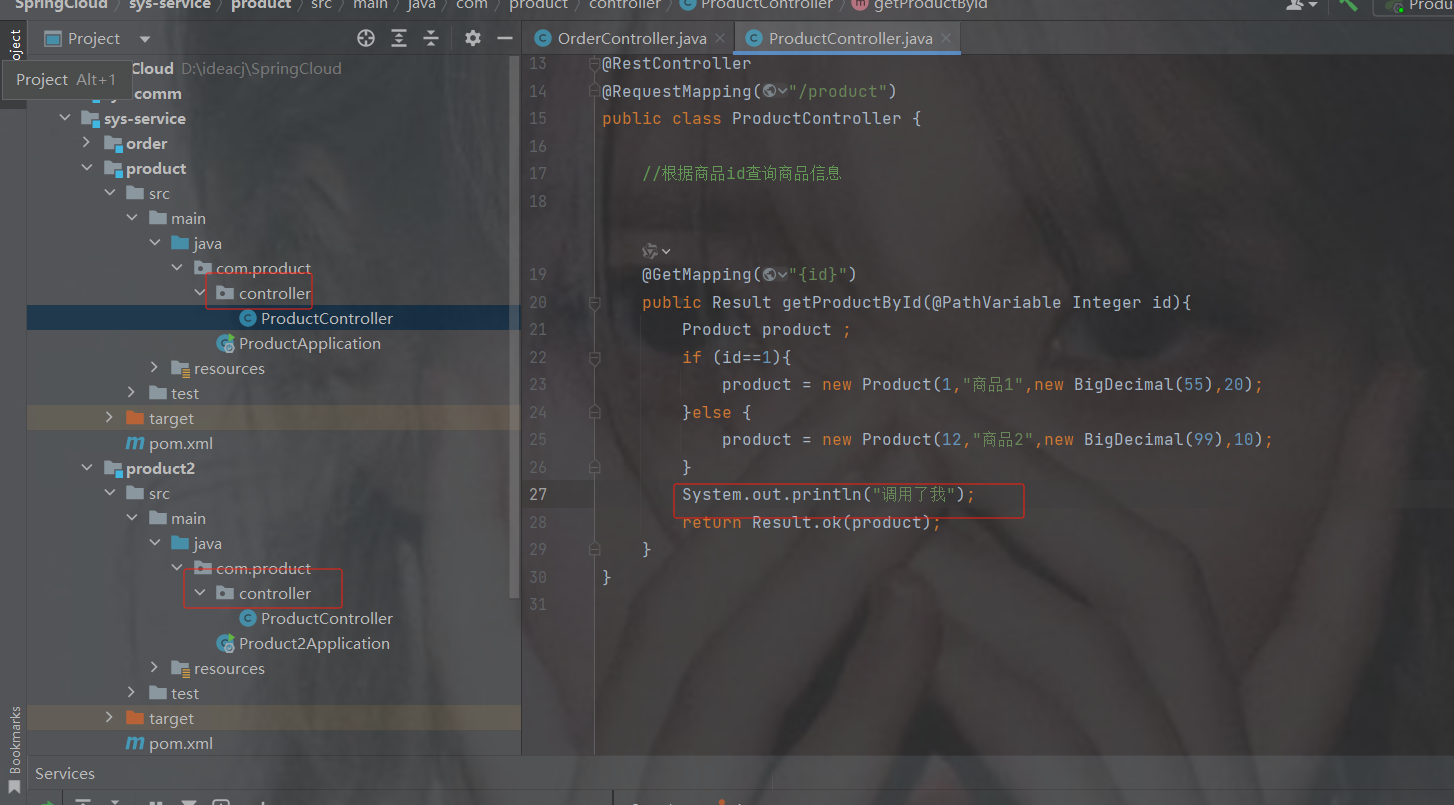
}商品controller
编写完重启
package com.product.controller;
import com.product.entity.Product;
import com.product.utlis.Result;
import org.springframework.web.bind.annotation.GetMapping;
import org.springframework.web.bind.annotation.PathVariable;
import org.springframework.web.bind.annotation.RequestMapping;
import org.springframework.web.bind.annotation.RestController;
import java.math.BigDecimal;
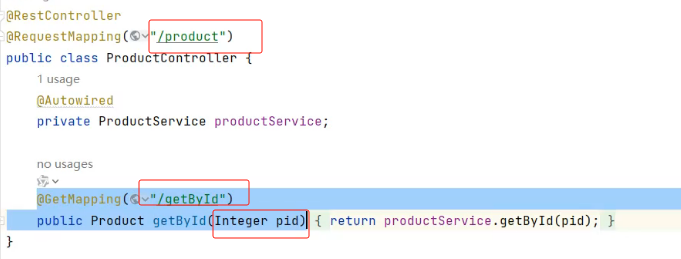
@RestController
@RequestMapping("/product")
public class ProductController {
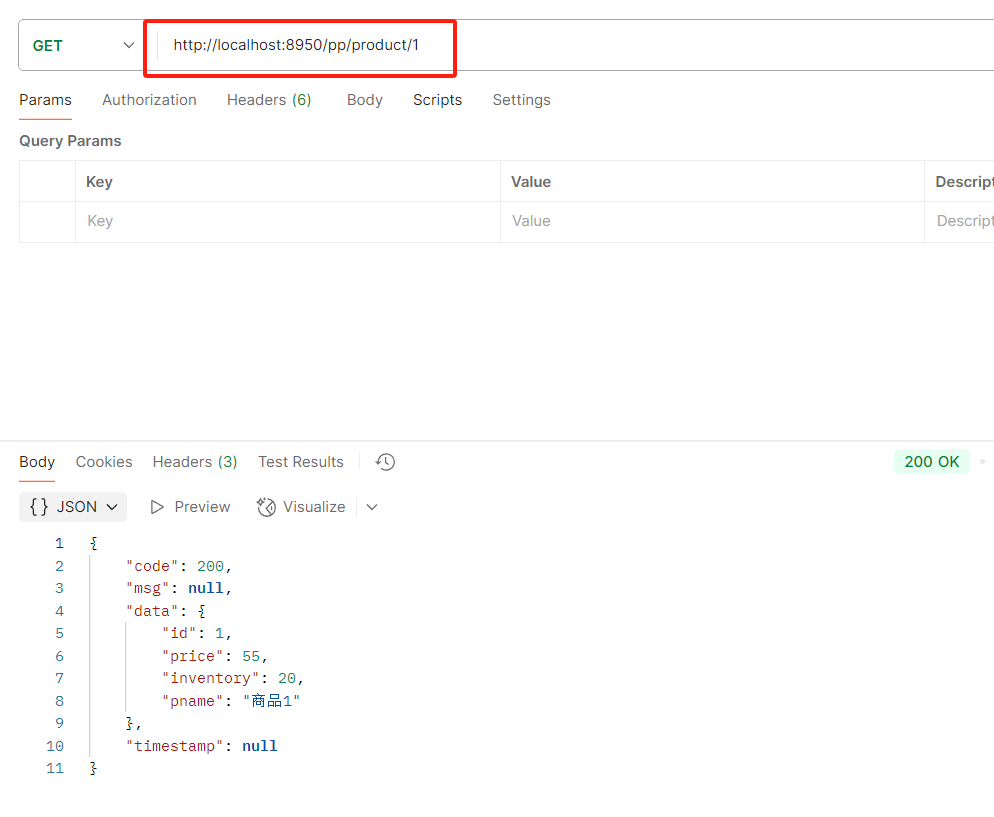
//根据商品id查询商品信息
@GetMapping("{id}")
public Result getProductById(@PathVariable Integer id){
Product product ;
if (id==1){
product = new Product(1,"商品1",new BigDecimal(55),20);
}else {
product = new Product(12,"商品2",new BigDecimal(99),10);
}
return Result.ok(product);
}
}访问结果

2.6. 远程调用 restTemplate 以及公共模块
订单模块实现的功能
1.根据商品的id 查询商品的价格 库存
2.存入订单
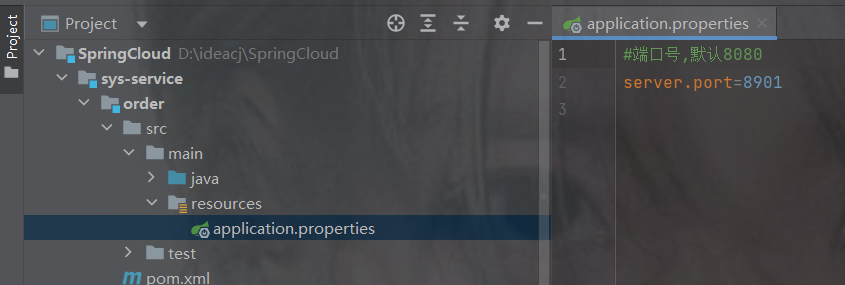
创建application.properties
订单端口号
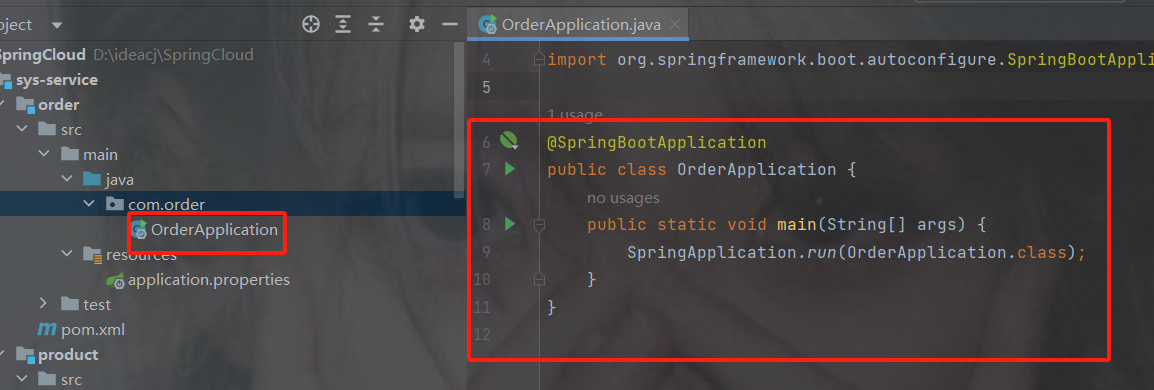
启动类
工具类响应
package com.order.utlis;
import java.io.Serializable;
public class Result implements Serializable {
    private static final long serialVersionUID = 1L;
    /** 成功 */
    public static final int SUCCESS = Constants.SUCCESS;
    /** 失败 */
    public static final int FAIL = Constants.FAIL;
    private int code;
    private String msg;
    private T data;
    private Long timestamp;
    public static  Result ok()
    {
        return restResult(null, SUCCESS, null);
    }
    public static  Result ok(T data)
    {
        return restResult(data, SUCCESS, null);
    }
    public static  Result ok(T data,long timestamp)
    {
        Result r = restResult(data, SUCCESS, null);
        r.timestamp = timestamp;
        return r;
    }
    public static  Result ok(T data, String msg)
    {
        return restResult(data, SUCCESS, msg);
    }
    public static  Result fail()
    {
        return restResult(null, FAIL, null);
    }
    public static  Result fail(String msg)
    {
        return restResult(null, FAIL, msg);
    }
    public static  Result fail(T data)
    {
        return restResult(data, FAIL, null);
    }
    public static  Result fail(T data, String msg)
    {
        return restResult(data, FAIL, msg);
    }
    public static  Result fail(int code, String msg)
    {
        return restResult(null, code, msg);
    }
    public Long getTimestamp() {
        return timestamp;
    }
    public void setTimestamp(Long timestamp) {
        this.timestamp = timestamp;
    }
    private static  Result restResult(T data, int code, String msg)
    {
        Result apiResult = new Result<>();
        apiResult.setCode(code);
        apiResult.setData(data);
        apiResult.setMsg(msg);
        return apiResult;
    }
    public int getCode()
    {
        return code;
    }
    public void setCode(int code)
    {
        this.code = code;
    }
    public String getMsg()
    {
        return msg;
    }
    public void setMsg(String msg)
    {
        this.msg = msg;
    }
    public T getData()
    {
        return data;
    }
    public void setData(T data)
    {
        this.data = data;
    }
    public static  Boolean isError(Result ret)
    {
        return !isSuccess(ret);
    }
    public static  Boolean isSuccess(Result ret)
    {
        return Result.SUCCESS == ret.getCode();
    }
}
package com.order.utlis;
public class Constants {
/**
* UTF-8 字符集
*/
public static final String UTF8 = "UTF-8";
/**
* GBK 字符集
*/
public static final String GBK = "GBK";
/**
* www主域
*/
public static final String WWW = "www.";
/**
* RMI 远程方法调用
*/
public static final String LOOKUP_RMI = "rmi:";
/**
* LDAP 远程方法调用
*/
public static final String LOOKUP_LDAP = "ldap:";
/**
* LDAPS 远程方法调用
*/
public static final String LOOKUP_LDAPS = "ldaps:";
/**
* http请求
*/
public static final String HTTP = "http://";
/**
* https请求
*/
public static final String HTTPS = "https://";
/**
* 成功标记
*/
public static final Integer SUCCESS = 200;
/**
* 失败标记
*/
public static final Integer FAIL = 500;
/**
* 登录成功状态
*/
public static final String LOGIN_SUCCESS_STATUS = "0";
/**
* 登录失败状态
*/
public static final String LOGIN_FAIL_STATUS = "1";
/**
* 登录成功
*/
public static final String LOGIN_SUCCESS = "Success";
/**
* 注销
*/
public static final String LOGOUT = "Logout";
/**
* 注册
*/
public static final String REGISTER = "Register";
/**
* 注销
*/
public static final String LOGOFF = "Logoff";
/**
* 登录失败
*/
public static final String LOGIN_FAIL = "Error";
/**
* 当前记录起始索引
*/
public static final String PAGE_NUM = "pageNum";
/**
* 每页显示记录数
*/
public static final String PAGE_SIZE = "pageSize";
/**
* 排序列
*/
public static final String ORDER_BY_COLUMN = "orderByColumn";
/**
* 排序的方向 "desc" 或者 "asc".
*/
public static final String IS_ASC = "isAsc";
/**
* 验证码有效期(分钟)
*/
public static final long CAPTCHA_EXPIRATION = 2;
/**
* 资源映射路径 前缀
*/
public static final String RESOURCE_PREFIX = "/profile";
/**
* 自动识别json对象白名单配置(仅允许解析的包名,范围越小越安全)
*/
public static final String[] JSON_WHITELIST_STR = { "org.springframework", "com.ruoyi" };
/**
* 定时任务白名单配置(仅允许访问的包名,如其他需要可以自行添加)
*/
public static final String[] JOB_WHITELIST_STR = { "com.ruoyi" };
/**
* 定时任务违规的字符
*/
public static final String[] JOB_ERROR_STR = { "java.net.URL", "javax.naming.InitialContext", "org.yaml.snakeyaml",
"org.springframework", "org.apache", "com.ruoyi.common.core.utils.file" };
}restTemplate
注意不要在订单里设置查询商品的信息,这样没有意义
此时我们需要用到一个http的客户端restTemplate来调用服务,需要我们自己来配置
获取商品的信息 ===>通过HTTP协议调用其他微服务 ===>自己封装Http工具===>
spring提供RestTemplate没有交于spring管理,需要我们自己配置
变成bean的配置形式
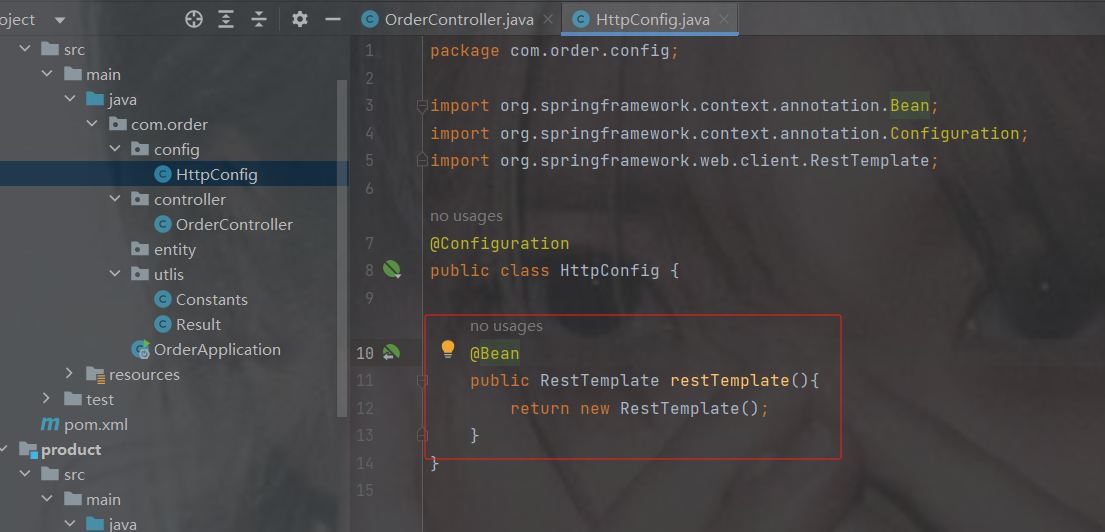
代码
package com.order.config;
import org.springframework.context.annotation.Bean;
import org.springframework.context.annotation.Configuration;
import org.springframework.web.client.RestTemplate;
@Configuration
public class HttpConfig {
@Bean
public RestTemplate restTemplate(){
return new RestTemplate();
}
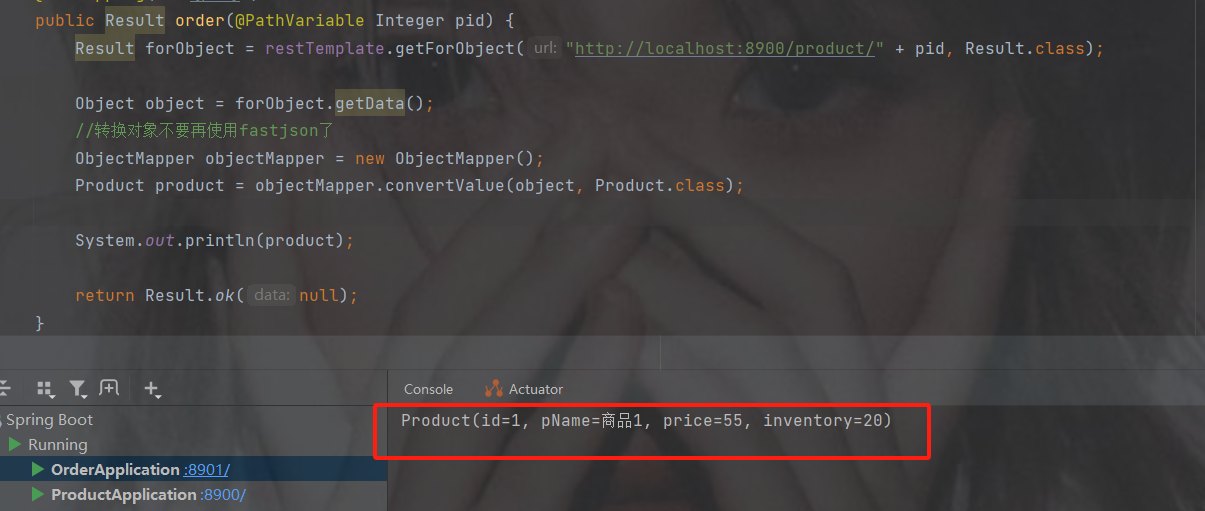
}订单controller
注入restTemplate后调用getForObject方法
需要传入路径以及你想返回的数据类型(反射类型)
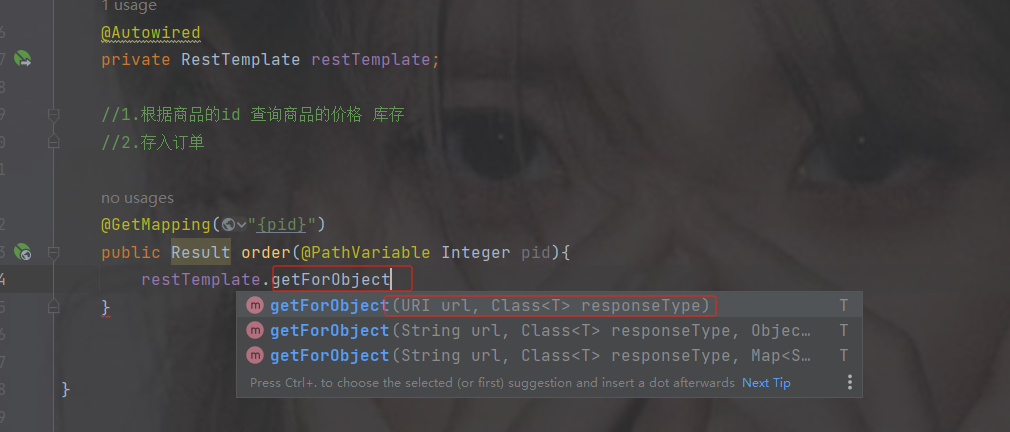
路径的地址就是商品的路径地址,并且要转成你想要的类型
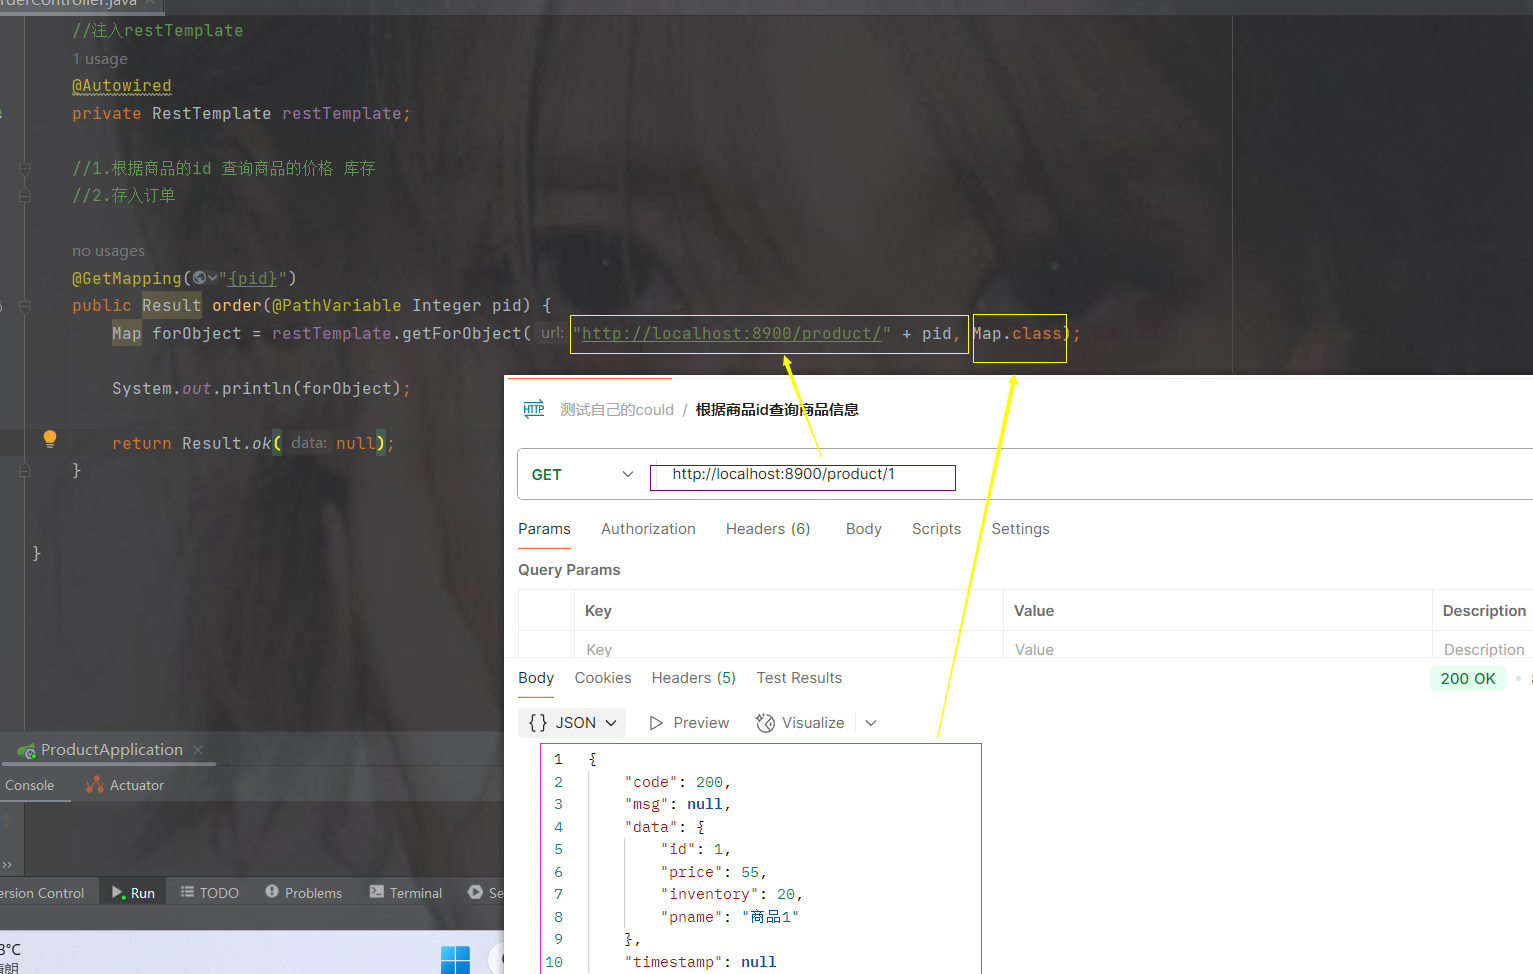
访问订单接口

发现的问题
当一访问订单的服务就会去调用商品的信息
但是如果想转换商品对象实体,会转不了的问题,有时候我们需要商品的信息,这样启动访问会报错的
当我们转换为result获取data数据的时候,发现需要转换为商品的实体对象,但是我们没有
而且像工具类,我们如果每建一个服务,如果用到工具类,我们难道都要挨个加吗?
像这些问题我们需要单独有一个公共的模块,像一些工具以及公共的配置以及实体都可以放在里面
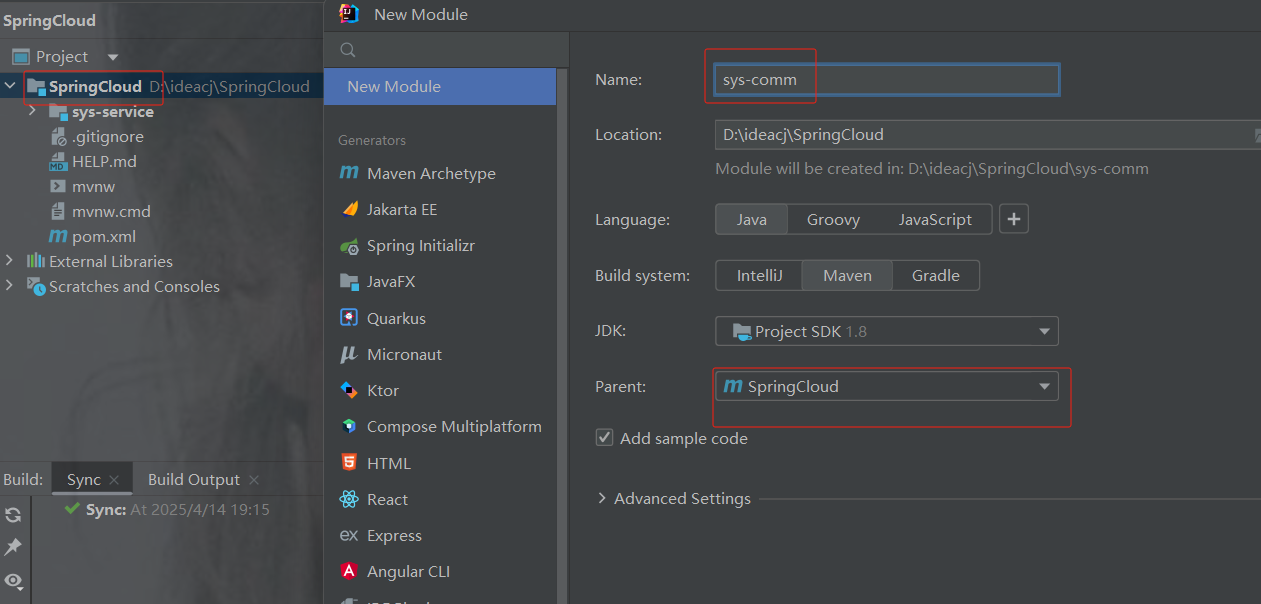
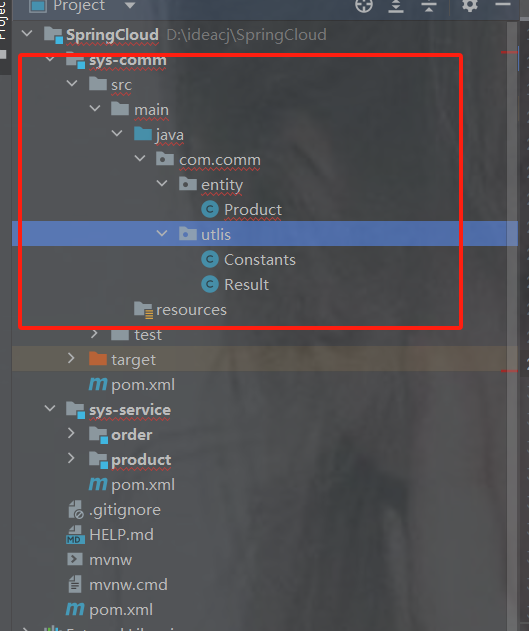
公共模块
创建公共模块
注意父类是springcloud
把商品的实体和两个模块的工具类移过去
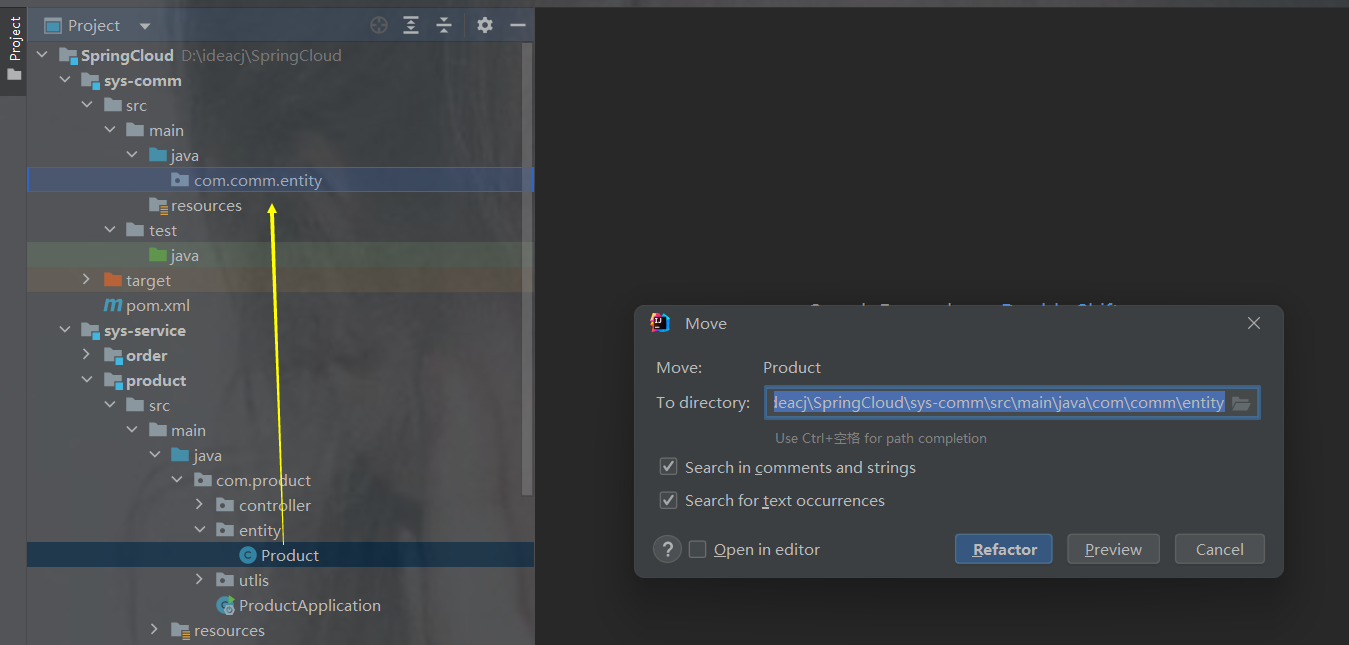
示例
删完多余的包以及订单和商品目前是这个样子
comm 的包示例
sys-service 的 lombok移过去
把service的lombok移到comm的pom.xml里

service的pom.xml引入comm公共模块包
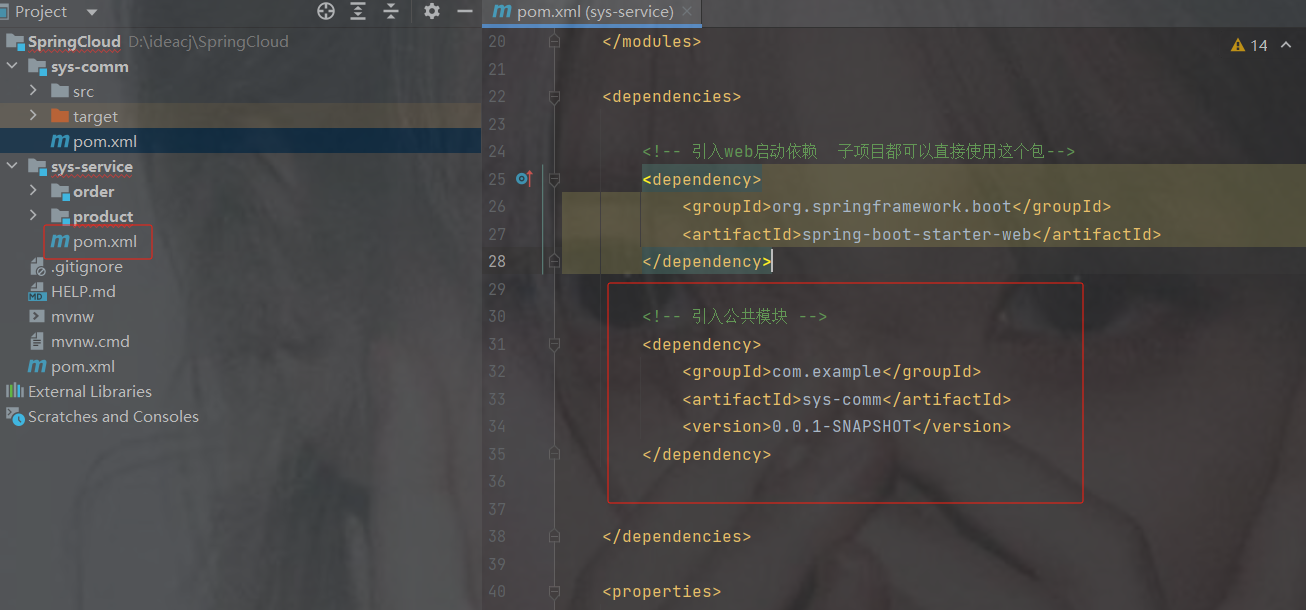
    4.0.0

        com.example
        SpringCloud
        0.0.1-SNAPSHOT


    sys-service
    pom


        order
        product


            org.springframework.boot
            spring-boot-starter-web


            com.example
            sys-comm
            0.0.1-SNAPSHOT


        8
        8
        UTF-8
删除商品和订单的重新导入
修改订单模块远程调用
package com.order.controller;
import com.comm.entity.Product;
import com.comm.utlis.Result;
import com.fasterxml.jackson.databind.ObjectMapper;
import org.springframework.beans.factory.annotation.Autowired;
import org.springframework.web.bind.annotation.GetMapping;
import org.springframework.web.bind.annotation.PathVariable;
import org.springframework.web.bind.annotation.RequestMapping;
import org.springframework.web.bind.annotation.RestController;
import org.springframework.web.client.RestTemplate;
import java.util.Map;
@RestController
@RequestMapping("/order")
public class OrderController {
//注入restTemplate
@Autowired
private RestTemplate restTemplate;
//1.根据商品的id 查询商品的价格 库存
//2.存入订单
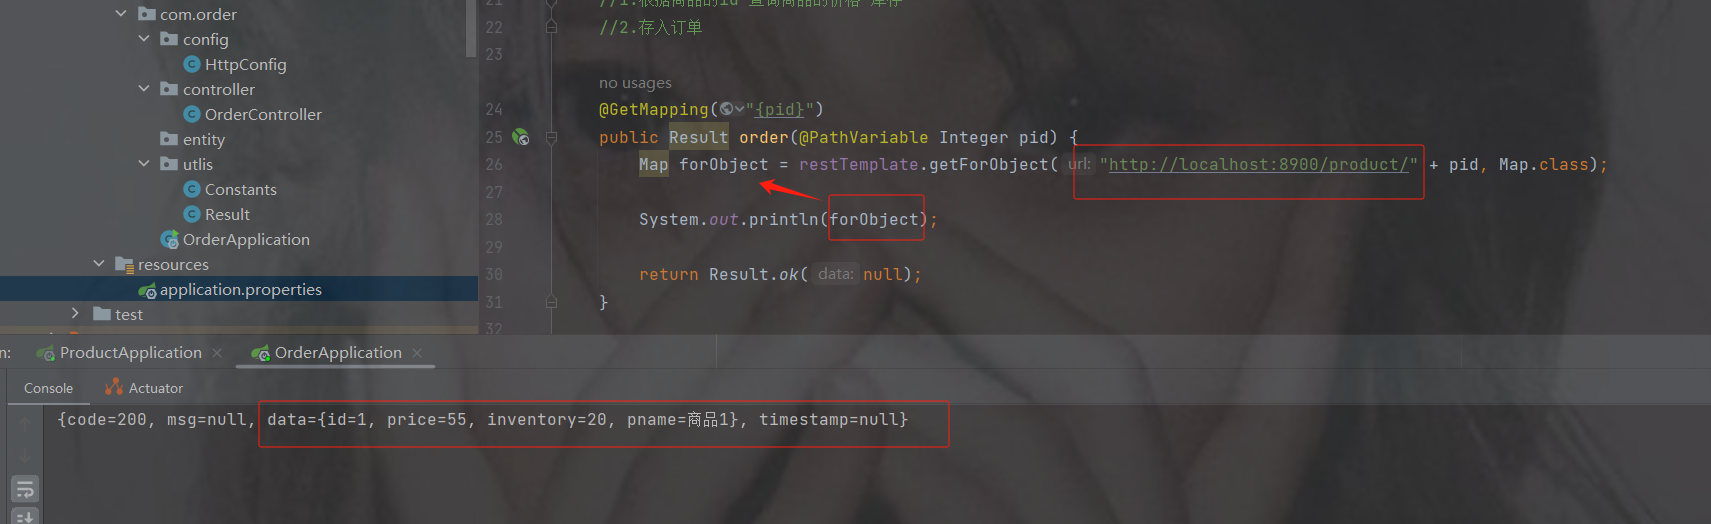
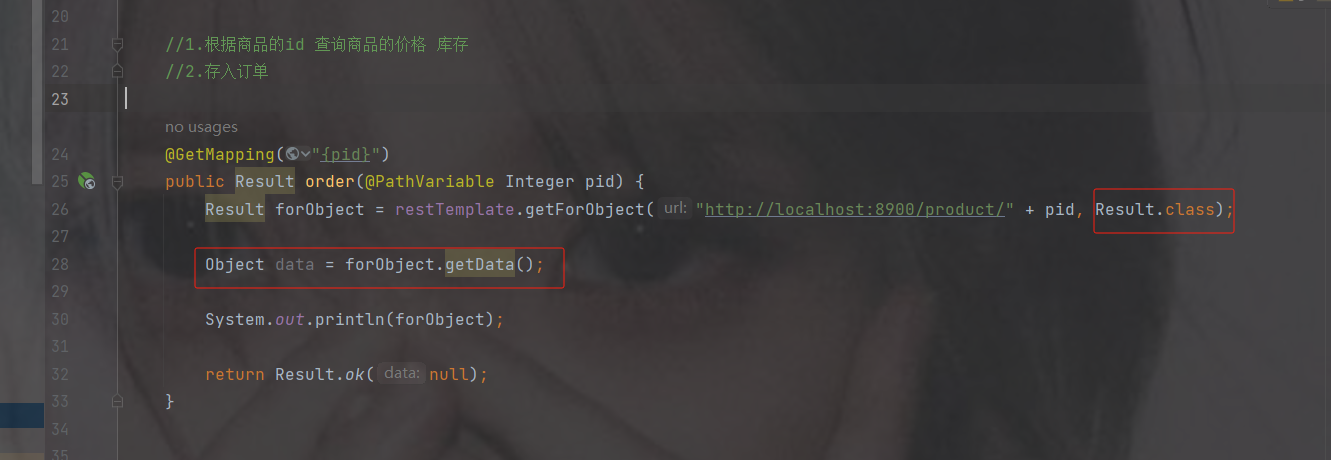
@GetMapping("{pid}")
public Result order(@PathVariable Integer pid) {
Result forObject = restTemplate.getForObject("http://localhost:8900/product/" + pid, Result.class);
Object object = forObject.getData();
//转换对象不要再使用fastjson了
ObjectMapper objectMapper = new ObjectMapper();
Product product = objectMapper.convertValue(object, Product.class);
System.out.println(product);
return Result.ok(null);
}
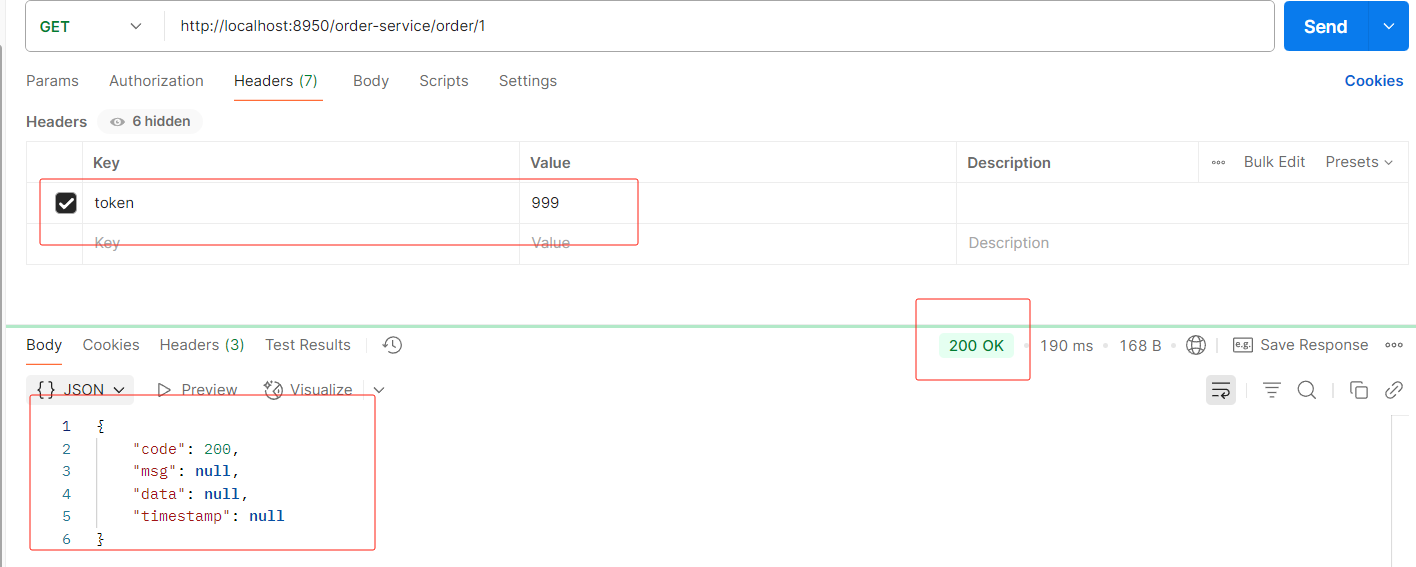
}访问接口地址http://localhost:8901/order/1
此时发现可以获取到商品的对象信息
修改列表服务展示
3.服务治理
3.1 什么是服务治理
服务治理是微服务架构中最核心最基本的模块。用于实现各个微服务的自动化注册与发现
服务注册:在服务治理框架中,都会构建一个*注册中心*,每个服务单元向注册中心登记自己提供服务的详细信息。并在注册中心形成一张服务的*清单*,服务注册中心需要以*心涨30s 90s*的方式去监测清单中的服务是否可用,如果不可用,需要在服务清单中剔除不可用的服务。
服务发现:服务调用方向服务注册中心咨询服务,并获取*所有服务*的实例清单,实现对具体服务实例的访问。
3.2 常见的注册中心软件
Zookeeper
zookeeper是一个分布式服务框架,是Apache Hadoop 的一个子项目,它主要是用来解决分布式应用中经常遇到的一些数据管理问题,如:统一命名服务、状态同步服务、集群管理、分布式应用配置项的管理等,----一般用于大数据
Eureka
Eureka是Springcloud Netflix中的重要组件,主要作用就是做服务注册和发现。但是现在已经闭源,更不停用。
Consul
Consul是基于GO语言开发的开源工具,主要面向分布式,服务化的系统提供服务注册、服务发现和配置管理的功能。Consul的功能都很实用,其中包括:服务注册/发现、健康检查、Key/alue存储、多数据中心和分布式一致性保证等特性。Consul本身只是一个二进制的可执行文件,所以安装和部罢都非常简单,只需要从官网下载后,在执行对应的启动脚本即可。
Nacos(服务治理 配置中心)
Nacos是一个更易于构建云原生应用的动态服务发现、配置管理和服务管理平台。它是SpringCloud Alibaba 组件之一,负责服务注册发现和服务配置.
[服务治理的作用和微服务配置管理]
3.3 nacos注册中心
Nacos 致力于帮助您发现、配置和管理微服务。Nacos 提供了一组简单易用的特性集,帮助您快速实现动态服务发现、服务配置、服务元数据及流量管理。从上面的介绍就可以看出,nacos**的作用就是一个注册中心**,用来管理注册上来的各个微服务的信息。
nacos注册中心的搭建
接下来,我们就在现有的环境中加入nacos,并将我们的两个微服务注册上去
第1步: 安装nacos
下载地址: https://github.com/alibaba/nacos/releases 下载zip格式的安装包,然后进行解压缩操作 |
注意nacos版本要根据你cloud版本对应关系,下图只是个示例

解压到安装目录中即可。要求安装目录不允许有中文和特殊符号。…必须配置过JDK的环境。
目录结构
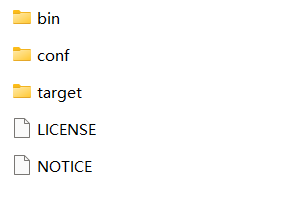
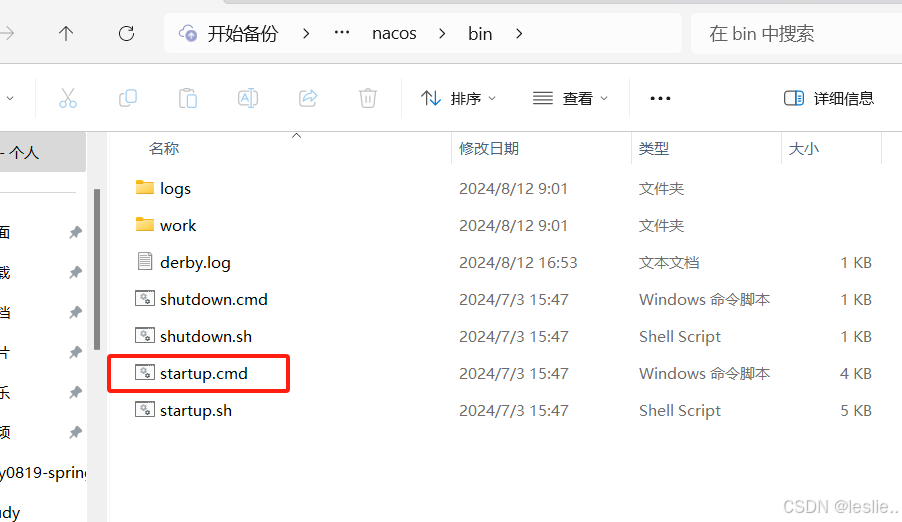
bin -- 一些脚本命令,比如启动
conf ---配置
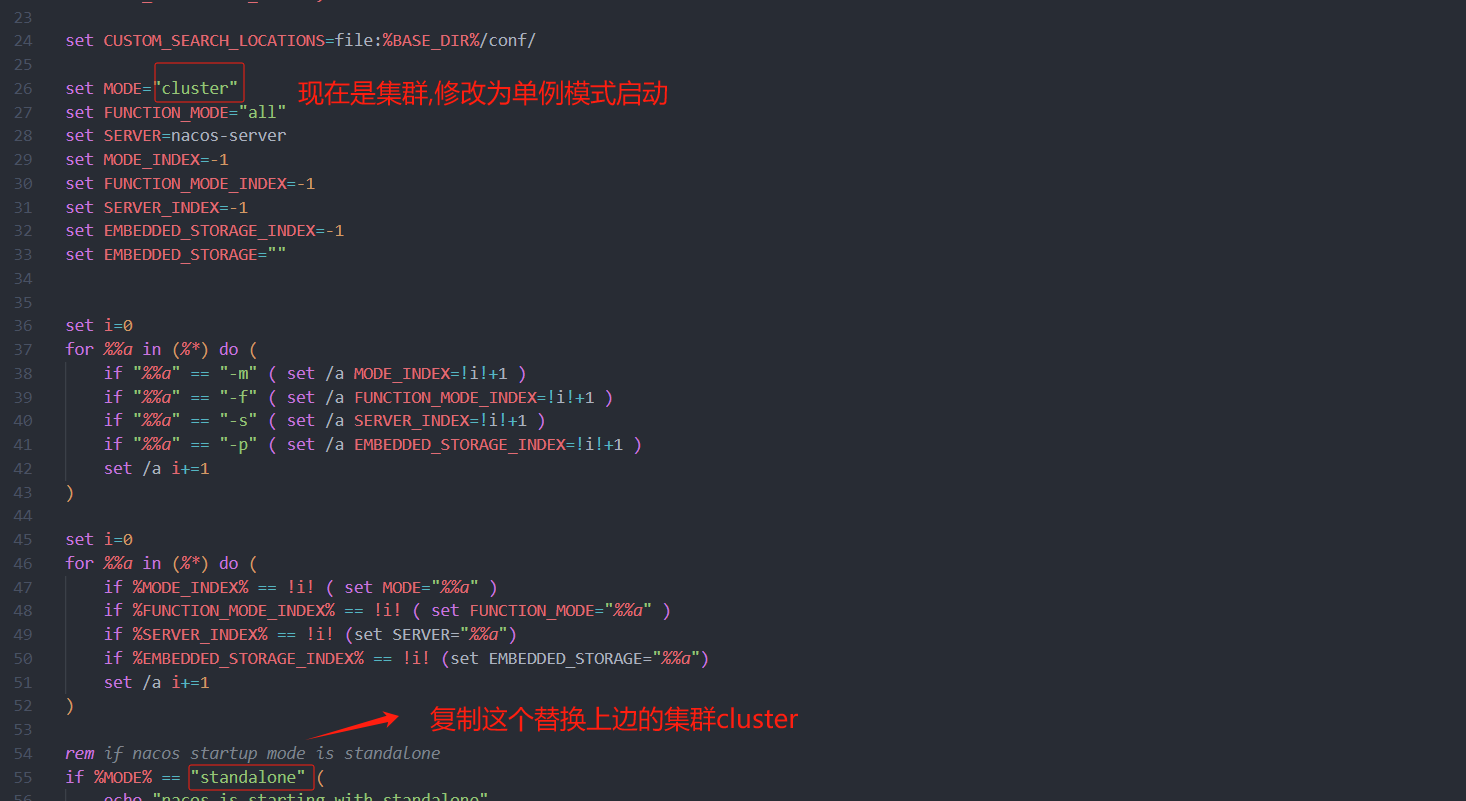
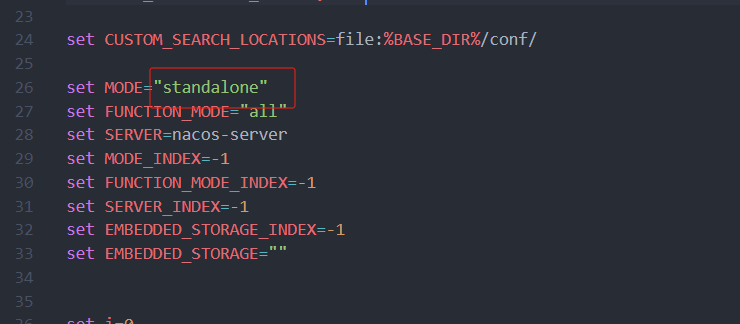
nacos默认是集群模式启动,不能直接双击startup.cmd,除非配置了集群模式,或者改为单例模式
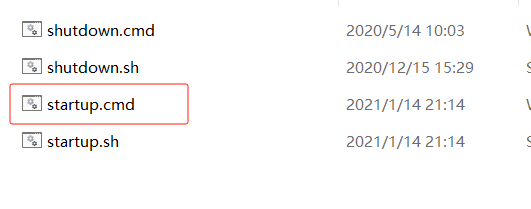
不修改模式单例启动方式
需要进入bin/目录下, 打开cmd 窗口
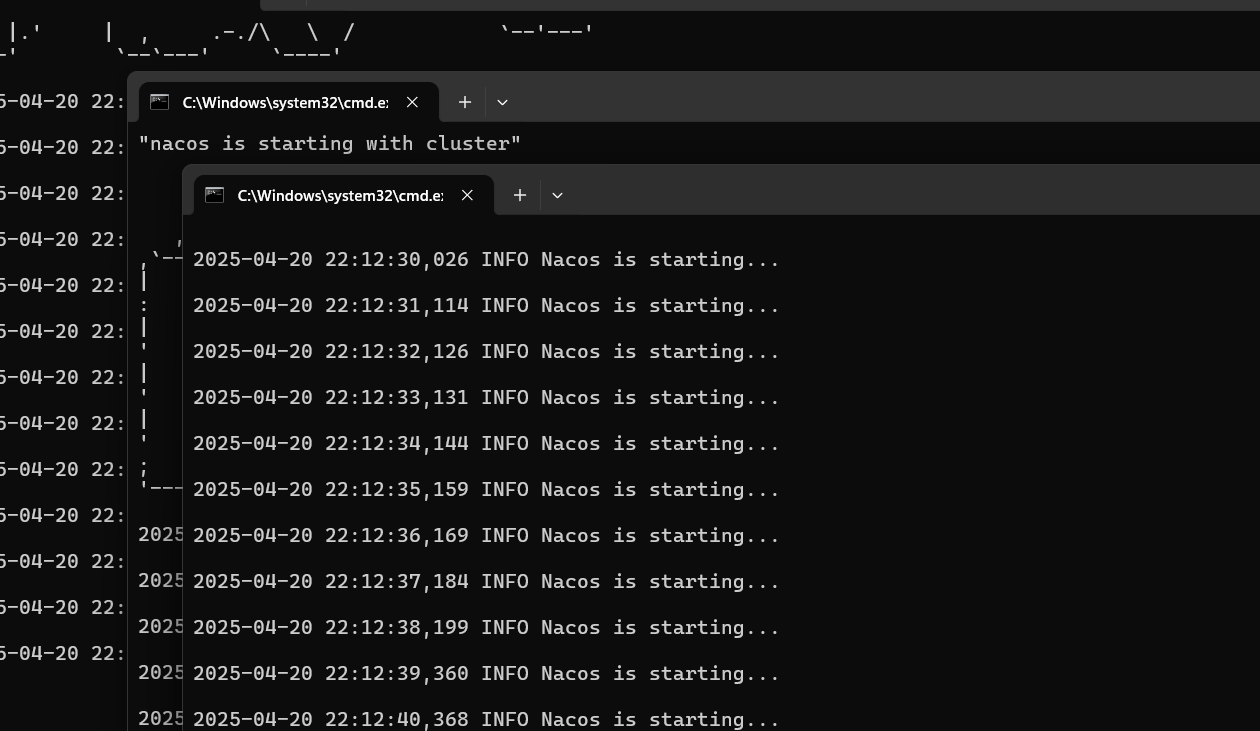
window启动命令 : startup.cmd -m standalone
linux启动命令是: sh startup.sh -m standalone
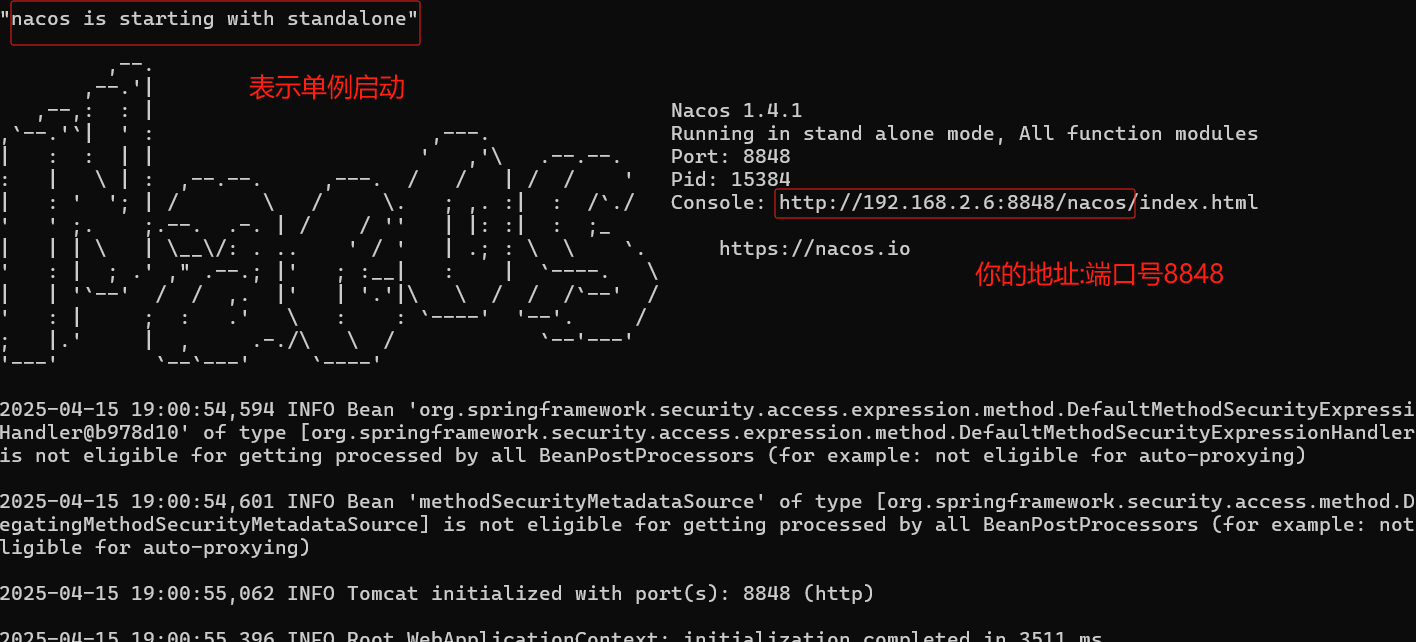
访问nacos
打开浏览器输入http://localhost:8848/nacos,即可访问服务, 默认密码是nacos/nacos
修改模式为单例模式启动方式
右键 startup.cmd 用记事本打开或拖到编译器中
修改为保存
此时可以双击startup.cmd 启动
访问nacos
打开浏览器输入http://localhost:8848/nacos,即可访问服务, 默认密码是nacos/nacos
nacos集群搭建
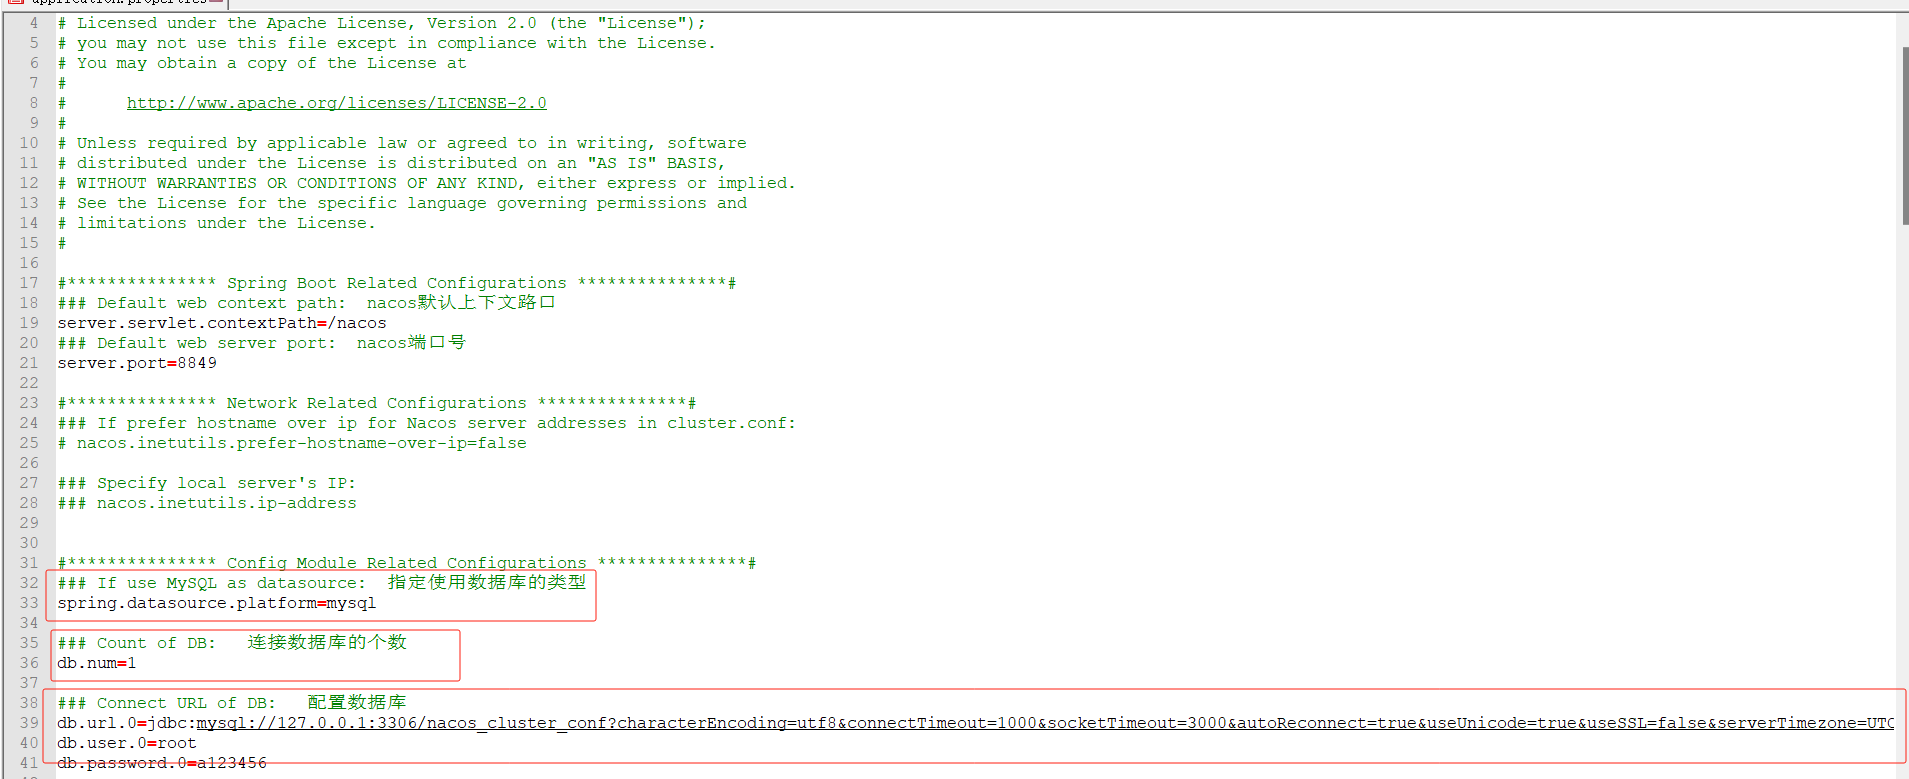
在实际开发过程中,如果使用Nacos的话,为了确保高可用,我们一般都会对其进行集群的部署。Nacos规定集群中Nacos节点的数量需要大于等于3个;同时,单机模式下Nacos的数据默认保存在其内嵌数据库中deby,不方便观察数据存储的基本情况。而且如果集群中启动多个默认配置下的Nacos节点,数据存储是存在一致性问题的。为了解决这个问题,Nacos采用了集中式存储的方式来支持集群化部署,目前只支持MySQL的存储;此外,我们还需要借助Nginx实现负载均衡。这一过程的部署架构图如下所示:
1.配置数据库信息
默认每个nacos都内置了一个deb数据库,如果使用内置的数据库则nacos集群之间无法共享数据。
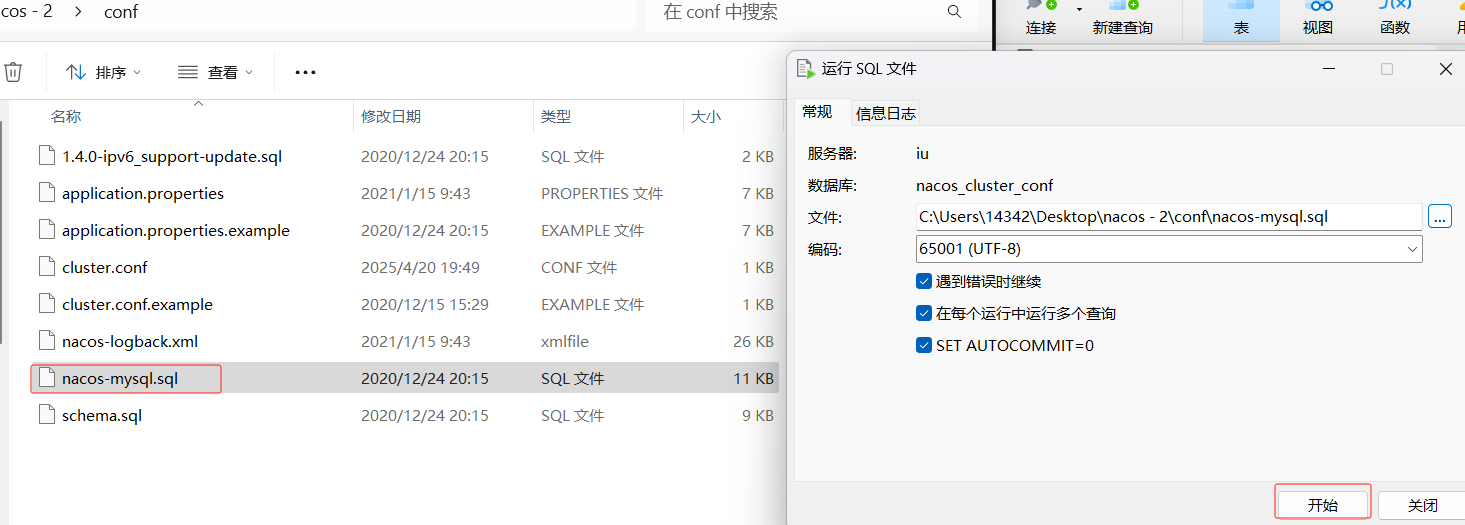
新建一个数据库
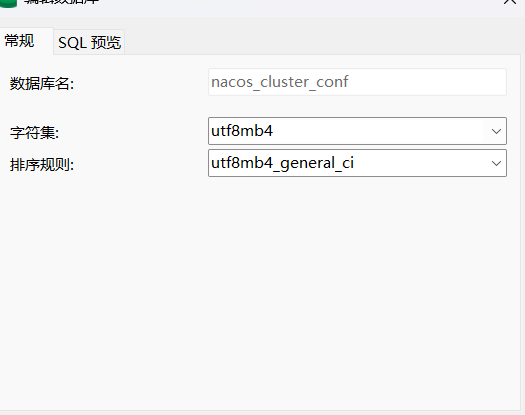
在nacos的conf下,把这个sql放入刚才建的库中
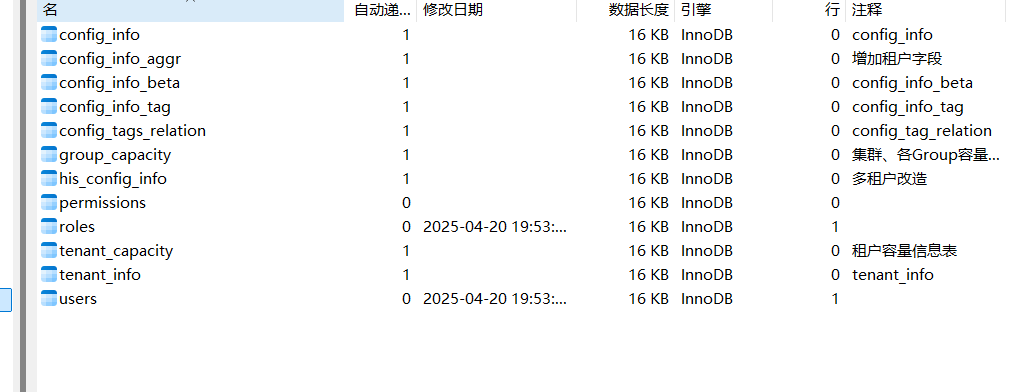
加完刷新会是这几张表
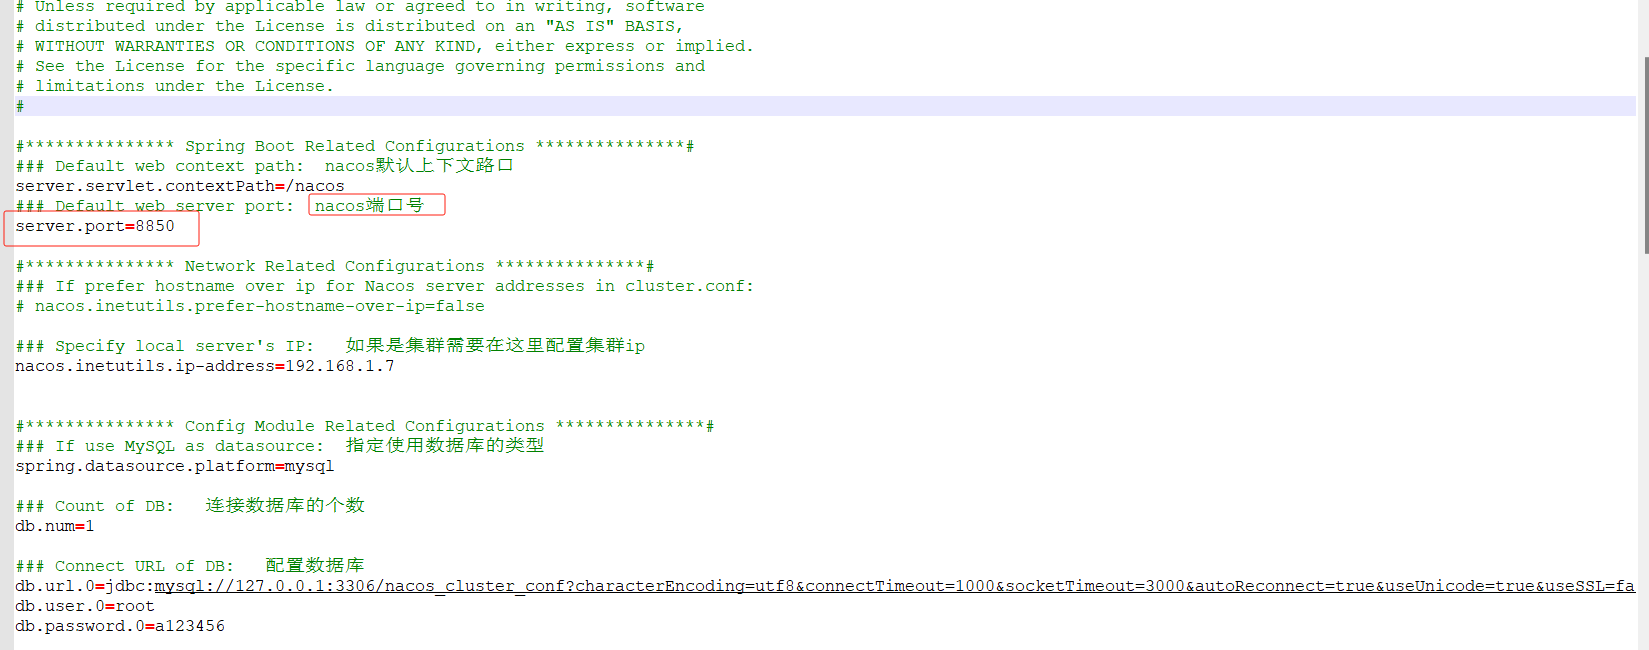
2.指定使用mysql作为数据存储
在nacos的conf下打开这个properties
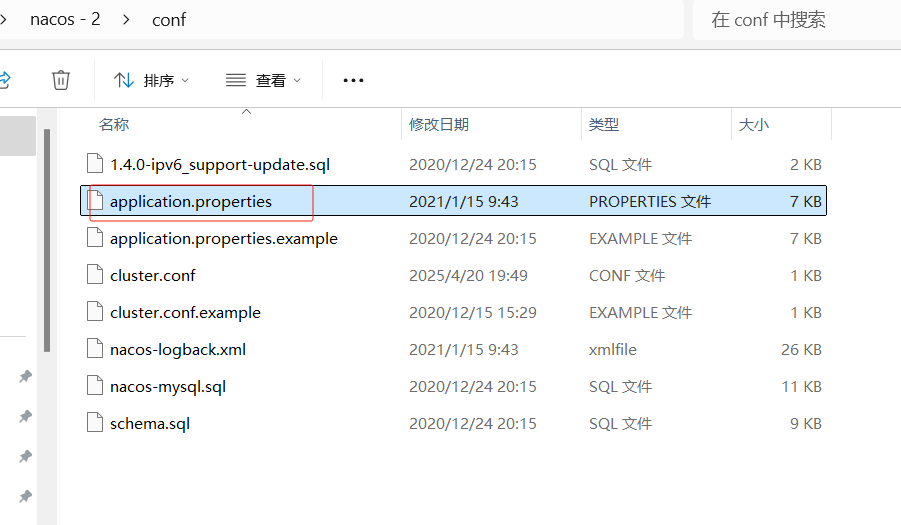
框起来的是要修改的
解开33行
解开36行
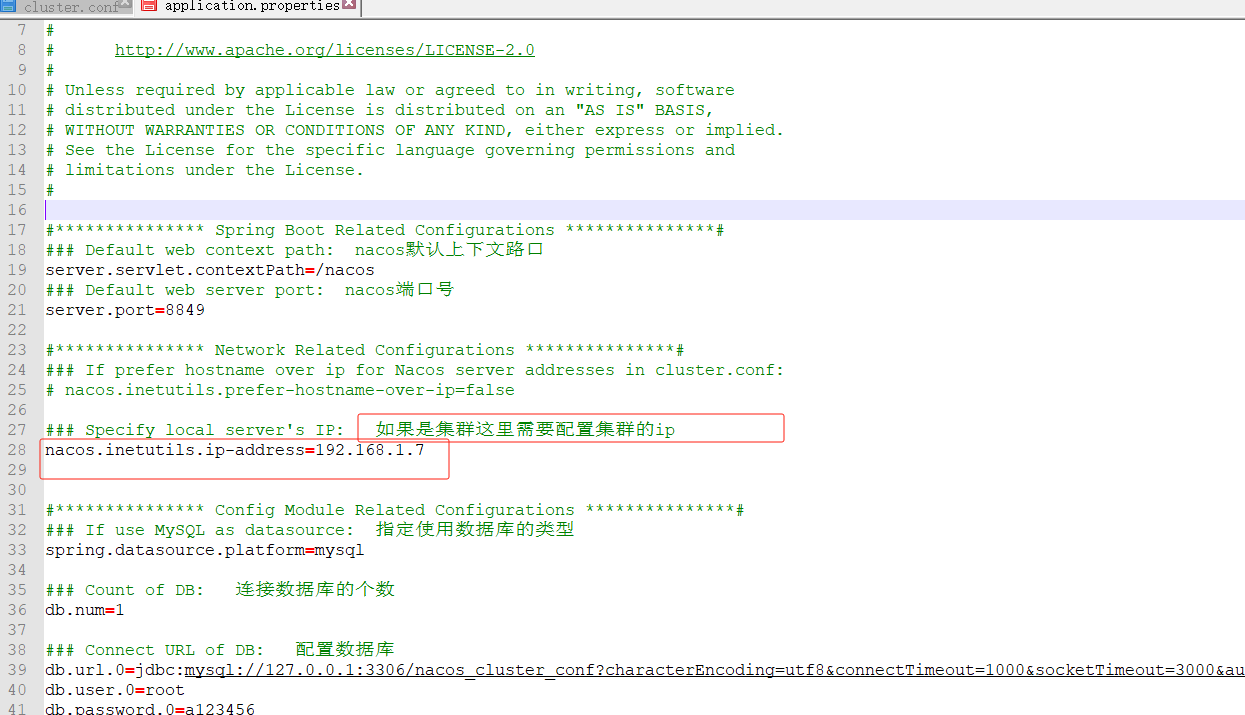
以及配置39、40、41行的数据库信息
解开28行并且配置你集群的ip
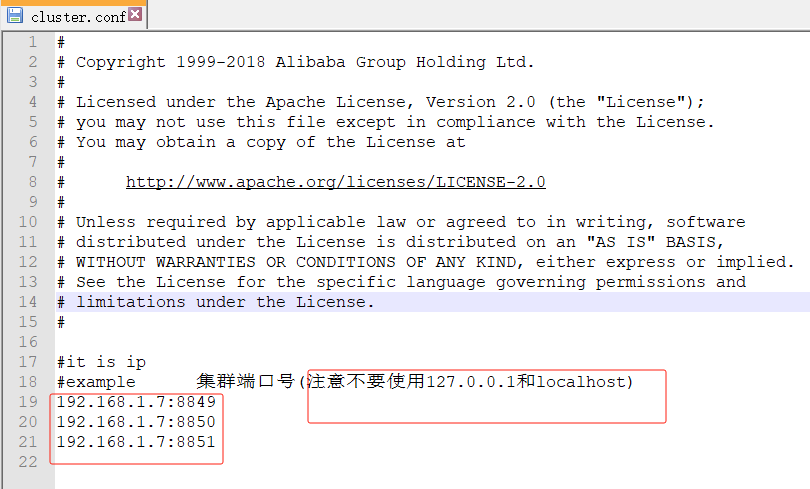
3.配置集群文件
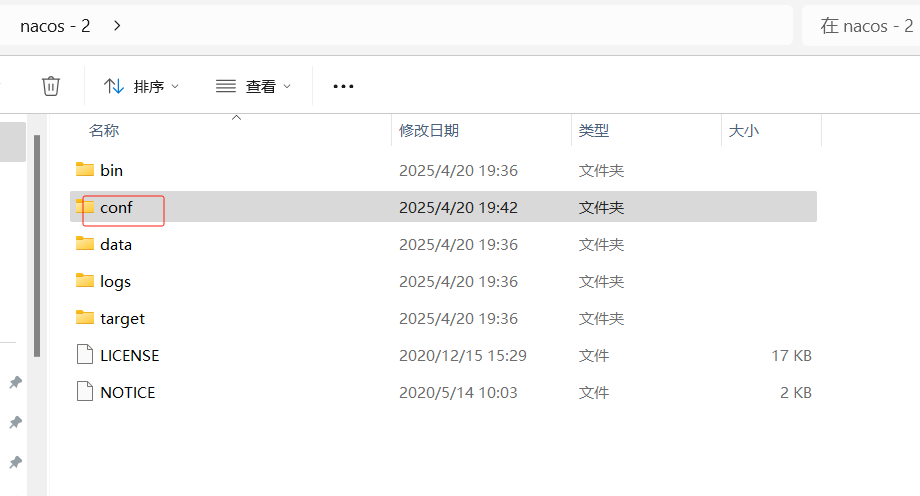
进入到nacos中的conf
复制cluster.conf.example一份改为cluster.conf,然后用记事本打开或者其他打开
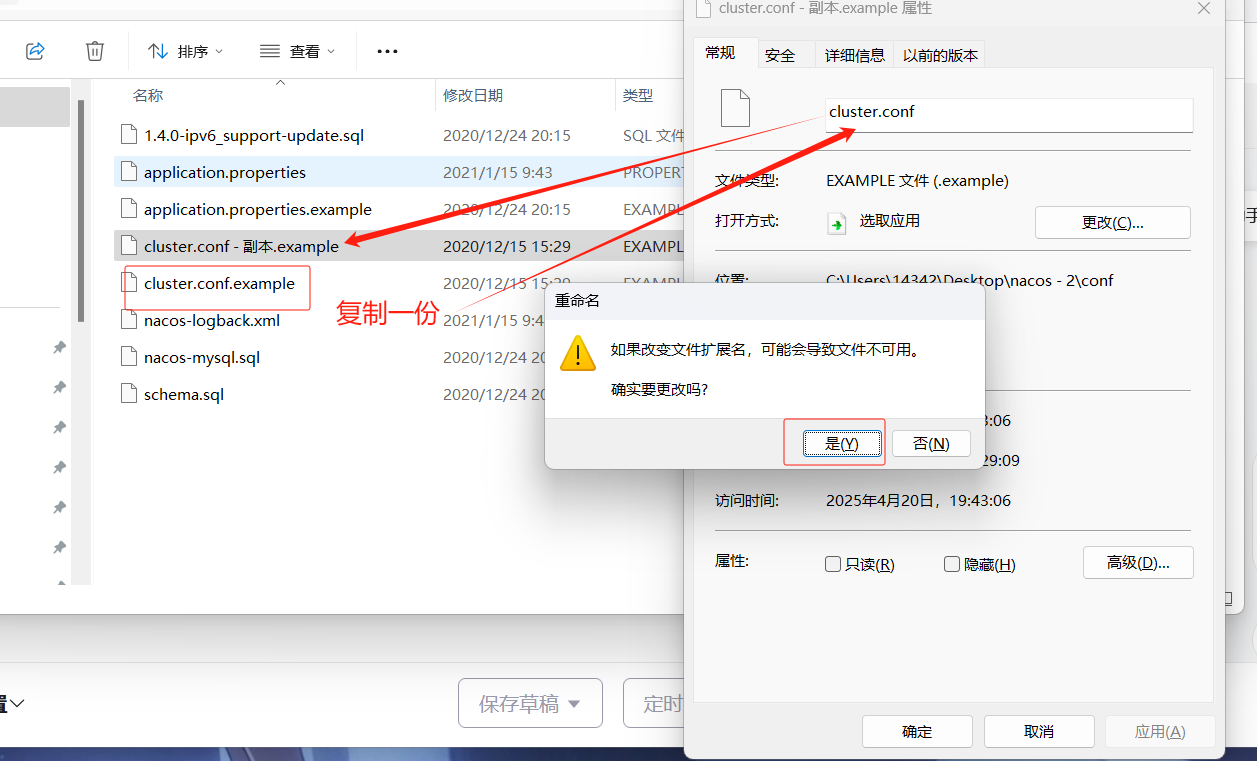
修改配置
注意不要使用127.0.0.1和localhost
#
# Copyright 1999-2018 Alibaba Group Holding Ltd.
#
# Licensed under the Apache License, Version 2.0 (the "License");
# you may not use this file except in compliance with the License.
# You may obtain a copy of the License at
#
# http://www.apache.org/licenses/LICENSE-2.0
#
# Unless required by applicable law or agreed to in writing, software
# distributed under the License is distributed on an "AS IS" BASIS,
# WITHOUT WARRANTIES OR CONDITIONS OF ANY KIND, either express or implied.
# See the License for the specific language governing permissions and
# limitations under the License.
#
#it is ip
#example 集群端口号(注意不要使用127.0.0.1和localhost)
192.168.1.7:8849
192.168.1.7:8850
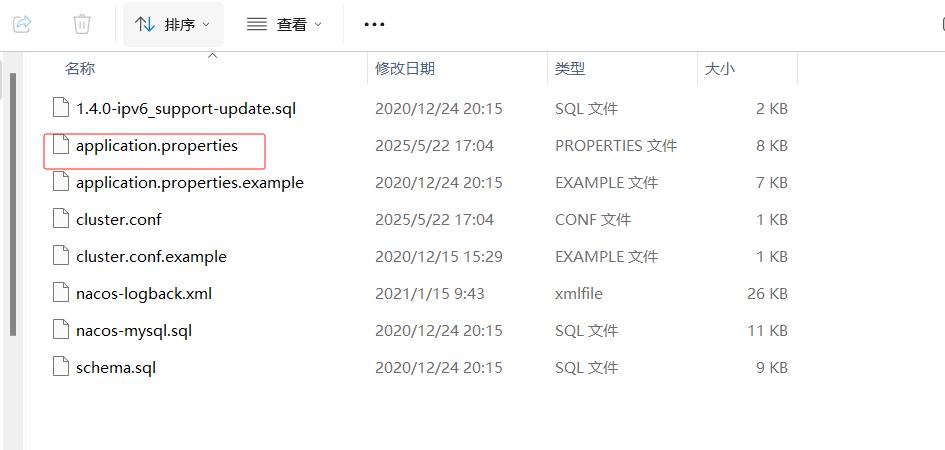
192.168.1.7:88514.复制nacos
直接复制一下写好的nacos,复制两份

5.修改端口号
需要改一下applicant.properties,修改剩下你上面集群配置的端口号就行了
6.集群启动
双击(没配置集群注意要用单例启动)
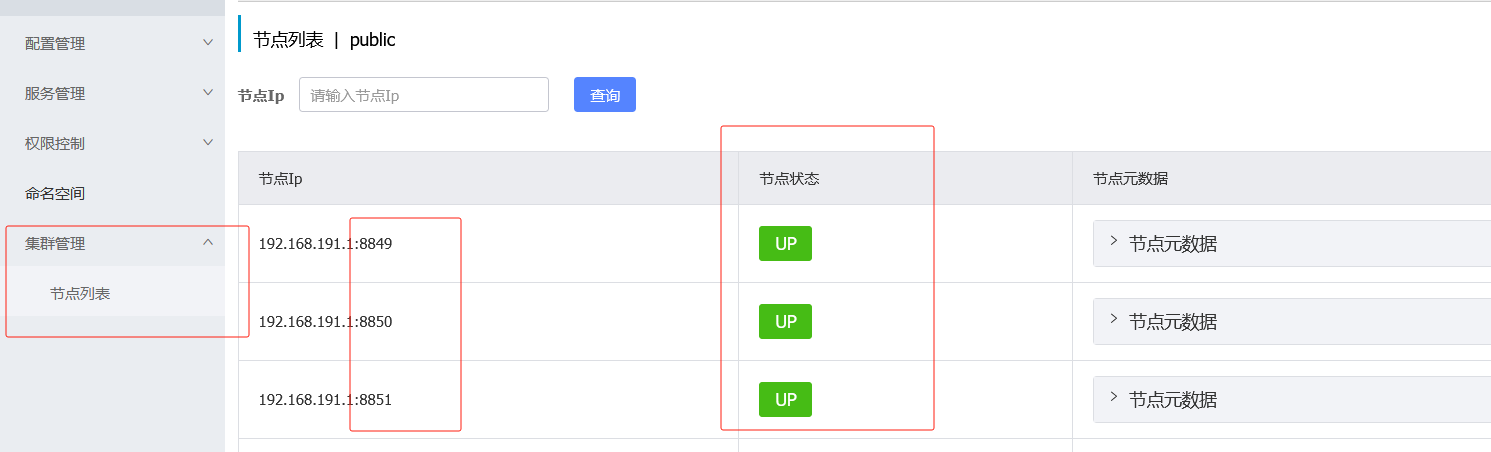
启动三台nacos此时可以任意访问其中一个端口
此时三个端口号任意一个都可以访问到

![]()
![]()
并且可以查看集群节点的信息并且可以查看节点状态,UP就是启动状态,DOWN就是未启动
3.4 将服务注册到 nacos中:
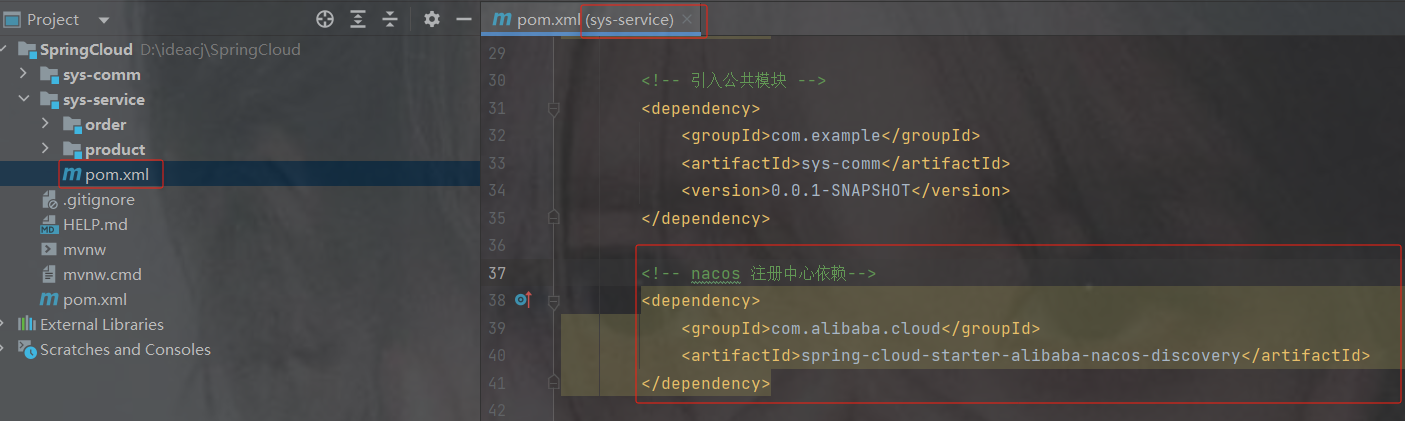
1.在pom.xml中添加nacos的依赖
    com.alibaba.cloud
    spring-cloud-starter-alibaba-nacos-discovery
2. 在application.properties添加nacos的配置
#设置nacos的注册中心地址
spring.cloud.nacos.discovery.server-addr=localhost:8848
#设置nacos的命名空间
spring.application.name=product-service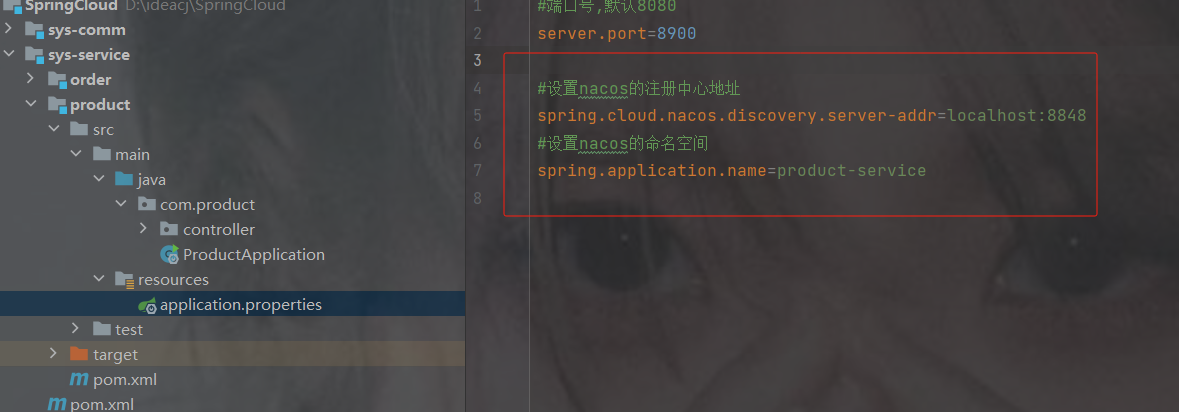
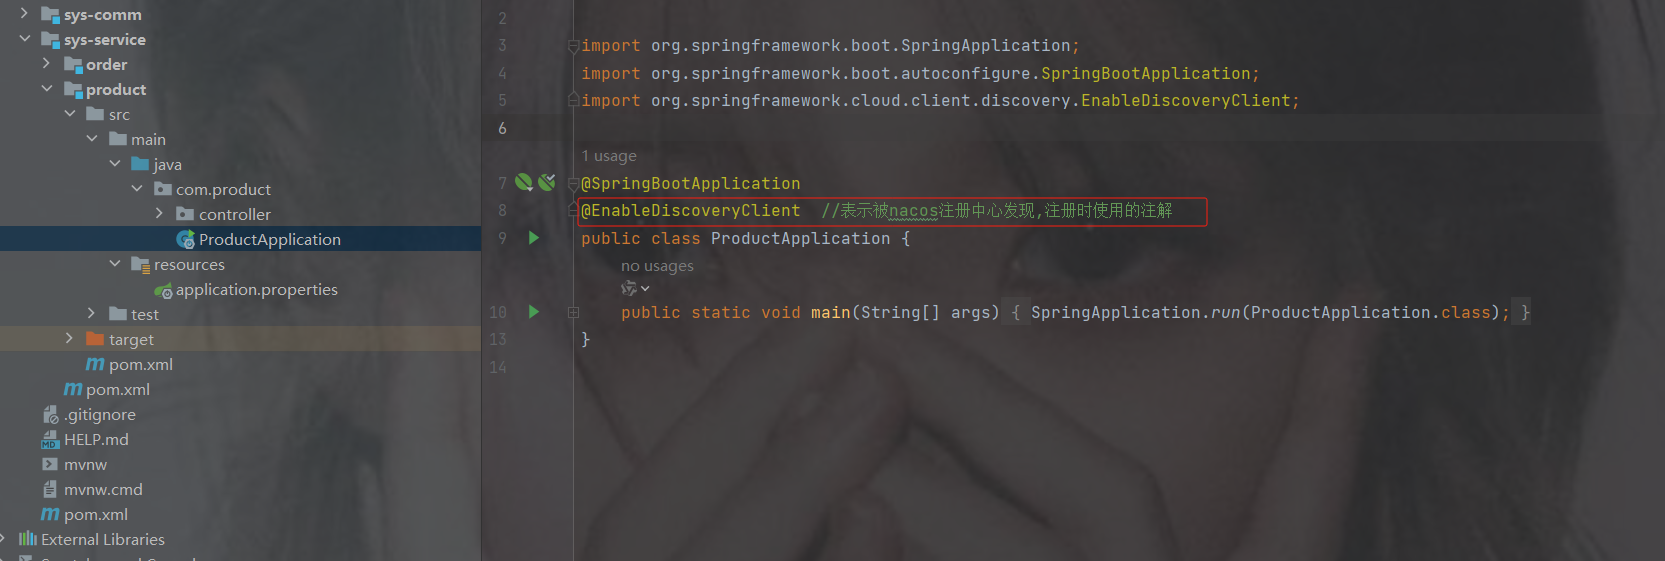
3. 在主启动类上添加nacos的开启注解
@EnableDiscoveryClient //表示被Nacos发现
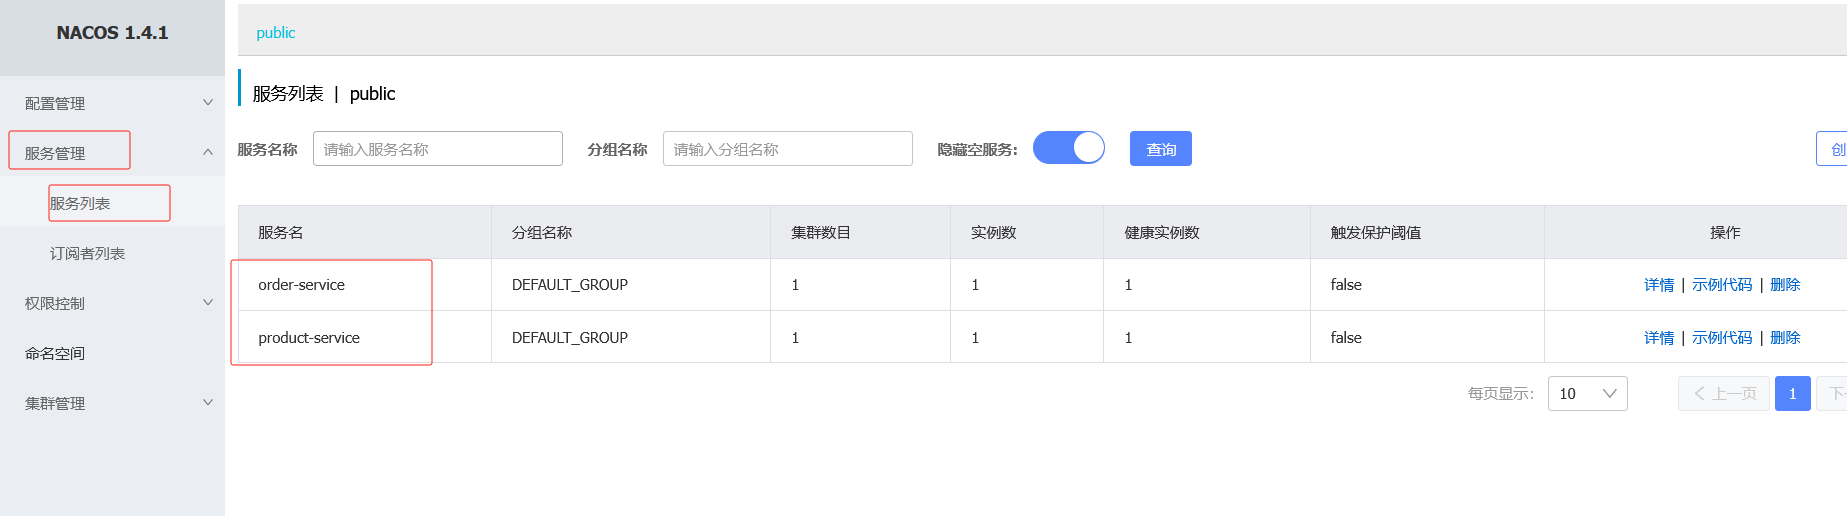
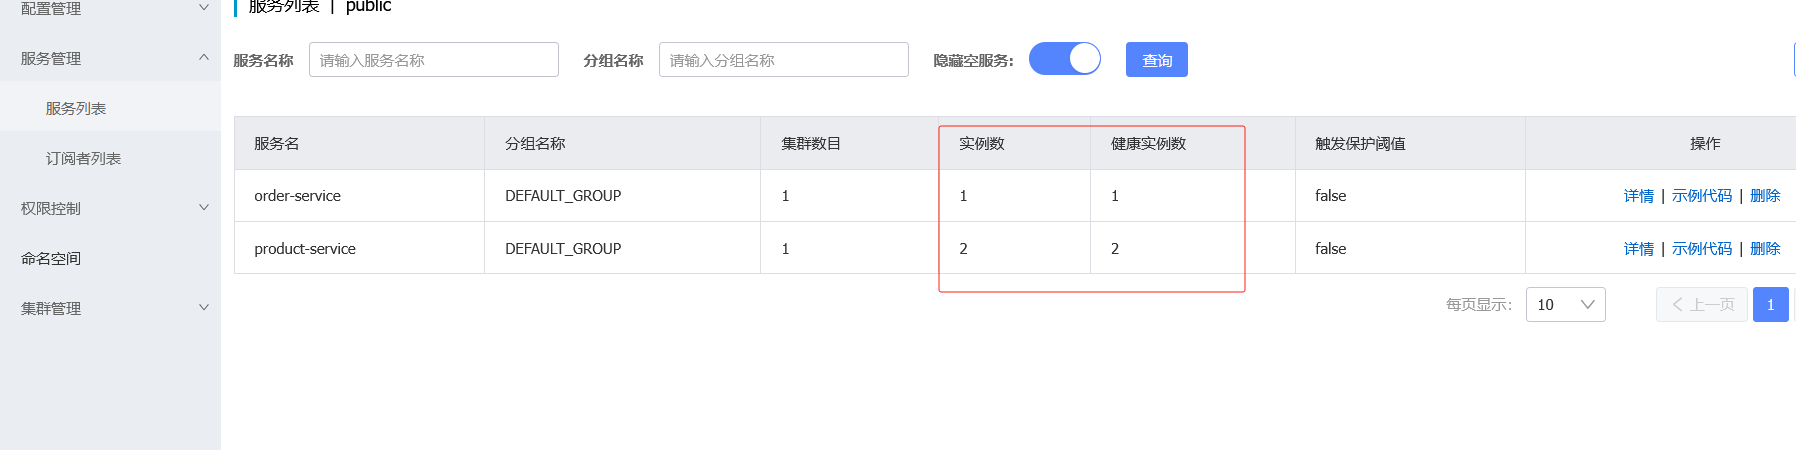
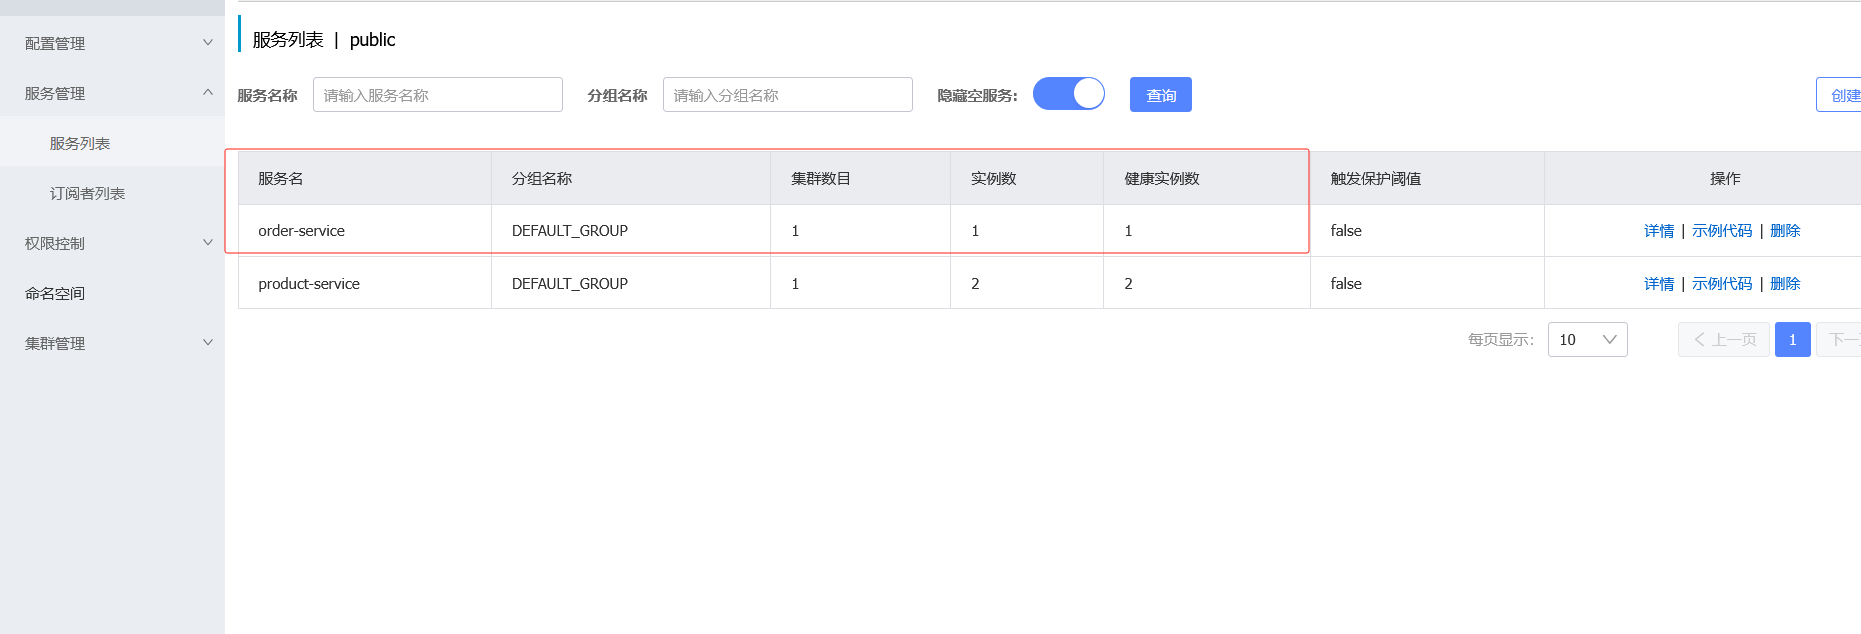
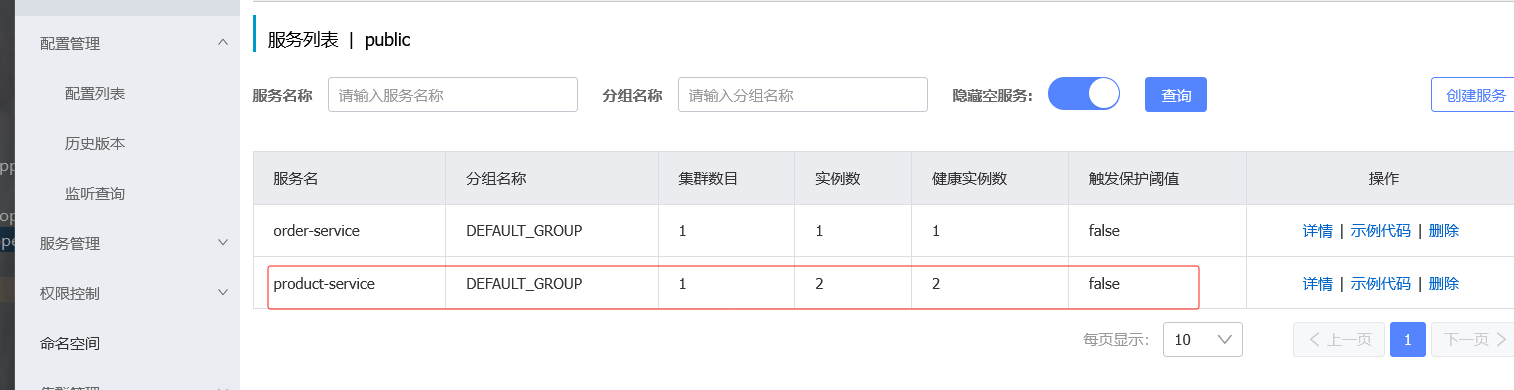
4.观察注册中心的服务列表
重启两个服务后查看nacos
注意:也用相同的 2、3 的方法注册订单模块,properties只需要修改命名空间
3.5 解决订单微服务和商品微服务的路径硬编码DiscoveryClient
这里的路径是硬编码,我们需要变成活的,万一端口号变了就没用了
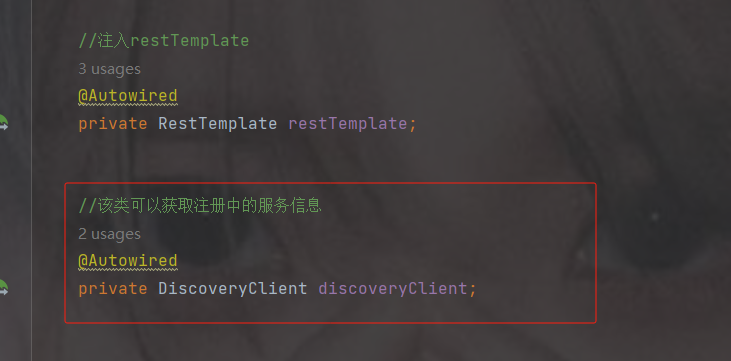
使用 DiscoveryClient:主要用于服务发现,可以获取某个服务的所有实例列表。它并不直接提供负载均衡能力,而是将选择具体实例的逻辑交给开发者实现
之前restTemplate的方式
1.注入DiscoveryClient,自带的不用配置
2.调用getInstances获取示例,传入的参数是注册中心的示例名
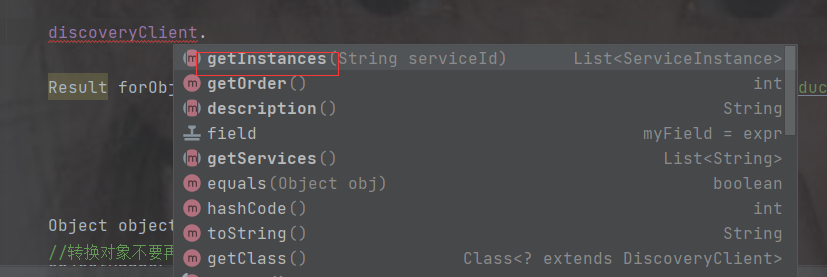
该返回的是个数组类型,因为可能有多个实例
![]()
获取第一个实例后再获取url,打印url
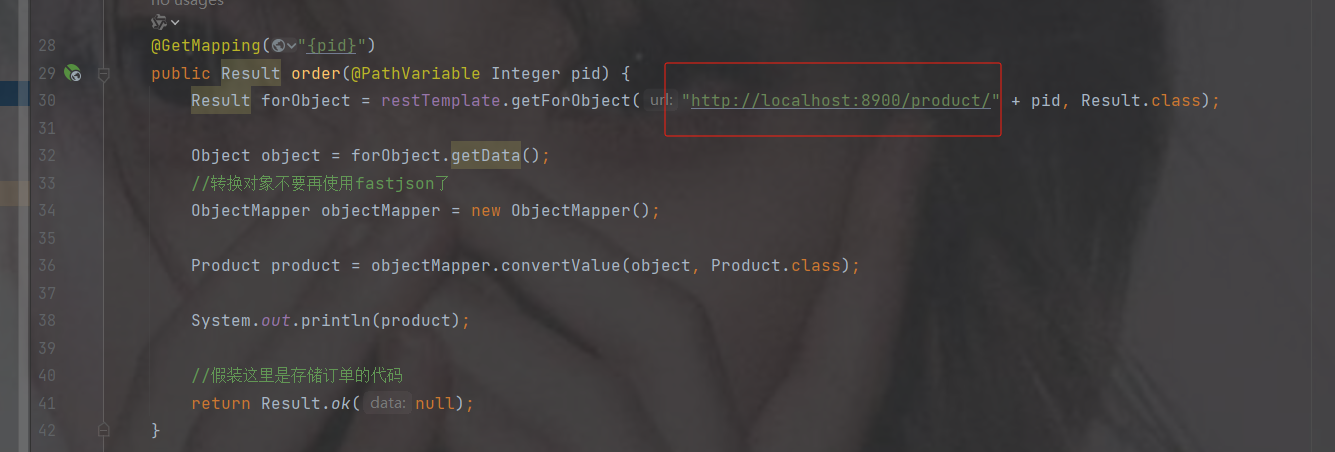
修改路径

代码
package com.order.controller;
import com.comm.entity.Product;
import com.comm.utlis.Result;
import com.fasterxml.jackson.databind.ObjectMapper;
import org.springframework.beans.factory.annotation.Autowired;
import org.springframework.cloud.client.ServiceInstance;
import org.springframework.cloud.client.discovery.DiscoveryClient;
import org.springframework.web.bind.annotation.GetMapping;
import org.springframework.web.bind.annotation.PathVariable;
import org.springframework.web.bind.annotation.RequestMapping;
import org.springframework.web.bind.annotation.RestController;
import org.springframework.web.client.RestTemplate;
import java.util.List;
import java.util.Map;
@RestController
@RequestMapping("/order")
public class OrderController {
//注入restTemplate
@Autowired
private RestTemplate restTemplate;
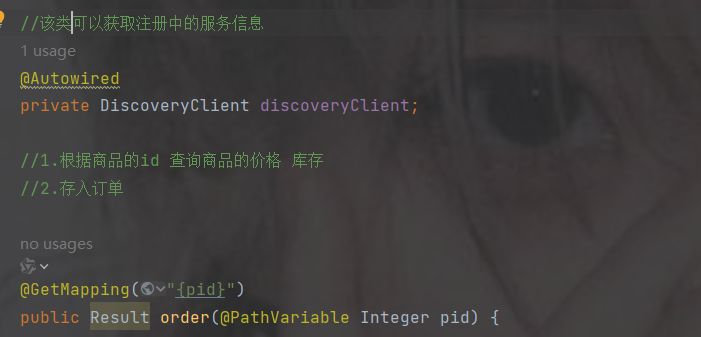
//该类可以获取注册中的服务信息
@Autowired
private DiscoveryClient discoveryClient;
//1.根据商品的id 查询商品的价格 库存
//2.存入订单
@GetMapping("{pid}")
public Result order(@PathVariable Integer pid) {
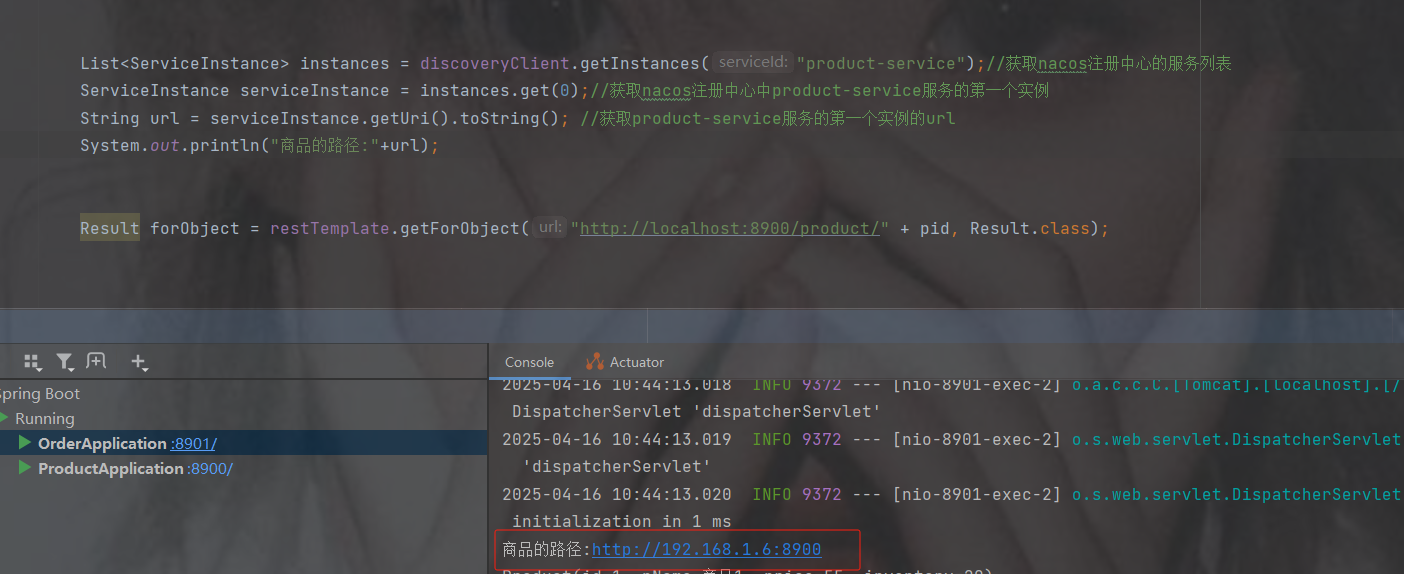
List instances = discoveryClient.getInstances("product-service");//获取nacos注册中心的服务列表
ServiceInstance serviceInstance = instances.get(0);//获取nacos注册中心中product-service服务的第一个实例
String url = serviceInstance.getUri().toString(); //获取product-service服务的第一个实例的url
System.out.println("商品的路径:" + url);
Result forObject = restTemplate.getForObject(url + "/product/" + pid, Result.class);
Object object = forObject.getData();
//转换对象不要再使用fastjson了
ObjectMapper objectMapper = new ObjectMapper();
Product product = objectMapper.convertValue(object, Product.class);
System.out.println(product);
//假装这里是存储订单的代码
return Result.ok(null);
}
} 4. 负载均衡
4.1 什么是负载均衡
通俗的讲, 负载均衡就是将负载(工作任务,访问请求)进行分摊到多个操作单元(服务器,组件)上 进行执行。
根据负载均衡发生位置的不同,一般分为服务端负载均衡和客户端负载均衡。
服务端负载均衡指的是发生在服务提供者一方,比如常见的nginx负载均衡
而客户端负载均衡指的是发生在服务请求的一方,也就是在发送请求之前已经选好了由哪个实例处理请 求
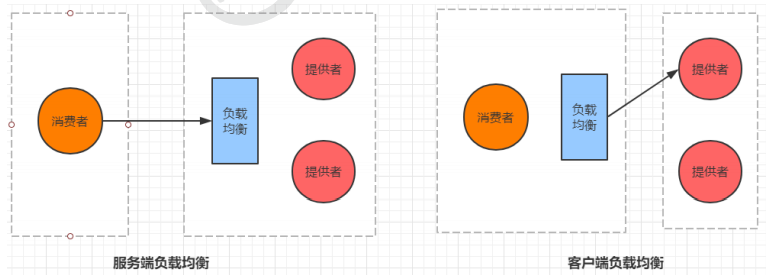
我们在微服务调用关系中一般会选择客户端负载均衡,也就是在服务调用的一方来决定服务由哪个提供 者执行。
4.2 手动负载均衡
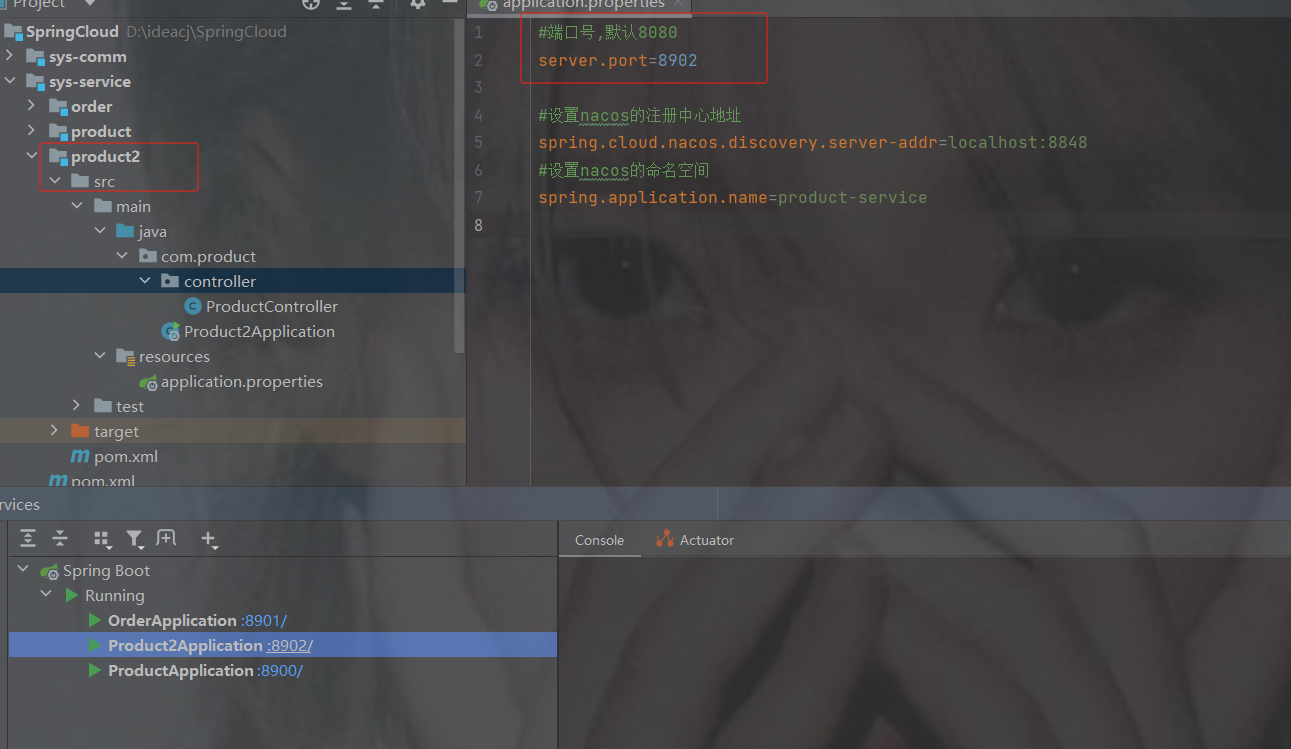
再创建一个商品的服务,和上面的商品的所有一致
注意: 除了端口号要修改和修改主启动类的名字,其他不动,注意命名空间要一样才能算两个实例
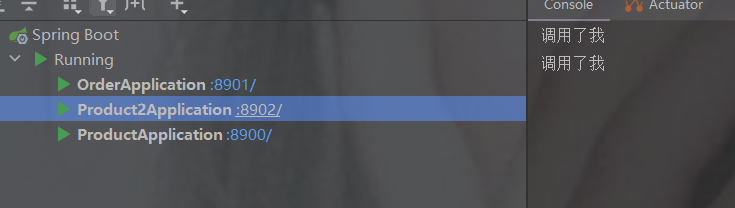
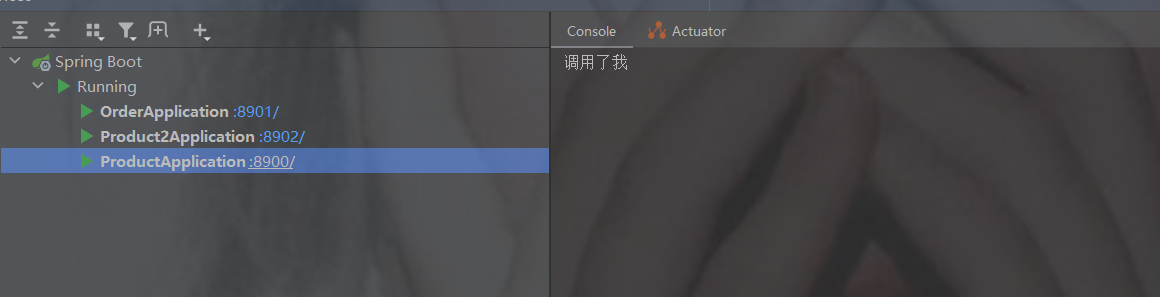
为了方便知道哪一个服务被调用,修改两个商品controller控制台打印如下图
此时重启两个商品服务后查看nacos列表就有两个实例数
点击nacos详情可以查看如下,下线就会停掉服务

默认是随机
修改订单controller
使用DiscoveryClient
discovery根据服务名称调用服务列表
用随机数随机,大小是服务列表的长度

代码
package com.order.controller;
import com.comm.entity.Product;
import com.comm.utlis.Result;
import com.fasterxml.jackson.databind.ObjectMapper;
import org.springframework.beans.factory.annotation.Autowired;
import org.springframework.cloud.client.ServiceInstance;
import org.springframework.cloud.client.discovery.DiscoveryClient;
import org.springframework.web.bind.annotation.GetMapping;
import org.springframework.web.bind.annotation.PathVariable;
import org.springframework.web.bind.annotation.RequestMapping;
import org.springframework.web.bind.annotation.RestController;
import org.springframework.web.client.RestTemplate;
import java.util.List;
import java.util.Map;
import java.util.Random;
@RestController
@RequestMapping("/order")
public class OrderController {
    //注入restTemplate
    @Autowired
    private RestTemplate restTemplate;
    //该类可以获取注册中的服务信息
    @Autowired
    private DiscoveryClient discoveryClient;
    //1.根据商品的id 查询商品的价格 库存
    //2.存入订单
    @GetMapping("{pid}")
    public Result order(@PathVariable Integer pid) {
        List instances = discoveryClient.getInstances("product-service");//获取nacos注册中心的服务列表
        int index = new Random().nextInt(instances.size());//随机获取一个实例的下标
        ServiceInstance serviceInstance = instances.get(index);//获取nacos注册中心中product-service的随机示例
        String url = serviceInstance.getUri().toString(); //获取实例的url
        System.out.println("商品的路径:" + url);
        Result forObject = restTemplate.getForObject(url + "/product/" + pid, Result.class);
        Object object = forObject.getData();
        //转换对象不要再使用fastjson了
        ObjectMapper objectMapper = new ObjectMapper();
        Product product = objectMapper.convertValue(object, Product.class);
        System.out.println(product);
        //假装这里是存储订单的代码
        return Result.ok(null);
    }
}
两个服务调用情况
负载均衡
代码
package com.order.controller;
import com.comm.entity.Product;
import com.comm.utlis.Result;
import com.fasterxml.jackson.databind.ObjectMapper;
import org.springframework.beans.factory.annotation.Autowired;
import org.springframework.cloud.client.ServiceInstance;
import org.springframework.cloud.client.discovery.DiscoveryClient;
import org.springframework.web.bind.annotation.GetMapping;
import org.springframework.web.bind.annotation.PathVariable;
import org.springframework.web.bind.annotation.RequestMapping;
import org.springframework.web.bind.annotation.RestController;
import org.springframework.web.client.RestTemplate;
import java.util.List;
import java.util.Map;
import java.util.Random;
@RestController
@RequestMapping("/order")
public class OrderController {
//注入restTemplate
@Autowired
private RestTemplate restTemplate;
//该类可以获取注册中的服务信息
@Autowired
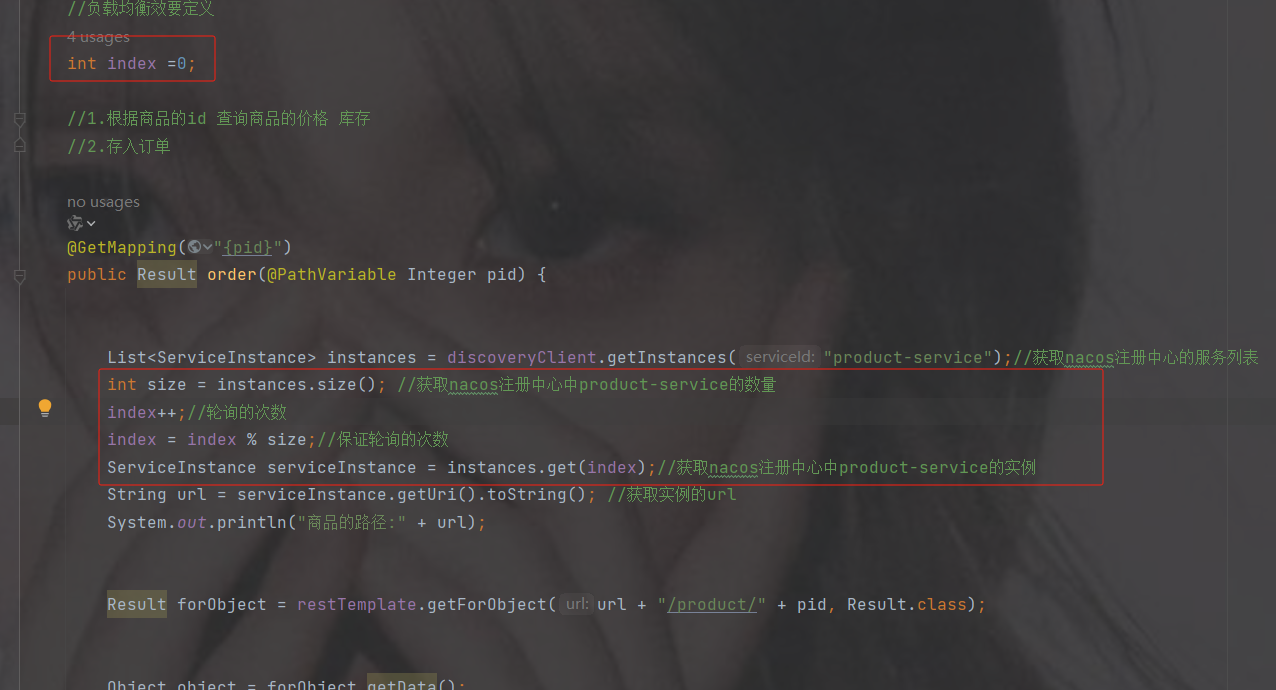
private DiscoveryClient discoveryClient;
//负载均衡效要定义
int index =0;
//1.根据商品的id 查询商品的价格 库存
//2.存入订单
@GetMapping("{pid}")
public Result order(@PathVariable Integer pid) {
List instances = discoveryClient.getInstances("product-service");//获取nacos注册中心的服务列表
int size = instances.size(); //获取nacos注册中心中product-service的数量
index++;//轮询的次数
index = index % size;//保证轮询的次数
ServiceInstance serviceInstance = instances.get(index);//获取nacos注册中心中product-service的实例
String url = serviceInstance.getUri().toString(); //获取实例的url
System.out.println("商品的路径:" + url);
Result forObject = restTemplate.getForObject(url + "/product/" + pid, Result.class);
Object object = forObject.getData();
//转换对象不要再使用fastjson了
ObjectMapper objectMapper = new ObjectMapper();
Product product = objectMapper.convertValue(object, Product.class);
System.out.println(product);
//假装这里是存储订单的代码
return Result.ok(null);
}
} 4.3 使用springcloud提供的负载均衡组件--LoadBalancer
我们自己可以手动完成负载均衡。那么springcloud也会提供一个负载均衡组件。
早期使用的为ribbon组件.属于netflix公司。但是 ribbon停止更新。
在 Spring Cloud 2020.0.0 版本之后已经被移除了,取而代之的是Spring Cloud
的 LoadBalancer,而且 Ribbon 也已经不再维护,所以它也是 Spring 官方推荐的负载均衡解决方案。
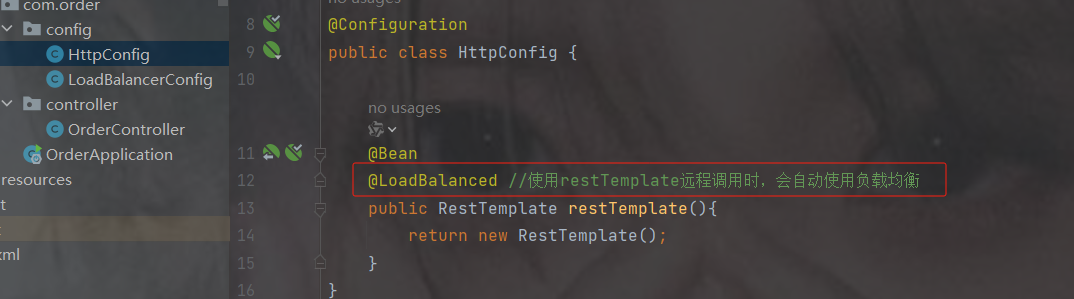
默认负载均衡
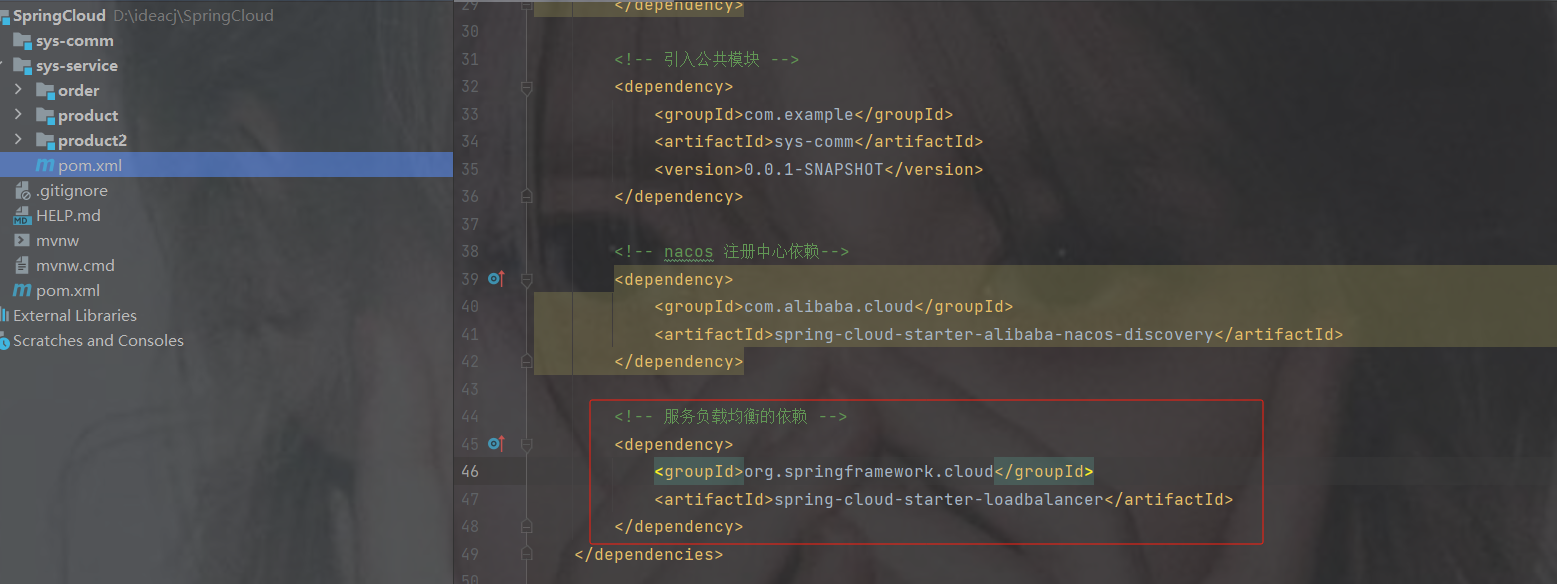
1.添加依赖
            org.springframework.cloud
            spring-cloud-starter-loadbalancer
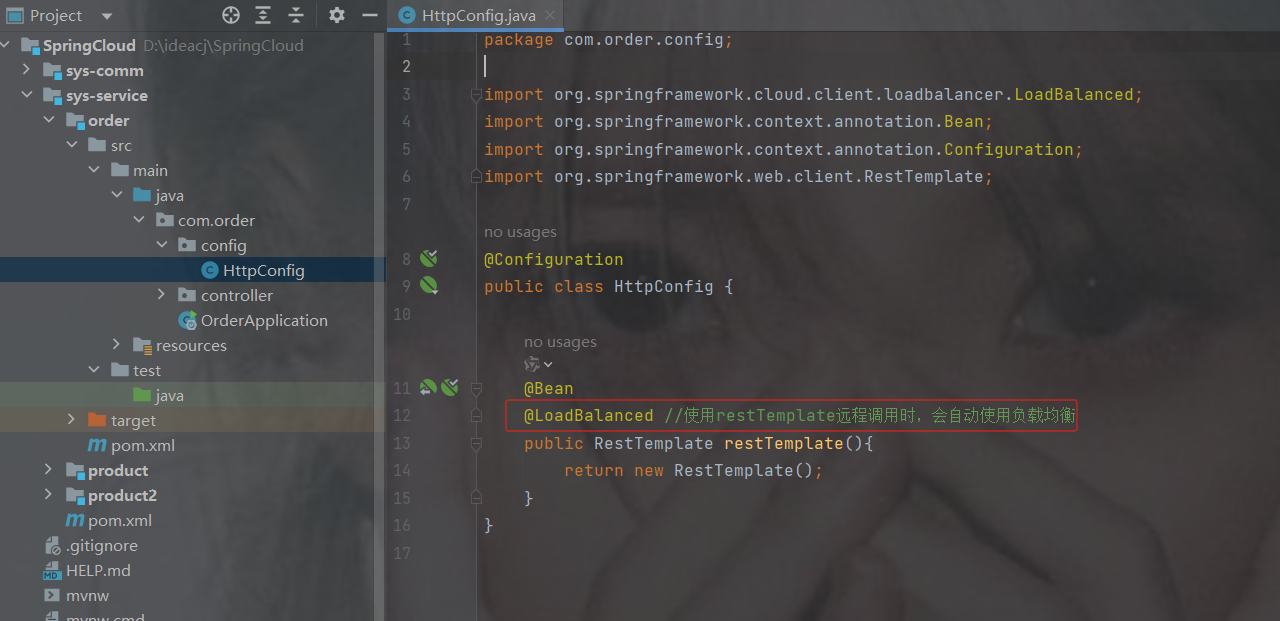
2.在RestTemplate类上使用@LoadBalanced
@LoadBalanced //使用restTemplate远程调用时,会自动使用负载均衡注意开启此注解,那么 restTemplate获取的是服务名而不再是url
3.修改OrderController代码
注意,开启负载均衡后,
restTemplate里url调用的是http://服务名称/接口路径,而不是url
package com.order.controller;
import com.comm.entity.Product;
import com.comm.utlis.Result;
import com.fasterxml.jackson.databind.ObjectMapper;
import org.springframework.beans.factory.annotation.Autowired;
import org.springframework.cloud.client.ServiceInstance;
import org.springframework.cloud.client.discovery.DiscoveryClient;
import org.springframework.cloud.client.loadbalancer.LoadBalanced;
import org.springframework.cloud.client.loadbalancer.LoadBalancerClient;
import org.springframework.web.bind.annotation.GetMapping;
import org.springframework.web.bind.annotation.PathVariable;
import org.springframework.web.bind.annotation.RequestMapping;
import org.springframework.web.bind.annotation.RestController;
import org.springframework.web.client.RestTemplate;
import java.net.URI;
import java.util.List;
import java.util.Map;
import java.util.Random;
@RestController
@RequestMapping("/order")
public class OrderController {
    //注入restTemplate
    @Autowired
    private RestTemplate restTemplate;
    /**
     * 使用springcloud 提供 的负载均衡
     */
    @GetMapping("/{pid}")
    public Result order(@PathVariable Integer pid) {
        //1.根据商品的id 查询商品的价格 库存
        //2.存入订单
        // http://product-service/product/1     注意http://服务的名称不是url/接口路径
        Result forObject = restTemplate.getForObject("http://product-service/" + "/product/" + pid, Result.class);
        Object object = forObject.getData();
        //转换对象不要再使用fastjson了
        ObjectMapper objectMapper = new ObjectMapper();
        Product product = objectMapper.convertValue(object, Product.class);
        System.out.println(product);
        //假装这里是存储订单的代码
        return Result.ok(null);
    }
}
随机
1.加配置策略
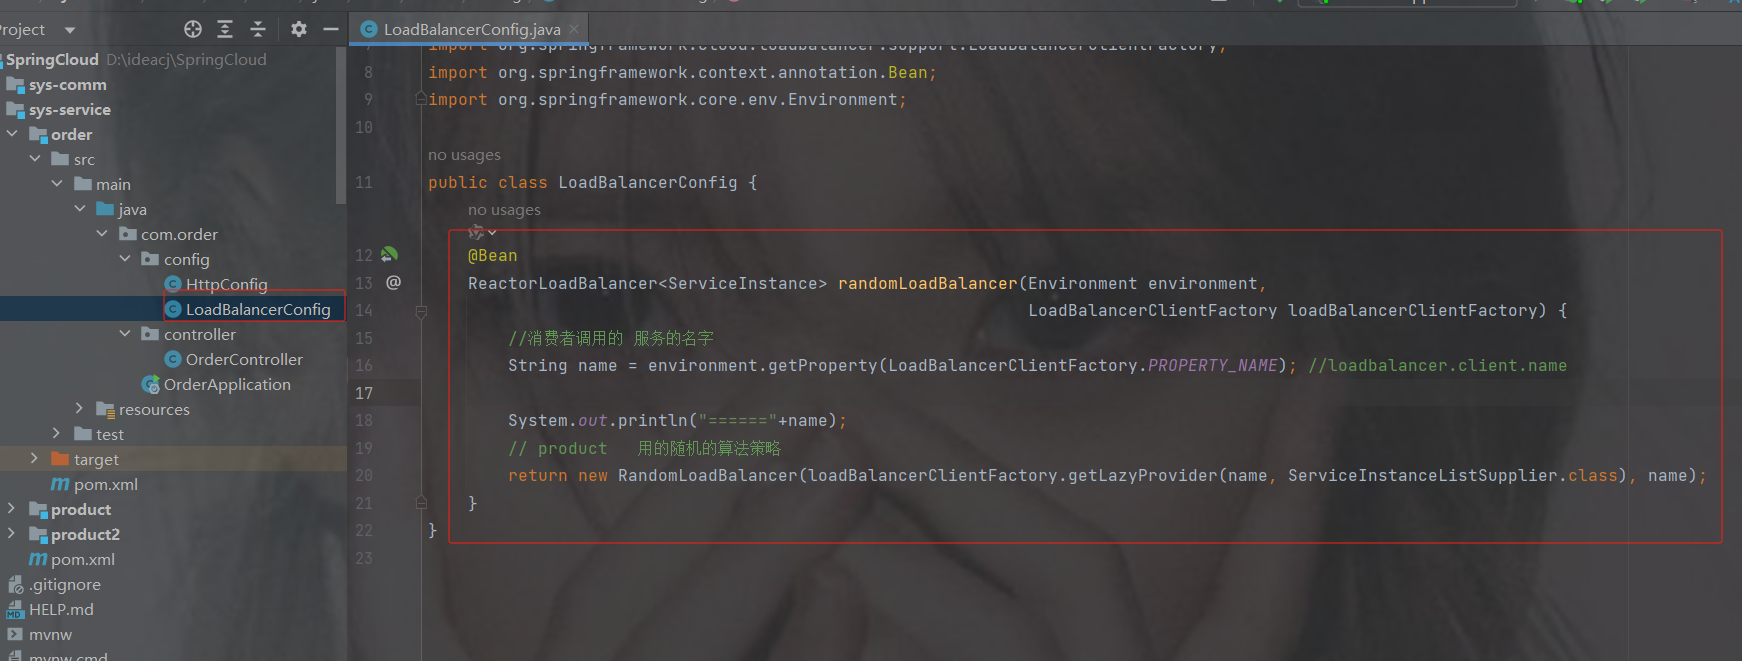
package com.order.config;
import org.springframework.cloud.client.ServiceInstance;
import org.springframework.cloud.loadbalancer.core.RandomLoadBalancer;
import org.springframework.cloud.loadbalancer.core.ReactorLoadBalancer;
import org.springframework.cloud.loadbalancer.core.ServiceInstanceListSupplier;
import org.springframework.cloud.loadbalancer.support.LoadBalancerClientFactory;
import org.springframework.context.annotation.Bean;
import org.springframework.core.env.Environment;
/* 随机算法的策略 */
public class LoadBalancerConfig {
    @Bean
    ReactorLoadBalancer randomLoadBalancer(Environment environment,
                                                            LoadBalancerClientFactory loadBalancerClientFactory) {
        //消费者调用的 服务的名字
        String name = environment.getProperty(LoadBalancerClientFactory.PROPERTY_NAME); //loadbalancer.client.name
        System.out.println("======"+name);
        // product   用的随机的算法策略
        return new RandomLoadBalancer(loadBalancerClientFactory.getLazyProvider(name, ServiceInstanceListSupplier.class), name);
    }
}
2.restTemplate加注解
@LoadBalanced,已加就不用加了
3.加注解@LoadBalancerClient
如果使用随机策略就加此注解,value是服务的名称,configuration是填写配置的类
如用不用随机策略就注掉此注解
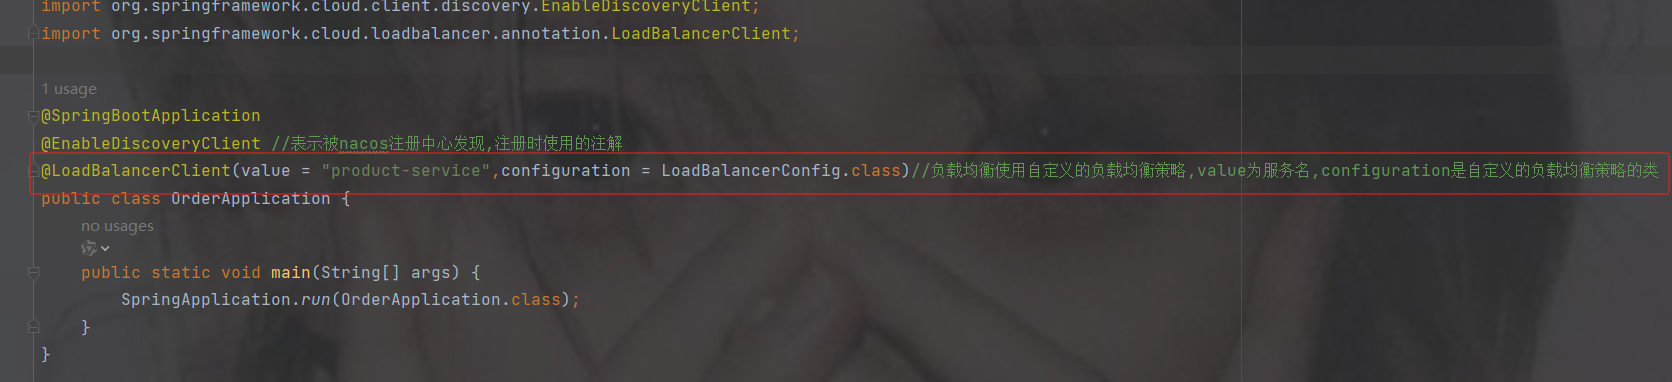
package com.order;
import com.order.config.LoadBalancerConfig;
import org.springframework.boot.SpringApplication;
import org.springframework.boot.autoconfigure.SpringBootApplication;
import org.springframework.cloud.client.discovery.EnableDiscoveryClient;
import org.springframework.cloud.loadbalancer.annotation.LoadBalancerClient;
import org.springframework.cloud.loadbalancer.annotation.LoadBalancerClients;
@SpringBootApplication
@EnableDiscoveryClient //表示被nacos注册中心发现,注册时使用的注解
@LoadBalancerClient(value = "product-service",configuration = LoadBalancerConfig.class)//负载均衡使用自定义的负载均衡策略,value为服务名,configuration是自定义的负载均衡策略的类
public class OrderApplication {
    public static void main(String[] args) {
        SpringApplication.run(OrderApplication.class);
    }
}
4.4 LoadBalancerClients
单个的负载均衡策略配置查看上面随机里的4.3里的随机3
如果想让所有的服务使用随机策略使用@LoadBalancerClients
只需要指定配置类

package com.order;
import com.order.config.LoadBalancerConfig;
import org.springframework.boot.SpringApplication;
import org.springframework.boot.autoconfigure.SpringBootApplication;
import org.springframework.cloud.client.discovery.EnableDiscoveryClient;
import org.springframework.cloud.loadbalancer.annotation.LoadBalancerClient;
import org.springframework.cloud.loadbalancer.annotation.LoadBalancerClients;
@SpringBootApplication
@EnableDiscoveryClient //表示被nacos注册中心发现,注册时使用的注解
@LoadBalancerClients(defaultConfiguration = LoadBalancerConfig.class)//如果有多个服务想用随机策略,则使用这个注解,默认的负载均衡策略为LoadBalancerConfig.class类
public class OrderApplication {
    public static void main(String[] args) {
        SpringApplication.run(OrderApplication.class);
    }
}多个服务指定某一个服务才能使用负载均衡策略

package com.order;
import com.order.config.LoadBalancerConfig;
import org.springframework.boot.SpringApplication;
import org.springframework.boot.autoconfigure.SpringBootApplication;
import org.springframework.cloud.client.discovery.EnableDiscoveryClient;
import org.springframework.cloud.loadbalancer.annotation.LoadBalancerClient;
import org.springframework.cloud.loadbalancer.annotation.LoadBalancerClients;
@SpringBootApplication
@EnableDiscoveryClient //表示被nacos注册中心发现,注册时使用的注解
/**
 * 多个服务指定某一个服务才能使用负载均衡策略
 */
@LoadBalancerClients(
        @LoadBalancerClient(value = "product-service",configuration = LoadBalancerConfig.class)
)
public class OrderApplication {
    public static void main(String[] args) {
        SpringApplication.run(OrderApplication.class);
    }
}
5. openfeign完成服务调用
原来使用restTemplate完成服务之间的调用: 它不符合我们的编程习惯。
在某层需要另一层的对象时,直接通过@Autowire注入,并通过对象调用其他的方法,传入相关的参数,这才是我们的习惯。比如像下代码class UserController{
@Autowire
UserService userService;userSerice.show(15);
}
class UserService{
public void show(int a){}
}
openFeign适合调用本地服务,restTemplate适合调用第三方服务的接口.
5.1 什么是OpenFeign
OpenFeign是Spring Cloud提供的一个声明式的伪Http客户端,它使得调用远程服务就像调用本地服务一样简单,只需要创建一个接口并添加一个注解即可。
Nacos很好的兼容了OpenFeign,Feign负载均衡默认集成了 SpringCloudLoadBalanced,所以在Nacos下使用OpenFegin默认就实现了负载均衡的效果。
5.2 如何使用OpenFeign
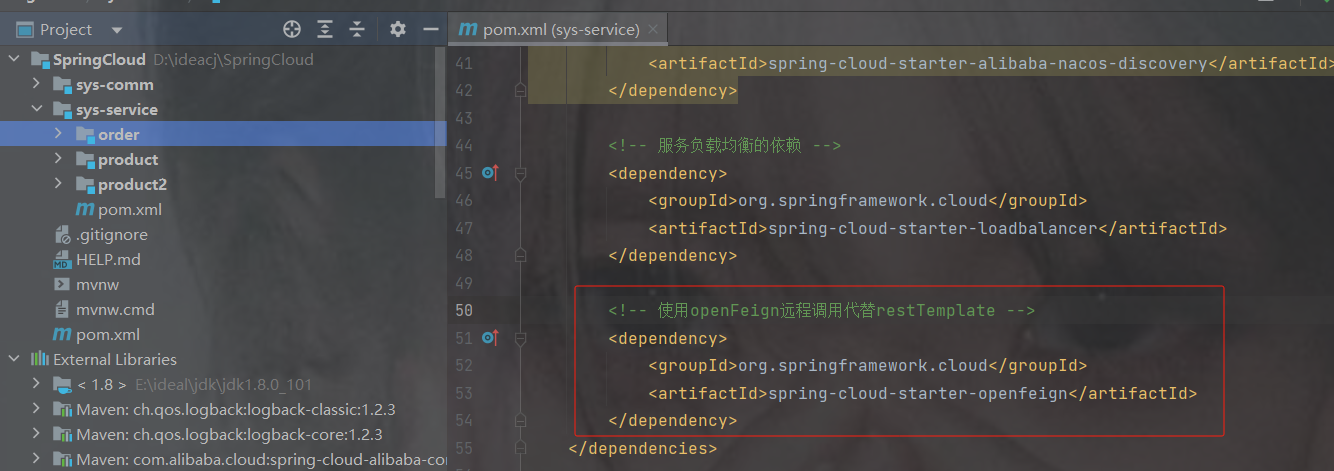
1.加依赖
            org.springframework.cloud
            spring-cloud-starter-openfeign
2.创建OpenFeign接口
在order创建feign的包,调用哪个服务就取哪个服务的名
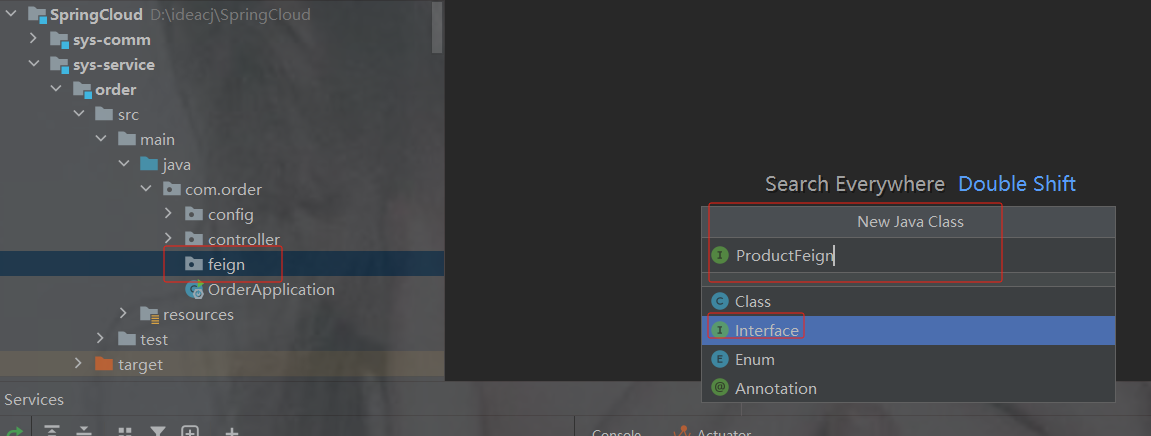
加注解@FeignClient(value="服务提供者的名称")

方法名 以及 请求类型返回值 都要一致,除了不写里面的方法
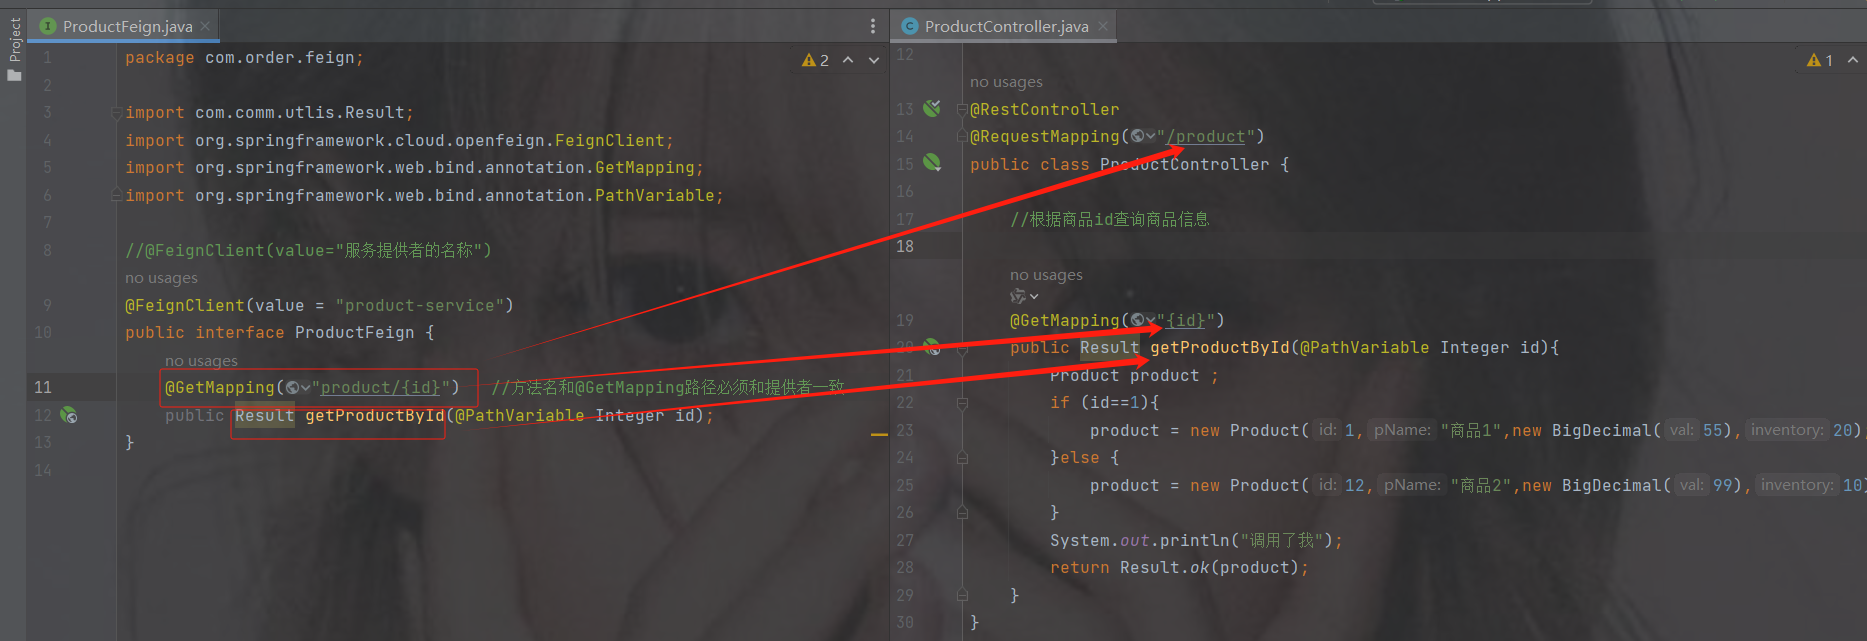
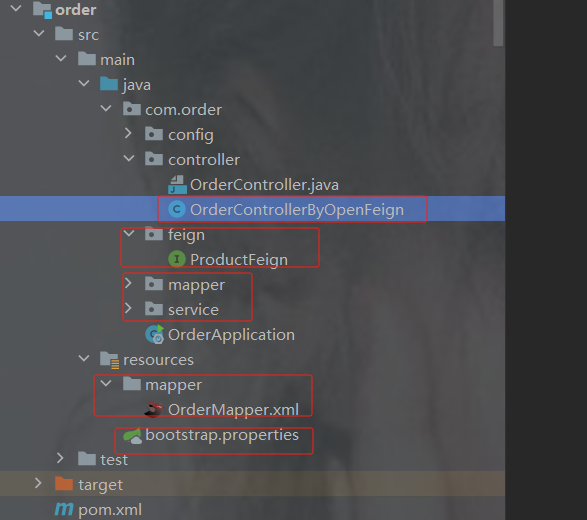
package com.order.feign;
import com.comm.utlis.Result;
import org.springframework.cloud.openfeign.FeignClient;
import org.springframework.web.bind.annotation.GetMapping;
import org.springframework.web.bind.annotation.PathVariable;
//@FeignClient(value="服务提供者的名称")
@FeignClient(value = "product-service")
public interface ProductFeign {
    @GetMapping("product/{id}")   //方法名和@GetMapping路径必须和提供者一致
    public Result getProductById(@PathVariable Integer id);
}
3.修改OrderController代码
controller里调用刚才的接口

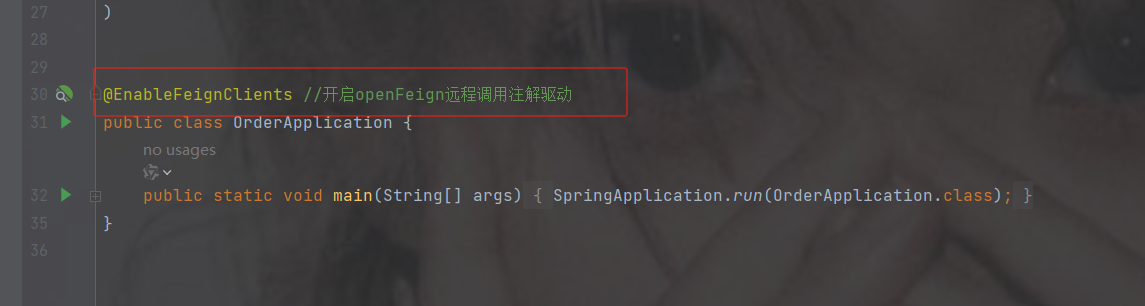
默认spring不认识@FeignClient注解
启动类加注解@EnableFeignClients----开启openFeign远程调用注解驱动
修改代码为openFeign调用
代码
package com.order.controller;
import com.comm.entity.Product;
import com.comm.utlis.Result;
import com.fasterxml.jackson.databind.ObjectMapper;
import com.order.feign.ProductFeign;
import org.springframework.beans.factory.annotation.Autowired;
import org.springframework.cloud.client.ServiceInstance;
import org.springframework.web.bind.annotation.GetMapping;
import org.springframework.web.bind.annotation.PathVariable;
import org.springframework.web.bind.annotation.RequestMapping;
import org.springframework.web.bind.annotation.RestController;
import java.util.List;
import java.util.Random;
@RestController
@RequestMapping("/order")
public class OrderControllerByOpenFeign {
    // 远程调用调用接口
    @Autowired
    private ProductFeign productFeign; //spring启动时会为使用@FeignClient注解的接口创建代理实现类
    @GetMapping("{pid}")
    public Result order(@PathVariable Integer pid) {
        //1.根据商品的id 查询商品的价格 库存
        //2.存入订单
        Result result = productFeign.getProductById(pid);
        //转换对象不要再使用fastjson了
        Product product = new ObjectMapper().convertValue(result.getData(), Product.class);
        System.out.println("订单存储的数据:" + product);
        //假装这里是存储订单的代码
        return Result.ok(null);
    }
}
如果你的接口路径以及参数是这样的然后报错了
那么openfeign里的参数要加@RequestParam

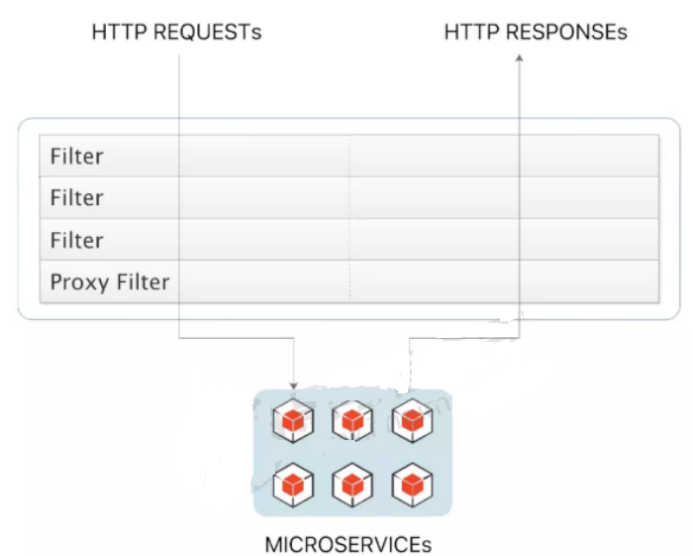
6.网关-gateway
6.1 不使用网关的问题
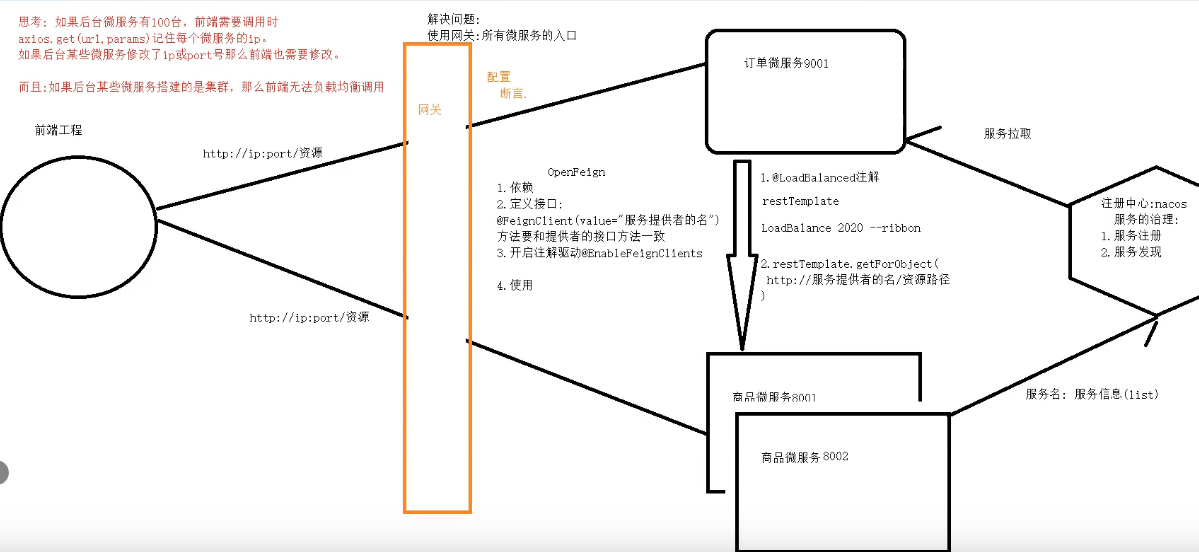
如果后台微服务有100台,前端需要调用时axios.get(ur1,params)记住每个微服务的ip。
如果后台某些微服务修改了ip或port号那么前端也需要修改
而且:如果后台某些微服务搭建的是集群,那么前端无法负载均衡调用解诀问题: 使用网关--->是所有微服务的入口
网关需要配置断言
6.2 网关的组件
Ngnix+lua
使用nginx的反向代理和负载均衡可实现对api服务器的负载均衡及高可用
lua是一种脚本语言,可以来编写一些简单的逻辑, nginx支持lua脚本
Kong
基于Nginx+Lua开发,性能高,稳定,有多个可用的插件(限流、鉴权等等)可以开箱即用。
问题:
只支持Http协议;二次开发,自由扩展困难;提供管理API,缺乏更易用的管控、配置方式。
Zuul
zuul 它是netfix公司提供的一款网关组件。基于servlet实现,效率慢。后期提成zuul2.0 但是没有出来。
问题:缺乏管控,无法动态配置;依赖组件较多;处理Http请求依赖的是Web容器,性能不如Nginx
Spring Cloud Gateway
Spring Cloud Gateway是Spring公司基于Spring 5.0,Spring Boot 2.0 和 Project Reactor 等术开发的网关,它旨在为微服务架构提供一种简单有效的统一的 API 路由管理方式。它的目标是替代 Netflflix Zuul,其不仅提供统一的路由方式,并且基于 Filter 链的方式提供了网关基本的功能,例如:安全,监控和限流。
优点:
性能强劲:是第一代网关Zuul的1.6倍
功能强大:内置了很多实用的功能,例如转发、监控、限流等
设计优雅,容易扩展
缺点:
其实现依赖Netty与WebFlux,不是传统的Servlet编程模型,学习成本高
不能将其部署在Tomcat、Jetty等Servlet容器里,只能打成jar包执行
需要Spring Boot 2.0及以上的版本,才支持
6.3 使用注意事项
1. gateway本身也是一个微服务
也要注册到 nacos 里面
2. Jar 包和 spring-boot-starter-web 有冲突
服务注册到 nacos,中的时候Ip地址 不能是虚拟机地址
6.4 快速使用gateway
1.创建gateway模块
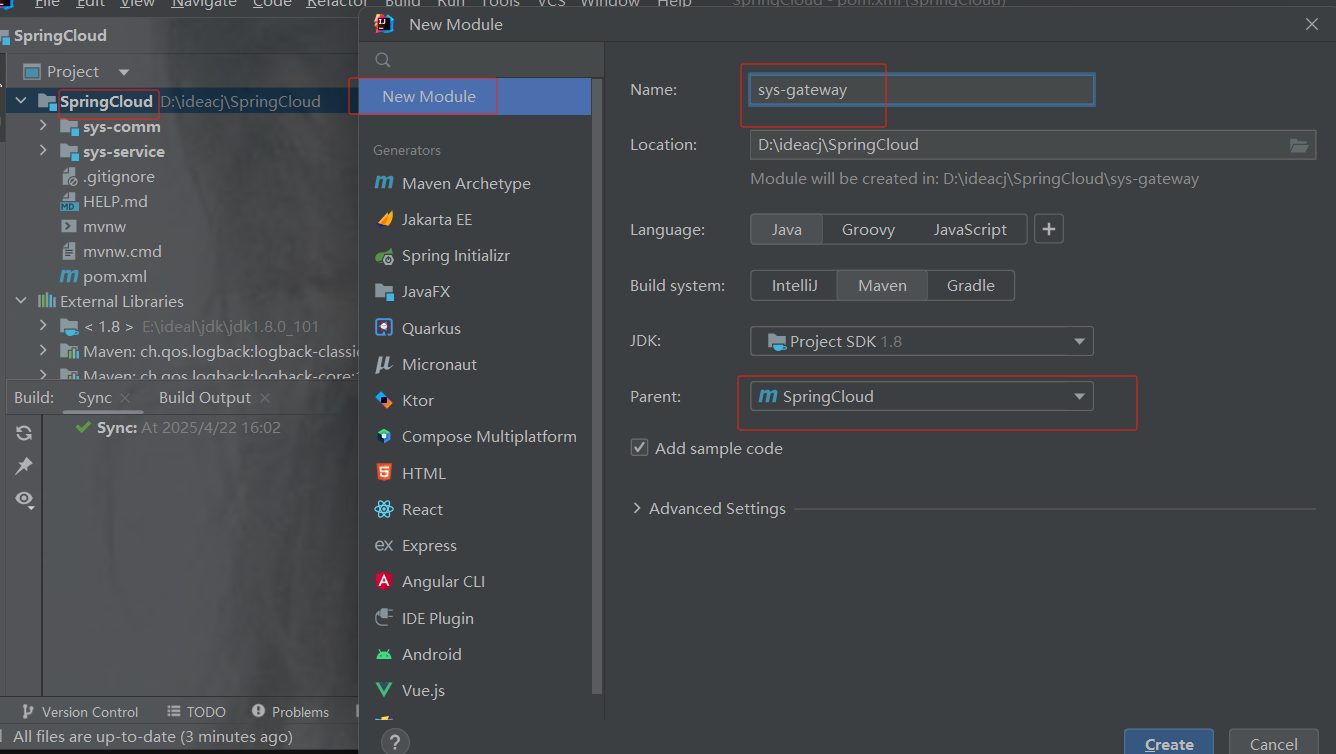
2.引入依赖
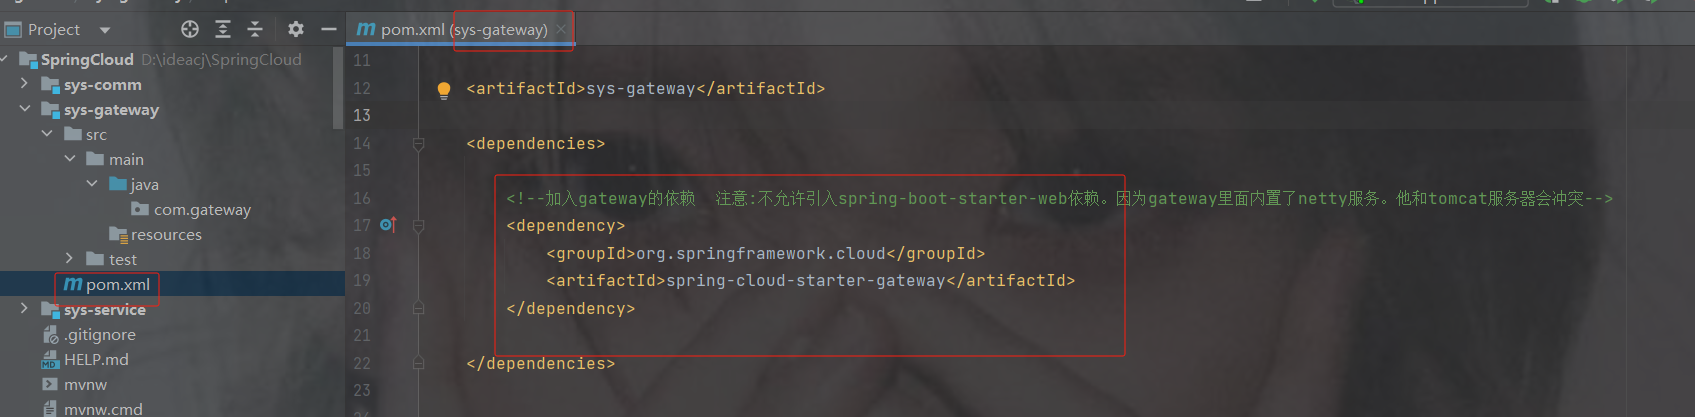
注意:不允许引入spring-boot-starter-web依赖,因为gateway里面内置了netty服务。他和tomcat服务器会冲突
            org.springframework.cloud
            spring-cloud-starter-gateway
3. 创建配置类和启动类
这里用yml的配置展示
4.路由配置规则介绍
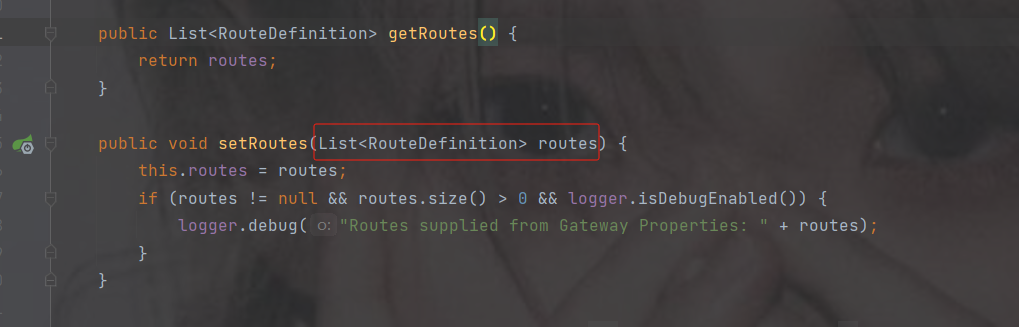
点击routes查看
传递的是list集合并且类型是RouteDefinition,点击RouteDefinition查看
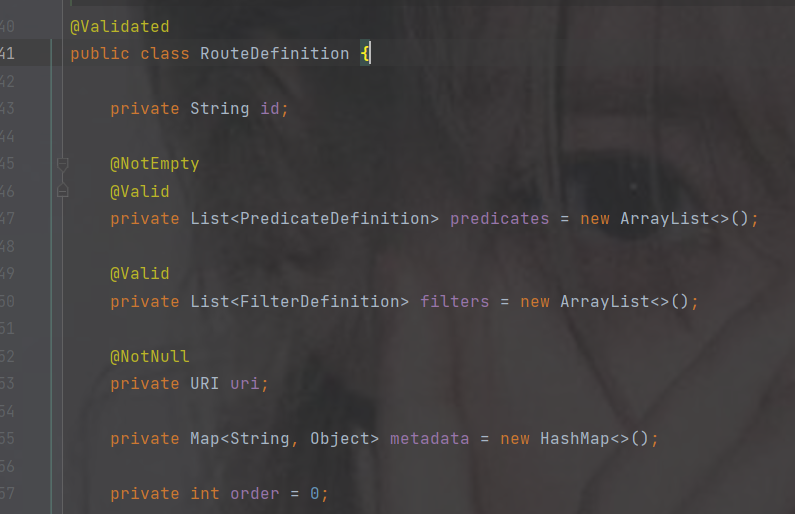
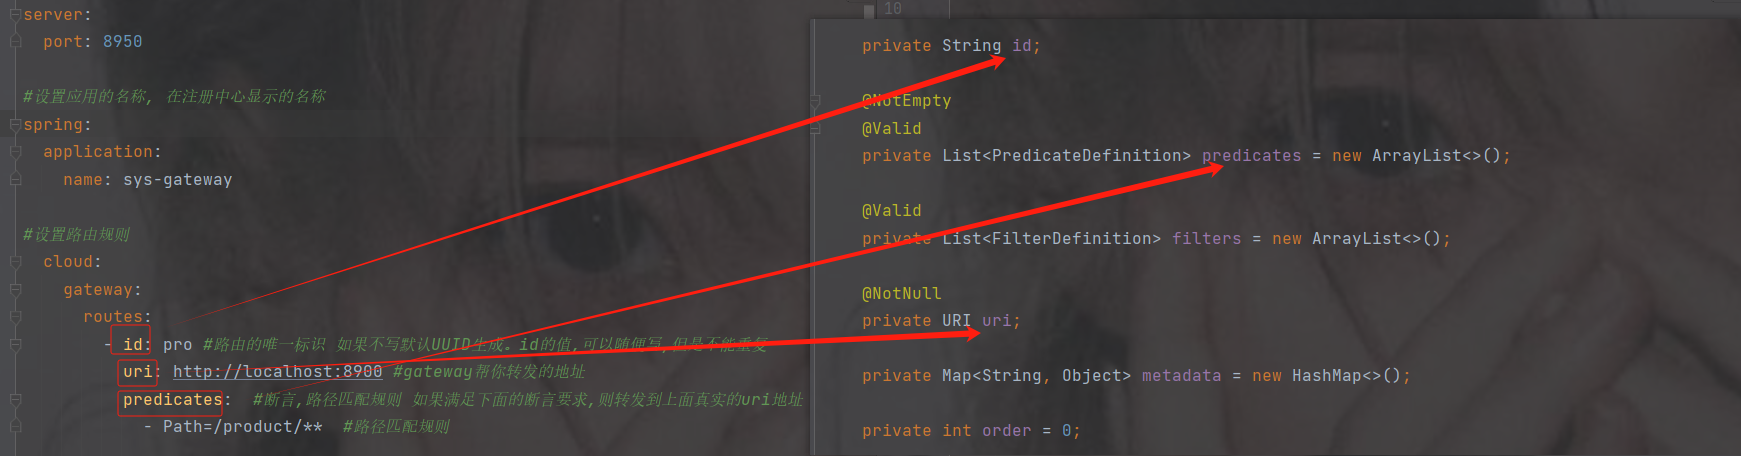
这是集合中一个元素的属性,其中带@NotEmpty注解的表示不能为空必须配置
- 代表集合的一个元素
配置信息
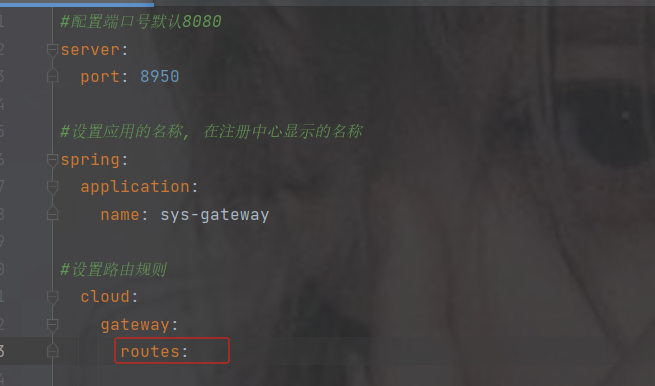
配置信息
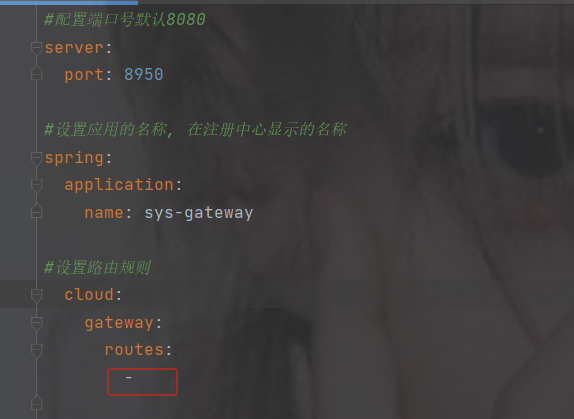
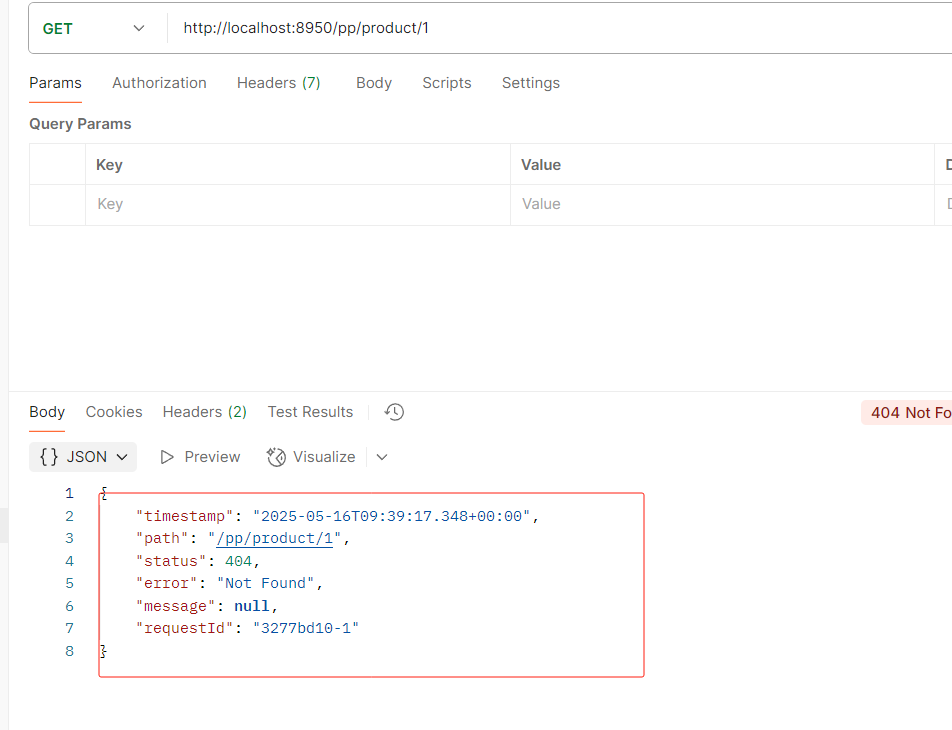
#配置端口号默认8080
server:
  port: 8950
#设置应用的名称, 在注册中心显示的名称
spring:
  application:
    name: sys-gateway
#设置路由规则
  cloud:
    gateway:
      routes:
        - id: pro #路由的唯一标识 如果不写默认UUID生成。id的值,可以随便写,但是不能重复
          uri: http://localhost:8900 #gateway帮你转发的地址
          predicates:  #断言,路径匹配规则 如果满足下面的断言要求,则转发到上面真实的uri地址
            - Path=/product/**  #路径匹配规则
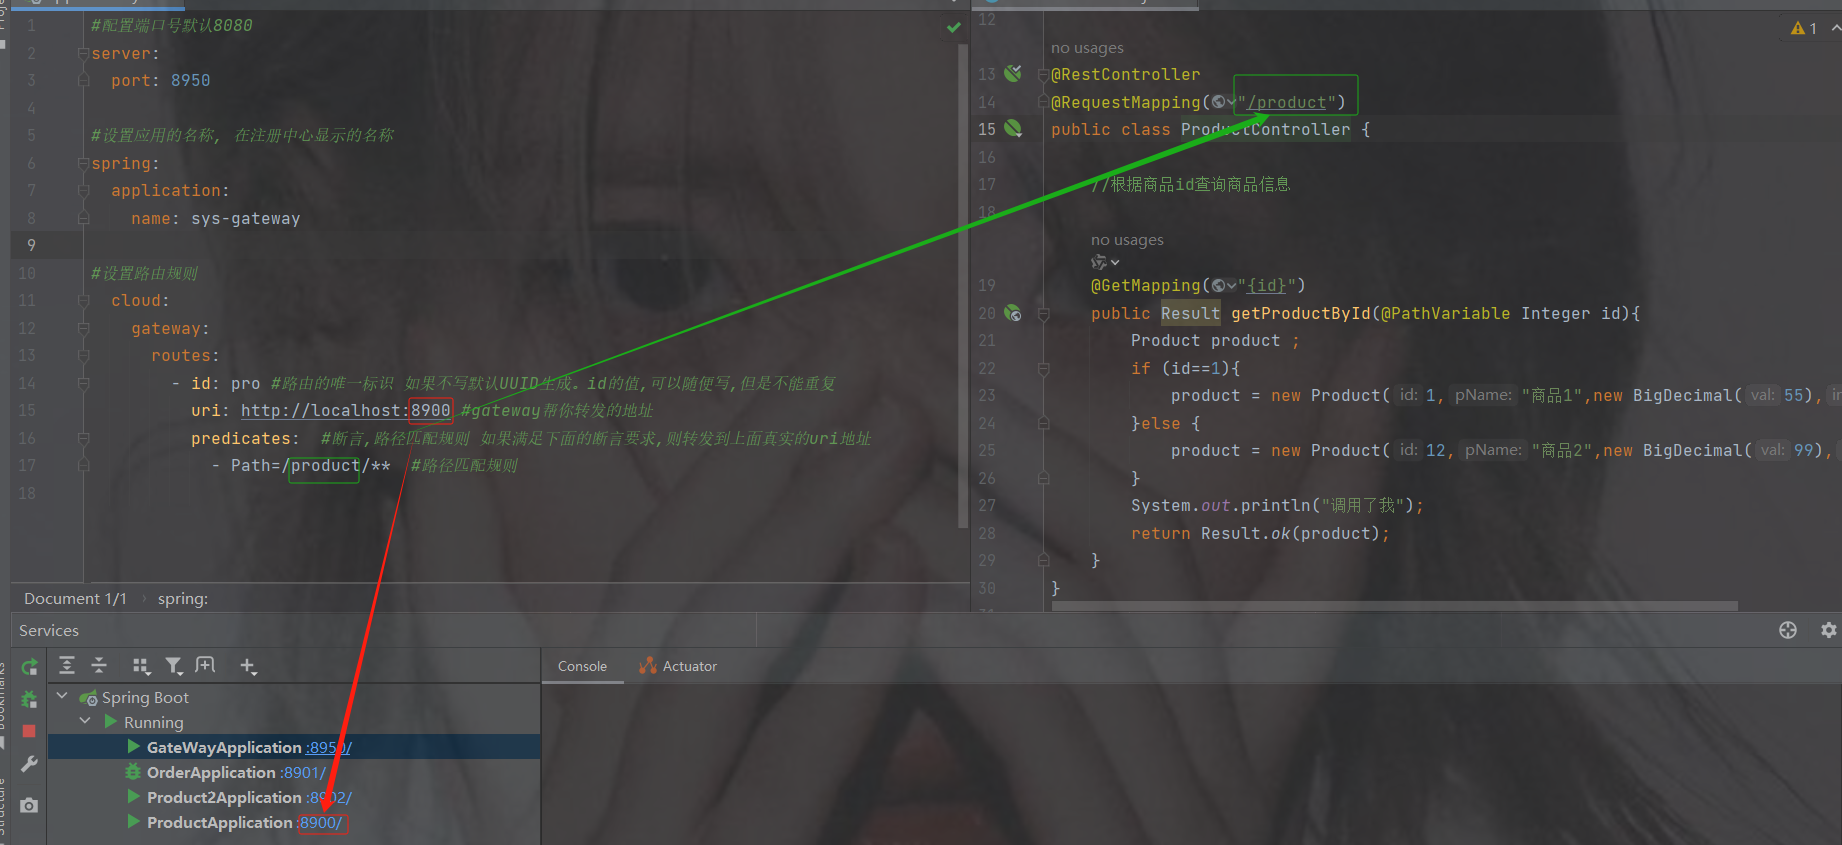
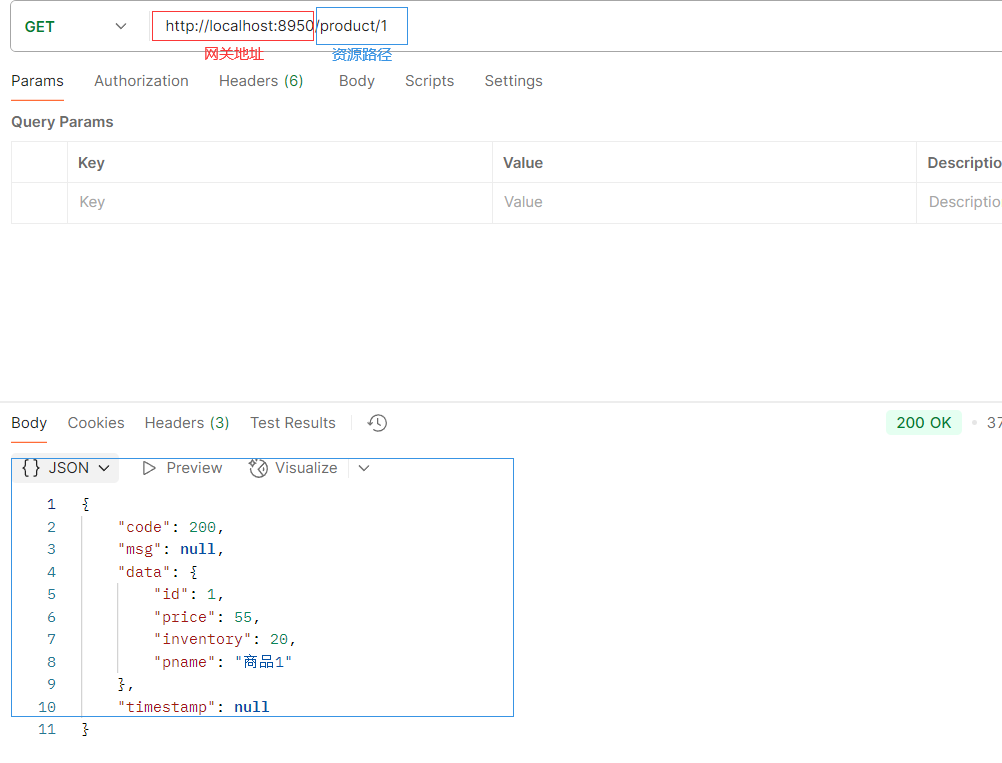
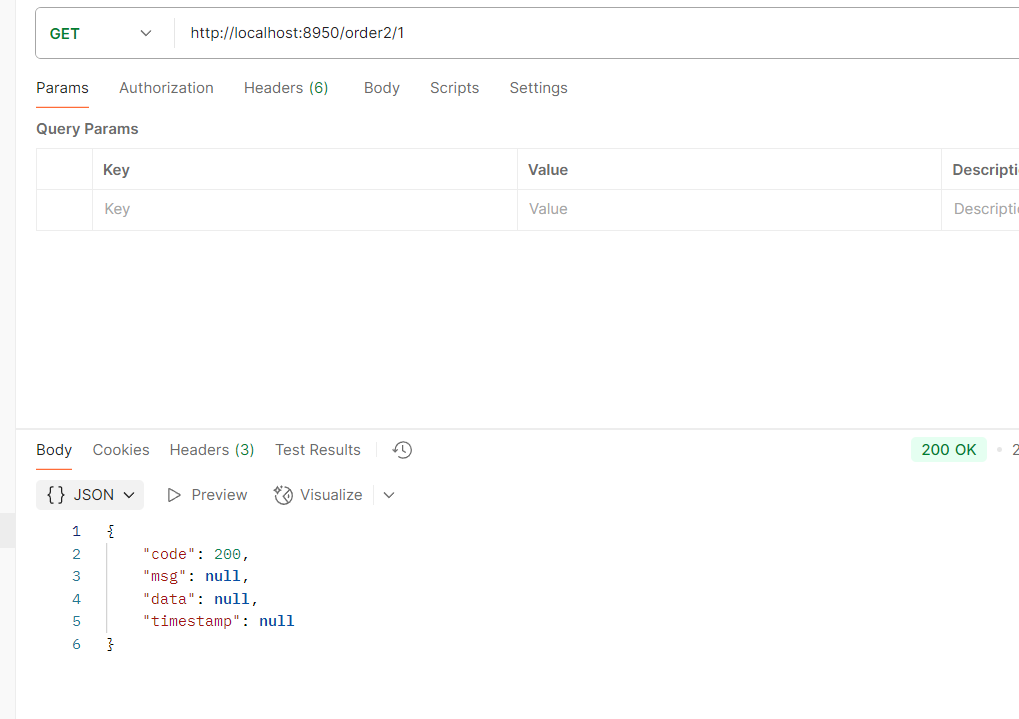
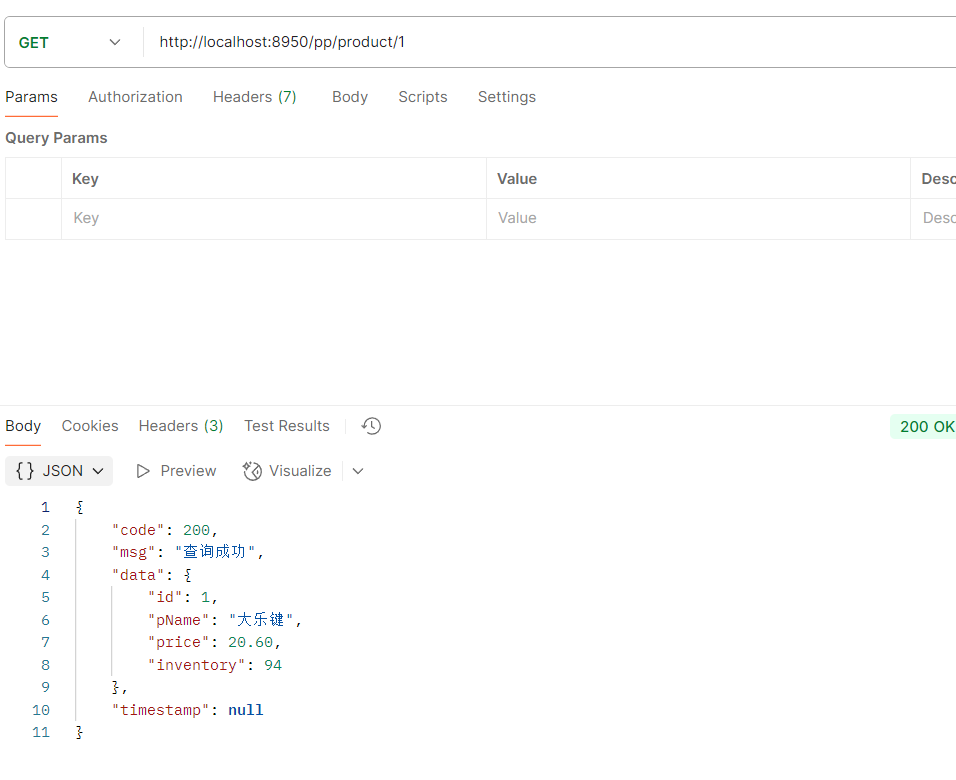
访问网关端口8950/product/1 --> 转发到 http://localhost:8900/product/1
要是多个服务就这么加就行了
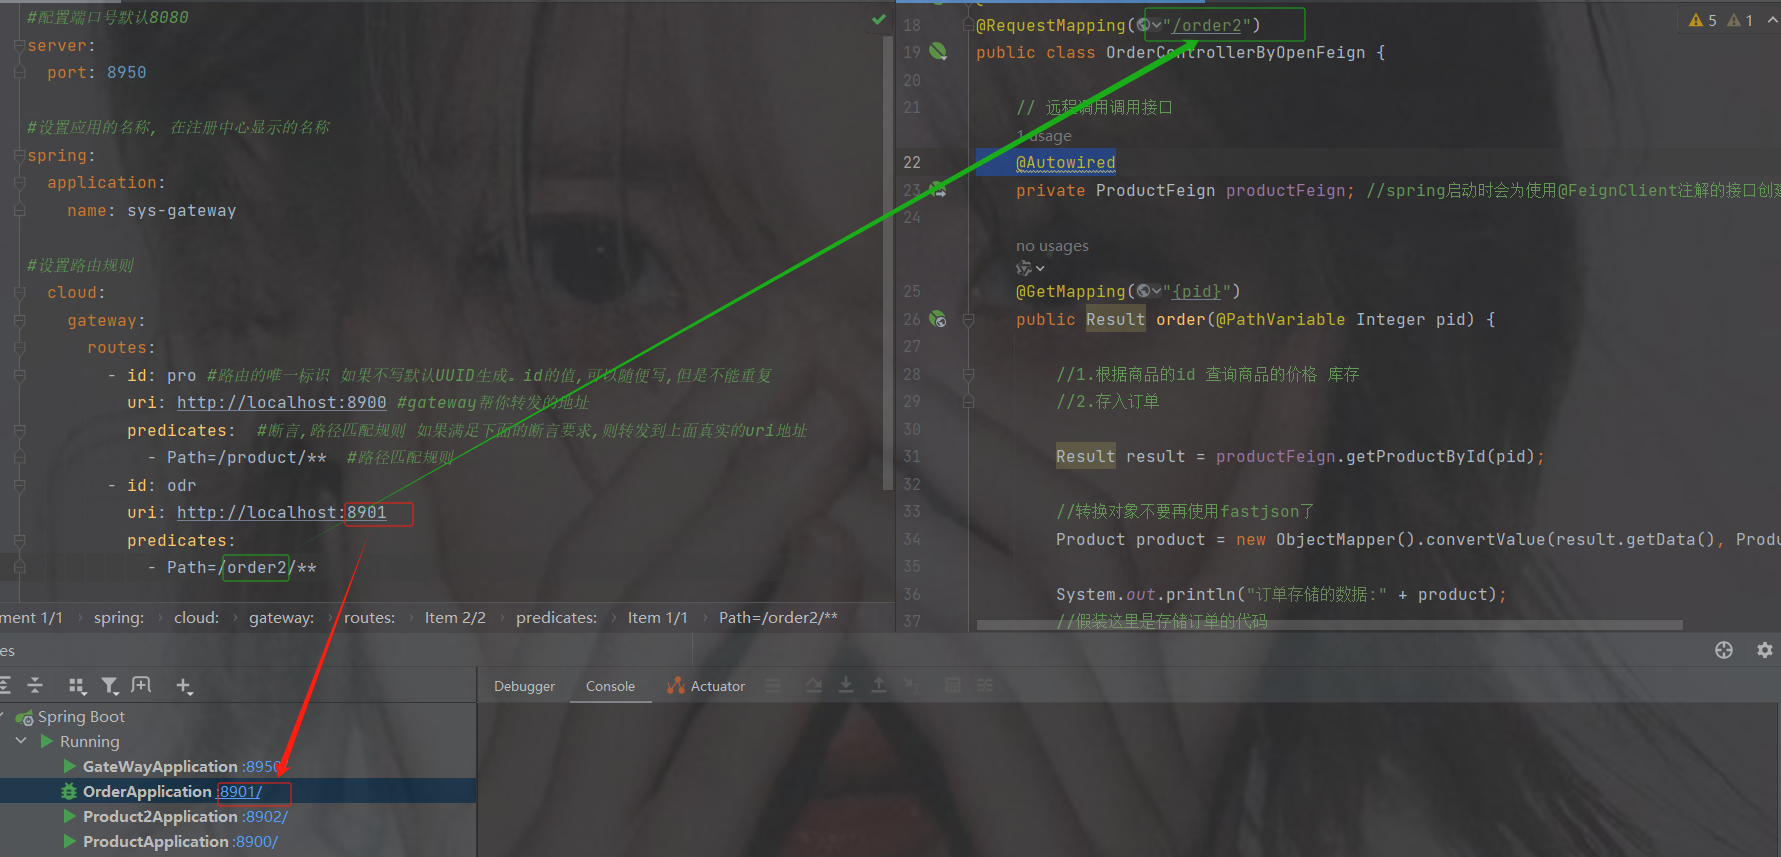
网关订单访问
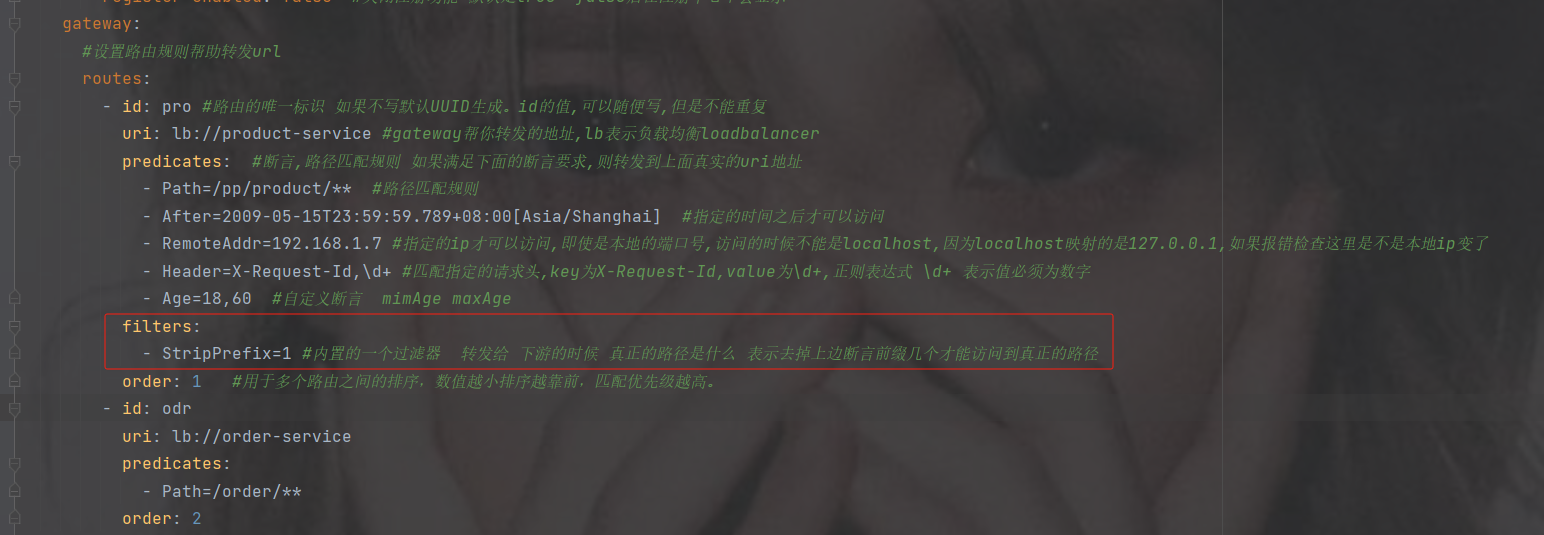
filters
如果路径前加了其他的路径那么就需要用到filters内置过滤器
StriPrefix = 1 表示截取1个前缀可以到达真实的路径,
= 表示去掉几个到达真实的路径
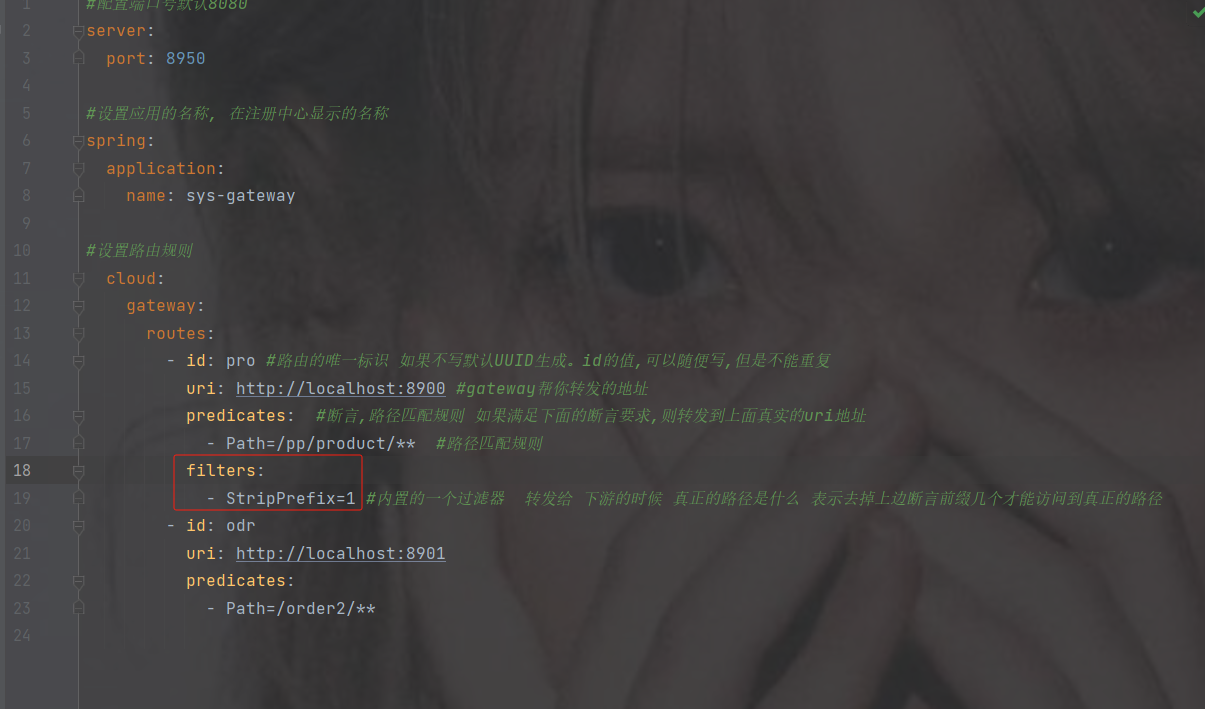
#配置端口号默认8080
server:
port: 8950
#设置应用的名称, 在注册中心显示的名称
spring:
application:
name: sys-gateway
#设置路由规则
cloud:
gateway:
routes:
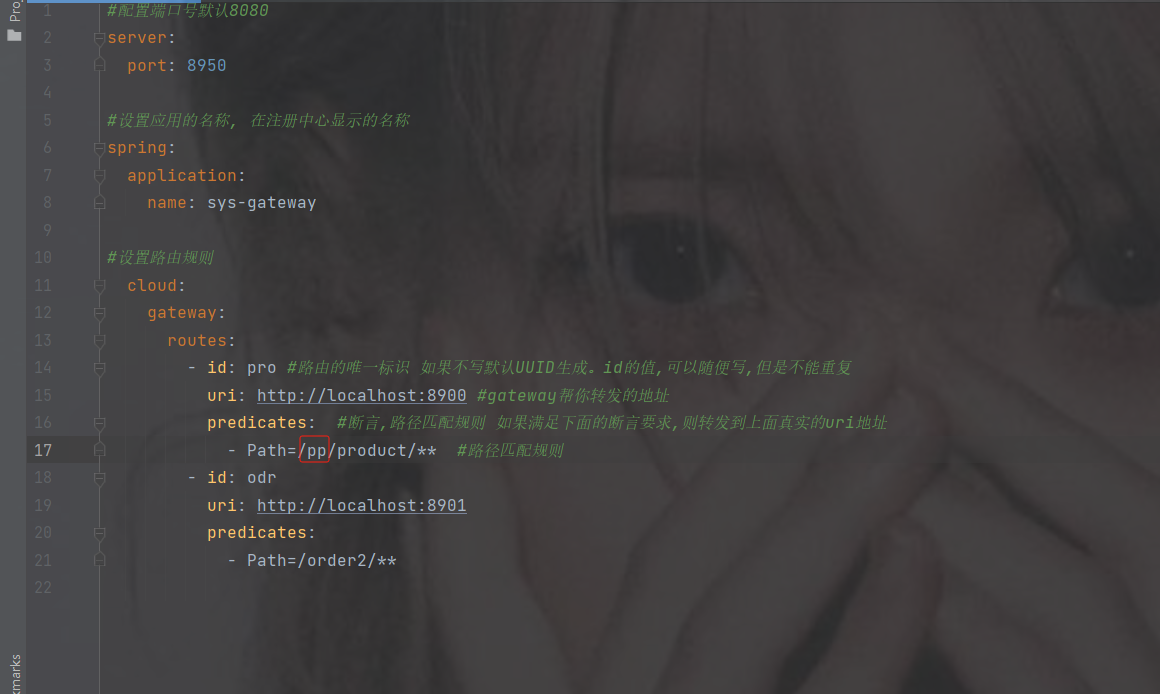
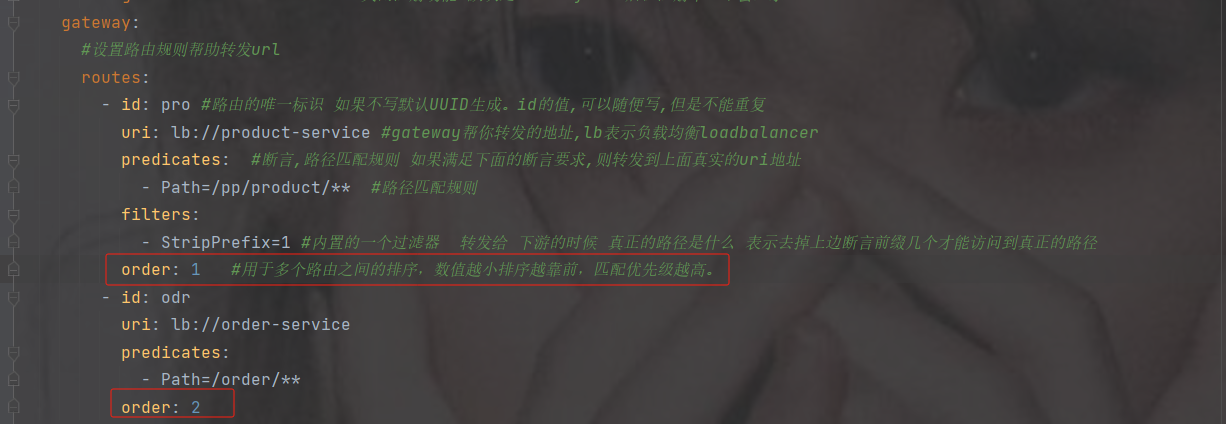
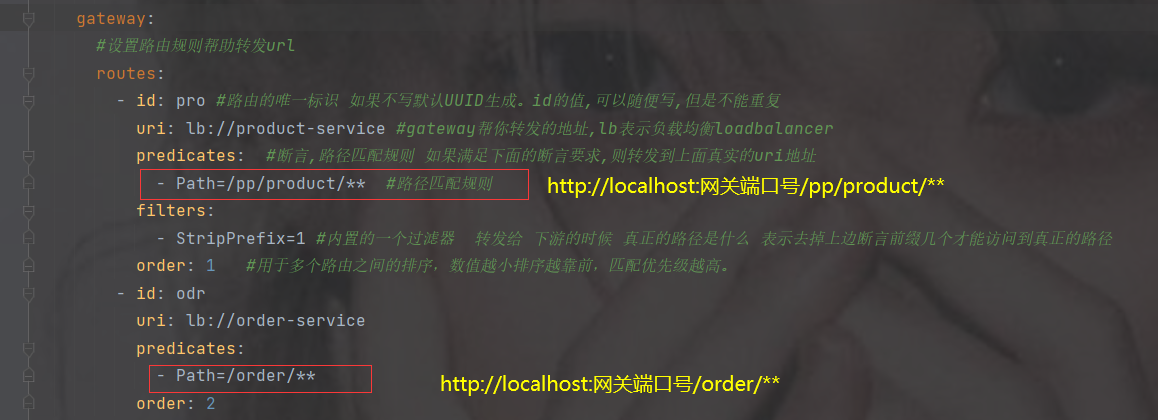
- id: pro #路由的唯一标识 如果不写默认UUID生成。id的值,可以随便写,但是不能重复
uri: http://localhost:8900 #gateway帮你转发的地址
predicates: #断言,路径匹配规则 如果满足下面的断言要求,则转发到上面真实的uri地址
- Path=/pp/product/** #路径匹配规则
filters:
- StripPrefix=1 #内置的一个过滤器 转发给 下游的时候 真正的路径是什么 表示去掉上边断言前缀几个才能访问到真正的路径
- id: odr
uri: http://localhost:8901
predicates:
- Path=/order2/**注意路径还是要加上你上的路径比如下图路径pp
order
用于多个 Route 之间的排序,数值越小排序越靠前,匹配优先级越高,如果不写优先级则默认从上往下。
6.6 gateway完成负载均衡
1.为何gateway使用负载均衡
问题:
1.如果后期转发的服务器ip或端口号发生改变,则需要修改网关的配置
2.如果转发的服务是一个集群,他们的路径都一样只是端口号不一致,但是配置相同路径,会出错不知道转发给哪个端口号
----------------------------------------------------------------------------------------------------------
解决:
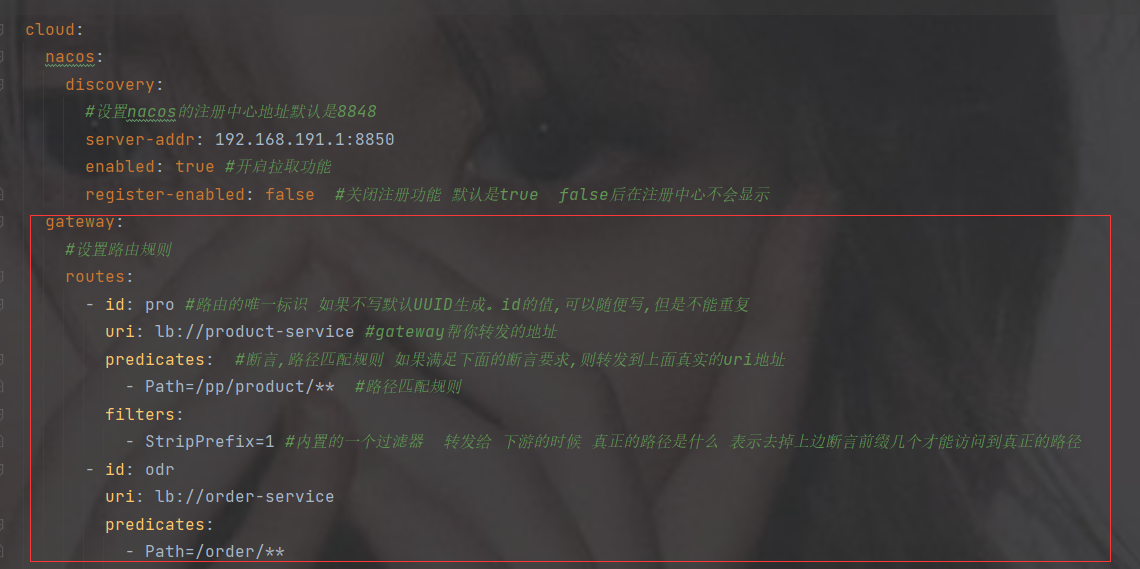
网关它也是一个独立的微服务,那么它也可以从注册中心按照服务名拉取相应的服务清单. ----- 而且它集成负载均衡的组件 --- 那么它也可以负载均衡的转发服务器
2.实现步骤
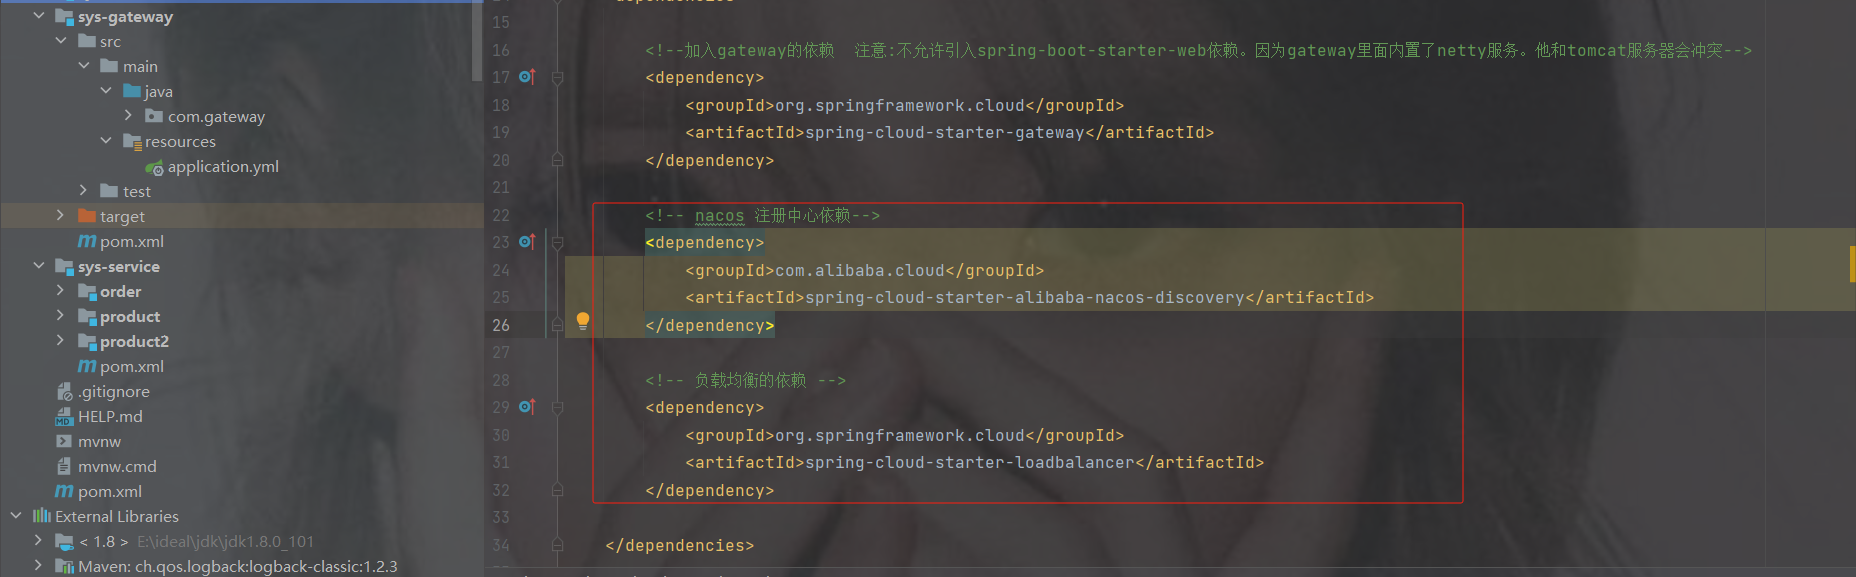
加注册中心以及负载均衡的依赖
            com.alibaba.cloud
            spring-cloud-starter-alibaba-nacos-discovery


            org.springframework.cloud
            spring-cloud-starter-loadbalancer
修改配置
注意url, 用了负载均衡后 lb://跟的是服务的名称
#配置端口号默认8080
server:
  port: 8950
#设置应用的名称, 在注册中心显示的名称
spring:
  application:
    name: sys-gateway
  cloud:
    nacos:
      discovery:
        #设置nacos的注册中心地址默认是8848
        server-addr: 192.168.191.1:8850
        enabled: true #开启拉取功能
        register-enabled: false  #关闭注册功能 默认是true  false后在注册中心不会显示
    gateway:
      #设置路由规则
      routes:
        - id: pro #路由的唯一标识 如果不写默认UUID生成。id的值,可以随便写,但是不能重复
          uri: lb://product-service #gateway帮你转发的地址
          predicates:  #断言,路径匹配规则 如果满足下面的断言要求,则转发到上面真实的uri地址
            - Path=/pp/product/**  #路径匹配规则
          filters:
            - StripPrefix=1 #内置的一个过滤器  转发给 下游的时候 真正的路径是什么 表示去掉上边断言前缀几个才能访问到真正的路径
        - id: odr
          uri: lb://order-service
          predicates:
            - Path=/order/**
依然访问路径查看打印
轮询打印了

6.7 gateway核心架构以及断言规则(了解即可,如有使用到再来观看使用)
1. 基本概念
路由(Route) 是 gateway 中最基本的组件之一,表示一个具体的路由信息载体。主要定义了下面的几个信息:
id,路由标识符,区别于其他 Route。唯一 不写 默认的唯一的值
uri,路由指向的目的地 uri,即客户端请求最终被转发到的微服务。
order,用于多个 Route 之间的排序,数值越小排序越靠前,匹配优先级越高。
predicates,断言的作用是进行条件判断,只有断言都返回真,才会真正的执行路由。
fifilters,过滤器用于修改请求和响应信息。
2. 执行流程
执行流程大体如下:
1. Gateway Client向Gateway Server发送请求
2. 请求首先会被HttpWebHandlerAdapter进行提取组装成网关上下文
3. 然后网关的上下文会传递到DispatcherHandler,它负责将请求分发给 RoutePredicateHandlerMapping
4. RoutePredicateHandlerMapping负责路由查找,并根据路由断言判断路由是否可用
5. 如果过断言成功,由FilteringWebHandler创建过滤器链并调用
6. 请求会一次经过PreFilter--微服务--PostFilter的方法,最终返回响应
3. 断言
Predicates(断言, 谓词) 用于进行条件判断,只有断言都返回真,才会真正的执行路由。
断言就是说: 在 什么条件下 才能进行路由转发
4. 内置路由断言工厂
SpringCloud Gateway包括许多内置的断言工厂,所有这些断言都与HTTP请求的不同属性匹配体如下:
基于Path请求路径的断言工厂
PathRoutePredicateFactory:接收一个参数,判断请求的URI部分是否满足路径规则。
- Path=/foo/{segment}基于Query请求参数的断言工厂
上面介绍过不多介绍path断言
QueryRoutePredicateFactory :接收两个参数,请求param和正则表达式, 判断请求参数是否具有给定名称且值与正则表达式匹配。
- Query=baz, ba.
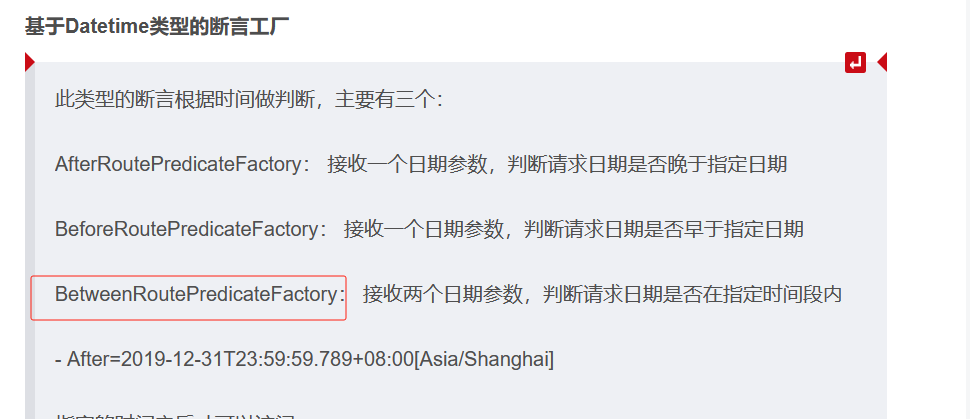
基于Datetime类型的断言工厂
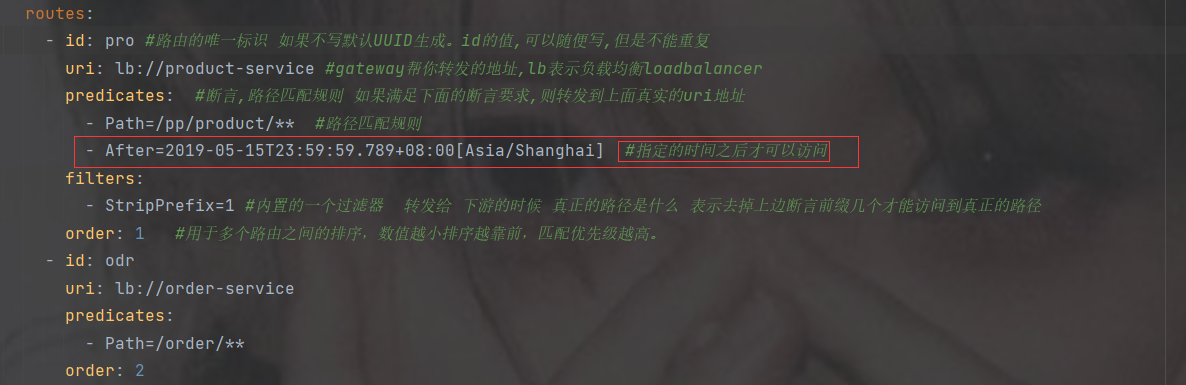
此类型的断言根据时间做判断,主要有三个:
AfterRoutePredicateFactory: 接收一个日期参数,判断请求日期是否晚于指定日期
BeforeRoutePredicateFactory: 接收一个日期参数,判断请求日期是否早于指定日期
BetweenRoutePredicateFactory: 接收两个日期参数,判断请求日期是否在指定时间段内
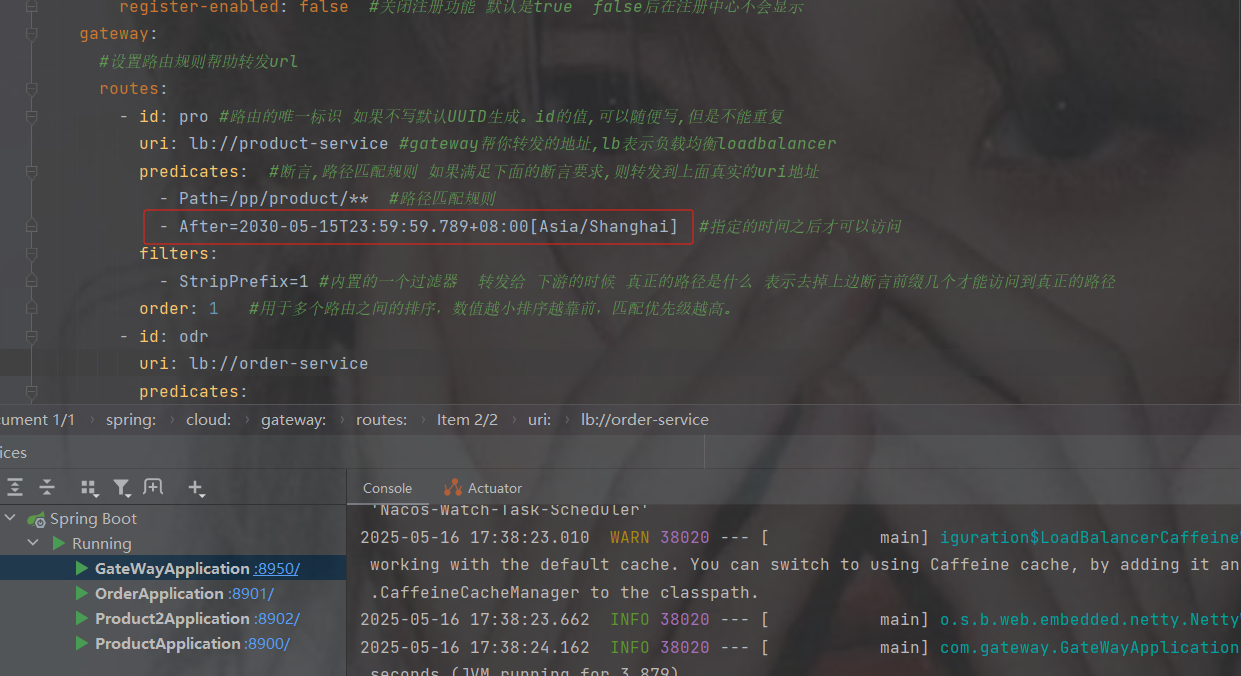
- After=2019-12-31T23:59:59.789+08:00[Asia/Shanghai]
指定的时间之后才可以访问
访问结果
如果修改还没到的时间之后
就会访问不到
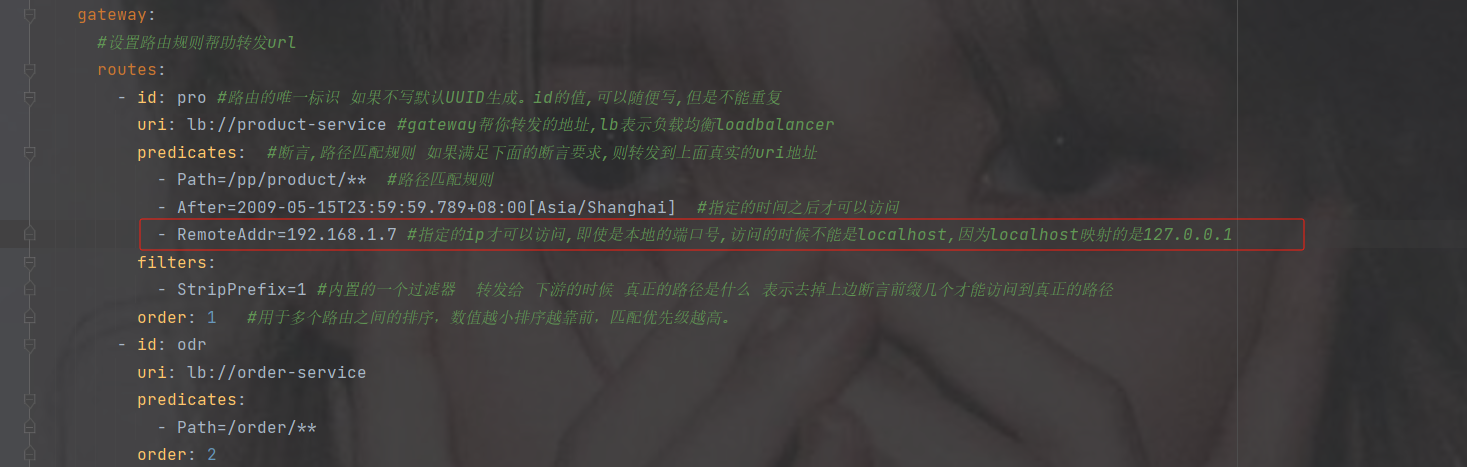
基于远程地址的断言工厂 RemoteAddrRoutePredicateFactory:
接收一个IP地址段,判断请求主机地址是否在地址段中
- RemoteAddr=xxx.xxx.xxx.xxx
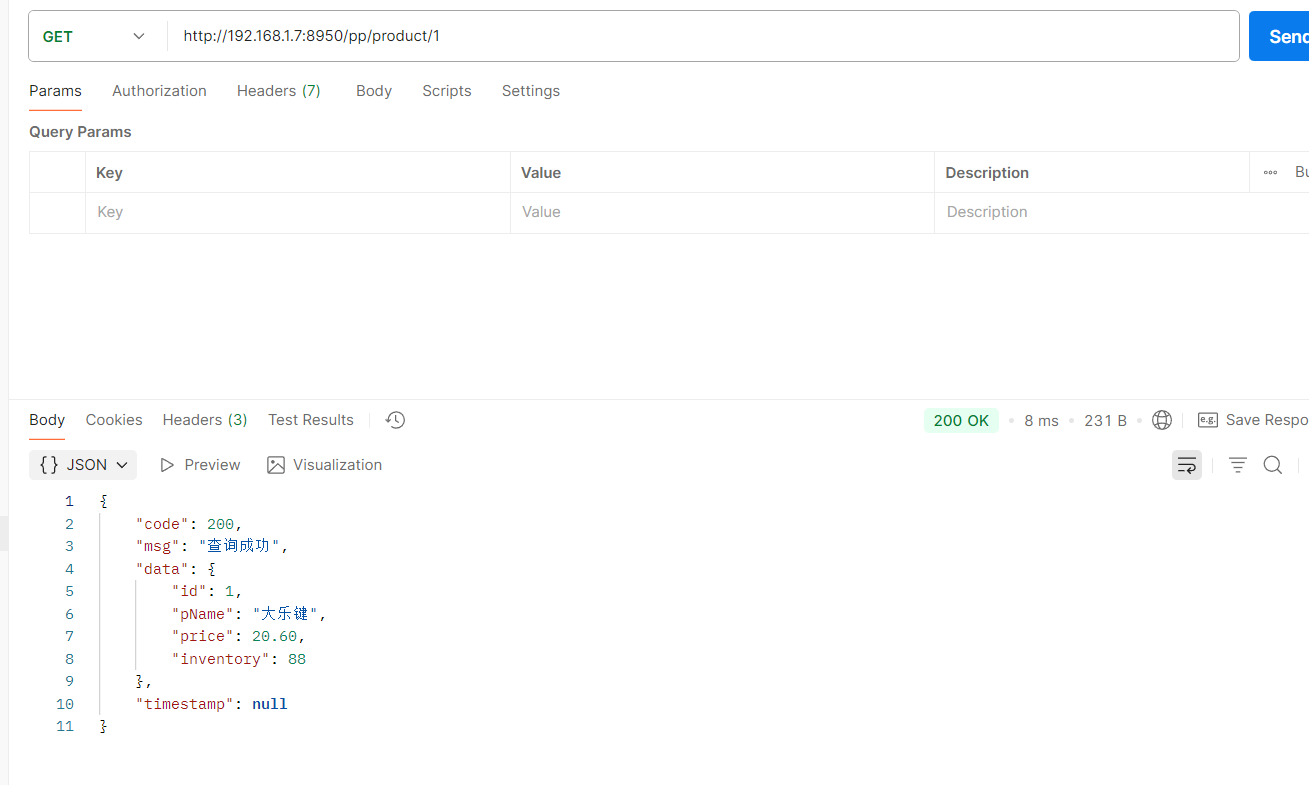
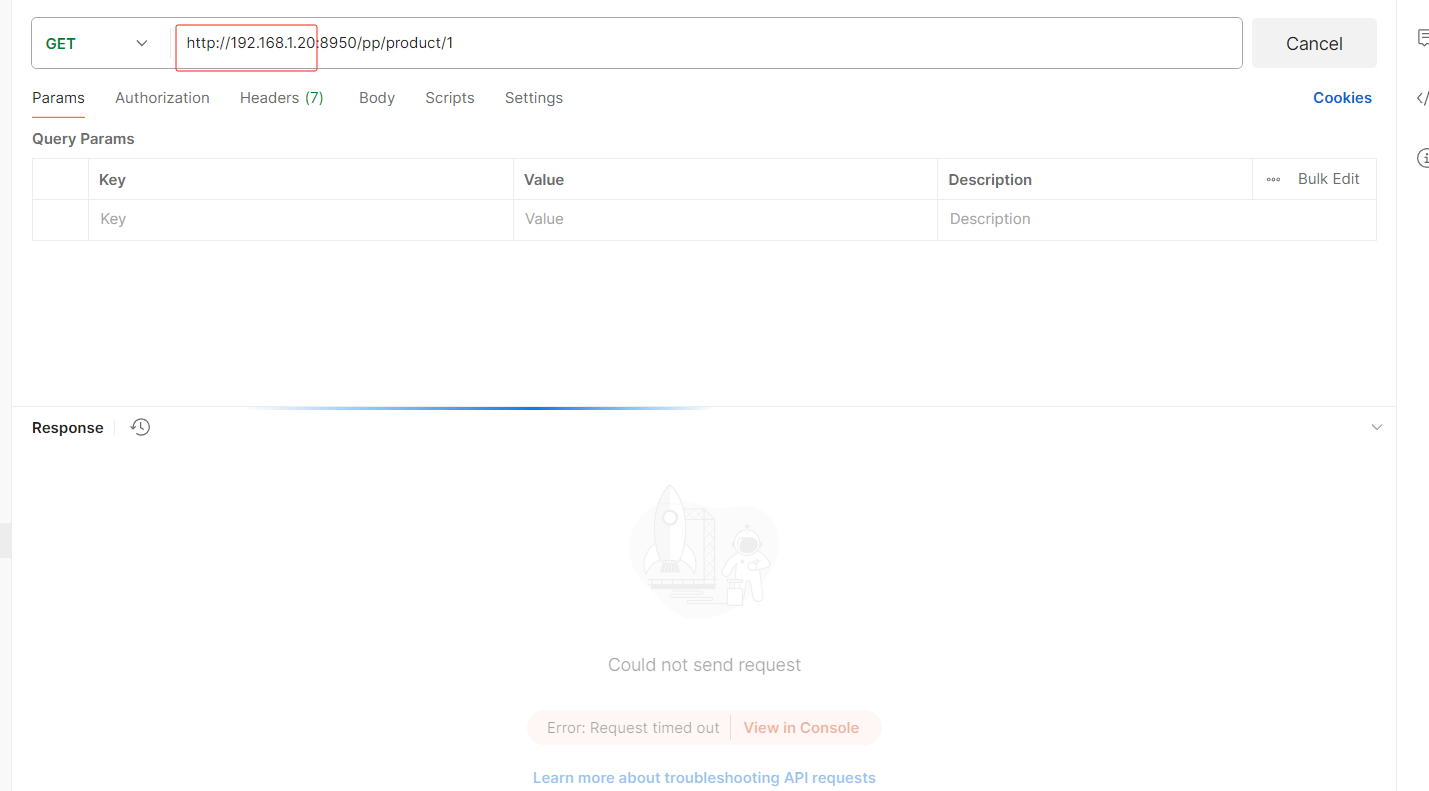
指定远程的ip为192.168.1.7才可以访问(这是我本地的ip)
注意不能用localhost,localhost会自动映射成127.0.0.1
如果修改了ip
即使你请求改为对应的ip地址也没用,因为你的ip不是,必须是192.168.1.20的ip才可以访问此接口

基于Header的断言工厂
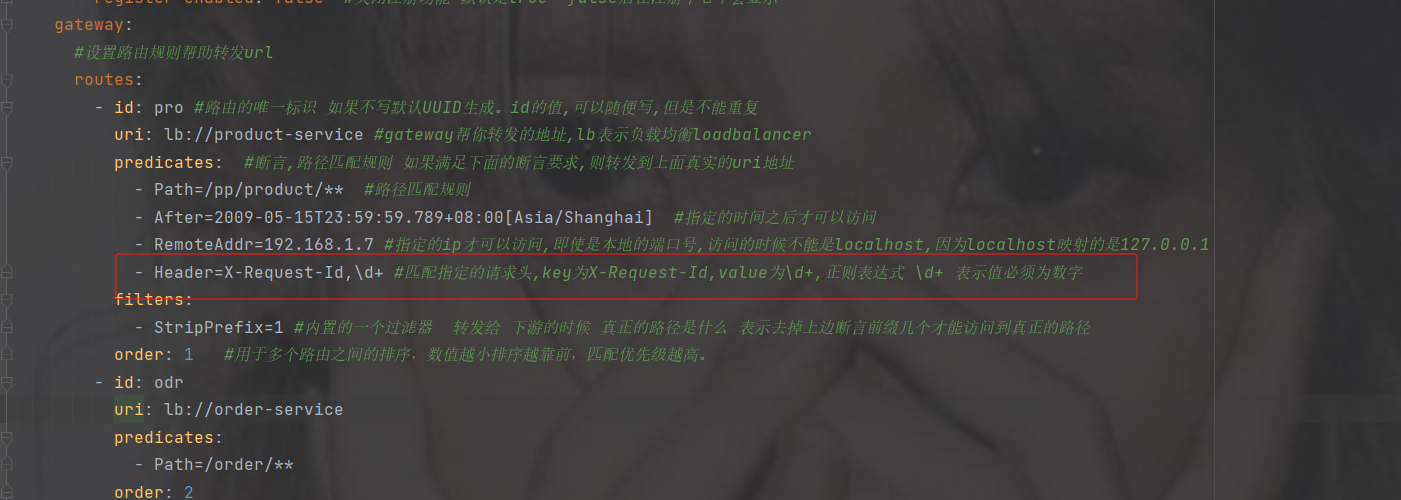
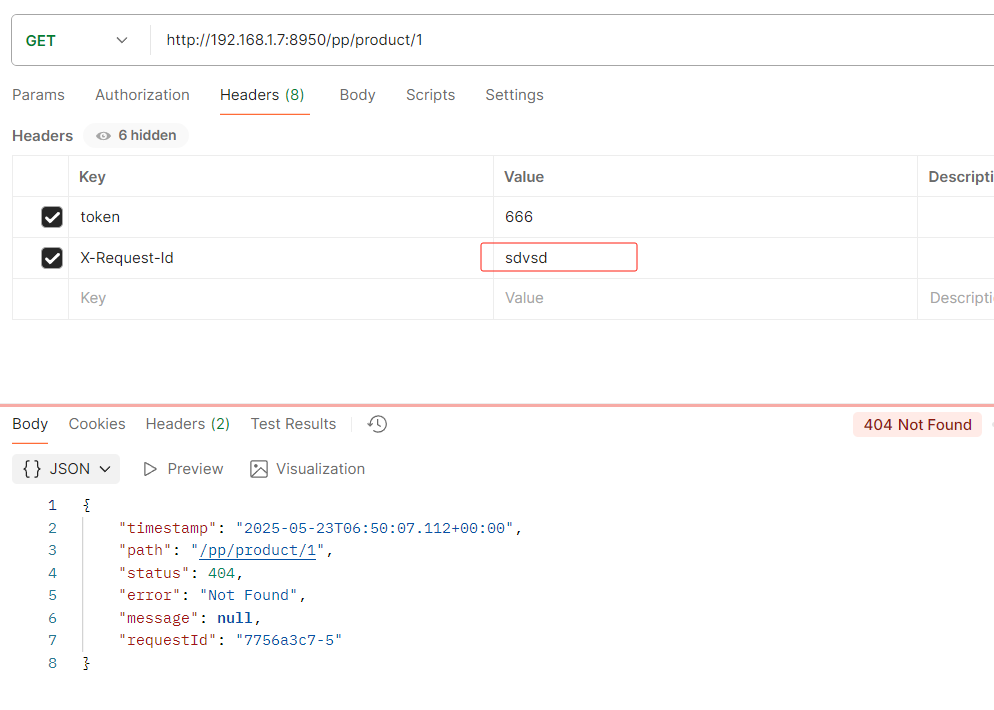
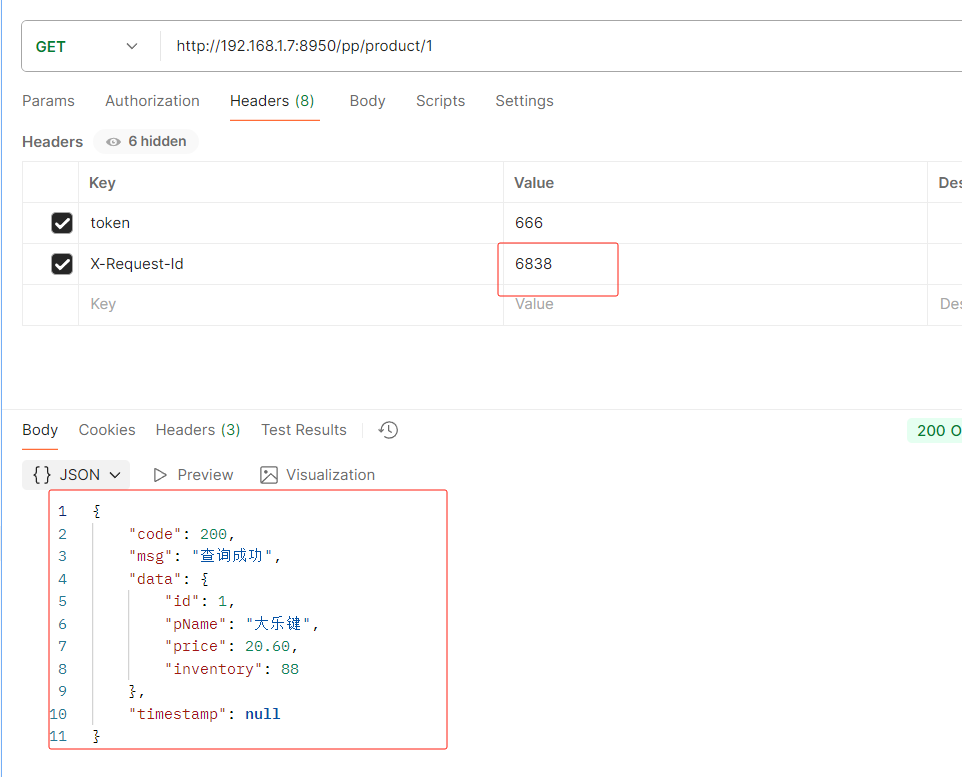
HeaderRoutePredicateFactory:接收两个参数,标题名称和正则表达式。 判断请求Header是否具有给定名称且值与正则表达式匹配。 key,value
- Header=X-Request-Id, \d+
key为X-Request-Id,value为\d+,正则表达式 \d+ 表示值必须为数字,value也可指定固定自定义的值
不是数字就会不让访问
修改为数字才可以访问
基于Cookie的断言工厂
CookieRoutePredicateFactory:接收两个参数,cookie 名字和一个正则表达式。 判断请求
cookie是否具有给定名称且值与正则表达式匹配。
- Cookie=chocolate, ch.
基于Host的断言工厂
HostRoutePredicateFactory:接收一个参数,主机名模式。判断请求的Host是否满足匹配规则。
- Host=**.testhost.org
基于Method请求方法的断言工厂
MethodRoutePredicateFactory:接收一个参数,判断请求类型是否跟指定的类型匹配。
- Method=GET
基于路由权重的断言工厂
WeightRoutePredicateFactory:接收一个[组名,权重], 然后对于同一个组内的路由按照权重转发
routes:
    -id: weight_route1
     uri: host1
     predicates:
        -Path=/product/**
        -Weight=group3, 1
    -id: weight_route2
     uri: host2
     predicates:
        -Path=/product/**
        -Weight= group3, 9
5. 自定义路由断言工厂
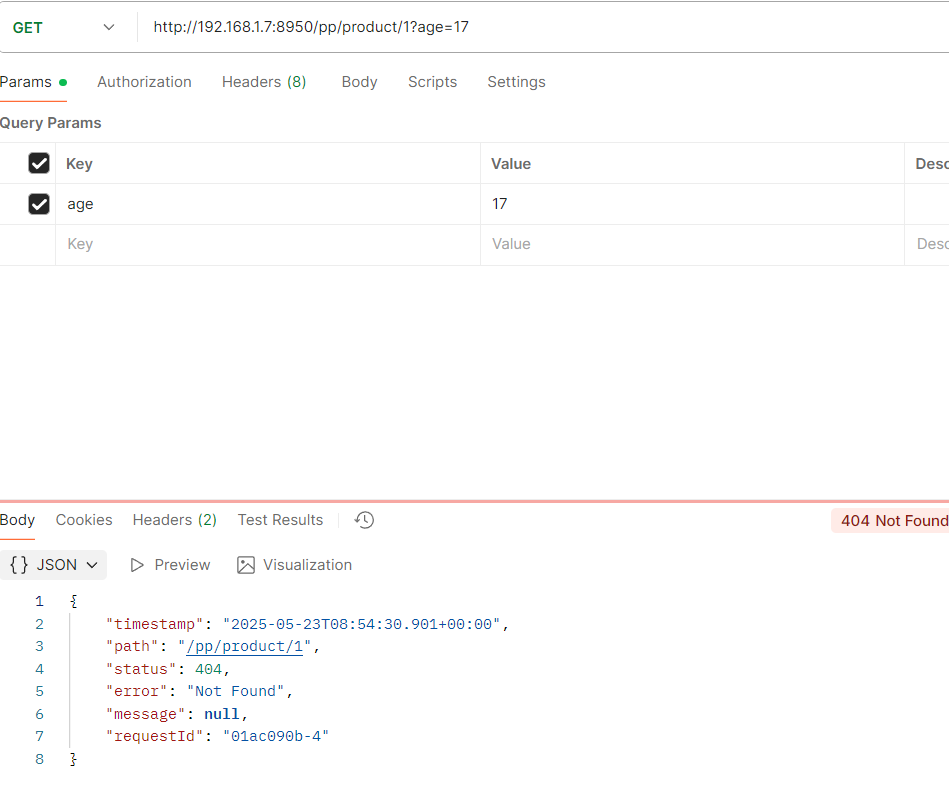
我们来设定一个场景: 假设我们的应用仅仅让age在(min,max)之间的人来访问。
18-40
第1步:在配置文件中,添加一个Age的断言配置
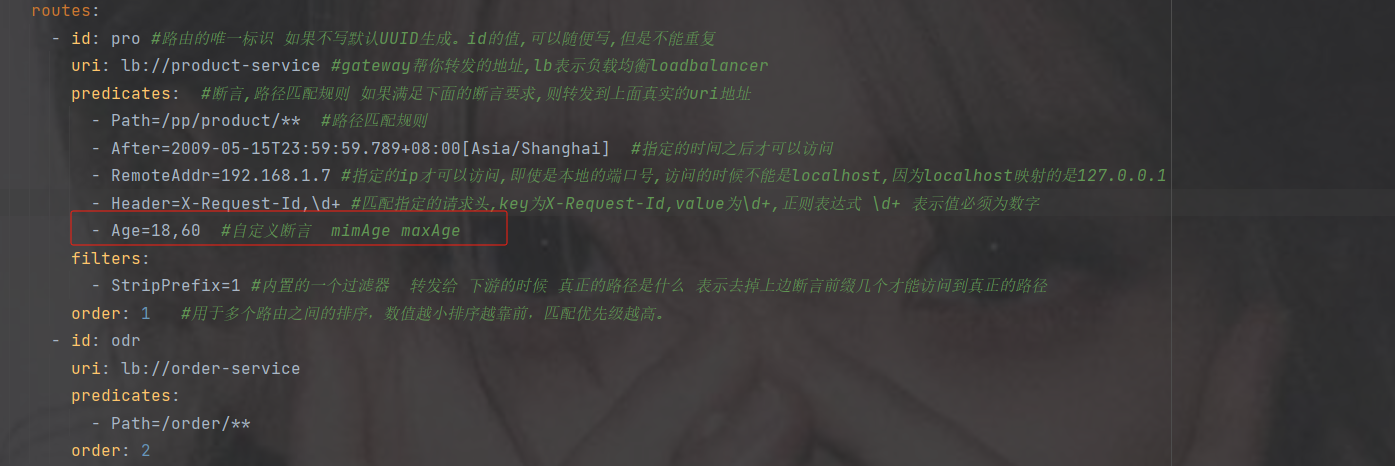
2.参考BetweenRoutePredicateFactory
创建一个包,并且先创建个类,一会儿修改

3.搜索复制粘贴修改
idea中Ctrl键+N搜索BetweenRoutePredicateFactory
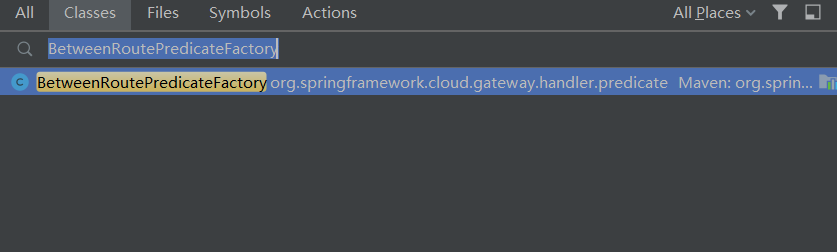
把BetweenRoutePredicateFactory复制到刚刚创建的A类中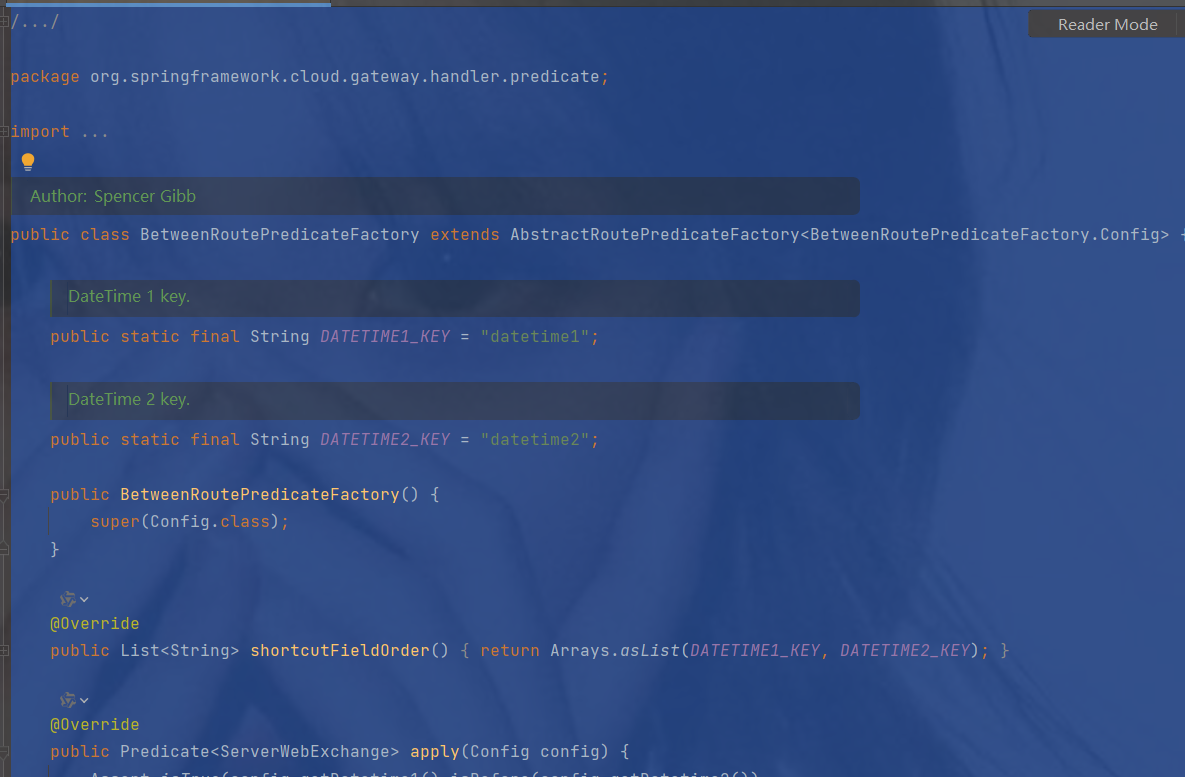
复制过来只做了简单修改,改造之前
package com.gateway.predicate;/*
 * Copyright 2013-2020 the original author or authors.
 *
 * Licensed under the Apache License, Version 2.0 (the "License");
 * you may not use this file except in compliance with the License.
 * You may obtain a copy of the License at
 *
 *      https://www.apache.org/licenses/LICENSE-2.0
 *
 * Unless required by applicable law or agreed to in writing, software
 * distributed under the License is distributed on an "AS IS" BASIS,
 * WITHOUT WARRANTIES OR CONDITIONS OF ANY KIND, either express or implied.
 * See the License for the specific language governing permissions and
 * limitations under the License.
 */
import java.time.ZonedDateTime;
import java.util.Arrays;
import java.util.List;
import java.util.function.Predicate;
import javax.validation.constraints.NotNull;
import org.springframework.cloud.gateway.handler.predicate.AbstractRoutePredicateFactory;
import org.springframework.cloud.gateway.handler.predicate.GatewayPredicate;
import org.springframework.util.Assert;
import org.springframework.validation.annotation.Validated;
import org.springframework.web.server.ServerWebExchange;
/**
 * @author Spencer Gibb
 */
             //可以自定义断言,但是名字必须以 "xxx" RoutePredicateFactory结尾
public class AgeRoutePredicateFactory extends AbstractRoutePredicateFactory {
    /**
     * DateTime 1 key.
     */
    public static final String DATETIME1_KEY = "datetime1";
    /**
     * DateTime 2 key.
     */
    public static final String DATETIME2_KEY = "datetime2";
    public AgeRoutePredicateFactory() {
        super(Config.class);
    }
    @Override
    public List shortcutFieldOrder() {
        return Arrays.asList(DATETIME1_KEY, DATETIME2_KEY);
    }
    @Override
    public Predicate apply(Config config) {
        Assert.isTrue(config.getDatetime1().isBefore(config.getDatetime2()),
                config.getDatetime1() + " must be before " + config.getDatetime2());
        return new GatewayPredicate() {
            @Override
            public boolean test(ServerWebExchange serverWebExchange) {
                final ZonedDateTime now = ZonedDateTime.now();
                return now.isAfter(config.getDatetime1()) && now.isBefore(config.getDatetime2());
            }
            @Override
            public String toString() {
                return String.format("Between: %s and %s", config.getDatetime1(), config.getDatetime2());
            }
        };
    }
    @Validated
    public static class Config {
        @NotNull
        private ZonedDateTime datetime1;
        @NotNull
        private ZonedDateTime datetime2;
        public ZonedDateTime getDatetime1() {
            return datetime1;
        }
        public Config setDatetime1(ZonedDateTime datetime1) {
            this.datetime1 = datetime1;
            return this;
        }
        public ZonedDateTime getDatetime2() {
            return datetime2;
        }
        public Config setDatetime2(ZonedDateTime datetime2) {
            this.datetime2 = datetime2;
            return this;
        }
    }
}
修改后
package com.gateway.predicate;/*
 * Copyright 2013-2020 the original author or authors.
 *
 * Licensed under the Apache License, Version 2.0 (the "License");
 * you may not use this file except in compliance with the License.
 * You may obtain a copy of the License at
 *
 *      https://www.apache.org/licenses/LICENSE-2.0
 *
 * Unless required by applicable law or agreed to in writing, software
 * distributed under the License is distributed on an "AS IS" BASIS,
 * WITHOUT WARRANTIES OR CONDITIONS OF ANY KIND, either express or implied.
 * See the License for the specific language governing permissions and
 * limitations under the License.
 */
import java.time.ZonedDateTime;
import java.util.Arrays;
import java.util.List;
import java.util.function.Predicate;
import javax.validation.constraints.NotNull;
import org.springframework.cloud.gateway.handler.predicate.AbstractRoutePredicateFactory;
import org.springframework.cloud.gateway.handler.predicate.GatewayPredicate;
import org.springframework.stereotype.Component;
import org.springframework.util.Assert;
import org.springframework.validation.annotation.Validated;
import org.springframework.web.server.ServerWebExchange;
/**
 * @author Spencer Gibb
 */
//4.注意自定义断言要交给Spring管理
@Component
            //可以自定义断言,但是名字必须以 "xxx" RoutePredicateFactory结尾
public class AgeRoutePredicateFactory extends AbstractRoutePredicateFactory {
    /**
     * Age 1 key.
     */
    public static final String MIN_AGE_KEY = "minAge";
    /**
     * Age 2 key.
     */
    public static final String MAX_AGE_KEY = "maxAge";
    public AgeRoutePredicateFactory() {
        super(Config.class);
    }
    //2.修改配置为自定义年龄
    @Override
    public List shortcutFieldOrder() {
        //读取配置文件中的内容
        return Arrays.asList(MIN_AGE_KEY, MAX_AGE_KEY);
    }
    @Override
    public Predicate apply(Config config) {
        return new GatewayPredicate() {
            @Override
            public boolean test(ServerWebExchange serverWebExchange) {
                //3.获取输入的年龄age
                String age = serverWebExchange.getRequest().getQueryParams().getFirst("age");
                int i = Integer.parseInt(age);
                return i >= config.getMinAge() && i <= config.getMaxAge();
            }
            @Override
            public String toString() {
                return String.format("Between: minAge and maxAge", config.getMinAge(), config.getMaxAge());
            }
        };
    }
    //1.先修改配置为自定义年龄
    @Validated
    public static class Config {
        @NotNull
        private Integer minAge;
        @NotNull
        private Integer maxAge;
        public Config() {
        }
        public Integer getMinAge() {
            return minAge;
        }
        public void setMinAge(Integer minAge) {
            this.minAge = minAge;
        }
        public Integer getMaxAge() {
            return maxAge;
        }
        public void setMaxAge(Integer maxAge) {
            this.maxAge = maxAge;
        }
    }
}
4.接口访问
携带正常age并且年龄是18可以访问到
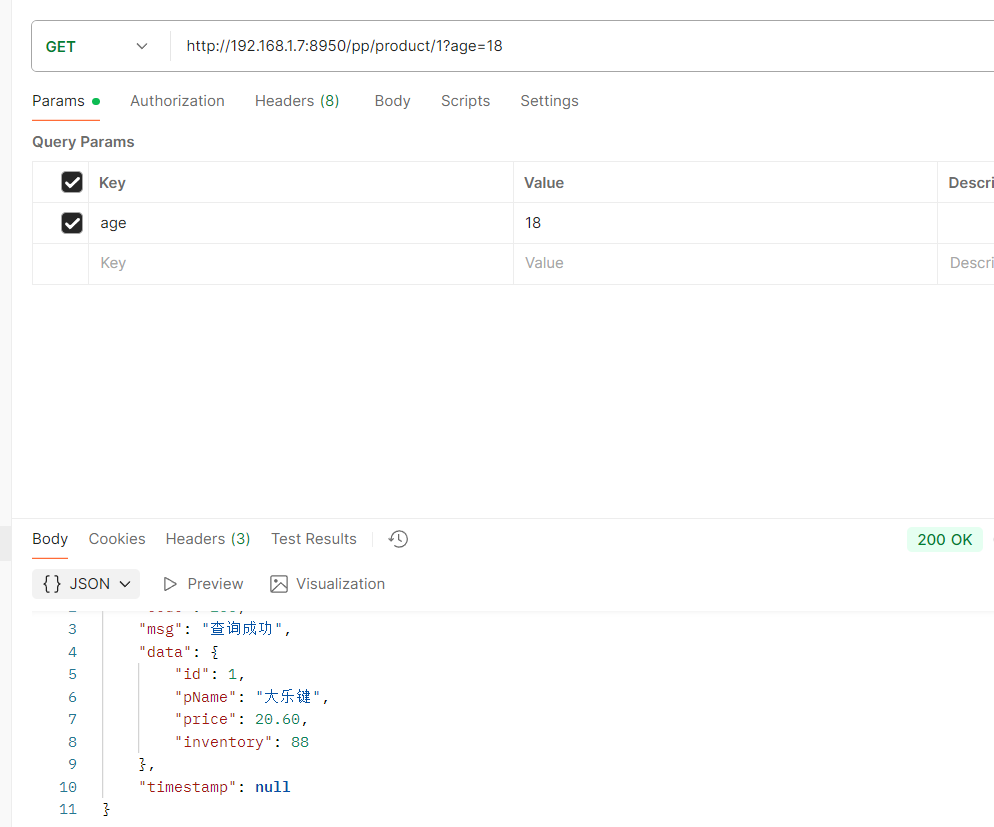
如果年龄不对就访问不到
6.8 服务发现定位器
发现的问题:
1.如果增加一个新的微服务,那么需要在gateway配置新服务的路由规则,但是一旦多了就很麻烦
--------------------------------------------------------------------------------------------------------------------------
解决:
使用自动定位功能 , 需要配置开启,访问资源时要添加微服务的名称
该配置启用Spring Cloud Gateway的服务发现定位器,自动将服务发现中的服务注册为路由,允许通过服务名称访问服务实例。
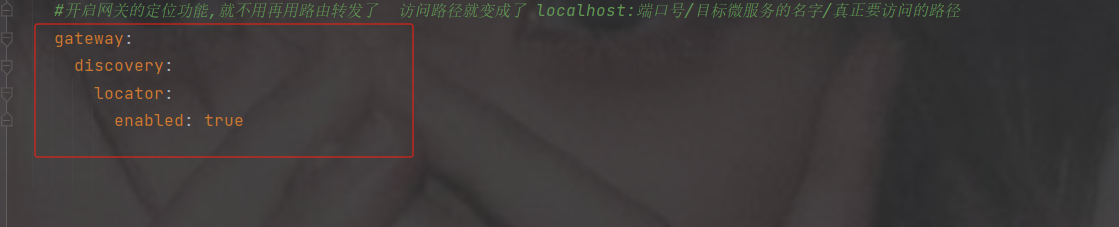
#配置端口号默认8080
server:
port: 8950
#设置应用的名称, 在注册中心显示的名称
spring:
application:
name: sys-gateway
cloud:
nacos:
discovery:
#设置nacos的注册中心地址默认是8848
server-addr: 192.168.191.1:8850
enabled: true #开启拉取功能
register-enabled: false #关闭注册功能 默认是true false后在注册中心不会显示
#开启网关的定位功能 访问路径就变成了 localhost:端口号/目标微服务的名字/真正要访问的路径
gateway:
discovery:
locator:
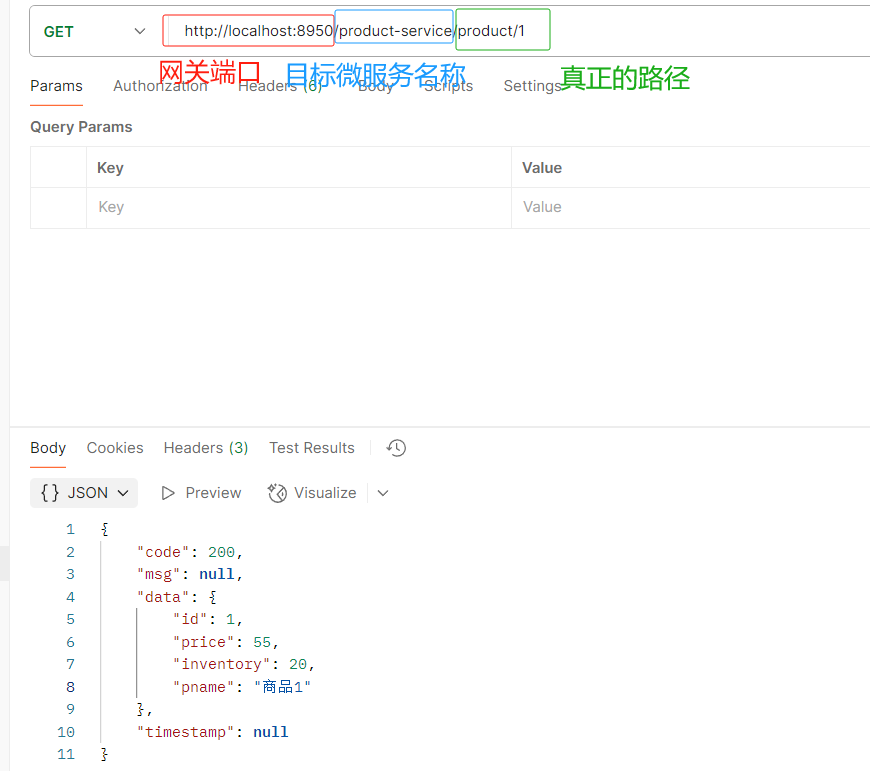
enabled: true访问路径
http://localhost:8950/product-service/product/1
6.9 过滤器
- 作用: 过滤器就是在请求的传递过程中,对请求和响应做一些操作
- 生命周期: Pre Post
- 分类: 局部过滤器(作用在某一个路由上) 全局过滤器(作用全部路由上)
在Gateway中, Filter的生命周期只有两个:“pre” 和 “post”。
- PRE: 这种过滤器在请求被路由之前调用。我们可利用这种过滤器实现身份验证、在集群中选择请求的微服务、记录调试信息等。
- POST:这种过滤器在路由到微服务以后执行。这种过滤器可用来为响应添加标准的HTTP Header、收集统计信息和指标、将响应从微服务发送给客户端等。
Gateway 的Filter从作用范围可分为两种: GatewayFilter与GlobalFilter。
- GatewayFilter:应用到单个路由或者一个分组的路由上。
- GlobalFilter:应用到所有的路由上。
1. 内置局部过滤器
像上面之前讲的用这个filters截取前缀就是它(局部过滤器)
在SpringCloud Gateway中内置了很多不同类型的网关路由过滤器。
Spring Cloud Gateway 内置的过滤器工厂 - 小菜鸟攻城狮 - 博客园
过滤器工厂 | 作用 | 参数 |
AddRequestHeader | 为原始请求添加Header | Header的名称及值 |
AddRequestParameter | 为原始请求添加请求参数 | 参数名称及值 |
AddResponseHeader | 为原始响应添加Header | Header的名称及值 |
DedupeResponseHeader | 剔除响应头中重复的值 | 需要去重的Header名称及去重策略 |
Hystrix | 为路由引入Hystrix的断路器保护 | HystrixCommand的名称 |
FallbackHeaders | 为fallbackUri的请求头中添加具体的异常信息 | Header的名称 |
PrefixPath | 为原始请求路径添加前缀 | 前缀路径 |
PreserveHostHeader | 为请求添加一个preserveHostHeader=true的属性,路由过滤器会检查该属性以决定是否要发送原始的Host | 无 |
RequestRateLimiter | 用于对请求限流,限流算法为令牌桶 | keyResolver、rateLimiter、statusCode、denyEmptyKey、emptyKeyStatus |
RedirectTo | 将原始请求重定向到指定的URL | http状态码及重定向的url |
RemoveHopByHopHeadersFilter | 为原始请求删除IETF组织规定的一系列Header | 默认就会启用,可以通过配置指定仅删除哪些Header |
RemoveRequestHeader | 为原始请求删除某个Header | Header名称 |
RemoveResponseHeader | 为原始响应删除某个Header | Header名称 |
RewritePath | 重写原始的请求路径 | 原始路径正则表达式以及重写后路径的正则表达式 |
RewriteResponseHeader | 重写原始响应中的某个Header | Header名称,值的正则表达式,重写后的值 |
SaveSession | 在转发请求之前,强制执行WebSession::save操作 | 无 |
secureHeaders | 为原始响应添加一系列起安全作用的响应头 | 无,支持修改这些安全响应头的值 |
SetPath | 修改原始的请求路径 | 修改后的路径 |
SetResponseHeader | 修改原始响应中某个Header的值 | Header名称,修改后的值 |
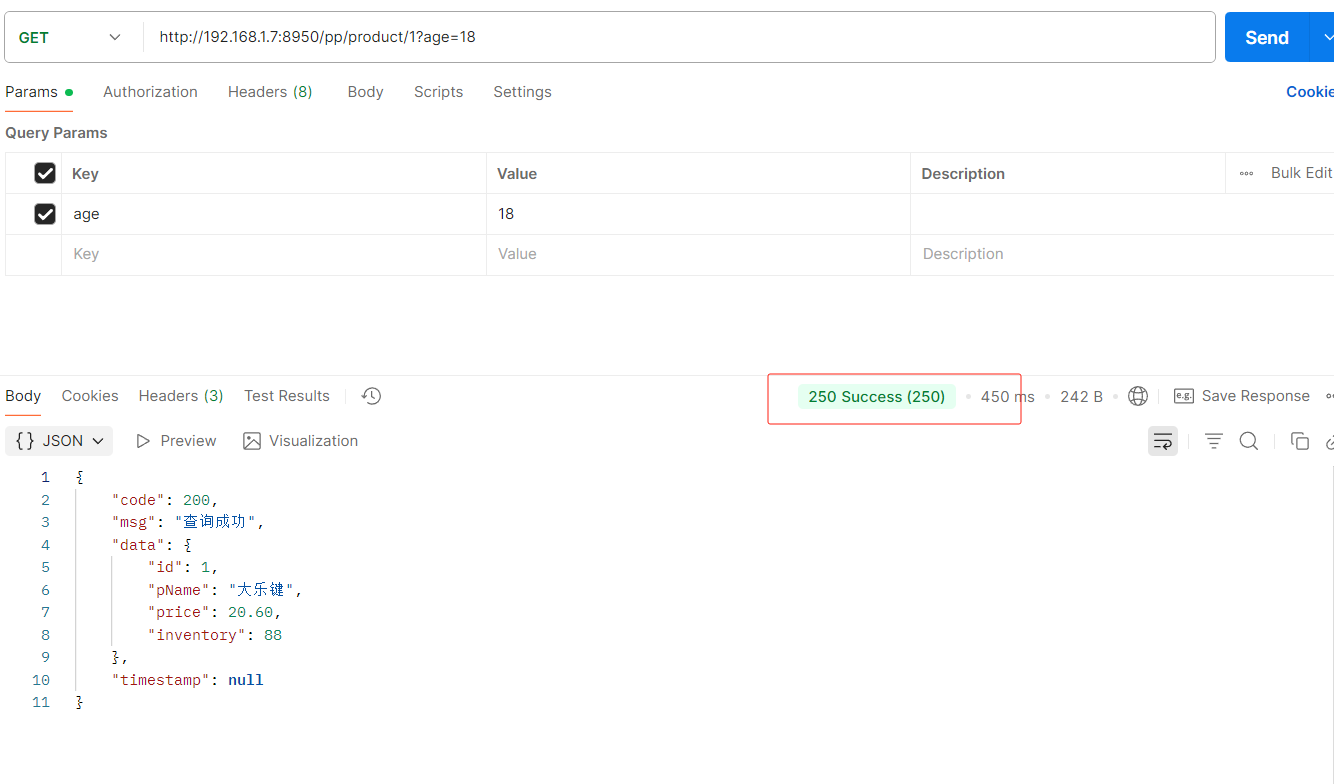
SetStatus | 修改原始响应的状态码 | HTTP 状态码,可以是数字,也可以是字符串 |
StripPrefix | 用于截断原始请求的路径 | 使用数字表示要截断的路径的数量 |
Retry | 针对不同的响应进行重试 | retries、statuses、methods、series |
RequestSize | 设置允许接收最大请求包的大小。如果请求包大小超过设置的值,则返回 413 Payload Too Large | 请求包大小,单位为字节,默认值为5M |
ModifyRequestBody | 在转发请求之前修改原始请求体内容 | 修改后的请求体内容 |
ModifyResponseBody | 修改原始响应体的内容 | 修改后的响应体内容 |
Default | 为所有路由添加过滤器 | 过滤器工厂名称及值 |
再添加一个设置成功响应的状态码
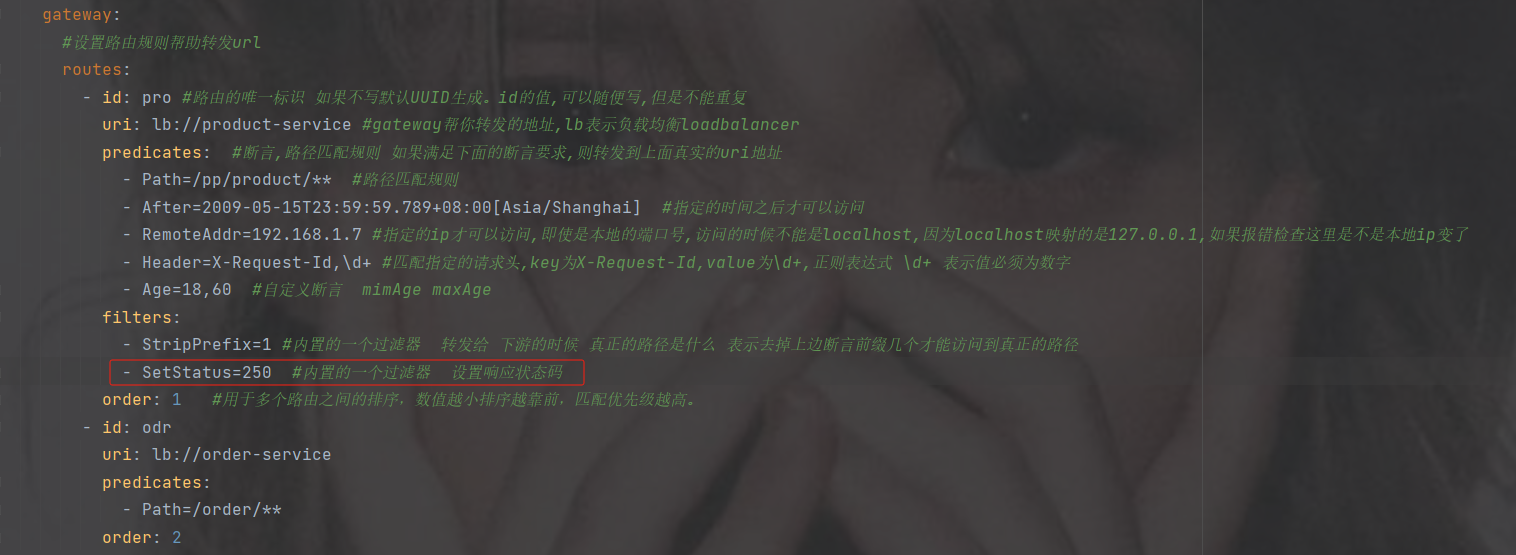
接口访问会发现状态200改为了250
2. 全局过滤器
加一个hutool工具依赖
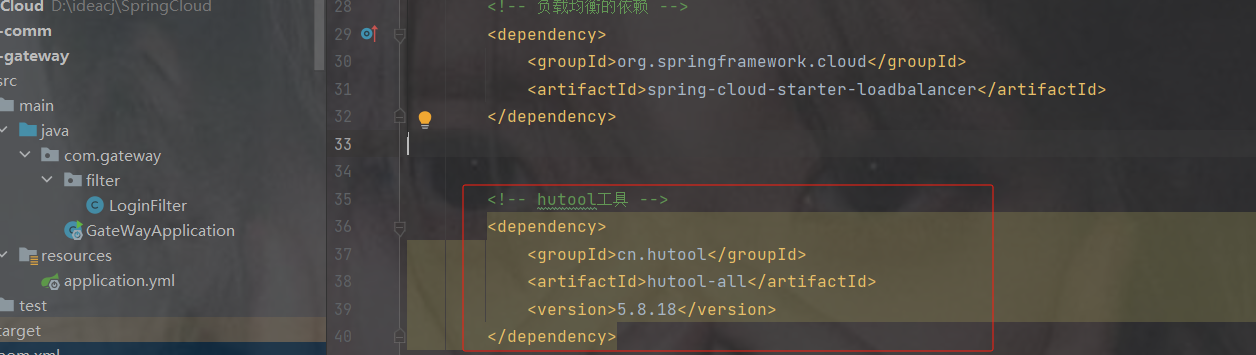
            cn.hutool
            hutool-all
            5.8.18
在gateway中创建filter包并且创建filter类
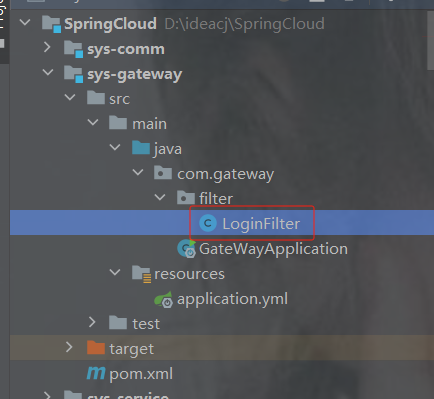
实现GlobalFilter,Ordered接口

filter是过滤器规则,getOrder是配置过滤器优先级
配置过滤规则
在配置中加一个白名单
#配置端口号默认8080
server:
  port: 8950
#设置应用的名称, 在注册中心显示的名称
spring:
  application:
    name: sys-gateway
  cloud:
    nacos:
      discovery:
        #设置nacos的注册中心地址默认是8848
        server-addr: 192.168.191.1:8850
        enabled: true #开启拉取功能
        register-enabled: false  #关闭注册功能 默认是true  false后在注册中心不会显示
    #开启网关的定位功能,就不用再用路由转发了  访问路径就变成了 localhost:端口号/目标微服务的名字/真正要访问的路径
    gateway:
      discovery:
        locator:
          enabled: true
#放行白名单
whiteName: /login
package com.gateway.filter;
import cn.hutool.core.util.ArrayUtil;
import com.alibaba.cloud.commons.lang.StringUtils;
import org.springframework.beans.factory.annotation.Value;
import org.springframework.cloud.gateway.filter.GatewayFilterChain;
import org.springframework.cloud.gateway.filter.GlobalFilter;
import org.springframework.core.Ordered;
import org.springframework.http.HttpStatus;
import org.springframework.http.server.RequestPath;
import org.springframework.http.server.reactive.ServerHttpRequest;
import org.springframework.http.server.reactive.ServerHttpResponse;
import org.springframework.stereotype.Component;
import org.springframework.web.server.ServerWebExchange;
import reactor.core.publisher.Mono;
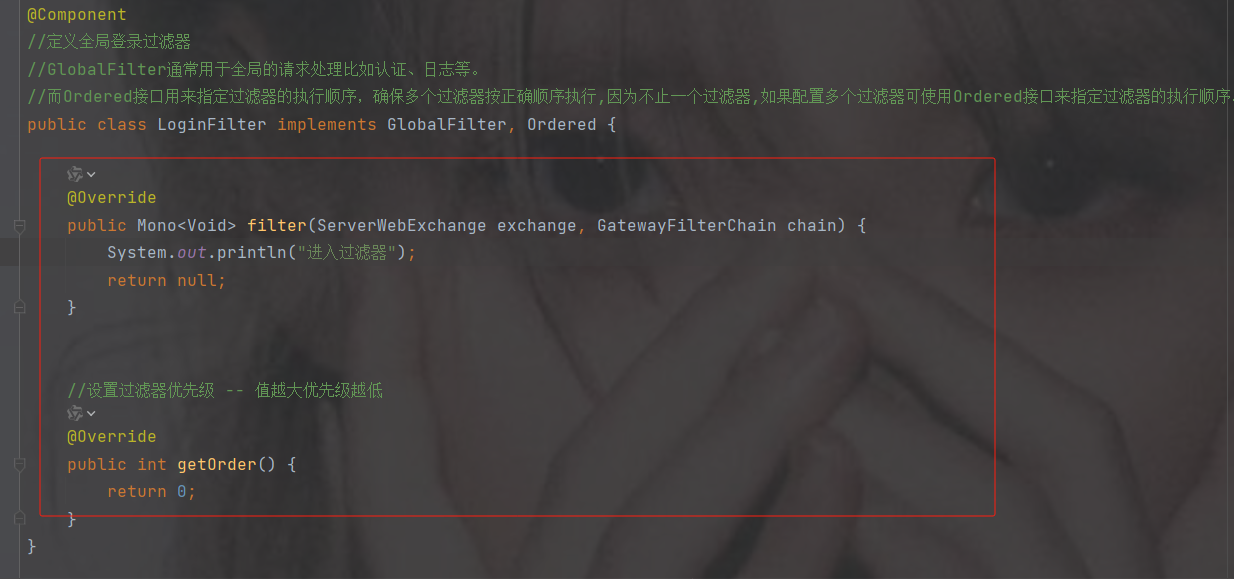
@Component
//定义全局登录过滤器
//GlobalFilter通常用于全局的请求处理比如认证、日志等。
//而Ordered接口用来指定过滤器的执行顺序,确保多个过滤器按正确顺序执行,因为不止一个过滤器,如果配置多个过滤器可使用Ordered接口来指定过滤器的执行顺序。
public class LoginFilter implements GlobalFilter, Ordered {
@Value("${whiteName}") //白名单
private String whiteName;
@Override
public Mono filter(ServerWebExchange exchange, GatewayFilterChain chain) {
//字符string 用 "," 分割变为集合
System.out.println(whiteName);
String[] whiteNames = whiteName.split(",");
//获取请求对象
ServerHttpRequest request = exchange.getRequest();
//获取响应对象
ServerHttpResponse response = exchange.getResponse();
//1.获取前端请求路径
String path = request.getURI().getPath();
System.out.println("请求路径:" + path);
//2.判断该路径是否包含匿名访问的路径--->匿名路径:不用登录就可以访问的比如一些登录页面、发送短信的路径等
if (ArrayUtil.contains(whiteNames, path)) {//判断路径是否包含在白名单中
//放行
return chain.filter(exchange);
} else {
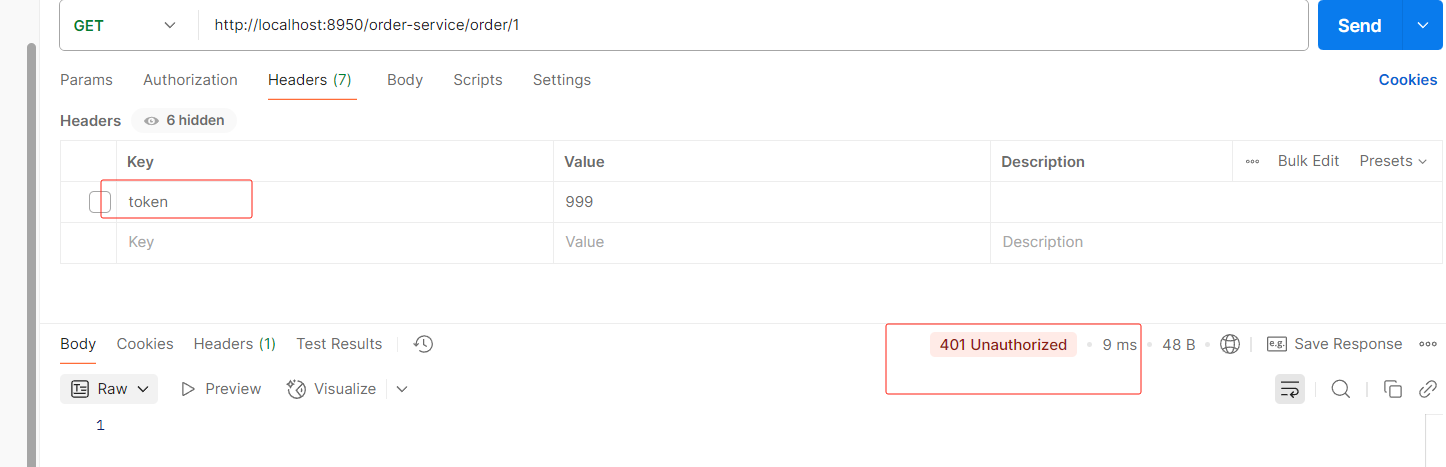
//3.路径不是匿名的就获取token,判断是否携带token,携带从redis中获取token,存在刷新token并且放行,不存在拦截,未携带token直接拦截
//获得请求参数中的第一个token,token可能有多个,但是一般token是在请求头
/*String token = request.getQueryParams().getFirst("token");*/
//获取请求头中第一个token
String token = request.getHeaders().getFirst("token");
//判断token不是空白的
if (StringUtils.isNotBlank(token)){
//TODO 4.从redis中获取token,有就刷新redis中的token过期时间并放行,没有就拦截
//放行
return chain.filter(exchange);
}else {
System.out.println("token为空");
response.setStatusCode(HttpStatus.UNAUTHORIZED);
return response.setComplete();
}
}
}
//设置过滤器优先级 -- 值越大优先级越低
@Override
public int getOrder() {
return 0;
}
} 没携带token
携带token
6.10 网关添加跨域配置
未来给前端提供的接口肯定只提供网关接口,这样走网关分发各个服务
http://网关ip:网关端口号/服务名/路径...
举例:http://localhost:8950/order-service/order/1/2
但是我们有可能会出现跨域的问题,那么问题来了,我们需要在各个服务都要加跨域吗?
---不需要,只需要在网关配置即可,
注意,跨域只能设置一次,如果写重了,前端会报错提示:允许跨域的头多了
package com.gateway.config;
import org.springframework.context.annotation.Bean;
import org.springframework.context.annotation.Configuration;
import org.springframework.web.cors.CorsConfiguration;
import org.springframework.web.cors.reactive.CorsWebFilter;
import org.springframework.web.cors.reactive.UrlBasedCorsConfigurationSource;
/**
* 配置跨域的信息
* 所有的请求 都允许跨域
* 任意的来源
* 任意的请求方法都可以
* 跨域只能设置一次
*/
@Configuration
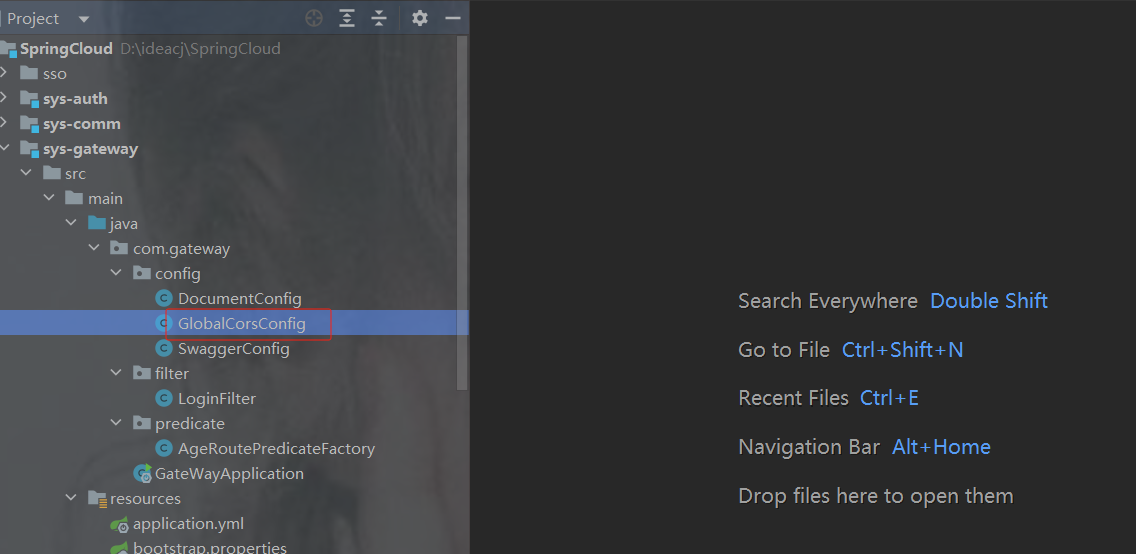
public class GlobalCorsConfig {
// 只能写一次 网关里面去写
// 如果写重了 前端提示 允许跨域的头多了
@Bean
public CorsWebFilter corsWebFilter(){
UrlBasedCorsConfigurationSource source = new UrlBasedCorsConfigurationSource();
CorsConfiguration configuration = new CorsConfiguration();
// 配置跨域的信息
configuration.addAllowedHeader("*");
configuration.addAllowedMethod("*");
// SpringBoot升级到2.4.0 之后需要使用该配置
configuration.addAllowedOriginPattern("*");
configuration.setAllowCredentials(true);
source.registerCorsConfiguration("/**",configuration);
return new CorsWebFilter(source);
}
}7.配置中心nacos
7.1为什么需要配置中心
首先我们来看一下,微服务架构下关于配置文件的一些问题:
1. 配置文件相对分散。
在一个微服务架构下,配置文件会随着微服务的增多变的越来越多,而且分散 在各个微服务中,不好统一配置和管理。
2. 配置文件无法区分环境。
微服务项目可能会有多个环境,例如:测试环境、预发布环境、生产环 境。每一个环境所使用的配置理论上都是不同的,一旦需要修改,就需要我们去各个微服务下手动 维护,这比较困难。
3. 配置文件无法实时更新。
我们修改了配置文件之后,必须重新启动微服务才能使配置生效,这对一 个正在运行的项目来说是非常不友好的。 基于上面这些问题,我们就需要配置中心的加入来解决这些问题。
配置中心的思路是:
首先把项目中各种配置全部都放到一个集中的地方进行统一管理,并提供一套标准的接口。
当各个服务需要获取配置的时候,就来配置中心的接口拉取自己的配置。
当配置中心中的各种参数有更新的时候,也能通知到各个服务实时的过来同步最新的信息,使之动 态更新。
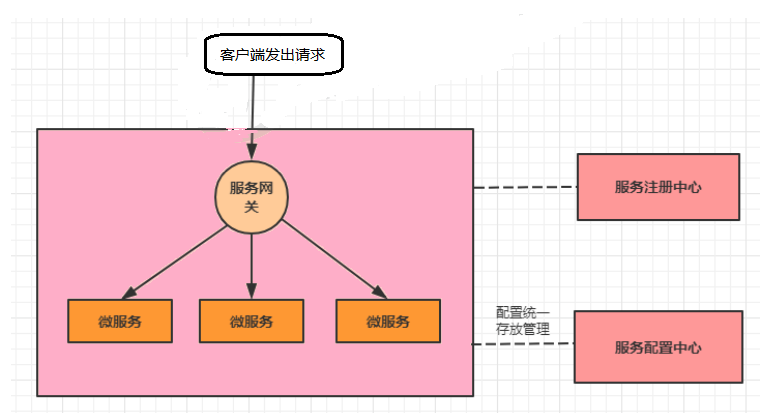
当加入了服务配置中心之后,我们的系统架构图会变成下面这样
------------------------------------------------------------------------------------------------------------------------
解决方法:需要一个微服务的配置管理器。用来管理微服务的配置文件,
7.2 配置中心组件有哪些
1.Apollo
Apollo是由携程开源的分布式配置中心。特点有很多,比如:配置更新之后可以实时生效,支持灰 度发布功能,并且能对所有的配置进行版本管理、操作审计等功能,提供开放平台API。并且资料 也写的很详细。
2.Disconf
Disconf是由百度开源的分布式配置中心。它是基于Zookeeper来实现配置变更后实时通知和生效 的。
3.SpringCloud Config--已过时
这是Spring Cloud中带的配置中心组件。它和Spring是无缝集成,使用起来非常方便,并且它的配 置存储支持Git。不过它没有可视化的操作界面,配置的生效也不是实时的,需要重启或去刷新。
4.Nacos
这是SpingCloud alibaba技术栈中的一个组件,前面我们已经使用它做过服务注册中心。其实它也 集成了服务配置的功能,我们可以直接使用它作为服务配置中心。
7.3 如何使用nacos配置中心
官网:
Nacos config · alibaba/spring-cloud-alibaba Wiki
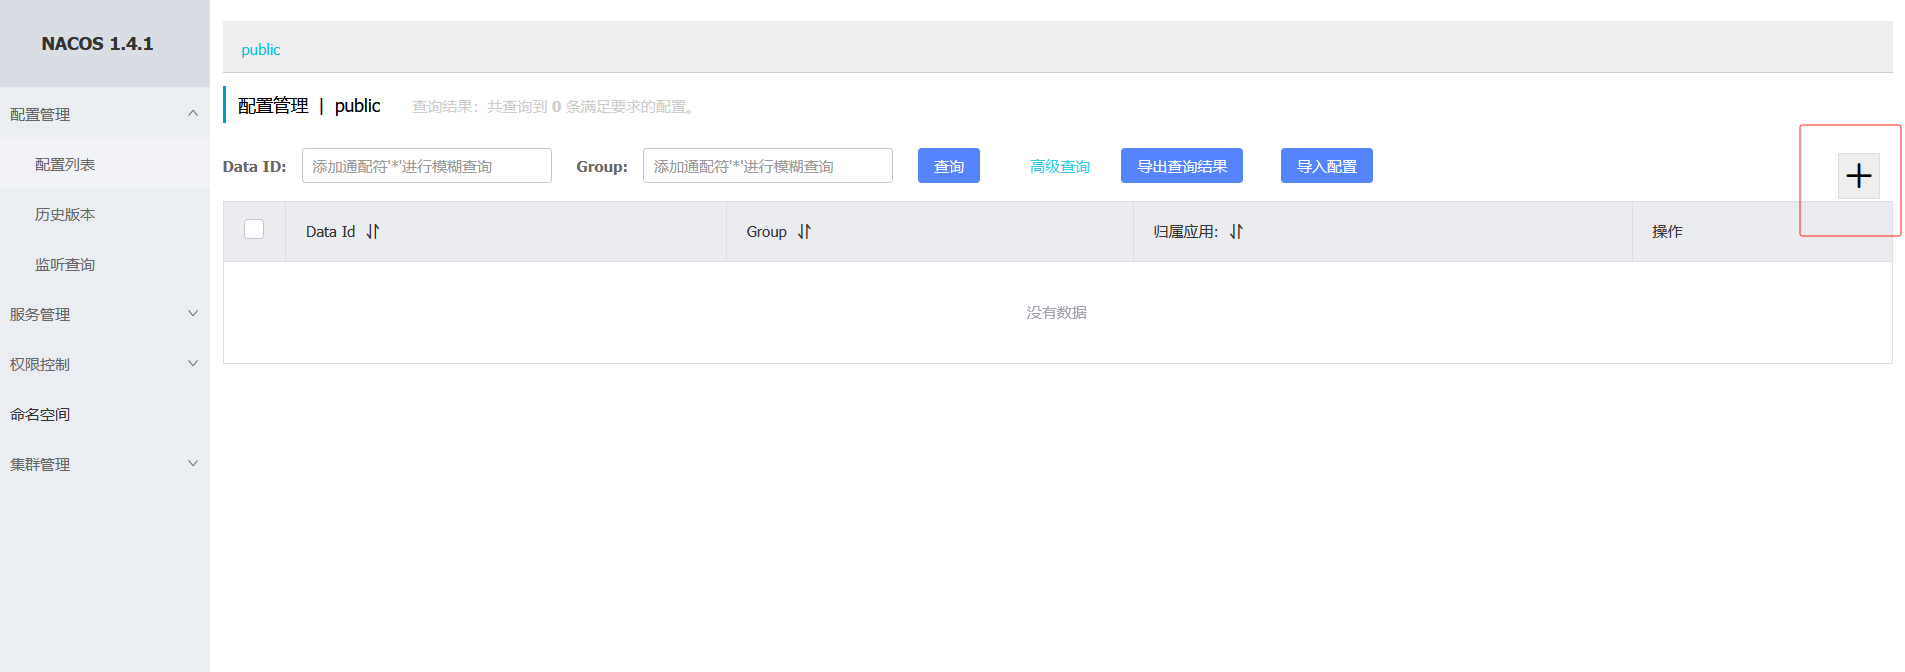
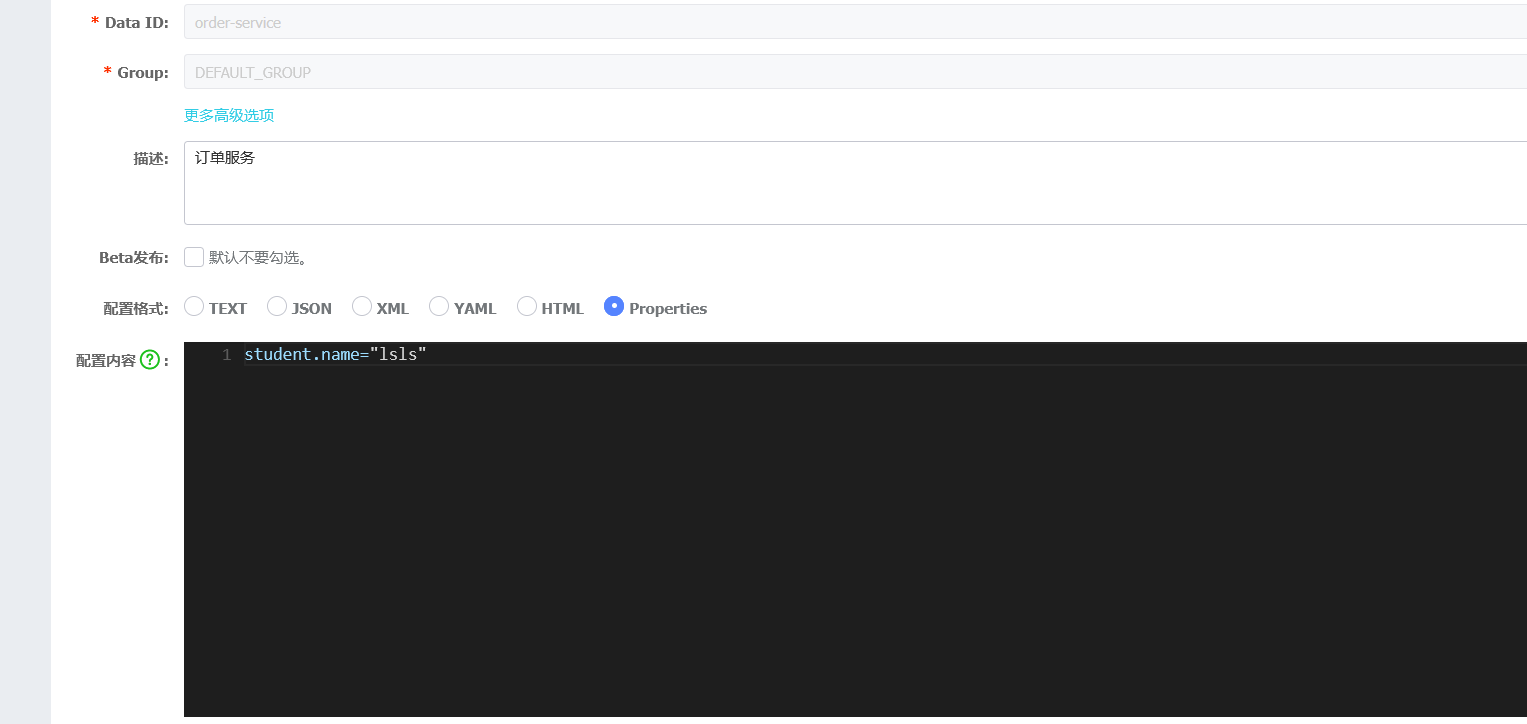
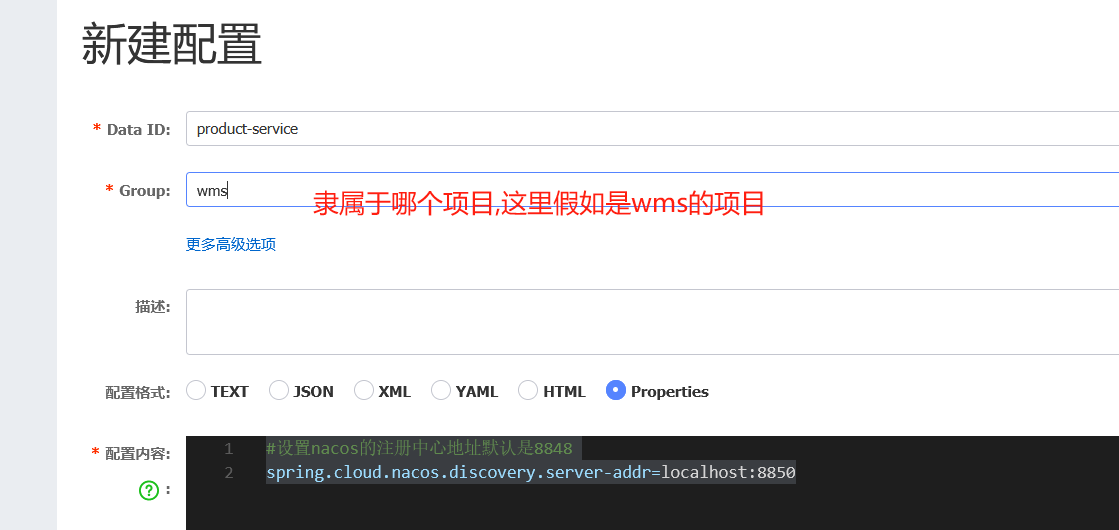
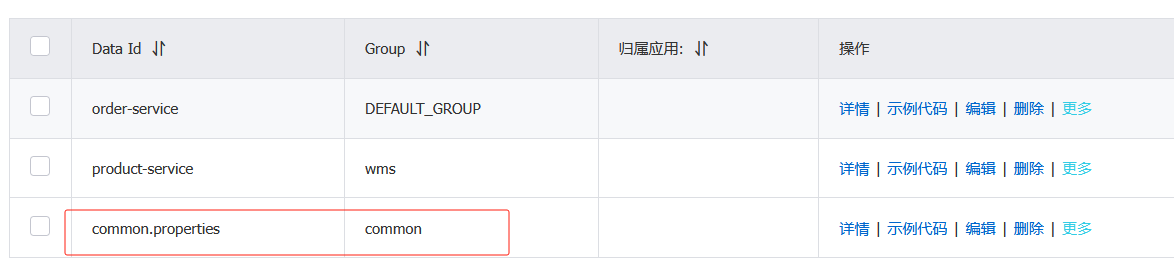
在配置中心找到创建配置,低版本如下图
注: 如果之前配置过了可以选择导入配置,只有加了配置后,才会有导出配置按钮
高版本会显示

说明
Data ID 一定要对应服务的名称
如果指定了开发环境就还需要 " -开发环境 "
类型properties和yml可加可不加
注意: 配置格式类型要和你项目中的格式类型保持一致,否则会找不到

1. 创建配置

创建完成界面
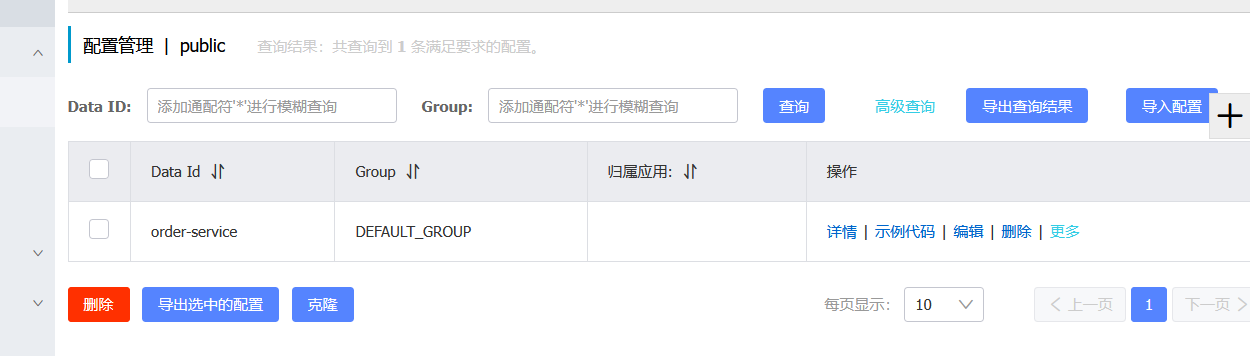
2.项目使用该配置
加配置中心依赖
            com.alibaba.cloud
            spring-cloud-starter-alibaba-nacos-config


            org.springframework.cloud
            spring-cloud-starter-bootstrap
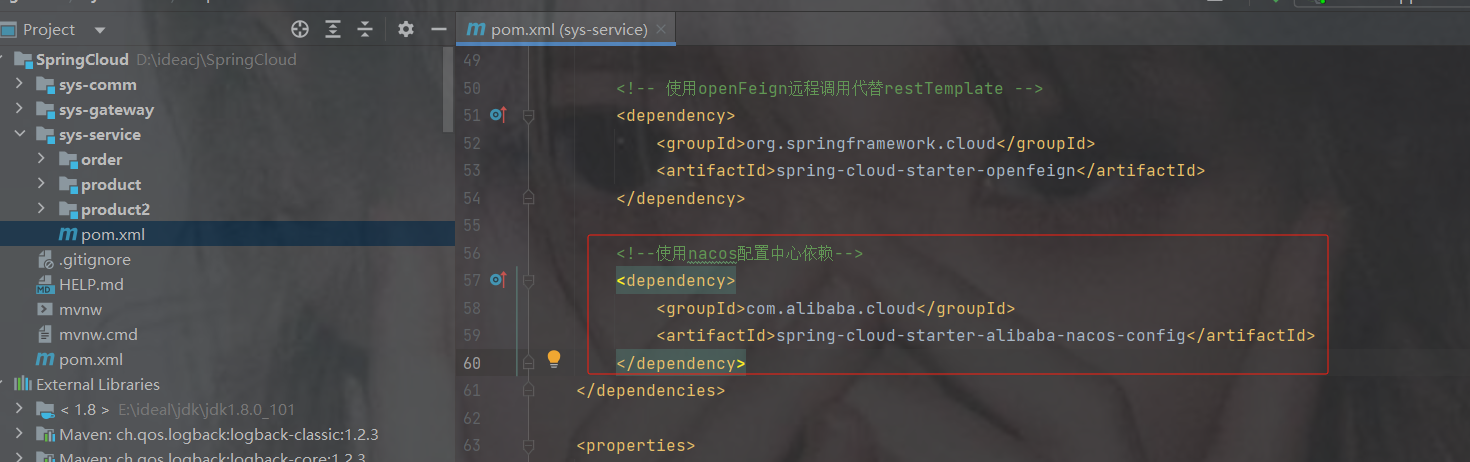
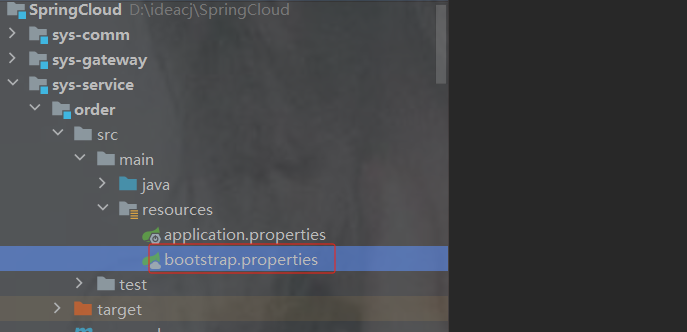
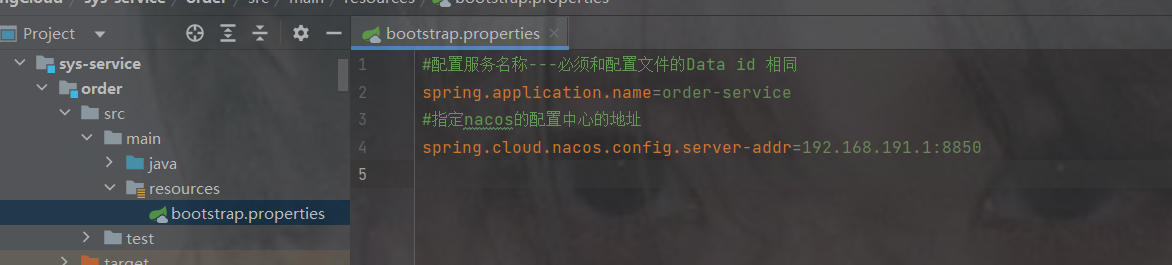
3.创建bootstrap配置文件以及配置内容

yml或者properties都可以
注意:
1.nacos配置的文件类型格式要跟项目bootstrap的格式保持一致, yml 和properties一致
2.如下示例配置在service里面,那么服务必须在所有的服务配置bootstrap,否则启动后会报错找不到nacos配置
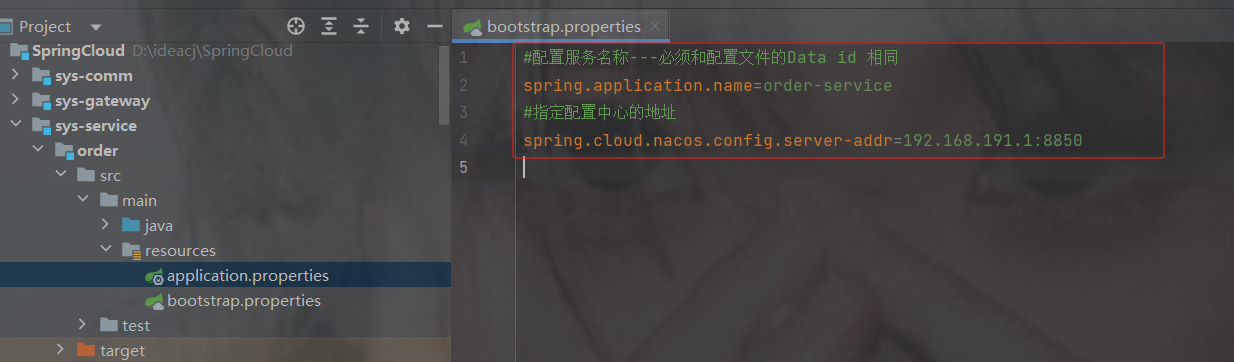
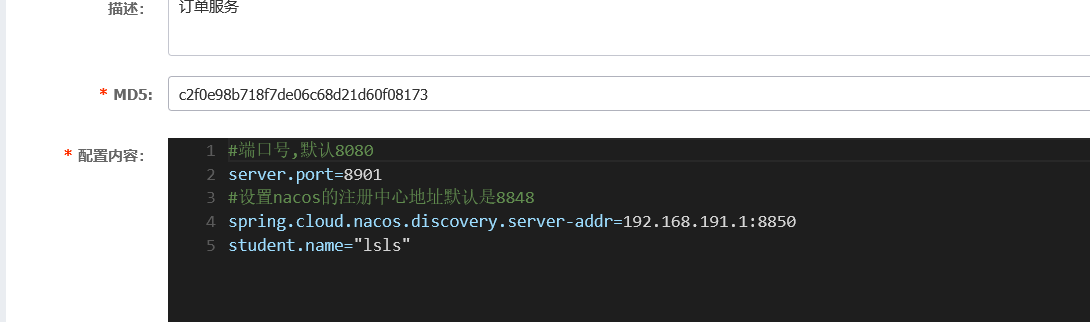
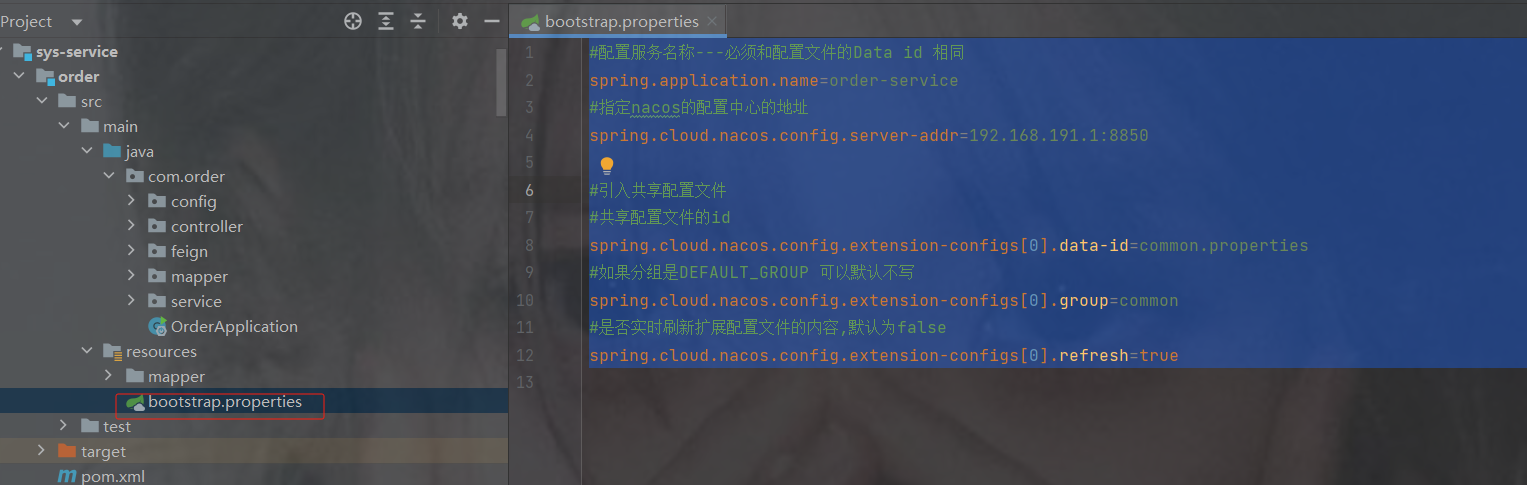
#配置服务名称---必须和配置文件的Data id 相同
spring.application.name=order-service
#指定配置中心的地址
spring.cloud.nacos.config.server-addr=192.168.191.1:8850
4.测试配置文件中是否生效

package com.order.controller;
import com.comm.entity.Product;
import com.comm.utlis.Result;
import com.fasterxml.jackson.databind.ObjectMapper;
import com.order.feign.ProductFeign;
import org.springframework.beans.factory.annotation.Autowired;
import org.springframework.beans.factory.annotation.Value;
import org.springframework.cloud.client.ServiceInstance;
import org.springframework.cloud.context.config.annotation.RefreshScope;
import org.springframework.web.bind.annotation.GetMapping;
import org.springframework.web.bind.annotation.PathVariable;
import org.springframework.web.bind.annotation.RequestMapping;
import org.springframework.web.bind.annotation.RestController;
import java.util.List;
import java.util.Random;
@RestController
@RequestMapping("/order")
public class OrderControllerByOpenFeign {
// 远程调用调用接口
@Autowired
private ProductFeign productFeign; //spring启动时会为使用@FeignClient注解的接口创建代理实现类
@GetMapping("{pid}")
public Result order(@PathVariable Integer pid) {
//1.根据商品的id 查询商品的价格 库存
//2.存入订单
Result result = productFeign.getProductById(pid);
//转换对象不要再使用fastjson了
Product product = new ObjectMapper().convertValue(result.getData(), Product.class);
System.out.println("订单存储的数据:" + product);
//假装这里是存储订单的代码
return Result.ok(null);
}
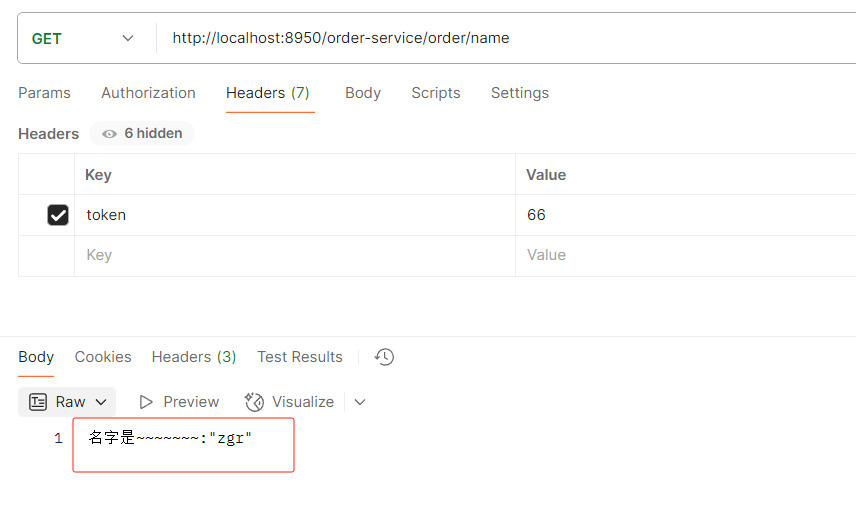
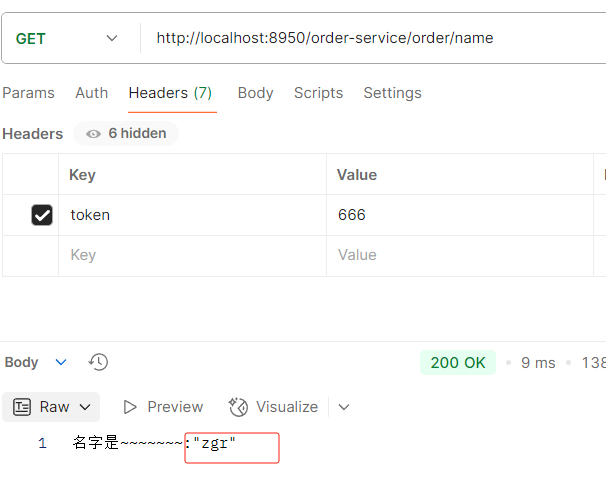
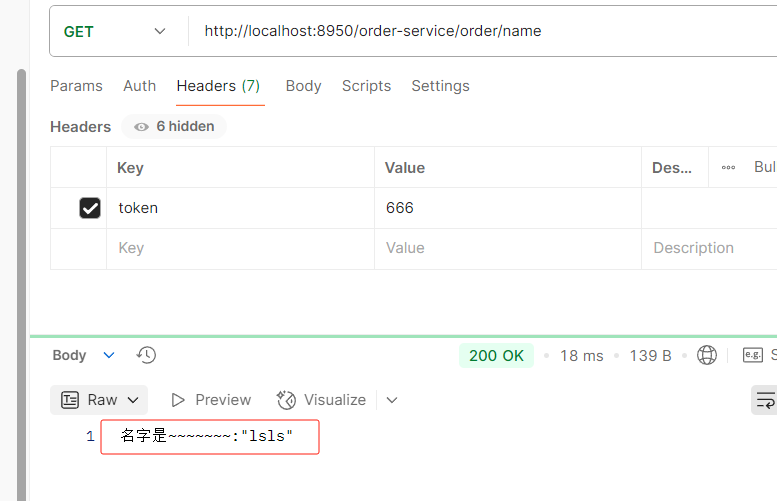
@Value("${student.name}")
private String name;
@GetMapping("/name")
public String name() {
return "名字是~~~~~~~:" + name;
}
}发现已生效
7.4 实时刷新配置
配置中心中配置文件修改后,无需重启服务,则自动更新内容
加注解@RefreshScope
加完后重启服务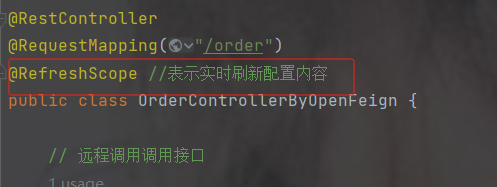
访问一下路径查看name是之前的
在nacos修改name值
直接访问接口不要重启服务,验证实时刷新配置成功了
7.5 建议以后把微服务的配置信息通用写在配置中心
这里演示的是订单服务,注意商品是两个服务,所以不能在配置中心配置端口号,商品可看7.6配置
把applicanton.properties的配置放到nacos中
配置中心配置好,删掉applicanton.properties
只留nacos配置中心的地址以及服务名称
不用配置注册中心是因为上图已经配置在nacos配置中了
启动查看成功
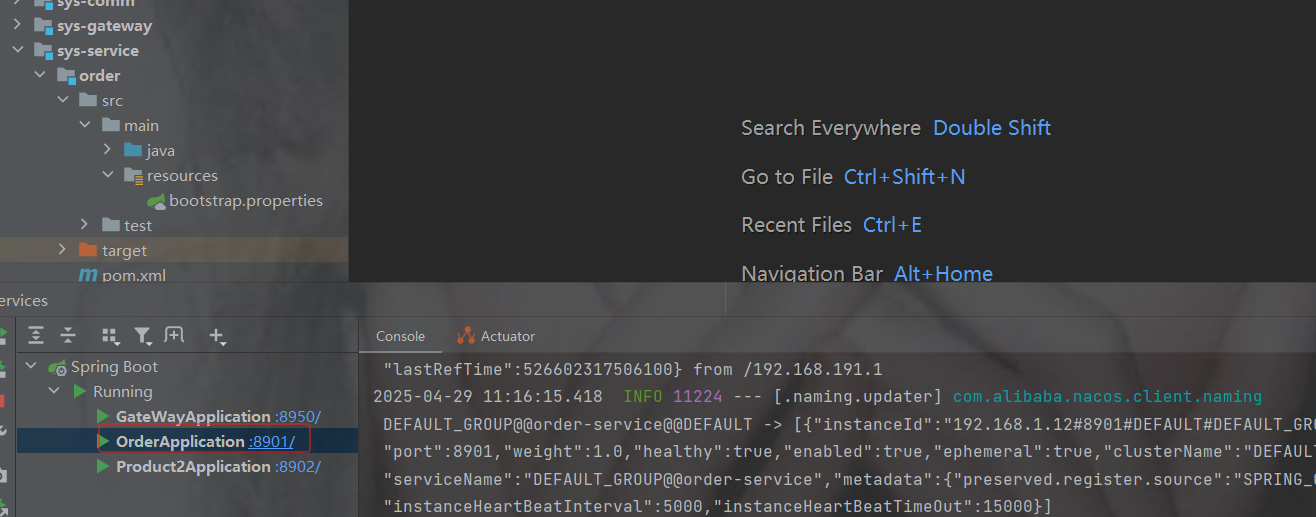
并且服务列表也在
7.6 配置文件指定组名
未来在公司开发的项目很多,需要规范点分组
注意因为商品有两个服务所以不能设置端口号
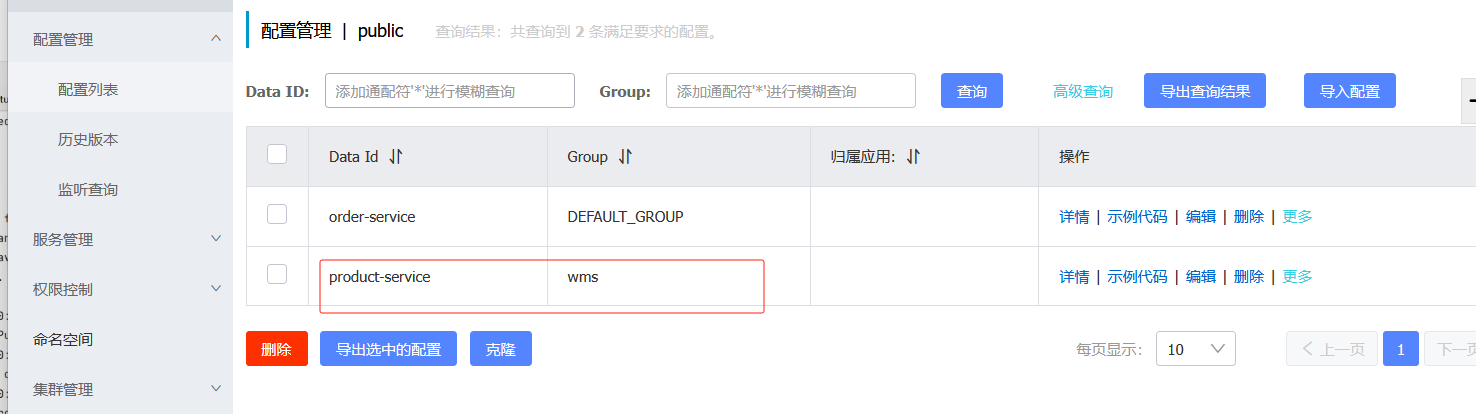
端口号只需要在bootstrap里配置就好了,但是会发现下面会报错
因为默认读的组是DEFAULT_GROUP,而上面配置的是wms分组
spring.cloud.nacos.config.group=你起的组名配置分组名称重启就成功了

两个服务也在正常运行
7.7 命名空间
命名空间可用于进行不同环境的配置隔离。一般一个环境划分到一个命名空间
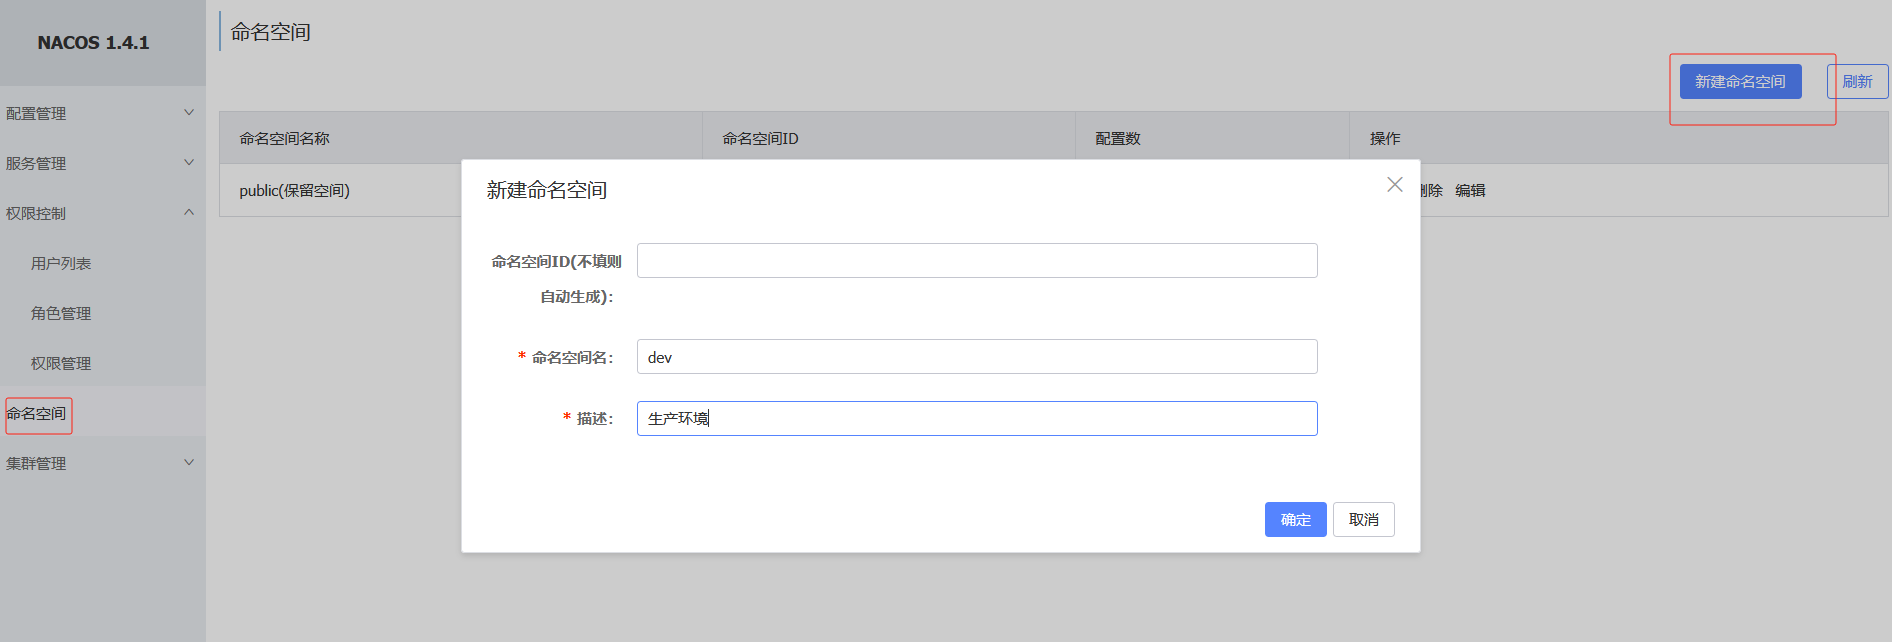
如果不设置命名空间id自动生成
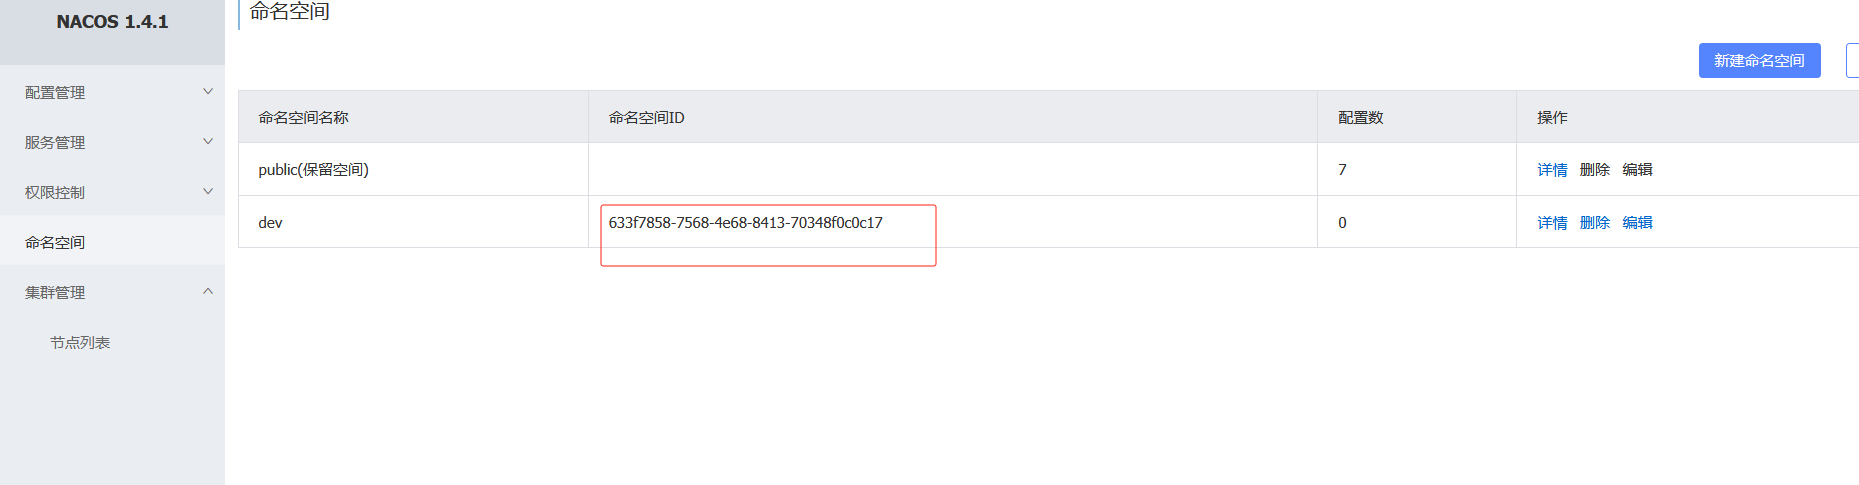
点击dev即可切换

同样的创建商品的配置
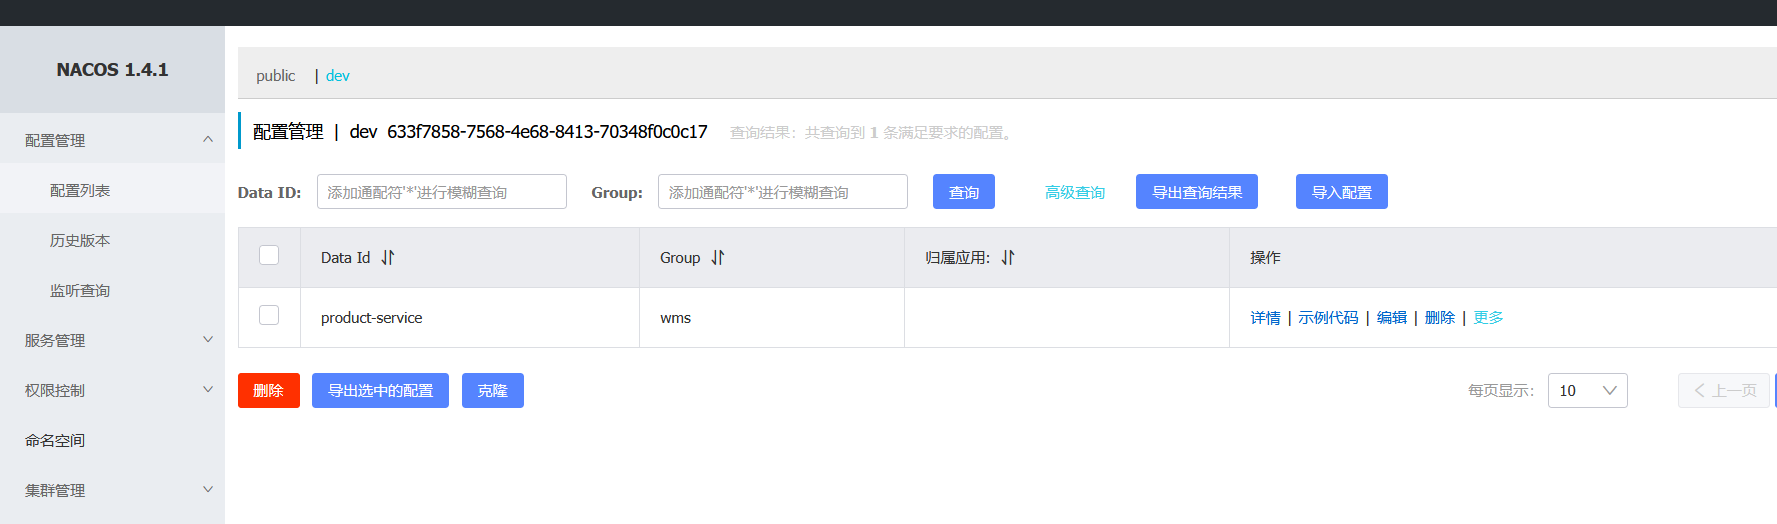
配置设置命名空间,默认是public,如果没设置命名空间可不加spring.cloud.nacos.config.namespace=命名空间id
7.8 多个微服务共享一个配置
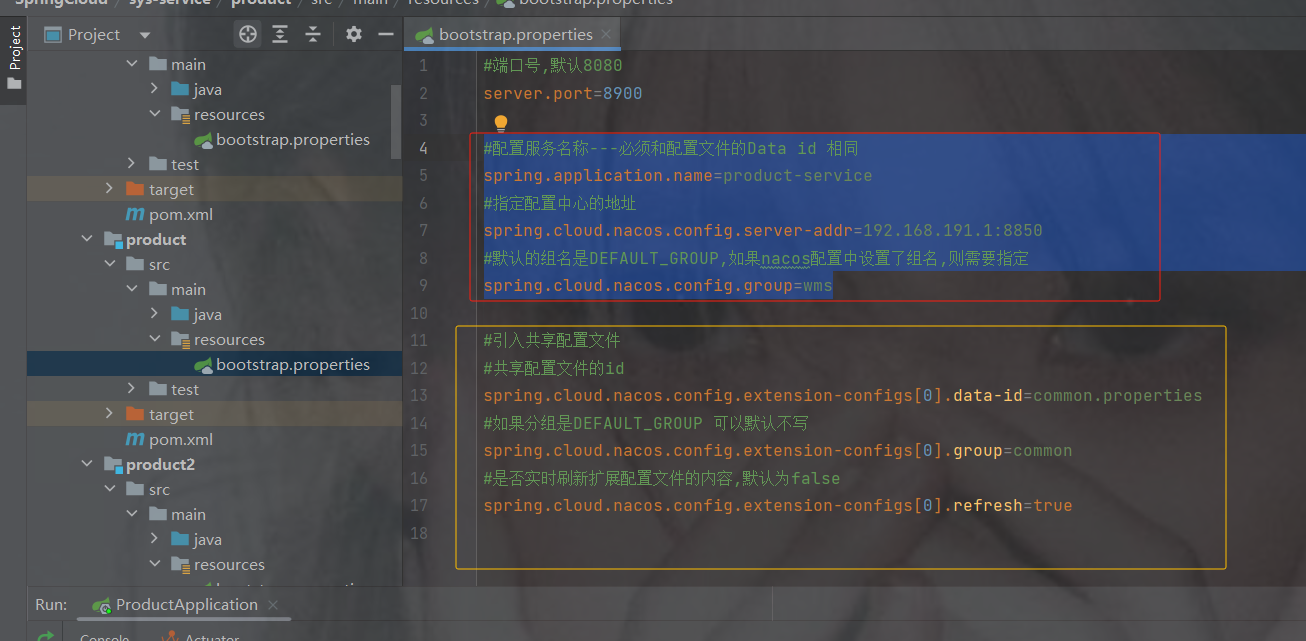
多个微服务可能存在相同的配置内容,那么我们就可以把这些相同配置的内容,独立提取到一个新的配置文件中,让这些微服务共享这个配置文件
创建共享配置,把公共的配置提取出来,以后一些一样的只需要修改共享配置即可,不用一个个修改了
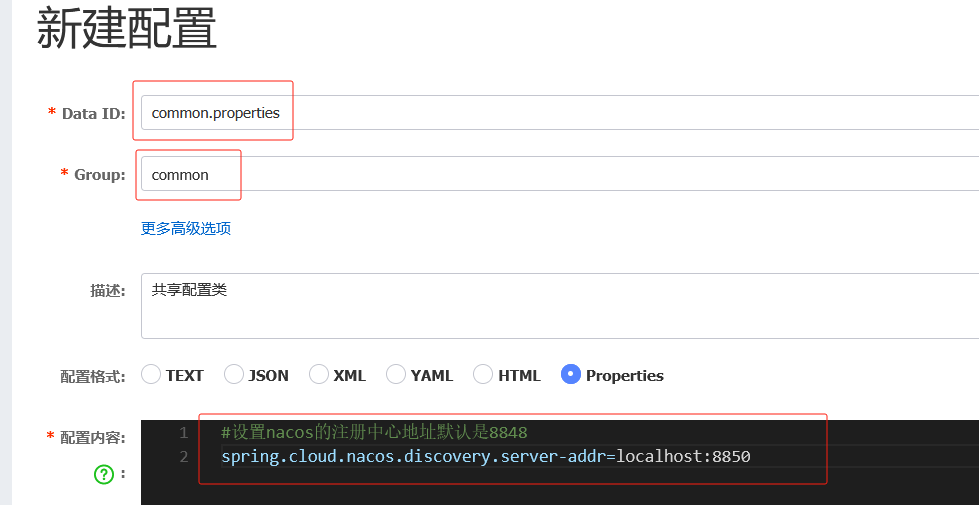
多个微服务共享的配置
删掉这两个配置里的nacos注册中心地址

此时重启服务是没有用的,因为注册中心被提取到共享配置里了
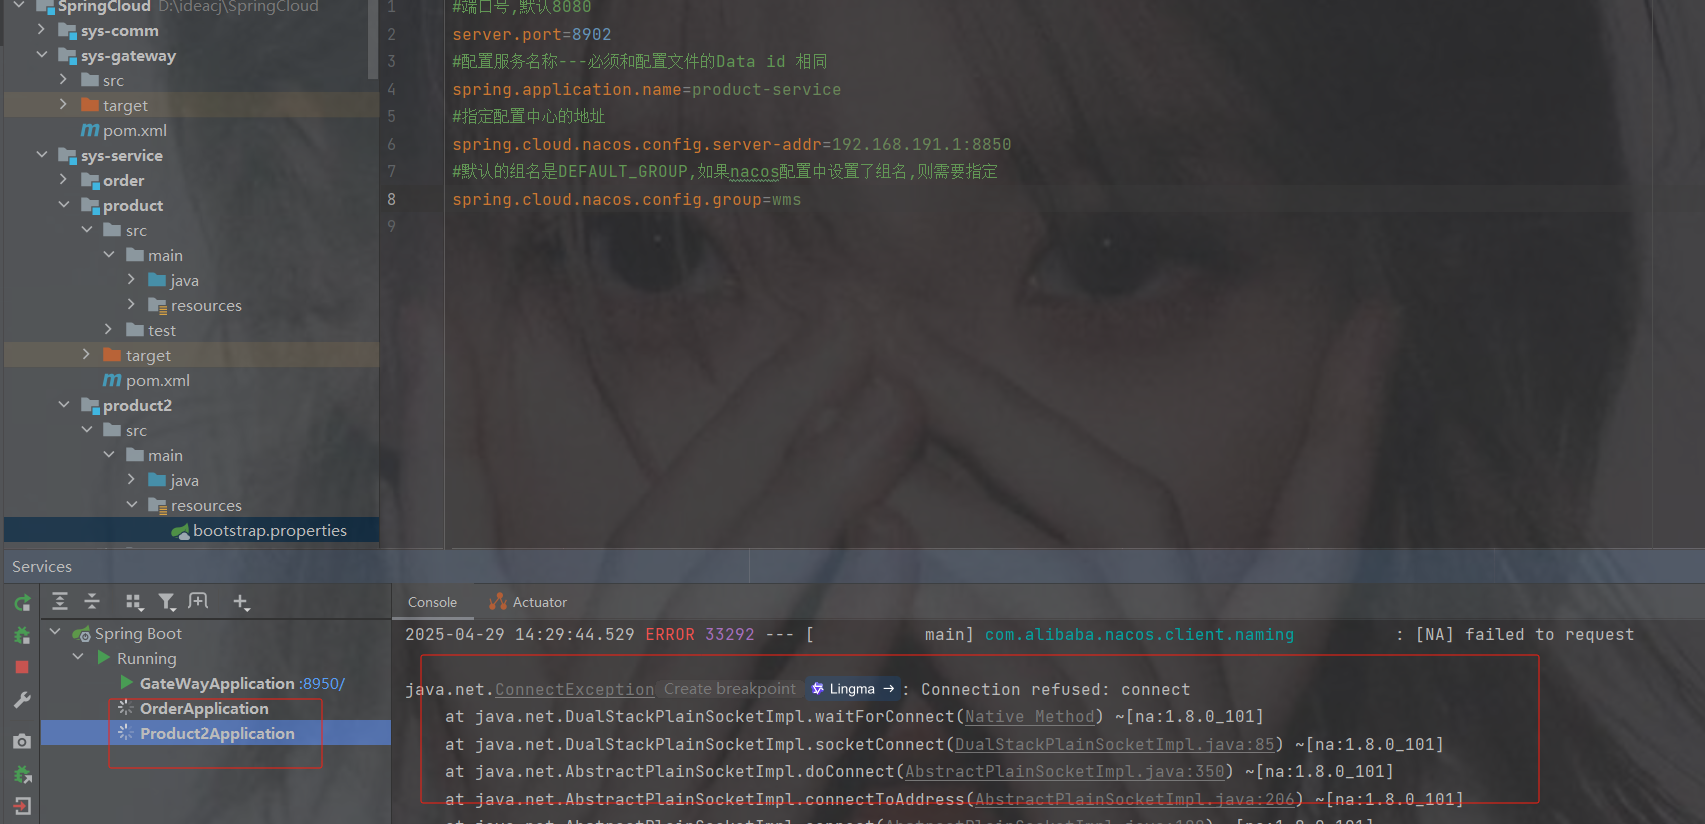
点击查看所需要的配置参数
spring.cloud.nacos.config.extension-configs
是一个数组并且需要的类型是Config类型,点击Config查看

dataId 共享配置的名字
group 共享配置的分组 ---如果分组是DEFAULT_GROUP 可以默认不写
refresh 是否实时刷新扩展配置文件的内容,默认为false
properties写法
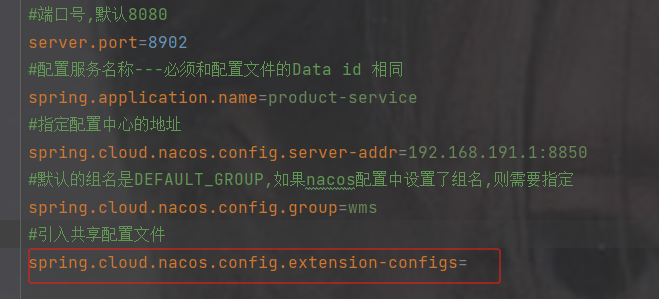
#引入共享配置文件
#共享配置文件的id
spring.cloud.nacos.config.extension-configs[0].data-id=文件id
#如果分组是DEFAULT_GROUP 可以默认不写
spring.cloud.nacos.config.extension-configs[0].group=分组名
#是否实时刷新扩展配置文件的内容,默认为false
spring.cloud.nacos.config.extension-configs[0].refresh=true
yml写法
spring:
  cloud:
    nacos:
      config:
        # 共享配置
        shared-configs:
          - data-id: common.properties
            group: common
            refresh: true
配置完重启发现启动成功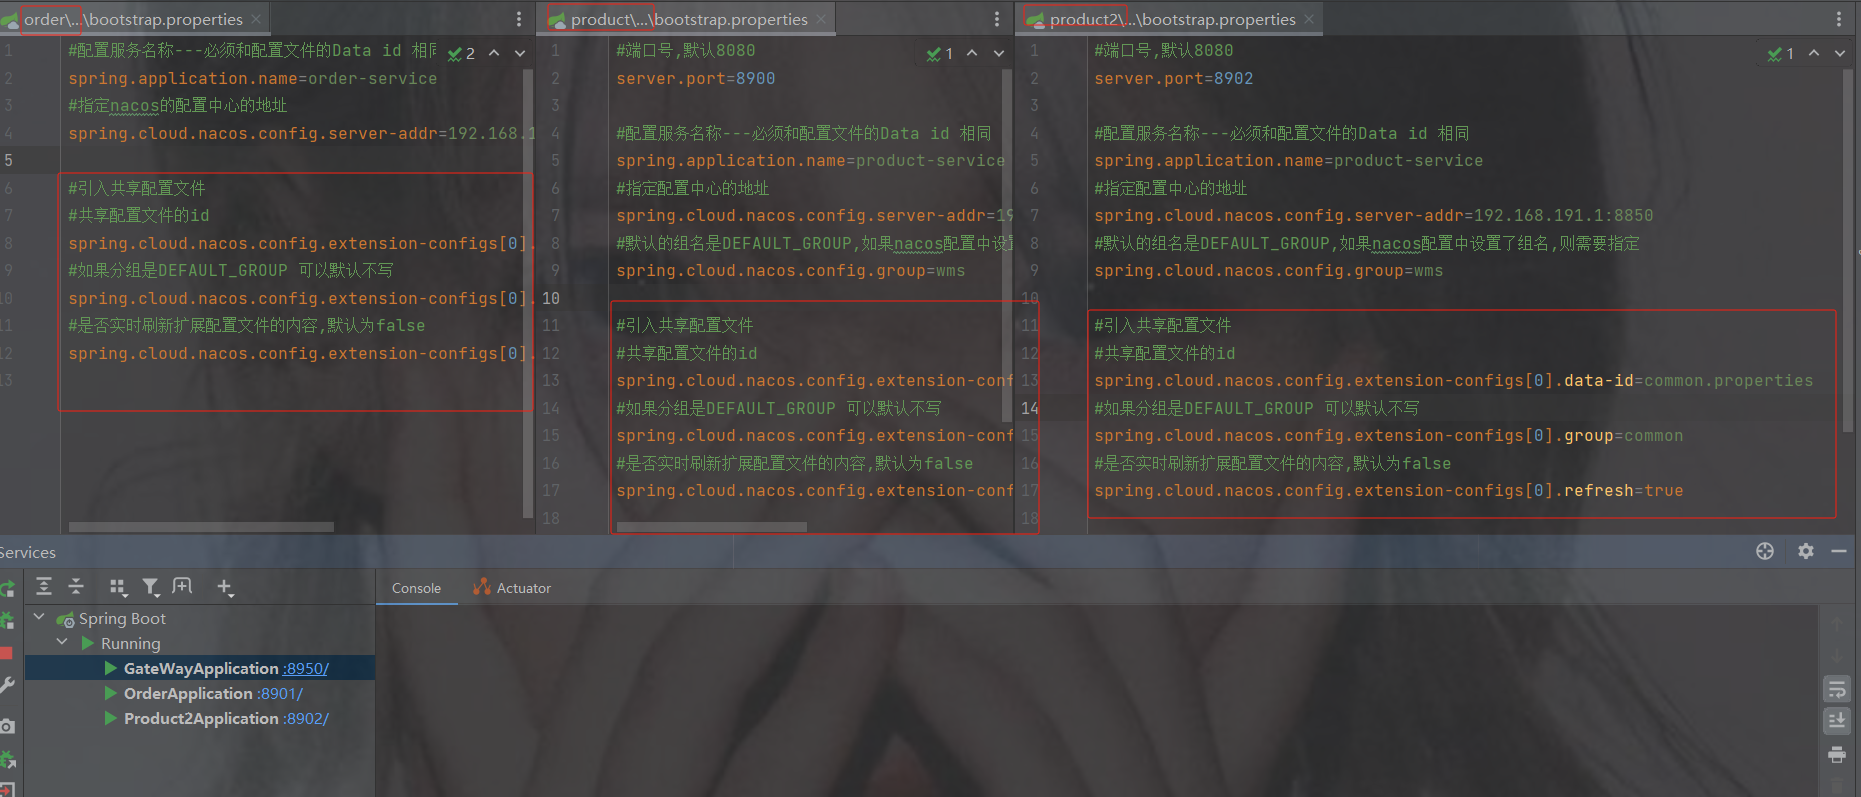
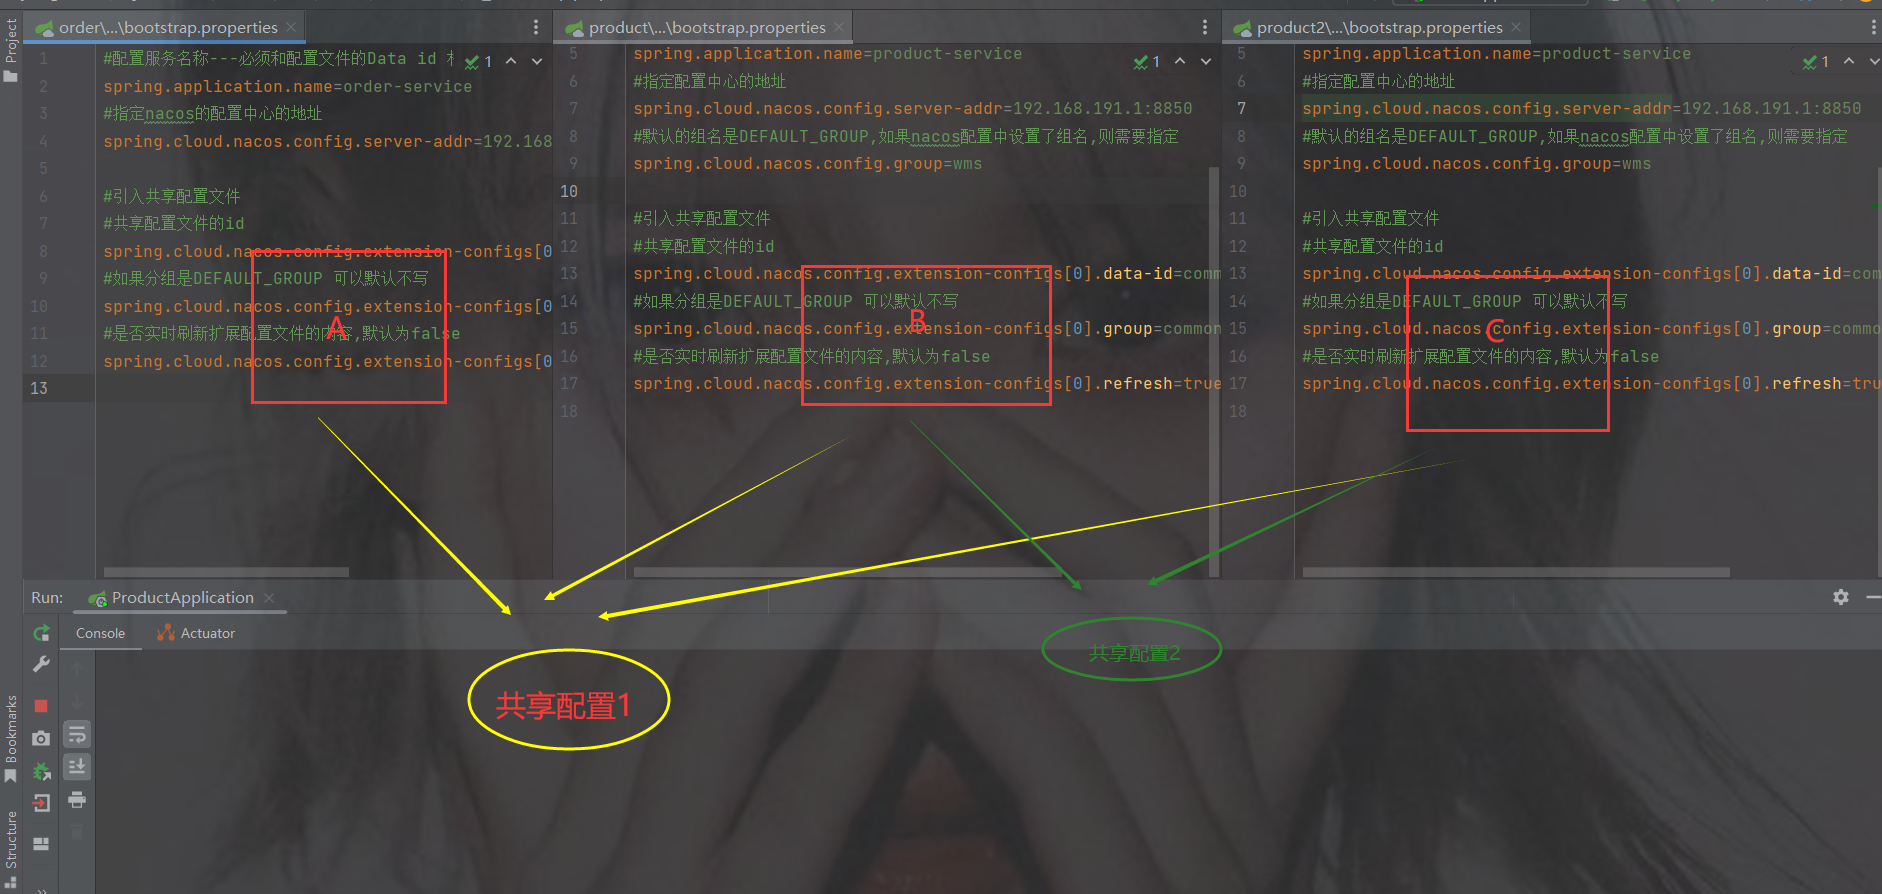
不要混乱了配置
1.图1
红色框起来的是当前微服务自己特有的配置
黄色共享框起来的是共享的配置 ------- 并且是个数组
但是为什么共享配置是数组呢?
2.图2
像下图有可能服务ABC的配置有一样的,那么提取出来是共享配置1
而B和C是一样的配置,可以单独再提取出来为共享配置2
举例:
假如两个商品要连接数据库,那么商品的库和订单又不是一样库,此时可以单独把两个商品服务的数据库连接配置提取出来
假如要加入redis,那么服务都是一样的redis,可以共同提取出来reids的配置
8. 加入其他配置修改代码以及mybatisplus使用
创建两个库,并且设计两张表,注意分库分表了
订单
商品
公共模块加依赖
公共模块所有依赖
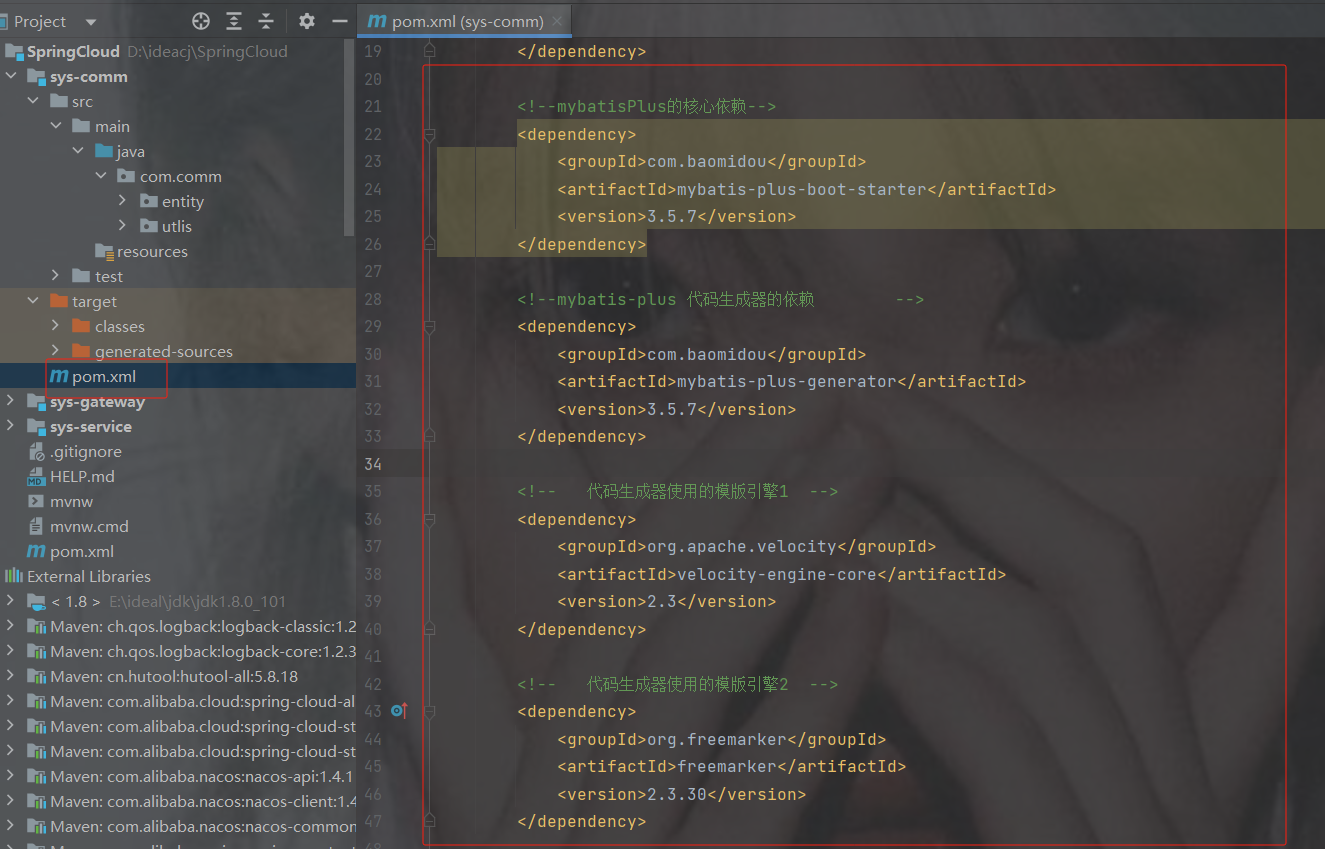
    4.0.0

        com.example
        SpringCloud
        0.0.1-SNAPSHOT

    sys-comm


            org.projectlombok
            lombok


            com.baomidou
            mybatis-plus-boot-starter
            3.5.7


            com.baomidou
            mybatis-plus-generator
            3.5.7


            org.apache.velocity
            velocity-engine-core
            2.3


            org.freemarker
            freemarker
            2.3.30


            mysql
            mysql-connector-java


            com.spring4all
            swagger-spring-boot-starter
            1.9.1.RELEASE


        8
        8
        UTF-8
使用代码生成器或手写实体类
代码生成器
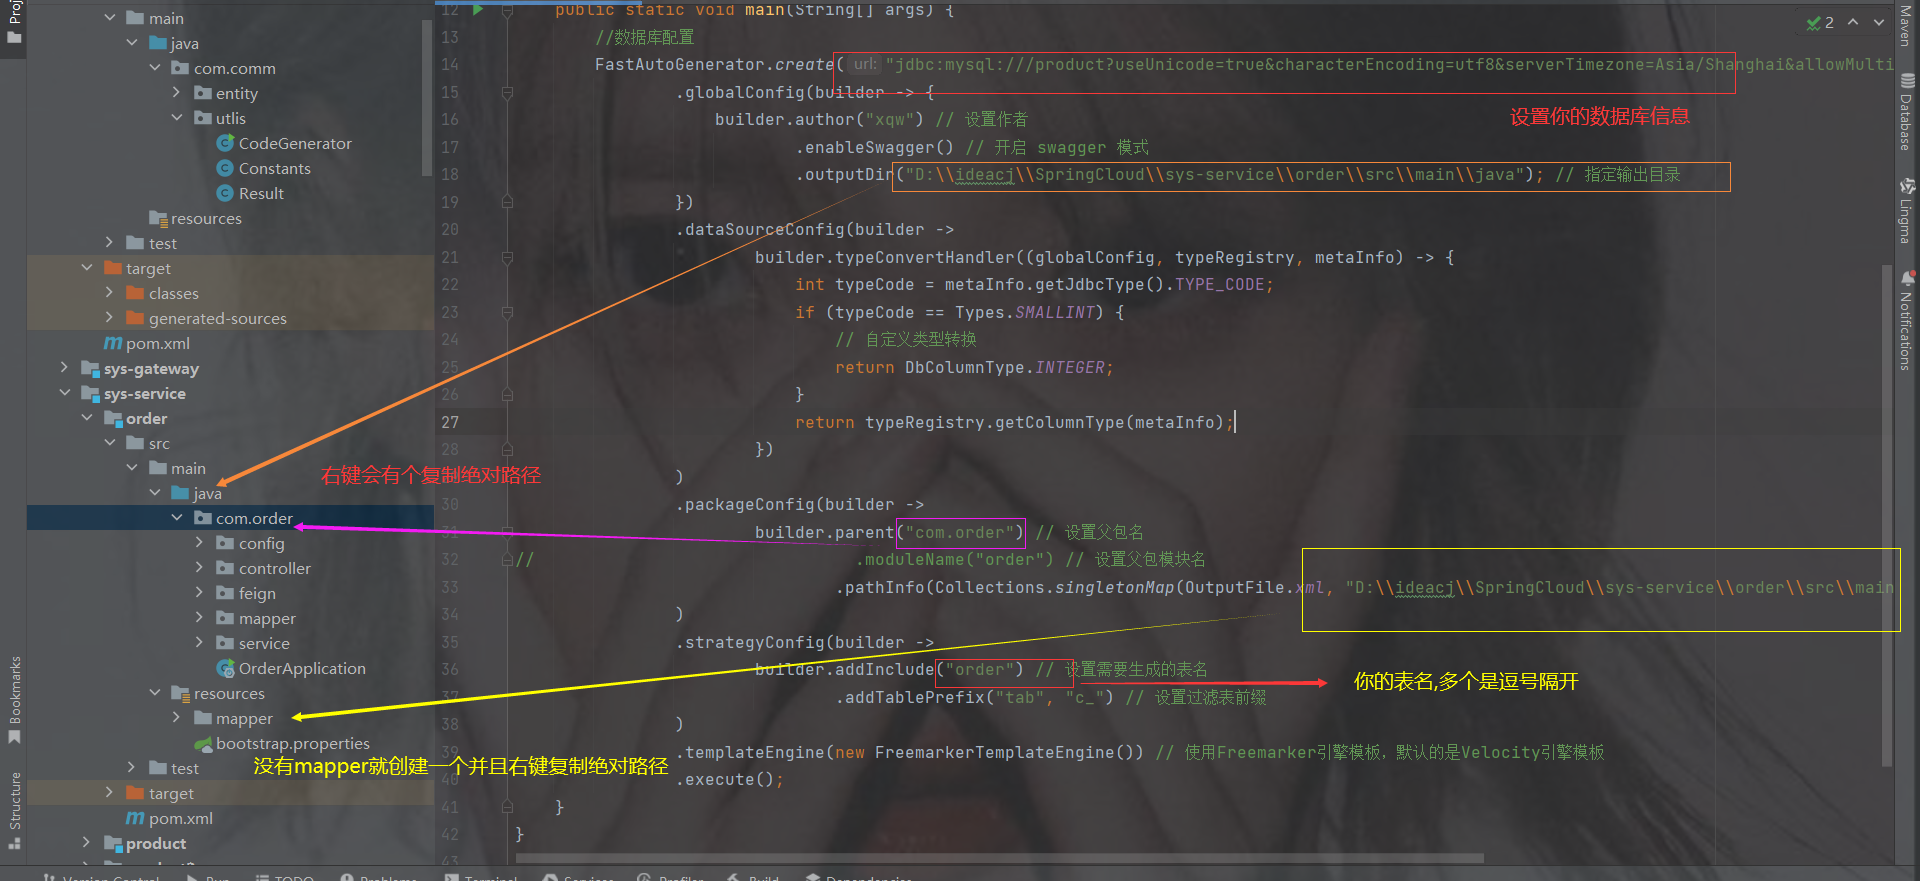
package com.comm.utlis;
import com.baomidou.mybatisplus.generator.FastAutoGenerator;
import com.baomidou.mybatisplus.generator.config.OutputFile;
import com.baomidou.mybatisplus.generator.config.rules.DbColumnType;
import com.baomidou.mybatisplus.generator.engine.FreemarkerTemplateEngine;
import java.sql.Types;
import java.util.Collections;
public class CodeGenerator {
    public static void main(String[] args) {
        //数据库配置
        FastAutoGenerator.create("jdbc:mysql:///product?useUnicode=true&characterEncoding=utf8&serverTimezone=Asia/Shanghai&allowMultiQueries=true","root","a123456")
                .globalConfig(builder -> {
                    builder.author("xqw") // 设置作者
                            .enableSwagger() // 开启 swagger 模式
                            .outputDir("D:\\ideacj\\SpringCloud\\sys-service\\order\\src\\main\\java"); // 指定输出目录
                })
                .dataSourceConfig(builder ->
                        builder.typeConvertHandler((globalConfig, typeRegistry, metaInfo) -> {
                            int typeCode = metaInfo.getJdbcType().TYPE_CODE;
                            if (typeCode == Types.SMALLINT) {
                                // 自定义类型转换
                                return DbColumnType.INTEGER;
                            }
                            return typeRegistry.getColumnType(metaInfo);
                        })
                )
                .packageConfig(builder ->
                        builder.parent("com.order") // 设置父包名
//                                .moduleName("order") // 设置父包模块名
                                .pathInfo(Collections.singletonMap(OutputFile.xml, "D:\\ideacj\\SpringCloud\\sys-service\\order\\src\\main\\resources\\mapper")) // 设置mapperXml生成路径
                )
                .strategyConfig(builder ->
                        builder.addInclude("t_order") // 设置需要生成的表名
                                .addTablePrefix("tab", "c_") // 设置过滤表前缀
                )
                .templateEngine(new FreemarkerTemplateEngine()) // 使用Freemarker引擎模板,默认的是Velocity引擎模板
                .execute();
    }
}
实体也会生成在order模块直接拖到公共模块去
剩下两个工具类
package com.comm.utlis; import java.io.Serializable; public class Resultimplements Serializable { private static final long serialVersionUID = 1L; /** 成功 */ public static final int SUCCESS = Constants.SUCCESS; /** 失败 */ public static final int FAIL = Constants.FAIL; private int code; private String msg; private T data; private Long timestamp; public static Result ok() { return restResult(null, SUCCESS, null); } public static Result ok(T data) { return restResult(data, SUCCESS, null); } public static Result ok(T data,long timestamp) { Result r = restResult(data, SUCCESS, null); r.timestamp = timestamp; return r; } public static Result ok(T data, String msg) { return restResult(data, SUCCESS, msg); } public static Result fail() { return restResult(null, FAIL, null); } public static Result fail(String msg) { return restResult(null, FAIL, msg); } public static Result fail(T data) { return restResult(data, FAIL, null); } public static Result fail(T data, String msg) { return restResult(data, FAIL, msg); } public static Result fail(int code, String msg) { return restResult(null, code, msg); } public Long getTimestamp() { return timestamp; } public void setTimestamp(Long timestamp) { this.timestamp = timestamp; } private static Result restResult(T data, int code, String msg) { Result apiResult = new Result<>(); apiResult.setCode(code); apiResult.setData(data); apiResult.setMsg(msg); return apiResult; } public int getCode() { return code; } public void setCode(int code) { this.code = code; } public String getMsg() { return msg; } public void setMsg(String msg) { this.msg = msg; } public T getData() { return data; } public void setData(T data) { this.data = data; } public static Boolean isError(Result ret) { return !isSuccess(ret); } public static Boolean isSuccess(Result ret) { return Result.SUCCESS == ret.getCode(); } } package com.comm.utlis; public class Constants { /** * UTF-8 字符集 */ public static final String UTF8 = "UTF-8"; /** * GBK 字符集 */ public static final String GBK = "GBK"; /** * www主域 */ public static final String WWW = "www."; /** * RMI 远程方法调用 */ public static final String LOOKUP_RMI = "rmi:"; /** * LDAP 远程方法调用 */ public static final String LOOKUP_LDAP = "ldap:"; /** * LDAPS 远程方法调用 */ public static final String LOOKUP_LDAPS = "ldaps:"; /** * http请求 */ public static final String HTTP = "http://"; /** * https请求 */ public static final String HTTPS = "https://"; /** * 成功标记 */ public static final Integer SUCCESS = 200; /** * 失败标记 */ public static final Integer FAIL = 500; /** * 登录成功状态 */ public static final String LOGIN_SUCCESS_STATUS = "0"; /** * 登录失败状态 */ public static final String LOGIN_FAIL_STATUS = "1"; /** * 登录成功 */ public static final String LOGIN_SUCCESS = "Success"; /** * 注销 */ public static final String LOGOUT = "Logout"; /** * 注册 */ public static final String REGISTER = "Register"; /** * 注销 */ public static final String LOGOFF = "Logoff"; /** * 登录失败 */ public static final String LOGIN_FAIL = "Error"; /** * 当前记录起始索引 */ public static final String PAGE_NUM = "pageNum"; /** * 每页显示记录数 */ public static final String PAGE_SIZE = "pageSize"; /** * 排序列 */ public static final String ORDER_BY_COLUMN = "orderByColumn"; /** * 排序的方向 "desc" 或者 "asc". */ public static final String IS_ASC = "isAsc"; /** * 验证码有效期(分钟) */ public static final long CAPTCHA_EXPIRATION = 2; /** * 资源映射路径 前缀 */ public static final String RESOURCE_PREFIX = "/profile"; /** * 自动识别json对象白名单配置(仅允许解析的包名,范围越小越安全) */ public static final String[] JSON_WHITELIST_STR = { "org.springframework", "com.ruoyi" }; /** * 定时任务白名单配置(仅允许访问的包名,如其他需要可以自行添加) */ public static final String[] JOB_WHITELIST_STR = { "com.ruoyi" }; /** * 定时任务违规的字符 */ public static final String[] JOB_ERROR_STR = { "java.net.URL", "javax.naming.InitialContext", "org.yaml.snakeyaml", "org.springframework", "org.apache", "com.ruoyi.common.core.utils.file" }; }

订单和商品实体
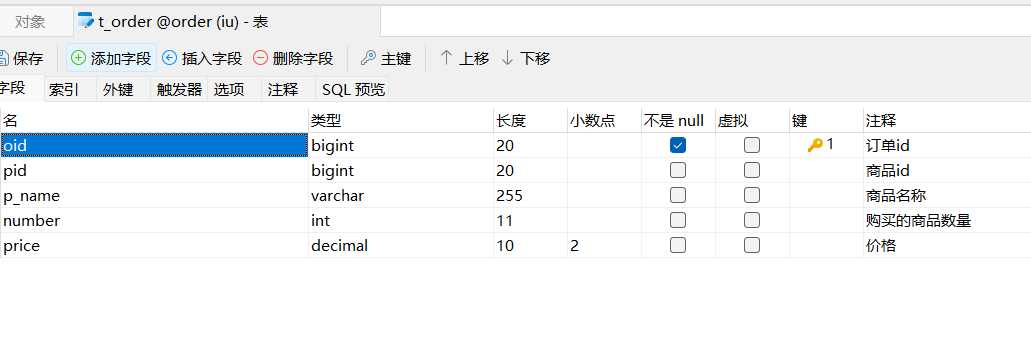
package com.comm.entity; import com.baomidou.mybatisplus.annotation.TableId; import java.io.Serializable; import java.math.BigDecimal; import io.swagger.annotations.ApiModel; import io.swagger.annotations.ApiModelProperty; /** ** *
* * @author xqw * @since 2025-04-30 */ @ApiModel(value = "Order对象", description = "") @NoArgsConstructor @AllArgsConstructor //实体与表名不一致使用此注解 @TableName(value="t_order") public class Order implements Serializable { private static final long serialVersionUID = 1L; @ApiModelProperty("订单id") @TableId("oid") private Long oid; @ApiModelProperty("商品id") private Long pid; @ApiModelProperty("商品名称") private String pName; @ApiModelProperty("购买的商品数量") private Integer number; @ApiModelProperty("价格") private BigDecimal price; public Long getOid() { return oid; } public void setOid(Long oid) { this.oid = oid; } public Long getPid() { return pid; } public void setPid(Long pid) { this.pid = pid; } public String getpName() { return pName; } public void setpName(String pName) { this.pName = pName; } public Integer getNumber() { return number; } public void setNumber(Integer number) { this.number = number; } public BigDecimal getPrice() { return price; } public void setPrice(BigDecimal price) { this.price = price; } @Override public String toString() { return "Order{" + "oid = " + oid + ", pid = " + pid + ", pName = " + pName + ", number = " + number + ", price = " + price + "}"; } }package com.comm.entity; import java.io.Serializable; import java.math.BigDecimal; import io.swagger.annotations.ApiModel; import io.swagger.annotations.ApiModelProperty; /** ** *
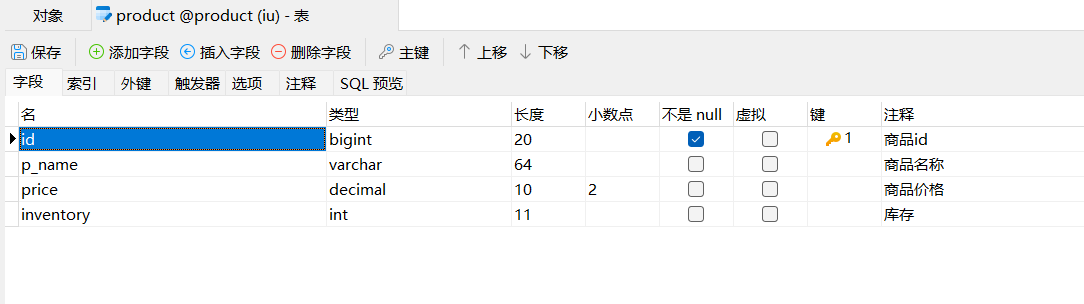
* * @author xqw * @since 2025-04-30 */ @ApiModel(value = "Product对象", description = "") @NoArgsConstructor @AllArgsConstructor @TableName("product") // 确保注解值与实际表名一致 public class Product implements Serializable { private static final long serialVersionUID = 1L; @ApiModelProperty("商品id") private Long id; @ApiModelProperty("商品名称") private String pName; @ApiModelProperty("商品价格") private BigDecimal price; @ApiModelProperty("库存") private Integer inventory; public Long getId() { return id; } public void setId(Long id) { this.id = id; } public String getpName() { return pName; } public void setpName(String pName) { this.pName = pName; } public BigDecimal getPrice() { return price; } public void setPrice(BigDecimal price) { this.price = price; } public Integer getInventory() { return inventory; } public void setInventory(Integer inventory) { this.inventory = inventory; } @Override public String toString() { return "Product{" + "id = " + id + ", pName = " + pName + ", price = " + price + ", inventory = " + inventory + "}"; } }
但是先把父类的依赖发出来,因为两个模块都是用的service的,看看有没有缺少
完整依赖
    4.0.0

        com.example
        SpringCloud
        0.0.1-SNAPSHOT


    sys-service
    pom


        order
        product
        product2


            org.springframework.boot
            spring-boot-starter-web


            com.example
            sys-comm
            0.0.1-SNAPSHOT


            com.alibaba.cloud
            spring-cloud-starter-alibaba-nacos-discovery


            org.springframework.cloud
            spring-cloud-starter-loadbalancer


            org.springframework.cloud
            spring-cloud-starter-openfeign


            com.alibaba.cloud
            spring-cloud-starter-alibaba-nacos-config


            org.springframework.cloud
            spring-cloud-starter-bootstrap


        8
        8
        UTF-8
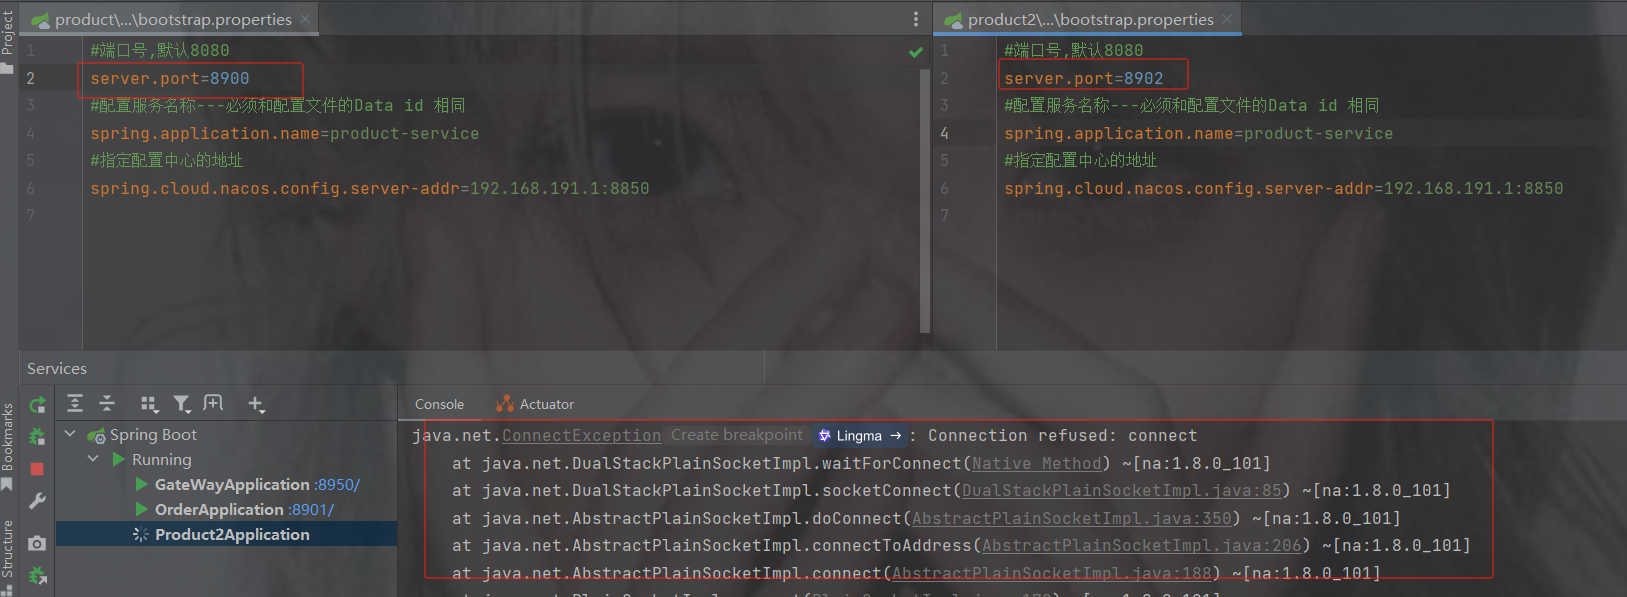
此时订单服务以及商品服务要加@MapperScan和数据库配置,因为公共模块引入了mysql依赖
订单项目结构
service以及mapper就不发了,因为是mp生成的,config是之前restTemplate的但是被openfeign替代了
bootstrap配置
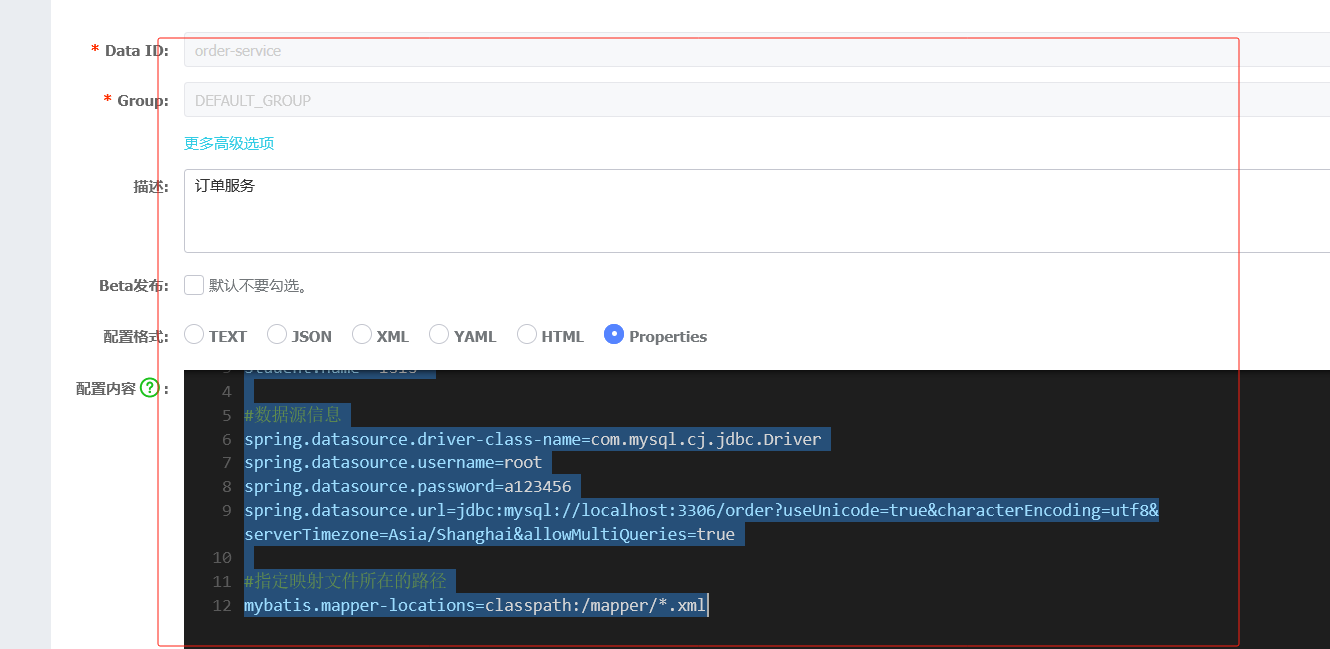
#配置服务名称---必须和配置文件的Data id 相同 spring.application.name=order-service #指定nacos的配置中心的地址 spring.cloud.nacos.config.server-addr=192.168.191.1:8850 #引入共享配置文件 #共享配置文件的id spring.cloud.nacos.config.extension-configs[0].data-id=common.properties #如果分组是DEFAULT_GROUP 可以默认不写 spring.cloud.nacos.config.extension-configs[0].group=common #是否实时刷新扩展配置文件的内容,默认为false spring.cloud.nacos.config.extension-configs[0].refresh=trueorder的专属nacos配置,注意是专属,商品的跟订单order的分库了
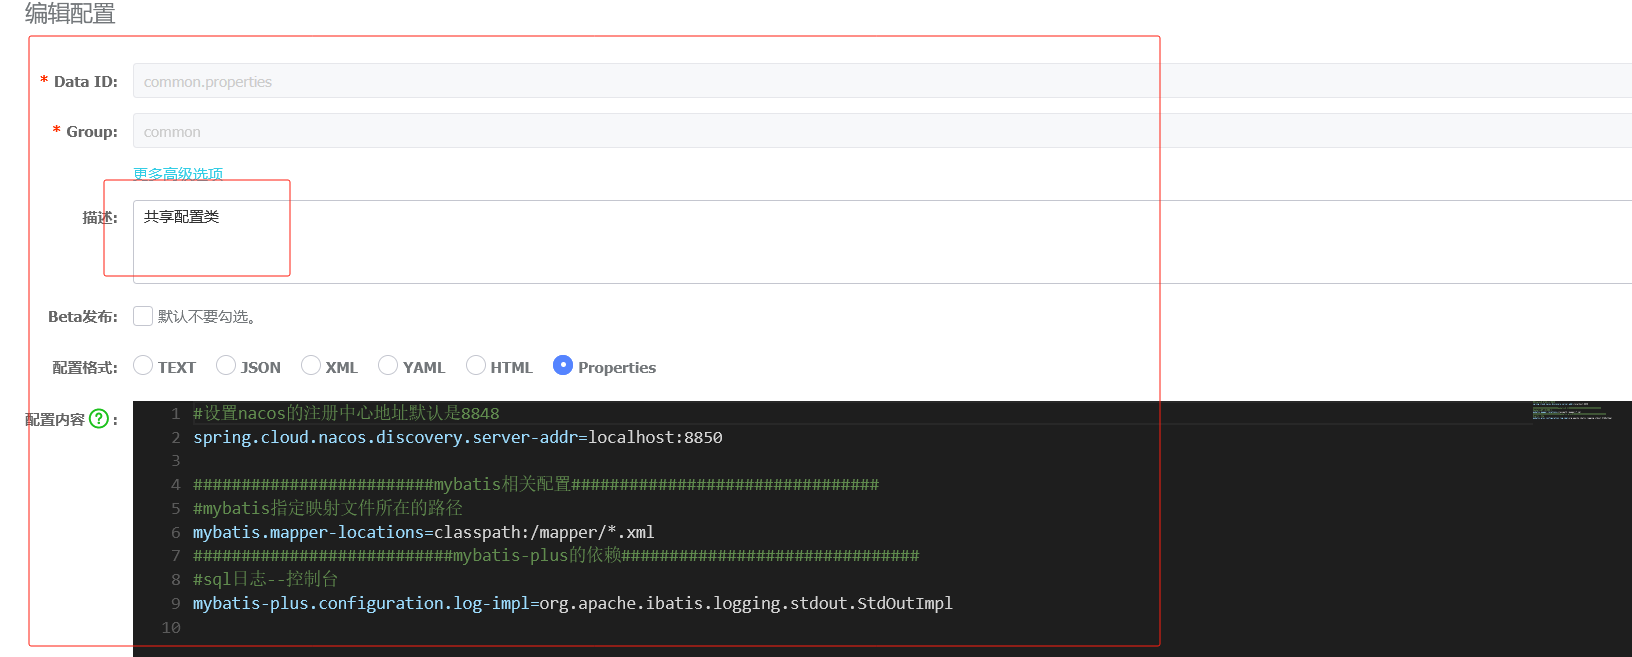
#端口号,默认8080
server.port=8901
student.name="lsls"
#########################数据库相关配置################################
#数据源信息
spring.datasource.driver-class-name=com.mysql.cj.jdbc.Driver
spring.datasource.username=root
spring.datasource.password=a123456
spring.datasource.url=jdbc:mysql://localhost:3306/order?useUnicode=true&characterEncoding=utf8&serverTimezone=Asia/Shanghai&allowMultiQueries=true
共享配置,只发一次,在商品里就不发了
#设置nacos的注册中心地址默认是8848
spring.cloud.nacos.discovery.server-addr=localhost:8850
#########################mybatis相关配置################################
#mybatis指定映射文件所在的路径
mybatis.mapper-locations=classpath:/mapper/*.xml
###########################mybatis-plus的依赖###############################
#sql日志--控制台
mybatis-plus.configuration.log-impl=org.apache.ibatis.logging.stdout.StdOutImpl
主启动类以及注解,注意加MapperScan
package com.order;
//import com.order.config.LoadBalancerConfig;
import org.mybatis.spring.annotation.MapperScan;
import org.springframework.boot.SpringApplication;
import org.springframework.boot.autoconfigure.SpringBootApplication;
import org.springframework.cloud.client.discovery.EnableDiscoveryClient;
import org.springframework.cloud.loadbalancer.annotation.LoadBalancerClient;
import org.springframework.cloud.loadbalancer.annotation.LoadBalancerClients;
import org.springframework.cloud.openfeign.EnableFeignClients;
@SpringBootApplication
@EnableDiscoveryClient //表示被nacos注册中心发现,注册时使用的注解
@EnableFeignClients //开启openFeign远程调用注解驱动
@MapperScan("com.order.mapper")//为指定的接口生成代理实现类
public class OrderApplication {
    public static void main(String[] args) {
        SpringApplication.run(OrderApplication.class);
    }
}
feign
package com.order.feign;
import com.comm.entity.Product;
import com.comm.utlis.Result;
import org.springframework.cloud.openfeign.FeignClient;
import org.springframework.web.bind.annotation.GetMapping;
import org.springframework.web.bind.annotation.PathVariable;
import org.springframework.web.bind.annotation.PutMapping;
import org.springframework.web.bind.annotation.RequestBody;
//@FeignClient(value="服务提供者的名称")
@FeignClient(value = "product-service")
public interface ProductFeign {
    @GetMapping("product/{id}")   //方法名和@GetMapping路径必须和提供者一致
    public Result getProductById(@PathVariable Integer id);
    //修改商品
    @PutMapping("product")
    public Result updateProduct(@RequestBody Product product);
}
controller
package com.order.controller;
import com.comm.entity.Order;
import com.comm.entity.Product;
import com.comm.utlis.Result;
import com.fasterxml.jackson.databind.ObjectMapper;
import com.order.feign.ProductFeign;
import com.order.service.IOrderService;
import org.springframework.beans.factory.annotation.Autowired;
import org.springframework.beans.factory.annotation.Value;
import org.springframework.cloud.client.ServiceInstance;
import org.springframework.cloud.context.config.annotation.RefreshScope;
import org.springframework.web.bind.annotation.GetMapping;
import org.springframework.web.bind.annotation.PathVariable;
import org.springframework.web.bind.annotation.RequestMapping;
import org.springframework.web.bind.annotation.RestController;
import java.util.List;
import java.util.Random;
import java.util.UUID;
@RestController
@RequestMapping("/order")
@RefreshScope //表示实时刷新配置内容
public class OrderControllerByOpenFeign {
    // 远程调用调用接口
    @Autowired
    private ProductFeign productFeign; //spring启动时会为使用@FeignClient注解的接口创建代理实现类
    @Autowired
    private IOrderService orderService;
    @GetMapping("{pid}/{number}")
    public Result order(@PathVariable Integer pid,@PathVariable Integer number) {
        //1.根据商品的id 查询商品的价格 库存
        //2.存入订单
        Result result = productFeign.getProductById(pid);
        //转换对象不要再使用fastjson了
        Product product = new ObjectMapper().convertValue(result.getData(), Product.class);
        System.out.println("商品的信息:" + product);
        Order order = new Order();
        order.setPid(product.getId());
        order.setpName(product.getpName());
        order.setNumber(number);
        order.setPrice(product.getPrice().multiply(new java.math.BigDecimal(number)));
        //存入订单
        orderService.save(order);
        //更新库存
        product.setInventory(product.getInventory() - number);
        productFeign.updateProduct(product);
        return Result.ok(product);
    }
    @Value("${student.name}")
    private String name;
    @GetMapping("/name")
    public String name() {
        return "名字是~~~~~~~:" + name;
    }
}
商品目录结构
商品1bootstrap配置
#端口号,默认8080
server.port=8900
#配置服务名称---必须和配置文件的Data id 相同
spring.application.name=product-service
#指定配置中心的地址
spring.cloud.nacos.config.server-addr=localhost:8850
#默认的组名是DEFAULT_GROUP,如果nacos配置中设置了组名,则需要指定
spring.cloud.nacos.config.group=wms
#引入共享配置文件
#共享配置文件的id
spring.cloud.nacos.config.extension-configs[0].data-id=common.properties
#如果分组是DEFAULT_GROUP 可以默认不写
spring.cloud.nacos.config.extension-configs[0].group=common
#是否实时刷新扩展配置文件的内容,默认为false
spring.cloud.nacos.config.extension-configs[0].refresh=true
商品2bootstrap配置
#端口号,默认8080
server.port=8902
#配置服务名称---必须和配置文件的Data id 相同
spring.application.name=product-service
#指定配置中心的地址
spring.cloud.nacos.config.server-addr=localhost:8850
#默认的组名是DEFAULT_GROUP,如果nacos配置中设置了组名,则需要指定
spring.cloud.nacos.config.group=wms
#引入共享配置文件
#共享配置文件的id
spring.cloud.nacos.config.extension-configs[0].data-id=common.properties
#如果分组是DEFAULT_GROUP 可以默认不写
spring.cloud.nacos.config.extension-configs[0].group=common
#是否实时刷新扩展配置文件的内容,默认为false
spring.cloud.nacos.config.extension-configs[0].refresh=true
商品专属nacos配置
#########################数据库相关配置################################
#数据源信息
spring.datasource.driver-class-name=com.mysql.cj.jdbc.Driver
spring.datasource.username=root
spring.datasource.password=a123456
spring.datasource.url=jdbc:mysql://localhost:3306/product?useUnicode=true&characterEncoding=utf8&serverTimezone=Asia/Shanghai&allowMultiQueries=true
两个商品的controller一摸一样的,并且订单的openfeign跟商品的保持一致
package com.product.controller;
import com.comm.entity.Product;
import com.comm.utlis.Result;
import com.product.service.IProductService;
import org.springframework.beans.factory.annotation.Autowired;
import org.springframework.web.bind.annotation.*;
import java.math.BigDecimal;
@RestController
@RequestMapping("/product")
public class ProductController {
    @Autowired
    private IProductService productService;
    //根据商品id查询商品信息
    @GetMapping("{id}")
    public Result getProductById(@PathVariable Integer id){
        Product product = productService.getById(id);
        if(product == null){
            return Result.fail("商品不存在");
        }
        return Result.ok(product,"查询成功");
    }
    //修改商品
    @PutMapping
    public Result updateProduct(@RequestBody Product product){
        boolean b = productService.updateById(product);
        if(b){
            return Result.ok(true,"修改成功");
        }
        return Result.fail(false,"修改失败");
    }
}
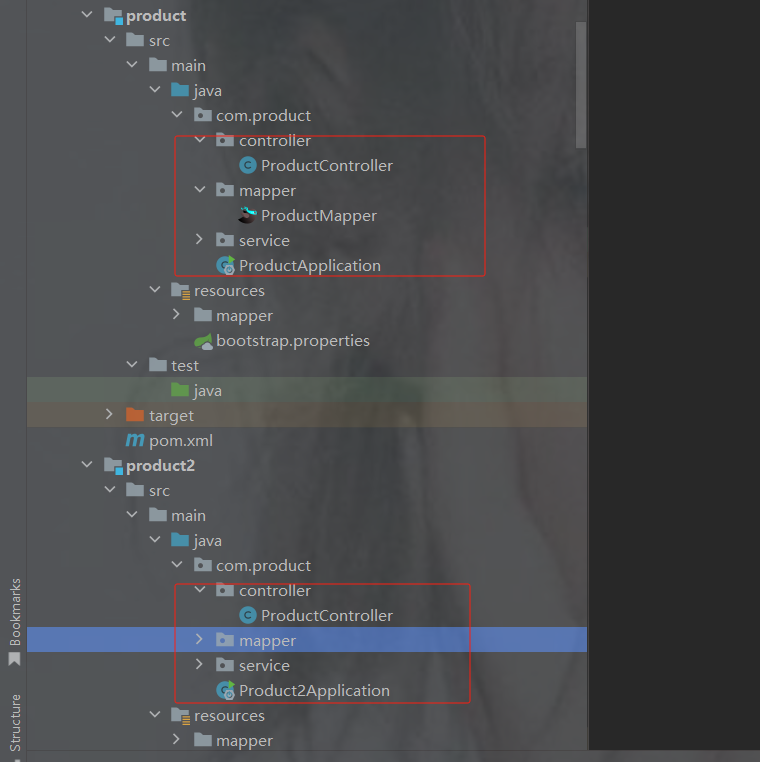
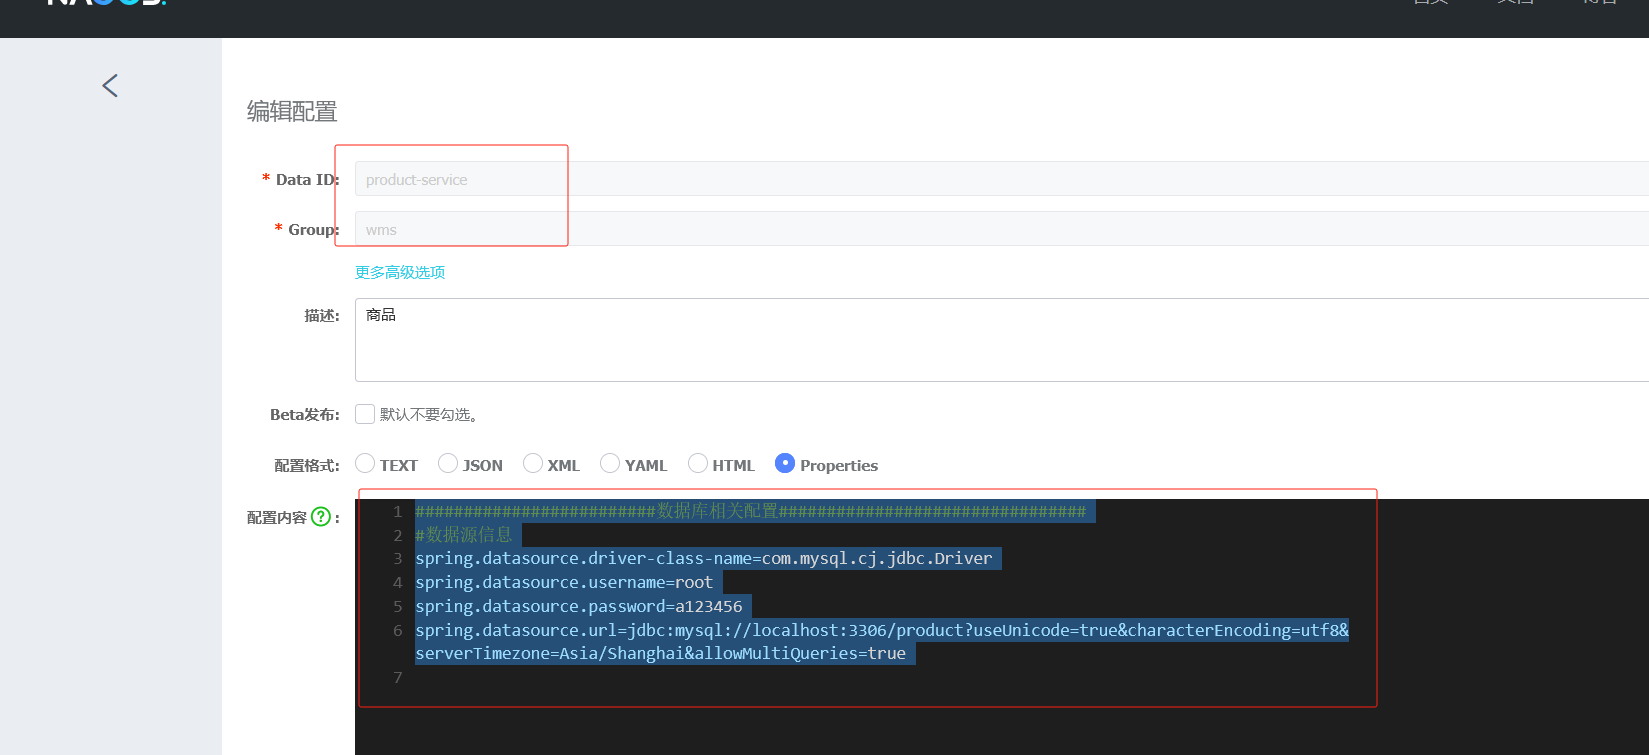
下单
原始商品库存数据
访问网关订单接口
商品库存也减了
订单有此数据成功了
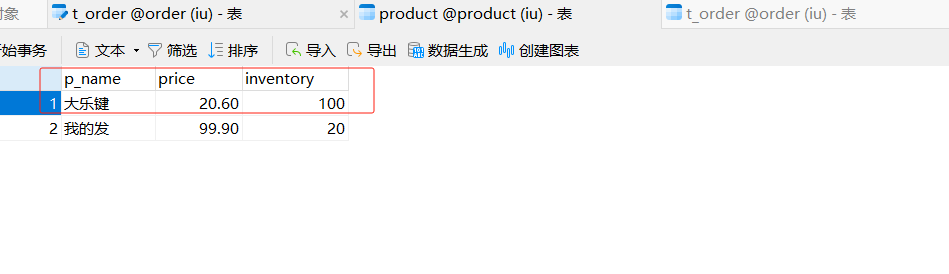
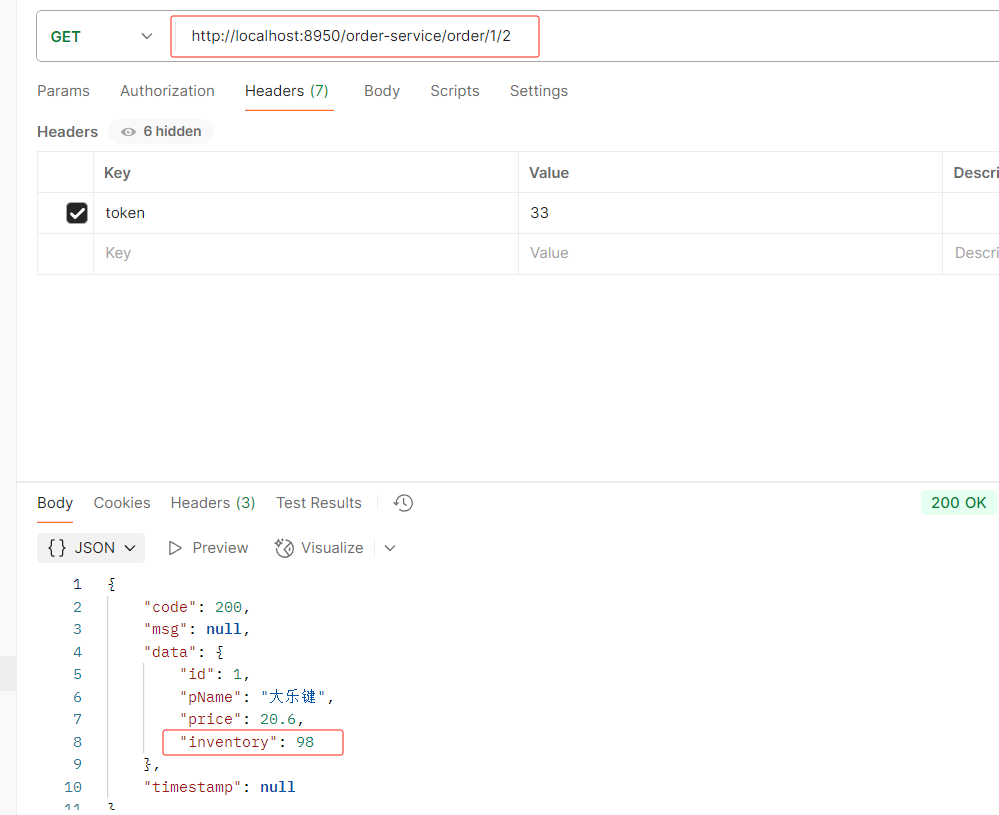
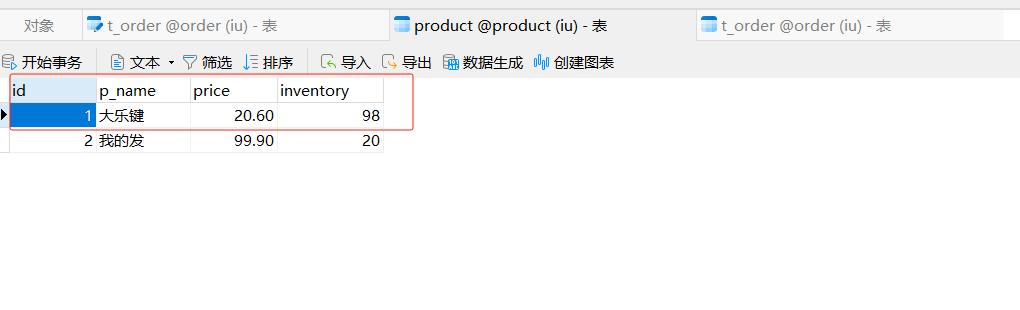
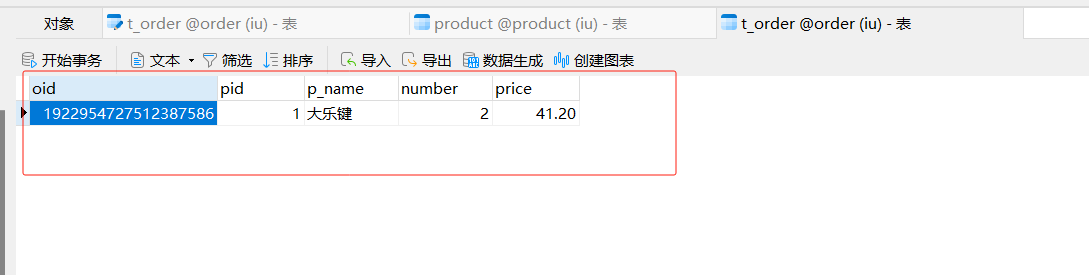
9. Sentinel
服务雪崩
假设存在如下调用链
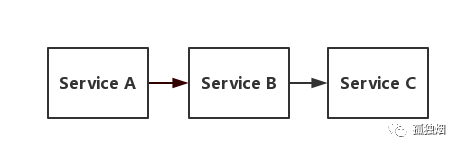
而此时,Service A的流量波动很大,流量经常会突然性增加!那么在这种情况下,就算Service A能扛得住请求,Service B和Service C未必能扛得住这突发的请求。
此时,如果Service C因为抗不住请求,变得不可用。那么Service B的请求也会阻塞,慢慢耗尽Service B的线程资源,Service B就会变得不可用。紧接着,Service A也会不可用,这一过程如下图所示

如上图所示,由于服务与服务之间的依赖性,故障会传播,会对整个微服务系统造成灾难性的严重后果,这就是 服务故障的 “雪崩效应” 。
那么,服务熔断和服务降级就可以视为解决服务雪崩的手段之一。
熔断
在互联网系统中,当下游服务因访问压力过大而响应变慢或失败,上游服务为了保护系统整 体的可用性,可以暂时切断对下游服务的调用。这种牺牲局部,保全整体的措施就叫做熔断
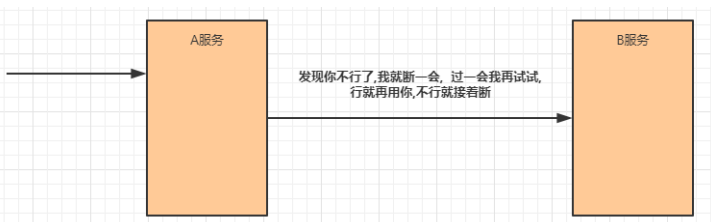
服务熔断一般有三种状态:
熔断关闭状态(Closed)
服务没有故障时,熔断器所处的状态,对调用方的调用不做任何限制
a->b ->c
熔断开启状态(Open)
后续对该服务接口的调用不再经过网络,直接执行本地的fallback方法
a->b->c(x)
a->b
半熔断状态(Half-Open)
尝试恢复服务调用,允许有限的流量调用该服务,并监控调用成功率。如果成功率达到预 期,则说明服务已恢复,进入熔断关闭状态;如果成功率仍旧很低,则重新进入熔断关闭状态
c
降级
降级其实就是为服务提供一个备用方案,一旦服务无法正常调用,就使用备用方案(相当于兜底的措施)
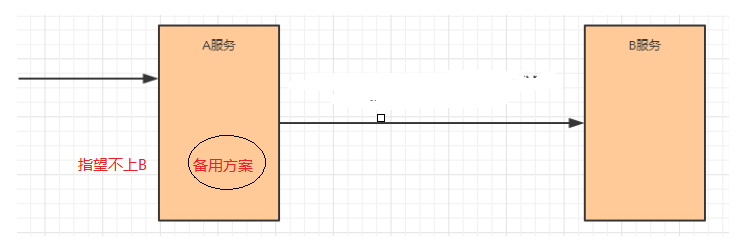
服务熔断的组件
Hystrix
Hystrix是由Netflix开源的一个延迟和容错库,用于隔离访问远程系统、服务或者第三方库,防止 级联失败,从而提升系统的可用性与容错性。--->3.0.0不能用了,之前的版本还可以用
Resilience4J
Resilicence4J一款非常轻量、简单,并且文档非常清晰、丰富的熔断工具,这也是Hystrix官方推 荐的替代产品。不仅如此,Resilicence4j还原生支持Spring Boot 1.x/2.x,而且监控也支持和 prometheus等多款主流产品进行整合。
Sentinel
Sentinel 是阿里巴巴开源的一款断路器实现,本身在阿里内部已经被大规模采用,非常稳定
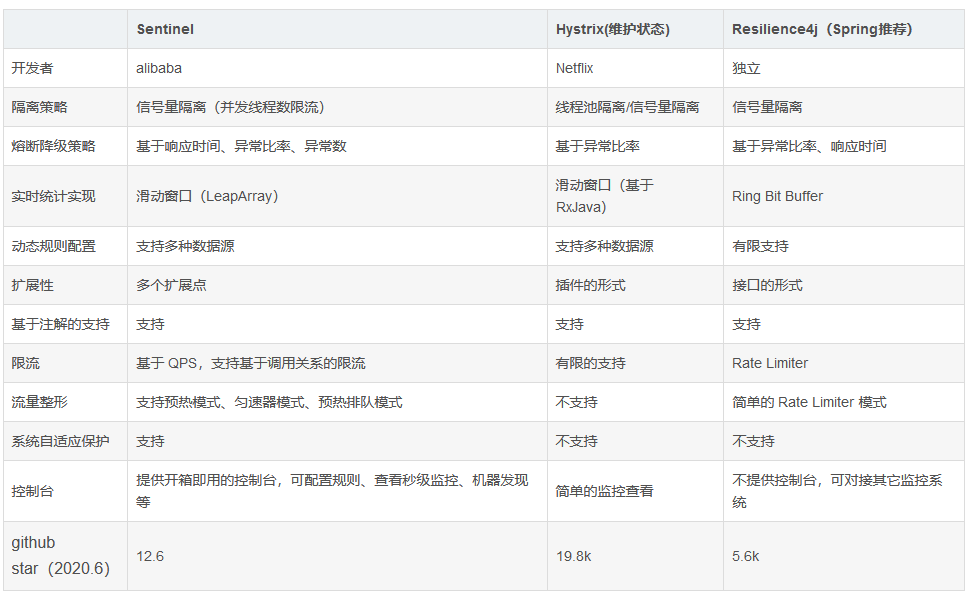
Sentinel入门
介绍 · alibaba/Sentinel Wiki · GitHub
Sentinel (分布式系统的流量防卫兵) 是阿里开源的一套用于服务容错的综合性解决方案。它以流量为切入点, 从流量控制、熔断降级、系统负载保护等多个维度来保护服务的稳定性。
Sentinel 具有以下特征:
丰富的应用场景:Sentinel 承接了阿里巴巴近 10 年的双十一大促流量的核心场景, 例如秒杀(即突发流量控制在系统容量可以承受的范围)、消息削峰填谷、集群流量控制、实时熔断下游不可用应用等。
完备的实时监控:Sentinel 提供了实时的监控功能。通过控制台可以看到接入应用的单台机器秒级数据, 甚至 500 台以下规模的集群的汇总运行情况。
广泛的开源生态:Sentinel 提供开箱即用的与其它开源框架/库的整合模块, 例如与 Spring Cloud、Dubbo、gRPC 的整合。只需要引入相应的依赖并进行简单的配置即可快速地接入 Sentinel。
完善的 SPI 扩展点:Sentinel 提供简单易用、完善的 SPI 扩展接口。您可以通过实现扩展接口快
速地定制逻辑。例如定制规则管理、适配动态数据源等
Sentinel 分为两个部分:
核心库(Java 客户端)不依赖任何框架/库,能够运行于所有 Java 运行时环境,同时对 Dubbo /Spring Cloud 等框架也有较好的支持。
控制台(Dashboard)基于 Spring Boot 开发,打包后可以直接运行,不需要额外的 Tomcat 等应用容器。
使用sentinel(opeFeign采用sentinel熔断器)
1.引入依赖
            com.alibaba.cloud
            spring-cloud-starter-alibaba-sentinel
2.修改openfeign接口
fallbackFactory = "需要创建个实体类来当降级"
为ProductFeign创建降级的实体类
降级实体类代码
package com.order.feign;
import com.comm.entity.Product;
import com.comm.utlis.Result;
import org.springframework.cloud.openfeign.FallbackFactory;
import org.springframework.stereotype.Component;
//实现FallbackFactory接口
@Component
public class ProductFeignFallback implements FallbackFactory {
    @Override
    public ProductFeign create(Throwable cause) {
        //返回一个降级的匿名内部类
        return new ProductFeign() {
            @Override
            public Result getProductById(Integer id) {
                return Result.fail("商品微服务故障,请稍候再试......");
            }
            @Override
            public Result updateProduct(Product product) {
                return Result.fail("修改商品微服务故障,请稍候再试......");
            }
        };
    }
} 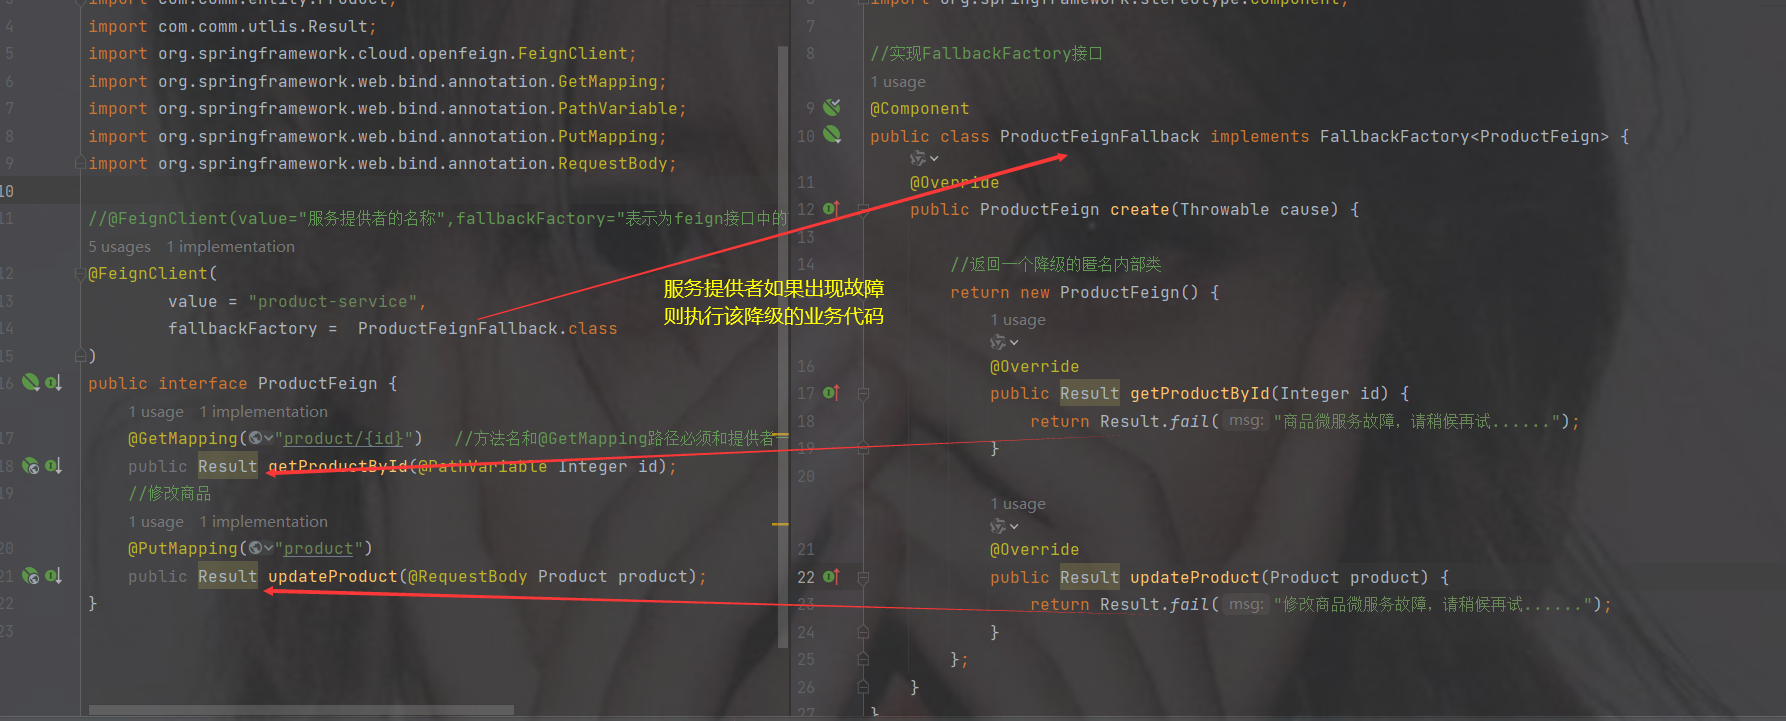
3.设置openfeign和sentinel允许降级(默认不允许降级)
加在配置中--->我们可以加在nacos配置中
#允许feign采用sentinel熔断器(降级兜底),默认值为false
feign.sentinel.enabled=true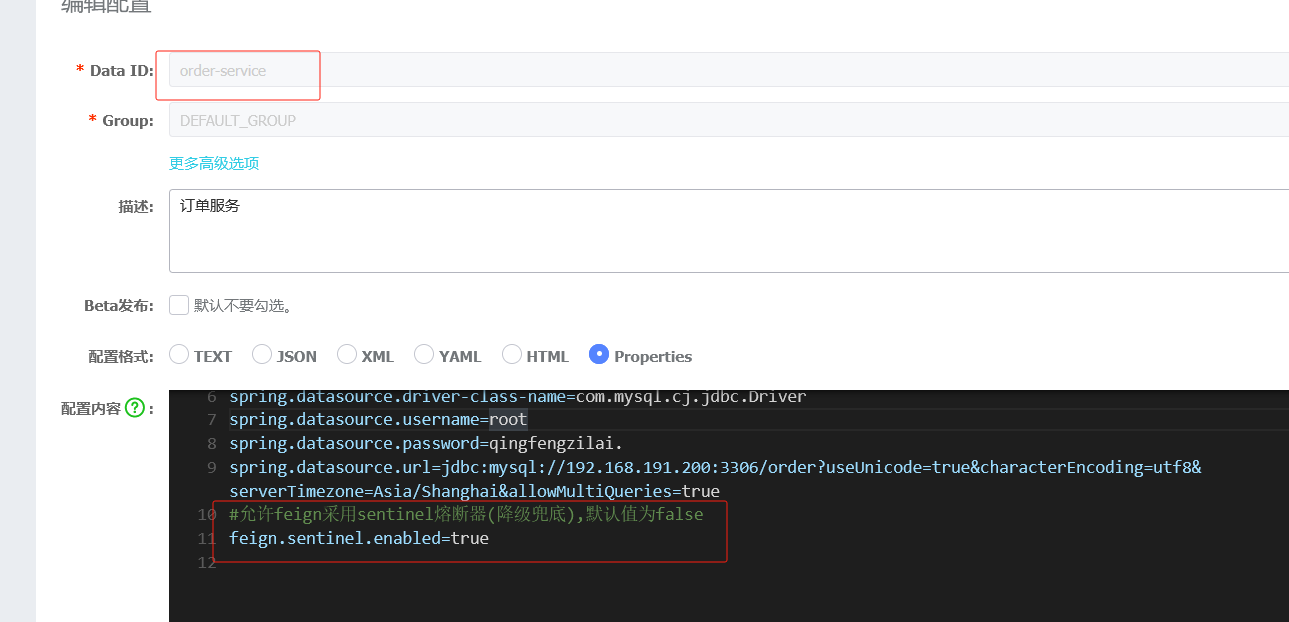
注意:如果是3.0.0版本需要再额外设置懒加载
报错信息如下

#设置懒加载
spring.cloud.openfeign.lazy-attributes-resolution=true
4.controller修改
加入框起来的代码
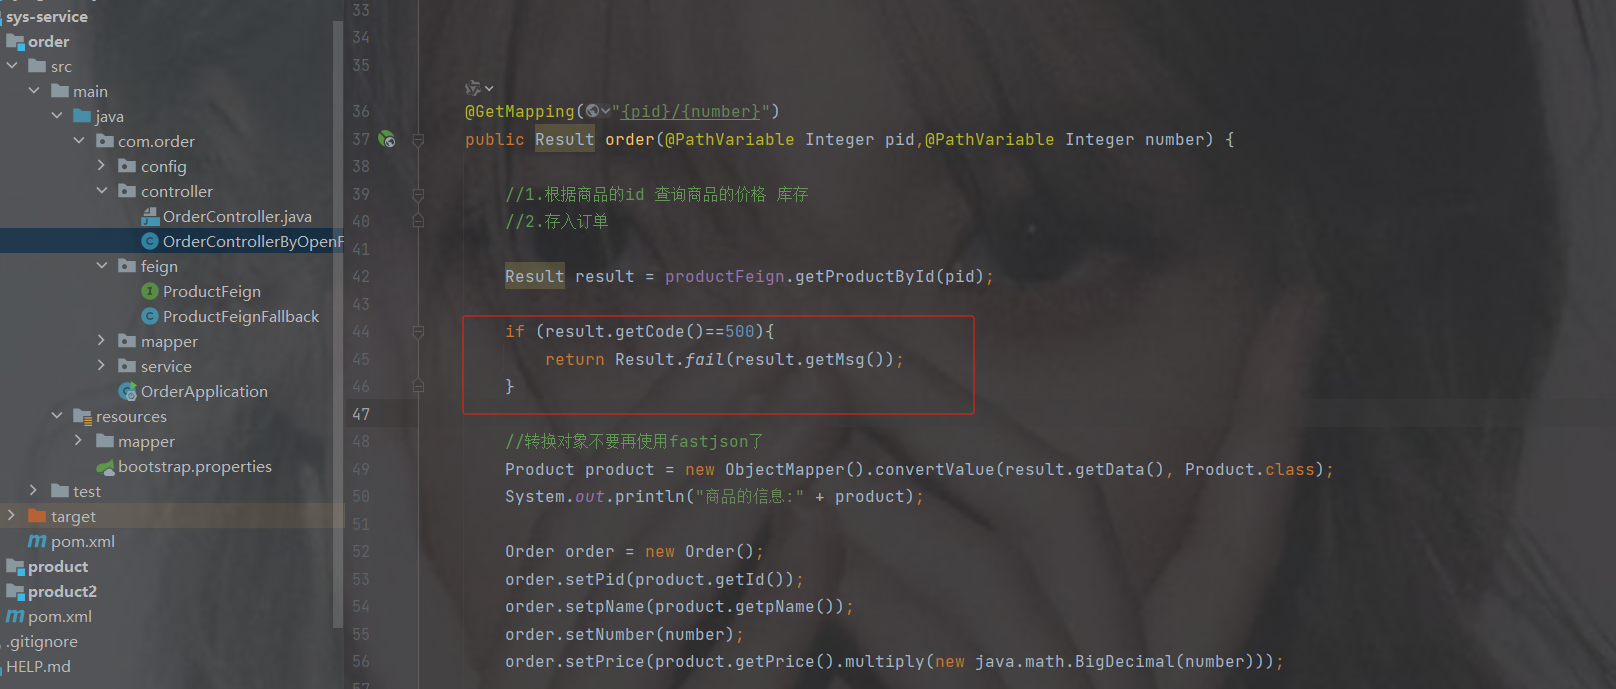
package com.order.controller;
import com.comm.entity.Order;
import com.comm.entity.Product;
import com.comm.utlis.Result;
import com.fasterxml.jackson.databind.ObjectMapper;
import com.order.feign.ProductFeign;
import com.order.service.IOrderService;
import org.springframework.beans.factory.annotation.Autowired;
import org.springframework.beans.factory.annotation.Value;
import org.springframework.cloud.client.ServiceInstance;
import org.springframework.cloud.context.config.annotation.RefreshScope;
import org.springframework.web.bind.annotation.GetMapping;
import org.springframework.web.bind.annotation.PathVariable;
import org.springframework.web.bind.annotation.RequestMapping;
import org.springframework.web.bind.annotation.RestController;
import java.util.List;
import java.util.Random;
import java.util.UUID;
@RestController
@RequestMapping("/order")
@RefreshScope //表示实时刷新配置内容
public class OrderControllerByOpenFeign {
    // 远程调用调用接口
    @Autowired
    private ProductFeign productFeign; //spring启动时会为使用@FeignClient注解的接口创建代理实现类
    @Autowired
    private IOrderService orderService;
    @GetMapping("{pid}/{number}")
    public Result order(@PathVariable Integer pid,@PathVariable Integer number) {
        //1.根据商品的id 查询商品的价格 库存
        //2.存入订单
        Result result = productFeign.getProductById(pid);
        if (result.getCode()==500){
            return Result.fail(result.getMsg());
        }
        //转换对象不要再使用fastjson了
        Product product = new ObjectMapper().convertValue(result.getData(), Product.class);
        System.out.println("商品的信息:" + product);
        Order order = new Order();
        order.setPid(product.getId());
        order.setpName(product.getpName());
        order.setNumber(number);
        order.setPrice(product.getPrice().multiply(new java.math.BigDecimal(number)));
        //存入订单
        orderService.save(order);
        //更新库存
        product.setInventory(product.getInventory() - number);
        productFeign.updateProduct(product);
        return Result.ok(product);
    }
    @Value("${student.name}")
    private String name;
    @GetMapping("/name")
    public String name() {
        return "名字是~~~~~~~:" + name;
    }
}
5.测试
正常情况下

停掉两个商品服务
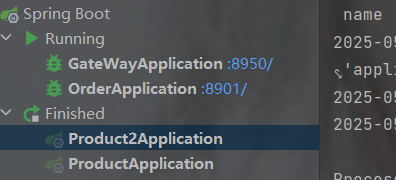
降级成功
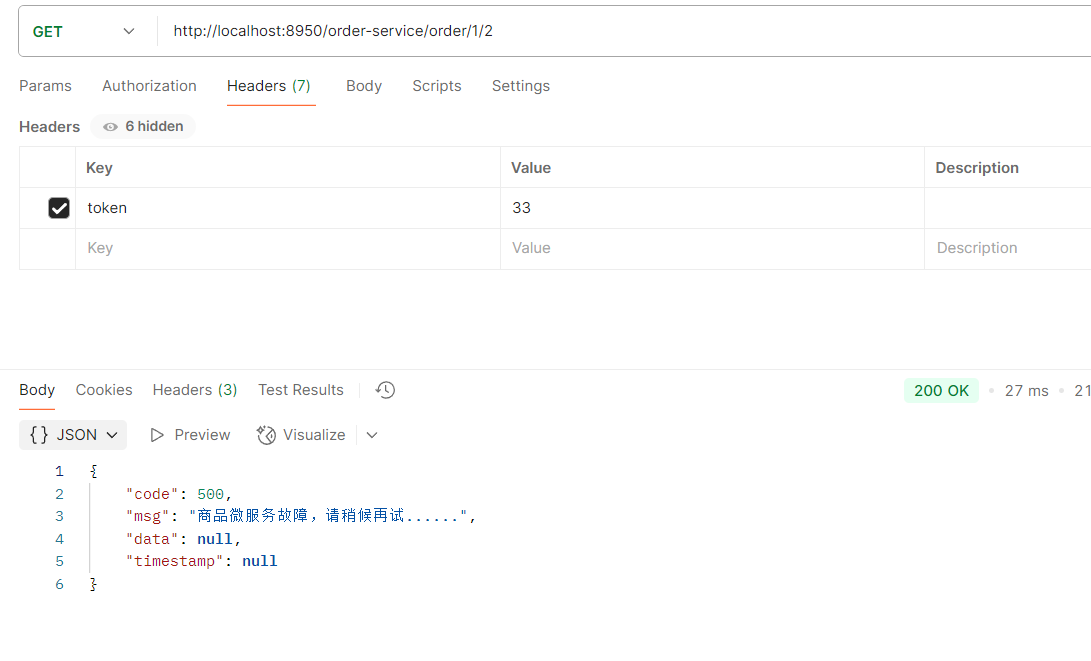
降级的执行流程
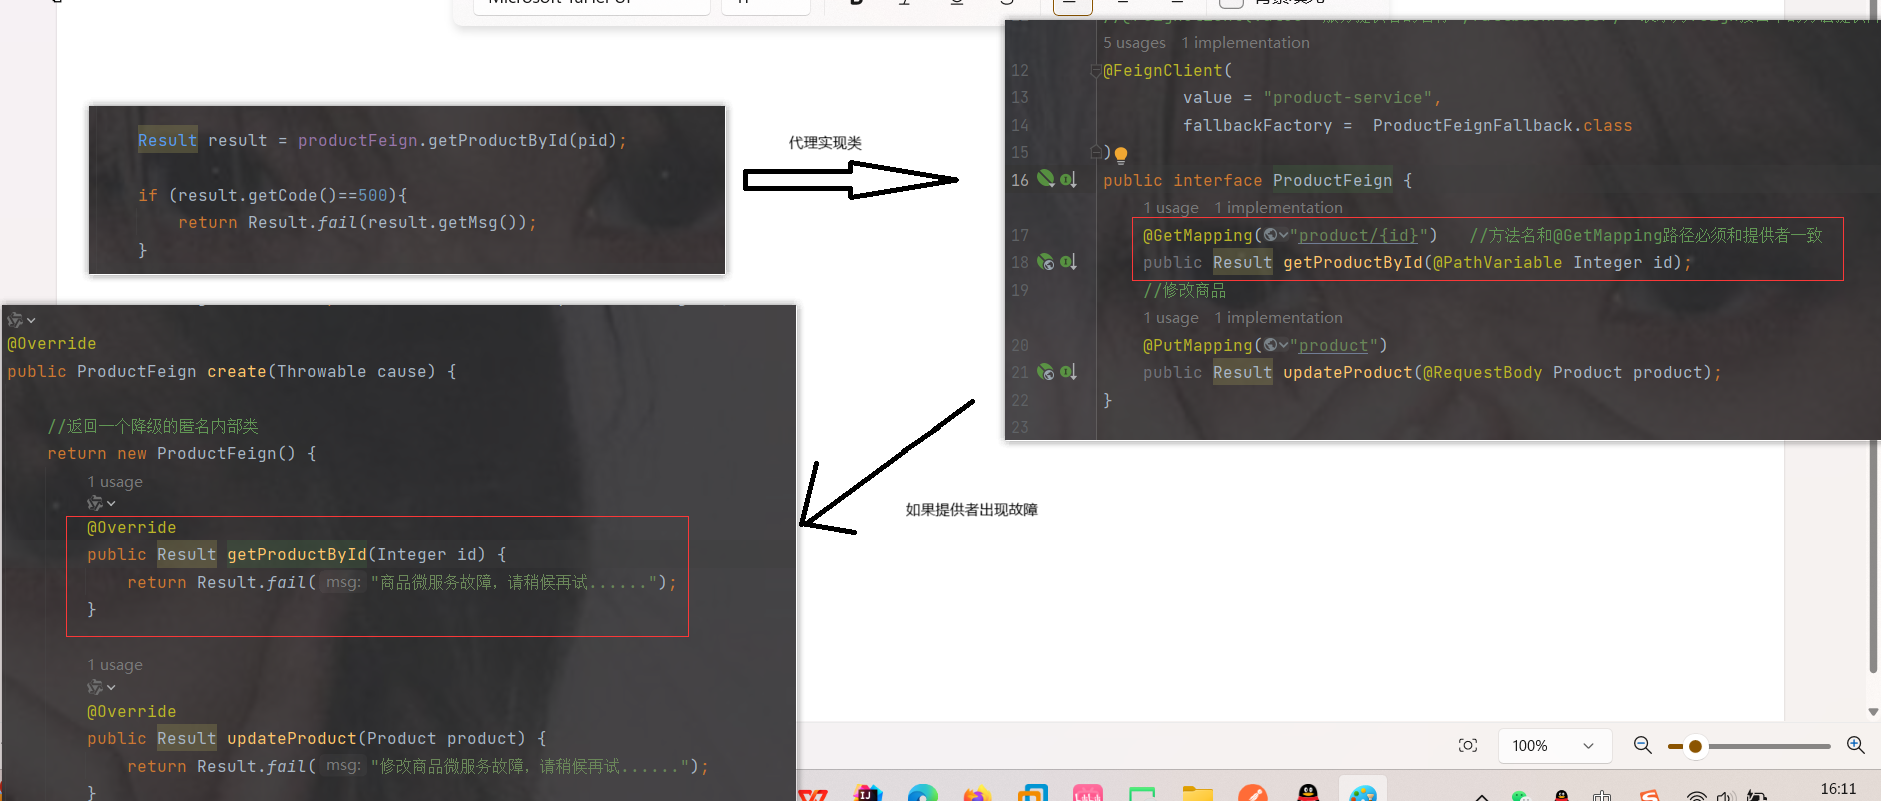
安装Sentinel控制台以及交互
Sentinel 提供一个轻量级的控制台, 它提供机器发现、单机资源实时监控以及规则管理等功能
sentinel的版本一定要和组件的版本对应一致,否则出现会在一定程序出现不可预知的错误
下载jar包
也可以从版本对应关系里下载sentinel控制台,右边全是组件,点击框起来的
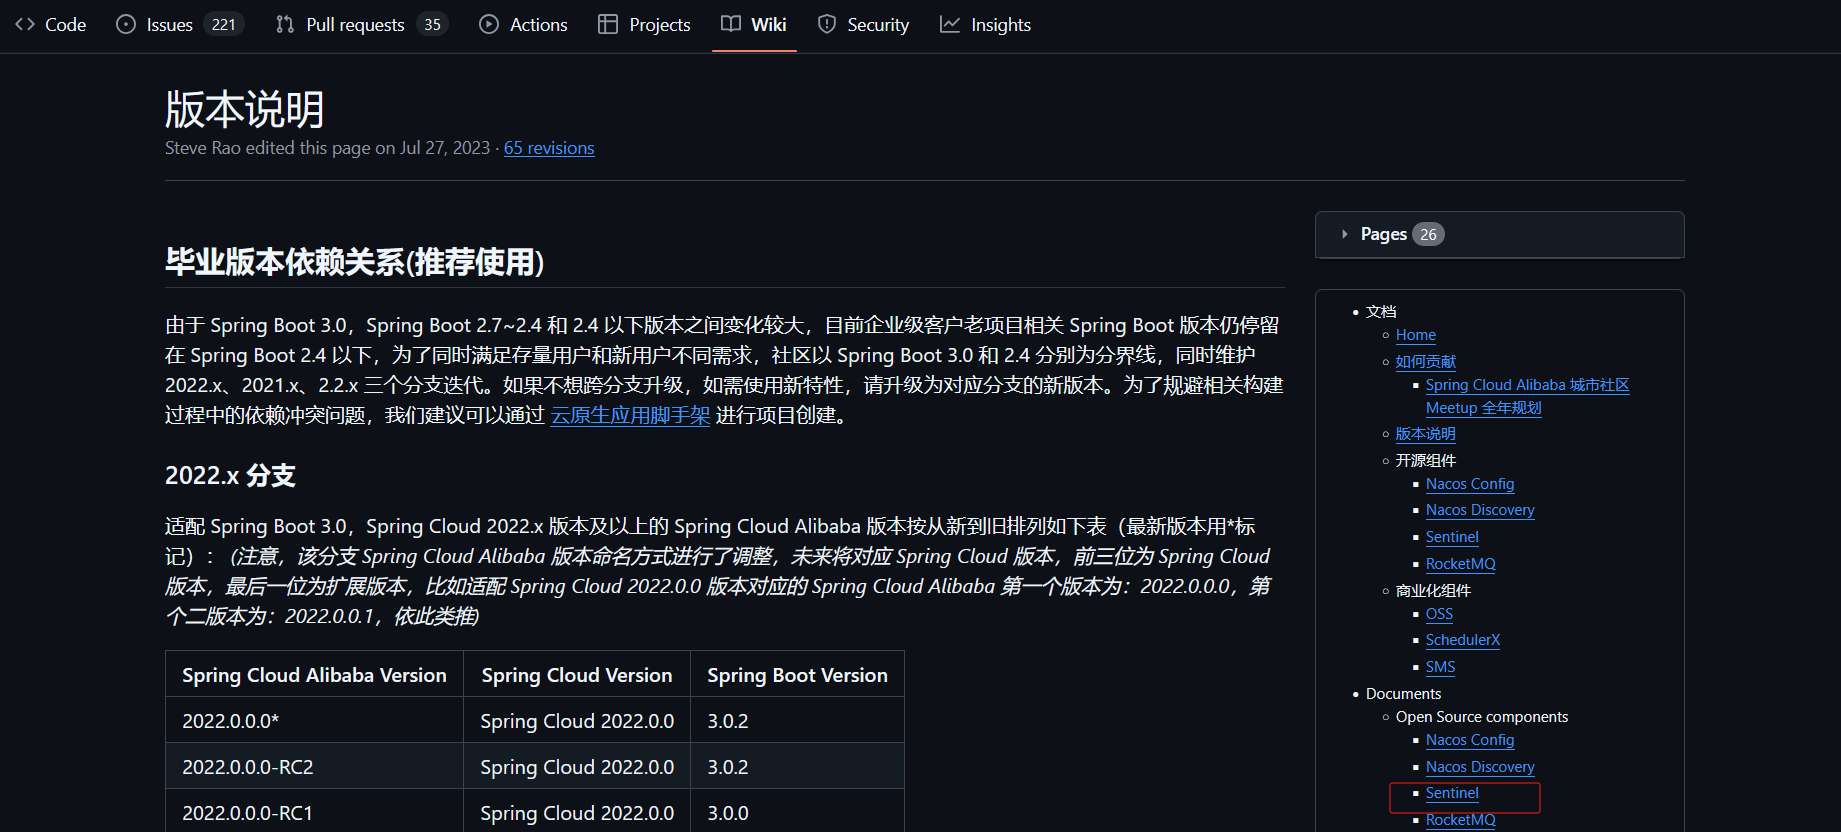
往下翻找到截图框起来的,点击
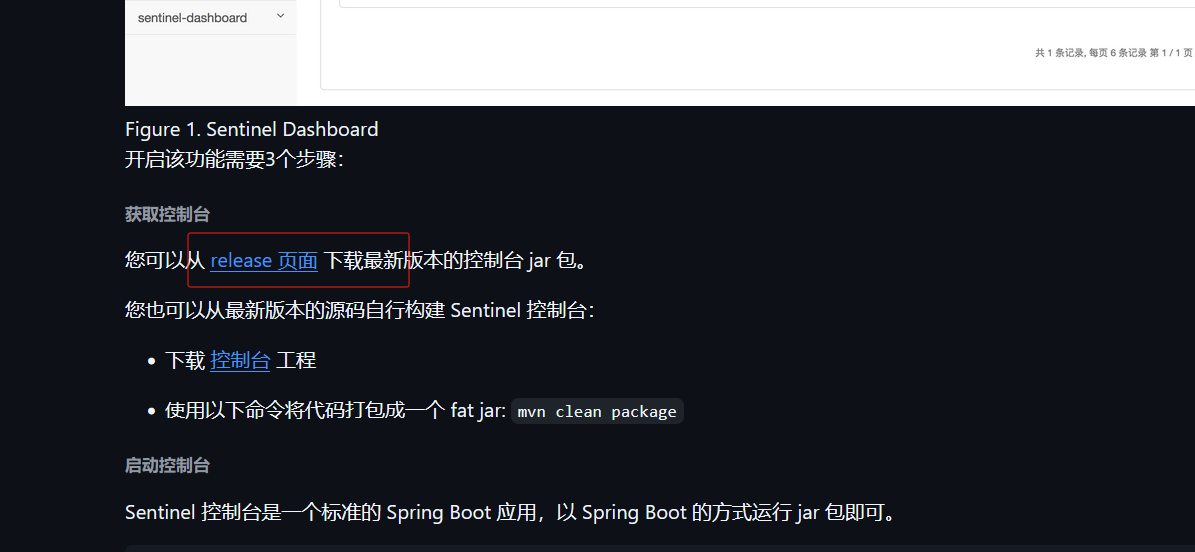
找到你对应的版本直接点击进去,我的版本是1.8.1
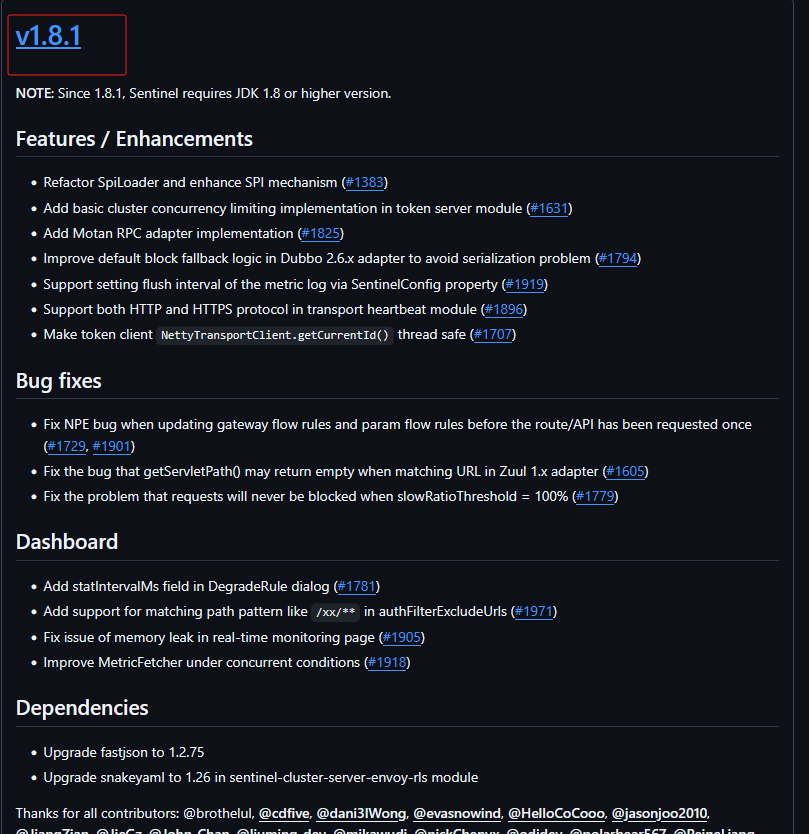
往下滑就能找到,选择.jar
启动
cmd窗口打开
java -jar sentinel jar包名 --server.port=8888
访问sentinel
localhost:你设置sentinel的端口号
上图中的 --server.port="端口号就访问这个"
![]()
默认密码是sentinel/sentinel
是空的就对了,因为还没有和sentinel交互
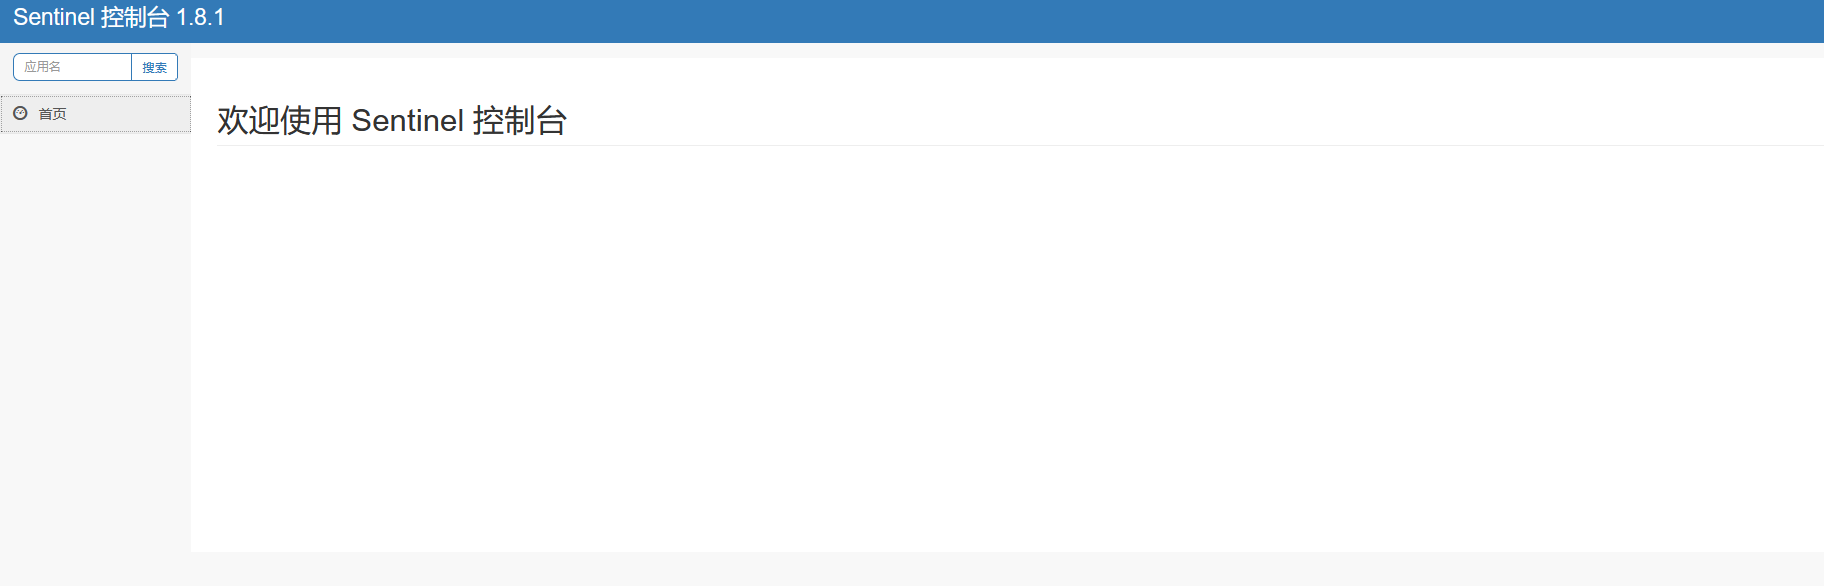
修改order服务,在里面加入有关控制台的配置
1.加jar包
            com.alibaba.cloud
            spring-cloud-starter-alibaba-sentinel
因为在sys-service中加过了,所以如果加过了就不用加了
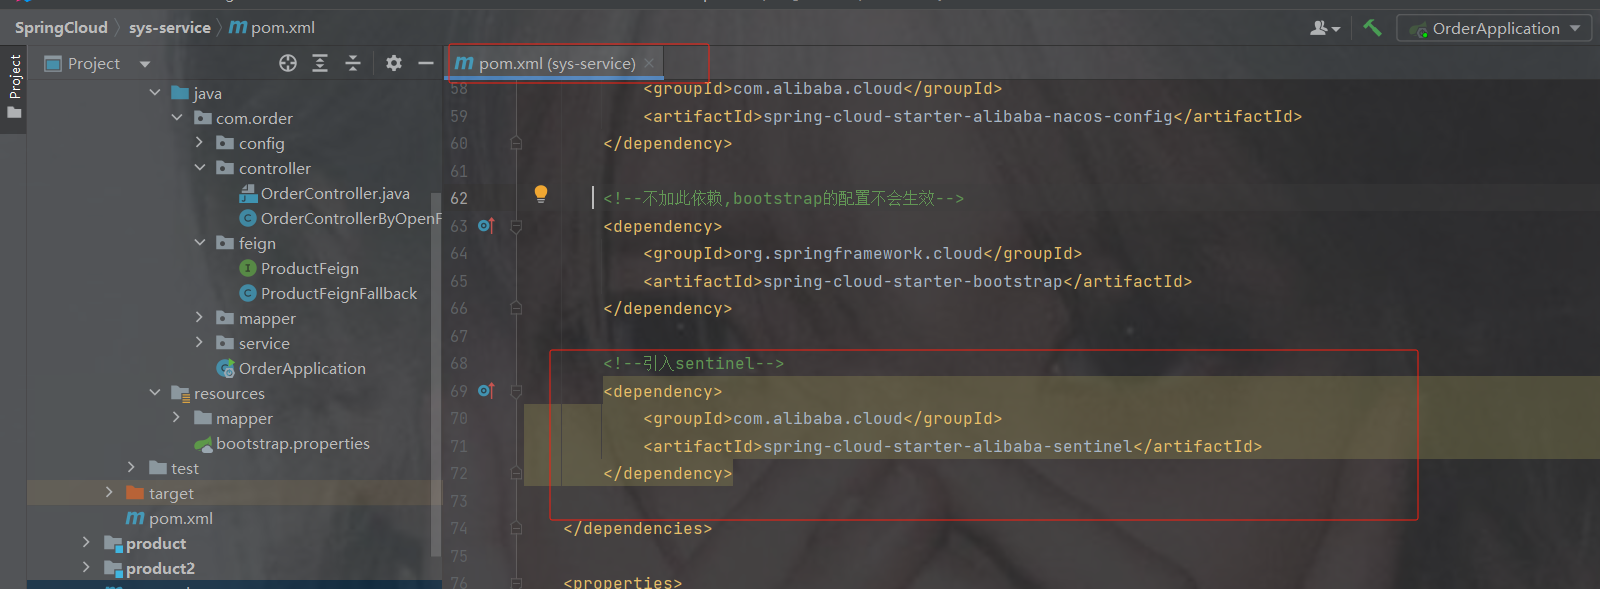
2.sentinel交互
#配置Sentinel客户端与控制台交互的传输端口。表示指定的通信端口号。默认情况下Sentinel使用8719端口,此处显式配置为9010
spring.cloud.sentinel.transport.port=9010
#sentinel控制台地址
spring.cloud.sentinel.transport.dashboard=localhost:8888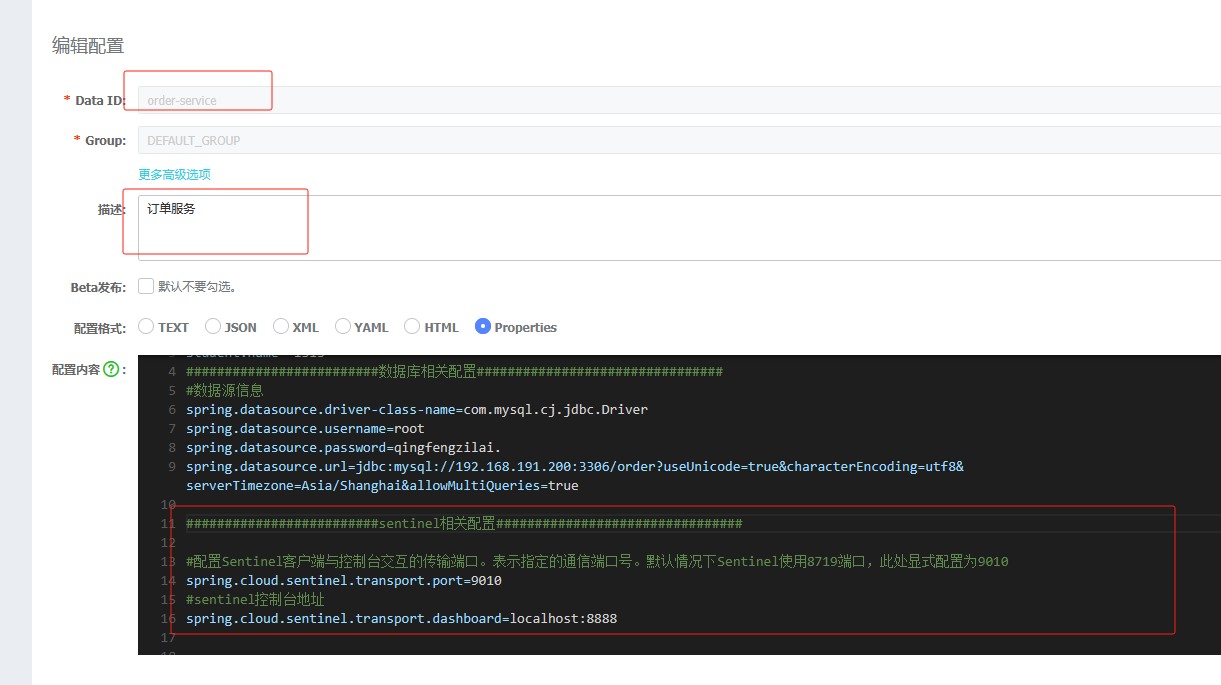
3.访问接口sentinel才会出来,注意是订单的
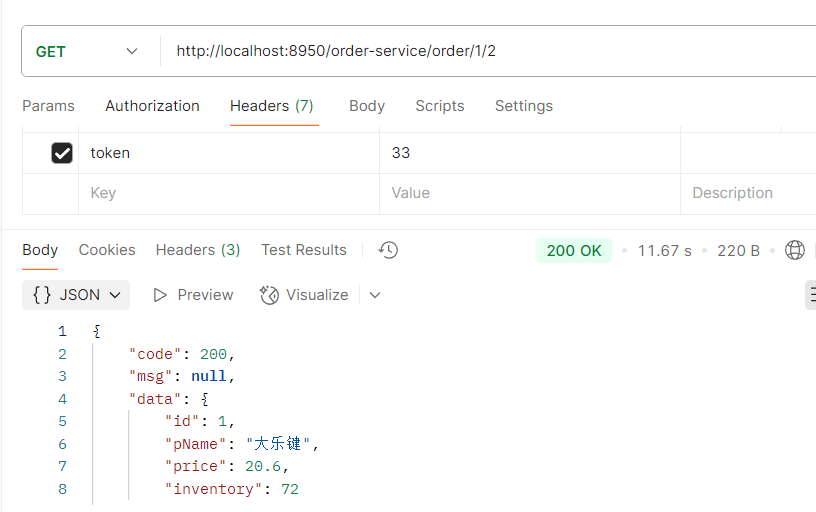
4.刷新sentinel
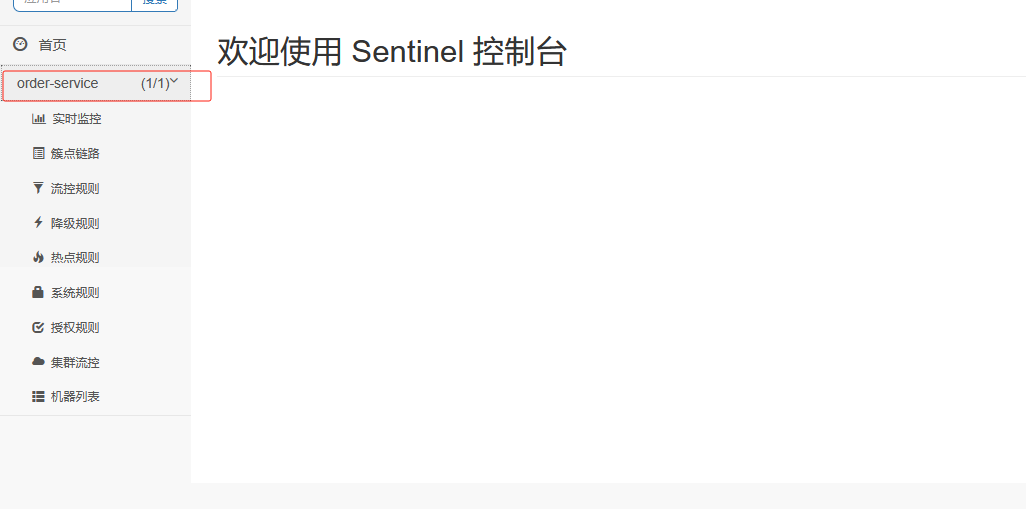
Sentinel规则
流控规则
流量控制,其原理是监控应用流量的QPS(每秒查询率) 或并发线程数等指标,当达到指定的阈值时对流量进行控制,以避免被瞬时的流量高峰冲垮,从而保障应用的高可用性。
第1步: 点击簇点链路,我们就可以看到访问过的接口地址,然后点击对应的流控按钮,进入流控规则配置页面。新增流控规则界面如下:
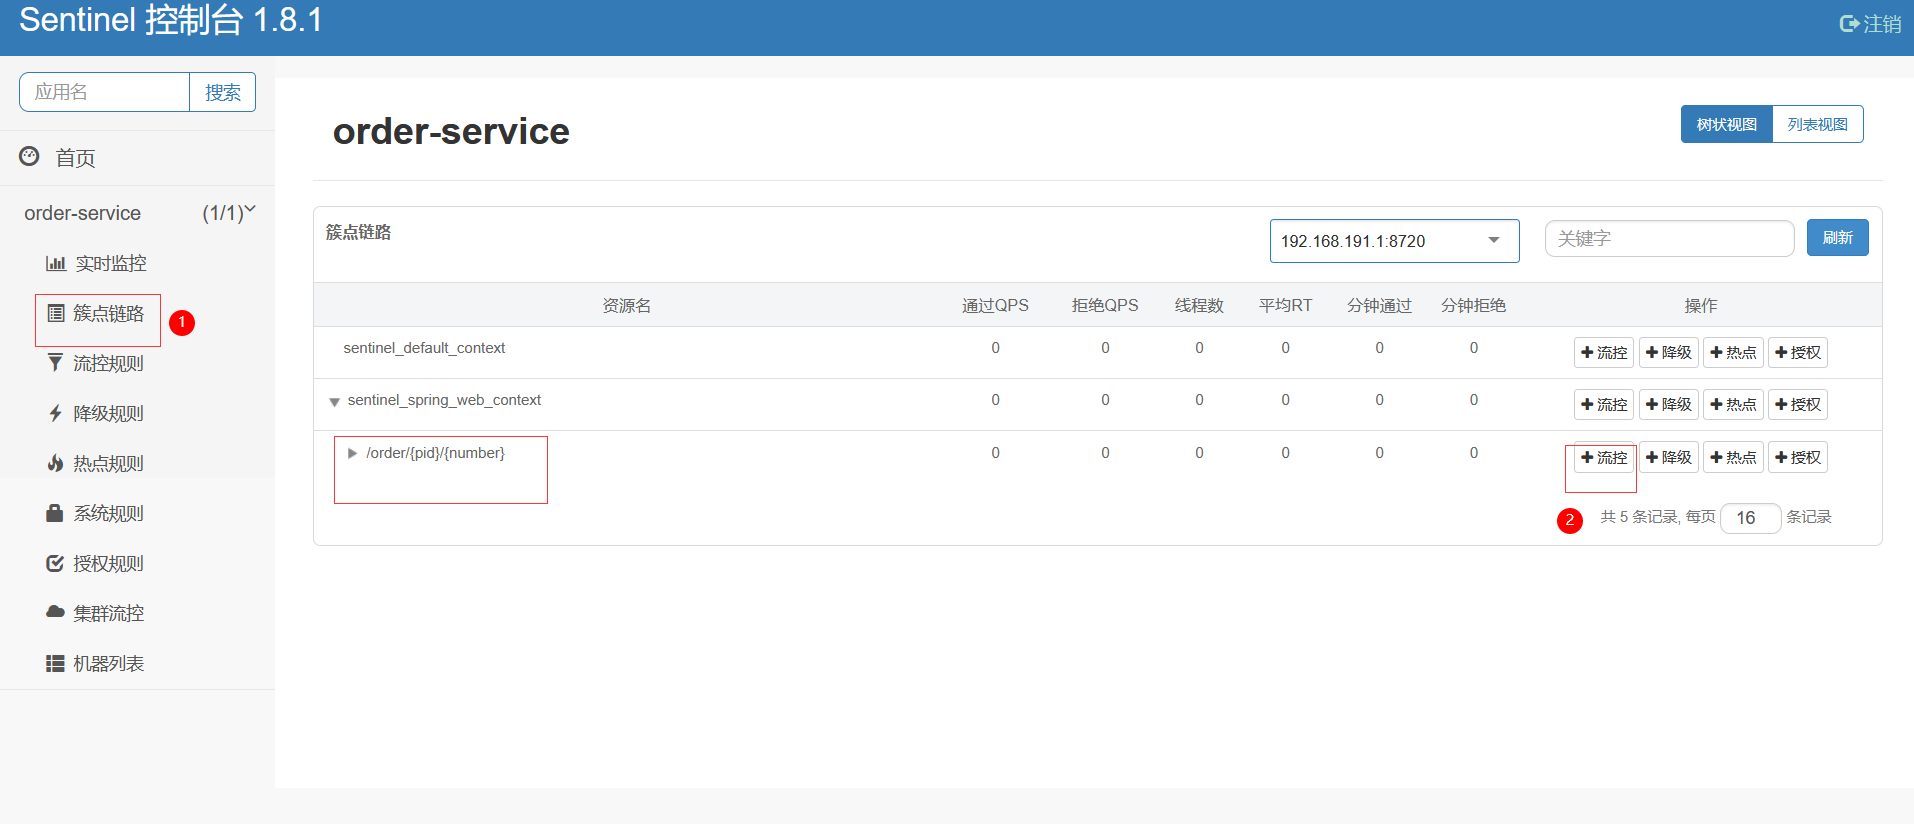
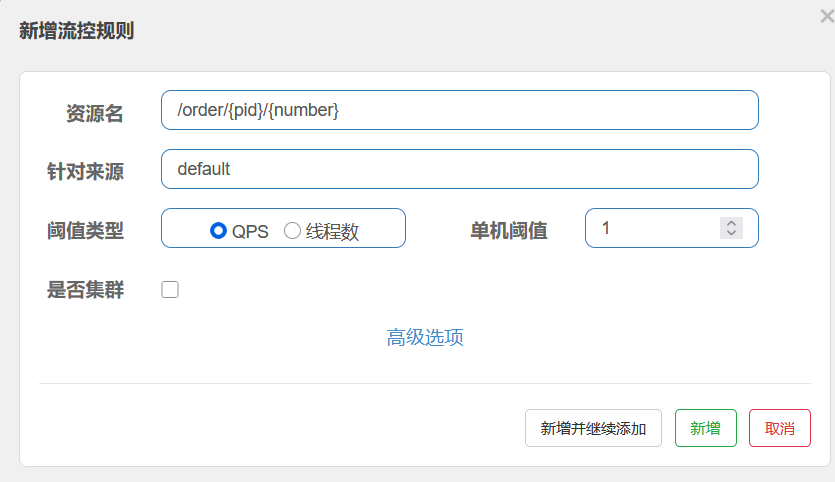
资源名:唯一名称,默认是请求路径,可自定义
针对来源:指定对哪个微服务进行限流,默认指default,意思是不区分来源,全部限制
阈值类型/单机阈值:
QPS(每秒请求数量): 当调用该接口的QPS达到阈值的时候,进行限流
线程数:当调用该接口的线程数达到阈值的时候,进行限流
并发数控制用于保护业务线程池不被慢调用耗尽。例如,当应用所依赖的下游应用由于某种原因导致服务不稳定、响应延迟增加,对于调用者来说,意味着吞吐量下降和更多的线程数占用,极端情况下甚至导致线程池耗尽。为应对太多线程占用的情况,业内有使用隔离的方案,比如通过不同业务逻辑使用不同线程池来隔离业务自身之间的资源争抢(线程池隔离)。这种隔离方案虽然隔离性比较好,但是代价就是线程数目太多,线程上下文切换的 overhead 比较大,特别是对低延时的调用有比较大的影响。Sentinel 并发控制不负责创建和管理线程池,而是简单统计当前请求上下文的线程数目(正在执行的调用数目),如果超出阈值,新的请求会被立即拒绝,效果类似于信号量隔离。并发数控制通常在调用端进行配置。
是否集群:暂不需要集群
接下来我们以QPS为例来研究限流规则的配置
1. 简单配置
我们先做一个简单配置,设置阈值类型为QPS,单机阈值为1。即每秒请求量大于1的时候开始限流
添加后,接下来,在流控规则页面就可以看到这个配置
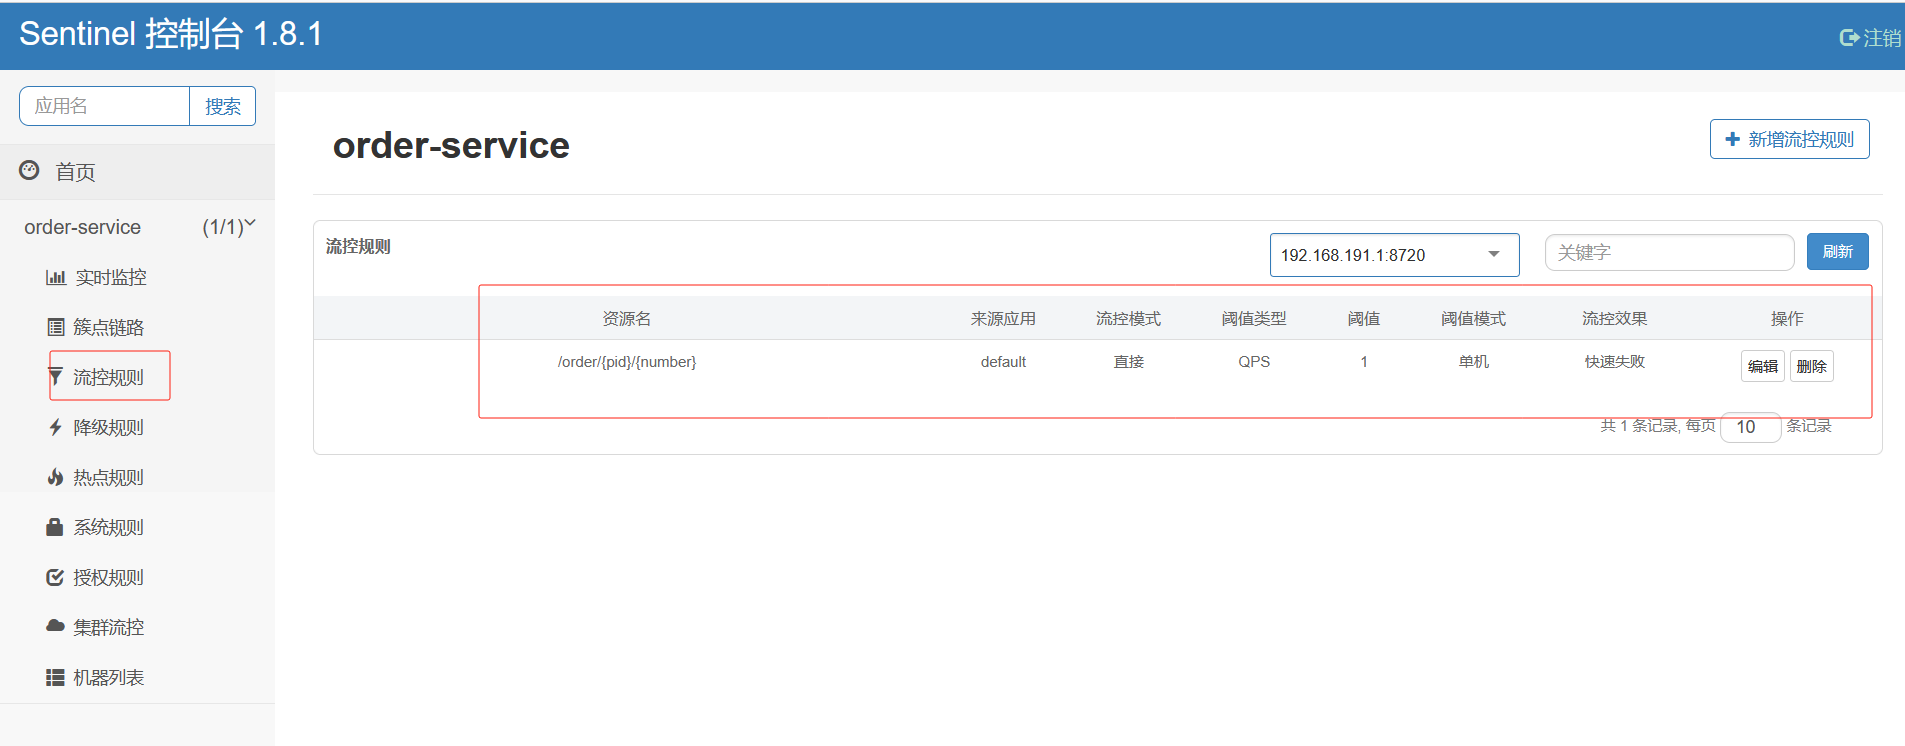
正常情况下是可以访问到
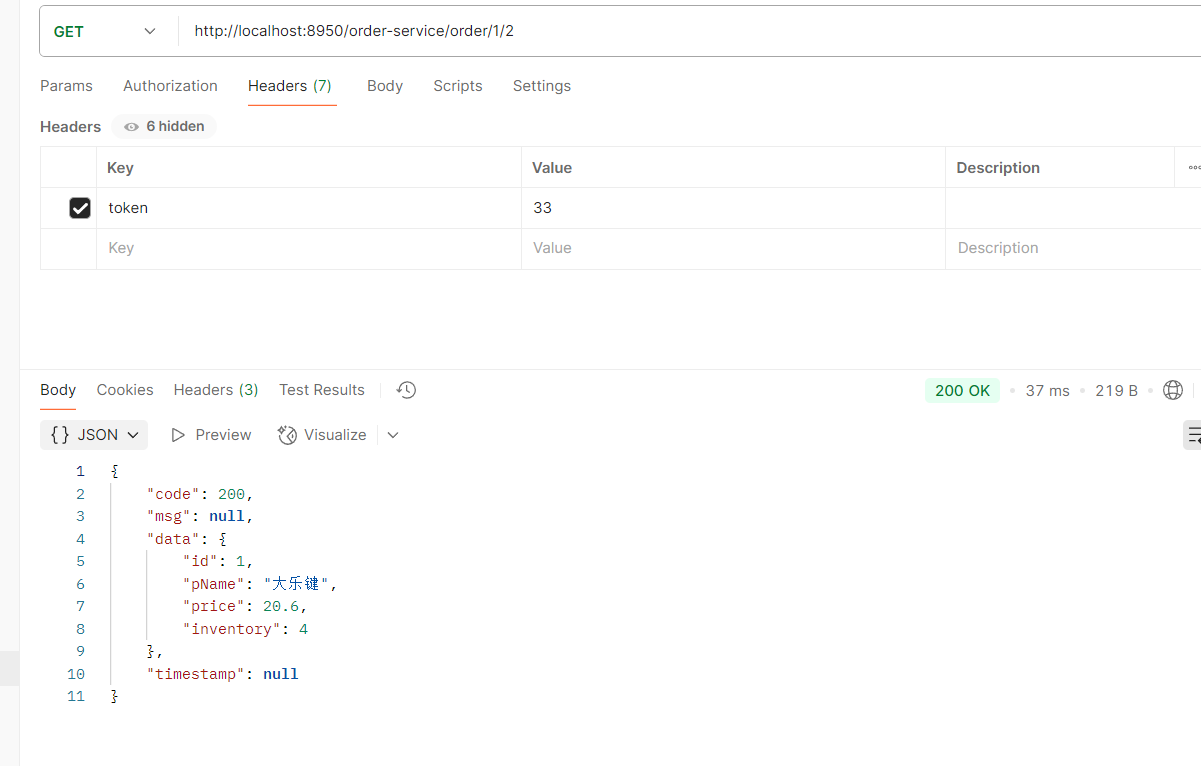
然后快速访问 接口,观察效果。此时发现,当QPS > 1的时候,服务就不能正常响应,而是返回Blocked by Sentinel (flow limiting)结果。
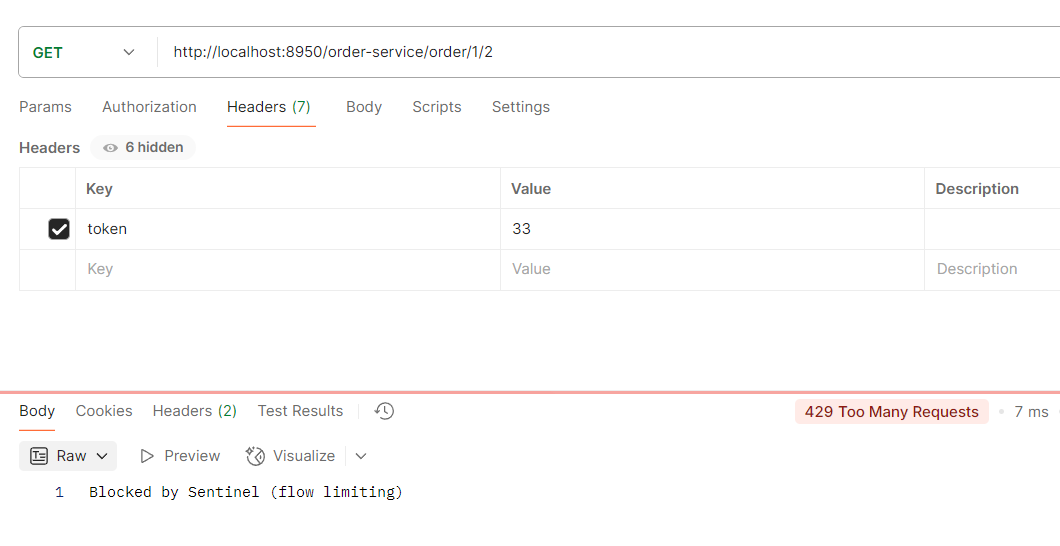
也可对线程做限制,如果有两个线程进来访问效果是一样的,因为设置了单机阈值是1表示每秒只能有一个线程访问
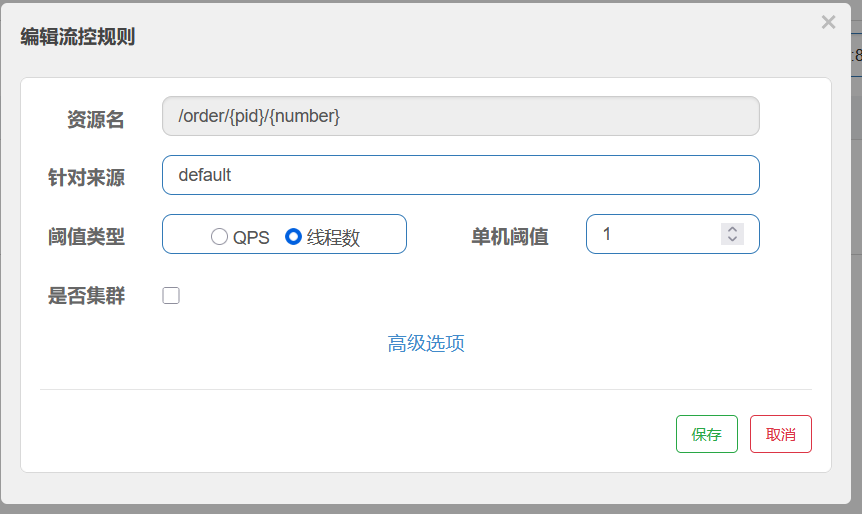
2. 自定义响应
返回这种异常是不合理的我们可以自定义返回响应的异常
BlockException异常统一处理
springwebmvc接口资源限流入口在HandlerInterceptor的实现类AbstractSentinelInterceptor的preHandle方法中,对异常的处理是BlockExceptionHandler的实现类
自定义BlockExceptionHandler 的实现类统一处理BlockException

1. 创建一个异常包再创建一个异常类
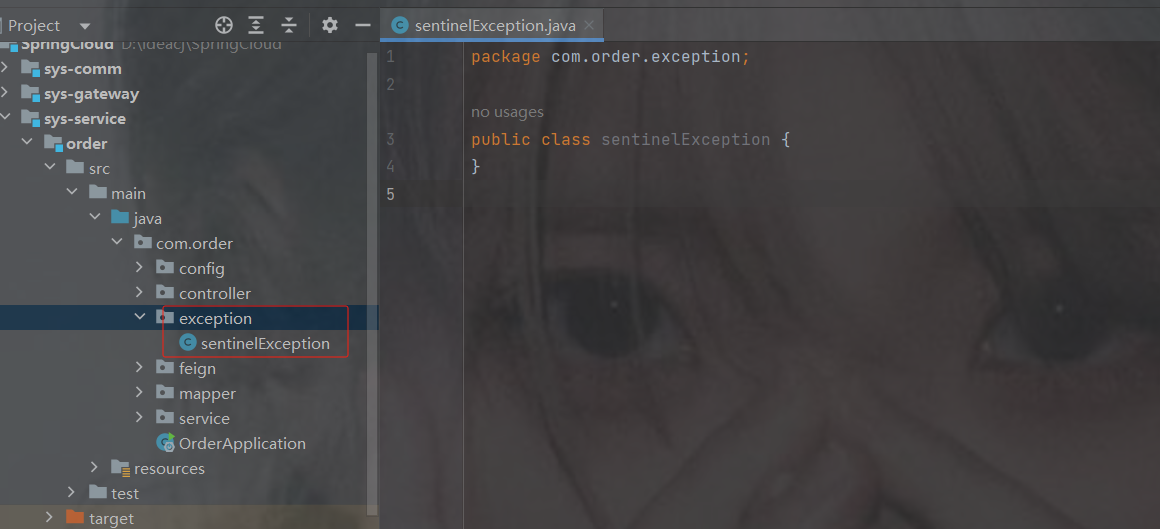
2.自定义的实现类统一处理BlockExceptionHandler
package com.order.exception;
import com.alibaba.csp.sentinel.adapter.spring.webmvc.callback.BlockExceptionHandler;
import com.alibaba.csp.sentinel.slots.block.BlockException;
import com.alibaba.csp.sentinel.slots.block.authority.AuthorityException;
import com.alibaba.csp.sentinel.slots.block.degrade.DegradeException;
import com.alibaba.csp.sentinel.slots.block.flow.FlowException;
import com.alibaba.csp.sentinel.slots.block.flow.param.ParamFlowException;
import com.alibaba.csp.sentinel.slots.system.SystemBlockException;
import com.comm.utlis.Result;
import com.fasterxml.jackson.databind.ObjectMapper;
import org.springframework.stereotype.Component;
import javax.servlet.http.HttpServletRequest;
import javax.servlet.http.HttpServletResponse;
@Component
public class sentinelException implements BlockExceptionHandler {
    @Override             //httpServletRequest是请求对象           httpServletResponse是响应对象           e是抛出的异常
    public void handle(HttpServletRequest httpServletRequest, HttpServletResponse httpServletResponse, BlockException e) throws Exception {
        Result result = new Result<>();
        // 判断异常是否是限流异常
        if (e instanceof FlowException) {
            result = Result.fail(450, "限流了");
            //  判断异常是否是降级异常
        } else if (e instanceof DegradeException) {
            result = Result.fail(451, "降级了");
            // 判断异常是否是参数限流异常
        } else if (e instanceof ParamFlowException) {
            result = Result.fail(452, "热点参数限流了");
            // 判断异常是否是系统负载异常
        } else if (e instanceof SystemBlockException) {
            result = Result.fail(453, "触发系统保护规则了");
            //  判断异常是否是授权异常
        } else if (e instanceof AuthorityException) {
            result = Result.fail(454, "授权规则不通过");
        }
        // 创建ObjectMapper实例,用于JSON数据的序列化与反序列化
        ObjectMapper objectMapper = new ObjectMapper();
        //将result对象序列化为JSON字符串,使用ObjectMapper的writeValueAsString方法
        String object = objectMapper.writeValueAsString(result);
        //设置响应内容类型为JSON格式,并指定UTF-8字符编码
        httpServletResponse.setContentType("application/json;charset=UTF-8");
        //将对象内容写入响应输出流
        httpServletResponse.getWriter().write(object);
        //强制刷新输出流确保内容完全输出
        httpServletResponse.getWriter().flush();
        //关闭输出流释放系统资源
        httpServletResponse.getWriter().close();
    }
}
3. 配置流控模式
点击上面设置流控规则的编辑按钮,然后在编辑页面点击高级选项,会看到有流控模式一栏。
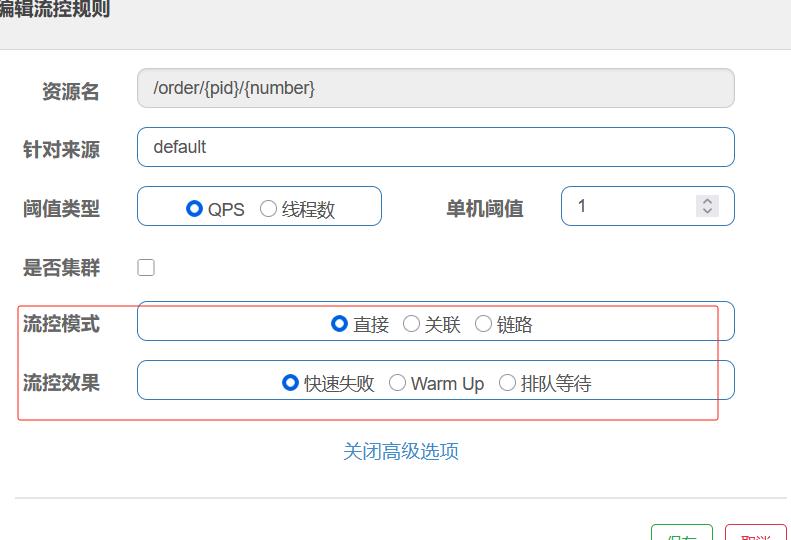
sentinel共有三种流控模式,分别是:
- 直接(默认):接口达到限流条件时,开启限流
- 关联:当关联的资源达到限流条件时,开启限流 [适合做应用让步]
- 链路:当从某个接口过来的资源达到限流条件时,开启限流
下面呢分别演示三种模式:
直接流控模式
直接流控模式是最简单的模式,当指定的接口达到限流条件时开启限流。上面案例使用的就是直接流控模式。
关联流控模式
关联流控模式指的是,当指定接口关联的接口达到限流条件时,指定的接口开启限流。

代码
package com.order.controller;
import com.comm.utlis.Result;
import org.springframework.web.bind.annotation.GetMapping;
import org.springframework.web.bind.annotation.RequestMapping;
import org.springframework.web.bind.annotation.RestController;
@RestController
@RequestMapping("/test")
public class TestSentinelMessage {
    @GetMapping("message1")
    public Result message1() {
        return Result.ok(null,"message1");
    }
    @GetMapping("message2")
    public Result message2() {
        return Result.ok(null,"message2");
    }
}
第1步:配置限流规则, 将流控模式设置为关联,关联资源设置为的 /test/message2。
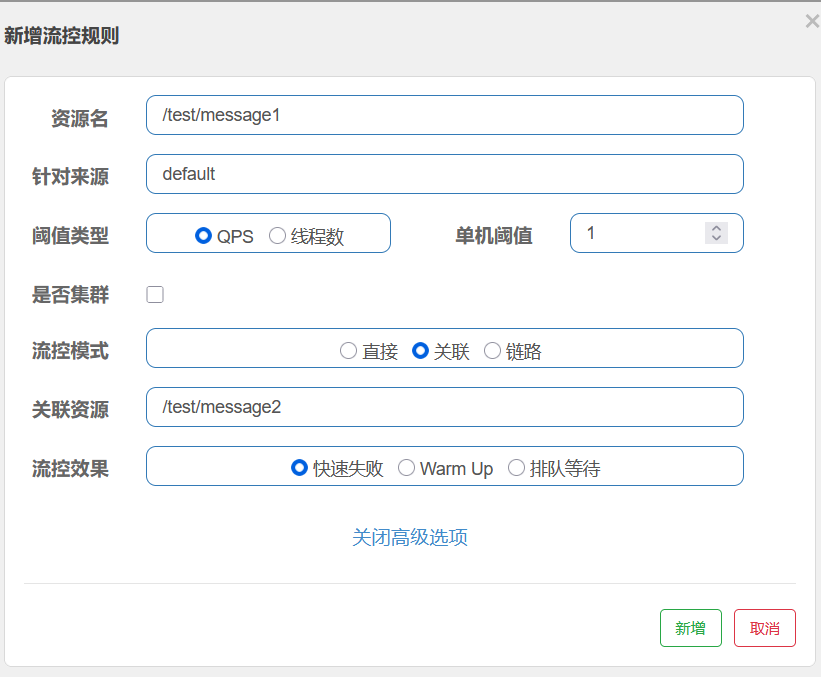
2. 使用压测工具jmeter请求 /test/message2
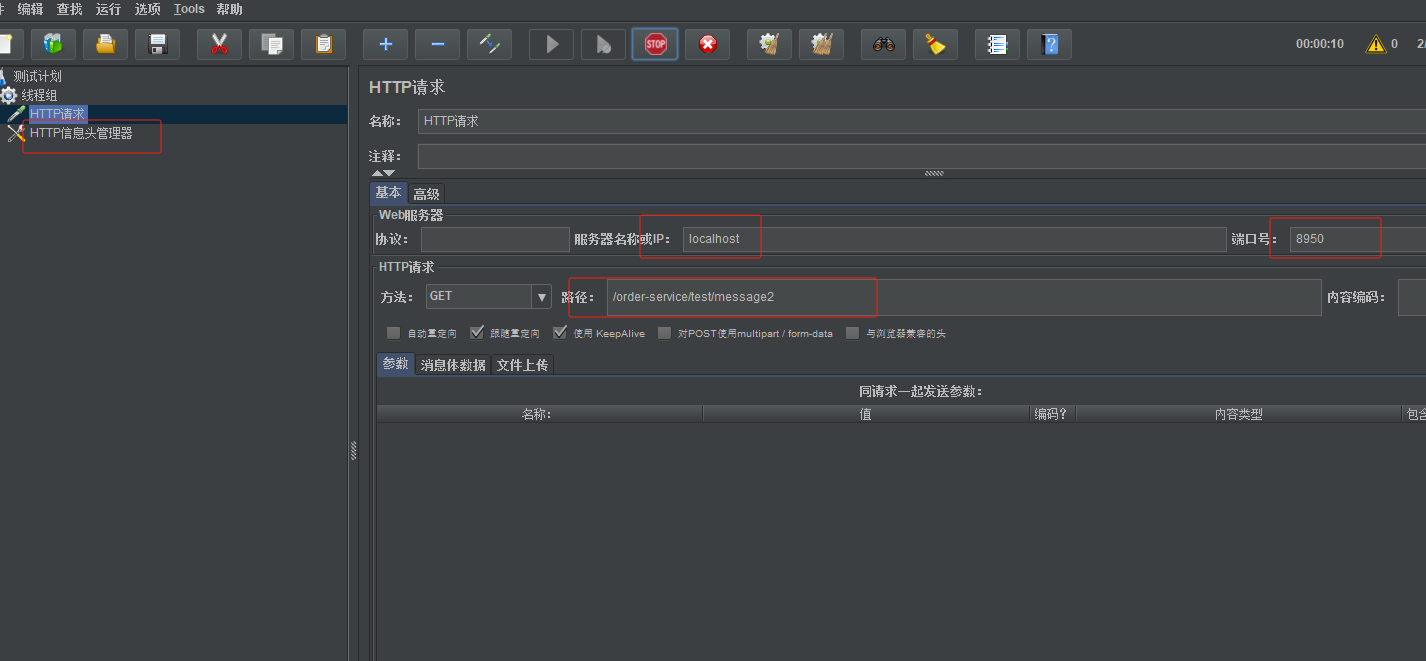
第3步:访问 /test/message1,会发现已经被限流,因为关联了message2,当message2达到上限了,就会保护message1
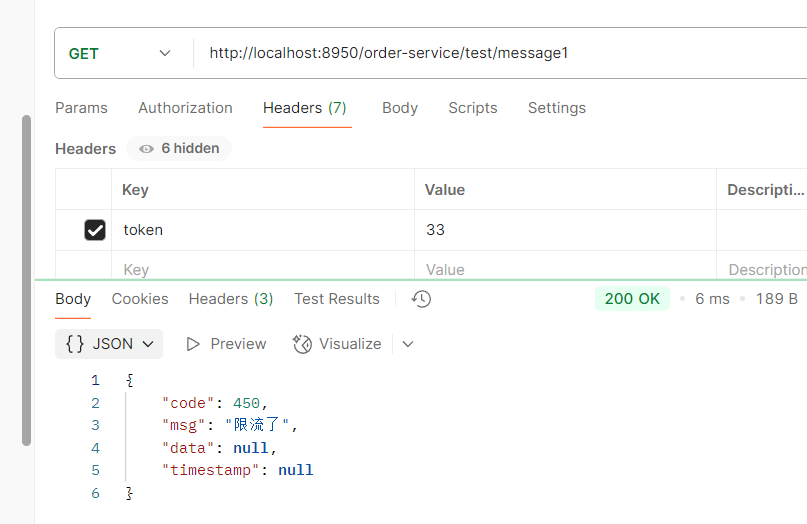
链路流控模式
链路流控模式指的是, 当从某个接口过来的资源达到限流条件时,开启限流。注解:
@SentinelResource我们可以对某一个方法进行限流控制,无论是谁在何处调用了它,这里需要使用到
@SentinelResource,一旦方法被标注,那么就会进行监控@SentinelResource,一旦方法被标注,那么就会进行监控。
第1步: 编写一个service,在里面添加一个方法message
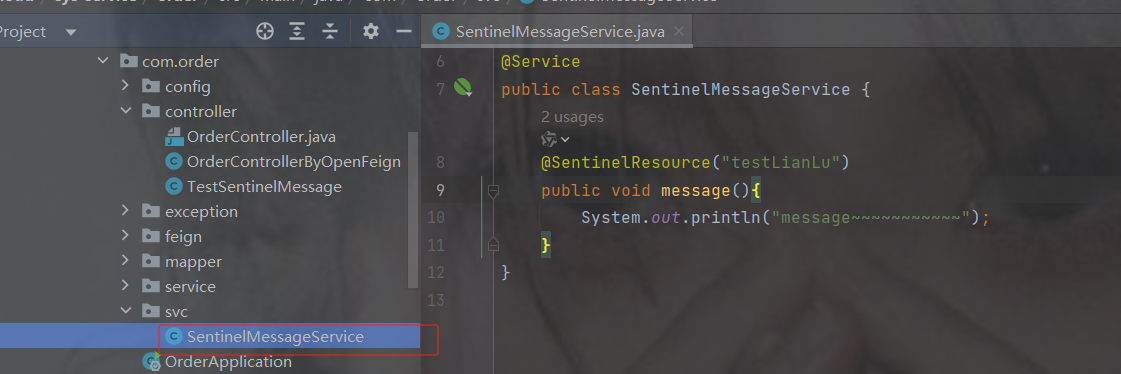
package com.order.svc;
import com.alibaba.csp.sentinel.annotation.SentinelResource;
import org.springframework.stereotype.Service;
@Service
public class SentinelMessageService {
    @SentinelResource("testLianLu")
    public void message(){
        System.out.println("message~~~~~~~~~~~");
    }
}
第2步: 在Controller中声明两个方法,分别调用service中的方法message
package com.order.controller;
import com.comm.utlis.Result;
import com.order.svc.SentinelMessageService;
import org.springframework.beans.factory.annotation.Autowired;
import org.springframework.web.bind.annotation.GetMapping;
import org.springframework.web.bind.annotation.RequestMapping;
import org.springframework.web.bind.annotation.RestController;
@RestController
@RequestMapping("/test")
public class TestSentinelMessage {
    @Autowired
    private SentinelMessageService messageService;
    //测试链路流控模式
    @GetMapping("message3")
    public Result message3() {
        messageService.message(); //调用message()方法
        return Result.ok(null,"message3");
    }
    @GetMapping("message4")
    public Result message4() {
        messageService.message(); //调用message()方法
        return Result.ok(null,"message4");
    }
}
第3步: 禁止收敛URL的入口 context
如果不禁止没有办法区分到底从哪一个接口访问的资源
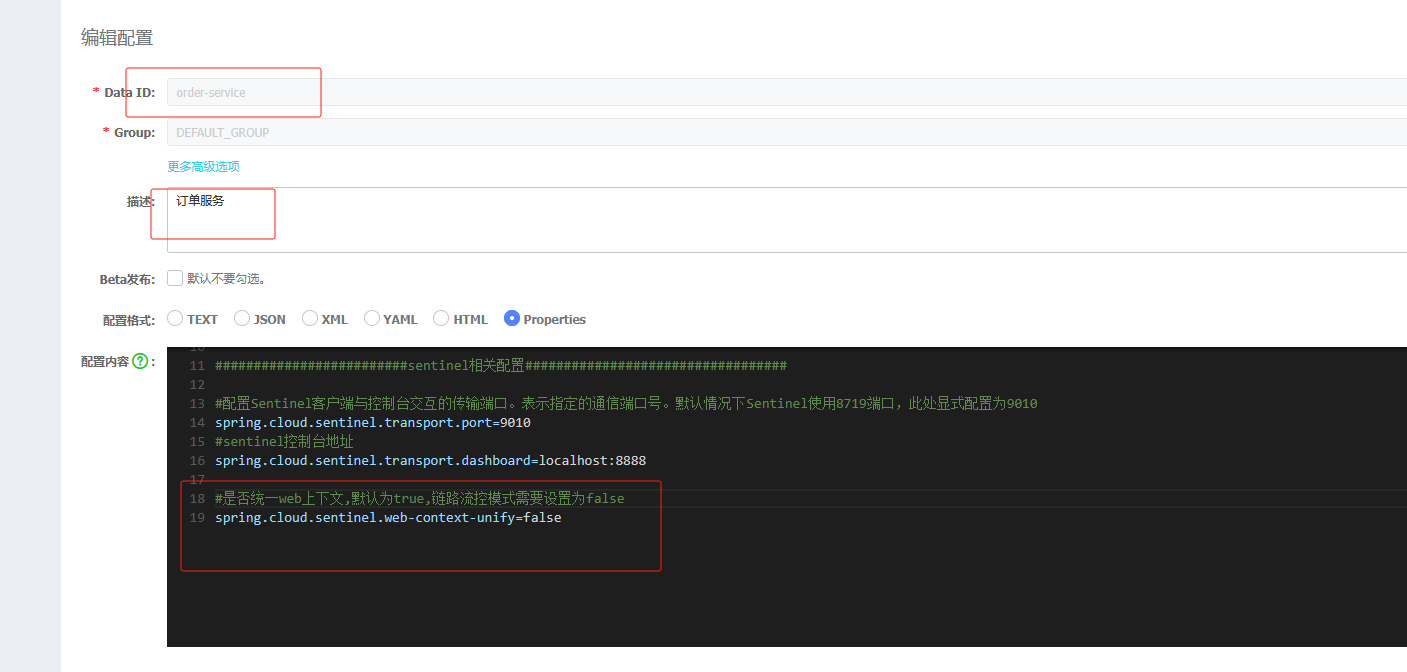
#是否统一web上下文,默认为true,链路流控模式需要设置为false
spring.cloud.sentinel.web-context-unify=false
第4步: 控制台配置限流规则
注意资源名不再是路径,而是你注解中起的名字
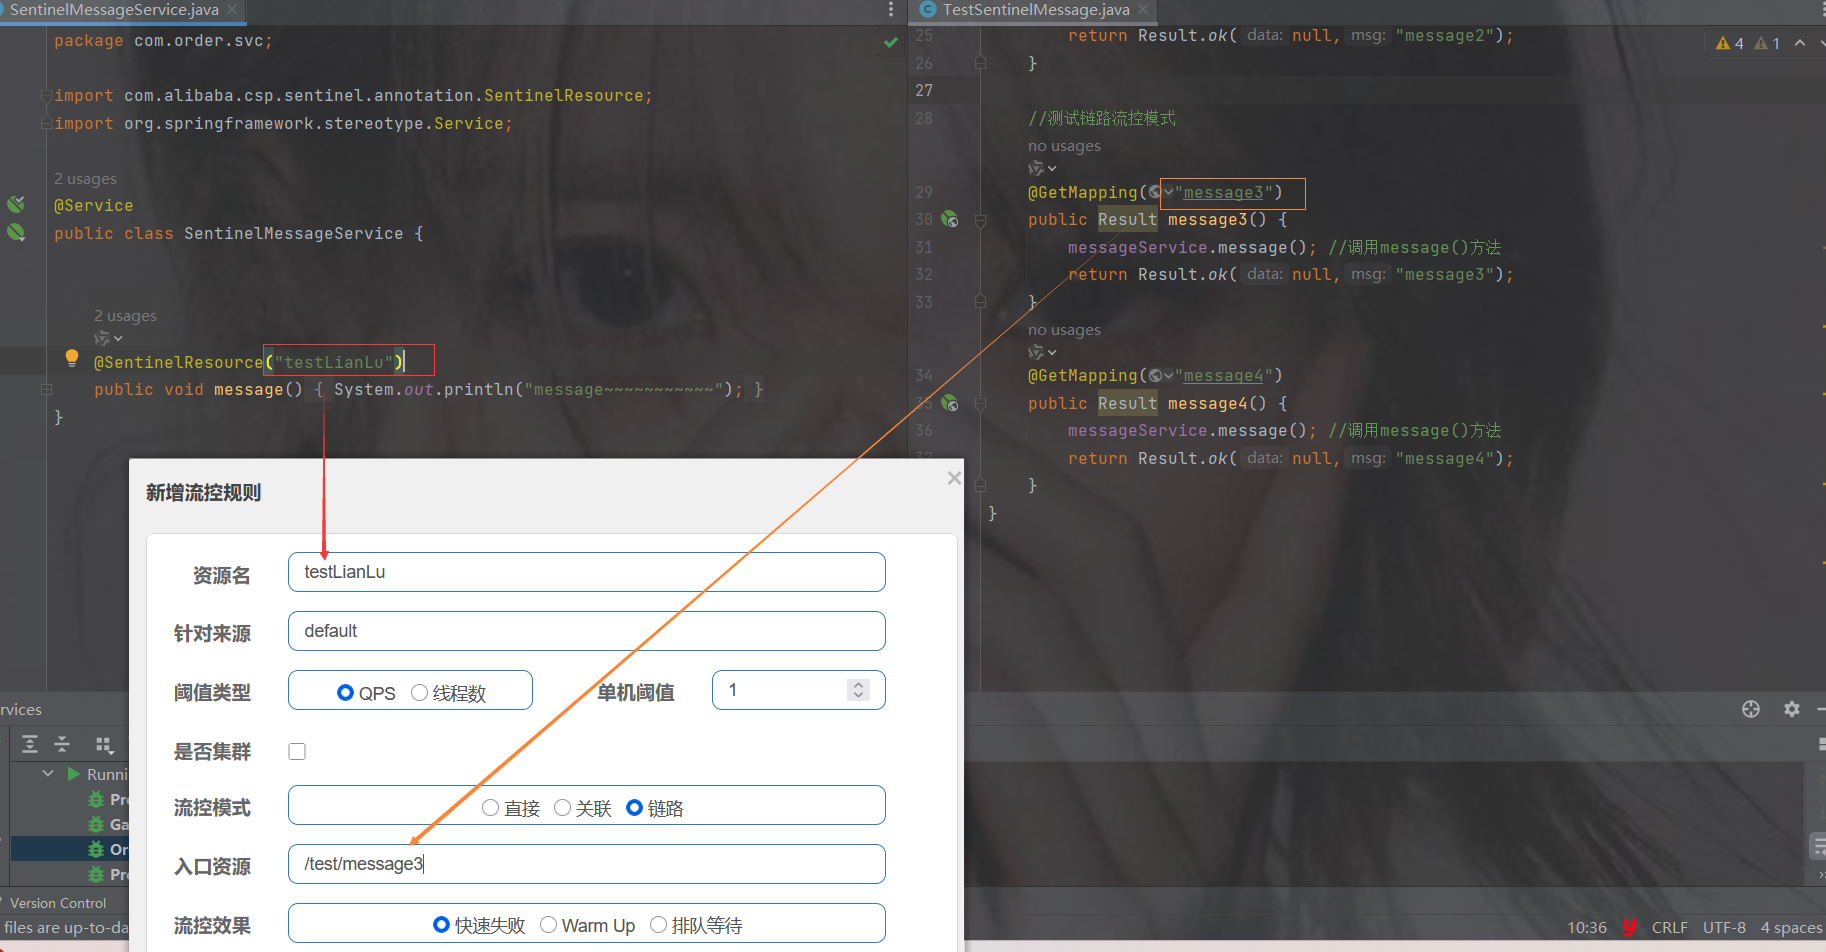
第5步: 分别快速访问 message3 和 message4 , 发现message4 没问题, message3的被限流了
访问过快就会被限制,虽然message4也用了同样的server,但是不会被限制,是因为上面的链路限制的路径只限制了message3
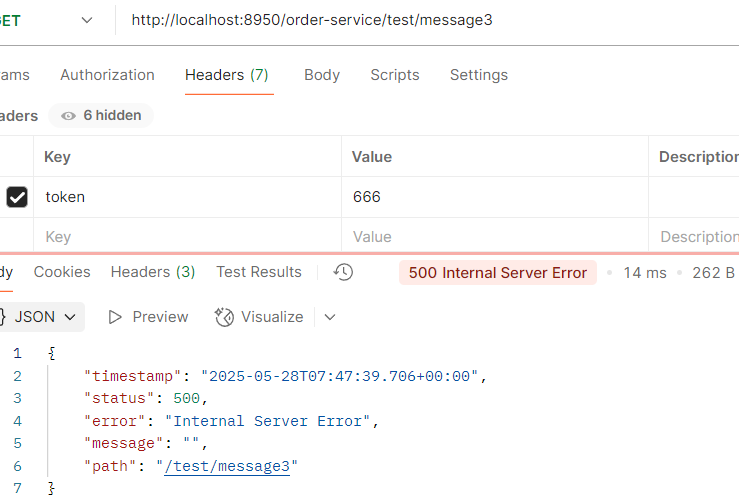
4. 配置流控效果
快速失败(默认)
直接失败,抛出异常,不做任何额外的处理,是最简单的效果
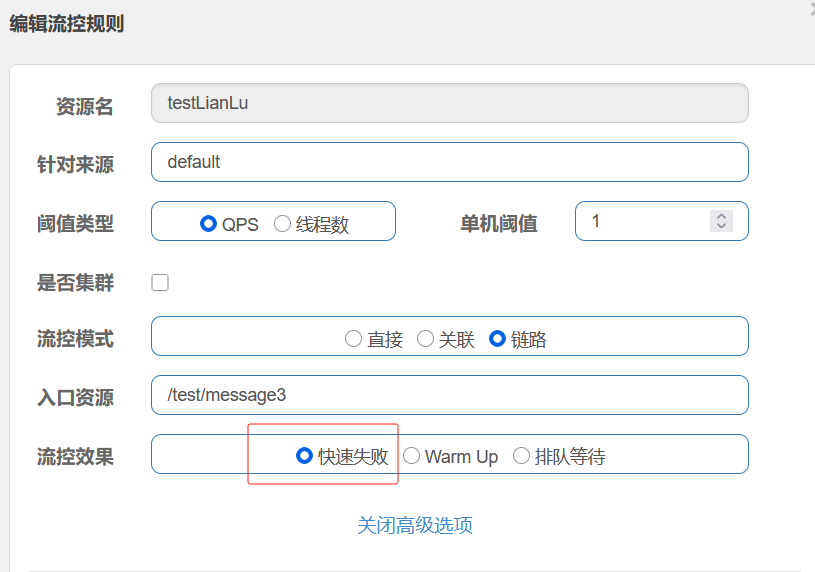
Warm Up
它从开始阈值到最大QPS阈值会有一个缓冲阶段,一开始的阈值是最大QPS阈值的1/3,然后慢慢增长,直到最大阈值,适用于将突然增大的流量转换为缓步增长的场景。
设置阈值为 9,预热时间是 5 秒,逐渐增加到阈值上限,所以会有一个初始阈值
初始阈值 = 阈值上限 / coldFactor, coldFactor 是冷加载因子,默认为3
上面这个配置的效果就是:在 5 秒内最大阈值是 3(9/codeFactor),超过5秒,最大阈值为9
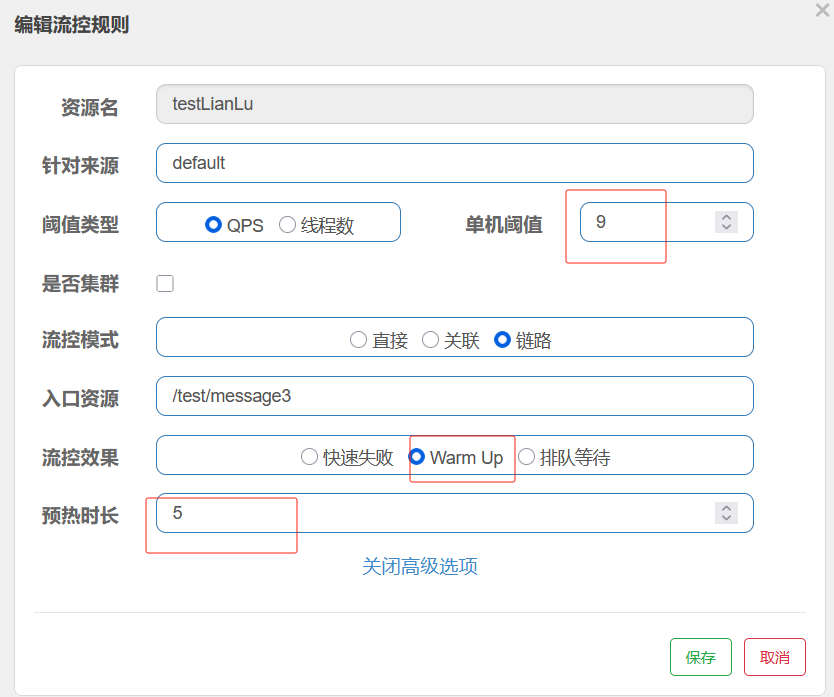
排队等待
让请求以均匀的速度通过,单机阈值为每秒通过数量,其余的排队等待; 它还会让设置一个超时时间,当请求超过超时间时间还未处理,则会被丢弃。
排队等待方式会严格控制请求通过的间隔时间,也即是让请求以均匀的速度通过,对应的是漏桶算法。
注意:匀速排队,让请求以匀速通过,阈值类型必须设置为QPS,否则无效,匀速排队模式暂时不支持 QPS > 1000 的场景
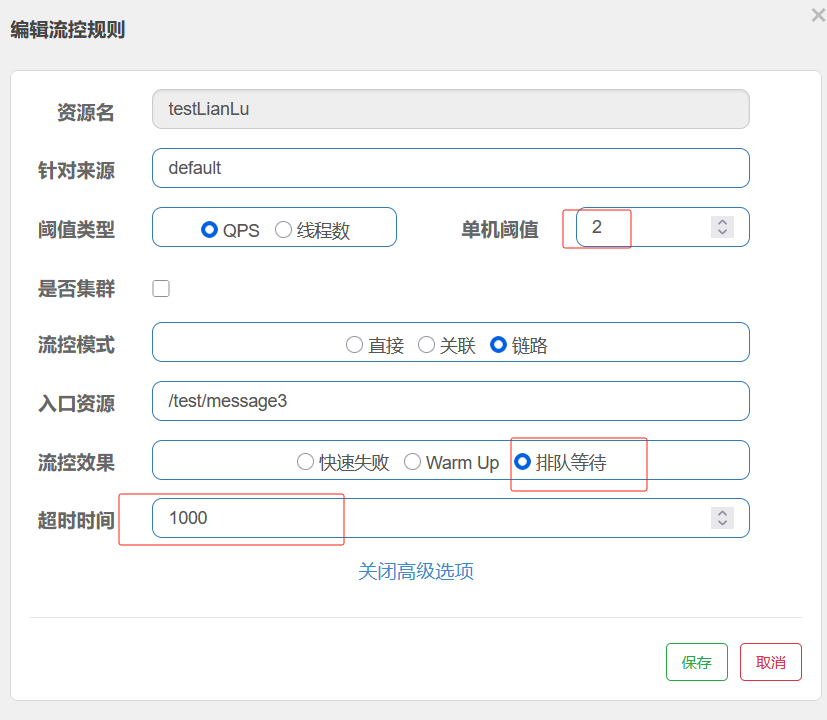
100个人同时发出了请求,接收几个请求 ?
2个请求 1s 处理两个请求
降级规则
降级规则就是设置当满足什么条件的时候,对服务进行降级。Sentinel提供了三个衡量条件:
慢比例调用
指在一个时间段内,响应时间超过设定阈值的请求所占的比例。当某个服务的响应时间变慢,并且慢请求的比例超过一定阈值时,系统会自动触发熔断,以避免因持续等待慢请求而导致资源耗尽
当资源的平均响应时间超过阈值(以 ms 为单位)之后,资源进入准降级状态。如果接下来 1s 内持续进入 2 个请求,它们的 RT都持续超过这个阈值,那么在接下的时间窗口(以 s 为单位)之内,就会对这个方法进行服务降级。
代码
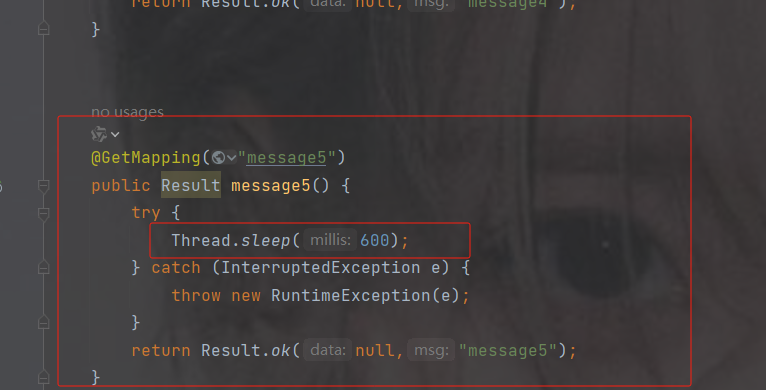

RT:平均响应时间 (DEGRADE_GRADE_RT);当 1s 内持续进入 5 个请求,对应时刻的平均响应时间(秒级)均超过阈值(count,以 ms 为单位),那么在接下来的时间窗口(DegradeRule 中的 timeWindow,以 s 为单位)之内,对这个方法的调用都会自动地熔断(抛出 DegradeException)。
注意 Sentinel 默认统计的 RT 上限是 4900 ms,超出此阈值的都会算作 4900 ms
正常情况下
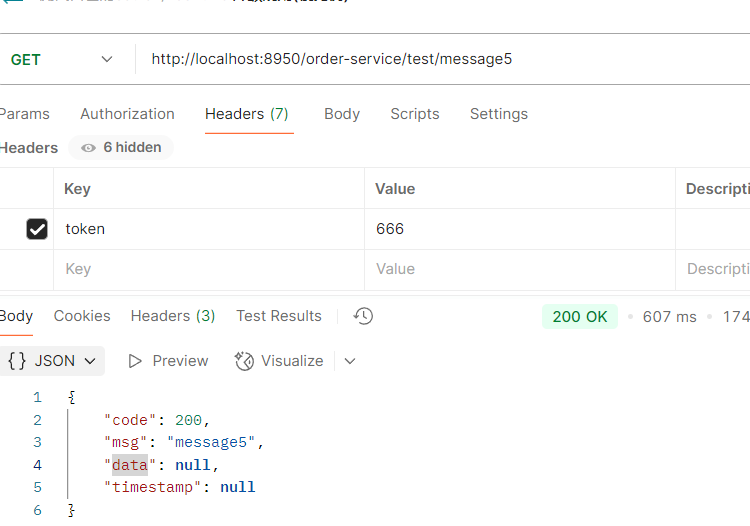
不正常就会这样,10秒后才恢复到正常
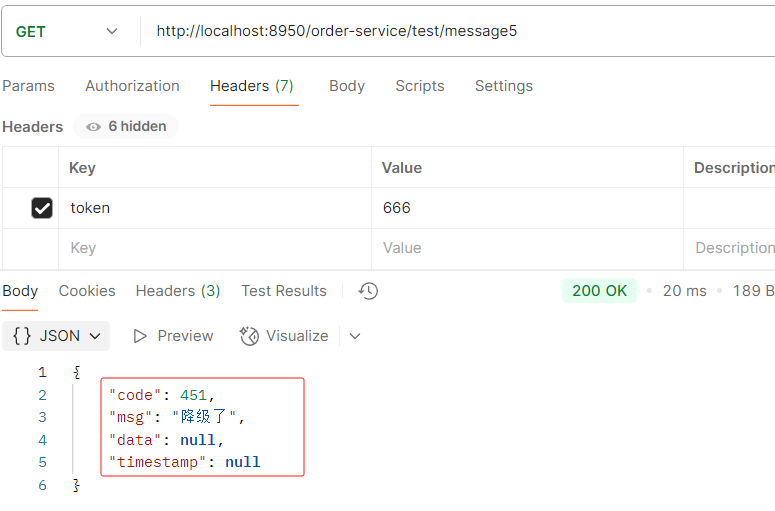
异常比例
当资源的每秒请求量 >= 5,并且每秒异常总数占通过量的比值超过阈值之后,资源进入降级状态,即在接下的时间窗口智能,对这个方法的调用都会自动地返回。异常比率的阈值范围是[0.0,1.0],代表0%~100%
代码

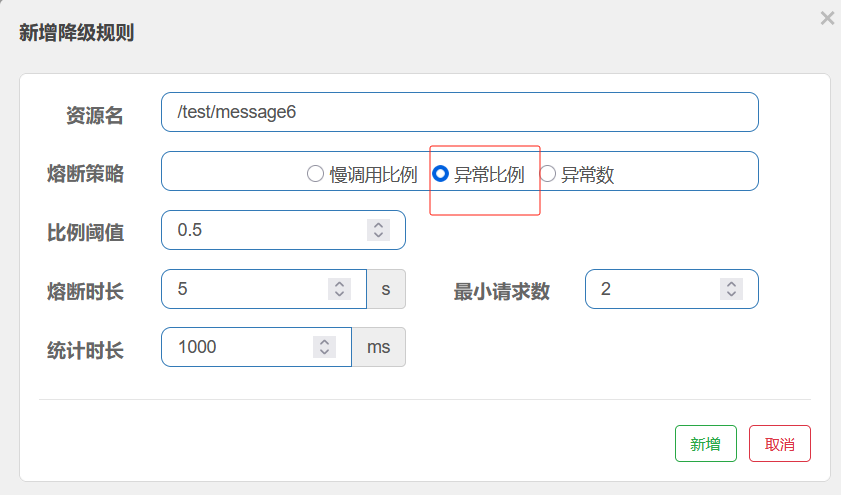
正常情况下
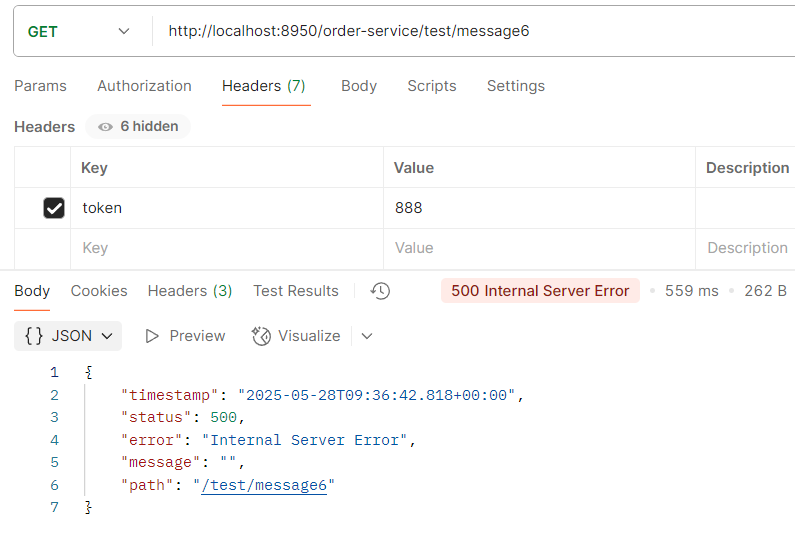
不正常情况下
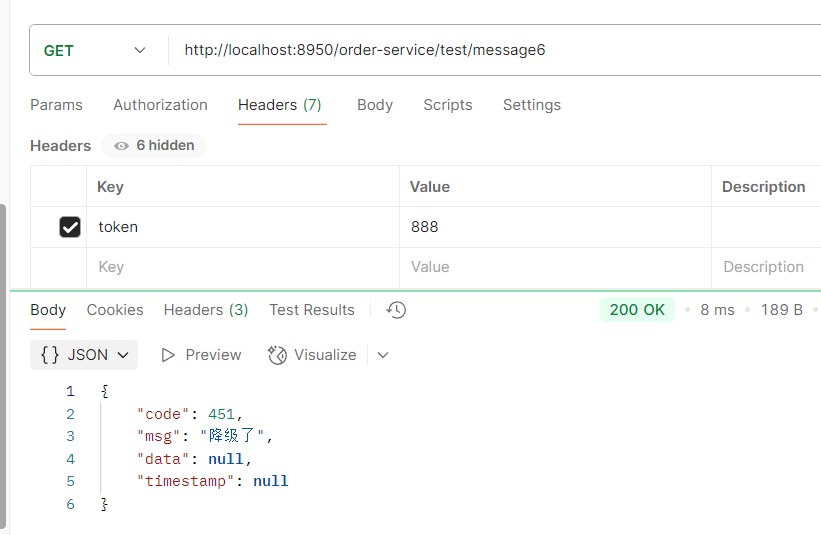
异常数
当资源近 1 分钟的异常数目超过阈值之后会进行服务降级。注意由于统计时间窗口是分钟级别的,若时间窗口小于 60s,则结束熔断状态后仍可能再进入熔断状态。
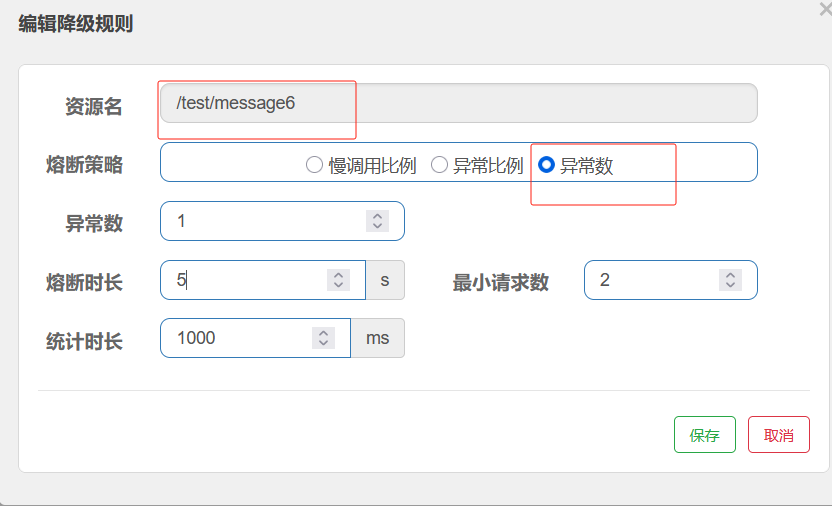
正常情况
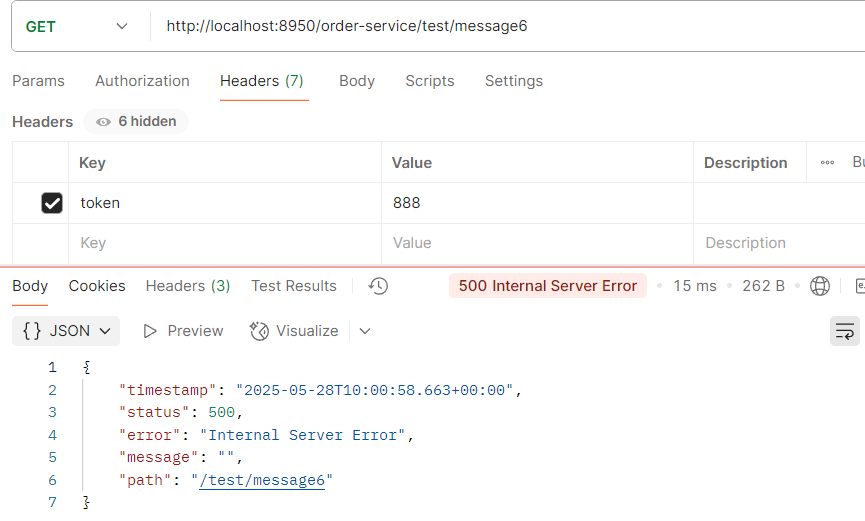
不正常情况下
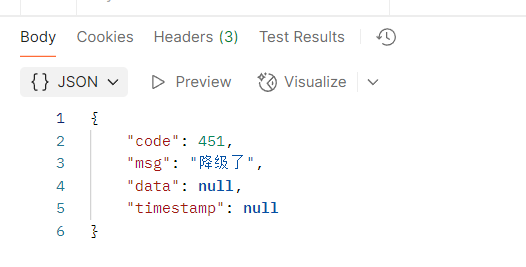
热点规则
热点参数流控规则是一种更细粒度的流控规则, 它允许将规则具体到参数上。
1. 编写代码
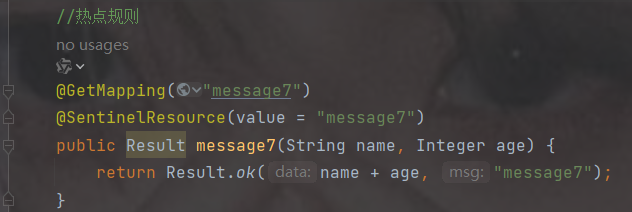
2.配置
注意因为加了@SentinelResource注解,所以资源名是里面的值
而不是路径,正常路径应该是/test/message7
参数索引0表示是name
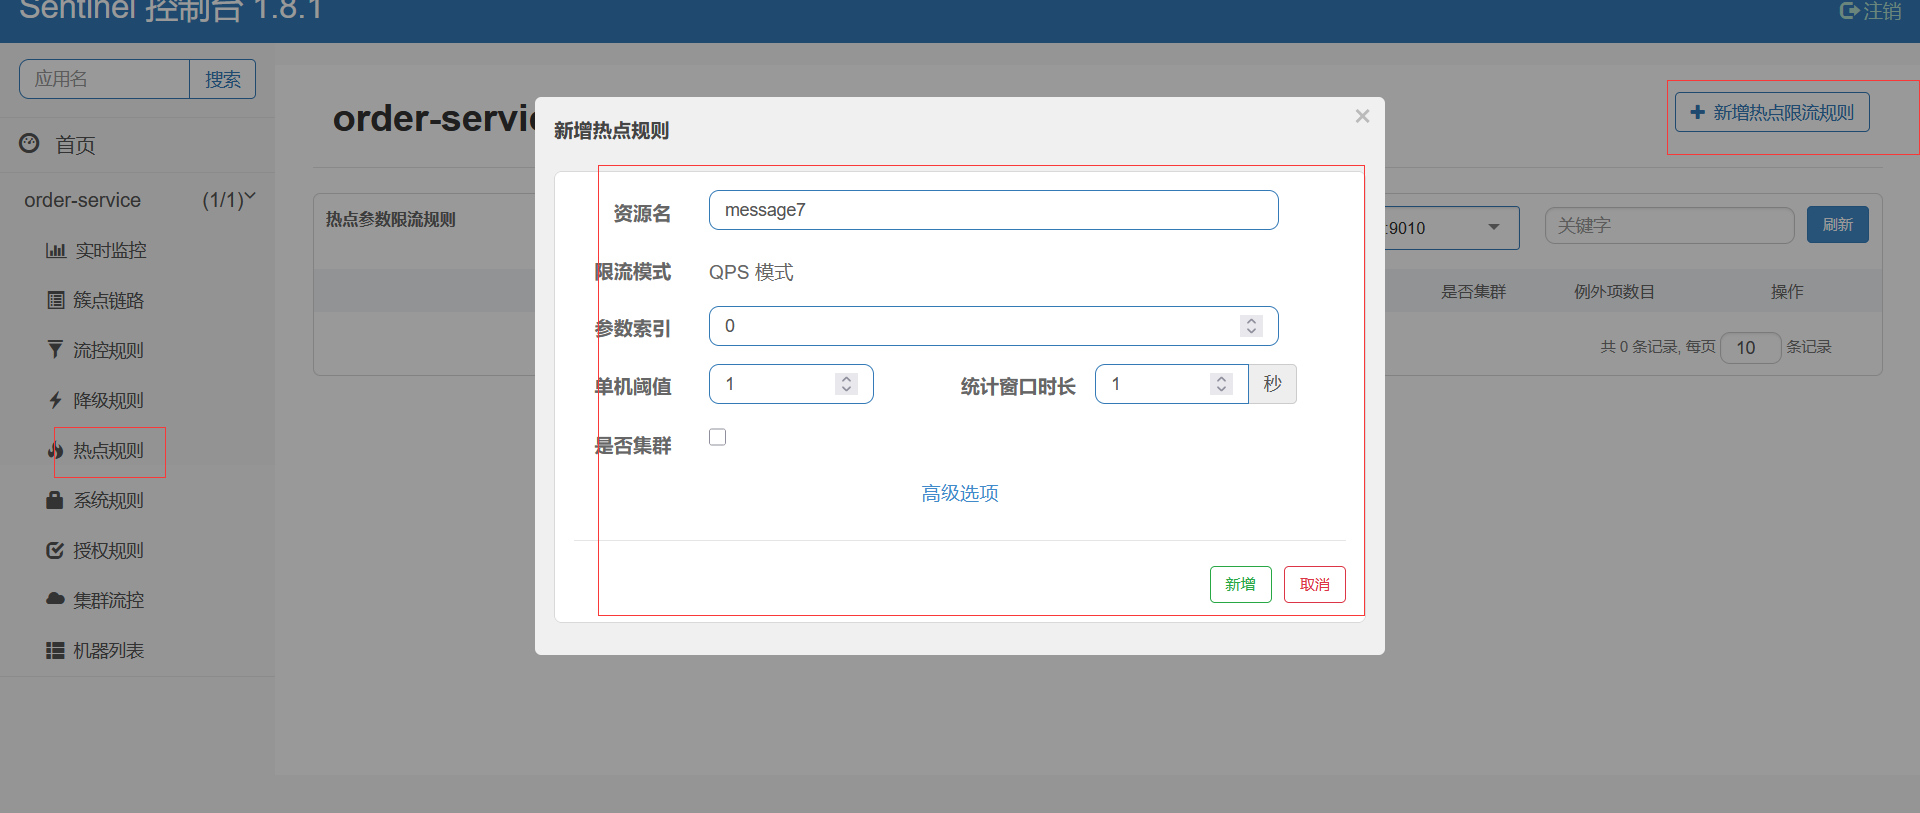
第3步: 分别用两个参数访问,会发现只对第一个参数限流了
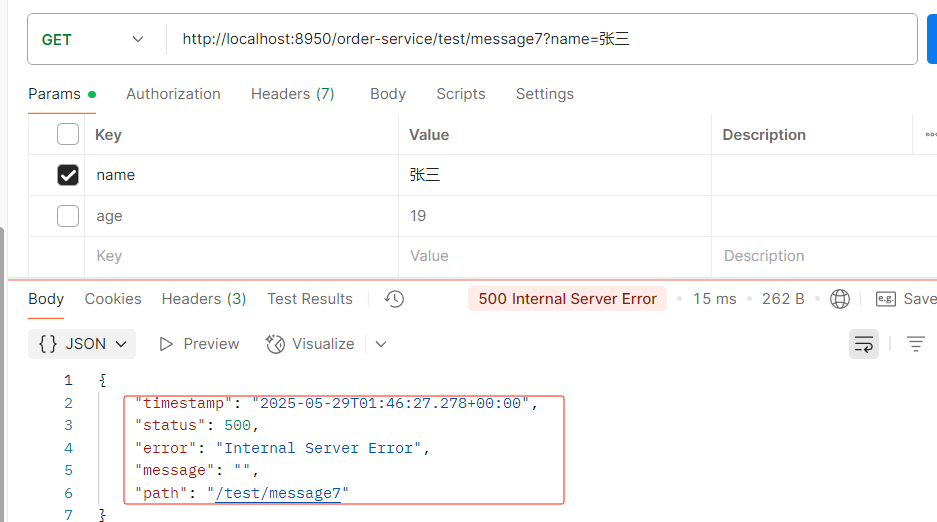
热点规则增强使用
参数例外项允许对一个参数的具体值进行流控编辑刚才定义的规则,增加参数例外项
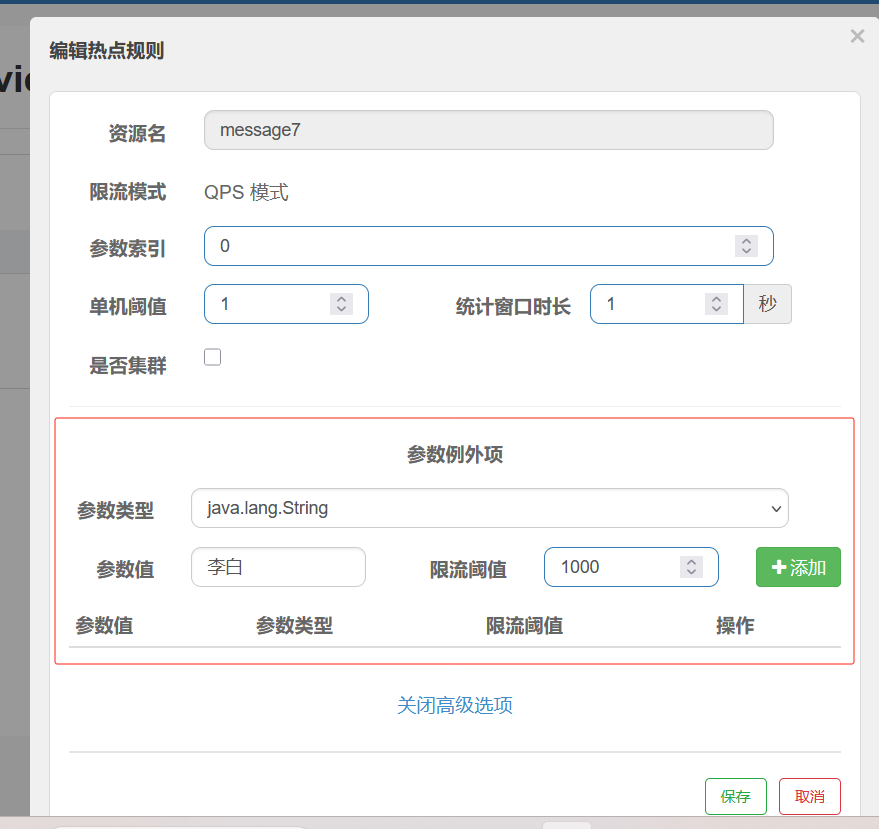
用李白跟上边的参数值一样发现不会限制,相当于白名单
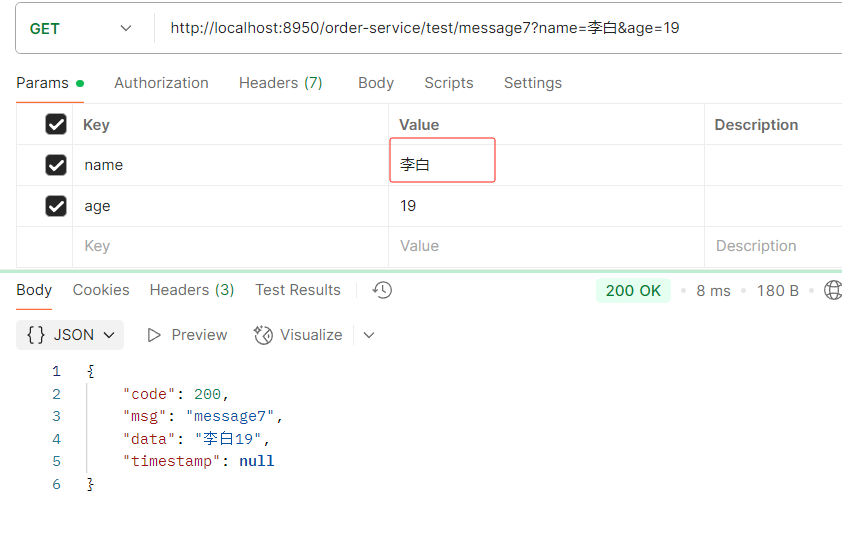
授权规则
很多时候,我们需要根据调用来源来判断该次请求是否允许放行,这时候可以使用 Sentinel 的来源 访问控制的功能。
来源访问控制根据资源的请求来源(origin)限制资源是否通过: 若配置白名单,则只有请求来源位于白名单内时才可通过;
若配置黑名单,则请求来源位于黑名单时不通过,其余的请求通过
1.创建一个类实现RequestOriginParser
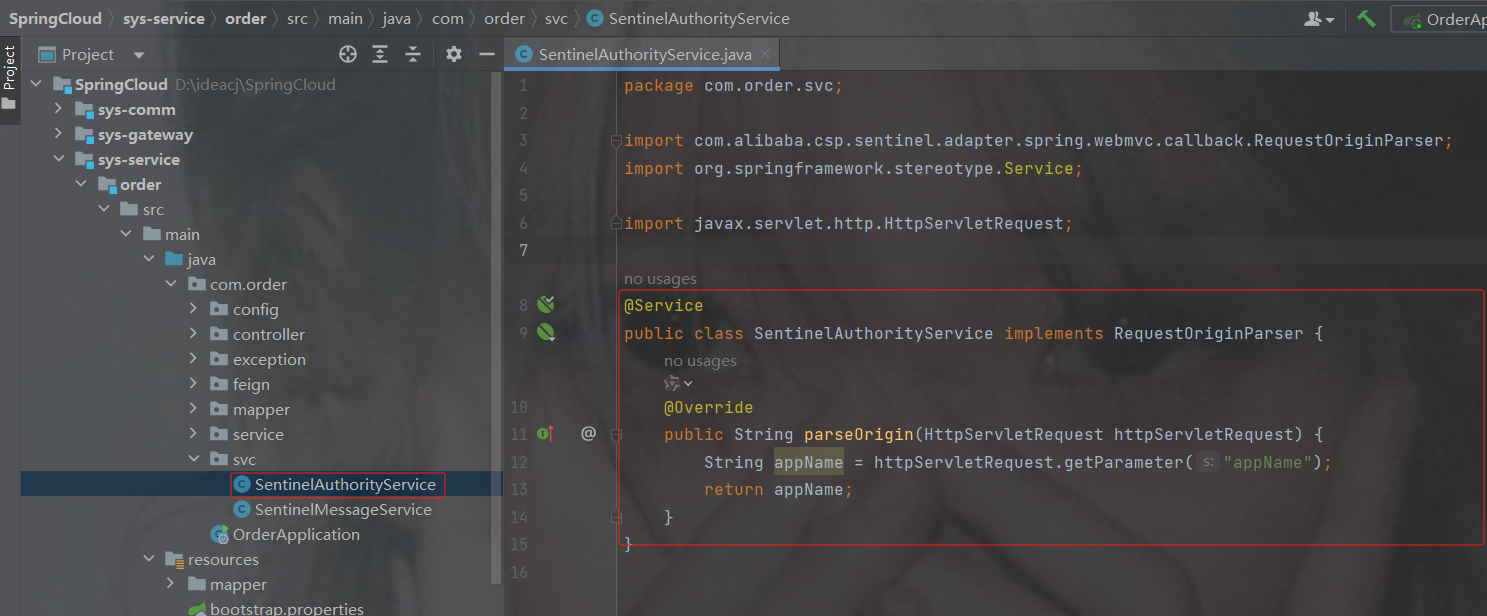
package com.order.svc;
import com.alibaba.csp.sentinel.adapter.spring.webmvc.callback.RequestOriginParser;
import org.springframework.stereotype.Service;
import javax.servlet.http.HttpServletRequest;
@Service
public class SentinelAuthorityService implements RequestOriginParser {
    @Override
    public String parseOrigin(HttpServletRequest httpServletRequest) {
        String appName = httpServletRequest.getParameter("appName");
        return appName;
    }
}
controller
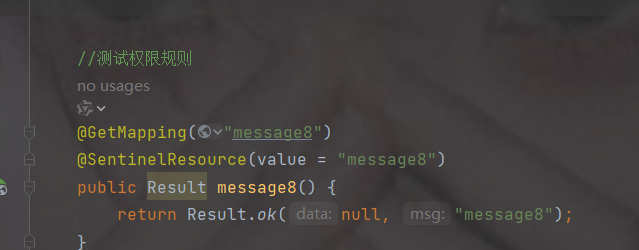
2.规则
资源名是注解里的value,流控应用表示这两个值是可不限流的,多个以英文的","隔开
这里演示的是白名单,只有下图中的小李小白可以访问,黑名单与之相反
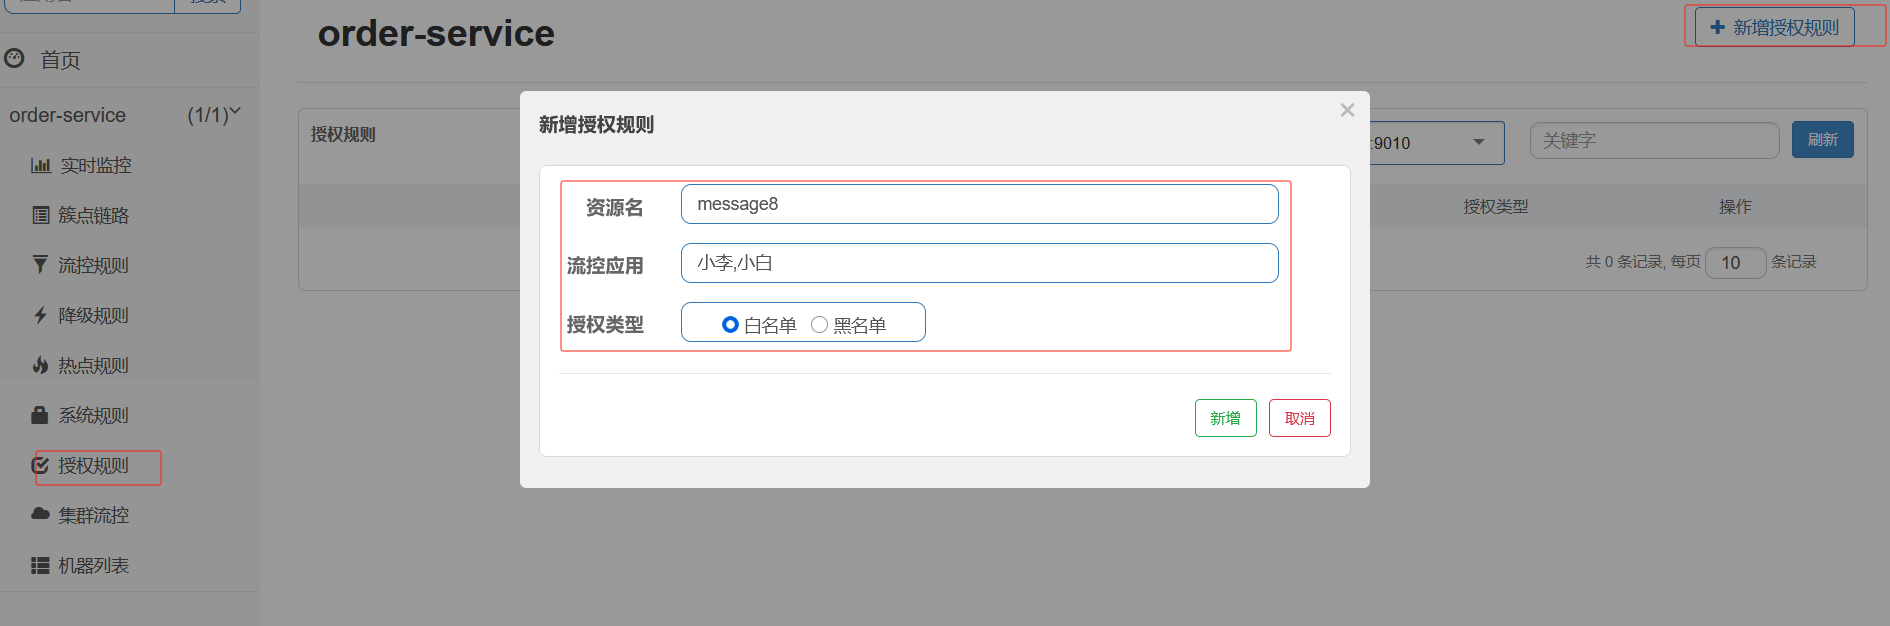
3.访问路径
注意key是server里获取的参数,这里发现报错是因为不是白名单的小李和小白
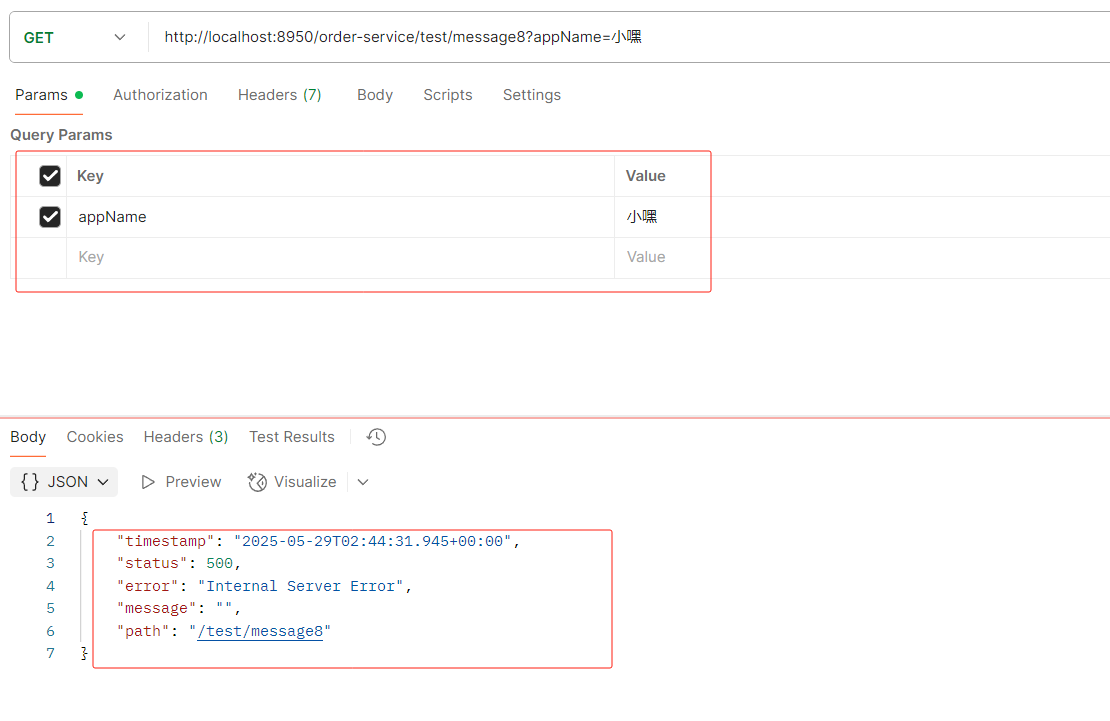
正常情况下
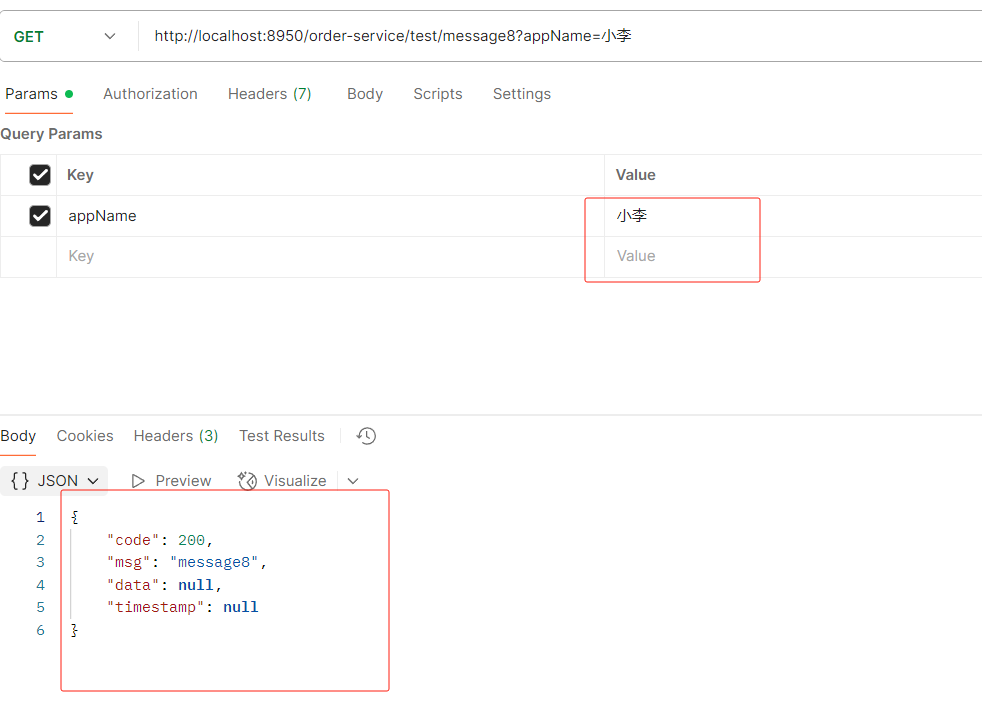
全局异常的返回
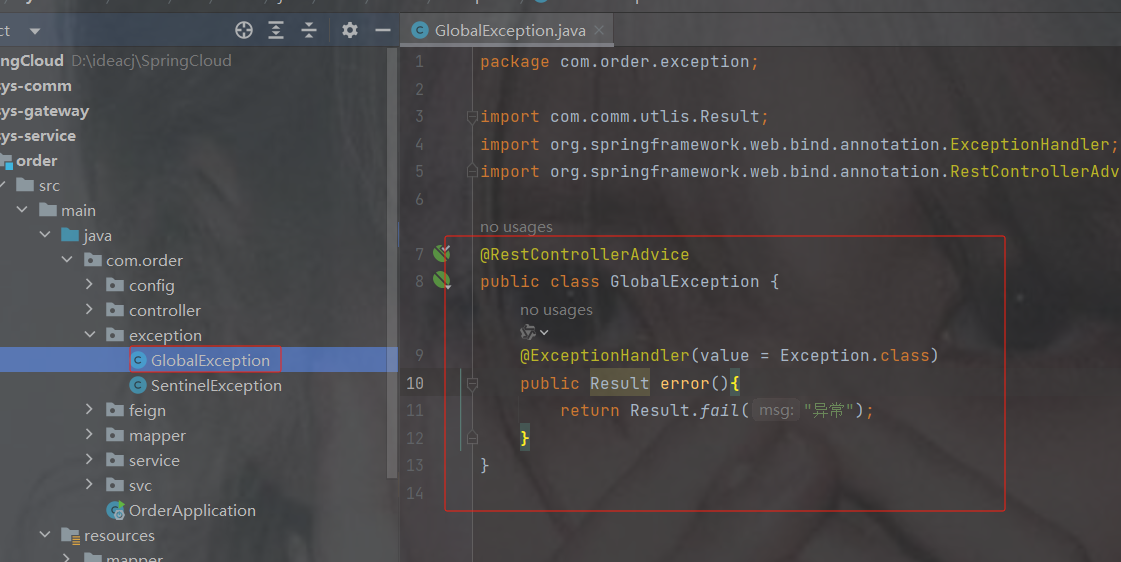
代码
package com.order.exception;
import com.comm.utlis.Result;
import org.springframework.web.bind.annotation.ExceptionHandler;
import org.springframework.web.bind.annotation.RestControllerAdvice;
// RestControllerAdvice:全局异常处理
@RestControllerAdvice
public class GlobalException {
    /**
     * 全局异常处理方法,捕获所有未被单独定义的异常
     *
     * 使用最高优先级异常处理器,当系统中未明确处理的Exception类型异常发生时:
     * 1. 自动拦截控制器层抛出的异常
     * 2. 返回标准化错误响应结构
     *
     * @return Result 封装后的标准化响应对象,包含预设的错误提示信息"异常"
     */
    @ExceptionHandler(value = Exception.class)
    public Result error(){
        return Result.fail("异常");
    }
}
再次设置权限规则后访问发现响应异常发生改变
Sentinel规则持久化
通过前面的讲解,我们已经知道,可以通过Dashboard来为每个Sentinel客户端设置各种各样的规则,但是这里有一个问题,就是这些规则默认是存放在内存中,极不稳定(每次重启服务就会发现规则都没有了),所以需要将其持久化。
方法1(不推荐):添加到nacos里面
(1)在配置文件application中添加以下内容
spring.cloud.sentinel.datasource.ds1.nacos.data-id=${spring.application.name}
spring.cloud.sentinel.datasource.ds1.nacos.data-type=json
spring.cloud.sentinel.datasource.ds1.nacos.server-addr=localhost:8888
spring.cloud.sentinel.datasource.ds1.nacos.group-id=DEFAULT_GROUP
spring.cloud.sentinel.datasource.ds1.nacos.rule-type=flow
(2)在nacos中为cloudalibaba-sentinel-service(可以在配置文件自定义)服务添加对应配置。
[
    {
        "resource": "/rateLimit/customerBlockHandler",#/rateLimit/customerBlockHandler
        "limitApp": "default",
        "grade": 1,
        "count": 1,
        "strategy": 0,
        "controlBehavior": 0,
        "clusterMode": false
    }
]
resource: 资源名称;
imitApp: 来源应用;
grade: 阈值类型,0表示线程数,1表示QPS;
count: 单机阈值;
strategy: 流控模式,0表示直接,1表示关联,2表示链路;
controlBehavior: 流控效果,0表示快速失败,1表示。Warm Up,2表示排队等待。
clusterMode: 是否集群。
2.方法2: 使用文件
编写配置类
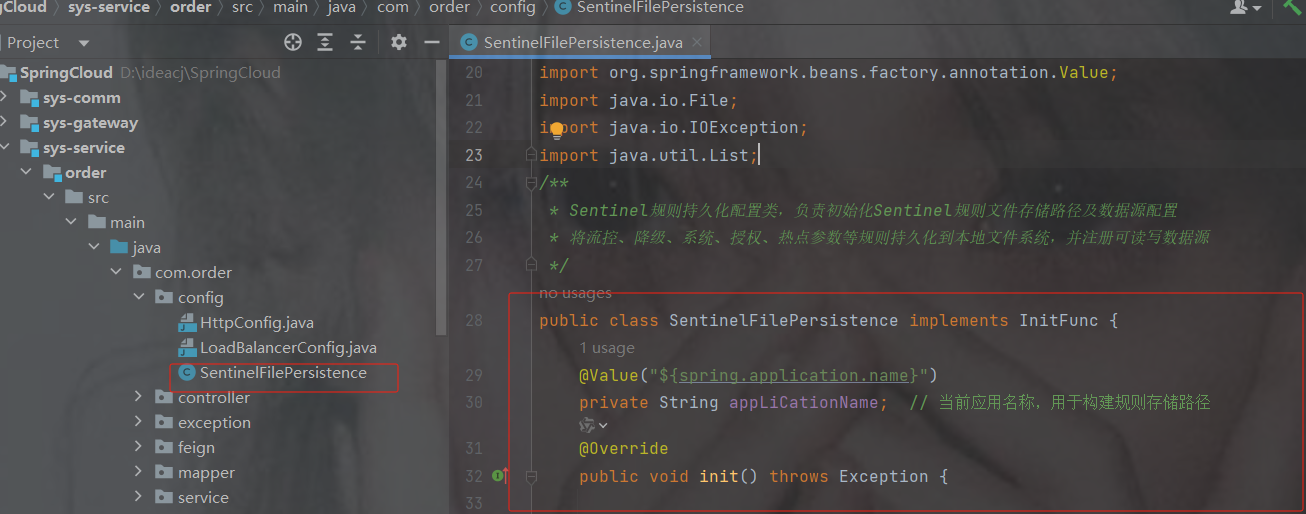
直接复制即可,自己改包名
package com.order.config;
import com.alibaba.csp.sentinel.command.handler.ModifyParamFlowRulesCommandHandler;
import com.alibaba.csp.sentinel.datasource.*;
import com.alibaba.csp.sentinel.init.InitFunc;
import com.alibaba.csp.sentinel.slots.block.authority.AuthorityRule;
import com.alibaba.csp.sentinel.slots.block.authority.AuthorityRuleManager;
import com.alibaba.csp.sentinel.slots.block.degrade.DegradeRule;
import com.alibaba.csp.sentinel.slots.block.degrade.DegradeRuleManager;
import com.alibaba.csp.sentinel.slots.block.flow.FlowRule;
import com.alibaba.csp.sentinel.slots.block.flow.FlowRuleManager;
import com.alibaba.csp.sentinel.slots.block.flow.param.ParamFlowRule;
import com.alibaba.csp.sentinel.slots.block.flow.param.ParamFlowRuleManager;
import com.alibaba.csp.sentinel.slots.system.SystemRule;
import com.alibaba.csp.sentinel.slots.system.SystemRuleManager;
import com.alibaba.csp.sentinel.transport.util.WritableDataSourceRegistry;
import com.alibaba.fastjson.JSON;
import com.alibaba.fastjson.TypeReference;
import org.springframework.beans.factory.annotation.Value;
import java.io.File;
import java.io.IOException;
import java.util.List;
/**
 * Sentinel规则持久化配置类,负责初始化Sentinel规则文件存储路径及数据源配置
 * 将流控、降级、系统、授权、热点参数等规则持久化到本地文件系统,并注册可读写数据源
 */
public class SentinelFilePersistence implements InitFunc {
    @Value("${spring.application.name}")
    private String appLiCationName;  // 当前应用名称,用于构建规则存储路径
    @Override
    public void init() throws Exception {
        String ruleDir = System.getProperty("user.home") + "/sentinel-rules/" + appLiCationName;
        String flowRulePath = ruleDir + "/flow-rule.json";
        String degradeRulePath = ruleDir + "/degrade-rule.json";
        String systemRulePath = ruleDir + "/system-rule.json";
        String authorityRulePath = ruleDir + "/authority-rule.json";
        String paramFlowRulePath = ruleDir + "/param-flow-rule.json";
        this.mkdirIfNotExits(ruleDir);
        this.createFileIfNotExits(flowRulePath);
        this.createFileIfNotExits(degradeRulePath);
        this.createFileIfNotExits(systemRulePath);
        this.createFileIfNotExits(authorityRulePath);
        this.createFileIfNotExits(paramFlowRulePath);
        // 流控规则
        ReadableDataSource> flowRuleRDS = new FileRefreshableDataSource<>(
                flowRulePath,
                flowRuleListParser
        );
        FlowRuleManager.register2Property(flowRuleRDS.getProperty());
        WritableDataSource> flowRuleWDS = new FileWritableDataSource<>(
                flowRulePath,
                this::encodeJson
        );
        WritableDataSourceRegistry.registerFlowDataSource(flowRuleWDS);
        // 降级规则
        ReadableDataSource> degradeRuleRDS = new FileRefreshableDataSource<>(
                degradeRulePath,
                degradeRuleListParser
        );
        DegradeRuleManager.register2Property(degradeRuleRDS.getProperty());
        WritableDataSource> degradeRuleWDS = new FileWritableDataSource<>(
                degradeRulePath,
                this::encodeJson
        );
        WritableDataSourceRegistry.registerDegradeDataSource(degradeRuleWDS);
        // 系统规则
        ReadableDataSource> systemRuleRDS = new FileRefreshableDataSource<>(
                systemRulePath,
                systemRuleListParser
        );
        SystemRuleManager.register2Property(systemRuleRDS.getProperty());
        WritableDataSource> systemRuleWDS = new FileWritableDataSource<>(
                systemRulePath,
                this::encodeJson
        );
        WritableDataSourceRegistry.registerSystemDataSource(systemRuleWDS);
        // 授权规则
        ReadableDataSource> authorityRuleRDS = new FileRefreshableDataSource<>(
                authorityRulePath,
                authorityRuleListParser
        );
        AuthorityRuleManager.register2Property(authorityRuleRDS.getProperty());
        WritableDataSource> authorityRuleWDS = new FileWritableDataSource<>(
                authorityRulePath,
                this::encodeJson
        );
        WritableDataSourceRegistry.registerAuthorityDataSource(authorityRuleWDS);
        // 热点参数规则
        ReadableDataSource> paramFlowRuleRDS = new FileRefreshableDataSource<>(
                paramFlowRulePath,
                paramFlowRuleListParser
        );
        ParamFlowRuleManager.register2Property(paramFlowRuleRDS.getProperty());
        WritableDataSource> paramFlowRuleWDS = new FileWritableDataSource<>(
                paramFlowRulePath,
                this::encodeJson
        );
        ModifyParamFlowRulesCommandHandler.setWritableDataSource(paramFlowRuleWDS);
    }
    /** JSON转换器:将字符串转换为流控规则列表 */
    private Converter> flowRuleListParser = source -> JSON.parseObject(
            source,
            new TypeReference>() {
            }
    );
    /** JSON转换器:将字符串转换为降级规则列表 */
    private Converter> degradeRuleListParser = source -> JSON.parseObject(
            source,
            new TypeReference>() {
            }
    );
    /** JSON转换器:将字符串转换为系统规则列表 */
    private Converter> systemRuleListParser = source -> JSON.parseObject(
            source,
            new TypeReference>() {
            }
    );
    /** JSON转换器:将字符串转换为授权规则列表 */
    private Converter> authorityRuleListParser = source -> JSON.parseObject(
            source,
            new TypeReference>() {
            }
    );
    /** JSON转换器:将字符串转换为热点参数规则列表 */
    private Converter> paramFlowRuleListParser = source -> JSON.parseObject(
            source,
            new TypeReference>() {
            }
    );
    /**
     * 创建指定目录(如果不存在)
     * @param filePath 要创建的目录路径
     * @throws IOException 目录创建失败时抛出
     */
    private void mkdirIfNotExits(String filePath) throws IOException {
        File file = new File(filePath);
        if (!file.exists()) {
            file.mkdirs();
        }
    }
    /**
     * 创建指定文件(如果不存在)
     * @param filePath 要创建的文件路径
     * @throws IOException 文件创建失败时抛出
     */
    private void createFileIfNotExits(String filePath) throws IOException {
        File file = new File(filePath);
        if (!file.exists()) {
            file.createNewFile();
        }
    }
    /**
     * 对象序列化为JSON字符串
     * @param t 要序列化的对象
     * @param  对象类型
     * @return JSON格式字符串
     */
    private  String encodeJson(T t) {
        return JSON.toJSONString(t);
    }
} 在对应的微服务下面的resources里面创建一个目录
META-INF/services
注意可不是META-INF.services,先创建了META-INF再创建了services
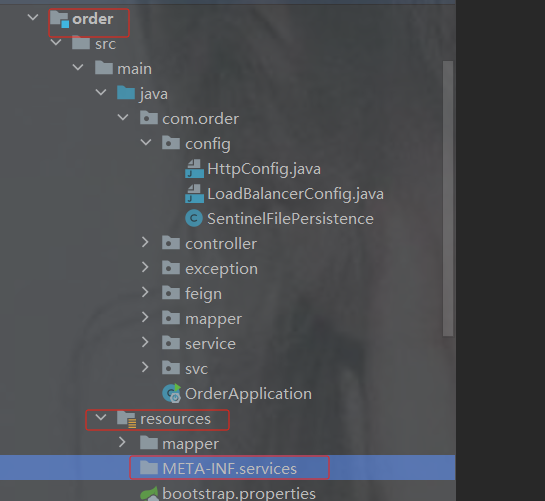
并在目录下面写一个 文件(直接cv过去)
com.alibaba.csp.sentinel.init.InitFunc
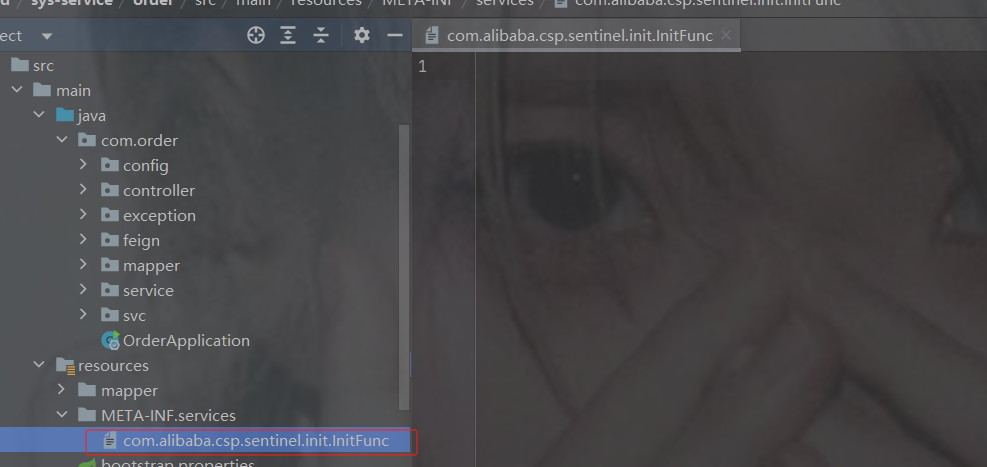
文件里面写的是刚才的配置类的包名加类名 :
com.order.config.SentinelFilePersistence
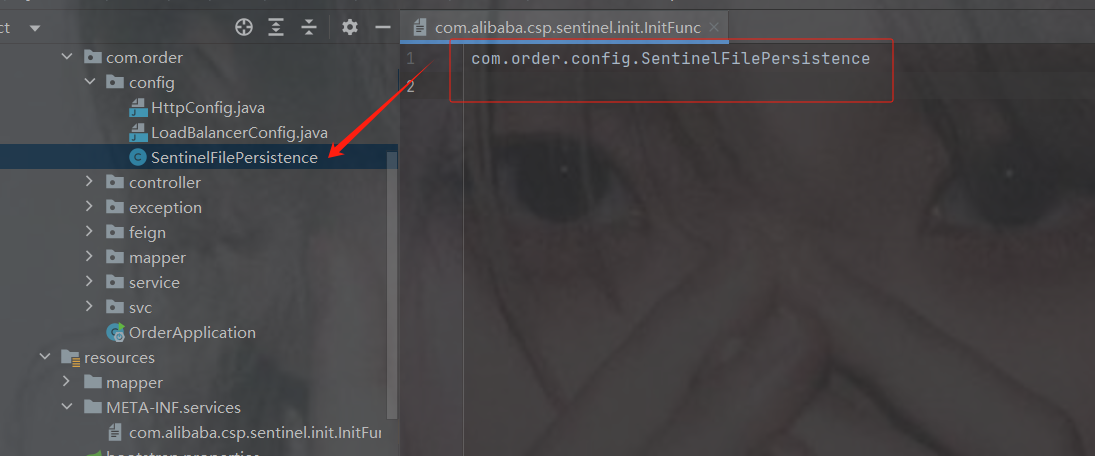
新建任意一个规则然后重启order服务
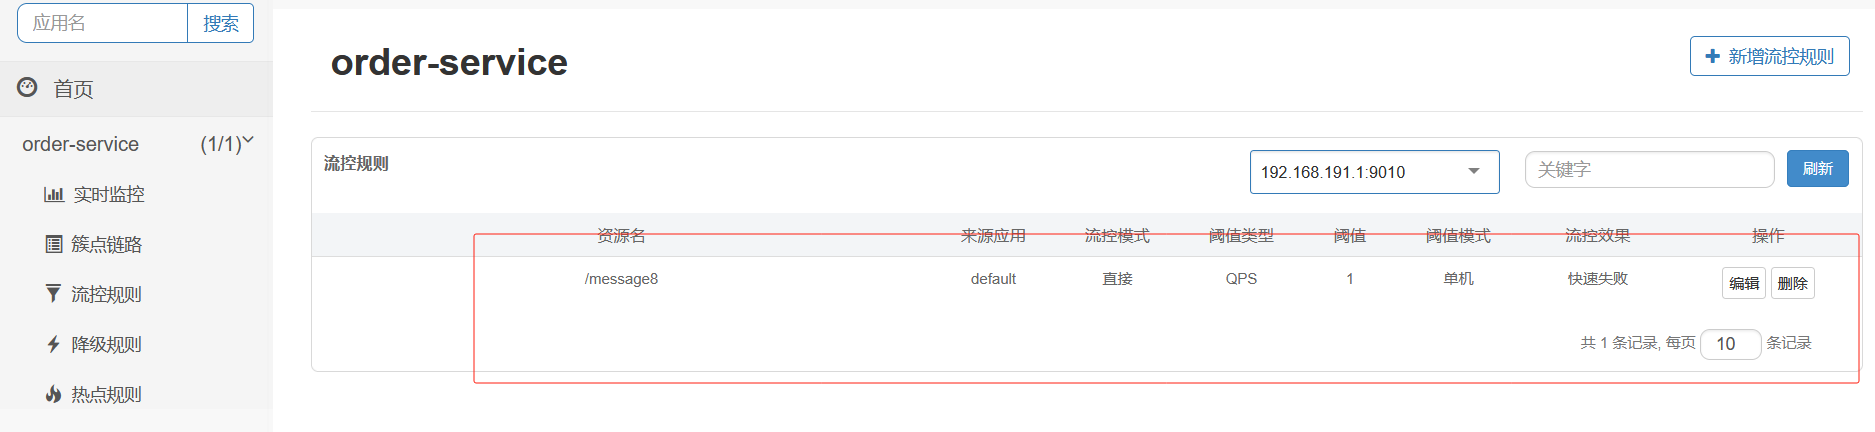
随便访问一个order的接口
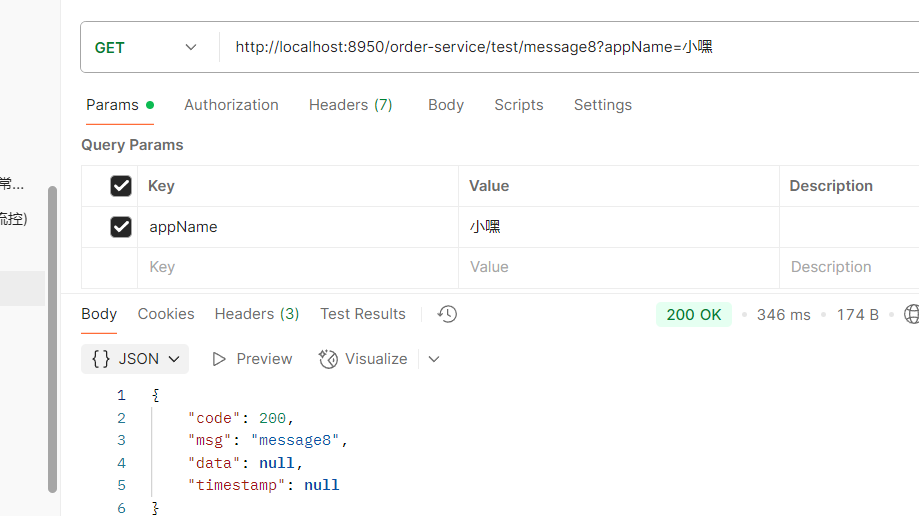
还在就表示持久化成功
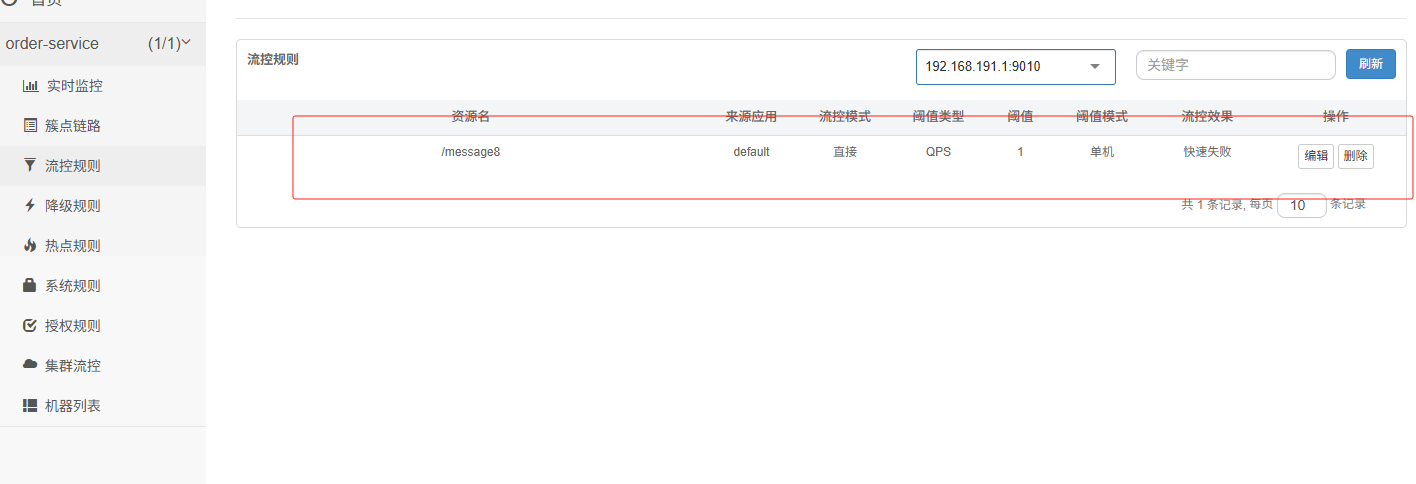
10. Sleuth--链路追踪
10.1 链路追踪介绍
在大型系统的微服务化构建中,一个系统被拆分成了许多微服务。这些模块负责不同的功能,组合成系统,最终可以提供丰富的功能。在这种架构中,一次请求往往需要涉及到多个服务。互联网应用构建在不同的软件模块集上,这些软件模块,有可能是由不同的团队开发、可能使用不同的编程语言来实现、有可能布在了几千台服务器,横跨多个不同的数据中心【区域】,也就意味着这种架构形式也会存在一些问题:
- 如何快速发现问题?
- 如何判断故障影响范围?
- 如何梳理服务依赖以及依赖的合理性?
- 如何分析链路性能问题以及实时容量规划?

分布式链路追踪(Distributed Tracing),就是将一次分布式请求还原成调用链路,进行日志记录性能监控并将一次分布式请求的调用情况集中展示。比如各个服务节点上的耗时、请求具体到达哪台机器上IP、每个服务节点的请求状态200 500等等。
常见的链路追踪技术有下面这些:
cat 由大众点评开源,基于Java开发的实时应用监控平台,包括实时应用监控,业务监控 。 集成 方案是通过代码埋点的方式来实现监控,比如: 拦截器,过滤器等。 对代码的侵入性很大,集成 成本较高。风险较大。
zipkin 由Twitter公司开源,开放源代码分布式的跟踪系统,用于收集服务的定时数据,以解决微服务架构中的延迟问题,包括:数据的收集、存储、查找和展现《图形化》。该产品结合springcloud-sleuth 使用较为简单,集成很方便,但是功能较简单。
pinpoint Pinpoint是韩国人开源的基于字节码注入的调用链分析,以及应用监控分析工具。特点 是支持多种插件,UI功能强大,接入端无代码侵入。
skywalking SkyWalking是本土开源的基于字节码注入的调用链分析,以及应用监控分析工具。特点是支持多 种插件,UI功能较强,接入端无代码侵入。目前已加入Apache孵化器。
Sleuth (日志记录每一条链路上的所有节点,以及这些节点所在的机器,和耗时。)log4j SpringCloud 提供的分布式系统中链路追踪解决方案。
注意:SpringCloud alibaba技术栈中并没有提供自己的链路追踪技术的,我们可以采用Sleuth + Zinkin(客户端)来做链路追踪解决方案
10.2 Sleuth入门
Sleuth介绍
SpringCloud Sleuth主要功能就是在分布式系统中提供追踪解决方案。它大量借用了Google Dapper的设计, 先来了解一下Sleuth中的术语和相关概念。
Trace
服务追踪的追踪单元是从客户发起请求(request)抵达被追踪系统的边界开始,到被追踪系统
向客户返回响应(response)为⽌的过程叫做链路追踪
由一组Trace Id相同的Span串联形成一个树状结构。为了实现请求跟踪,当请求到达分布式系统的 入口端点时,只需要服务跟踪框架为该请求创建一个唯一的标识(即TraceId),同时在分布式系 统内部流转的时候,框架始终保持传递该唯一值,直到整个请求的返回。那么我们就可以使用该唯 一标识将所有的请求串联起来,形成一条完整的请求链路。
Span
代表了一组基本的工作单元。为了统计各处理单元的延迟,当请求到达各个服务组件的时 候,也通过一个唯一标识(SpanId)来标记它的开始、具体过程和结束。通过SpanId的开始和结 束时间戳,就能统计该span的调用时间,除此之外,我们还可以获取如事件的名称。请求信息等 元数据。
Annotation
用它记录一段时间内的事件,内部使用的重要注释:
cs(Client Send)客户端发出请求,开始一个请求的生命
sr(Server Received)服务端接受到请求开始进行处理, sr-cs = 网络延迟(服务调用的时间)
ss(Server Send)服务端处理完毕准备发送到客户端,ss - sr = 服务器上的请求处理时间
cr(Client Reveived)客户端接受到服务端的响应,请求结束。 cr - sr = 请求的总时间
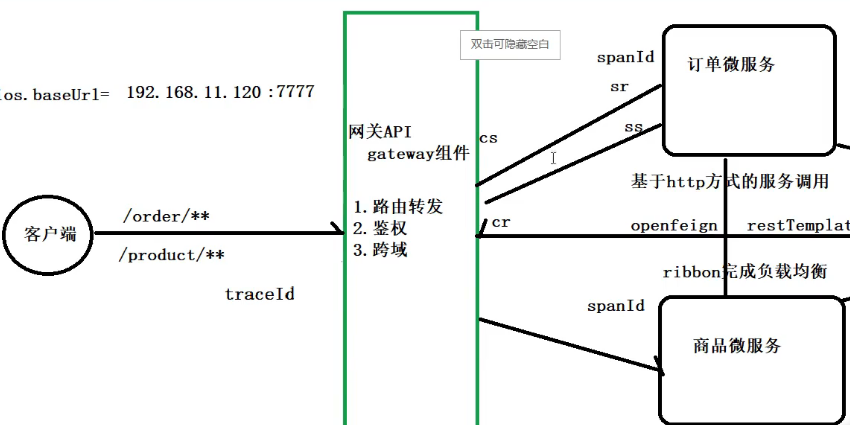
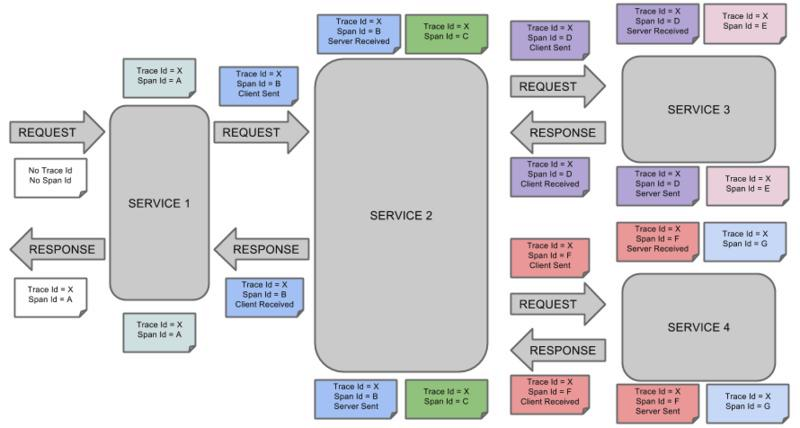
微服务集成Sleuth
1.加依赖
注意要加在父工程里而且不能加在上面的dependencyManagement里
            org.springframework.cloud
            spring-cloud-starter-sleuth
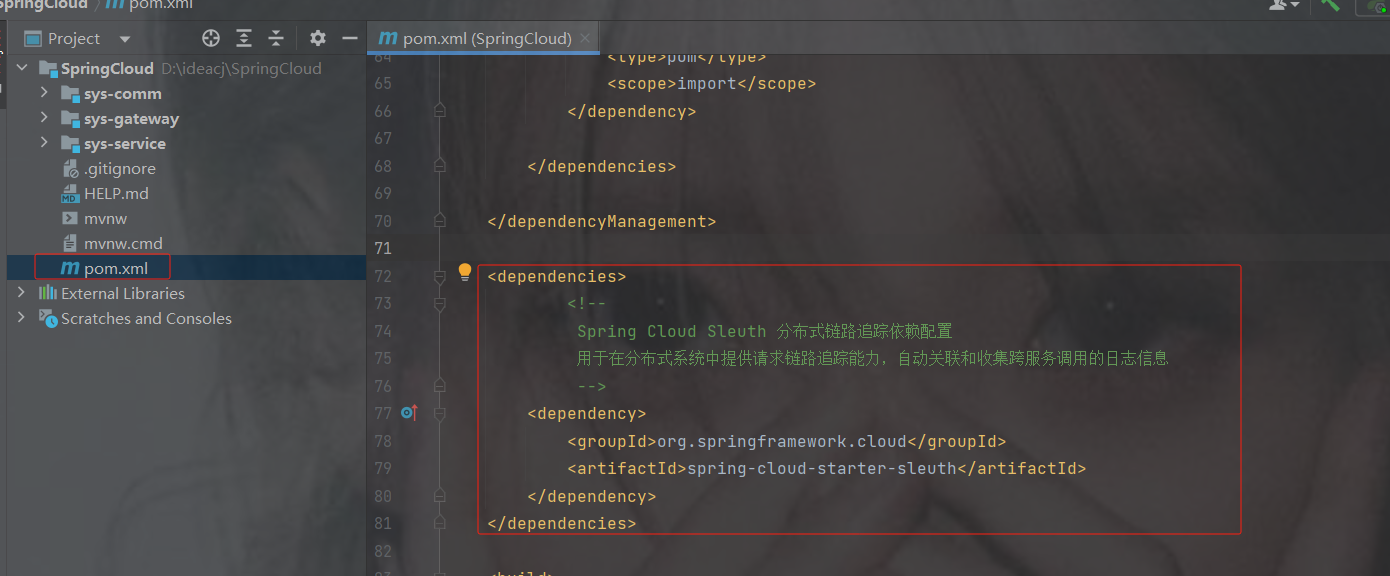
追踪的时候必须开启日志的记录:(不开启就没有办法查看)
加在了共享配置里
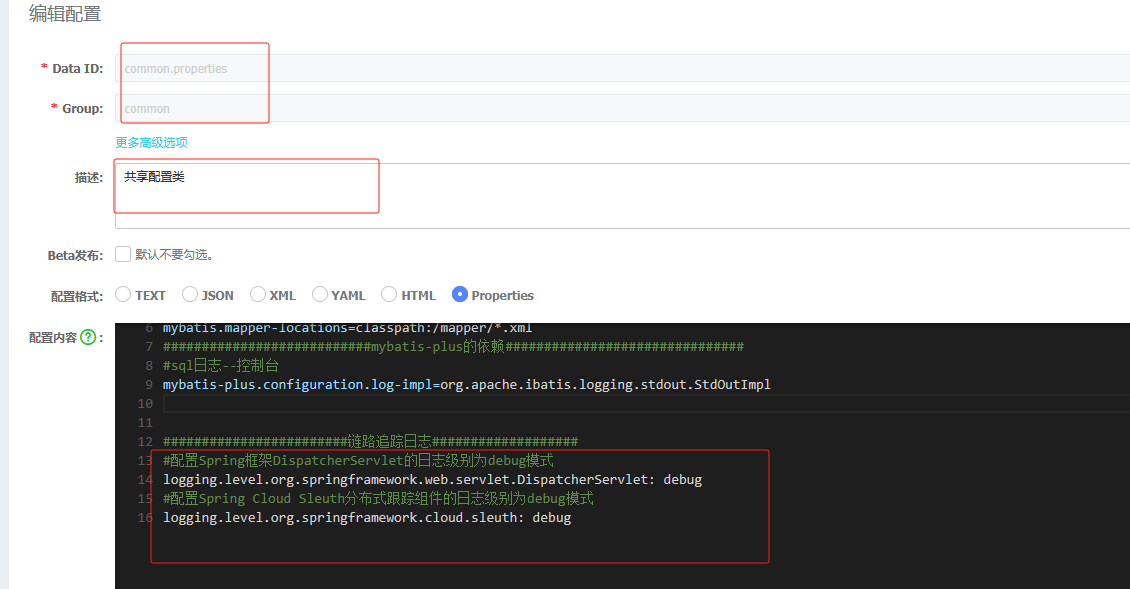
#配置Spring框架DispatcherServlet的日志级别为debug模式
logging.level.org.springframework.web.servlet.DispatcherServlet: debug
#配置Spring Cloud Sleuth分布式跟踪组件的日志级别为debug模式
logging.level.org.springframework.cloud.sleuth: debug
访问接口就能看到
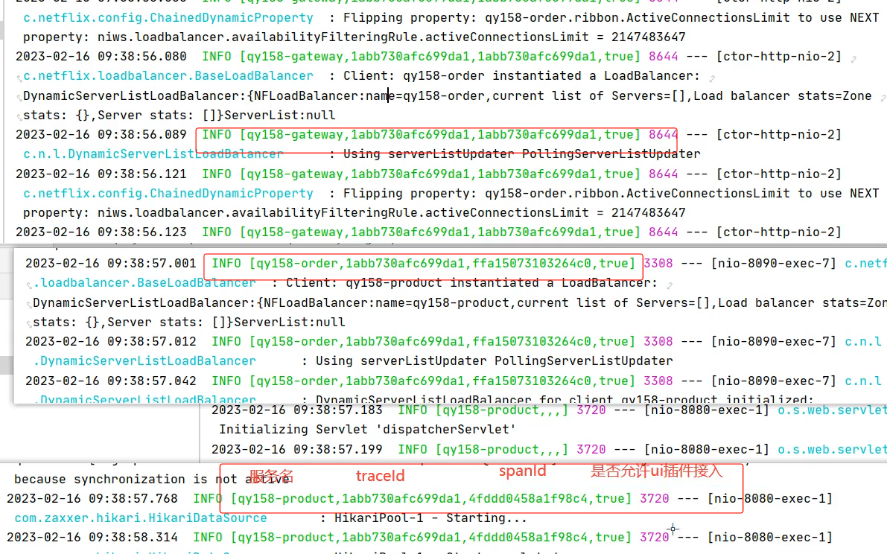
仔细分析每个微服务的日志,不难看出请求的具体过程。 查看日志文件并不是一个很好的方法,当微服务越来越多日志文件也会越来越多,通过Zipkin可以 将日志聚合,并进行可视化展示和全文检索
10.3 Zipkin
ZipKin介绍
Zipkin 是 Twitter 的一个开源项目,它基于Google Dapper实现,它致力于收集服务的定时数据, 以解决微服务架构中的延迟问题,包括数据的收集、存储、查找和展现。
我们可以使用它来收集各个服务器上请求链路的跟踪数据,并通过它提供的REST API接口来辅助我 们查询跟踪数据以实现对分布式系统的监控程序,从而及时地发现系统中出现的延迟升高问题并找出系 统性能瓶颈的根源。
除了面向开发的 API 接口之外,它也提供了方便的UI组件来帮助我们直观的搜索跟踪信息和分析请 求链路明细,比如:可以查询某段时间内各用户请求的处理时间等。
Zipkin 提供了可插拔数据存储方式:In-Memory、MySql、Cassandra 以及 Elasticsearch。
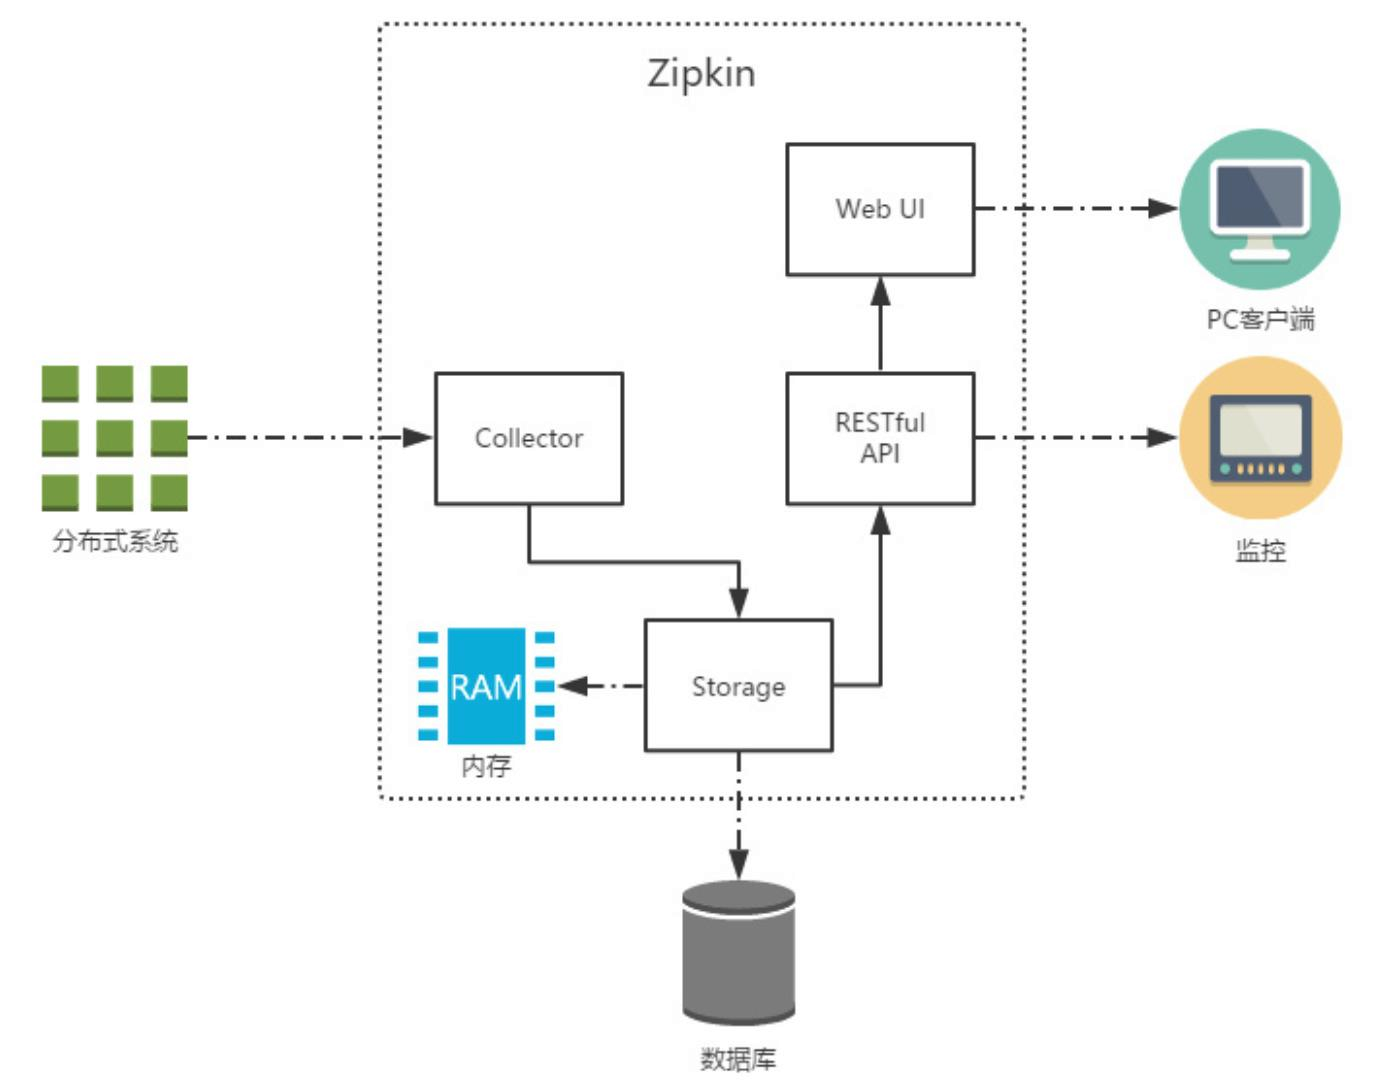
上图展示了 Zipkin 的基础架构,它主要由 4 个核心组件构成:
Collector:收集器组件,它主要用于处理从外部系统发送过来的跟踪信息,将这些信息转换为 Zipkin内部处理的 Span 格式,以支持后续的存储、分析、展示等功能。
Storage:存储组件,它主要对处理收集器接收到的跟踪信息,默认会将这些信息存储在内存中, 我们也可以修改此存储策略,通过使用其他存储组件将跟踪信息存储到数据库中。
RESTful API:API 组件,它主要用来提供外部访问接口。比如给客户端展示跟踪信息,或是外接 系统访问以实现监控等。
Web UI:UI 组件, 基于API组件实现的上层应用。通过UI组件用户可以方便而有直观地查询和分 析跟踪信息。
Zipkin分为两端,一个是 Zipkin服务端,一个是 Zipkin客户端,客户端也就是微服务的应用。 客户端会 配置服务端的 URL 地址,一旦发生服务间的调用的时候,会被配置在微服务里面的 Sleuth 的监听器监 听,并生成相应的 Trace 和 Span 信息发送给服务端。
ZipKin服务端安装
1.下载ZipKin的jar包
地址
选择zipkin-server,再选则一个版本
选择.jar的
2.通过cmd窗口打开,再通过命令行,输入下面的命令启动ZipKin Server
java -jar zipkin-server-2.22.2-exec.jar
3.默认端口号9411,通过浏览器访问
localhost:9411
Zipkin客户端集成
ZipKin客户端和Sleuth的集成非常简单,只需要在微服务中添加其依赖和配置即可
第1步:在父工程微服务上添加依赖
注意如果此依赖下不下来的话用下面那个
    org.springframework.cloud
    spring-cloud-starter-zipkin
    2.4.2
            org.springframework.cloud
            spring-cloud-sleuth-zipkin
父工程引入
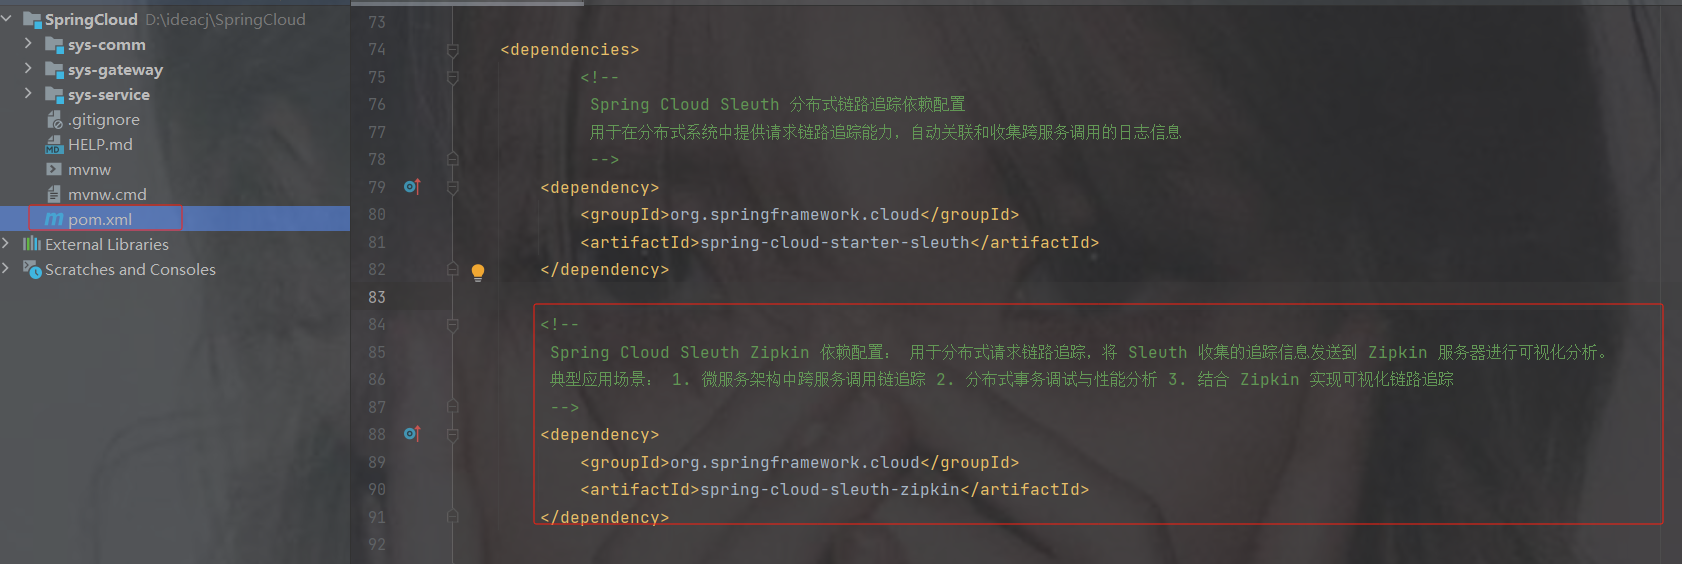
第2步:添加配置
############################zipkin的配置##########################
#zipkin的url
spring.zipkin.base-url=http://localhost:9411
#让nacos把它当成一个URL,而不要当成一个服务注册到nacos中
spring.zipkin.discovery-client-enabled=false
# zipkin要把sleuth产生的日志,抽取的比例,在真实工作中正常都是0.几,比如0.3百分之30%或者0.03抽3条
spring.sleuth.sampler.probability=1.0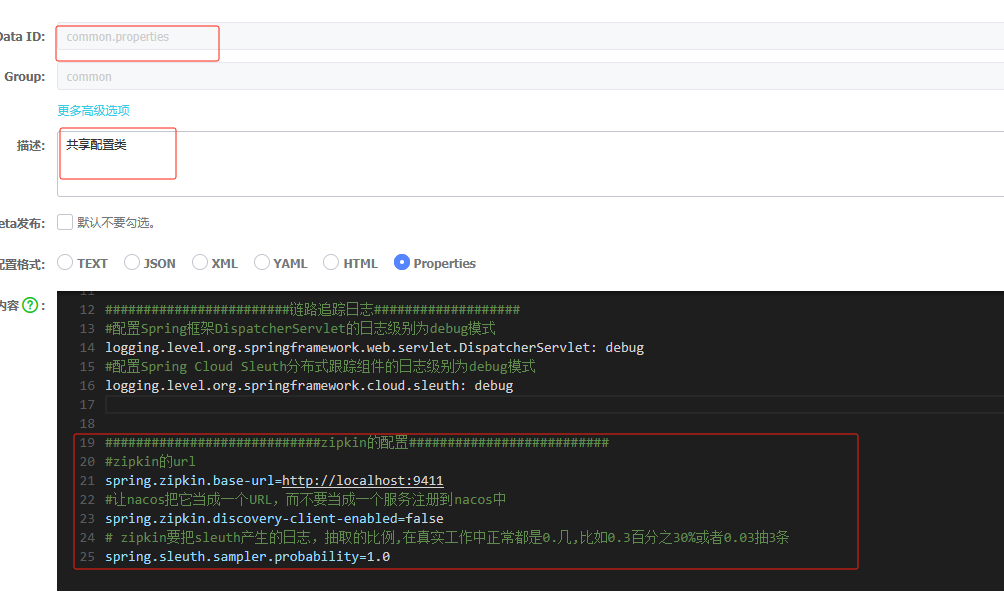
第3步: 访问微服务
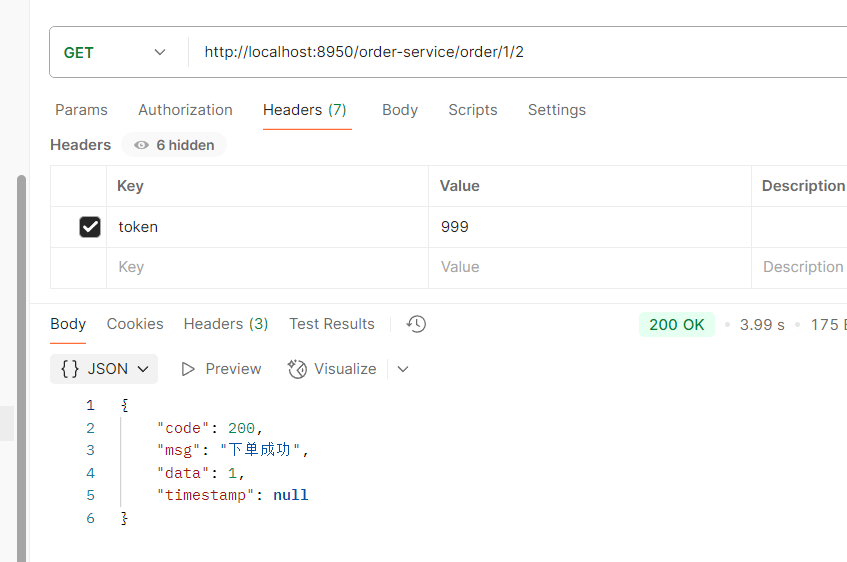
第4步: 访问zipkin的UI界面,观察效果
点一下run query

第5步:点击其中一条记录,再点击show可观察一次访问的详细线路。
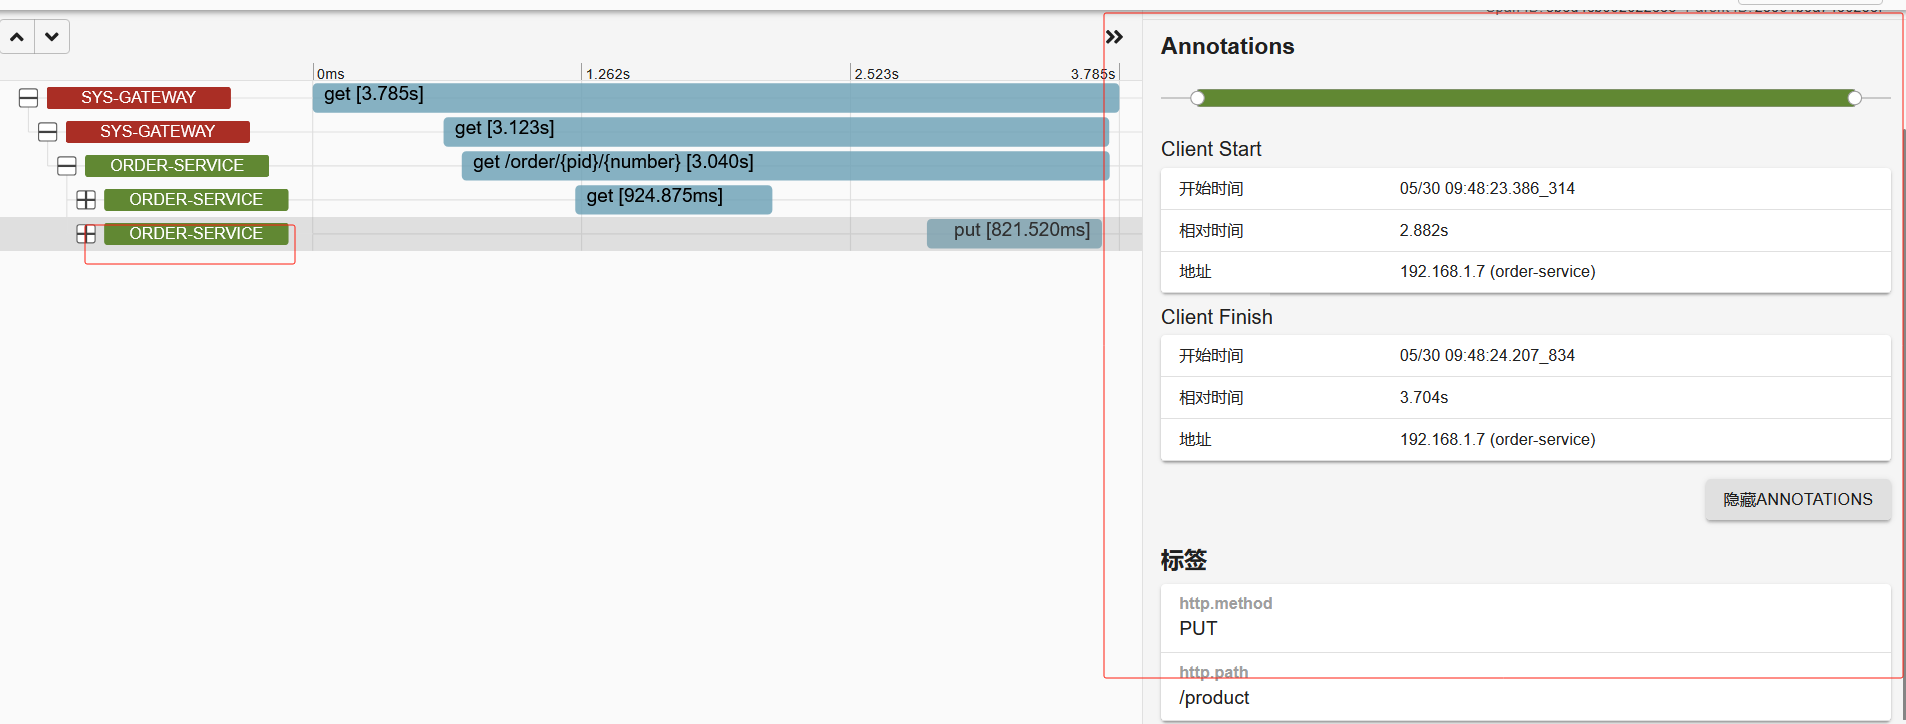
ZipKin数据持久化
ZipKin默认是保存在内存中的,一旦重启ZipKin服务端日志就没有了,我们可以保存到数据库中,redis中,ES中,这里演示保存到数据库中
1.创建个数据库名字自己定义即可,我的叫zipkin_config
![]()
2.导入建表语句
注意:如果后续zipkin服务报错未知的列那就从下面官方的sql中创建表
zipkin/zipkin-storage/mysql-v1/src/main/resources/mysql.sql at master · openzipkin/zipkin · GitHub
CREATE TABLE IF NOT EXISTS zipkin_spans (
  `trace_id_high` BIGINT NOT NULL DEFAULT 0 COMMENT 'If non zero, this means the trace uses 128 bit traceIds instead of 64 bit',
  `trace_id` BIGINT NOT NULL,
  `id` BIGINT NOT NULL,
  `name` VARCHAR(255) NOT NULL,
  `remote_service_name` VARCHAR(255),
  `parent_id` BIGINT,
  `debug` BIT(1),
  `start_ts` BIGINT COMMENT 'Span.timestamp(): epoch micros used for endTs query and to implement TTL',
  `duration` BIGINT COMMENT 'Span.duration(): micros used for minDuration and maxDuration query',
  PRIMARY KEY (`trace_id_high`, `trace_id`, `id`)
) ENGINE=InnoDB ROW_FORMAT=COMPRESSED CHARACTER SET=utf8 COLLATE utf8_general_ci;
ALTER TABLE zipkin_spans ADD INDEX(`trace_id_high`, `trace_id`) COMMENT 'for getTracesByIds';
ALTER TABLE zipkin_spans ADD INDEX(`name`) COMMENT 'for getTraces and getSpanNames';
ALTER TABLE zipkin_spans ADD INDEX(`remote_service_name`) COMMENT 'for getTraces and getRemoteServiceNames';
ALTER TABLE zipkin_spans ADD INDEX(`start_ts`) COMMENT 'for getTraces ordering and range';
CREATE TABLE IF NOT EXISTS zipkin_annotations (
  `trace_id_high` BIGINT NOT NULL DEFAULT 0 COMMENT 'If non zero, this means the trace uses 128 bit traceIds instead of 64 bit',
  `trace_id` BIGINT NOT NULL COMMENT 'coincides with zipkin_spans.trace_id',
  `span_id` BIGINT NOT NULL COMMENT 'coincides with zipkin_spans.id',
  `a_key` VARCHAR(255) NOT NULL COMMENT 'BinaryAnnotation.key or Annotation.value if type == -1',
  `a_value` BLOB COMMENT 'BinaryAnnotation.value(), which must be smaller than 64KB',
  `a_type` INT NOT NULL COMMENT 'BinaryAnnotation.type() or -1 if Annotation',
  `a_timestamp` BIGINT COMMENT 'Used to implement TTL; Annotation.timestamp or zipkin_spans.timestamp',
  `endpoint_ipv4` INT COMMENT 'Null when Binary/Annotation.endpoint is null',
  `endpoint_ipv6` BINARY(16) COMMENT 'Null when Binary/Annotation.endpoint is null, or no IPv6 address',
  `endpoint_port` SMALLINT COMMENT 'Null when Binary/Annotation.endpoint is null',
  `endpoint_service_name` VARCHAR(255) COMMENT 'Null when Binary/Annotation.endpoint is null'
) ENGINE=InnoDB ROW_FORMAT=COMPRESSED CHARACTER SET=utf8 COLLATE utf8_general_ci;
ALTER TABLE zipkin_annotations ADD UNIQUE KEY(`trace_id_high`, `trace_id`, `span_id`, `a_key`, `a_timestamp`) COMMENT 'Ignore insert on duplicate';
ALTER TABLE zipkin_annotations ADD INDEX(`trace_id_high`, `trace_id`, `span_id`) COMMENT 'for joining with zipkin_spans';
ALTER TABLE zipkin_annotations ADD INDEX(`trace_id_high`, `trace_id`) COMMENT 'for getTraces/ByIds';
ALTER TABLE zipkin_annotations ADD INDEX(`endpoint_service_name`) COMMENT 'for getTraces and getServiceNames';
ALTER TABLE zipkin_annotations ADD INDEX(`a_type`) COMMENT 'for getTraces and autocomplete values';
ALTER TABLE zipkin_annotations ADD INDEX(`a_key`) COMMENT 'for getTraces and autocomplete values';
ALTER TABLE zipkin_annotations ADD INDEX(`trace_id`, `span_id`, `a_key`) COMMENT 'for dependencies job';
CREATE TABLE IF NOT EXISTS zipkin_dependencies (
  `day` DATE NOT NULL,
  `parent` VARCHAR(255) NOT NULL,
  `child` VARCHAR(255) NOT NULL,
  `call_count` BIGINT,
  `error_count` BIGINT,
  PRIMARY KEY (`day`, `parent`, `child`)
) ENGINE=InnoDB ROW_FORMAT=COMPRESSED CHARACTER SET=utf8 COLLATE utf8_general_ci;
3.重启ZipKin
下面的作参考
java -jar zipkin-server-2.12.9-exec.jar --STORAGE_TYPE=mysql --MYSQL_HOST=127.0.0.1 --MYSQL_TCP_PORT=3306 --MYSQL_DB=zipkin --MYSQL_USER=root --MYSQL_PASS=root
java -jar 启动你的jar包
--STORAGE_TYPE=使用的存储类型
--MYSQL_HOST=mysql地址
--MYSQL_TCP_PORT=mysql端口号
--MYSQL_DB=使用的数据库名
--MYSQL_USER=数据库账号
--MYSQL_PASS=数据库密码
我的是
java -jar zipkin-server-2.22.2-exec.jar --STORAGE_TYPE=mysql --MYSQL_HOST=192.168.191.200 --MYSQL_TCP_PORT=3306 --MYSQL_DB=zipkin_config --MYSQL_USER=root --MYSQL_PASS=qingfengzilai.4.访问接口
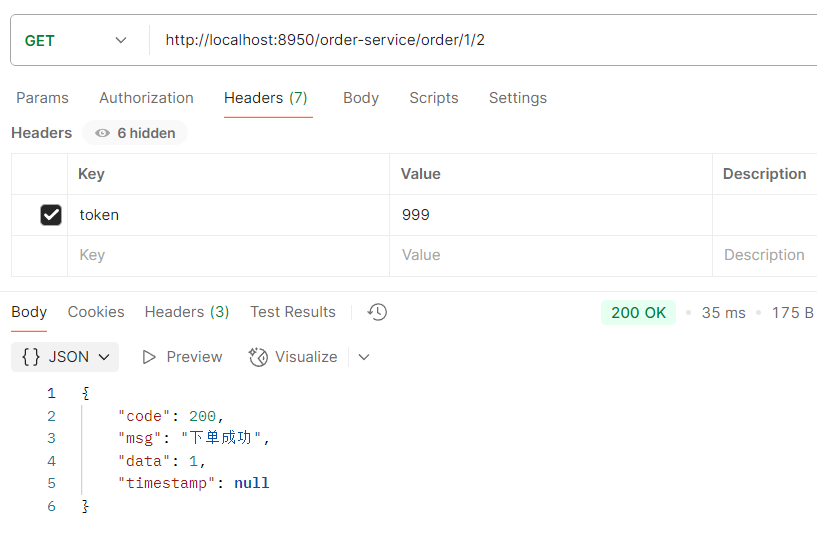
5.查看ZipKin
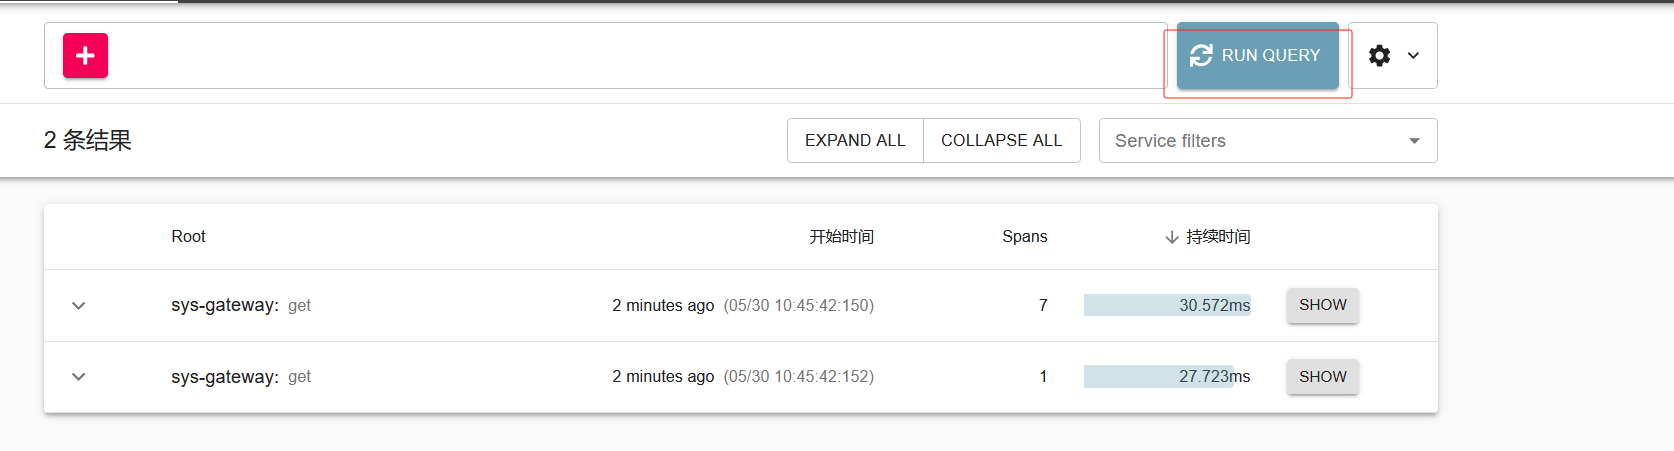
6.再次重启ZipKin
不要访问接口,点击运行查询如果有之前的记录表示持久化成功,而且表中也有数据
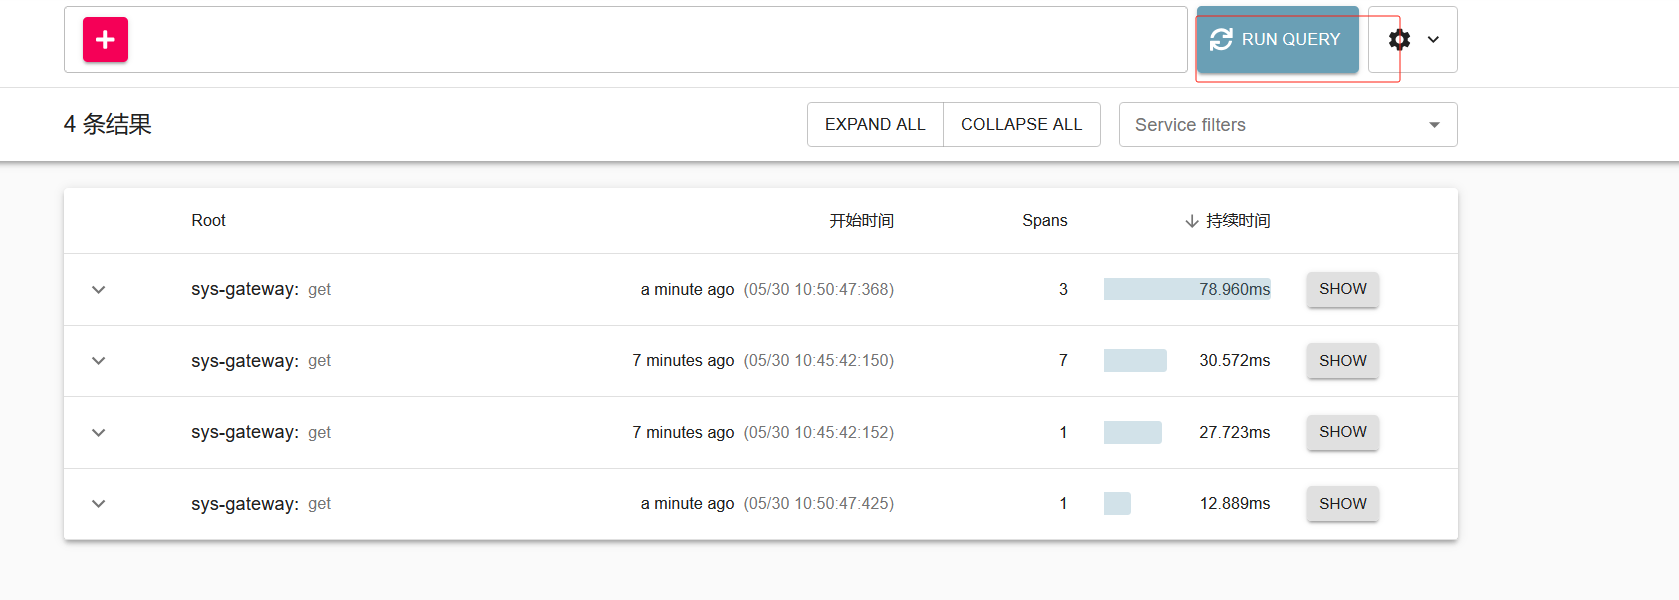
11. 网关聚合swagger
1.加入依赖
            com.spring4all
            swagger-spring-boot-starter
            1.9.1.RELEASE


            com.github.xiaoymin
            swagger-bootstrap-ui
            1.9.6
注意是加在sys-service里
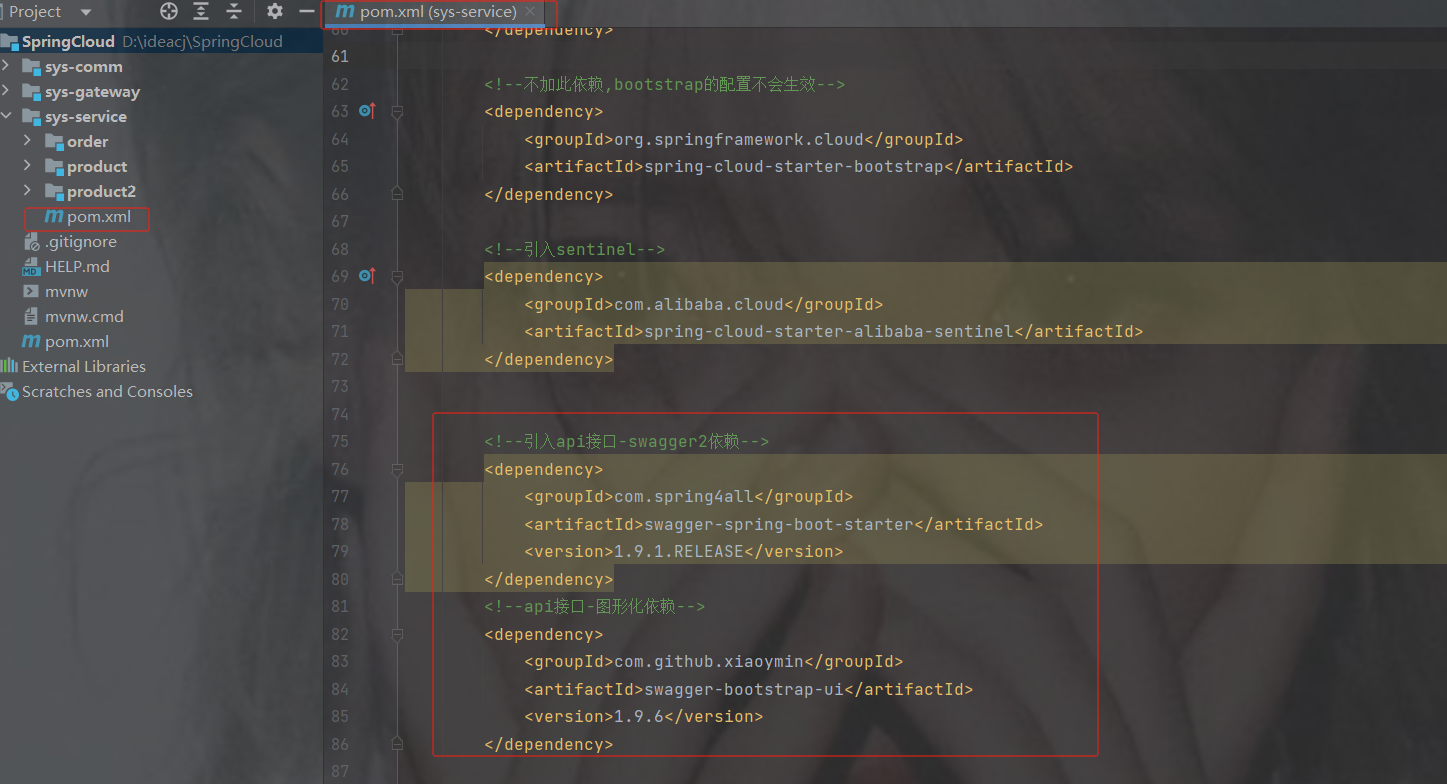
2. 在两个服务加入swagger的配置类
注意:商品服务就加一个就行
package com.order.config;
import org.springframework.context.annotation.Bean;
import org.springframework.context.annotation.Configuration;
import springfox.documentation.builders.PathSelectors;
import springfox.documentation.builders.RequestHandlerSelectors;
import springfox.documentation.service.ApiInfo;
import springfox.documentation.service.Contact;
import springfox.documentation.spi.DocumentationType;
import springfox.documentation.spring.web.plugins.Docket;
import java.util.ArrayList;
@Configuration//这是一个配置类,替代以前的配置文件xml。配置类本身也是容器中的组件
public class SwaggerConfig {
    @Bean //相当于spring配置文件中把该方法返回的对象交给与spring容器来管理
    //访问路径: http://localhost:服务端口号/doc.html  ||   http://localhost:服务端口号/swagger-ui.html*/
    public Docket docket(){
        Docket docket = new Docket(DocumentationType.SWAGGER_2)
                .apiInfo(getInfo())//设置(api/文档)的信息
                .select()
                .apis(RequestHandlerSelectors.basePackage("com.order.controller"))//生成接口文档包的路径
                .paths(PathSelectors.any())
                .build();//生成构建,不加不生效
        return docket;
    }
    //文档的信息
    private ApiInfo getInfo(){
        Contact DEFAULT_CONTACT = new Contact("张国荣", "https://www.zgr.com", "111@qq.com");
        ApiInfo info = new ApiInfo("阿巴阿巴公司", "订单管理系统", "V2.0", "https://www.jd.com",
                DEFAULT_CONTACT, "Apache 2.0", "https://www.baidu.com", new ArrayList<>());
        return info;
    }
}
注意自己改生成接口文档的路径
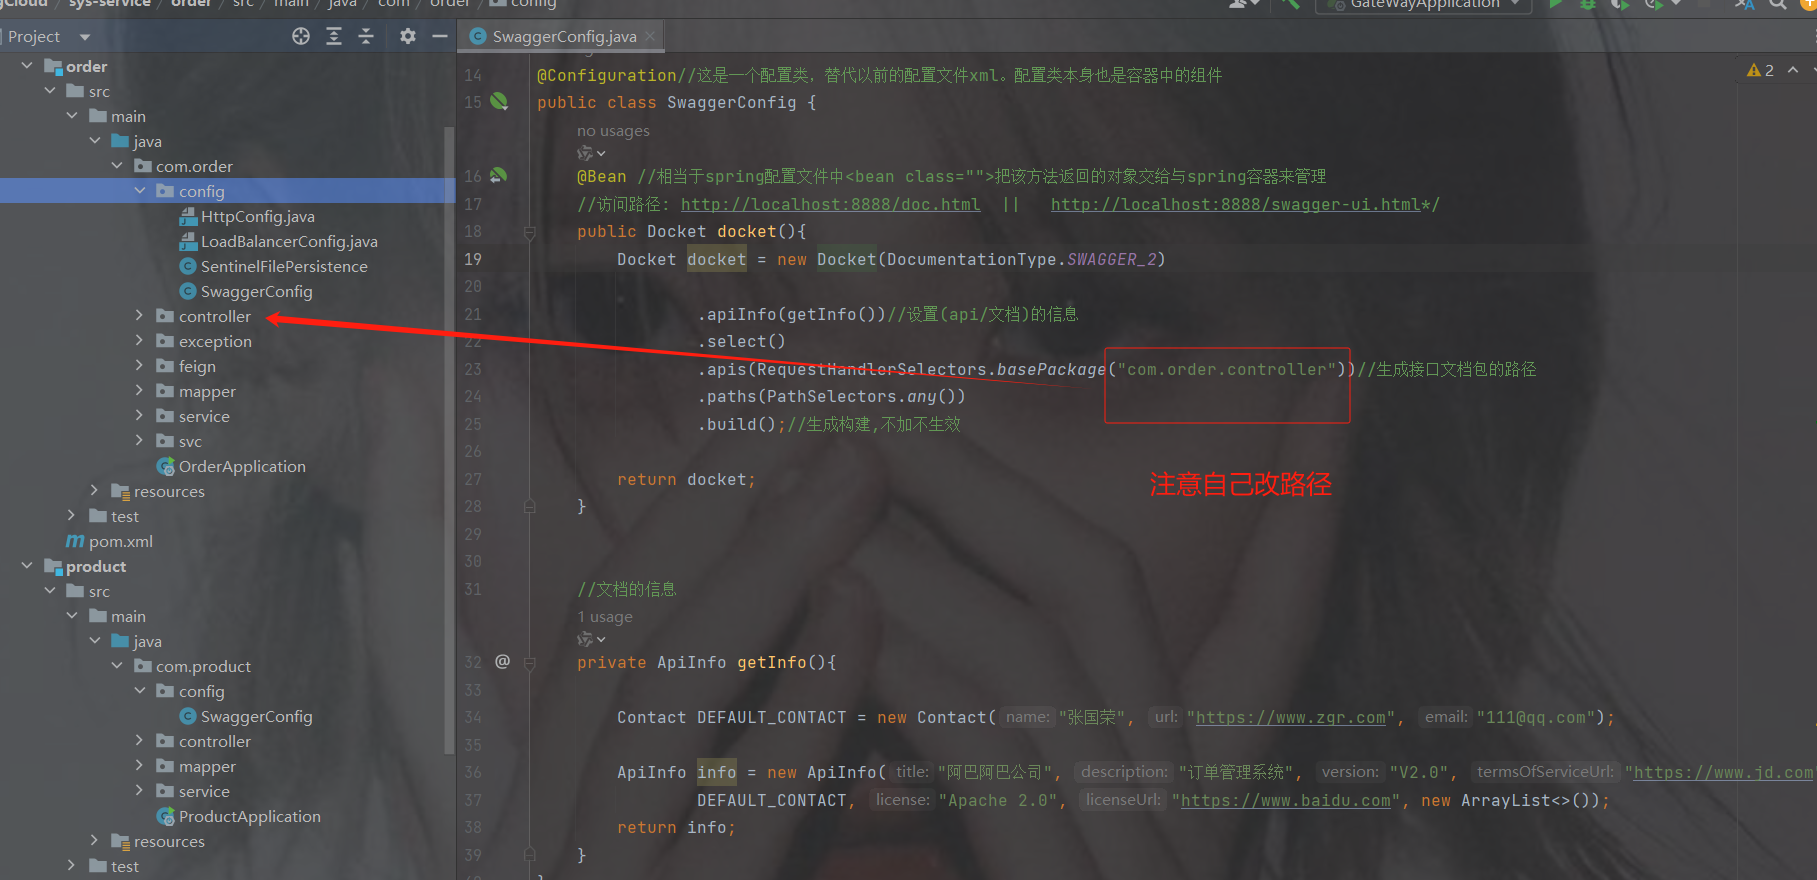
3.加swagger注解
两个启动类上都加此注解
@EnableSwagger2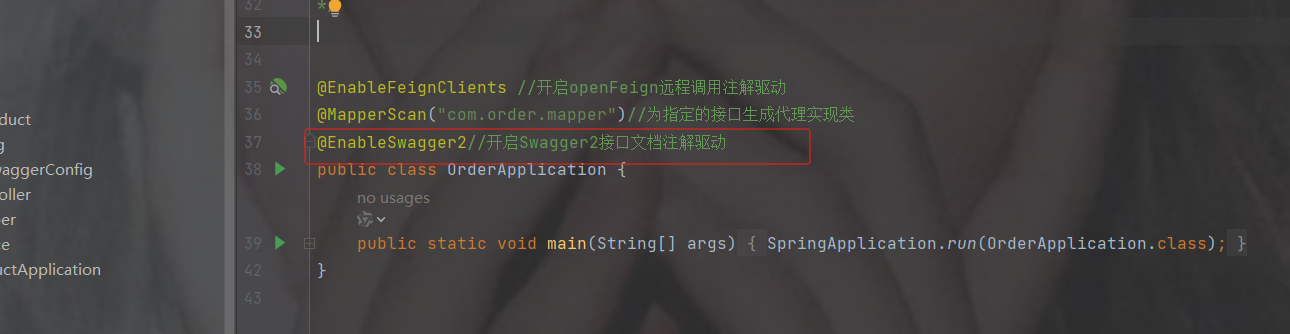
4.测试访问两个服务的swagger
http://localhost:端口号/doc.html
 http://localhost:端口号/swagger-ui.html
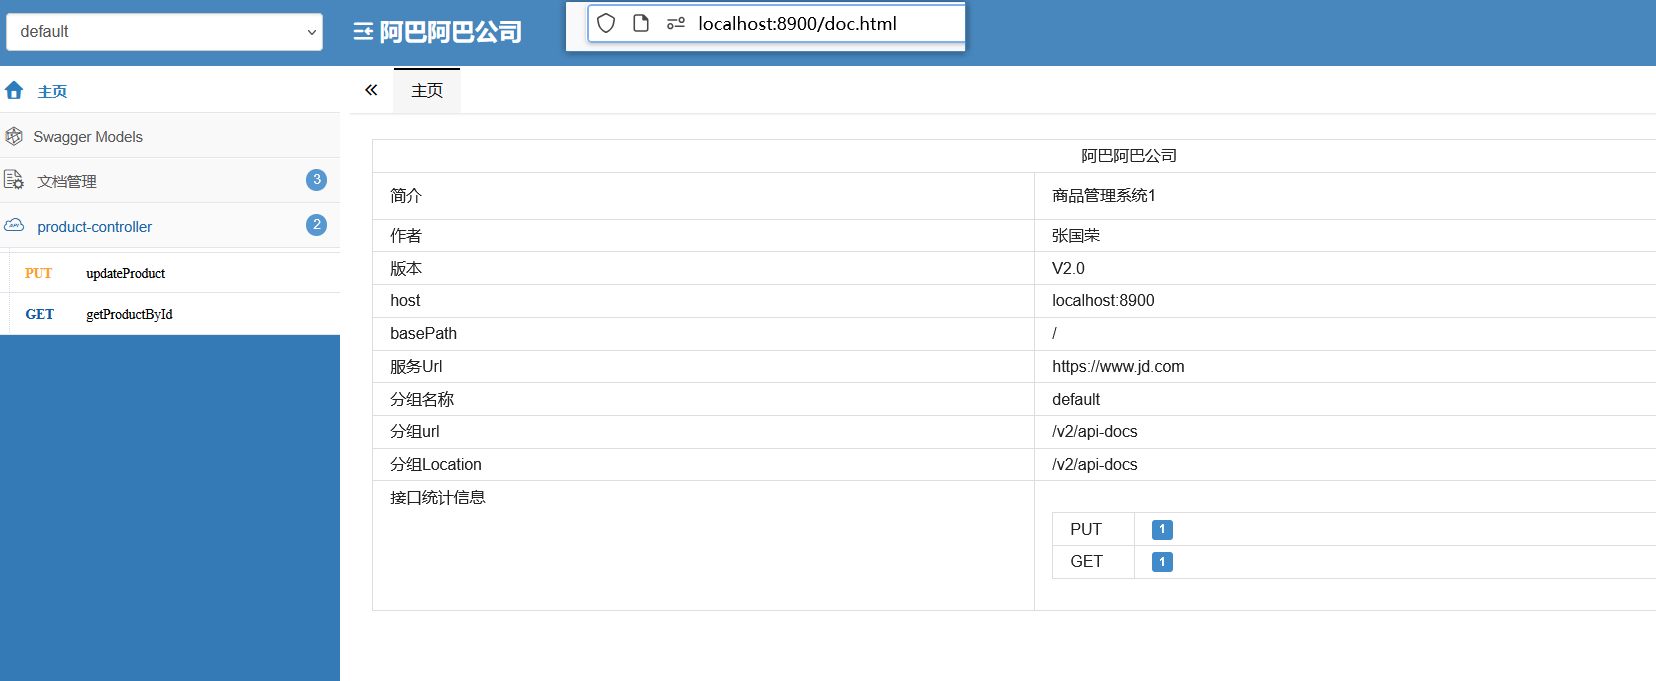
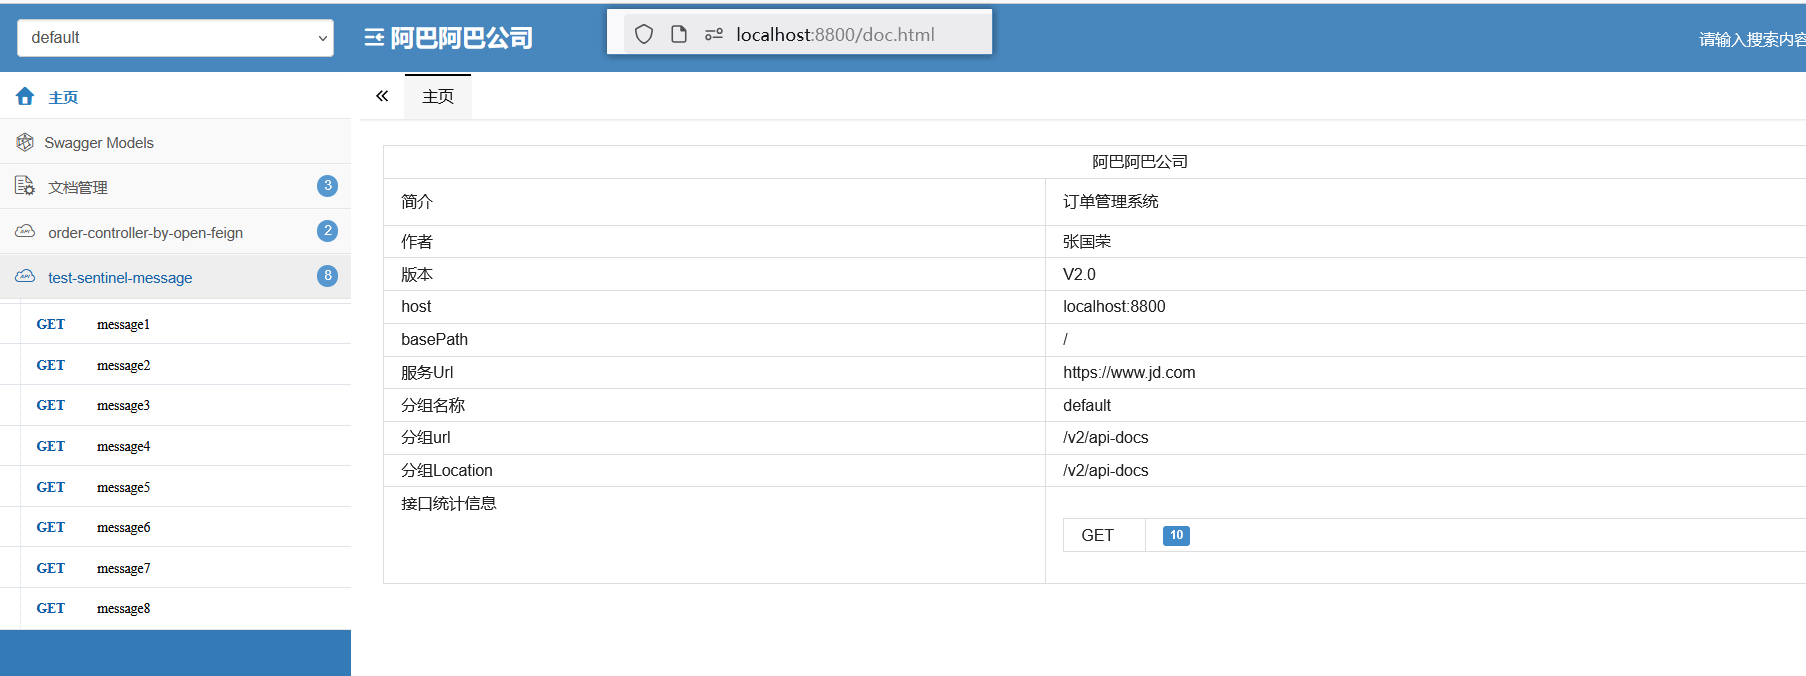
5.在网关服务加依赖
核心是将swagger升级到了3.0.0版本。 之前的低版本泵在网关中直接使用
            io.springfox
            springfox-boot-starter
            3.0.0


            com.github.xiaoymin
            swagger-bootstrap-ui
            1.9.6
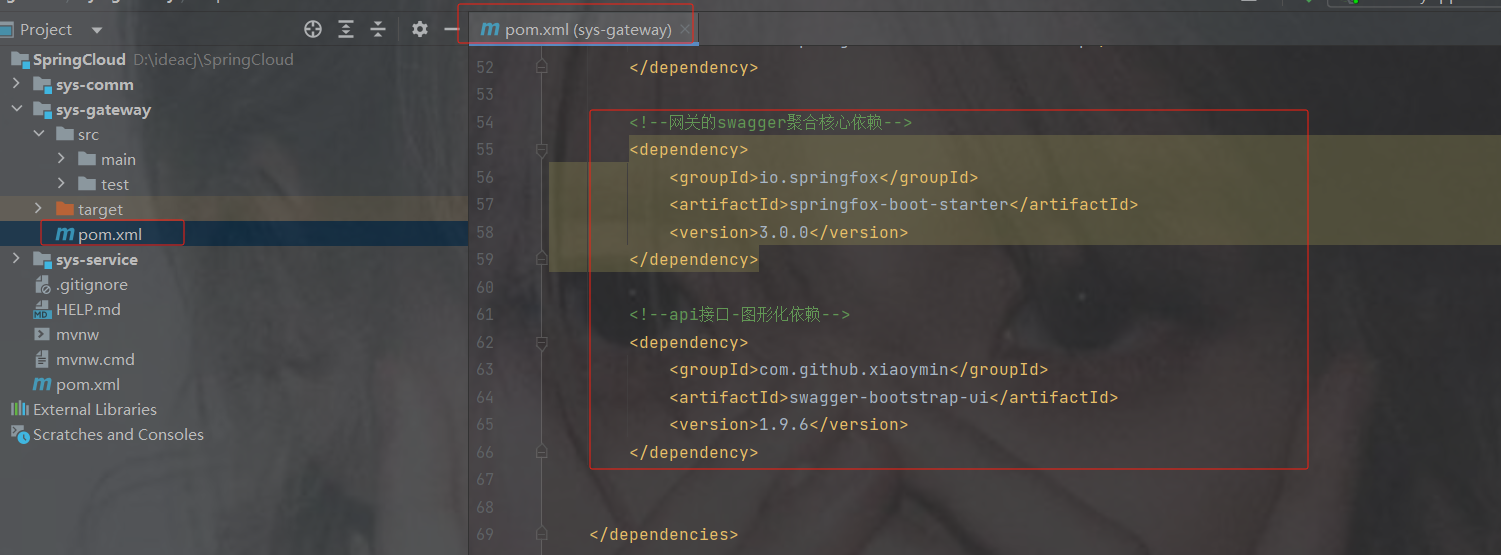
说明:
将swagger升级到3.0.0可用支持webflux,同时有以下这些变化:
1、自动化注解变更:
由之前的 @EnableSwagger2 更改为 @EnableOpenApi,当然@EnableOpenApi可以放在配置类,也可以放在启动类上
2、页面访问变更:
项目访问地址从2.x的 http://localhost:端口号/swagger-ui.html 到 3.x的 http://localhost:端口号/swagger-ui/index.html 或 http://localhost:8080/swagger-ui/
注:@EnableSwagger2在springfox3版本依然可以继续使用
6.在gateway加配置类
package com.order.config;
import org.springframework.context.annotation.Bean;
import org.springframework.context.annotation.Configuration;
import springfox.documentation.builders.PathSelectors;
import springfox.documentation.builders.RequestHandlerSelectors;
import springfox.documentation.service.ApiInfo;
import springfox.documentation.service.Contact;
import springfox.documentation.spi.DocumentationType;
import springfox.documentation.spring.web.plugins.Docket;
import java.util.ArrayList;
@Configuration
public class SwaggerConfig {
    @Bean
    public Docket docket() {
        Docket docket = new Docket(DocumentationType.SWAGGER_2)
                .apiInfo(getInfo());//设置(api/文档)的信息
        return docket;
    }
    //文档的信息
    private ApiInfo getInfo() {
        Contact DEFAULT_CONTACT = new Contact("张国荣", "https://www.zgr.com", "111@qq.com");
        ApiInfo info = new ApiInfo("阿巴阿巴公司", "网关管理系统", "V2.0", "https://www.jd.com",
                DEFAULT_CONTACT, "Apache 2.0", "https://www.baidu.com", new ArrayList<>());
        return info;
    }
}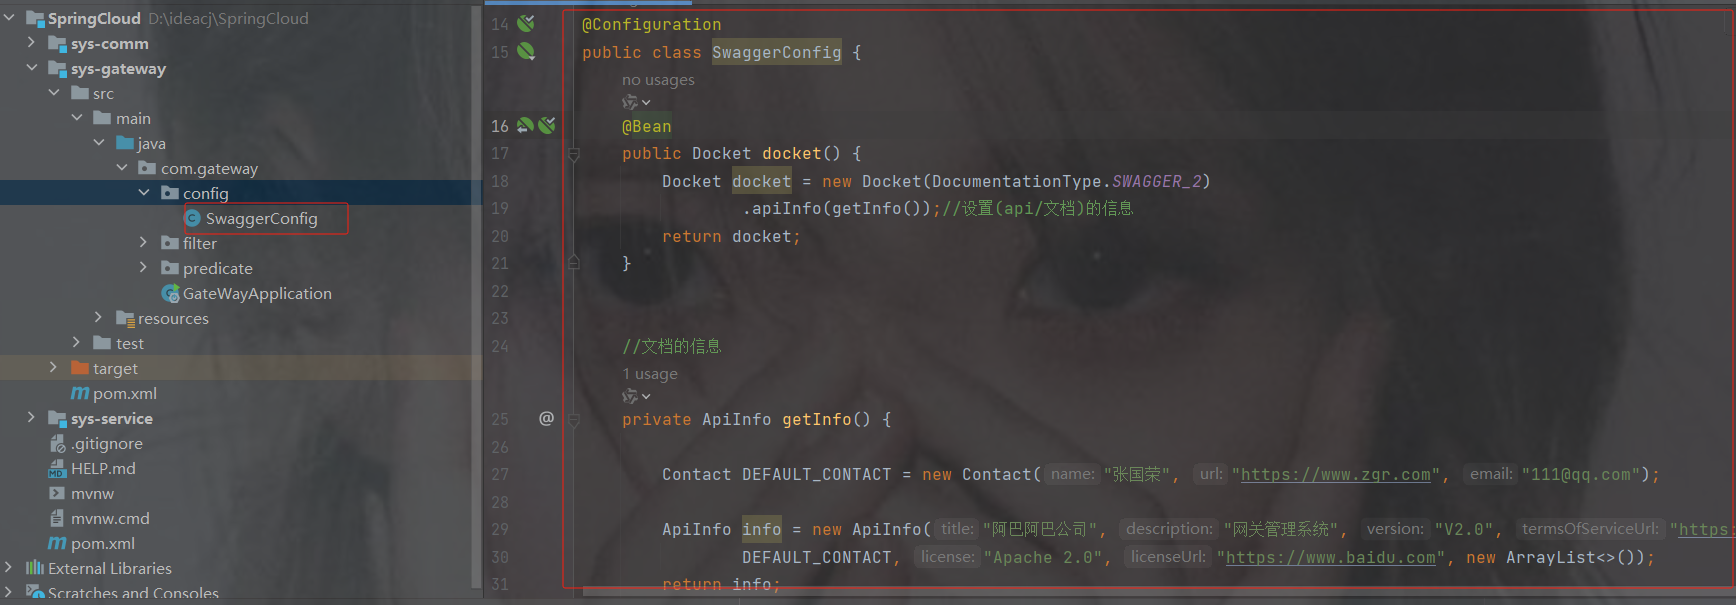
7. 启动类加注解
//开启swagger2,这是3X开始的注解,之前的@EnableSwagger2也可以用
@EnableOpenApi
8. 聚合swagger
创建一个类实现SwaggerResourcesProvider接口
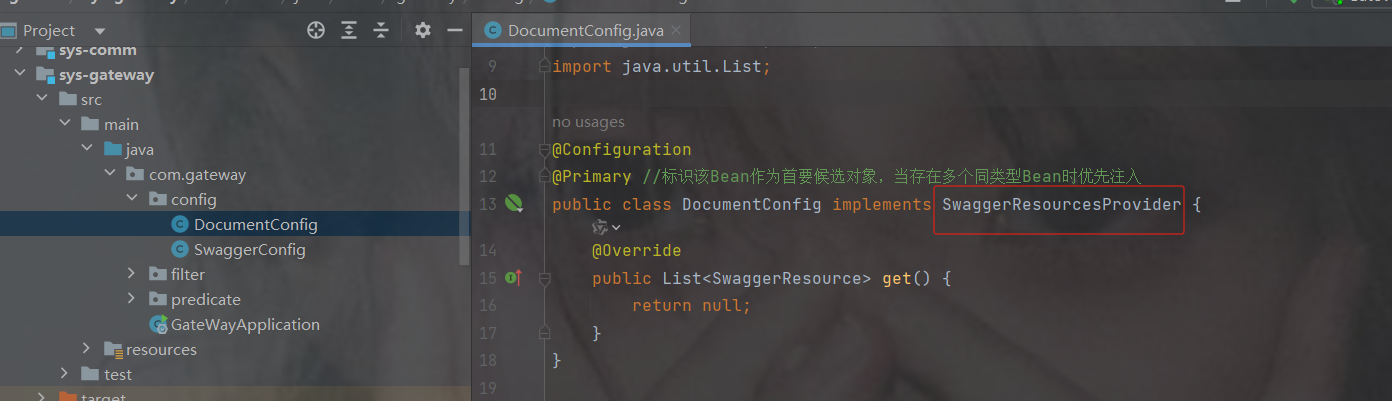
代码
package com.gateway.config;
import org.springframework.context.annotation.Configuration;
import org.springframework.context.annotation.Primary;
import springfox.documentation.swagger.web.SwaggerResource;
import springfox.documentation.swagger.web.SwaggerResourcesProvider;
import java.util.ArrayList;
import java.util.List;
@Configuration
@Primary //标识该Bean作为首要候选对象,当存在多个同类型Bean时优先注入
public class DocumentConfig implements SwaggerResourcesProvider {
    @Override
    public List get() {
        //获取所有微服务配置的Swagger资源
        List resourceArrayList = new ArrayList<>();
        SwaggerResource order = new SwaggerResource();
        order.setName("订单服务"); //  资源名称
        order.setSwaggerVersion("2.0"); //  swagger版本
        order.setLocation("/order-service/v2/api-docs");//  资源路径,注意这里是微服务名称,固定格式:/服务名称/v2/api-docs
        SwaggerResource product = new SwaggerResource();
        product.setName("商品服务1"); //  资源名称
        product.setSwaggerVersion("2.0"); //  swagger版本
        product.setLocation("/product-service/v2/api-docs");//  资源路径,注意这里是微服务名称,固定格式:/服务名称/v2/api-docs
        resourceArrayList.add(order);
        resourceArrayList.add(product);
        return resourceArrayList;
    }
}
注意放行白名单,否则会访问不到
#白名单:多个以","分割
whiteName=/login,/order-service/v2/api-docs,/product-service/v2/api-docs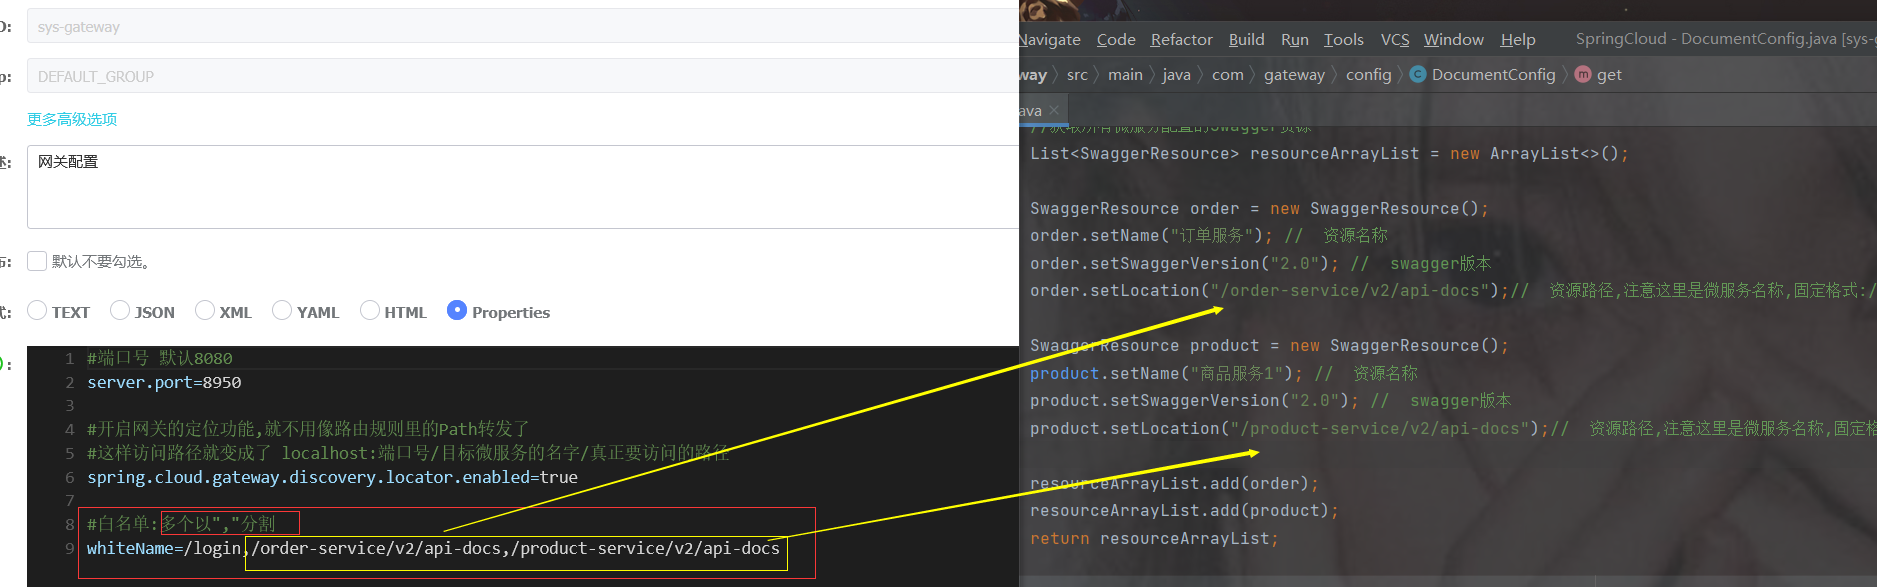
访问
http://localhost:端口号/doc.html
http://localhost:端口号/swagger-ui/index.html或 注意下面的ui后面有/
http://localhost:端口号/swagger-ui/
doc.html展示
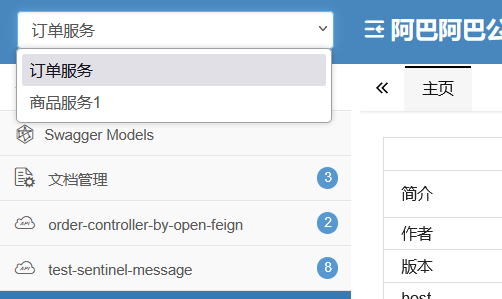
swagger-ui/ 展示
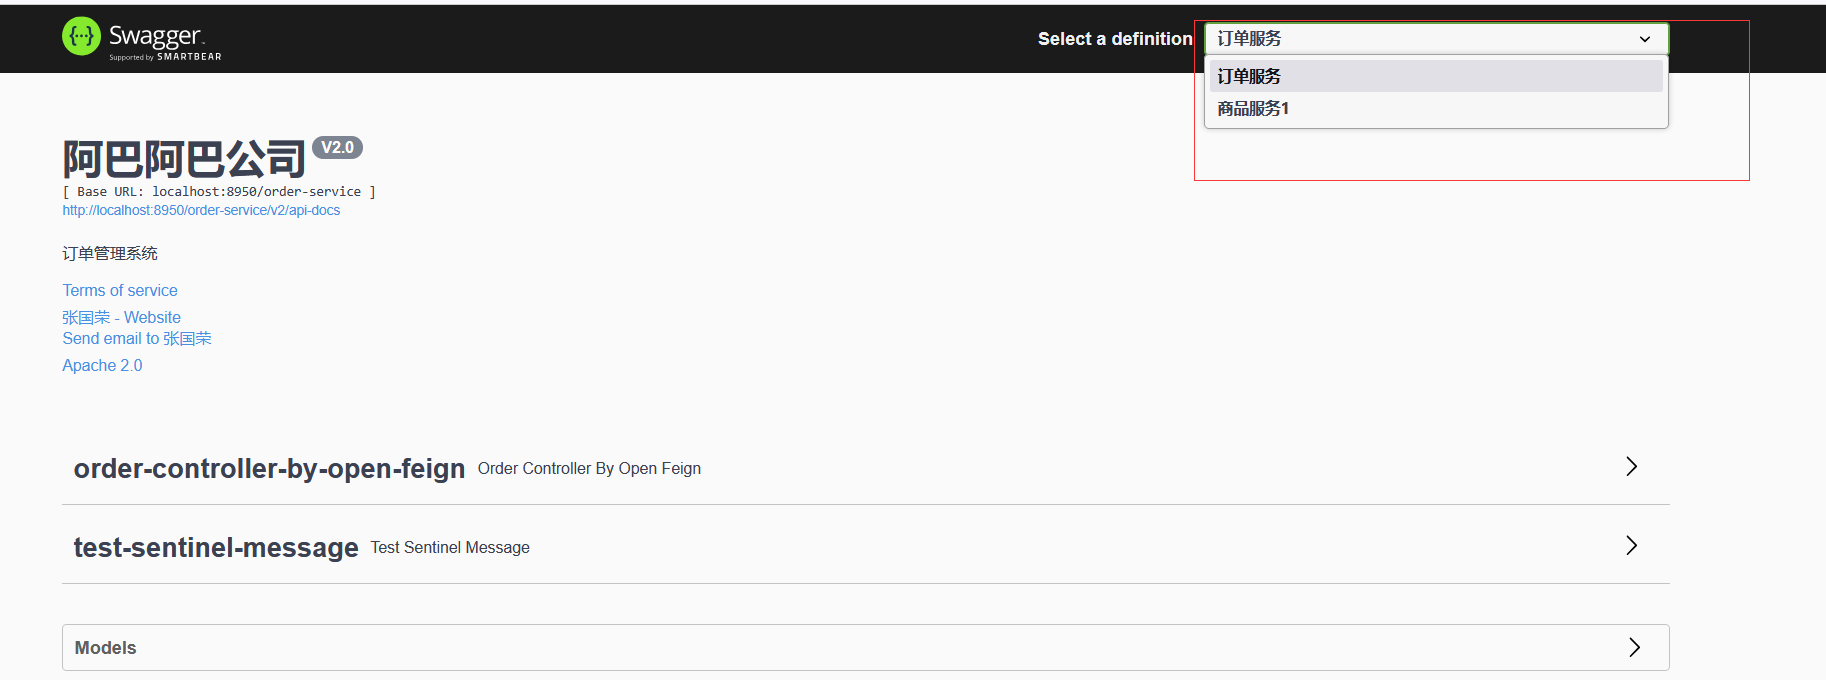
12.监控服务 springboot-admin-ui
12.1 创建服务监控的微服务
该服务可以从nacos注册中心获取微服务的信息而显示出来
比如实时监控观看注册中心有没有荡机,一旦荡机可以发通知告知
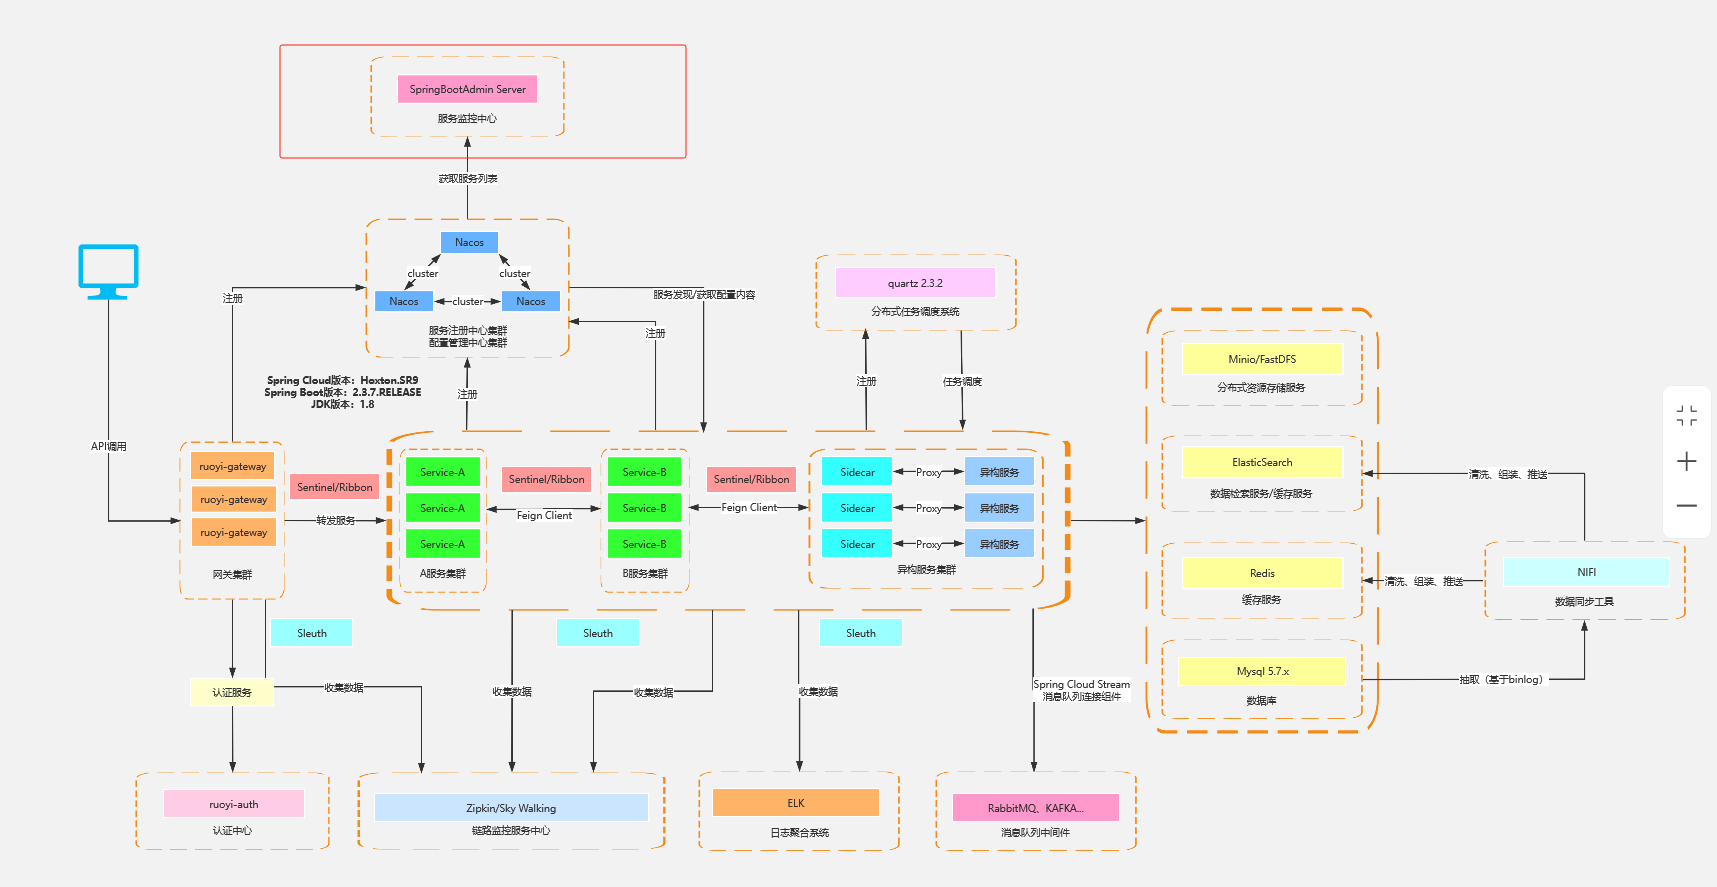
1.依赖
            org.springframework.boot
            spring-boot-starter-web


            de.codecentric
            spring-boot-admin-starter-server
            2.4.2


            com.alibaba.cloud
            spring-cloud-starter-alibaba-nacos-discovery
2.配置
#端口号,默认8080
server.port=8686
# 应用名称
spring.application.name=monitor-service
#设置nacos的注册中心地址默认是8848
spring.cloud.nacos.discovery.server-addr=192.168.191.200:8850
3.开启服务监控的注解
@EnableAdminServer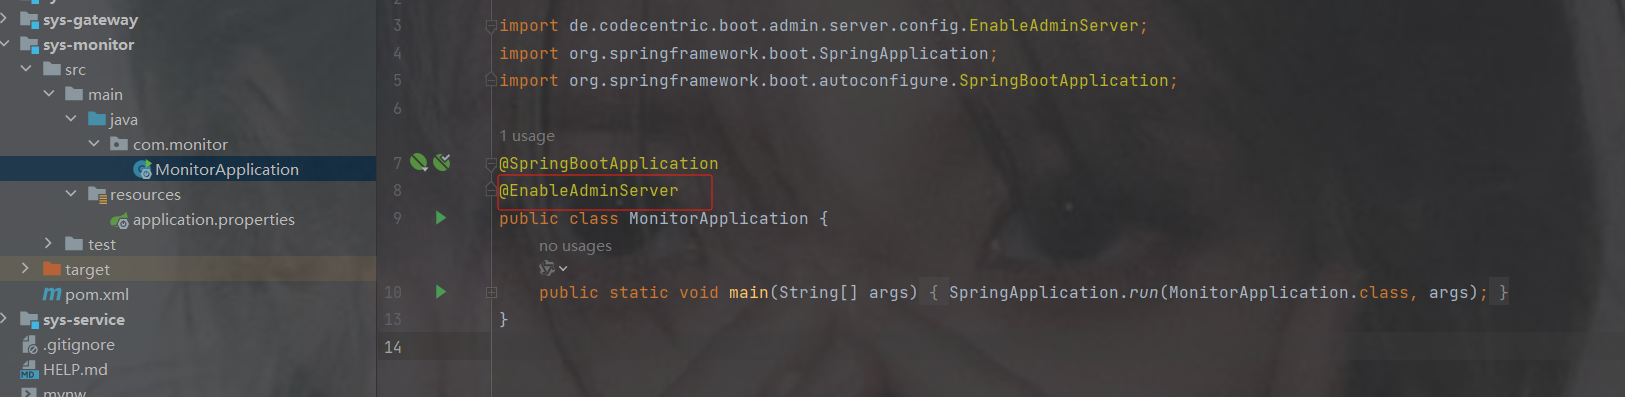
4. 访问localhost:端口号
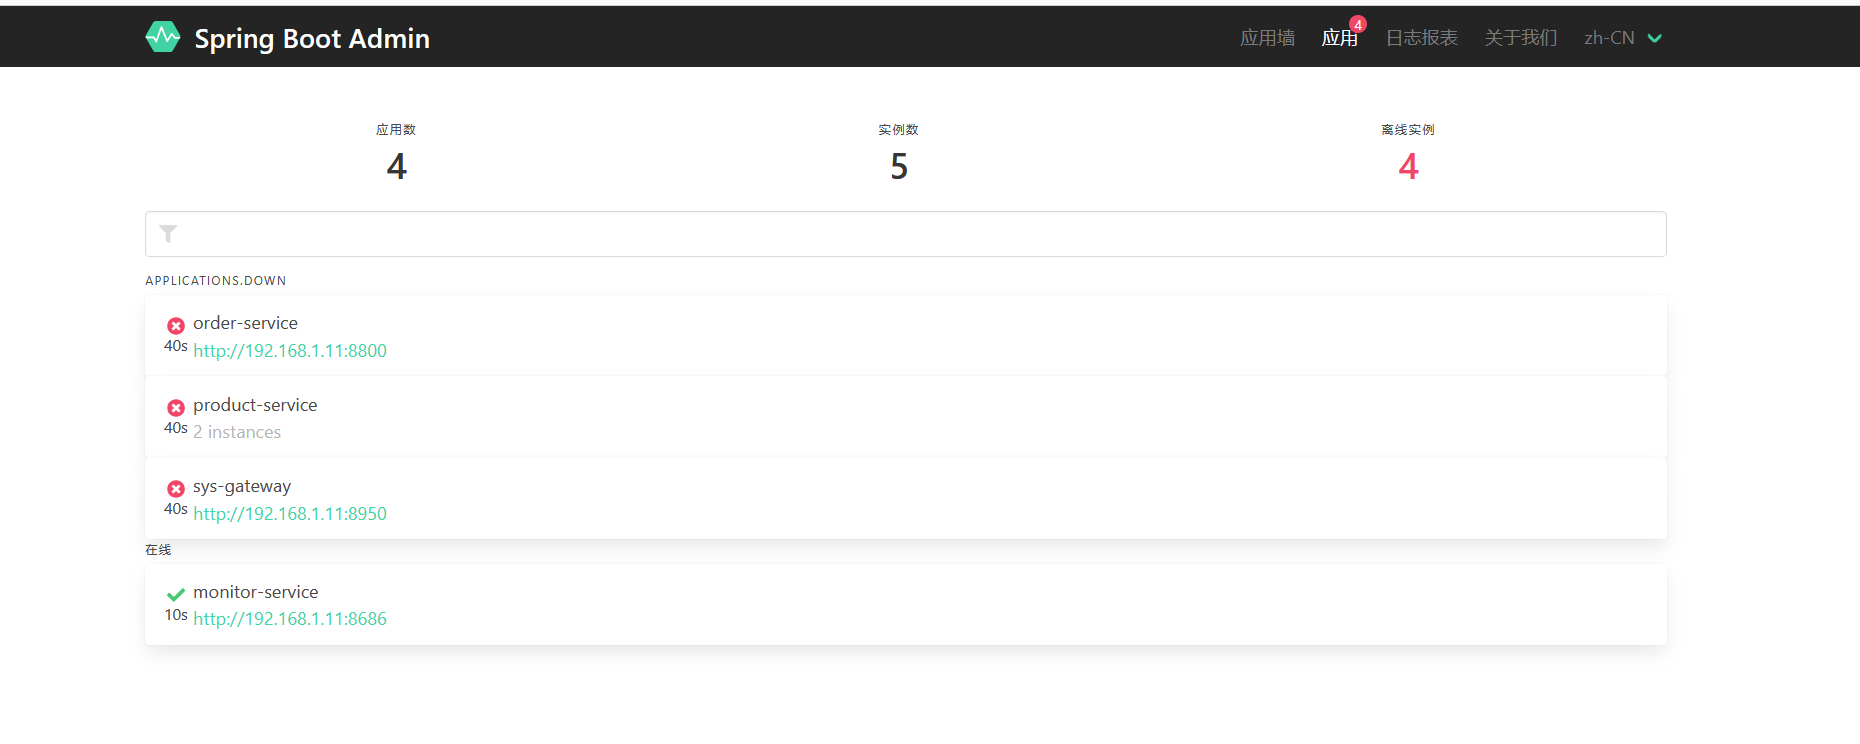
如果我们服务开启着,应用墙也显示荡机,因为其他服务没有让admin来监控,所以都是荡机的消息
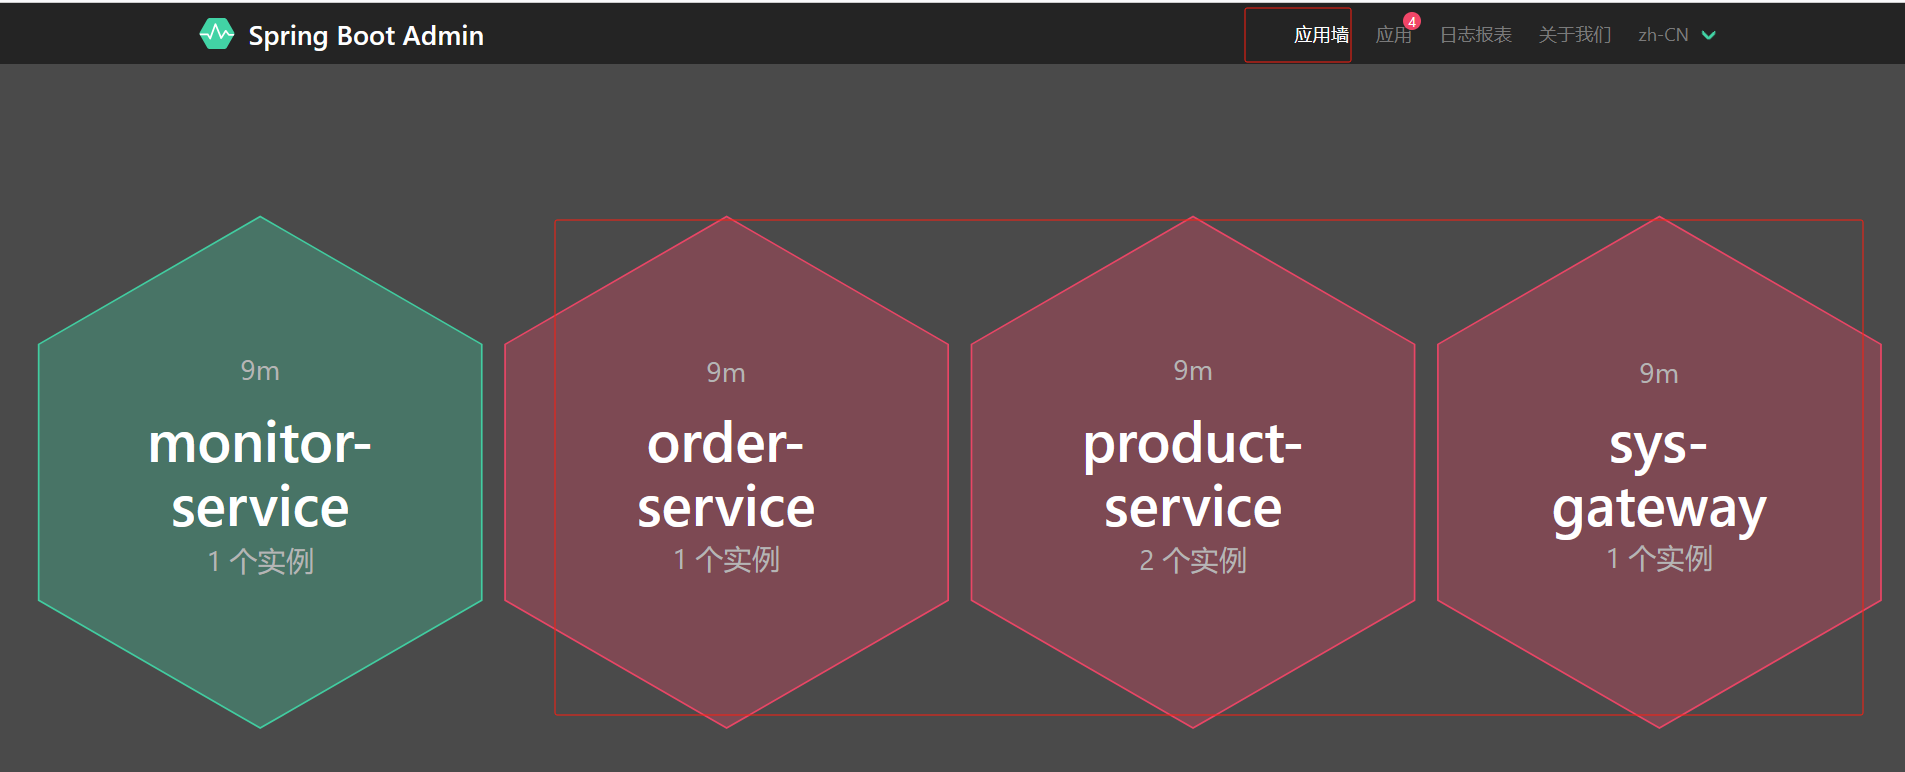
12.2 让微服务交于admin服务器端监控
1.依赖
可以加在sys-service的xml里,这样三个服务都可以用,再把配置放到nacos共享配置就行了
这里演示只加在了order服务里
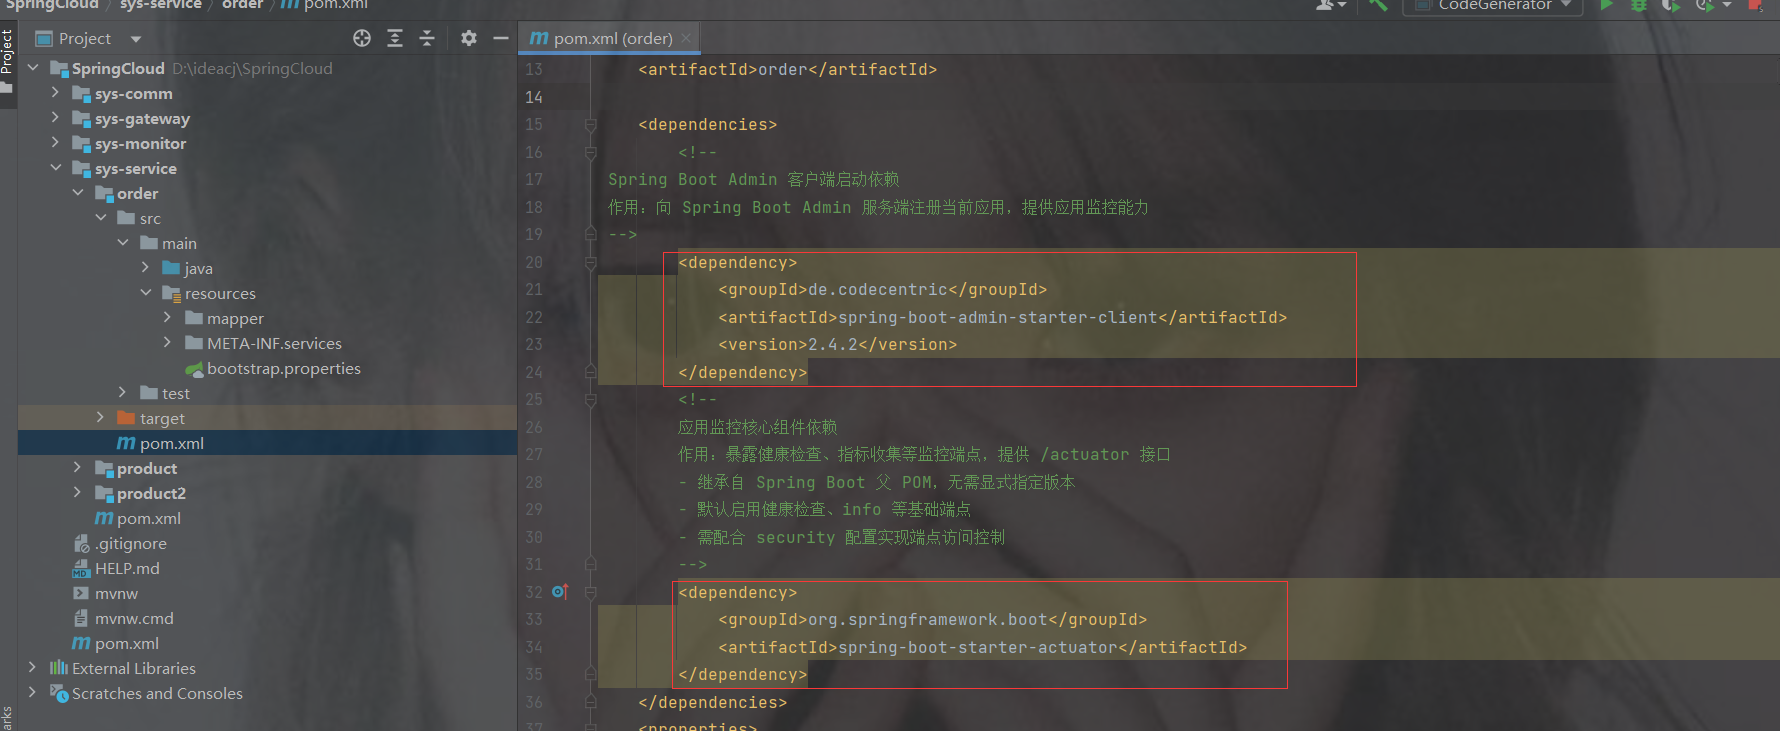
            de.codecentric
            spring-boot-admin-starter-client
            2.4.2


            org.springframework.boot
            spring-boot-starter-actuator
2.配置
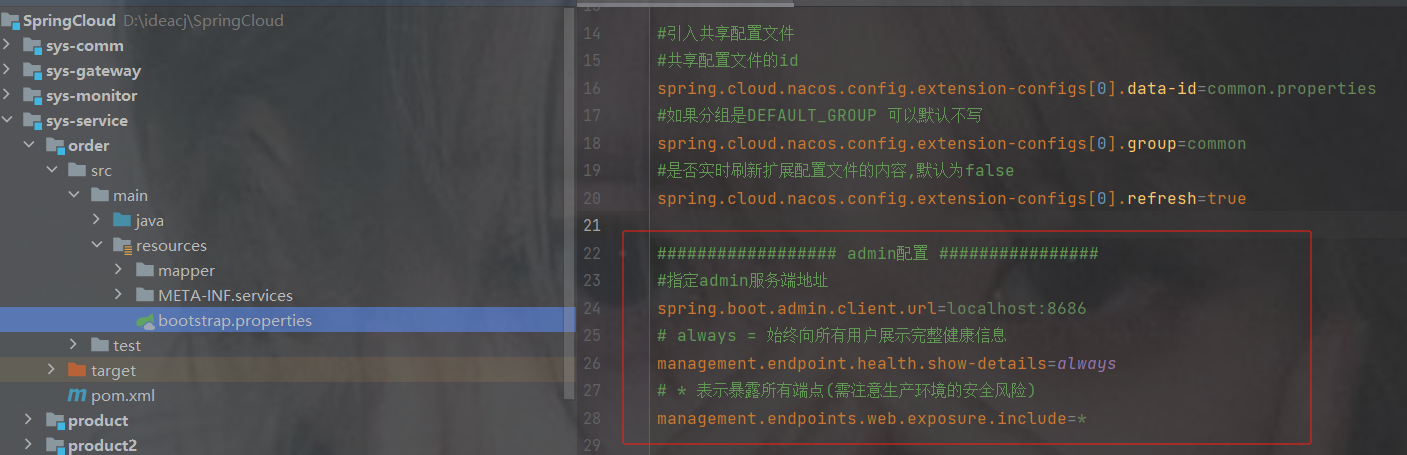
#指定admin服务端地址
spring.boot.admin.client.url=localhost:8686
# always = 始终向所有用户展示完整健康信息
management.endpoint.health.show-details=always
# * 表示暴露所有端点(需注意生产环境的安全风险)
management.endpoints.web.exposure.include=*
3.重启访问服务端地址
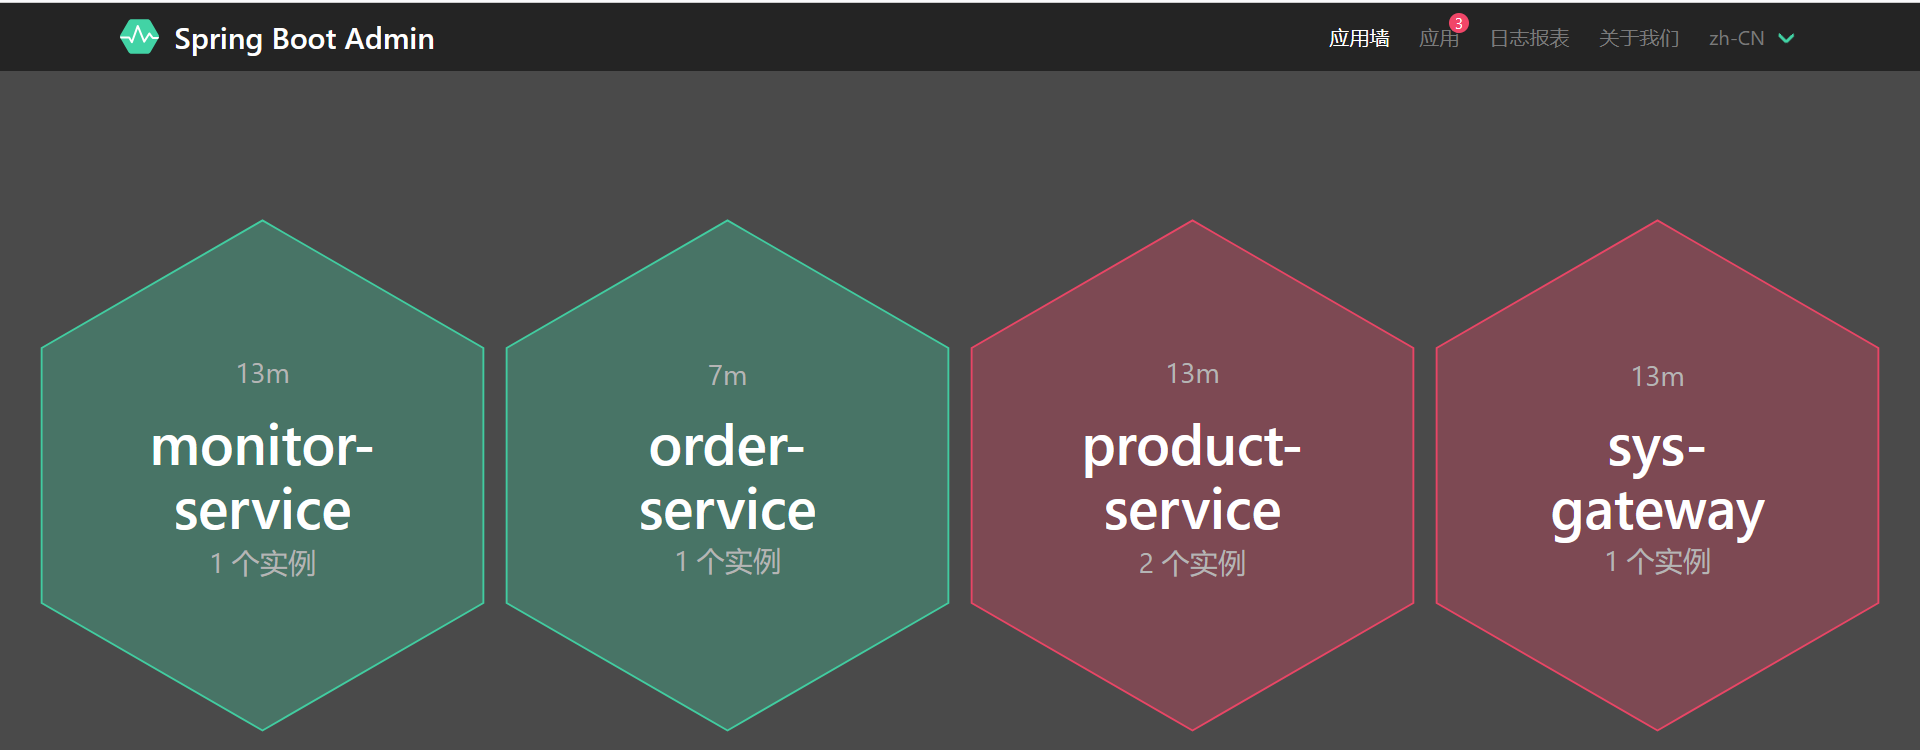
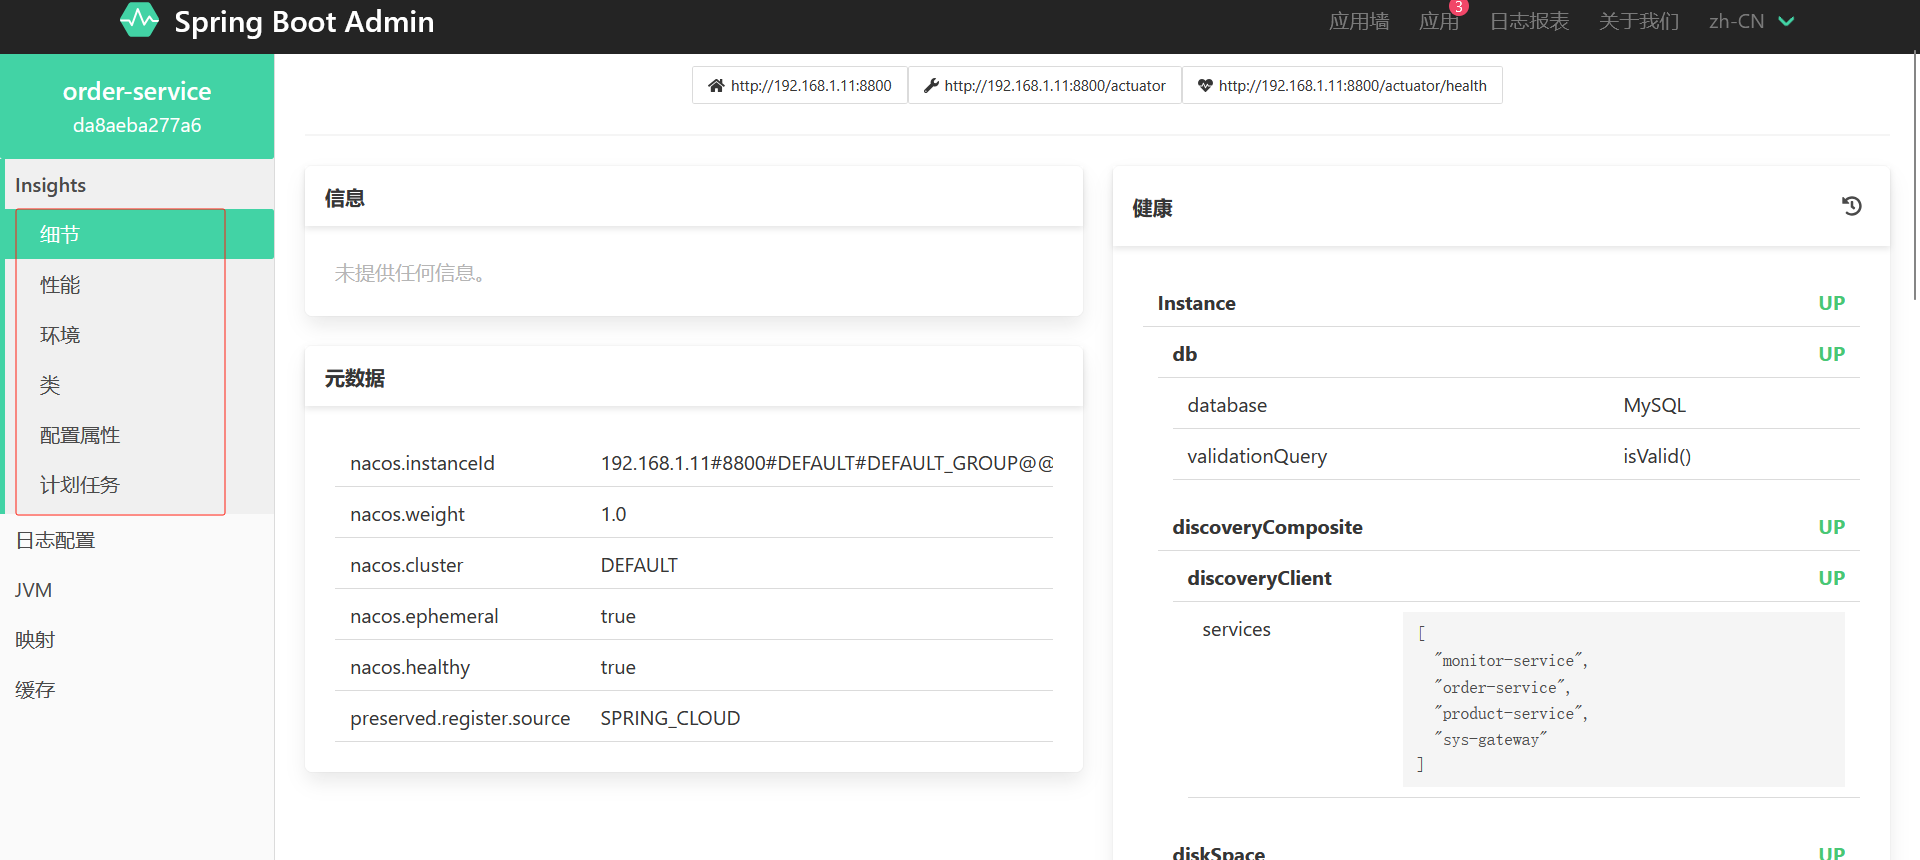
注意
如果你发现有两个,但是你只启动了一个服务,而且order-service本身就一个,那是因为它也用了vm虚拟机的ip
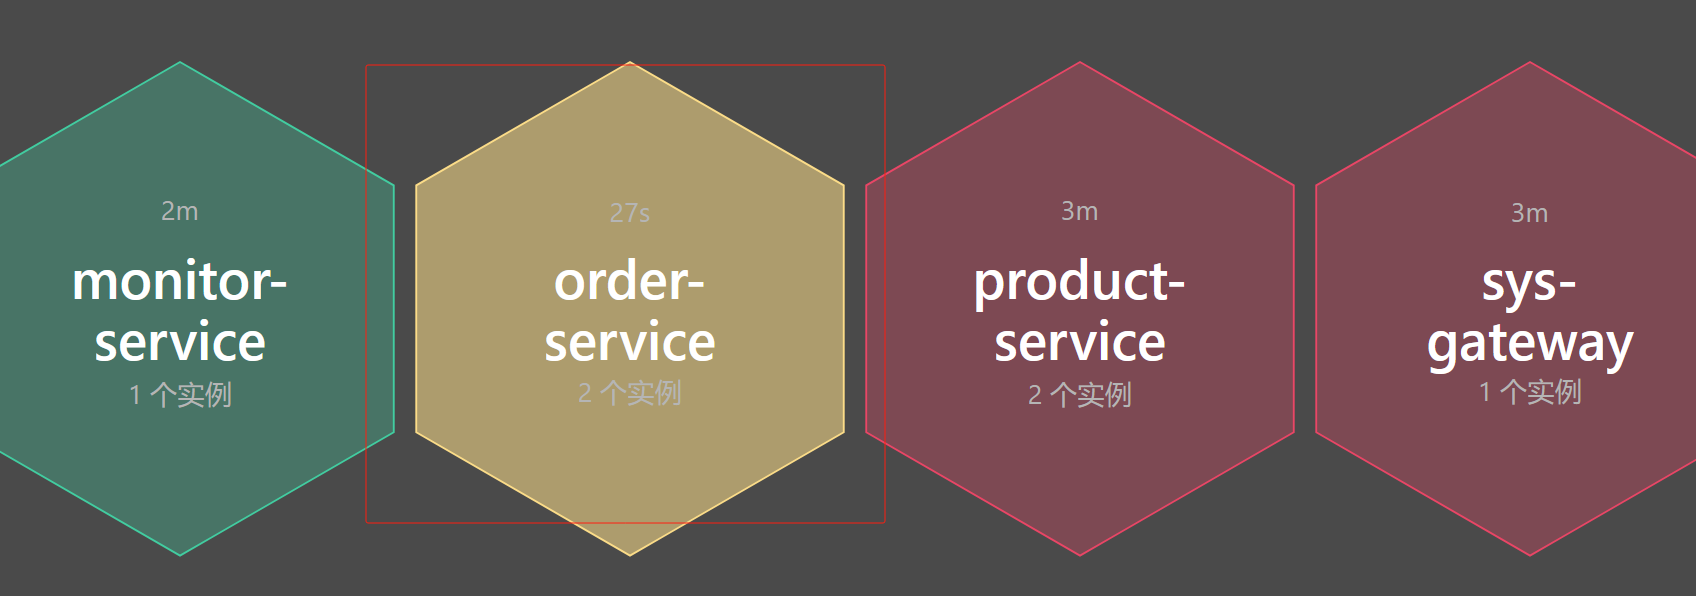
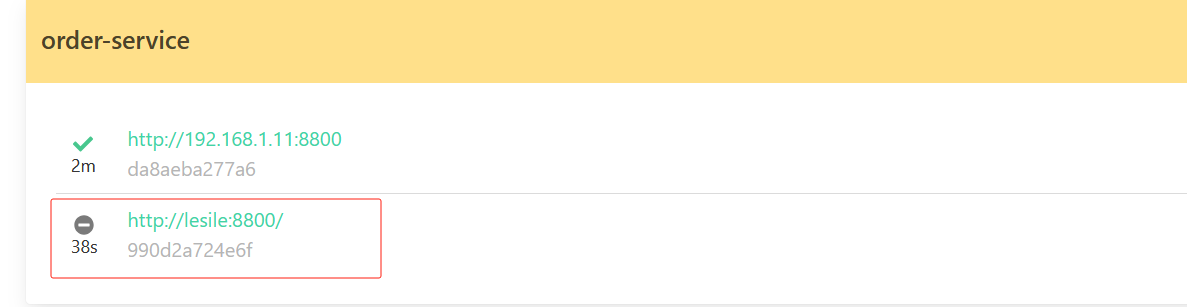
加入以下配置

#明确指定注册类型为 IP
spring.boot.admin.client.instance.service-host-type=ip
#该配置控制客户端实例向Admin Server注册时使用的地址类型。
#当设置为true时,优先使用实例的IP地址而非主机名进行注册,适用于容器化或DNS解析受限的环境,确保Admin Server能正确访问实例端点。
spring.boot.admin.client.instance.prefer-ip=true
# 指定Spring Boot应用绑定的网络接口地址。
# 此处配置为固定内网IP地址,强制应用仅在指定网络接口上监听请求,常用于多网卡环境或需要限制访问来源的生产环境部署。
server.address=127.0.0.1
12.3 监控的微服务宕机后触发一段代码
1.创建配置
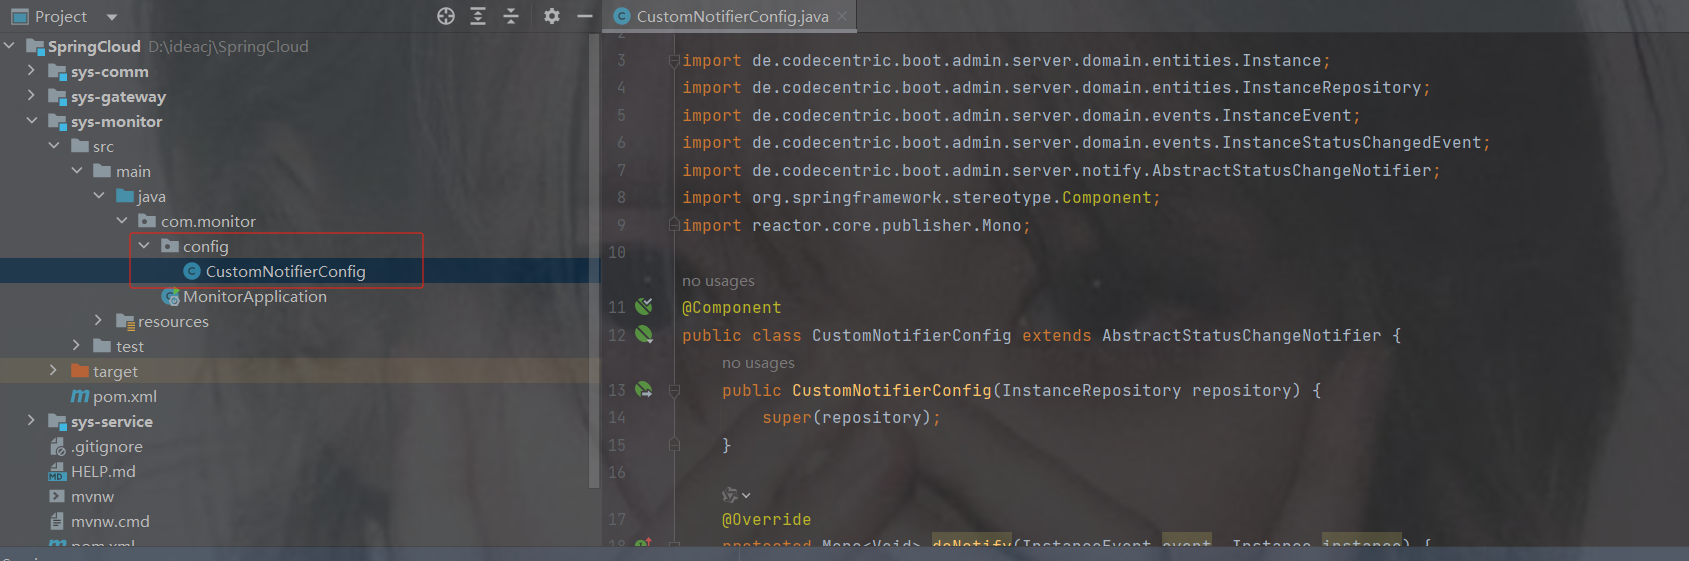
代码
package com.monitor.config;
import de.codecentric.boot.admin.server.domain.entities.Instance;
import de.codecentric.boot.admin.server.domain.entities.InstanceRepository;
import de.codecentric.boot.admin.server.domain.events.InstanceEvent;
import de.codecentric.boot.admin.server.domain.events.InstanceStatusChangedEvent;
import de.codecentric.boot.admin.server.notify.AbstractStatusChangeNotifier;
import org.springframework.stereotype.Component;
import reactor.core.publisher.Mono;
/**
 * 自定义服务状态变更通知配置类
 * 继承自Spring Boot Admin的抽象状态通知器,用于实现自定义的实例状态变更通知逻辑
 */
@Component
public class CustomNotifierConfig extends AbstractStatusChangeNotifier {
    /**
     * 构造函数
     * @param repository 实例存储库,用于访问和管理监控实例信息
     */
    public CustomNotifierConfig(InstanceRepository repository) {
        super(repository);
    }
    /**
     * 执行自定义通知逻辑的核心方法
     * @param event 实例事件对象,包含事件相关数据
     * @param instance 触发事件的实例对象,包含实例详细信息
     * @return Mono 表示异步操作完成的响应式返回值
     */
    @Override
    protected Mono doNotify(InstanceEvent event, Instance instance) {
        return Mono.fromRunnable(() -> {
            // 仅处理实例状态变更事件
            if (event instanceof InstanceStatusChangedEvent){
                System.out.println("实例名称:"+instance.getRegistration().getName());
                System.out.println("实例服务地址:"+instance.getRegistration().getServiceUrl());
                // 解析并处理状态变更信息
                String status = ((InstanceStatusChangedEvent) event).getStatusInfo().getStatus();
                // 根据状态值输出对应的处理逻辑
                switch (status){
                    case "DOWN":
                        System.out.println("健康检查没通过!");
                        break;
                    case "OFFLINE":
                        //发送短信 邮件给管理员
                        System.out.println("服务离线!");
                        break;
                    case "UP":
                        System.out.println("服务上线!");
                        break;
                    case "UNKNOWN":
                        System.out.println("服务未知异常!");
                        break;
                    default:
                        System.out.println(status);
                        break;
                }
            }
        });
    }
}
2.重启monitor服务后,关闭order服务,查看monitor控制台打印
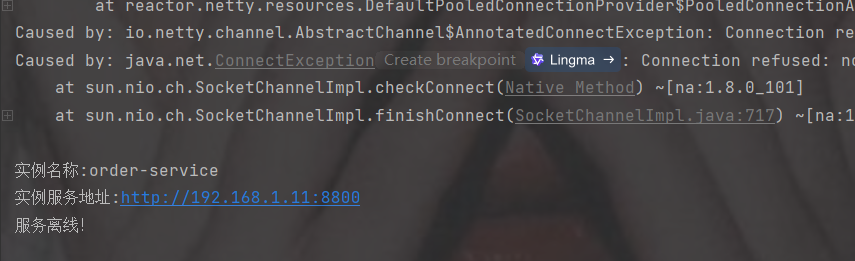
12.4 添加邮件预警
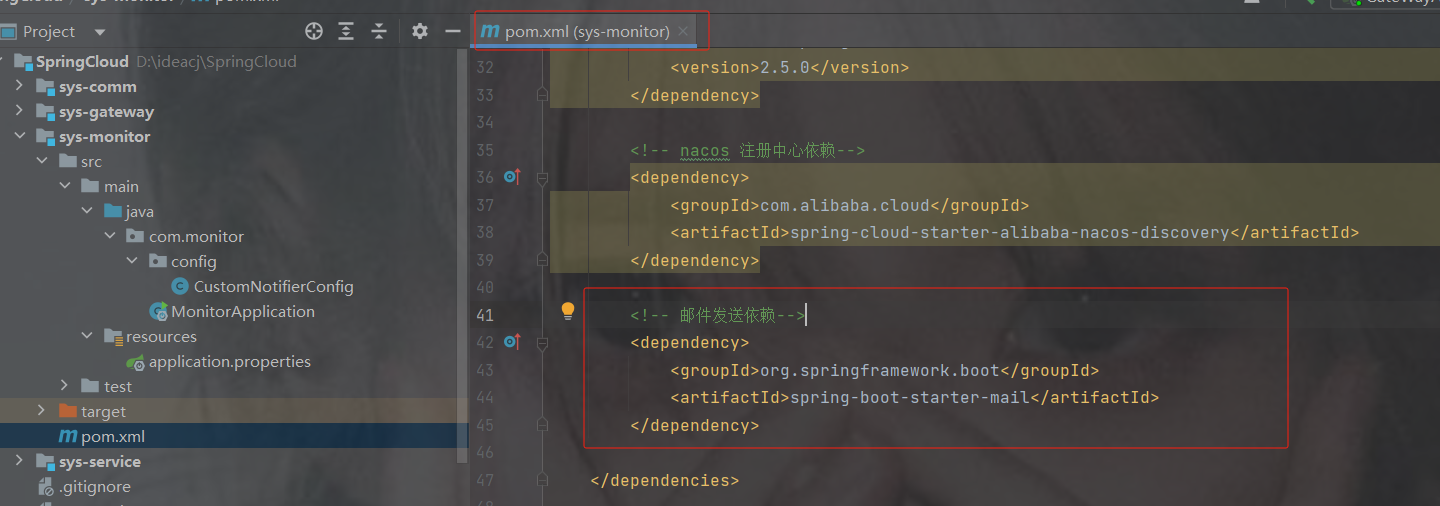
1.依赖
    org.springframework.boot
    spring-boot-starter-mail
2.配置
spring.mail.host=smtp.qq.com
spring.mail.port=465
#邮箱账号
spring.mail.username=123xxxx@qq.com
# 配置申请到的授权码
spring.mail.password=mguzxrqhiaabgccd
spring.mail.protocol=smtp
spring.mail.properties.mail.smtp.ssl.enable=true
spring.mail.properties.mail.smtp.auth=true
spring.mail.properties.mail.smtp.ssl.trust=*
spring.mail.properties.mail.smtp.ssl.checkserveridentity=false
3.修改代码
package com.monitor.config;
import de.codecentric.boot.admin.server.domain.entities.Instance;
import de.codecentric.boot.admin.server.domain.entities.InstanceRepository;
import de.codecentric.boot.admin.server.domain.events.InstanceEvent;
import de.codecentric.boot.admin.server.domain.events.InstanceStatusChangedEvent;
import de.codecentric.boot.admin.server.notify.AbstractStatusChangeNotifier;
import org.apache.http.client.utils.DateUtils;
import org.springframework.mail.MailAuthenticationException;
import org.springframework.mail.MailSendException;
import org.springframework.stereotype.Component;
import reactor.core.publisher.Mono;
import org.springframework.mail.SimpleMailMessage;
import org.springframework.mail.javamail.JavaMailSender;
import java.time.Instant;
import java.util.Date;
/**
 * 自定义服务状态变更通知配置类
 * 继承自Spring Boot Admin的抽象状态通知器,用于实现自定义的实例状态变更通知逻辑
 */
@Component
public class CustomNotifierConfig extends AbstractStatusChangeNotifier {
    // 新增邮件发送器
    private final JavaMailSender javaMailSender;
    /**
     * 构造函数
     * @param repository 实例存储库,用于访问和管理监控实例信息
     */
    public CustomNotifierConfig(InstanceRepository repository,JavaMailSender javaMailSender) {
        super(repository);
        this.javaMailSender = javaMailSender;
    }
    /**
     * 执行自定义通知逻辑的核心方法
     * @param event 实例事件对象,包含事件相关数据
     * @param instance 触发事件的实例对象,包含实例详细信息
     * @return Mono 表示异步操作完成的响应式返回值
     */
    @Override
    protected Mono doNotify(InstanceEvent event, Instance instance) {
        return Mono.fromRunnable(() -> {
            // 仅处理实例状态变更事件
            if (event instanceof InstanceStatusChangedEvent){
                System.out.println("实例名称:"+instance.getRegistration().getName());
                System.out.println("实例服务地址:"+instance.getRegistration().getServiceUrl());
                // 解析并处理状态变更信息
                String status = ((InstanceStatusChangedEvent) event).getStatusInfo().getStatus();
                // 根据状态值输出对应的处理逻辑
                switch (status){
                    case "DOWN":
                        System.out.println("健康检查没通过!");
                        break;
                    case "OFFLINE":
                        try {
                            //发送短信 邮件给管理员
                            SimpleMailMessage message = new SimpleMailMessage();
                            /*
                             * 设置消息的发送方和接收方邮箱地址
                             * 说明:
                             * - 使用QQ邮箱服务进行消息发送
                             * - 当前设置为发件人与收件人使用同一测试邮箱
                             * - 生产环境需将setTo()修改为实际收件地址
                             */
                            message.setFrom("xxx@qq.com");
                            message.setTo("xxx@qq.com");
                            // 构建告警邮件主题,包含服务名称标识
                            message.setSubject("服务离线告警 - " + instance.getRegistration().getName());
                            // 构造告警邮件正文,包含关键信息: // 1. 服务地址 2. 状态变更类型 3. 精确到秒的时间戳
                            message.setText("服务地址:" + instance.getRegistration().getServiceUrl() + "\n状态变更:OFFLINE\n时间:" + DateUtils.formatDate(new Date(), "yyyy-MM-dd HH:mm:ss"));
                            // 触发邮件发送操作
                            javaMailSender.send(message);
                        }catch (MailAuthenticationException e){
                            System.err.println("认证失败!原因:" + e.getMessage());
                            e.printStackTrace();
                        }catch (MailSendException e) {
                            System.err.println("发送失败!原因:" + e.getMessage());
                            e.printStackTrace();
                        }
                        System.out.println("服务离线!");
                        break;
                    case "UP":
                        System.out.println("服务上线!");
                        break;
                    case "UNKNOWN":
                        System.out.println("服务未知异常!");
                        break;
                    default:
                        System.out.println(status);
                        break;
                }
            }
        });
    }
}
13. 分布式事务组件 seata
13.1 事务
1. 本地事务
本地事务,也就是传统的单机事务。在传统数据库事务中,必须要满足四个原则:
A:原子性(Atomicity),一个事务中的所有操作,要么全部完成,要么全部不完成
C:一致性(Consistency),在一个事务执行之前和执行之后数据库都必须处于一致性状态
I:隔离性(Isolation),在并发环境中,当不同的事务同时操作相同的数据时,事务之间互不影响
D:持久性(Durability),指的是只要事务成功结束,它对数据库所做的更新就必须永久的保存下来
数据库事务在实现时会将一次事务涉及的所有操作全部纳入到一个不可分割的执行单元,该执行单 元中的所有操作要么都成功,要么都失败,只要其中任一操作执行失败,都将导致整个事务的回滚
2. 什么是分布式事务
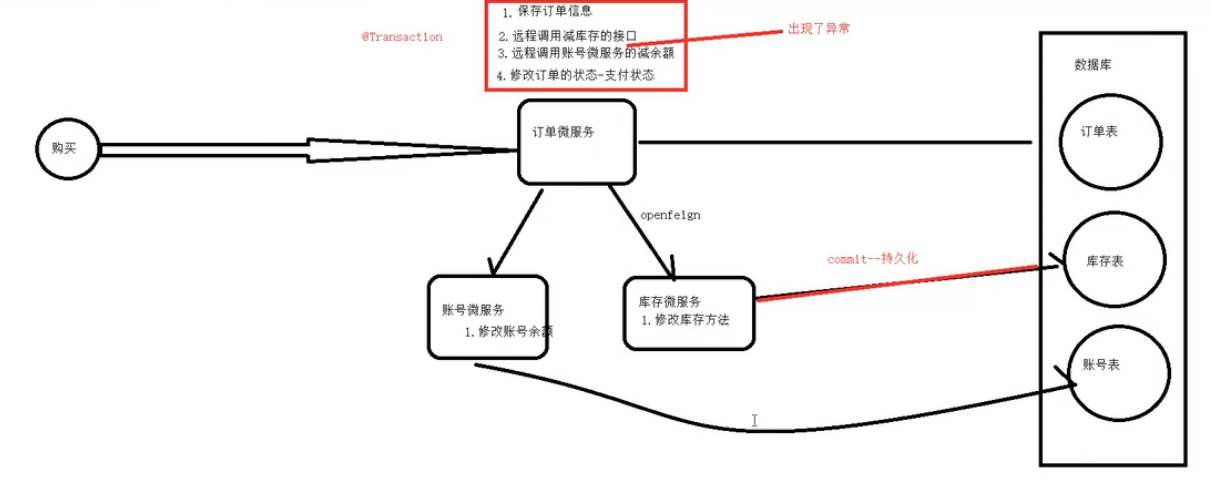
分布式事务,一般使用在微服务架构上,就是指不是在单个服务或单个数据库架构下,产生的事务,例如:
- 跨数据源的分布式事务
- 跨服务的分布式事务
以及上面两种情况的综合
在数据库水平拆分、服务垂直拆分之后,一个业务操作通常要跨多个数据库、服务才能完成。例如电商行业中比较常见的下单付款案例,包括下面几个行为:
zs 买了一瓶玻璃水
- 创建新订单
- 扣减商品库存
- 从用户账户余额扣除金额
成上面的操作可能需要访问三个不同的微服务和三个不同的数据库
订单的创建、库存的扣减、账户扣款在每一个服务和数据库内是一个本地事务,可以保证ACID原则。
但是当我们把三件事情看做一个"业务",要满足保证“业务”的原子性,要么所有操作全部成功,要么全部失败,不允许出现部分成功部分失败的现象,这就是分布式系统下的事务了。
此时ACID难以满足,这是分布式事务要解决的问题
3. 演示分布式事务的问题
1.表结构
订单
SET NAMES utf8mb4;
SET FOREIGN_KEY_CHECKS = 0;
-- ----------------------------
-- Table structure for t_order
-- ----------------------------
DROP TABLE IF EXISTS `t_order`;
CREATE TABLE `t_order`  (
  `oid` bigint(20) NOT NULL COMMENT '订单id',
  `pid` bigint(20) NULL DEFAULT NULL COMMENT '商品id',
  `p_name` varchar(255) CHARACTER SET utf8mb4 COLLATE utf8mb4_general_ci NULL DEFAULT NULL COMMENT '商品名称',
  `number` int(11) NULL DEFAULT NULL COMMENT '购买的商品数量',
  `price` decimal(10, 2) NULL DEFAULT NULL COMMENT '价格',
  `user_id` bigint(20) NULL DEFAULT NULL COMMENT '用户id',
  `status` bigint(1) NULL DEFAULT NULL COMMENT '0未支付,1支付',
  PRIMARY KEY (`oid`) USING BTREE
) ENGINE = InnoDB CHARACTER SET = utf8mb4 COLLATE = utf8mb4_general_ci ROW_FORMAT = DYNAMIC;
-- ----------------------------
-- Records of t_order
-- ----------------------------
SET FOREIGN_KEY_CHECKS = 1;

商品
SET NAMES utf8mb4;
SET FOREIGN_KEY_CHECKS = 0;
-- ----------------------------
-- Table structure for product
-- ----------------------------
DROP TABLE IF EXISTS `product`;
CREATE TABLE `product`  (
  `id` bigint(20) NOT NULL AUTO_INCREMENT COMMENT '商品id',
  `p_name` varchar(64) CHARACTER SET utf8mb4 COLLATE utf8mb4_general_ci NULL DEFAULT NULL COMMENT '商品名称',
  `price` decimal(10, 2) NULL DEFAULT NULL COMMENT '商品价格',
  `inventory` int(11) NULL DEFAULT NULL COMMENT '库存',
  PRIMARY KEY (`id`) USING BTREE
) ENGINE = InnoDB AUTO_INCREMENT = 3 CHARACTER SET = utf8mb4 COLLATE = utf8mb4_general_ci ROW_FORMAT = DYNAMIC;
-- ----------------------------
-- Records of product
-- ----------------------------
INSERT INTO `product` VALUES (1, '大乐键', 20.60, 100);
INSERT INTO `product` VALUES (2, '我的发', 99.90, 100);
SET FOREIGN_KEY_CHECKS = 1;

账户
SET NAMES utf8mb4;
SET FOREIGN_KEY_CHECKS = 0;
-- ----------------------------
-- Table structure for t_account
-- ----------------------------
DROP TABLE IF EXISTS `t_account`;
CREATE TABLE `t_account`  (
  `id` bigint(20) NOT NULL COMMENT '账户id',
  `user_id` bigint(20) NULL DEFAULT NULL COMMENT '用户id',
  `total_money` decimal(10, 2) NULL DEFAULT NULL COMMENT '总金额',
  `used_money` decimal(10, 2) NULL DEFAULT NULL COMMENT '使用金额',
  `residue_money` decimal(10, 2) NULL DEFAULT NULL COMMENT '剩余金额',
  PRIMARY KEY (`id`) USING BTREE
) ENGINE = InnoDB CHARACTER SET = utf8mb4 COLLATE = utf8mb4_general_ci ROW_FORMAT = Dynamic;
-- ----------------------------
-- Records of t_account
-- ----------------------------
SET FOREIGN_KEY_CHECKS = 1;

2.代码演示
正常效果
业务代码
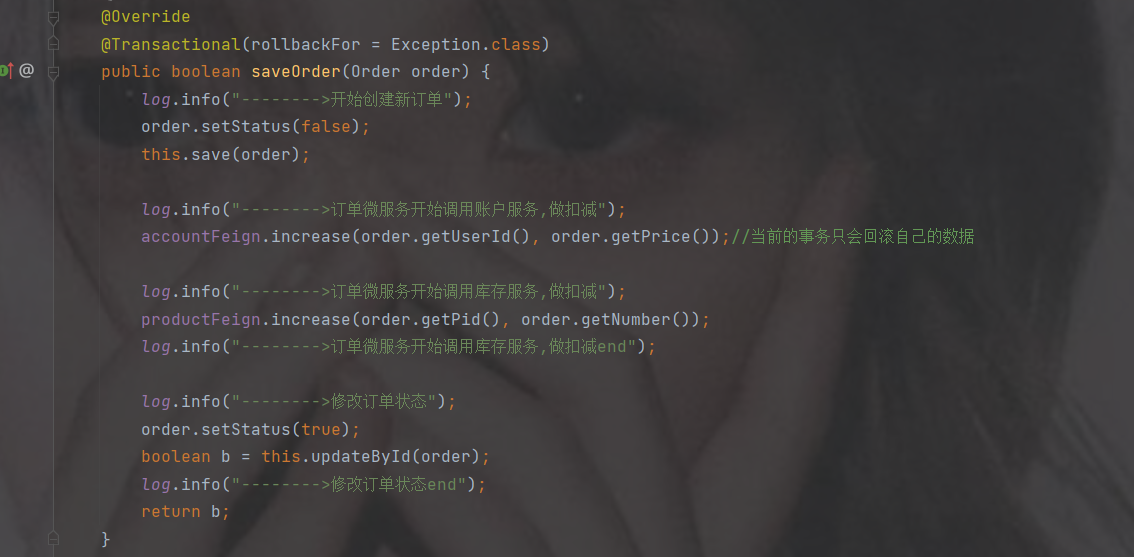
初始表数据
订单
商品
账户


访问接口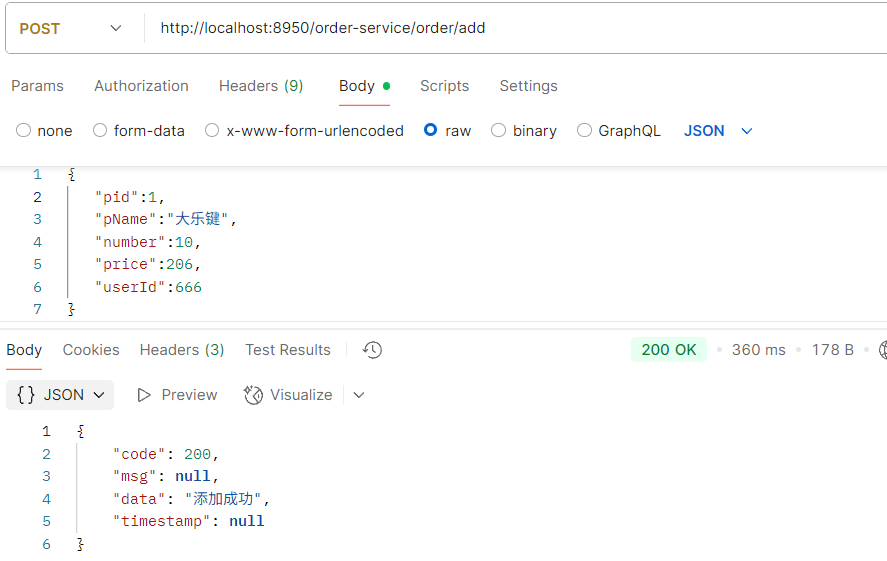
订单添加了订单记录
商品扣了库存
账户也减少了金额


异常效果
加个异常,正常情况下订单不会增加,账户的钱也不会扣,库存也不会减少
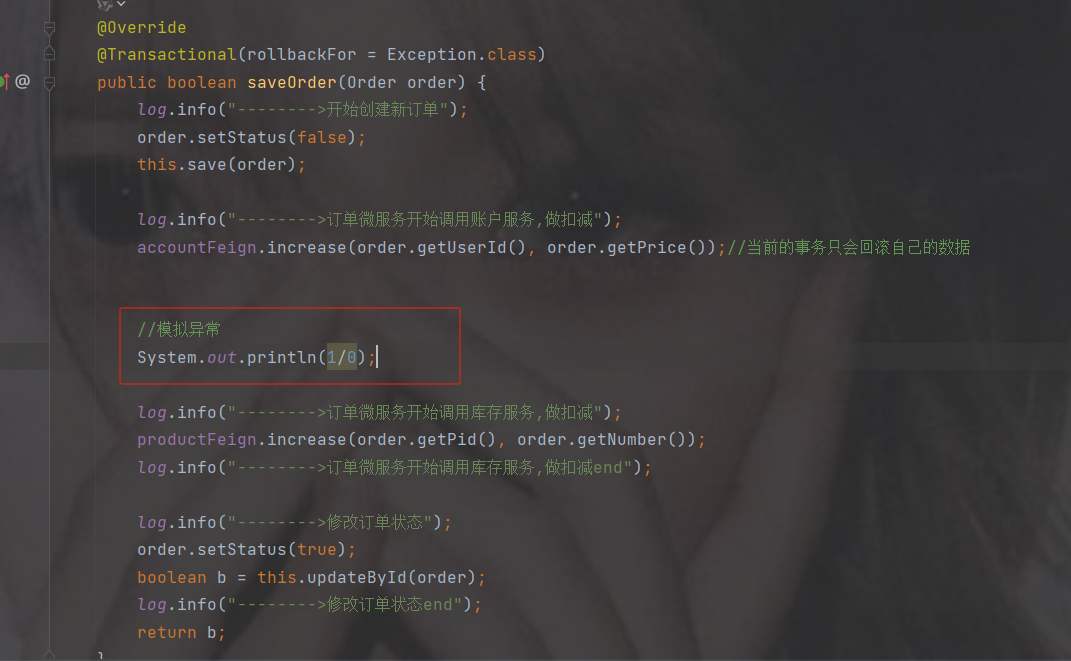
再次访问订单接口下单
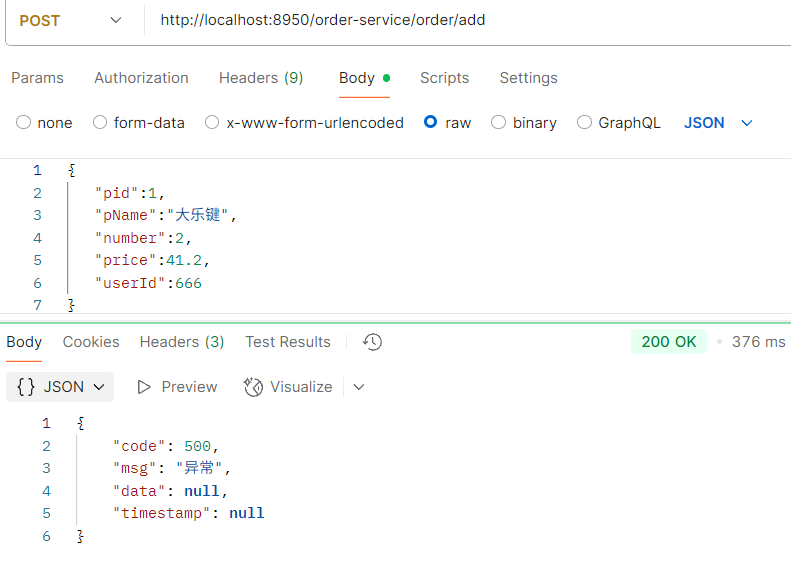
订单没有增加
库存没有减少
账户钱出现异常扣了

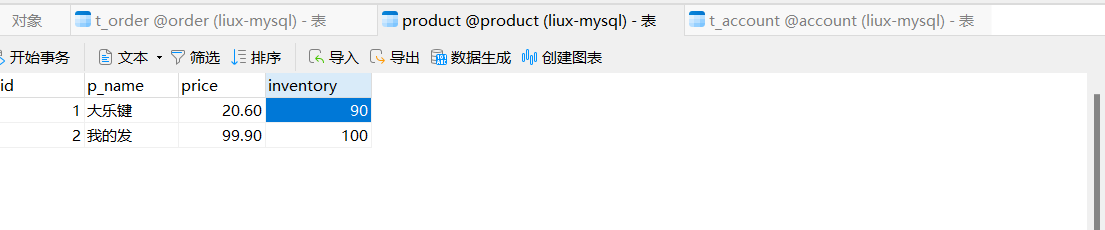
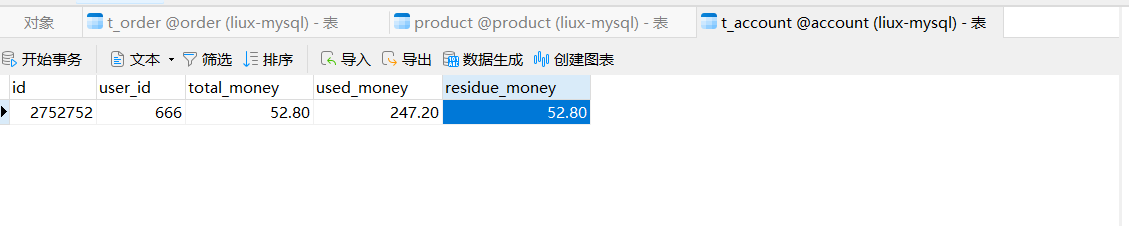
原因
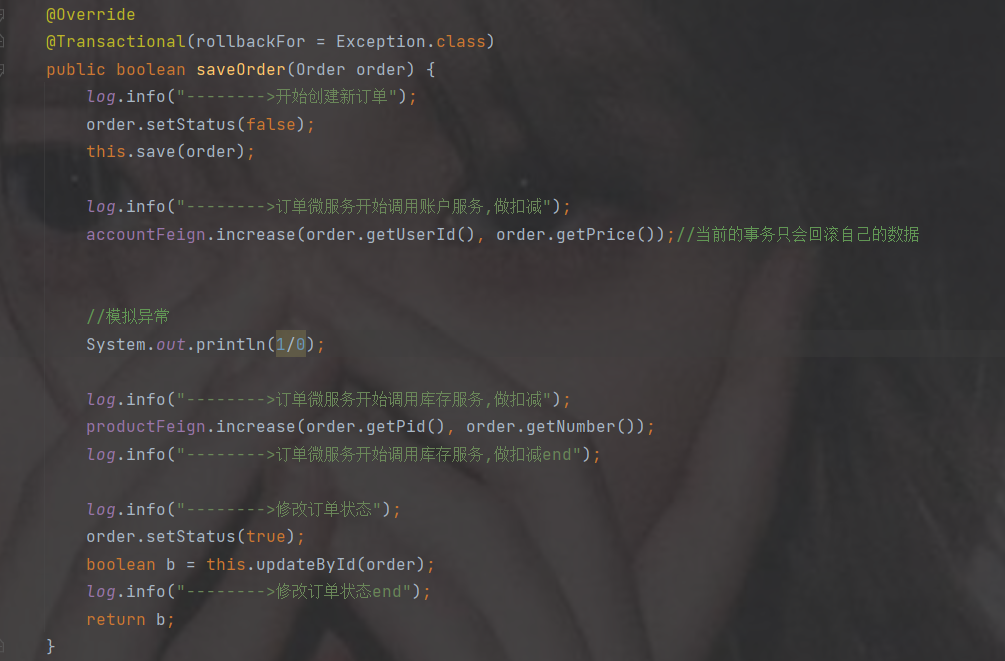
虽然加了事务注解@Transactional事务注解,但是它属于本地事务,服务是在order服务,只能回滚订单的操作,出现异常回滚了添加订单的操作,所以添加订单没有添加进去
而扣钱不是同一个服务也不是同一个数据库,所以不会回滚
没有扣库存和修改订单状态是因为代码异常没走到下面
13.2 理论
1. CAP
1998年,加州大学的计算机科学家 Eric Brewer 提出,分布式系统有三个指标。
Consistency(一致性)
Availability(可用性)
Partition tolerance (分区容错性)
这三个指标不可能同时做到
一致性:
Consistency(一致性):用户访问分布式系统中的任意节点,得到的数据必须一致。
Availability (可用性):用户访问集群中的任意健康节点,必须能得到响应,而不是超时或拒绝Partition(分区):因为网络故障或其它原因导致分布式系统中的部分节点与其它节点失去连接,形成独立分区。
在分布式系统中,系统间的网络不能100%保证健康,一定会有故障的时候,而服务有必须对外保证服务。因此Partition Tolerance不可避免。
当节点接收到新的数据变更时,就会出现问题了:
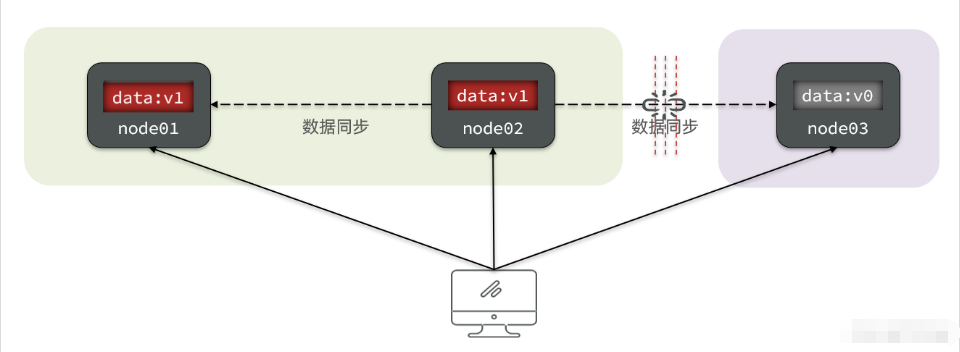
如果此时要保证**一致性**,就必须等待网络恢复,完成数据同步后,整个集群才对外提供服务,服务处于阻塞状态,不可用。
如果此时要保证**可用性**,就不能等待网络恢复,那node01、node02与node03之间就会出现数据不一致。
也就是说,在P一定会出现的情况下,A和C之间只能实现一个。
2. BASE理论
BASE理论是对CAP的一种解决思路,包含三个思想:
Basically Available(基本可用):分布式系统在出现故障时,允许损失部分可用性,即保证核心可用。
Soft State(软状态):在一定时间内,允许出现中间状态,比如临时的不一致状态。
Eventually Consistent(最终一致性):虽然无法保证强一致性,但是在软状态结束后,最终达到数据一致。
3. 解决分布式事务的思路
分布式事务最大的问题是各个子事务的一致性问题,因此可以借鉴CAP定理和BASE理论,有两种解决思路:
AP模式:各子事务分别执行和提交,允许出现结果不一致,然后采用弥补措施恢复数据即可,实现最终一致。
CP模式:各个子事务执行后互相等待,同时提交,同时回滚,达成强一致。但事务等待过程中,处于弱可用状态。
但不管是哪一种模式,都需要在子系统事务之间互相通讯,协调事务状态,也就是需要一个事务协调者(TC):
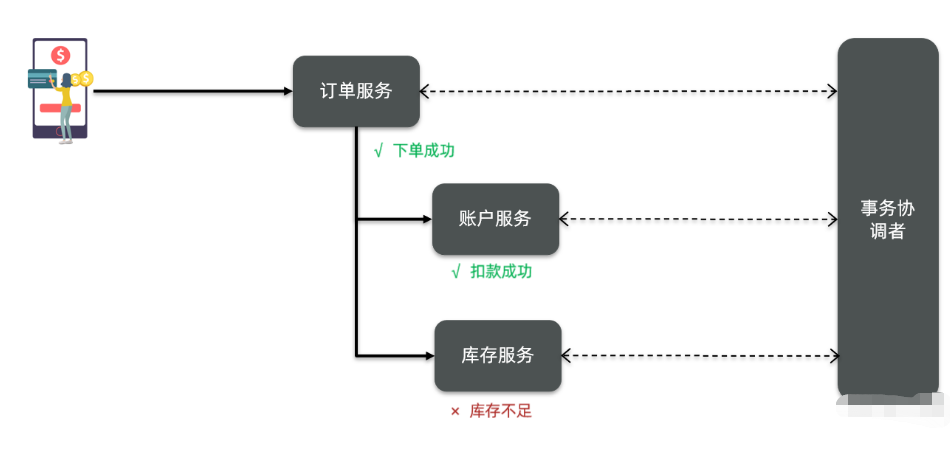
这里的子系统事务,称为分支事务;有关联的各个分支事务在一起称为全局事务。
13.3 初识Seata
官网:Apache Seata
Seata 是一款开源的分布式事务解决方案,致力于在微服务架构下提供高性能和简单易用的分布式事务服务。在 Seata 开源之前,其内部版本在阿里系内部一直扮演着应用架构层数据一致性的中间件角色,帮助经济体平稳的度过历年的双11,对上层业务进行了有力的技术支撑。经过多年沉淀与积累,其商业化产品先后在阿里云、金融云上售卖。2019.1 为了打造更加完善的技术生态和普惠技术成果,Seata 正式宣布对外开源,未来 Seata 将以社区共建的形式帮助用户快速落地分布式事务解决方案。
1. Seata的架构
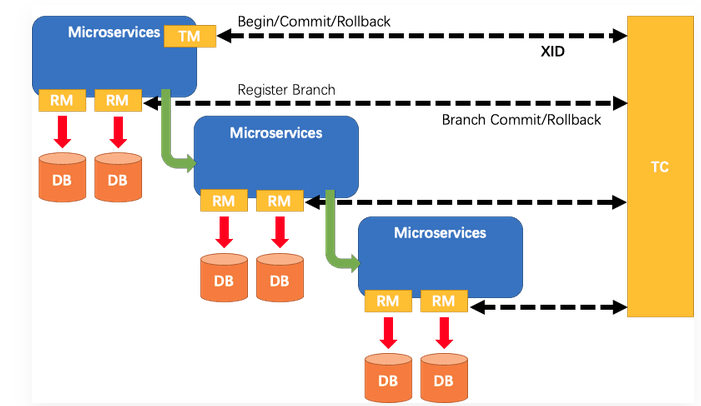
Seata的执行流程如下:
- A服务【订单微服务】的TM[事务发起者]向TC[seata服务端]申请开启一个全局事务,TC就会创建一个全局事务并返回一个唯一的XID
- A服务开始远程调用B服务【账户微服务】,此时XID会在微服务的调用链上传播
- B服务的RM向TC注册分支事务,并将其纳入XID对应的全局事务的管辖
- B服务执行分支事务,向数据库做操作
- 全局事务调用链处理完毕,TM根据有无异常向TC发起全局事务的提交或者回滚
- TC协调其管辖之下的所有分支事务,决定是否回滚
简单来说
TC: seata服务器--用来统一协调管理分支事务
TM: 事务的发起者---比如订单服务加上分布式事务注解
RM: 分支事务---商品服务或者
xid: 全局事务的标识符详细
Seata事务管理中有三个重要的角色:
TC (Transaction Coordinator) -事务协调者:维护全局和分支事务的状态,协调全局事务提交或回滚。
TM (Transaction Manager) -事务管理器:定义全局事务的范围、开始全局事务、提交或回滚全局事务。
RM (Resource Manager) -资源管理器:管理分支事务处理的资源,与TC交谈以注册分支事务和报告分支事务的状态,并驱动分支事务提交或回滚。
Seata基于上述架构提供了几种不同的分布式事务解决方案:
- XA模式:强一致性分阶段事务模式,牺牲了一定的可用性,无业务侵入
- TCC模式:最终一致的分阶段事务模式,有业务侵入
TRY 业务
CONFIRM 提交
CANCEL 回滚
- AT模式:最终一致的分阶段事务模式,无业务侵入,也是Seata的默认模式
- SAGA模式:长事务模式,有业务侵入
无论哪种方案,都离不开TC,也就是事务的协调者
2. 搭建seata服务端(TC)
Seata-Server版本历史 | Apache Seata
注意seata要和springcloud有组件版本关系对应,不能使用任意版本
高版本参考如下分布式事务解决方案及Seata 1.6.1案例_seata1.6.1-CSDN博客文章浏览阅读2.4k次,点赞4次,收藏15次。2PC/3PC:依赖于数据库,能够很好的提供强一致性和强事务性,但延迟比较高,比较适合传统的单体应用,在同一个方法中存在跨库操作的情况,不适合高并发和高性能要求的场景。TCC:适用于执行时间确定且较短,实时性要求高,对数据一致性要求高,比如互联网金融企业最核心的三个服务:交易、支付、账务。本地消息表/MQ 事务:适用于事务中参与方支持操作幂等,对一致性要求不高,业务上能容忍数据不一致到一个人工检查周期,事务涉及的参与方、参与环节较少,业务上有对账/校验系统兜底。_seata1.6.1https://blog.csdn.net/qq_42665745/article/details/130805466
1.下载

2.解压
在非中文目录解压缩这个zip包,其目录结构如下:
![[外链图片转存失败,源站可能有防盗链机制,建议将图片保存下来直接上传(img-EXT8AgCJ-1667042131105)(assets/image-20210622202515014.png)]](https://i-blog.csdnimg.cn/blog_migrate/dbcc8871ed0343b21425d0d1cc89cd31.png)
3.配置seater-server
修改conf目录下的registry.conf文件
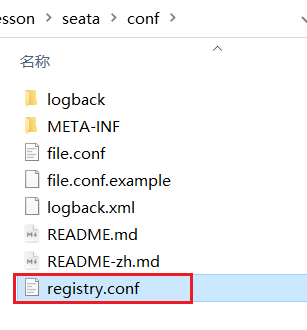
设置seata-server的注册中心的地址和配置中心的地址
因为我们的seata服务端未来也是集群,方便其他微服务访问该集群。
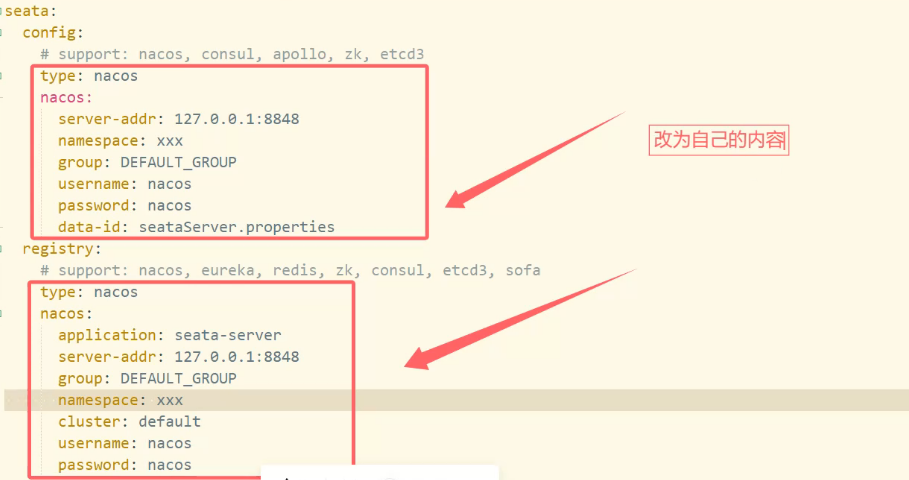
registry {
  # file 、nacos 、eureka、redis、zk、consul、etcd3、sofa
  #tc服务的注册中心类,这里选择nacos,也可以是eureka、zookeeper等,默认是file
  type = "nacos"
  nacos {
    # seata tc 服务注册到 nacos的服务名称,可以自定义
    application = "seata-server"
	#nacos注册中心地址
    serverAddr = "http://192.168.191.200:81"
	#分组名称
    group = "SEATA_GROUP"
	#命名空间
    namespace = "3c982136-78ea-4cee-8605-10485e324a1d"
	#服务分组标识
    cluster = "SH"
	#nacos用户名
    username = "nacos"
	#nacos密码
    password = "nacos"
  }
}
#配置中心使用的配置
config {
  # file、nacos 、apollo、zk、consul、etcd3
  type = "nacos"
  nacos {
    serverAddr = "http://192.168.191.200:81"
    namespace = "3c982136-78ea-4cee-8605-10485e324a1d"
    group = "SEATA_GROUP"
    username = "nacos"
    password = "nacos"
	  #配置中心使用配置的Data id
    dataId = "seataServer.properties"
  }
}
4.在nacos添加配置
4.1 新建namespace
新建namespace命名空间,需与上述的namespace中配置一致
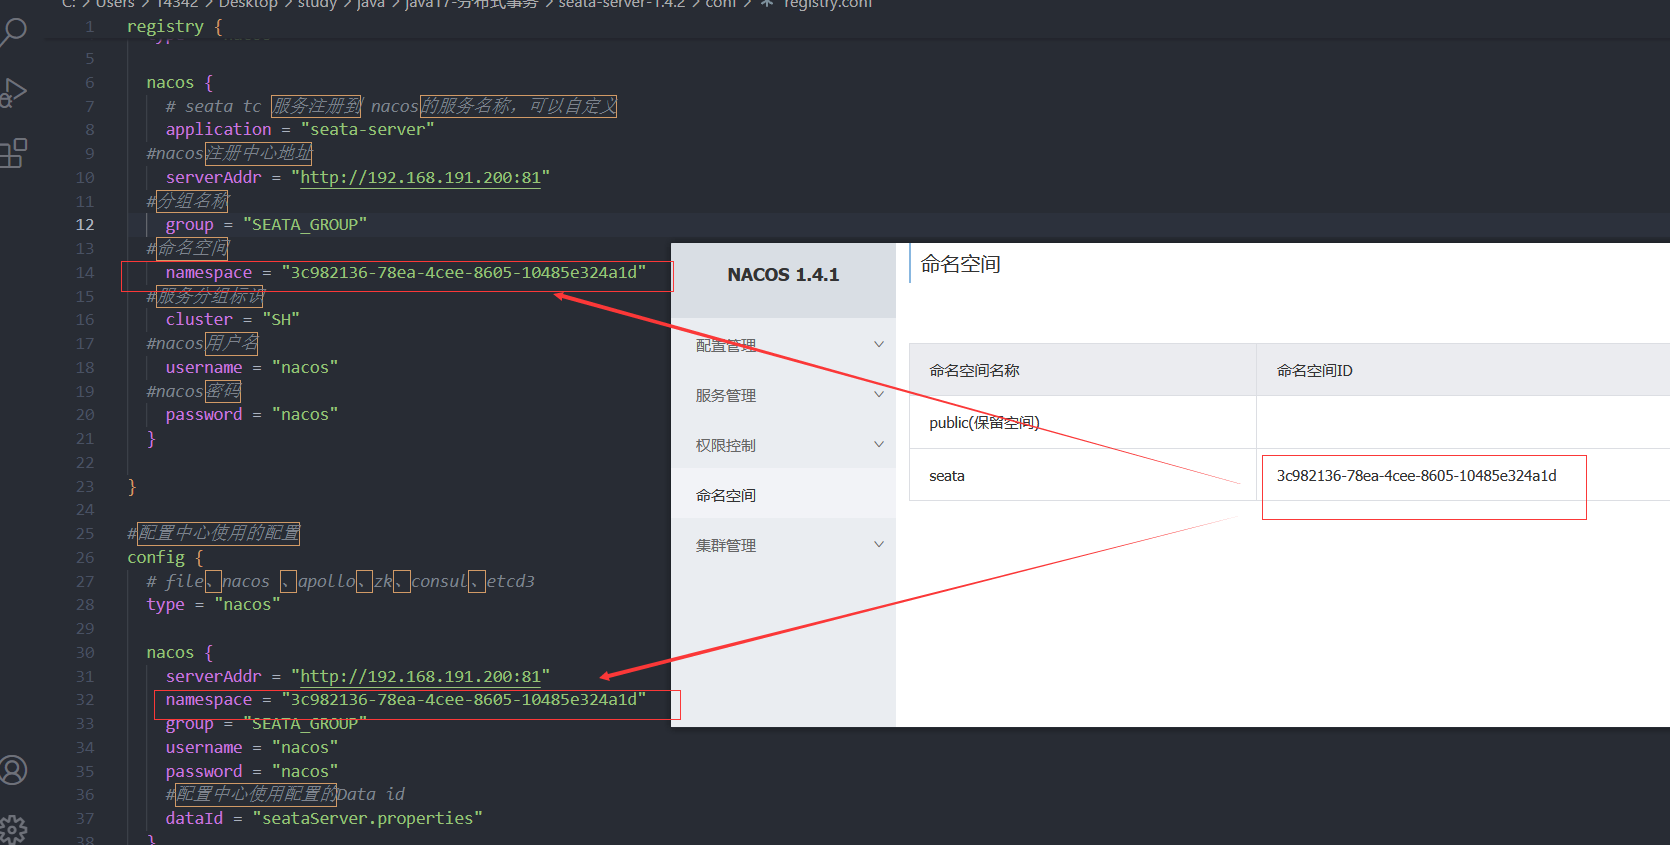
4.2 新建seata的seataServer.properties配置文件
记得切换到seata命名空间

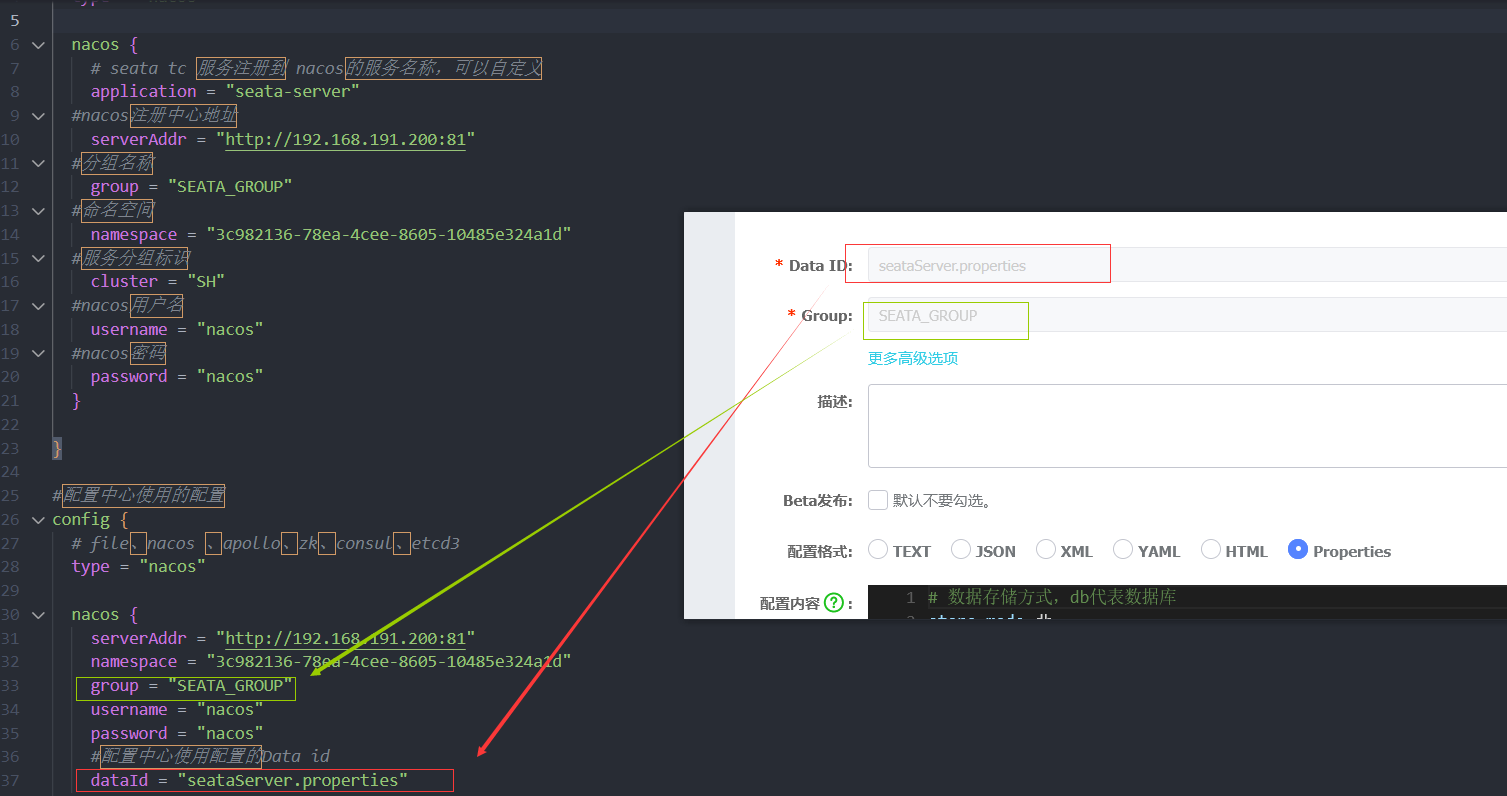
配置内容如下
# 数据存储方式,db代表数据库
store.mode=db
store.db.datasource=druid
store.db.dbType=mysql
store.db.driverClassName=com.mysql.cj.jdbc.Driver
store.db.url=jdbc:mysql://127.0.0.1:3306/seata?useUnicode=true&rewriteBatchedStatements=true
store.db.user=root
store.db.password=qingfengzilai.
store.db.minConn=5
store.db.maxConn=30
store.db.globalTable=global_table
store.db.branchTable=branch_table
store.db.queryLimit=100
store.db.lockTable=lock_table
store.db.maxWait=5000
# 事务、日志等配置
server.recovery.committingRetryPeriod=1000
server.recovery.asynCommittingRetryPeriod=1000
server.recovery.rollbackingRetryPeriod=1000
server.recovery.timeoutRetryPeriod=1000
server.maxCommitRetryTimeout=-1
server.maxRollbackRetryTimeout=-1
server.rollbackRetryTimeoutUnlockEnable=false
server.undo.logSaveDays=7
server.undo.logDeletePeriod=86400000
# 客户端与服务端传输方式
transport.serialization=seata
transport.compressor=none
# 关闭metrics功能,提高性能
metrics.enabled=false
metrics.registryType=compact
metrics.exporterList=prometheus
metrics.exporterPrometheusPort=9898
其中的数据库地址、用户名、密码都需要修改成你自己的数据库信息。
5.创建数据库表
5.1 新建配置表
新建一个名为seata的数据库
在seata数据库中新建查询,执行如下sql
特别注意:tc服务在管理分布式事务时,需要记录事务相关数据到数据库中,你需要提前创建好这些表。
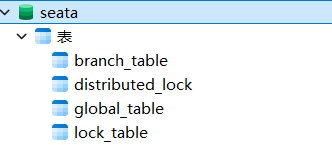
-- -------------------------------- The script used when storeMode is 'db' --------------------------------
-- the table to store GlobalSession data
CREATE TABLE IF NOT EXISTS `global_table`
(
    `xid`                       VARCHAR(128) NOT NULL,
    `transaction_id`            BIGINT,
    `status`                    TINYINT      NOT NULL,
    `application_id`            VARCHAR(32),
    `transaction_service_group` VARCHAR(32),
    `transaction_name`          VARCHAR(128),
    `timeout`                   INT,
    `begin_time`                BIGINT,
    `application_data`          VARCHAR(2000),
    `gmt_create`                DATETIME,
    `gmt_modified`              DATETIME,
    PRIMARY KEY (`xid`),
    KEY `idx_status_gmt_modified` (`status` , `gmt_modified`),
    KEY `idx_transaction_id` (`transaction_id`)
) ENGINE = InnoDB
  DEFAULT CHARSET = utf8mb4;
-- the table to store BranchSession data
CREATE TABLE IF NOT EXISTS `branch_table`
(
    `branch_id`         BIGINT       NOT NULL,
    `xid`               VARCHAR(128) NOT NULL,
    `transaction_id`    BIGINT,
    `resource_group_id` VARCHAR(32),
    `resource_id`       VARCHAR(256),
    `branch_type`       VARCHAR(8),
    `status`            TINYINT,
    `client_id`         VARCHAR(64),
    `application_data`  VARCHAR(2000),
    `gmt_create`        DATETIME(6),
    `gmt_modified`      DATETIME(6),
    PRIMARY KEY (`branch_id`),
    KEY `idx_xid` (`xid`)
) ENGINE = InnoDB
  DEFAULT CHARSET = utf8mb4;
-- the table to store lock data
CREATE TABLE IF NOT EXISTS `lock_table`
(
    `row_key`        VARCHAR(128) NOT NULL,
    `xid`            VARCHAR(128),
    `transaction_id` BIGINT,
    `branch_id`      BIGINT       NOT NULL,
    `resource_id`    VARCHAR(256),
    `table_name`     VARCHAR(32),
    `pk`             VARCHAR(36),
    `status`         TINYINT      NOT NULL DEFAULT '0' COMMENT '0:locked ,1:rollbacking',
    `gmt_create`     DATETIME,
    `gmt_modified`   DATETIME,
    PRIMARY KEY (`row_key`),
    KEY `idx_status` (`status`),
    KEY `idx_branch_id` (`branch_id`),
    KEY `idx_xid` (`xid`)
) ENGINE = InnoDB
  DEFAULT CHARSET = utf8mb4;
CREATE TABLE IF NOT EXISTS `distributed_lock`
(
    `lock_key`       CHAR(20) NOT NULL,
    `lock_value`     VARCHAR(20) NOT NULL,
    `expire`         BIGINT,
    primary key (`lock_key`)
) ENGINE = InnoDB
  DEFAULT CHARSET = utf8mb4;
INSERT INTO `distributed_lock` (lock_key, lock_value, expire) VALUES ('AsyncCommitting', ' ', 0);
INSERT INTO `distributed_lock` (lock_key, lock_value, expire) VALUES ('RetryCommitting', ' ', 0);
INSERT INTO `distributed_lock` (lock_key, lock_value, expire) VALUES ('RetryRollbacking', ' ', 0);
INSERT INTO `distributed_lock` (lock_key, lock_value, expire) VALUES ('TxTimeoutCheck', ' ', 0);
5.2 业务数据库添加undo_log表
-- 注意此处0.3.0+ 增加唯一索引 ux_undo_log
CREATE TABLE `undo_log` (
  `id` bigint(20) NOT NULL AUTO_INCREMENT,
  `branch_id` bigint(20) NOT NULL,
  `xid` varchar(100) NOT NULL,
  `context` varchar(128) NOT NULL,
  `rollback_info` longblob NOT NULL,
  `log_status` int(11) NOT NULL,
  `log_created` datetime NOT NULL,
  `log_modified` datetime NOT NULL,
  `ext` varchar(100) DEFAULT NULL,
  PRIMARY KEY (`id`),
  UNIQUE KEY `ux_undo_log` (`xid`,`branch_id`)
) ENGINE=InnoDB AUTO_INCREMENT=1 DEFAULT CHARSET=utf8;
6.启动TC服务
进入bin目录,运行其中的seata-server.bat即可,下面那个是liux的:
启动成功后,seata-server应该已经注册到nacos注册中心了。
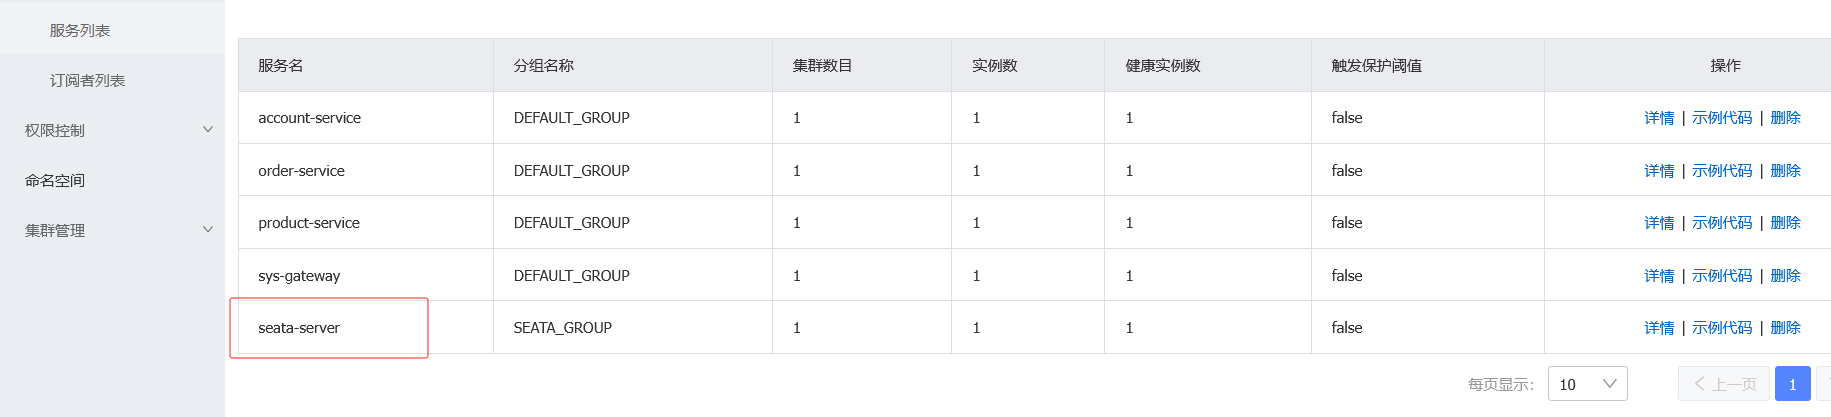
3. 微服务集成seata
1.加依赖
所有用到分布式事物的加上这个jar包,我们刚好可以加在他们的上一级sys-service的pom.xml里
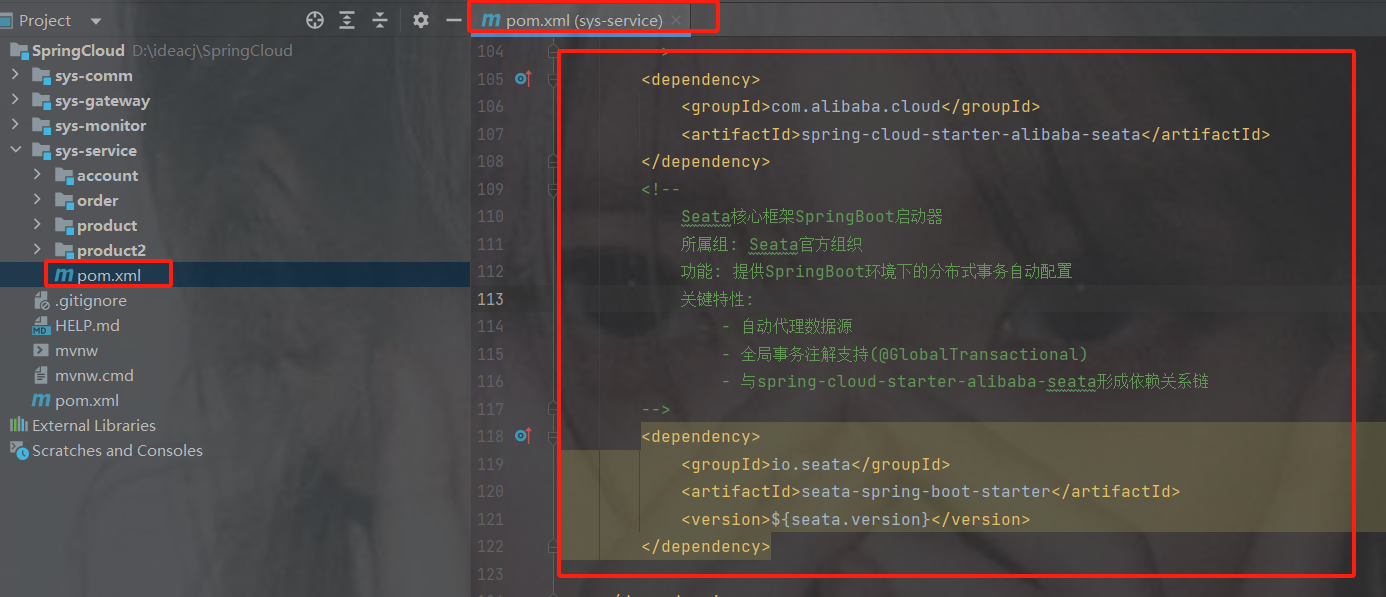
            com.alibaba.cloud
            spring-cloud-starter-alibaba-seata


            io.seata
            seata-spring-boot-starter
            ${seata.version}
2.配置TC地址
我配置在了nacos共享配置类中
没有配置在seata命名空间是因为我也用了public其他的共享配置
版本太低了不能如下图所配,
不能用全局命名空间是我已经讲了,有其他配置在用public里的
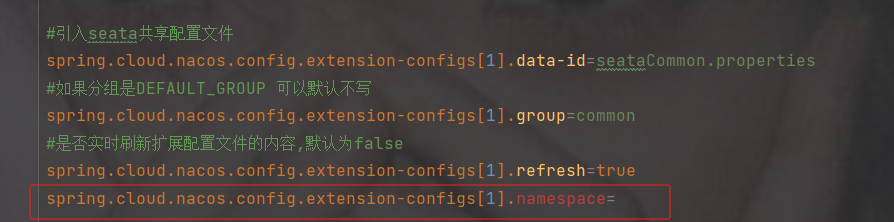
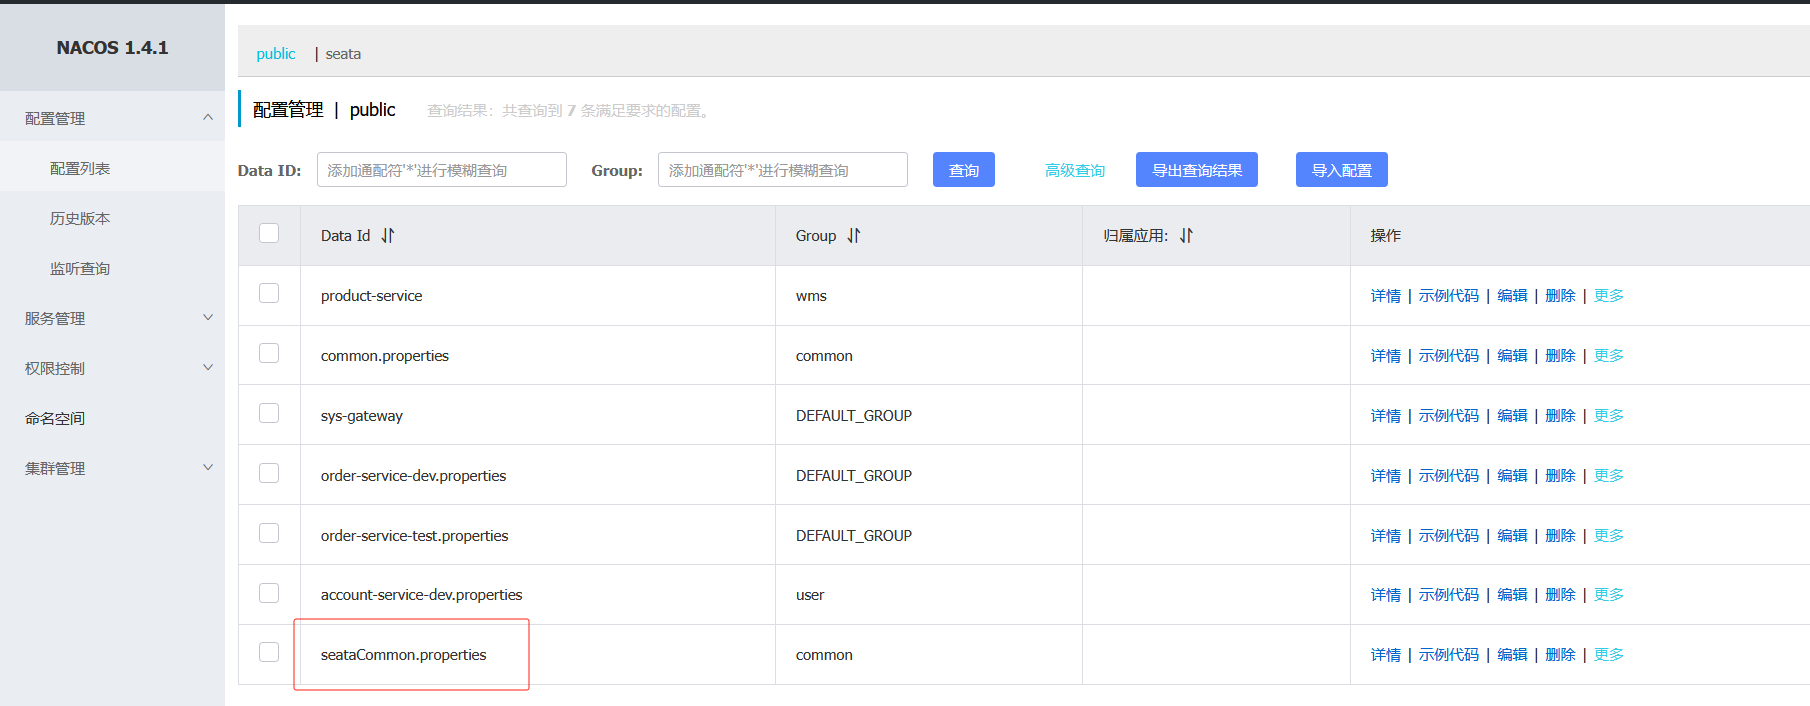
##################Seata的 TC服务注册中心的配置,微服务根据这些信息去注册中心获取tc服务地址###############
# 注册中心类型 nacos
seata.registry.type=nacos
# 注册中心地址
seata.registry.nacos.server-addr=http://192.168.191.200:8850
# 注册中心命名空间,没有就注掉下面的这行
seata.registry.nacos.namespace=3c982136-78ea-4cee-8605-10485e324a1d
# 注册中心分组,默认是DEFAULT_GROUP
seata.registry.nacos.group=SEATA_GROUP
# 服务注册到 nacos的服务名称
seata.registry.nacos.application=seata-server
# nacos 账号
seata.registry.nacos.username=nacos
# nacos 密码
seata.registry.nacos.password=nacos
#  配置Seata事务组名称,可以自定义
seata.tx-service-group=seata-demo
#  配置Seata事务组名称与微服务名称的映射关系,要与服务分组标识一致
seata.service.vgroup-mapping.seata-demo=SH
3.加注解
@GlobalTransactional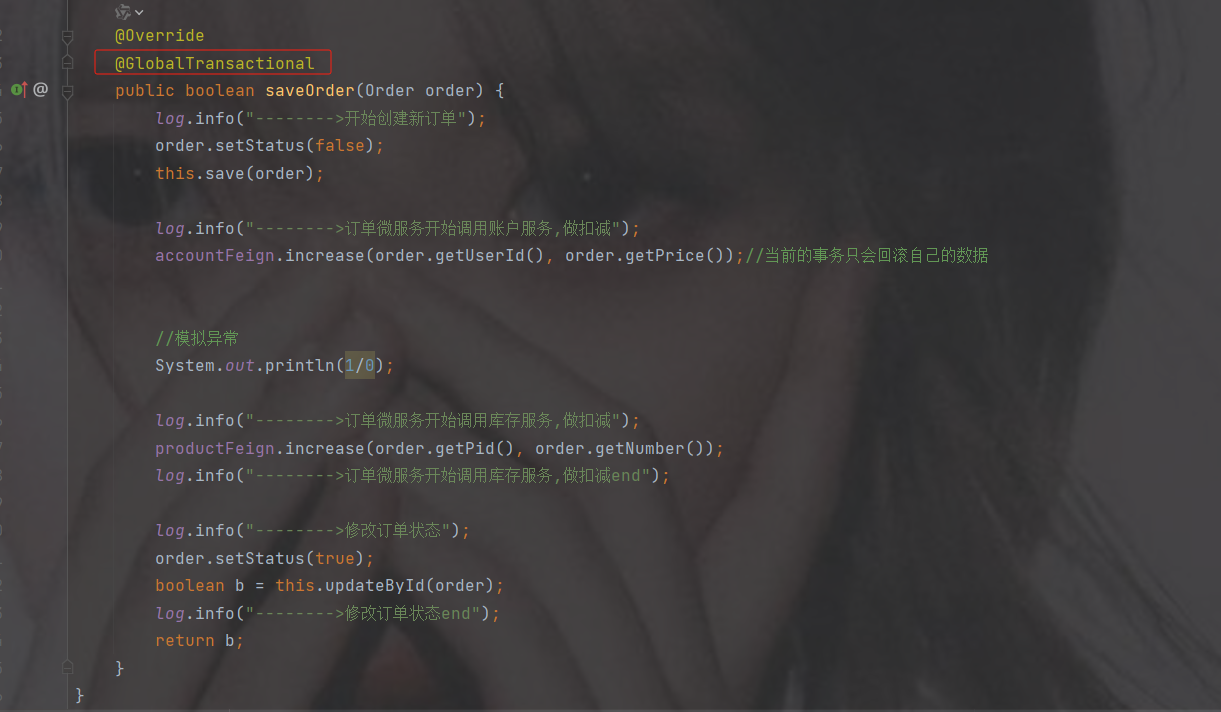
14.单点登录
https://blog.csdn.net/2301_76557773/article/details/148696641?spm=1001.2014.3001.5502

 浙公网安备 33010602011771号