虚拟环境搭建pip换源
介绍
|
1
2
3
4
5
6
7
8
|
"""1、采用国内源,加速下载模块的速度2、常用pip源: -- 豆瓣:https://pypi.douban.com/simple -- 阿里:https://mirrors.aliyun.com/pypi/simple3、加速安装的命令: -- >: pip install -i https://pypi.douban.com/simple 模块名""" |
永久配置安装源
|
1
2
3
4
5
|
"""1、文件管理器文件路径地址栏敲:%APPDATA% 回车,快速进入 C:\Users\电脑用户\AppData\Roaming 文件夹中2、新建 pip 文件夹并在文件夹中新建 pip.ini 配置文件3、新增 pip.ini 配置文件内容""" |
MacOS、Linux
|
1
2
3
4
5
6
7
8
|
"""1、在用户根目录下 ~ 下创建 .pip 隐藏文件夹,如果已经有了可以跳过 -- mkdir ~/.pip2、进入 .pip 隐藏文件夹并创建 pip.conf 配置文件 -- cd ~/.pip && touch pip.conf3、启动 Finder(访达) 按 cmd+shift+g 来的进入,输入 ~/.pip 回车进入4、新增 pip.conf 配置文件内容""" |
配置文件内容
|
1
2
3
4
5
6
7
8
|
"""[global]index-url = http://pypi.douban.com/simple[install]use-mirrors =truemirrors =http://pypi.douban.com/simple/trusted-host =pypi.douban.com""" |
优点
|
1
2
3
|
1、使不同应用开发环境相互独立2、环境升级不影响其他应用,也不会影响全局的python环境3、防止出现包管理混乱及包版本冲突 |
安装
|
1
2
3
|
# 建议使用pip3安装到python3环境下pip3 install virtualenvpip3 install virtualenvwrapper-win |
配置虚拟环境管理器工作目录
|
1
2
3
4
5
6
7
|
# 配置环境变量:# 控制面板 => 系统和安全 => 系统 => 高级系统设置 => 环境变量 => 系统变量 => 点击新建 => 填入变量名与值变量名:WORKON_HOME 变量值:自定义存放虚拟环境的绝对路径eg: WORKON_HOME: D:\Virtualenvs# 同步配置信息:# 去向Python3的安装目录 => Scripts文件夹 => virtualenvwrapper.bat => 双击 |
MacOS、Linux
安装
|
1
2
3
|
# 建议使用pip3安装到python3环境下pip3 install -i https://pypi.douban.com/simple virtualenvpip3 install -i https://pypi.douban.com/simple virtualenvwrapper |
工作文件
|
1
2
3
4
5
6
|
# 先找到virtualenvwrapper的工作文件 virtualenvwrapper.sh,该文件可以刷新自定义配置,但需要找到它# MacOS可能存在的位置 /Library/Frameworks/Python.framework/Versions/版本号文件夹/bin# Linux可能所在的位置 /usr/local/bin | ~/.local/bin | /usr/bin# 建议不管virtualenvwrapper.sh在哪个目录,保证在 /usr/local/bin 目录下有一份# 如果不在 /usr/local/bin 目录,如在 ~/.local/bin 目录,则复制一份到 /usr/local/bin 目录 -- sudo cp -rf ~/.local/bin/virtualenvwrapper.sh /usr/local/bin |
配置
|
1
2
3
4
5
6
7
|
# 在 ~/.bash_profile 完成配置,virtualenvwrapper的默认默认存放虚拟环境路径是 ~/.virtualenvs# WORKON_HOME=自定义存放虚拟环境的绝对路径,需要自定义就解注VIRTUALENVWRAPPER_PYTHON=/usr/local/bin/python3source /usr/local/bin/virtualenvwrapper.sh# 在终端让配置生效: -- source ~/.bash_profile |
使用
|
1
2
3
4
5
6
7
8
9
10
11
12
13
14
15
16
17
18
19
20
21
22
23
24
25
26
|
# 在终端工作的命令# 1、创建虚拟环境到配置的WORKON_HOME路径下# 选取默认Python环境创建虚拟环境: -- mkvirtualenv 虚拟环境名称# 基于某Python环境创建虚拟环境: -- mkvirtualenv -p python2.7 虚拟环境名称 -- mkvirtualenv -p python3.6 虚拟环境名称# 2、查看已有的虚拟环境 -- workon# 3、使用某个虚拟环境 -- workon 虚拟环境名称 # 4、进入|退出 该虚拟环境的Python环境 -- python | exit()# 5、为虚拟环境安装模块 -- pip或pip3 install 模块名# 6、退出当前虚拟环境 -- deactivate# 7、删除虚拟环境(删除当前虚拟环境要先退出) -- rmvirtualenv 虚拟环境名称 |
pycharm使用
新建项目
添加环境
使用环境
环境
|
1
2
3
4
5
6
7
8
9
10
11
|
"""为luffy项目创建一个虚拟环境>: mkvirtualenv luffy""""""按照基础环境依赖>: pip install django==2.0.7>: pip install djangorestframework>: pip install pymysql""" |
创建项目
|
1
2
3
4
5
6
7
|
"""前提:在目标目录新建luffy文件夹>: cd 建立的luffy文件夹>: django-admin startproject luffyapi开发:用pycharm打开项目,并选择提前备好的虚拟环境""" |
重构项目目录
|
1
2
3
4
5
6
7
8
9
10
11
12
13
14
|
"""├── luffyapi ├── logs/ # 项目运行时/开发时日志目录 - 文件夹 ├── manage.py # 脚本文件 ├── luffyapi/ # 项目主应用,开发时的代码保存 - 包 ├── apps/ # 开发者的代码保存目录,以模块[子应用]为目录保存 - 包 ├── libs/ # 第三方类库的保存目录[第三方组件、模块] - 包 ├── settings/ # 配置目录 - 包 ├── dev.py # 项目开发时的本地配置 └── prod.py # 项目上线时的运行配置 ├── urls.py # 总路由 └── utils/ # 多个模块[子应用]的公共函数类库[自己开发的组件] └── scripts/ # 保存项目运营时的脚本文件 - 文件夹""" |
配置开发环境
|
1
2
3
4
5
6
7
8
9
10
11
12
13
14
15
16
17
|
"""1.修改 wsgi.py 与 manage.py 两个文件:os.environ.setdefault('DJANGO_SETTINGS_MODULE', 'luffyapi.settings.dev')2.将settings.py删除或改名,内容拷贝到settings/dev.py中3.修改dev.py文件内容LANGUAGE_CODE = 'zh-hans'TIME_ZONE = 'Asia/Shanghai'USE_TZ = False4.修改启动配置:见插图5.在任何一个__init__.py文件中测试默认配置文件是否是dev.py文件from django.conf import settingsprint(settings)""" |
配置日志
|
1
2
3
4
5
6
7
8
9
10
11
12
13
14
15
16
17
18
19
20
21
22
23
24
25
26
27
28
29
30
31
32
33
34
35
36
37
38
39
40
41
42
43
44
45
46
47
|
LOGGING = { 'version': 1, 'disable_existing_loggers': False, 'formatters': { 'verbose': { 'format': '%(levelname)s %(asctime)s %(module)s %(lineno)d %(message)s' }, 'simple': { 'format': '%(levelname)s %(module)s %(lineno)d %(message)s' }, }, 'filters': { 'require_debug_true': { '()': 'django.utils.log.RequireDebugTrue', }, }, 'handlers': { 'console': { 'level': 'DEBUG', 'filters': ['require_debug_true'], 'class': 'logging.StreamHandler', 'formatter': 'simple' }, 'file': { # 实际开发建议使用WARNING 'level': 'INFO', 'class': 'logging.handlers.RotatingFileHandler', # 日志位置,日志文件名,日志保存目录必须手动创建,注:这里的文件路径要注意BASE_DIR代表的是小luffyapi 'filename': os.path.join(os.path.dirname(BASE_DIR), "logs", "luffy.log"), # 日志文件的最大值,这里我们设置300M 'maxBytes': 300 * 1024 * 1024, # 日志文件的数量,设置最大日志数量为10 'backupCount': 10, # 日志格式:详细格式 'formatter': 'verbose', # 文件内容编码 'encoding': 'utf-8' }, }, # 日志对象 'loggers': { 'django': { 'handlers': ['console', 'file'], 'propagate': True, # 是否让日志信息继续冒泡给其他的日志处理系统 }, }} |
dev.py
|
1
2
3
4
5
|
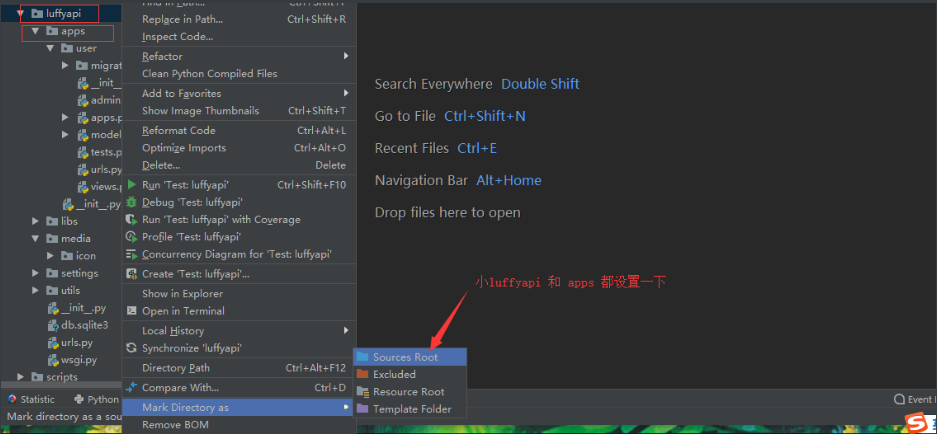
# 环境变量操作:小luffyapiBASE_DIR与apps文件夹都要添加到环境变量import syssys.path.insert(0, BASE_DIR)APPS_DIR = os.path.join(BASE_DIR, 'apps')sys.path.insert(1, APPS_DIR) |
在写项目直接导入utils文件夹也不''错误提示''
封装logger
dev.py
|
1
2
3
4
5
6
7
8
9
10
11
12
13
14
15
16
17
18
19
20
21
22
23
24
25
26
27
28
29
30
31
32
33
34
35
36
37
38
39
40
41
42
43
44
45
46
47
48
49
|
# 真实项目上线后,日志文件打印级别不能过低,因为一次日志记录就是一次文件io操作LOGGING = { 'version': 1, 'disable_existing_loggers': False, 'formatters': { 'verbose': { 'format': '%(levelname)s %(asctime)s %(module)s %(lineno)d %(message)s' }, 'simple': { 'format': '%(levelname)s %(module)s %(lineno)d %(message)s' }, }, 'filters': { 'require_debug_true': { '()': 'django.utils.log.RequireDebugTrue', }, }, 'handlers': { 'console': { # 实际开发建议使用WARNING 'level': 'DEBUG', 'filters': ['require_debug_true'], 'class': 'logging.StreamHandler', 'formatter': 'simple' }, 'file': { # 实际开发建议使用ERROR 'level': 'INFO', 'class': 'logging.handlers.RotatingFileHandler', # 日志位置,日志文件名,日志保存目录必须手动创建,注:这里的文件路径要注意BASE_DIR代表的是小luffyapi 'filename': os.path.join(os.path.dirname(BASE_DIR), "logs", "luffy.log"), # 日志文件的最大值,这里我们设置300M 'maxBytes': 300 * 1024 * 1024, # 日志文件的数量,设置最大日志数量为10 'backupCount': 10, # 日志格式:详细格式 'formatter': 'verbose', # 文件内容编码 'encoding': 'utf-8' }, }, # 日志对象 'loggers': { 'django': { 'handlers': ['console', 'file'], 'propagate': True, # 是否让日志信息继续冒泡给其他的日志处理系统 }, }} |
utils/logging.py
|
1
2
|
import logginglogger = logging.getLogger('django') |
封装项目异常处理
utils/exception.py
|
1
2
3
4
5
6
7
8
9
10
11
12
|
from rest_framework.views import exception_handler as drf_exception_handlerfrom rest_framework.views import Responsefrom rest_framework import statusfrom utils.logging import loggerdef exception_handler(exc, context): response = drf_exception_handler(exc, context) if response is None: logger.error('%s - %s - %s' % (context['view'], context['request'].method, exc)) return Response({ 'detail': '服务器错误' }, status=status.HTTP_500_INTERNAL_SERVER_ERROR, exception=True) return response |
二次封装Response模块
utils/response.py
|
1
2
3
4
5
6
7
8
9
10
11
12
13
|
from rest_framework.response import Responseclass APIResponse(Response): def __init__(self, data_status=0, data_msg='ok', results=None, http_status=None, headers=None, exception=False, **kwargs): data = { 'status': data_status, 'msg': data_msg, } if results is not None: data['results'] = results data.update(kwargs) super().__init__(data=data, status=http_status, headers=headers, exception=exception) |
创建数据库
|
1
2
3
4
5
6
7
8
9
10
|
"""1.管理员连接数据库>: mysql -uroot -proot2.创建数据库>: create database luffy default charset=utf8;3.查看用户>: select user,host,password from mysql.user;""" |
|
1
2
3
4
5
6
7
8
9
10
11
12
13
14
15
16
17
|
"""设置权限账号密码# 授权账号命令:grant 权限(create, update) on 库.表 to '账号'@'host' identified by '密码'1.配置任意ip都可以连入数据库的账户>: grant all privileges on luffy.* to 'luffy'@'%' identified by 'Luffy123?';2.由于数据库版本的问题,可能本地还连接不上,就给本地用户单独配置>: grant all privileges on luffy.* to 'luffy'@'localhost' identified by 'Luffy123?';3.刷新一下权限>: flush privileges;只能操作luffy数据库的账户账号:luffy密码:Luffy123?""" |
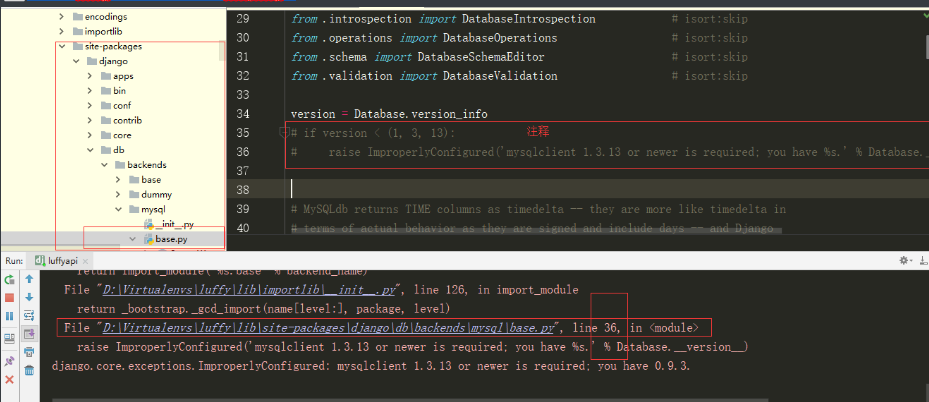
Django 2.x 一些版本pymysql兼容问题
Django不采用2.0.7版本很可能出现以下问题,需要修改源代码

创建user模块
|
1
2
3
4
5
6
7
|
前提:在 luffy 虚拟环境下1.终端从项目根目录进入apps目录>: cd luffyapi & cd apps2.创建app>: python ../../manage.py startapp user |
创建User表对应的model:user/models.py
|
1
2
3
4
5
6
7
8
9
10
11
12
13
|
from django.db import modelsfrom django.contrib.auth.models import AbstractUserclass User(AbstractUser): mobile = models.CharField(max_length=11, unique=True) icon = models.ImageField(upload_to='icon', default='icon/default.png') class Meta: db_table = 'luffy_user' verbose_name = '用户表' verbose_name_plural = verbose_name def __str__(self): return self.username |
注册user模块,配置User表:dev.py
|
1
2
3
4
5
6
7
|
INSTALLED_APPS = [ # ... 'user',]# 自定义User表AUTH_USER_MODEL = 'user.User' |
配置media
media配置:dev.py
|
1
2
|
MEDIA_URL = '/media/'MEDIA_ROOT = os.path.join(BASE_DIR, 'media') |
media目录配置
|
1
2
3
4
5
6
7
|
"""├── luffyapi └── luffyapi/ └── media/ └── icon └── default.png""" |
主路由:luffyapi/urls.py
|
1
2
3
4
5
6
7
8
9
10
11
|
from django.contrib import adminfrom django.urls import path, re_path, includefrom django.views.static import servefrom django.conf import settingsurlpatterns = [ path('admin/', admin.site.urls), path('user/', include('user.urls')), re_path('^media/(?P<path>.*)', serve, {'document_root': settings.MEDIA_ROOT})] |
子路由:user/urls.py
|
1
2
3
4
|
from django.urls import path, re_pathurlpatterns = [] |
vue环境
1.傻瓜式安装node:
官网下载:https://nodejs.org/zh-cn/
2.安装cnpm:
>: npm install -g cnpm --registry=https://registry.npm.taobao.org
3.安装vue最新脚手架:
>: cnpm install -g @vue/cli
注:如果2、3步报错,清除缓存后重新走2、3步
>: npm cache clean --force
"""
前提:在目标目录新建luffy文件夹
>: cd 建立的luffy文件夹
>: vue create luffycity
"""
重构项目目录
"""
├── luffycity
    ├── public/                     # 项目共有资源
        ├── favicon.ico             # 站点图标
        └── index.html              # 主页
    ├── src/                        # 项目主应用,开发时的代码保存
        ├── assets/                 # 前台静态资源总目录
            ├── css/                # 自定义css样式
                └── global.css      # 自定义全局样式
            ├── js/                 # 自定义js样式
                └── settings.js     # 自定义配置文件
            └── img/                # 前台图片资源
        ├── components/             # 小组件目录
        ├── views/                  # 页面组件目录
        ├── App.vue                 # 根路由
        ├── main.js                 # 入口脚本文件
        ├── router
            └── index.js            # 路由脚本文件
        store
            └── index.js            # 仓库脚本文件
    ├── vue.config.js               # 项目配置文件
    └── *.*                         # 其他配置文件
"""
文件修订:目录中非配置文件的多余文件可以移除
App.vue
|
1
2
3
4
5
|
<template> <div id="app"> <router-view/> </div></template> |
router/index.js
|
1
2
3
4
5
6
7
8
9
10
11
12
13
14
15
16
17
18
19
20
21
|
import Vue from 'vue'import VueRouter from 'vue-router'import Home from '../views/Home.vue'Vue.use(VueRouter);const routes = [ { path: '/', name: 'home', component: Home },];const router = new VueRouter({ mode: 'history', base: process.env.BASE_URL, routes});export default router |
Home.vue
|
1
2
3
4
5
6
7
8
9
10
11
12
|
<template> <div class="home"> </div></template><script> export default { name: 'home', components: { }, }</script> |
全局配置:全局样式、配置文件
global.css
|
1
2
3
4
5
6
7
8
9
10
11
12
13
14
15
16
17
18
19
|
/* 声明全局样式和项目的初始化样式 */body, h1, h2, h3, h4, p, table, tr, td, ul, li, a, form, input, select, option, textarea { margin: 0; padding: 0; font-size: 15px;}a { text-decoration: none; color: #333;}ul { list-style: none;}table { border-collapse: collapse; /* 合并边框 */} |
settings.js
|
1
2
3
|
export default { base_url: 'http://127.0.0.1:8000'} |
main.js
|
1
2
3
4
5
6
7
|
// 配置全局样式import '@/assets/css/global.css'// 配置全局自定义设置import settings from '@/assets/js/settings'Vue.prototype.$settings = settings;// 在所有需要与后台交互的组件中:this.$settings.base_url + '再拼接具体后台路由' |
axios前后台交互
安装:前端项目目录下的终端
|
1
|
>: cnpm install axios |
配置:main.js
|
1
2
|
import axios from 'axios'Vue.prototype.$axios = axios; |
cookies操作
安装:前端项目目录下的终端
|
1
|
>: cnpm install vue-cookies |
配置:main.js
|
1
2
|
import cookies from 'vue-cookies'Vue.prototype.$cookies = cookies; |
element-ui页面组件框架
安装:前端项目目录下的终端
|
1
|
>: cnpm install element-ui |
配置:main.js
|
1
2
3
4
5
6
7
|
import ElementUI from 'element-ui';import 'element-ui/lib/theme-chalk/index.css';Vue.use(ElementUI);// bootstrap+jq配置:cnpm install jquery、cnpm install bootstrap@3import 'bootstrap'import 'bootstrap/dist/css/bootstrap.min.css' |
bootstrap页面组件框架
安装:前端项目目录下的终端
|
1
2
|
>: cnpm install jquery>: cnpm install bootstrap@3 |
配置jquery:vue.config.js
|
1
2
3
4
5
6
7
8
9
10
11
12
13
14
15
|
const webpack = require("webpack");module.exports = { configureWebpack: { plugins: [ new webpack.ProvidePlugin({ $: "jquery", jQuery: "jquery", "window.jQuery": "jquery", "window.$": "jquery", Popper: ["popper.js", "default"] }) ] }}; |
配置bootstrap:main.js
|
1
2
|
import 'bootstrap'import 'bootstrap/dist/css/bootstrap.min.css' |
图片准备
将提供的资料中的图片移植到项目的img文件夹下
页头组件:components/Header.vue
|
1
2
3
4
5
6
7
8
9
10
11
12
13
14
15
16
17
18
19
20
21
22
23
24
25
26
27
28
29
30
31
32
33
34
35
36
37
38
39
40
41
42
43
44
45
46
47
48
49
50
51
52
53
54
55
56
57
58
59
60
61
62
63
64
65
66
67
68
69
70
71
72
73
74
75
76
77
78
79
80
81
82
83
84
85
86
87
88
89
90
91
92
93
94
95
96
97
98
99
100
101
102
103
104
105
106
107
108
109
110
111
112
113
114
115
116
117
118
119
120
121
122
123
124
125
126
127
128
129
130
131
132
133
134
135
136
137
138
139
140
141
142
143
144
145
146
147
148
149
150
151
152
153
154
155
156
157
158
159
160
161
162
163
164
165
166
167
168
169
170
171
172
173
174
175
176
177
178
179
180
181
182
183
184
185
186
187
188
189
190
191
192
193
194
195
|
<template> <div class="header-box"> <div class="header"> <div class="content"> <div class="logo full-left"> <router-link to="/"><img @click="jump('/')" src="@/assets/img/logo.svg" alt=""></router-link> </div> <ul class="nav full-left"> <li><span @click="jump('/course')" :class="this_nav=='/course'?'this':''">免费课</span></li> <li><span @click="jump('/light-course')" :class="this_nav=='/light-course'?'this':''">轻课</span></li> <li><span>学位课</span></li> <li><span>题库</span></li> <li><span>老男孩教育</span></li> </ul> <div class="login-bar full-right"> <div class="shop-cart full-left"> <img src="@/assets/img/cart.svg" alt=""> <span><router-link to="/cart">购物车</router-link></span> </div> <div class="login-box full-left"> <span>登录</span> | <span>注册</span> </div> </div> </div> </div> </div></template><script> export default { name: "Header", data() { return { this_nav: "", } }, created() { this.this_nav = localStorage.this_nav; }, methods: { jump(location) { localStorage.this_nav = location; // vue-router除了提供router-link标签跳转页面以外,还提供了js跳转的方式 this.$router.push(location); } } }</script><style scoped> .header-box { height: 80px; } .header { width: 100%; height: 80px; box-shadow: 0 0.5px 0.5px 0 #c9c9c9; position: fixed; top: 0; left: 0; right: 0; margin: auto; z-index: 99; background: #fff; } .header .content { max-width: 1200px; width: 100%; margin: 0 auto; } .header .content .logo { height: 80px; line-height: 80px; margin-right: 50px; cursor: pointer; } .header .content .logo img { vertical-align: middle; } .header .nav li { float: left; height: 80px; line-height: 80px; margin-right: 30px; font-size: 16px; color: #4a4a4a; cursor: pointer; } .header .nav li span { padding-bottom: 16px; padding-left: 5px; padding-right: 5px; } .header .nav li span a { display: inline-block; } .header .nav li .this { color: #4a4a4a; border-bottom: 4px solid #ffc210; } .header .nav li:hover span { color: #000; } .header .login-bar { height: 80px; } .header .login-bar .shop-cart { margin-right: 20px; border-radius: 17px; background: #f7f7f7; cursor: pointer; font-size: 14px; height: 28px; width: 88px; margin-top: 30px; line-height: 32px; text-align: center; } .header .login-bar .shop-cart:hover { background: #f0f0f0; } .header .login-bar .shop-cart img { width: 15px; margin-right: 4px; margin-left: 6px; } .header .login-bar .shop-cart span { margin-right: 6px; } .header .login-bar .login-box { margin-top: 33px; } .header .login-bar .login-box span { color: #4a4a4a; cursor: pointer; } .header .login-bar .login-box span:hover { color: #000000; } .full-left { float: left !important; } .full-right { float: right !important; } .el-carousel__arrow { width: 120px; height: 120px; } .el-checkbox__input.is-checked .el-checkbox__inner, .el-checkbox__input.is-indeterminate .el-checkbox__inner { background: #ffc210; border-color: #ffc210; border: none; } .el-checkbox__inner:hover { border-color: #9b9b9b; } .el-checkbox__inner { width: 16px; height: 16px; border: 1px solid #9b9b9b; border-radius: 0; } .el-checkbox__inner::after { height: 9px; width: 5px; }</style> |
轮播图组件:components/Banner.vue
|
1
2
3
4
5
6
7
8
9
10
11
12
13
14
15
16
17
18
19
20
21
22
23
24
25
26
27
28
29
30
31
32
33
34
35
36
37
38
39
40
41
42
|
<template> <el-carousel height="520px" :interval="3000" arrow="always"> <el-carousel-item> <img src="@/assets/img/banner1.png" alt=""> </el-carousel-item> <el-carousel-item> <img src="@/assets/img/banner2.png" alt=""> </el-carousel-item> <el-carousel-item> <img src="@/assets/img/banner3.png" alt=""> </el-carousel-item> </el-carousel></template><script> export default { name: "Banner", }</script><style scoped> .el-carousel__item h3 { color: #475669; font-size: 18px; opacity: 0.75; line-height: 300px; margin: 0; } .el-carousel__item:nth-child(2n) { background-color: #99a9bf; } .el-carousel__item:nth-child(2n+1) { background-color: #d3dce6; } .el-carousel__item img { text-align: center; height: 520px; margin: 0 auto; display: block; }</style> |
页脚组件:components/Footer.vue
|
1
2
3
4
5
6
7
8
9
10
11
12
13
14
15
16
17
18
19
20
21
22
23
24
25
26
27
28
29
30
31
32
33
34
35
36
37
38
39
40
41
42
43
44
45
46
47
48
49
50
51
52
53
|
<template> <div class="footer"> <ul> <li>关于我们</li> <li>联系我们</li> <li>商务合作</li> <li>帮助中心</li> <li>意见反馈</li> <li>新手指南</li> </ul> <p>Copyright © luffycity.com版权所有 | 京ICP备17072161号-1</p> </div></template><script> export default { name: "Footer" }</script><style scoped> .footer { width: 100%; height: 128px; background: #25292e; color: #fff; } .footer ul { margin: 0 auto 16px; padding-top: 38px; width: 810px; } .footer ul li { float: left; width: 112px; margin: 0 10px; text-align: center; font-size: 14px; } .footer ul::after { content: ""; display: block; clear: both; } .footer p { text-align: center; font-size: 12px; }</style> |
主页组件:views/Home.vue
|
1
2
3
4
5
6
7
8
9
10
11
12
13
14
15
16
17
18
19
20
21
22
|
<template> <div class="home"> <Header /> <Banner /> <Footer /> </div></template><script> import Header from '@/components/Header' import Banner from '@/components/Banner' import Footer from '@/components/Footer' export default { name: 'home', components: { Header, Banner, Footer }, }</script> |
创建home模块
前提:在 luffy 虚拟环境下
1.终端从项目根目录进入apps目录
|
1
2
3
4
|
>: cd luffyapi & cd apps2.创建app>: python ../../manage.py startapp home |
主路由:luffyapi/urls.py
|
1
2
3
4
5
6
|
from django.urls import path, re_path, includeurlpatterns = [ # ... path('user/', include('home.urls')), # ...] |
子路由:home/urls.py
|
1
2
3
4
|
from django.urls import path, re_pathurlpatterns = [] |
Banner数据表model设计
utils/model.py
|
1
2
3
4
5
6
7
8
9
|
from django.db import modelsclass BaseModel(models.Model): orders = models.IntegerField(verbose_name='显示顺序') is_show = models.BooleanField(verbose_name="是否上架", default=False) is_delete = models.BooleanField(verbose_name="逻辑删除", default=False) class Meta: abstract = True |
home/models.py
|
1
2
3
4
5
6
7
8
9
10
11
12
13
14
15
16
|
from django.db import modelsfrom utils.model import BaseModelclass Banner(BaseModel): image = models.ImageField(upload_to='banner', verbose_name='轮播图', null=True, blank=True) name = models.CharField(max_length=150, verbose_name='轮播图名称') note = models.CharField(max_length=150, verbose_name='备注信息') link = models.CharField(max_length=150, verbose_name='轮播图广告地址') class Meta: db_table = 'luffy_banner' verbose_name = '轮播图' verbose_name_plural = verbose_name def __str__(self): return self.name |
数据迁移:在大luffyapi路径下的终端
|
1
2
|
>: python manage.py makemigrations>: python manage.py migrate |
注册home模块:dev.py
|
1
2
3
4
5
6
|
INSTALLED_APPS = [ # ... 'rest_framework', 'home',] |
设计Banner数据接口
home/serializers.py
|
1
2
3
4
5
6
|
from rest_framework.serializers import ModelSerializerfrom . import modelsclass BannerModelSerializer(ModelSerializer): class Meta: model = models.Banner fields = ('name', 'note', 'image', 'link') |
home/views.py
|
1
2
3
4
5
6
|
from rest_framework.generics import ListAPIViewfrom utils.response import APIResponsefrom . import models, serializersclass BannerListAPIView(ListAPIView): queryset = models.Banner.objects.filter(is_delete=False, is_show=True).order_by('-orders') serializer_class = serializers.BannerModelSerializer |
home/urls.py
|
1
2
3
4
5
|
from django.urls import path, re_pathfrom . import viewsurlpatterns = [ path('banners/', views.BannerListAPIView.as_view())] |
接口
|
1
|
http://api.luffy.cn:8000/home/banner/ |
后台处理跨域
|
1
2
3
|
>: pip install django-cors-headers插件参考地址:https://github.com/ottoyiu/django-cors-headers/ |
项目配置:dev.py
|
1
2
3
4
5
6
7
8
9
10
11
12
13
14
|
# 注册appINSTALLED_APPS = [ ... 'corsheaders']# 添加中间件MIDDLEWARE = [ ... 'corsheaders.middleware.CorsMiddleware']# 允许跨域源CORS_ORIGIN_ALLOW_ALL = True |
前台请求Banner数据
修订Banner.vue
|
1
2
3
4
5
6
7
8
9
10
11
12
13
14
15
16
17
18
19
20
21
22
23
24
25
26
27
28
29
30
31
32
33
34
35
36
37
38
39
40
41
42
43
44
45
46
47
48
49
50
51
52
53
54
55
56
57
|
<template> <el-carousel height="520px" :interval="3000" arrow="always"> <!-- 渲染后台数据 --> <el-carousel-item v-for="banner in banner_list" :key="banner.name"> <a :href="banner.link"> <img :src="banner.image" alt="" :title="banner.note"> </a> </el-carousel-item> </el-carousel></template><script> export default { name: "Banner", data() { return { banner_list: [] } }, created() { // 请求后台数据 this.$axios({ url: this.$settings.base_url + '/home/banners/', method: 'get', }).then(response => { // window.console.log(response.data); this.banner_list = response.data; }).catch(errors => { window.console.log(errors) }) } }</script><style scoped> .el-carousel__item h3 { color: #475669; font-size: 18px; opacity: 0.75; line-height: 300px; margin: 0; } .el-carousel__item:nth-child(2n) { background-color: #99a9bf; } .el-carousel__item:nth-child(2n+1) { background-color: #d3dce6; } .el-carousel__item img { text-align: center; height: 520px; margin: 0 auto; display: block; }</style> |
安装:luffy虚拟环境下
|
1
|
# >: pip install https://codeload.github.com/sshwsfc/xadmin/zip/django2 |
|
1
2
3
4
5
6
7
8
9
|
INSTALLED_APPS = [ # ... # xamin主体模块 'xadmin', # 渲染表格模块 'crispy_forms', # 为模型通过版本控制,可以回滚数据 'reversion',] |
xadmin:需要自己的数据库模型类,完成数据库迁移
|
1
2
|
python manage.py makemigrationspython manage.py migrate |
设置主路由替换掉admin:主urls.py
|
1
2
3
4
5
6
7
8
9
10
11
|
# xadmin的依赖import xadminxadmin.autodiscover()# xversion模块自动注册需要版本控制的 Modelfrom xadmin.plugins import xversionxversion.register_models()urlpatterns = [ # ... path(r'xadmin/', xadmin.site.urls),] |
创建超级用户:大luffyapi路径终端
|
1
2
3
|
# 在项目根目录下的终端python manage.py createsuperuser# 账号密码设置:admin | admin123 |
完成xadmin全局配置:新建home/adminx.py
|
1
2
3
4
5
6
7
8
9
10
11
12
|
# home/adminx.py# xadmin全局配置import xadminfrom xadmin import viewsclass GlobalSettings(object): """xadmin的全局配置""" site_title = "路飞学城" # 设置站点标题 site_footer = "路飞学城有限公司" # 设置站点的页脚 menu_style = "accordion" # 设置菜单折叠xadmin.site.register(views.CommAdminView, GlobalSettings) |
在adminx.py中注册model:home/adminx.px
|
1
2
3
|
from . import models# 注册xadmin.site.register(models.Banner) |
修改app:home的名字:xadmin页面上的显示效果
|
1
2
3
4
5
6
7
8
|
# home/__init__.pydefault_app_config = "home.apps.HomeConfig"# home/apps.pyfrom django.apps import AppConfigclass HomeConfig(AppConfig): name = 'home' verbose_name = '我的首页' |

 浙公网安备 33010602011771号