Thymeleaf 学习笔记-实例demo(中文教程)
项目demo http://pan.baidu.com/s/1wg6PC
学习资料网址 http://www.blogjava.net/bjwulin/archive/2013/02/07/395234.html (不做浮躁的人)博文
http://www.blogjava.net/bjwulin/archive/2014/02/11/409734.html (不做浮躁的人)博文<与spring整合>
springMVC + thymeleaf demo步骤:
1.建一个springMVC项目
2.加jar包
3.在web.xml中配置servlet
4.在配置的servlet.xml文件夹里配置thymeleaf相关配置
5.在cotroller中定义入口控制
6.将静态页面加入项目中,并添加thymeleaf标签
7.部署访问
--系统 Windows7
--开发工具 intelliJ idea
--项目管理工具 maven
--自动化构建工具 gradle
--模板 thymeleaf
--框架 springMVC
1.建一个springMVC项目
用intelliJ 新建一个springMVC项目 参见http://note.youdao.com/share/?id=89349b4e4f6f57ae603c2c43bad1bb62&type=note
2.加jar包
1)gradle加jar包
compile("org.springframework.boot:spring-boot-starter-thymeleaf")
2)jar包下载地址
3.在web.xml中配置servlet

<?xml version="1.0" encoding="UTF-8"?>
<web-app xmlns="http://java.sun.com/xml/ns/javaee"
         xmlns:xsi="http://www.w3.org/2001/XMLSchema-instance"
         xsi:schemaLocation="http://java.sun.com/xml/ns/javaee
                 http://java.sun.com/xml/ns/javaee/web-app_3_0.xsd"
         version="3.0">
    <!--配置WEB-INF下的servlet-context.xml文件-->
    <servlet>
        <servlet-name>appServlet</servlet-name>
        <servlet-class>org.springframework.web.servlet.DispatcherServlet</servlet-class>
        <init-param>
            <param-name>contextConfigLocation</param-name>
            <param-value>/WEB-INF/servlet-context.xml</param-value>
        </init-param>
        <load-on-startup>1</load-on-startup>
    </servlet>
    <servlet-mapping>
        <servlet-name>appServlet</servlet-name>
        <url-pattern>/</url-pattern>
    </servlet-mapping>
</web-app>
4.在配置的servlet.xml文件夹里配置thymeleaf相关配置
<?xml version="1.0" encoding="UTF-8"?>
<beans xmlns="http://www.springframework.org/schema/beans"
       xmlns:xsi="http://www.w3.org/2001/XMLSchema-instance"
       xmlns:context="http://www.springframework.org/schema/context"
       xmlns:mvc="http://www.springframework.org/schema/mvc"
       xsi:schemaLocation="http://www.springframework.org/schema/mvc
       http://www.springframework.org/schema/mvc/spring-mvc-3.1.xsd
       http://www.springframework.org/schema/beans http://www.springframework.org/schema/beans/spring-beans-3.1.xsd
       http://www.springframework.org/schema/context http://www.springframework.org/schema/context/spring-context-3.1.xsd">

       <!-- Scans the classpath of this application for @Components to deploy as beans -->
       <context:component-scan base-package="com.test.thymeleaf.controller" />

       <!-- Configures the @Controller programming model -->
       <mvc:annotation-driven />

        <!--Resolves view names to protected .jsp resources within the /WEB-INF/views directory -->
        <!--springMVC+jsp的跳转页面配置-->
       <!--<bean class="org.springframework.web.servlet.view.InternalResourceViewResolver">-->
              <!--<property name="prefix" value="/WEB-INF/views/" />-->
              <!--<property name="suffix" value=".jsp" />-->
       <!--</bean>-->

       <!--springMVC+thymeleaf的跳转页面配置-->
       <bean id="templateResolver"
          class="org.thymeleaf.templateresolver.ServletContextTemplateResolver">
         <property name="prefix" value="/WEB-INF/views/" />
         <property name="suffix" value=".html" />
         <property name="templateMode" value="HTML5" />
       </bean>

       <bean id="templateEngine"
           class="org.thymeleaf.spring4.SpringTemplateEngine">
          <property name="templateResolver" ref="templateResolver" />
       </bean>

       <bean class="org.thymeleaf.spring4.view.ThymeleafViewResolver">
         <property name="templateEngine" ref="templateEngine" />
       </bean>
</beans>
5.在cotroller中定义入口控制
package com.test.thymeleaf.controller;
import com.test.thymeleaf.domain.User;
import org.springframework.stereotype.Controller;
import org.springframework.ui.Model;
import org.springframework.web.bind.annotation.RequestMapping;
import org.springframework.web.bind.annotation.RequestMethod;

@Controller
public class HomeController {
    User user = new User();
    //入口
    @RequestMapping(value = "/home")
    public String home(Model model) {
        model.addAttribute("user",user);
        return "aa";
    }

  //提交表单后进行数据读取,并将数据传出
    @RequestMapping(value = "/bb",method = RequestMethod.POST)
    public String bb(User user,Model model) {
        model.addAttribute("user", user);
        model.addAttribute("message", ",welcome");
        return "bb";
    }
}
6.将静态页面加入项目中,并添加thymeleaf标签
注意头文件
<!DOCTYPE html>
<html xmlns="http://www.w3.org/1999/xhtml"
      xmlns:th="http://www.thymeleaf.org">
aa.html(用th:object定义表单数据提交对象,用th:field定义表单数据属性,用*{}锁定上级定义的对象,{}内填写对象属性,提交表单时自动降属性值封住到对象中)
<!DOCTYPE html>
<html xmlns="http://www.w3.org/1999/xhtml"
      xmlns:th="http://www.thymeleaf.org">

<head>
  <title>Home</title>
</head>
<body>
<form th:action="@{/bb}" th:object="${user}" th:method="post">

    <input type="text" th:field="*{name}"/>
    <input type="text" th:field="*{msg}"/>

    <input type="submit"/>
</form>

</body>
</html>
bb.html(用${}读取后台传出的数据动态替换静态数据“vinphy,”和"welcome!")
<!DOCTYPE html>
<html xmlns="http://www.w3.org/1999/xhtml"
      xmlns:th="http://www.thymeleaf.org">

<head>
    <meta charset="utf-8"/>
  <title>Home</title>
</head>
<body>
<div>
<sapn th:text="${user.name}">vinphy,</sapn>
<sapn th:text="${message}">welcome!</sapn>
</div>
</body>
</html>
7.部署访问
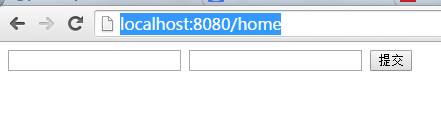
部署后访问http://localhost:8080/home进行访问,出现aa.html的内容

 浙公网安备 33010602011771号