装饰器
1. 函数装饰器
装饰器(fuctional decorators)可以定义成函数,来拓展原函数的功能,这个函数的特殊之处在于它的返回值也是一个函数,这个函数是内嵌“原”函数的函数。
本质上,函数装饰器就是一个返回函数的高阶函数。函数装饰器在被装饰函数定义好后立即执行。
1)最原始的装饰器
结合下面的例子。被装饰函数 f 即使没有被调用,但因为被 @deco 修饰,所以函数装饰器的代码已经运行了,即 deco 已经运行,deco内部嵌套的 wrapper
显然还没有运行,只是被定义了下,然后返回 wrapper 函数名变量。执行流程如下:
a. 先定义原函数 f。
b. 然后运行函数装饰器,即 f = deco(f)。
我们看到装饰器语法:@函数装饰器名,函数后面加上()才表示调用执行,故这个调用由解释器完成,它会自动执
行语句:deco(f),即以被装饰函数为参数来调用函数装饰器。如果我们这么修饰呢:@函数装饰器名(),即用 @deco() 代替 @deco,
那么按自动调用机制会执行:deco()(f),显然就会出错,除非让deco()返回一个带参数 func 的函数。
函数装饰器执行完后,被装饰函数名的引用就变了,变成函数装饰器的返回值 wrapper,即 f = deco(f) = wrapper。
def deco(f):
    def wrapper():
        print("decorate begin")
        f()
        print("decorate end")
    return wrapper

@deco  # 此行代码等同于,f = deco(f) = wrapper
def f():
    print("call f")

f()  # f = deco(f) = wrapper => f() = wrapper()

"""
decorate begin
call f
decorate end
"""
2)带有固定参数的装饰器
由1)中的解释,我们可以知道调用f时,实际调用的是wrapper,参数先通过wrapper的形参传入,然后wrapper内部再调用函数f,参数再间接传给f。
这种情况下,函数 f 和 wrapper 的参数个数和形式必须是一致的。
def deco(f):
    def wrapper(a, b):
        print("decorate begin")
        f(a, b)
        print("decorate end")
    return wrapper

@deco
def f(a, b):
    print("call f")

f(3, 4)  # f = deco(f) = wrapper => f(3,4) = wrapper(3,4)
因为类的实例方法固定都会有一个参数,即self,所以如果将函数装饰器修饰类方法,那么作为装饰器嵌套的函数至少得带有一个参数。举个例子
def deco(f):
    def wrapper(obj, s):   # 第一个参数是实例对象
        print("decorate begin")
        f(obj, s)
        print("decorate end")
    return wrapper

class Bar:
    @deco
    def f(self, s):     # 这里有两个参数,所以wrapper也得有相同的参数形式
        print("call f")
        print(s)
        print("call f end")

x = Bar()
x.f("hello world")    # 因为 f 是 x 的方法,所以会隐式传递 self 参数,x.f("hello world") => f(x, "hello world") => wrapper(x, "hello world")
3)带有可变参数的装饰器
如果可变参数语法不理解请先阅读另一篇博客 默认参数和可变参数
def deco(f):
    def wrapper(*args, **kwargs):  # args = (3,4), kwargs = {}
        print("decorate begin")
        f(*args, **kwargs)         # args 和 kwargs 分别被解包后,再整体按顺序赋值给 f 的形参
        print("decorate end")
    return wrapper

@deco
def f(a, b):
    print("call f")

f(3, 4)
4)使用多个装饰器,装饰一个函数
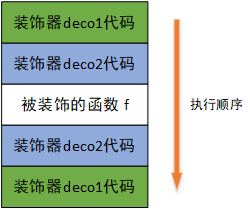
多个装饰器函数装饰的顺序是从里到外,也可以说由近到远,直接来看一个例子。
def deco01(f):
    def wrapper(*args, **kwargs):
        print("this is deco01")
        f(*args, **kwargs)
        print("deco01 end here")
    return wrapper

def deco02(f):
    def wrapper(*args, **kwargs):
        print("this is deco02")
        f(*args, **kwargs)
        print("deco02 end here")
    return wrapper

@deco01
@deco02
def f(a,b):
    print("我是被装饰的函数")

f(3,4)

"""
output:
this is deco01
this is deco02
我是被装饰的函数
deco02 end here
deco01 end here
"""
按由近到远的原则,首先先装饰deco02,便得到下面的函数体:
print("this is deco02")
f(*args, **kwargs)
print("deco02 end here")
然后继续装饰deco01,在已经装饰了deco02的基础上,继续扩展代码,函数体就变成这样:
print("this is deco01")
print("this is deco02")
f(*args, **kwargs)
print("deco02 end here")
print("deco01 end here")
给个图,一目了然:
2. 类装饰器
代码逻辑很复杂时,不适合写在一个函数内,这时就可以使用类来实现。由函数装饰器可以知道,装饰器的执行其实就是:f = deco(f)。
把装饰器定义成类也是一样的,它与函数装饰器的区别如下:
1)deco 由函数名变成类名。
2)deco(f)含义不同,原先表示函数的执行,现在表示类实例化,即对象的定义。
3)函数装饰器执行完成后,f 重新引用的是装饰器的返回值; 而类装饰器实例化后,f 就引用了该实例。
所以这个类对象必须是可调用的,即f()能执行,就像 C++ 语法中的函数对象,即重载()运算符。python 中是通过实现__call__方法来达到这个目的。
实例变为可调用对象,与普通函数一致,执行的逻辑是 __call__ 函数内部逻辑。
class Bar:
    def __call__(self, *args, **kwargs):
        print(*args, **kwargs)

b = Bar()  # 实例化
b("I am instance method.")   # 等价于:b.__call__("I am instance method.")
类装饰器 __call__ 方法内的逻辑相当于函数装饰器内嵌的 wrapper 函数。举个例子,用类装饰器装饰普通函数:
class Deco:
    def __init__(self, f):
        self.func = f

    def __call__(self):
        print("Start __call__")
        self.func()
        print("End __call__ ")

@Deco           # 函数定义完后会执行:hello = Deco(hello),hello 不再是函数引用,而是装饰器类对象
def hello():
    print("Hello")

hello()   # 其实是装饰器类对象的执行,hello() => Deco(hello)()

"""
Start __call__
Hello
End __call__
"""
如果把类装饰器用来装饰其它的类成员函数呢?参考用函数装饰器装饰类方法,装饰器内嵌的那个函数至少得存在一个参数来提供实例,因为类装饰器的
执行最终是调用 __call__ 函数,所以 __call__ 函数至少得存在两个参数,一个是 self,另一个提供给被装饰函数的 self。
class Deco:
    def __init__(self, f):
        self.func = f

    def __call__(self, own):    # 将 Test 实例对象传入,提供给 f
        print("Start __call__")
        self.func(own)
        print("End __call__")

class Test:
    @Deco          # f = Deco(f)
    def f(self):   # 被装饰函数 f 有一个 self 参数
        print("hello")

t = Test()
t.f(t)     # t.f 被装饰后就是一个 object 而不是 method,所以没有传递 self 参数,t.f(t) = f(t) = Deco(f)(t) = __call__(Deco(f), t)

"""
Start __call__
hello
End __call__
"""
如果不想显示地传递这个实例参数,即 t.f(t) 改成 t.f(),该怎么做呢?可以实现一个__get__方法,即一个描述器,相关语法请先阅读:描述器。
from types import MethodType

class Deco:
    def __init__(self, f):
        self.func = f

    def __call__(self, own):
        print("Start __call__")
        self.func(own)
        print("End __call__")

    def __get__(self, instance, owner):
        if instance is None:
            return self
        else:
            return MethodType(self, instance) # Deco 对象是可调用的,可以将它当作方法绑定 Test 对象

class Test:
    @Deco     # f = Deco(f)
    def f(self):
        print("hello")

t = Test()
t.f()   # 因为 Deco 对象通过 MethodType 绑定到 Test 实例上了, 所以 f 此时是一个method,需要先传 self 参数
        # 我们可以推知:t.f() => f(t) => Deco(f)(t) => __ call__(Deco(f), t)
__call__ 可以使用可变类型参数,增加普适性:
from types import MethodType

class Deco:
    def __init__(self, f):
        self.func = f

    def __call__(self, *args, **kwargs):
        print("Start __call__")
        self.func(*args, **kwargs)
        print("End __call__")

    def __get__(self, instance, owner):
        if instance is None:
            return self
        else:
            return MethodType(self, instance)

class Test:
    @Deco
    def f(self):
        print("hello")

t = Test()
t.f()
3. python内置的函数装饰器
有3种,分别是 @staticmethod、@classmethod 和 @property。
1)@staticmethod 修饰的方法是类静态方法:其跟成员方法的区别是没有 self 参数,并且可以在类不进行实例化的情况下调用,也可以在实例化的情况使用。
由于静态方法不包含 self 参数,所以它只能通过类名访问类成员,且只能访问静态成员,如 类名.属性名、类名.方法名。
class Test(object):
    x = 0.1
    @staticmethod
    def f():
        print("call static method.")
        Test.x = 0.5

Test.f()       # 静态方法无需实例化
Test().f()     # 也可以实例化后调用
print(Test.x)

"""
output:
call static method.
call static method.
0.5
"""
2)@classmethod 修饰的方法是类方法:与实例方法的区别在于所接收的第一个参数不是 self (类实例的指针),而是cls(当前类的具体类型,有子类继承时,
就是子类类型)。类方法可以在类不进行实例化的情况下调用,也可以在实例化的情况使用。但静态方法的行为就是一个普通的全局函数,而类方法包含cls参
数,那 cls 参数有啥用呢?
解释:比如静态方法想要调用非静态的成员,必须知道类的具体类型,如在函数内部构造一个实例来调用,在存在派生类的代码中,知道具体类型还挺麻烦,
如果类名被修改,那代码就也得改。但 classmethod 方法却可以直接知道类的具体类型,即通过 cls 参数。看一个例子便清楚了:
class Test(object):
    a = 123
    def normalFoo(self):
        print('call normalFoo.')

    @staticmethod
    def staticFoo():
        print('call staticFoo.')
        print(Test.a)
        Test().normalFoo()  # 访问非静态成员

    @classmethod
    def classFoo(cls):
        print('call classFoo.')
        print(Test.a)
        cls().normalFoo()   # 访问非静态成员

Test.staticFoo()
Test.classFoo()
3)property(把函数变属性):把一个方法变成属性调用,起到既能检查属性,还能用属性的方式来访问该属性。
访问属性的时候不需要是可调用的(即不用在后面加括号),所以装饰器没必要实现 __call__ 方法,它其实就是一个地地道道的描述器。
为什么需要它呢?我们在绑定属性时,如果我们直接把属性暴露出去,虽然写起来很简单,但是,没办法检查参数,导致可以把属性随便改:
class Student(object):
    def __init__(self, score = 0):
        self.score = score

s = Student()
s.score = 100
s.score = 200  # 分数为200明显不合理
s.score = -50  # 分数为负数也不合理
print(s.score)
对值进行约束的一个明显解决方案是隐藏属性 score(使其私有)并定义新的 getter 和 setter 接口来操作它。可以按照下面这样改,但这样
做存在的一个大问题:所有在其程序中实现我们前面的类的客户都必须修改他们的代码,将 s.score 修改为 s.getScore(),并且将像 s.score = val的
所有赋值语句修改为 s.setScore(val)。这种重构可能会给客户带来数十多万行代码的麻烦。
class Student(object):
    def __init__(self, value=0):
        self.setScore(value)

    def getScore(self):
        return self._score

    def setScore(self, value):
        if value < 0 or value > 100:
            raise ValueError('score must between 0 ~ 100!')
        self._score = value

s = Student()
s.setScore(100)
s.setScore(105)     # 报错
s.setScore(-50)     # 报错
print(s.getScore())
这时 property 就派上用场了。@property 真正强大的就是可以对属性增加约束来限制属性的定义。
class Student(object):
    def __init__(self, value=0):
        self._score = value

    @property        # 以需要定义的属性为方法名,如果没有@属性名.setter,则就是一个只读属性
    def score(self):
        return self._score

    @score.setter    # @property定义可访问属性的语法:以属性名为方法名,并在方法名上增加@属性名.setter
    def score(self, value):
        if value < 0 or value > 100:
            raise ValueError('score must between 0 ~ 100!')
        self._score = value

s = Student()
s.score = 100    #
s.score = 105    # 报错
s.score = -50    # 报错
print(s.score)

 浙公网安备 33010602011771号