100-CH32V307(WCH单片机)学习开发-GPIO输出高低电平
<p><iframe name="ifd" src="https://mnifdv.cn/resource/cnblogs/LearnCH32V307VCT6" frameborder="0" scrolling="auto" width="100%" height="1500"></iframe></p>
测试(API函数和STM32封装的一样)
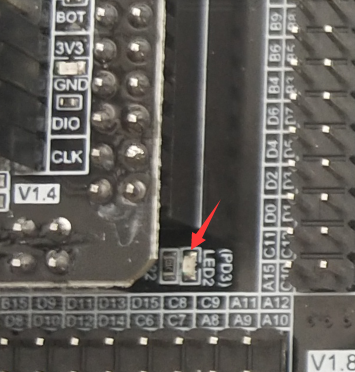
1,开发板上的led连接了PD3
2,控制PD3 输出高低电平(把以下程序直接拷贝到自己工程运行)
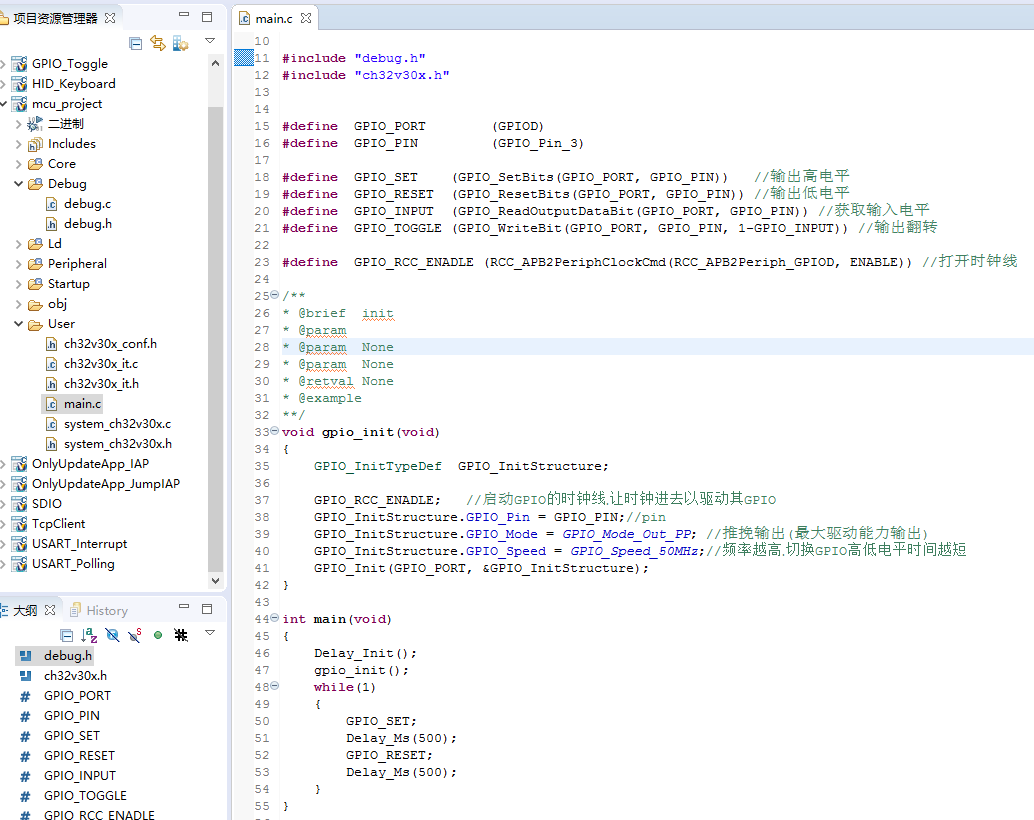
#include "debug.h"
#include "ch32v30x.h"


#define  GPIO_PORT        (GPIOD)
#define  GPIO_PIN         (GPIO_Pin_3)

#define  GPIO_SET    (GPIO_SetBits(GPIO_PORT, GPIO_PIN))   //输出高电平
#define  GPIO_RESET  (GPIO_ResetBits(GPIO_PORT, GPIO_PIN)) //输出低电平
#define  GPIO_INPUT  (GPIO_ReadOutputDataBit(GPIO_PORT, GPIO_PIN)) //获取输入电平
#define  GPIO_TOGGLE (GPIO_WriteBit(GPIO_PORT, GPIO_PIN, 1-GPIO_INPUT)) //输出翻转

#define  GPIO_RCC_ENADLE (RCC_APB2PeriphClockCmd(RCC_APB2Periph_GPIOD, ENABLE)) //打开时钟线

/**
* @brief  init
* @param
* @param  None
* @param  None
* @retval None
* @example
**/
void gpio_init(void)
{
    GPIO_InitTypeDef  GPIO_InitStructure;

    GPIO_RCC_ENADLE;   //启动GPIO的时钟线,让时钟进去以驱动其GPIO
    GPIO_InitStructure.GPIO_Pin = GPIO_PIN;//pin
    GPIO_InitStructure.GPIO_Mode = GPIO_Mode_Out_PP; //推挽输出(最大驱动能力输出)
    GPIO_InitStructure.GPIO_Speed = GPIO_Speed_50MHz;//频率越高,切换GPIO高低电平时间越短
    GPIO_Init(GPIO_PORT, &GPIO_InitStructure);
}

int main(void)
{
    Delay_Init();
    gpio_init();
    while(1)
    {
        GPIO_SET;
        Delay_Ms(500);
        GPIO_RESET;
        Delay_Ms(500);
    }
}
会看到LED每隔500ms 闪耀

程序说明
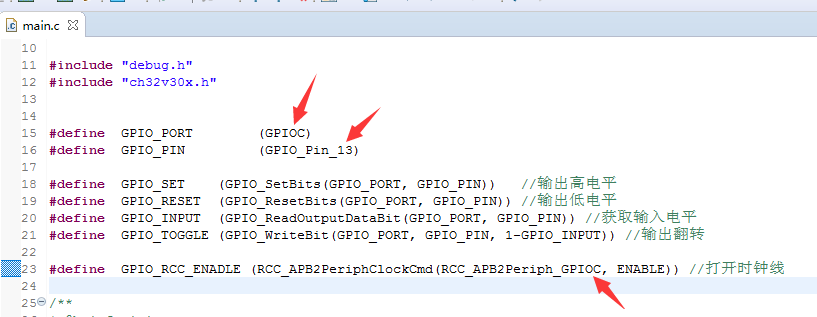
1,程序是按照便于移植使用编写的
用户想使用其它端口可直接在上面修改(列如改为PC13)


 浙公网安备 33010602011771号