Spring AOP - 静态代理实践
说明
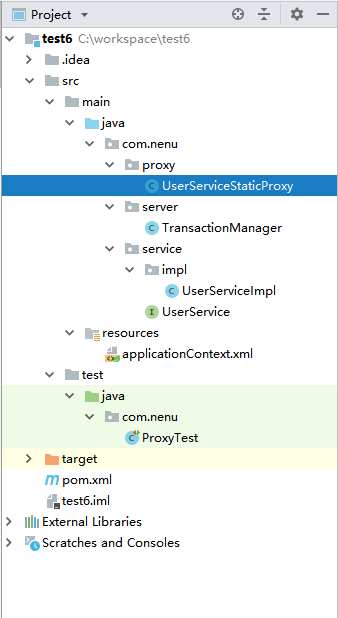
如图项目目录,以下所有操作对应此项目目录:
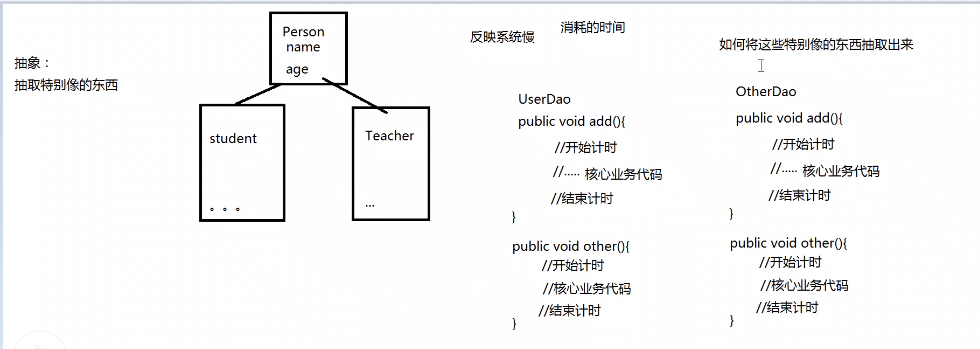
如图,根据SpringAOP的原理,使用静态代理抽取其中特别像的方法add()和other()
一、xml类中配置全注解:
<?xml version="1.0" encoding="UTF-8"?>
<beans xmlns="http://www.springframework.org/schema/beans"
       xmlns:xsi="http://www.w3.org/2001/XMLSchema-instance"
       xmlns:context="http://www.springframework.org/schema/context"
       xsi:schemaLocation="http://www.springframework.org/schema/beans
    http://www.springframework.org/schema/beans/spring-beans-3.0.xsd http://www.springframework.org/schema/context https://www.springframework.org/schema/context/spring-context.xsd">

    <!-- 开启扫描 -->
    <context:component-scan base-package="com.nenu"/>

</beans>
二、UserService类:
编辑add和other方法的接口
package com.nenu.service;

public interface UserService {
    public void add();
    public void other();
}
三、UserServiceImpl类
编辑add和other方法的继承类,这两个方法主要是输出一句话:
package com.nenu.service.impl;

import com.nenu.service.UserService;
import org.springframework.stereotype.Component;

@Component
public class UserServiceImpl implements UserService {

    @Override
    public void add() {
        System.out.println("UserServiceImpl add……");
    }

    @Override
    public void other() {
        System.out.println("UserServiceImpl other.....");
    }

    public UserServiceImpl(){}

}
四、TransactionManager(事务管理类)
在事务管理类TransactionManager中设置add和other方法前后的事务管理before和after(非核心代码)
package com.nenu.server;

public class TransactionManager {
    //before
    public void before(){
        System.out.println("TransactionManager before");
    }
    //after
    public void after(){
        System.out.println("TransactionManager before");
    }
}
PS:这里面的方法也可以写静态的,这样后面就不用new对象了
事务管理详见:Spring 事务管理详解
五、UserServiceStaticProxy
package com.nenu.proxy;

import com.nenu.server.TransactionManager;
import com.nenu.service.UserService;

public class UserServiceStaticProxy implements UserService {
    //目标对象 - 代理谁
    private UserService target;

    //要加入的业务增强,比如记录时间,加入事务控制
    private TransactionManager transactionManager;

    //通过构造方法来传入具体要代理的对象
    public UserServiceStaticProxy(UserService target, TransactionManager transactionManager){
        this.target = target;
        this.transactionManager = transactionManager;
    }
    @Override
    public void add() {
        //非核心业务1
        transactionManager.before();
        //核心活,目标对象来做
        target.add();
        //非核心业务2
        transactionManager.after();
    }

    @Override
    public void other() {
        //非核心业务1
        transactionManager.before();
        //核心活,目标对象来做
        target.other();
        //非核心业务2
        transactionManager.after();
    }
}
六、测试类:
package com.nenu;

import com.nenu.proxy.UserServiceStaticProxy;
import com.nenu.server.TransactionManager;
import com.nenu.service.UserService;
import org.junit.Test;
import org.springframework.context.ApplicationContext;
import org.springframework.context.support.ClassPathXmlApplicationContext;

public class ProxyTest {
    @Test
    public void UserTest(){
        //1.配置容器
        ApplicationContext applicationContext =
                new ClassPathXmlApplicationContext("applicationContext.xml");
        //2.取出容器中bean
        UserService target =
                (UserService) applicationContext.getBean("userServiceImpl");
        //3.创建一个代理对象
        //3.1 创建非核心业务增强对象
        TransactionManager transactionManager = new TransactionManager();
        //3.2 创建代理对象
        UserServiceStaticProxy proxy = new UserServiceStaticProxy(target, transactionManager);
        //3.调用
        proxy.add();
        proxy.other();
    }
}
测试:
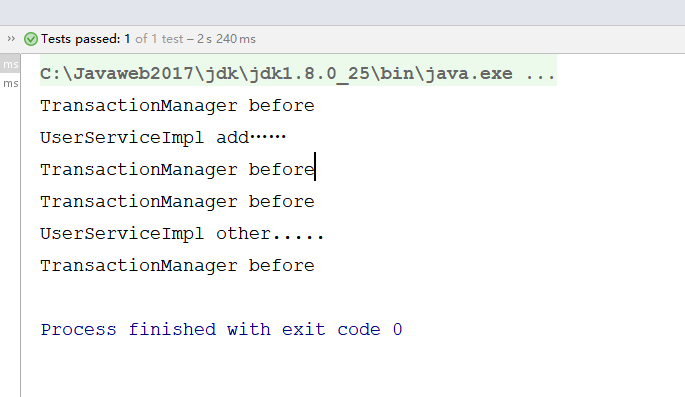
成功!!!
创建代理模式的方法分为静态代理和动态代理,静态代理的对象是要实实在在创造出来的,静态代理在编译期就决定了。
原理上图↑↑↑,小伙伴们加油

 浙公网安备 33010602011771号