高并发秒杀应用:Web层设计(SpringMvc的使用)
设计Restful接口
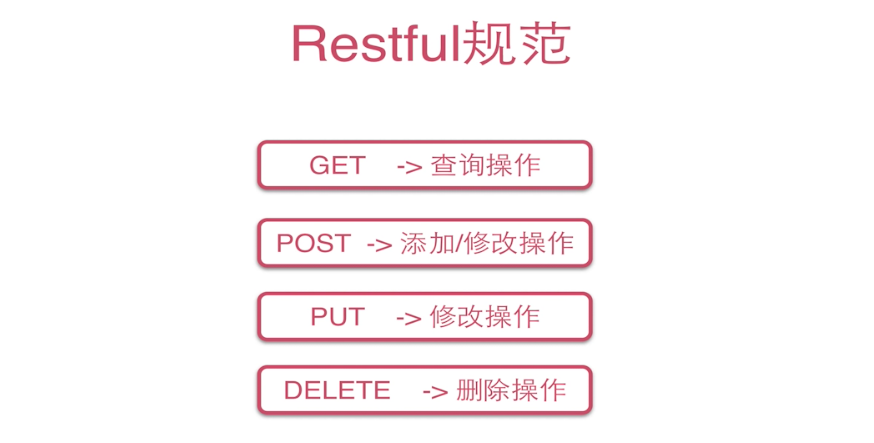
RESTful:是很久以前就出现的一个设计理念, 但是在的应用在Rails中才得到真正的发扬光大。在Rails中的设计规范中,对Http的各种请求和URL的表示、提交做了非常友好的规范。其本质是一个优雅的URL的表示方式,他的意义是资源的状态和资源状态的转移。
RESTful示例:
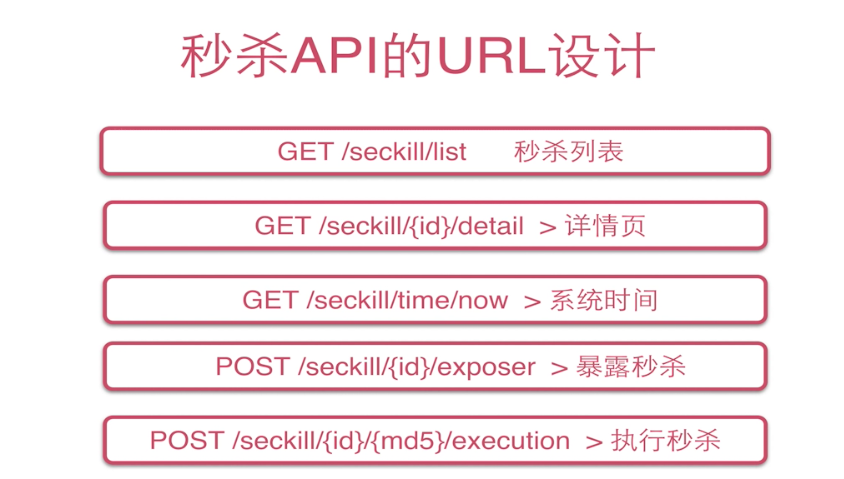
GET /seckill/list 表示秒杀的列表页使用GET方式获取提交。
POST /seckill/{seckillId}/execution 表示以post执行对相应商品的秒杀,seckillId是商品的 Id,execution是秒杀的接口。
DELETE /seckill/{id}/delete 以DELETE的方式删除一个资源。
注意:Http的请求不止是GET和POST,这两个只是常用的请求方式,还有其他八种:GET,POST,HEAD,PUT,DELETE,CONNECT,TARCE,OPTIONS。具体可以参考这篇博客:HTTP的请求、响应。
Restful规范:
URL设计:
- /模块/资源/{标识}/集合1/......
- /user/{uid}/freands ->好友列表。
- /User/{uid}/flowers ->关注者列表。
本项目的URL的设计:
SpringMvc
springmvc开发主要是围绕着Handler开发,在Handler的开发的产出有两个部分:①:数据(Model);②:页面(View)。
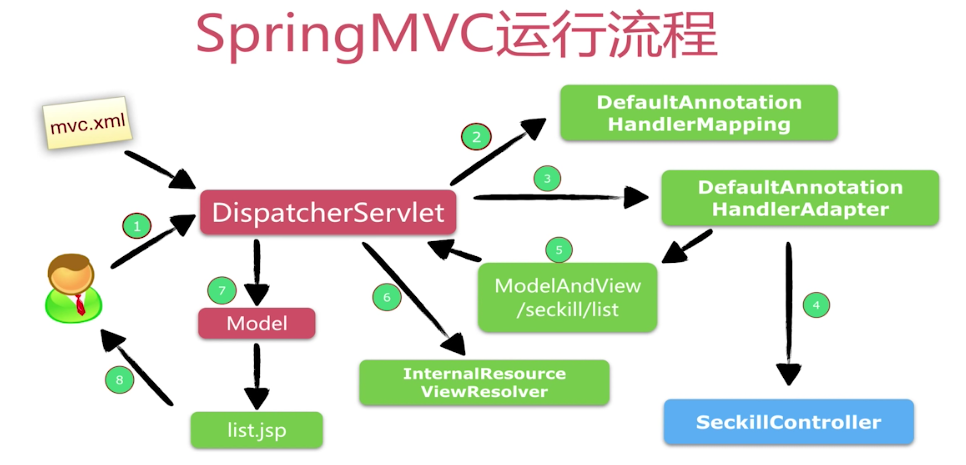
SpringMvc流程:
①:用户发送一个请求,所有的请求都会被映射到DispatcherServlet(这是一个中 央控制器的Servlet)。
②:中央控制器Servlet会拦截所有的请求,默认使用 DefaultAnnotationHandlerMapping,主要的作用是用来映射URL,那个URL 来对应那个Handler。
③:第②步映射完成之后,将会使用默认的DefaultAnnotationHandlerAdapter, 目的是做Handler的一个适配。
④:终衔接自己开发的Controller。
⑤:生成对应的View同时会交付到Servlet中,就是中央控制器DispatcherServlet
⑥:InteralResourceViewResolver默认JSP的一个View。
⑦:InterResourceViewResolver将Model和XXX.jsp相结合。最终返回给用户。
* 我们在开发的时候通常是Controller,其他部分使用springMvc使用的注解形式来映射URL。对应到我们的逻辑,控制输出我们的数据。
Http请求映射的原理:
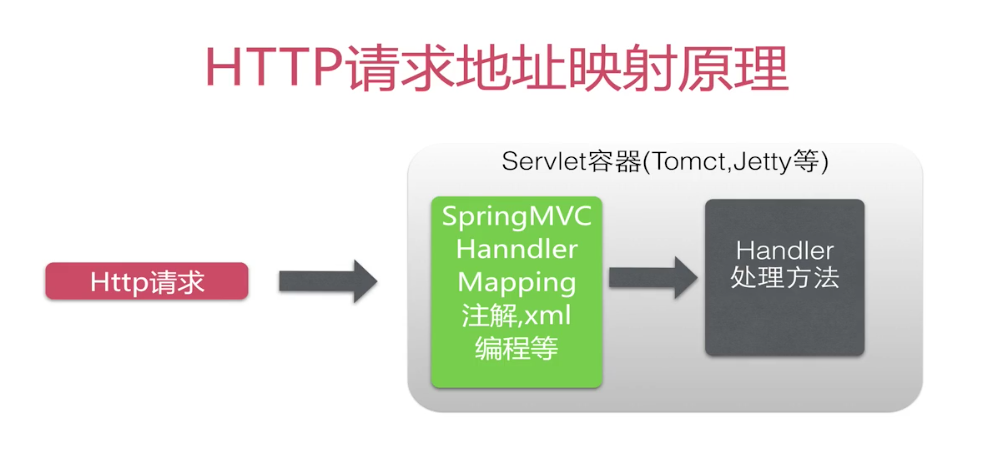
注解映射:
@RequestMapping注解:支持标准的的Url;支持Ant风格的Url。(?和*和**等字符);支持带{XXX}占位符的URL。
eg:/user/*/creation *可以匹配任意字符串:/user/aaa/creation,/user/bbb/creation....
/user/**/creation **可以匹配任意路径:/user/creation、/user/aaa/bbb/creation......
/user/{userId} 可以匹配:/user/123 、/user/aaa............
/company/{complyId}/user/{id}/detail 和上面一样的。
请求方法的细节处理:
①:请求参数的绑定:在URL中的参数占位符,参数绑定使用注解@PathVariable来绑定,这个和
先前dao层设计时,mybatis的参数绑定类似使用的是 @Param注解,具体使用如下。
②:请求方式的限制:在@RequestMapping中使用method属性进行限制。

③:请求转发重定向
④:数据模型的赋值:我们通常使用Model进行赋值传值。
⑤:怎样返回Json数据:@ResponseBody和produces属性。

⑥:cookie访问

*在学习后面之前需要先学习:
配置SpringMvc框架
配置web.xml:打开web.xml配置springmvc。根据先前SpringMvc的流程可得,我们第一步应该配置SpringMvc的DispatcherServlet。我们还得配置springmvc需要加载的配置文件。
<!--配置DispatcherServlet-->
    <servlet>
        <servlet-name>seckill-dispatcher</servlet-name>
        <servlet-class>org.springframework.web.servlet.DispatcherServlet</servlet-class>
        <!-- 配置springmvc需要加载的配置文件
            ①:springDao-config.xml.②springService-config.xml.③springWeb-config.xml的配置
            springmvc 的实现路径是Mybatis->spring->springMvc.
        -->
        <init-param>
            <param-name>contextConfigLocation</param-name>
            <param-value>classpath:spring/spring*.xml</param-value>
        </init-param>
    </servlet>
我们还需要配置URL的映射路径:
    <servlet-mapping>
        <servlet-name>seckill-dispatcher</servlet-name>
        <!--默认匹配所有请求-->
        <url-pattern>/</url-pattern>
    </servlet-mapping>
web.xml配置如下:
![]() View Code<?xml version="1.0" encoding="UTF-8"?> <web-app version="3.1" xmlns="http://xmlns.jcp.org/xml/ns/javaee" xmlns:xsi="http://www.w3.org/2001/XMLSchema-instance" xsi:schemaLocation="http://xmlns.jcp.org/xml/ns/javaee http://xmlns.jcp.org/xml/ns/javaee/web-app_3_1.xsd"> <!--配置DispatcherServlet--> <servlet> <servlet-name>seckill-dispatcher</servlet-name> <servlet-class>org.springframework.web.servlet.DispatcherServlet</servlet-class> <!-- 配置springmvc需要加载的配置文件 ①:springDao-config.xml.②springService-config.xml.③springWeb-config.xml的配置 springmvc 的实现路径是Mybatis->spring->springMvc. --> <init-param> <param-name>contextConfigLocation</param-name> <param-value>classpath:spring/spring*.xml</param-value> </init-param> </servlet> <servlet-mapping> <servlet-name>seckill-dispatcher</servlet-name> <!--默认匹配所有请求--> <url-pattern>/</url-pattern> </servlet-mapping> </web-app>
View Code<?xml version="1.0" encoding="UTF-8"?> <web-app version="3.1" xmlns="http://xmlns.jcp.org/xml/ns/javaee" xmlns:xsi="http://www.w3.org/2001/XMLSchema-instance" xsi:schemaLocation="http://xmlns.jcp.org/xml/ns/javaee http://xmlns.jcp.org/xml/ns/javaee/web-app_3_1.xsd"> <!--配置DispatcherServlet--> <servlet> <servlet-name>seckill-dispatcher</servlet-name> <servlet-class>org.springframework.web.servlet.DispatcherServlet</servlet-class> <!-- 配置springmvc需要加载的配置文件 ①:springDao-config.xml.②springService-config.xml.③springWeb-config.xml的配置 springmvc 的实现路径是Mybatis->spring->springMvc. --> <init-param> <param-name>contextConfigLocation</param-name> <param-value>classpath:spring/spring*.xml</param-value> </init-param> </servlet> <servlet-mapping> <servlet-name>seckill-dispatcher</servlet-name> <!--默认匹配所有请求--> <url-pattern>/</url-pattern> </servlet-mapping> </web-app>


配置SpringMvc配置文件:在spring文件夹中新建springWeb-config.xml配置文件。首先我们要开启SpringMvc的注解。作用是:
①:自动注册DefaultAnnotationHandlerMapping,AnnotationMethodHandlerAdapter
②: 提供一系列的功能:Url的数据绑定,数字和日期的format @NumberFormat,@DataTimeFormat。 xml,json的默认读写支持。
<mvc:annotation-driven></mvc:annotation-driven>
第二步是配置servletMapping的映射路径。<mvc:default-servlet-handler/>
第三步就是jsp显示的ViewResolver,也就是拦截器。
    <!--jsp的显示ViewResolver-->
    <bean class="org.springframework.web.servlet.view.InternalResourceViewResolver">
        <property name="viewClass" value="org.springframework.web.servlet.view.JstlView"/>
        <!--文件的开始-->
        <property name="prefix" value="/WEB-INF/jsp/"/>
        <!--文件的结尾-->
        <property name="suffix" value=".jsp"/>
    </bean>
第四步:扫描web相关的bean:
   <!-- 扫描web相关的bean-->
    <context:component-scan base-package="org.seckill.web"/>
springWeb-config.xml文件如下:
![]() View Code<?xml version="1.0" encoding="UTF-8"?> <beans xmlns="http://www.springframework.org/schema/beans" xmlns:xsi="http://www.w3.org/2001/XMLSchema-instance" xmlns:mvc="http://www.springframework.org/schema/mvc" xmlns:context="http://www.springframework.org/schema/context" xsi:schemaLocation="http://www.springframework.org/schema/beans http://www.springframework.org/schema/beans/spring-beans.xsd http://www.springframework.org/schema/mvc http://www.springframework.org/schema/mvc/spring-mvc.xsd http://www.springframework.org/schema/context http://www.springframework.org/schema/context/spring-context.xsd"> <!-- 配置springMvc--> <!-- 1.开启SpringMvc注解模式 这步是一个简化配置。 作用:①:自动注册DefaultAnnotationHandlerMapping,AnnotationMethodHandlerAdapter ②: 提供一系列的功能:Url的数据绑定,数字和日期的format @NumberFormat,@DataTimeFormat xml,json的默认读写支持。 --> <mvc:annotation-driven></mvc:annotation-driven> <!-- servletMapping的映射路径是"/"--> <!-- 静态资源默认servlet配置 1.加入对静态资源的处理:js,gif,png 2.允许/做整体的映射。 张智老师先前的<mvc:resource mapping="",location=""/>的配置方便许多 --> <mvc:default-servlet-handler/> <!--jsp的显示ViewResolver--> <bean class="org.springframework.web.servlet.view.InternalResourceViewResolver"> <property name="viewClass" value="org.springframework.web.servlet.view.JstlView"/> <!--文件的开始--> <property name="prefix" value="/WEB-INF/jsp/"/> <!--文件的结尾--> <property name="suffix" value=".jsp"/> </bean> <!-- 扫描web相关的bean--> <context:component-scan base-package="org.seckill.web"/> </beans>
View Code<?xml version="1.0" encoding="UTF-8"?> <beans xmlns="http://www.springframework.org/schema/beans" xmlns:xsi="http://www.w3.org/2001/XMLSchema-instance" xmlns:mvc="http://www.springframework.org/schema/mvc" xmlns:context="http://www.springframework.org/schema/context" xsi:schemaLocation="http://www.springframework.org/schema/beans http://www.springframework.org/schema/beans/spring-beans.xsd http://www.springframework.org/schema/mvc http://www.springframework.org/schema/mvc/spring-mvc.xsd http://www.springframework.org/schema/context http://www.springframework.org/schema/context/spring-context.xsd"> <!-- 配置springMvc--> <!-- 1.开启SpringMvc注解模式 这步是一个简化配置。 作用:①:自动注册DefaultAnnotationHandlerMapping,AnnotationMethodHandlerAdapter ②: 提供一系列的功能:Url的数据绑定,数字和日期的format @NumberFormat,@DataTimeFormat xml,json的默认读写支持。 --> <mvc:annotation-driven></mvc:annotation-driven> <!-- servletMapping的映射路径是"/"--> <!-- 静态资源默认servlet配置 1.加入对静态资源的处理:js,gif,png 2.允许/做整体的映射。 张智老师先前的<mvc:resource mapping="",location=""/>的配置方便许多 --> <mvc:default-servlet-handler/> <!--jsp的显示ViewResolver--> <bean class="org.springframework.web.servlet.view.InternalResourceViewResolver"> <property name="viewClass" value="org.springframework.web.servlet.view.JstlView"/> <!--文件的开始--> <property name="prefix" value="/WEB-INF/jsp/"/> <!--文件的结尾--> <property name="suffix" value=".jsp"/> </bean> <!-- 扫描web相关的bean--> <context:component-scan base-package="org.seckill.web"/> </beans>
使用SprinMvc实现Restful接口
新建文件夹web存放web层的逻辑处理,新建SeckillController。
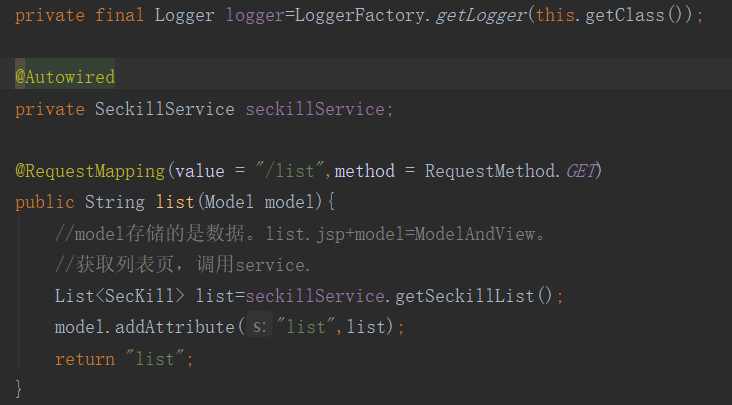
首先在类上面使用@Controller 将其放入spring容器,@RequestMapping("/seckill") 模块部分。

①:实现前台获取所有秒杀列表信息的list接口。调用Service层实现的接口并且封装在Model中,等待前台获取数据。
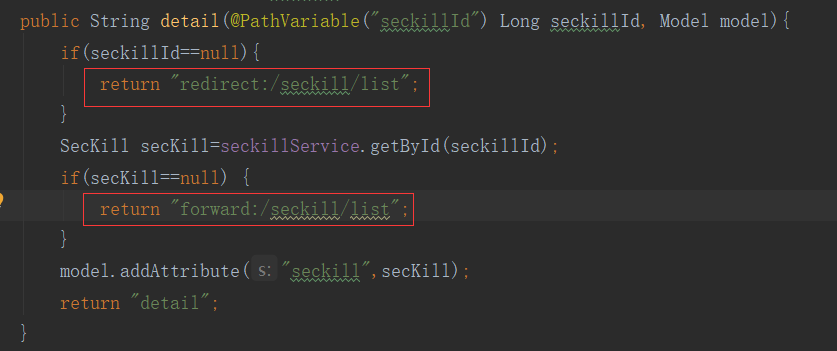
②:实现详情页接口(根据seckillId获取商品的详细信息)

在实现获取秒杀地址和执行秒杀接口前,我们需要封装一下传输层Dto的数据对象SeckillResult:成员变量:
bool success;//表示用户端在服务器获取数据是否成功。
T data;//这个数据为泛型,有可能其他地方也会使用,数据对象不同,所以使用泛型,用来表示传 //输的数据.
String errmsg;//表示失败时的错误信息。
SeckillResult如下:
package org.seckill.dto;

/**
 *封装成json结果
 *所有的Ajax请求返回类型。
 * @author yangxin
 * @time 2018/12/8  12:34
 */
public class SeckillResult<T> {

    //表示是否拿到数据。
    private boolean success;

    private T data;

    private String errMes;

    public SeckillResult(boolean success, String errMes) {
        this.success = success;
        this.errMes = errMes;
    }

    public SeckillResult(boolean success, T data) {
        this.success = success;
        this.data = data;
    }

    public boolean isSuccess() {
        return success;
    }

    public void setSuccess(boolean success) {
        this.success = success;
    }

    public T getData() {
        return data;
    }

    public void setData(T data) {
        this.data = data;
    }

    public String getErrMes() {
        return errMes;
    }

    public void setErrMes(String errMes) {
        this.errMes = errMes;
    }
}
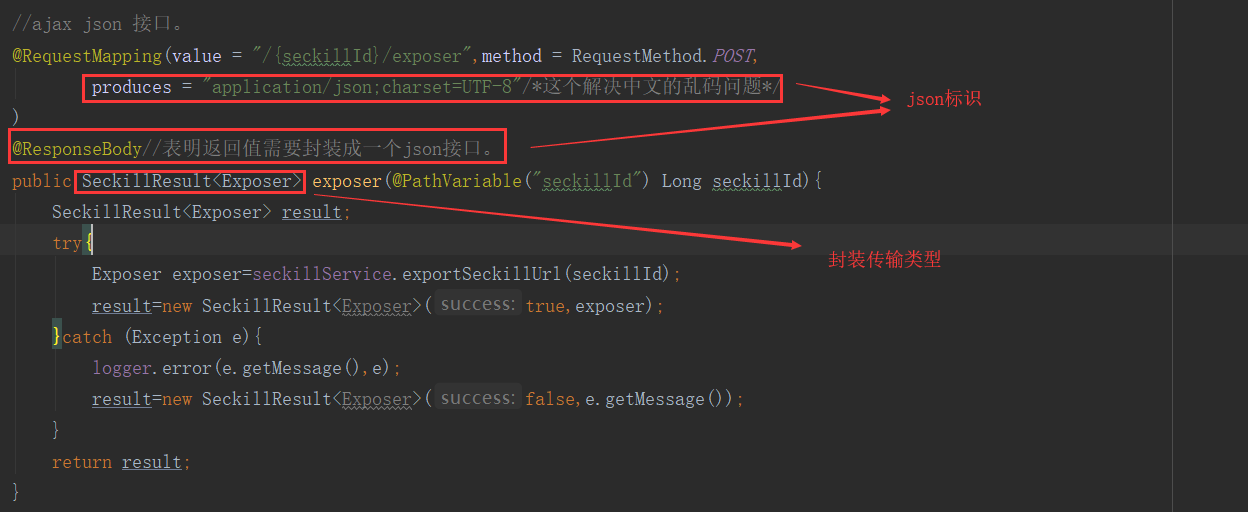
③:实现暴露URL地址的接口,他将返回给前端以Json的格式。我们把整个操作放在try/catch中,没有任何问题则直接返回成功的json数据;如果有异常则返回失败的数据。
④:实现执行秒杀的接口。
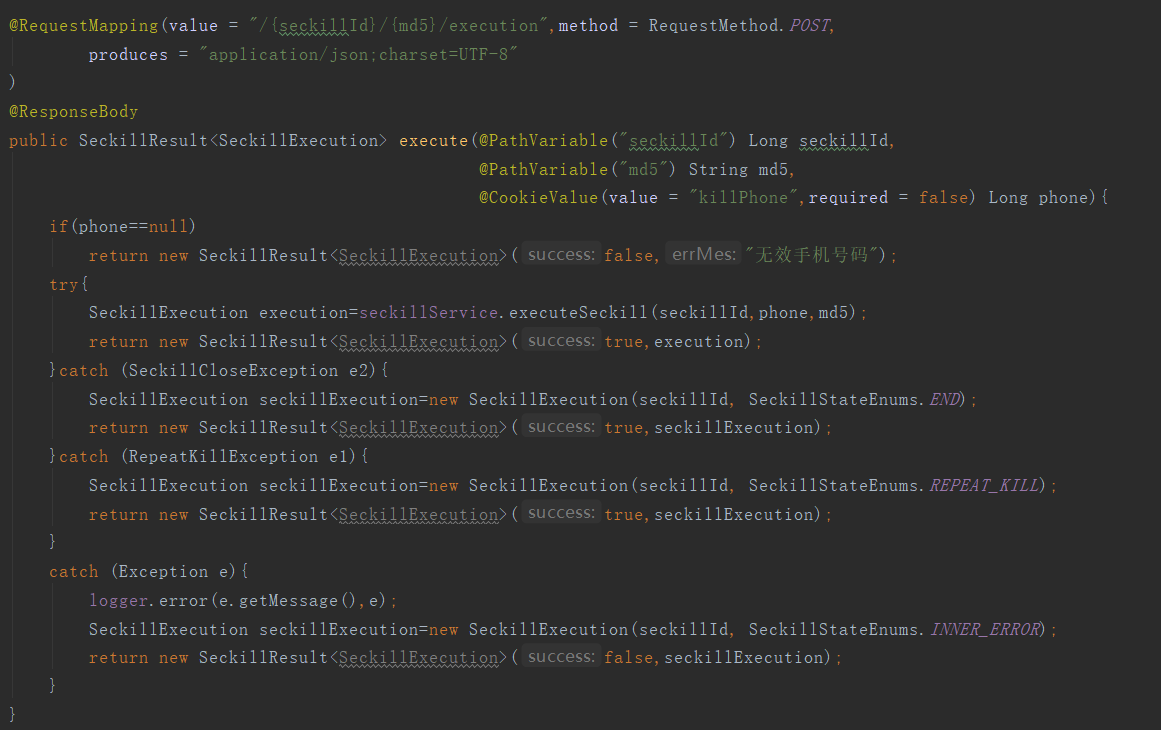
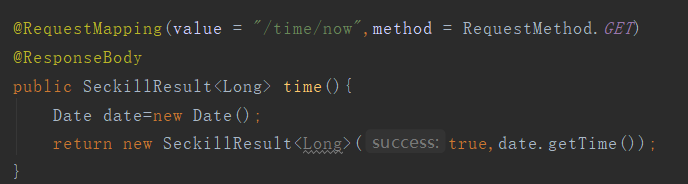
⑤:实现获取服务器时间接口。有的时候由于时区造成客户端和服务器端时间不一致导致秒杀提前或者延后开始。或者有可能用户恶意篡改客户端时间,倒是秒杀非正常的开始,所有需要获取系统时间,确保时间的一致性。
Controller代码
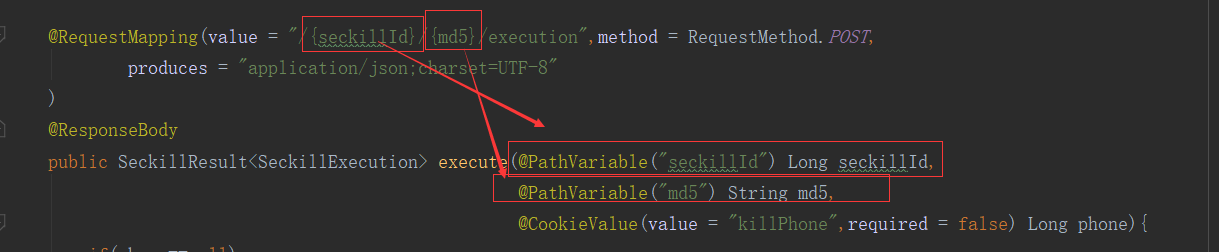
package org.seckill.web;

/**
 * @author yangxin
 * @time 2018/12/8  12:06
 */
@Controller
@RequestMapping("/seckill")//模块
public class SeckillController {
    private final Logger logger=LoggerFactory.getLogger(this.getClass());

    @Autowired
    private SeckillService seckillService;

    @RequestMapping(value = "/list",method = RequestMethod.GET)
    public String list(Model model){
        //model存储的是数据。list.jsp+model=ModelAndView。
        //获取列表页,调用service.
        List<SecKill> list=seckillService.getSeckillList();
        model.addAttribute("list",list);
        return "list";
    }

    @RequestMapping(value="/{seckillId}/detail",method = RequestMethod.GET)
    public String detail(@PathVariable("seckillId") Long seckillId, Model model){
        if(seckillId==null){
            return "redirect:/seckill/list";
        }
        SecKill secKill=seckillService.getById(seckillId);
        if(secKill==null) {
            return "redirect:/seckill/list";
        }
        model.addAttribute("seckill",secKill);
        return "detail";
    }

    //ajax json 接口。
    @RequestMapping(value = "/{seckillId}/exposer",method = RequestMethod.POST,
            produces = "application/json;charset=UTF-8"/*这个解决中文的乱码问题*/
    )
    @ResponseBody//表明返回值需要封装成一个json接口。
    public SeckillResult<Exposer> exposer(@PathVariable("seckillId") Long seckillId){
        SeckillResult<Exposer> result;
        try{
            Exposer exposer=seckillService.exportSeckillUrl(seckillId);
            result=new SeckillResult<Exposer>(true,exposer);
        }catch (Exception e){
            logger.error(e.getMessage(),e);
            result=new SeckillResult<Exposer>(false,e.getMessage());
        }
        return result;
    }

    @RequestMapping(value = "/{seckillId}/{md5}/execution",method = RequestMethod.POST,
            produces = "application/json;charset=UTF-8"
    )
    @ResponseBody
    public SeckillResult<SeckillExecution> execute(@PathVariable("seckillId") Long seckillId,
                                                   @PathVariable("md5") String md5,
                                                   @CookieValue(value = "killPhone",required = false) Long phone){
        if(phone==null)
            return new SeckillResult<SeckillExecution>(false,"无效手机号码");
        try{
            SeckillExecution execution=seckillService.executeSeckill(seckillId,phone,md5);
            return new SeckillResult<SeckillExecution>(true,execution);
        }catch (SeckillCloseException e2){
            SeckillExecution seckillExecution=new SeckillExecution(seckillId, SeckillStateEnums.END);
            return new SeckillResult<SeckillExecution>(true,seckillExecution);
        }catch (RepeatKillException e1){
            SeckillExecution seckillExecution=new SeckillExecution(seckillId, SeckillStateEnums.REPEAT_KILL);
            return new SeckillResult<SeckillExecution>(true,seckillExecution);
        }
        catch (Exception e){
            logger.error(e.getMessage(),e);
            SeckillExecution seckillExecution=new SeckillExecution(seckillId, SeckillStateEnums.INNER_ERROR);
            return new SeckillResult<SeckillExecution>(false,seckillExecution);
        }
    }

    @RequestMapping(value = "/time/now",method = RequestMethod.GET)
    @ResponseBody
    public SeckillResult<Long> time(){
        Date date=new Date();
        return new SeckillResult<Long>(true,date.getTime());
    }

}
客户端的开发
我们在WEB-INF下创建jsp文件夹来存放所有的jsp文件,再在jsp文件夹下创建common创建公共部分的jsp,比如head.jsp,公共的头。
我们需要注意的问题:
①:提取jsp公共的部分,在相应的jsp页面静态引入,防止代码混杂。
②:引入jstl支持,如时间格式fmt,核心库c

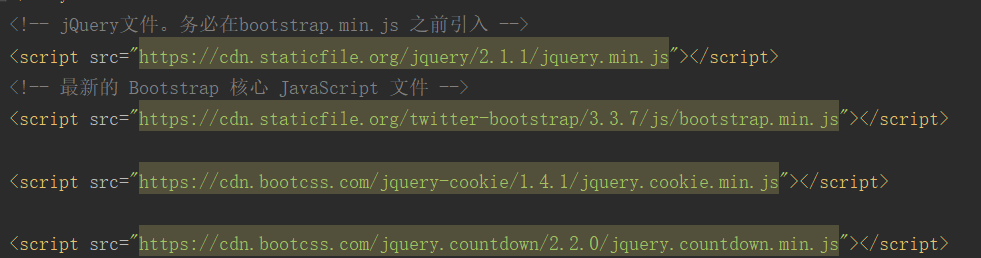
③:使用CDN的方式引入Jquery包、bootstrap。目的是方便引入,不需要下载具体 的包。而且部署在服务器上运行速率会有所提高。缺点是:调试必须联网。
如:
④:关于js的编写;因为Js是动态语言,所以在大多数编写的时候都比较杂乱,而 且不方便维护;所以在编写的过程中我们对将要编写的js模块化。
比如:var seckill={
//表示使用的URL地址整理打包
URL:{},
//表示detail页面的逻辑代码
detail:{},
//表示list页面的逻辑代码
list{},
}
所以在调用的时候如下效果,就具有分包的效果,条例清晰。
head.jsp
<meta name="viewport" content="width=device-width, initial-scale=1.0">
<!-- 引入 Bootstrap -->
<link href="https://maxcdn.bootstrapcdn.com/bootstrap/3.3.7/css/bootstrap.min.css" rel="stylesheet">

<!-- HTML5 Shiv 和 Respond.js 用于让 IE8 支持 HTML5元素和媒体查询 -->
<!-- 注意: 如果通过 file://  引入 Respond.js 文件,则该文件无法起效果 -->
<!--[if lt IE 9]>
<script src="https://oss.maxcdn.com/libs/html5shiv/3.7.0/html5shiv.js"></script>
<script src="https://oss.maxcdn.com/libs/respond.js/1.3.0/respond.min.js"></script>
<![endif]-->
tag.jsp
<%@taglib prefix="c" uri="http://java.sun.com/jsp/jstl/core"%>
<%@taglib prefix="fmt" uri="http://java.sun.com/jsp/jstl/fmt"%>
list.jsp文件中包含这些文件
在list文件中主要实现table的数据填充。

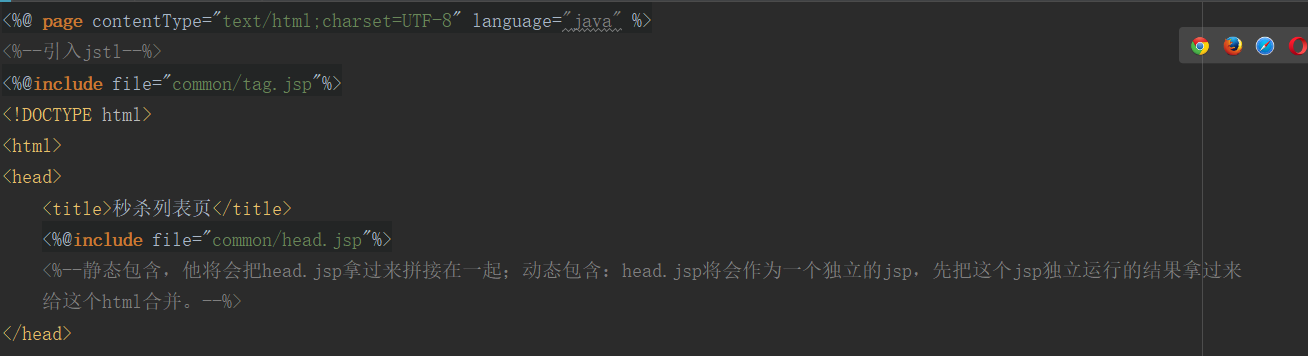
list.jsp
<%@ page contentType="text/html;charset=UTF-8" language="java" %>
<%--引入jstl--%>
<%@include file="common/tag.jsp"%>
<!DOCTYPE html>
<html>
<head>
    <title>秒杀列表页</title>
    <%@include file="common/head.jsp"%>
    <%--静态包含,他将会把head.jsp拿过来拼接在一起;动态包含:head.jsp将会作为一个独立的jsp,先把这个jsp独立运行的结果拿过来
    给这个html合并。--%>
</head>
<body>
    <div class="container">
        <div class="panel panel-default">
            <div class="panel-heading text-center">
                <h2>秒杀列表</h2>
            </div>
            <div class="panel-body">
                <table class="table table-hover">
                    <thead>
                    <tr>
                            <th>名称</th>
                            <th>库存</th>
                            <th>开始时间</th>
                            <th>结束时间</th>
                            <th>创建时间</th>
                            <th>详情页</th>
                    </tr>
                    </thead>
                    <tbody>
                    <c:forEach var="sk" items="${list}">
                        <tr>
                            <td>${sk.name}</td>
                            <td>${sk.number}</td>
                            <td><fmt:formatDate value="${sk.startTime}" pattern="yyyy-MM-dd HH:mm:ss"></fmt:formatDate></td>
                            <td><fmt:formatDate value="${sk.endTime}" pattern="yyyy-MM-dd HH:mm:ss"></fmt:formatDate></td>
                            <td><fmt:formatDate value="${sk.createTime}" pattern="yyyy-MM-dd HH:mm:ss"></fmt:formatDate></td>
                            <td><a class="btn btn-info" href="/SSM_Learning/seckill/${sk.seckillId}/detail" target="_blank">link</a></td>
                        </tr>
                    </c:forEach>

                    </tbody>
                </table>
            </div>
        </div>
    </div>

</body>
<!-- jQuery文件。务必在bootstrap.min.js 之前引入 -->
<script src="https://cdn.staticfile.org/jquery/2.1.1/jquery.min.js"></script>
<!-- 最新的 Bootstrap 核心 JavaScript 文件 -->
<script src="https://cdn.staticfile.org/twitter-bootstrap/3.3.7/js/bootstrap.min.js"></script>
</html>
detail.jsp
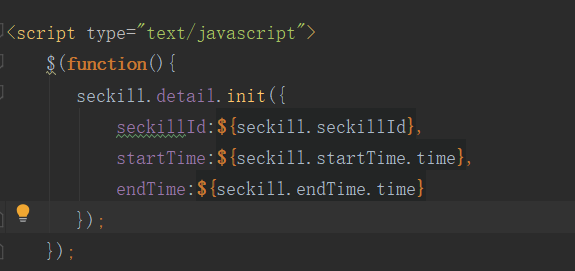
<%@ page contentType="text/html;charset=UTF-8" language="java" %>

<!DOCTYPE html>
<html>
<head>
    <title>秒杀详情页</title>
    <meta name="content-type" content="text/html; charset=UTF-8">
    <%@include file="common/head.jsp"%>
    <%--静态包含,他将会把head.jsp拿过来拼接在一起;动态包含:head.jsp将会作为一个独立的jsp,先把这个jsp独立运行的结果拿过来
    给这个html合并。--%>
</head>
<body>
    <div class="container">
        <div class="panel panel-default text-center">
            <div class="panel-heading">
                <h1>${seckill.name}</h1>
            </div>
            <div class="panel-body">
                <h2 class="text-danger">
                    <%--显示时间--%>
                    <span class="glyphicon glyphicon-time"></span>
                    <%--显示倒计时--%>
                    <span class="glyphicon" id="seckill-box"></span>
                </h2>
            </div>
        </div>
    </div>
    <%--登录弹出层,输入电话--%>
    <div id="killPhoneModal" class="modal fade">
        <div class="modal-dialog">
            <div class="modal-content">
                <div class="modal-header">
                    <h3 class="modal-title text-center">
                        <span class="glyphicon glyphicon-phone"></span>
                    </h3>
                </div>
                <div class="modal-body">
                    <div class="row">
                        <div class="col-xs-8 col-xs-offset-2">
                            <input type="text" name="killPhone" id="killPhoneKey"
                                   placeholder="填手机号^o^" class="form-control">
                        </div>
                    </div>
                </div>

                <div class="modal-footer">
                    <span id="killPhoneMessage" class="glyphicon"></span>
                    <button type="button" id="killPhoneBtn" class="btn btn-success">
                        <span class="glyphicon glyphicon-phone"></span>
                        Submit
                    </button>
                </div>
            </div>
        </div>
    </div>
</body>
<!-- jQuery文件。务必在bootstrap.min.js 之前引入 -->
<script src="https://cdn.staticfile.org/jquery/2.1.1/jquery.min.js"></script>
<!-- 最新的 Bootstrap 核心 JavaScript 文件 -->
<script src="https://cdn.staticfile.org/twitter-bootstrap/3.3.7/js/bootstrap.min.js"></script>

<script src="https://cdn.bootcss.com/jquery-cookie/1.4.1/jquery.cookie.min.js"></script>

<script src="https://cdn.bootcss.com/jquery.countdown/2.2.0/jquery.countdown.min.js"></script>

<script src="/SSM_Learning/resource/script/seckill.js" type="text/javascript"  charset="UTF-8"></script>

<script type="text/javascript">
    $(function(){
       seckill.detail.init({
           seckillId:${seckill.seckillId},
           startTime:${seckill.startTime.time},
           endTime:${seckill.endTime.time}
       });
    });
</script>
</html>
页面都完成了,具体实现 seckill.js的逻辑部分。
//存放主要交互逻辑的js代码
// javascript 模块化(package.类.方法)
//需要显示本页面注解,需要将本页面代码调成utf-8格式。
var seckill= {
    //封装秒杀相关ajax的url
    URl: {
        now:function () {
            return '/SSM_Learning/seckill/time/now';
        },
        exposer:function(seckillId){
            return '/SSM_Learning/seckill/'+seckillId+'/exposer';
        },
        execution:function(md5,seckillId){
            return '/SSM_Learning/seckill/'+seckillId+'/'+md5+'/execution';
        }

    },
    handlerSeckillkill:function(seckillId,node){
        //获取秒杀地址,控制显示器,执行秒杀
        node.hide().html('<button class="btn btn-primary btn-lg" id="killBtn">开始秒杀</button>');
        $.post(seckill.URl.exposer(seckillId),{},function(result){
            //再回调函数中执行交互流程。
            if(result&&result['success']){
                var exposer =result['data'];
                if(exposer['exposed']){
                    //开始秒杀。
                    //获取秒杀地址。
                    var md5=exposer['md5'];
                    var killUrl=seckill.URl.execution(md5,seckillId);
                    console.log("killURrl:"+killUrl);
                    //绑定一次点击事件,防止用户连续点击,造成服务器时间在同一时间受到大量的请求。
                    $('#killBtn').one('click',function(){
                        //执行秒杀请求的操作
                        //首先禁用按钮。
                        $(this).addClass('disabled');
                        //发送秒杀请求。执行秒杀。
                        $.post(killUrl,{},function(result){
                            if(result&&result['success']){
                                var killResult=result['data'];
                                var state=killResult['state'];
                                var stateinfo=killResult['stateInfo'];
                                //显示秒杀结果
                                node.html('<span class="label label-success">'+stateinfo+'</span>');
                            }
                        });
                    });
                    node.show();
                }else{
                    //未开始秒杀。
                    var now=exposer['now'];
                    var start=exposer['start'];
                    var end=exposer['end'];
                    //防止用户端的计时偏移导致等待时间过长,重新计时
                    seckill.countdown(seckillId,now,start,end);
                }
            }else{
                console.log('result='+result);
            }
        });
    },

    //验证手机号
    validatePhone: function (phone) {
        if (phone && phone.length == 11 && !isNaN(phone)) {
            return true
        }else{
            return false;
        }
    },


    countdown:function (seckillId,nowTime,startTime,endTime) {
        var seckillBox=$("#seckill-box");
        if(nowTime>endTime){
            //秒杀结束
            seckillBox.html('秒杀结束');
        }else if(nowTime<startTime){
            //秒杀未开始,计时事件绑定
            var killTime=new Date(startTime+1000);
            seckillBox.countdown(killTime,function (event) {
                //时间格式
                var format=event.strftime('秒杀倒计时:%D天 %H时 %M分 %S秒');
                seckillBox.html(format);
            }).on('finish.countdown',function () {
                //时间完成后回调事件
                //获取秒杀地址,控制现实逻辑,执行秒杀
                seckill.handlerSeckillkill(seckillId,seckillBox);
            });
        }else{
            //seckillBox.html('秒杀开始!');
            seckill.handlerSeckillkill(seckillId,seckillBox);
        }
    }
    ,
    //详情页秒杀逻辑
    detail: {
        //详情页初始化
        init: function (params) {
            //手机验证和登录,计时交互
            //规划我们的交互流程
            //在cookie中查找手机号
            var killPhone = $.cookie('killPhone');
            //验证手机号
            if (!seckill.validatePhone(killPhone)) {
                //绑定手机 控制输出
                var killPhoneModal = $('#killPhoneModal');
                killPhoneModal.modal({
                    show: true,
                    backdrop: 'static',//禁止位置关闭
                    keyboard: false   //关闭键盘事件
                });
                $('#killPhoneBtn').click(function () {
                    var inputPhone = $('#killPhoneKey').val();
                    if (seckill.validatePhone(inputPhone)) {
                        //电话写入cookie(7天过期)
                        $.cookie('killPhone', inputPhone, {expries: 7, path: '/SSM_Learning/seckill'})
                        //验证通过  刷新页面
                        window.location.reload();
                    } else {
                        //todo 错误文案信息抽取到前端字典里
                        $('#killPhoneMessage').hide().html("<label>phone error</label>").show(200);
                    }
                });
            }
            var seckillId = params['seckillId'];
            var startTime = params['startTime'];
            var endTime = params['endTime'];
            //已经登录
            //计时交互
            $.get(seckill.URl.now(),{},function (result){
                if(result&&result['success']){
                    var nowTime=result['data'];
                    //时间判断 计时交互
                    seckill.countdown(seckillId,nowTime,startTime,endTime);
                }else {
                    console.log('result='+result);
                }
            });
        }
    }
}
运行截图
总结
①:前端交互设计
js的分包。

②:RestFul接口设计----秒杀应用的URL设计。
③:SpringMvc使用的技巧和SpringMvc的流程。
④Bootstrap、Js使用。

 浙公网安备 33010602011771号