

1 Nginx集群测试
Nginx ("engine x") 是一个高性能的 HTTP和反向代理服务器,也是一个 IMAP/POP3/SMTP 服务器。
正向代理:

反向代理:
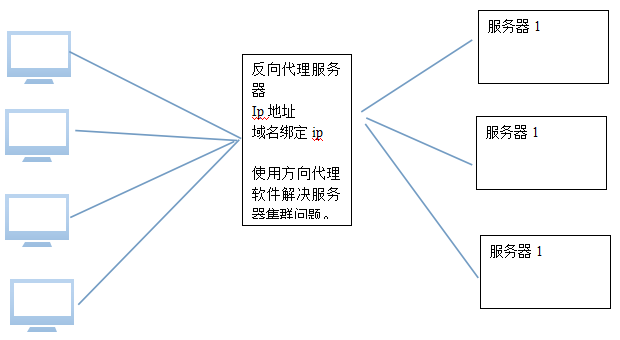
很多大网站都是使用nginx做反向代理,应用非常广泛。
Nginx是一款高性能的http 服务器/反向代理服务器及电子邮件(IMAP/POP3)代理服务器。由俄罗斯的程序设计师Igor Sysoev所开发,官方测试nginx能够支支撑5万并发链接,并且cpu、内存等资源消耗却非常低,运行非常稳定。
2 应用场景
http服务器,可以做静态网页的http服务器。
配置虚拟机。
一个域名可以被多个ip绑定。可以根据域名的不同吧请求转发给运行在不同端口的服务器。
反向代理,负载均衡。把请求转发给不同的服务器。
3 安装及配置
3.1 下载
官方网站:http://nginx.org/
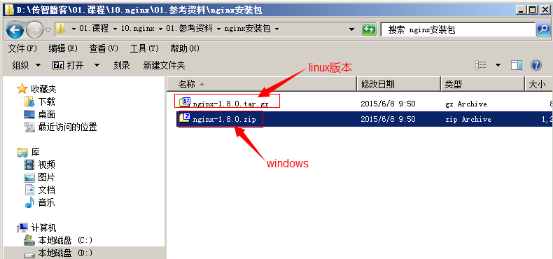
最后的一个稳定版本:1.8.0版本。有两个版本windows版本和linux版本。生产环境都是使用linux版本。
3.1.1. 环境准备
安装gcc-c++
Nginx是c语言开发的,我们使用源码安装,需要先进行编译,在安装,所以需要gcc-c++库
yum install gcc-c++
安装pcre库
yum install -y pcre pcre-devel
安装zlib库
yum install -y zlib zlib-devel
安装openssl库
yum install -y openssl openssl-devel
3.1.2. 安装Nginx
3.1.2.1. 上传Nginx
按alt+p进入上传界面,上传Nginx
3.1.2.2. 解压
解压
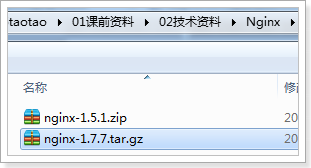
tar -zxvf nginx-1.7.7.tar.gz
进入解压文件夹
cd nginx-1.7.7
3.1.2.3. 编译安装
设置安装参数
./configure
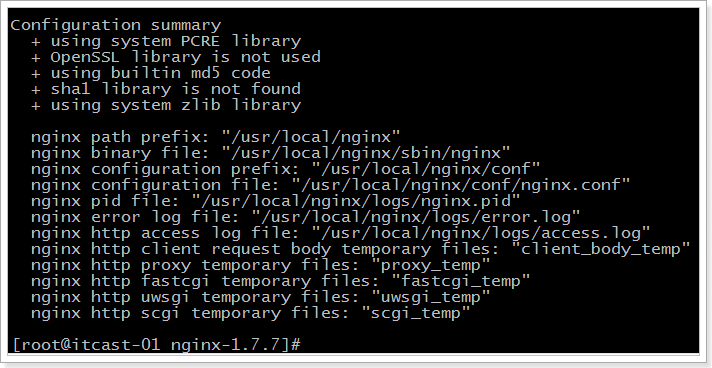
设置成功效果
报错解决:
Configuration summary
  + using system PCRE library
  + OpenSSL library is not used
  + using system zlib library

  nginx path prefix: "/usr/local/nginx"
  nginx binary file: "/usr/local/nginx/sbin/nginx"
  nginx modules path: "/usr/local/nginx/modules"
  nginx configuration prefix: "/usr/local/nginx/conf"
  nginx configuration file: "/usr/local/nginx/conf/nginx.conf"
  nginx pid file: "/usr/local/nginx/logs/nginx.pid"
  nginx error log file: "/usr/local/nginx/logs/error.log"
  nginx http access log file: "/usr/local/nginx/logs/access.log"
  nginx http client request body temporary files: "client_body_temp"
  nginx http proxy temporary files: "proxy_temp"
  nginx http fastcgi temporary files: "fastcgi_temp"
  nginx http uwsgi temporary files: "uwsgi_temp"
  nginx http scgi temporary files: "scgi_temp"
解决办法:
./configure --with-http_ssl_module
或者
./configure --with-openssl=/usr/include/openssl
编译并安装
make
编译成功效果
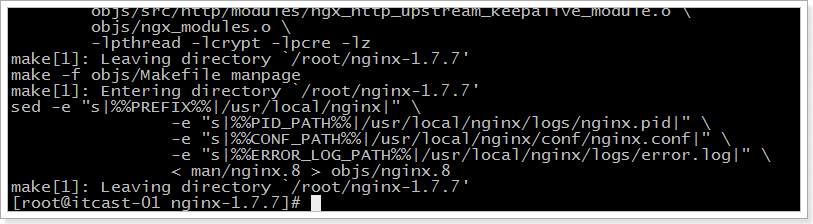
make install
3.1.2.4. 启动Nginx
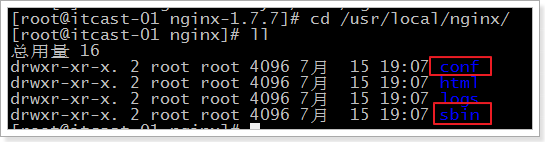
查看安装文件,conf是配置文件,sbin是启动目录
进入启动文件目录,启动Nginx
cd /usr/local/nginx/sbin/
./nginx
查看启动进程

将端口号80 放行
/sbin/iptables -I INPUT -p tcp --dport 80 -j ACCEPT
将该设置添加到防火墙的规则中
/etc/rc.d/init.d/iptables save
访问测试

3.2 配置环境变量
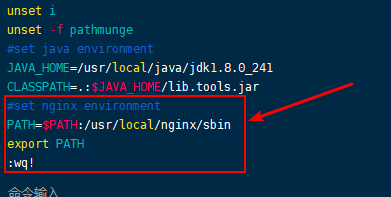
3.2.2. 编辑 /etc/profile 文件
vim /etc/profile
PATH=$PATH:/usr/local/nginx/sbin
export PATH
3.2.2. 重新编译 配置文件profile
source /etc/profile
测试
nginx -s reload
开机自启动
即在rc.local增加启动代码就可以了。
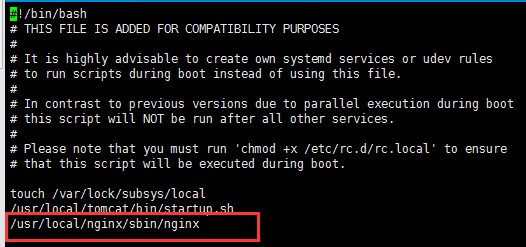
vim /etc/rc.local
增加一行
/usr/local/nginx/sbin/nginx
设置执行权限:
chmod 755 /etc/rc.local
到这里,nginx就安装完毕了,启动、停止、重启操作也都完成了。
4 配置Nginx集群
前提必须先安装Nginx
4.1.1. 修改Nginx的nginx.conf文件
进入cd /usr/local/nginx/conf,在http节点添加:
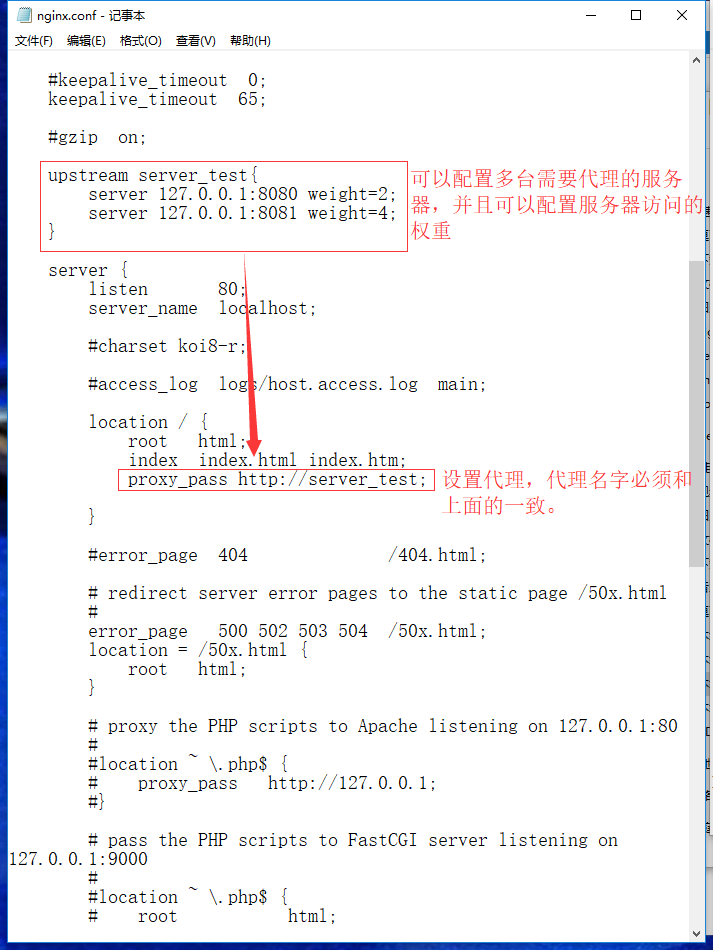
4.1.2. 修改完成后重载Nginx
[root@itcast-01 sbin]# ./nginx -s reload
5 Nginx停止服务和各种命令
5.1 停止Nginx服务的四种方法
- 从容停止服务
这种方法较stop相比就比较温和一些了,需要进程完成当前工作后再停止。
nginx -s quit
- 立即停止服务
这种方法比较强硬,无论进程是否在工作,都直接停止进程。
nginx -s stop
- systemctl 停止
systemctl属于Linux命令
systemctl stop nginx.service
- killall 方法杀死进程
直接杀死进程,在上面无效的情况下使用,态度强硬,简单粗暴!
killall nginx
5.2.启动Nginx
1.nginx直接启动
nginx
2.systemctl命令启动
systemctl start nginx.service
3.查看启动后记录
ps aux | grep nginx
4.重启Nginx服务
systemctl restart nginx.service
5.重新载入配置文件
当有系统配置文件有修改,用此命令,建议不要停止再重启,以防报错!
nginx -s reload
6.查看端口号
netstat -tlnp
6 卸载Nginx
6.1 首先输入命令 ps -ef | grep nginx检查一下nginx服务是否在运行。
[root@localhost /]# ps -ef |grep nginx
root       3163   2643  0 14:08 tty1     00:00:00 man nginx
root       5427      1  0 14:50 ?        00:00:00 nginx: master process nginx
nginx      5428   5427  0 14:50 ?        00:00:00 nginx: worker process
root       5532   2746  0 14:52 pts/0    00:00:00 grep --color=auto nginx
6.2 停止Nginx服务
[root@localhost /]# /usr/sbin/nginx -s stop
[root@localhost /]# netstat -lntp
Active Internet connections (only servers)
Proto Recv-Q Send-Q Local Address           Foreign Address         State       PID/Program name
tcp        0      0 0.0.0.0:111             0.0.0.0:*               LISTEN      1/systemd
tcp        0      0 0.0.0.0:22              0.0.0.0:*               LISTEN      1261/sshd
tcp6       0      0 :::111                  :::*                    LISTEN      1/systemd
tcp6       0      0 :::22                   :::*                    LISTEN      1261/sshd
6.3 查找、删除Nginx相关文件
- 查看Nginx相关文件:whereis nginx
[root@localhost /]# whereis nginx
nginx: /usr/sbin/nginx /usr/lib64/nginx /etc/nginx /usr/share/nginx /usr/share/man/man8/nginx.8.gz /usr/share/man/man3/nginx.3pm.gz
- find查找相关文件
[root@localhost /]# find / -name nginx
/usr/lib64/perl5/vendor_perl/auto/nginx
/usr/lib64/nginx
/usr/share/nginx
/usr/sbin/nginx
/etc/logrotate.d/nginx
/etc/nginx
/var/lib/nginx
/var/log/nginx
- 依次删除find查找到的所有目录:rm -rf /usr/sbin/nginx
6.4 再使用yum清理
[root@localhost /]# yum remove nginx
依赖关系解决

======================================================================================================
 Package                              架构            版本                       源              大小
======================================================================================================
正在删除:
 nginx                                x86_64          1:1.12.2-3.el7             @epel          1.5 M
为依赖而移除:
 nginx-all-modules                    noarch          1:1.12.2-3.el7             @epel          0.0
 nginx-mod-http-geoip                 x86_64          1:1.12.2-3.el7             @epel           21 k
 nginx-mod-http-image-filter          x86_64          1:1.12.2-3.el7             @epel           24 k
 nginx-mod-http-perl                  x86_64          1:1.12.2-3.el7             @epel           54 k
 nginx-mod-http-xslt-filter           x86_64          1:1.12.2-3.el7             @epel           24 k
 nginx-mod-mail                       x86_64          1:1.12.2-3.el7             @epel           99 k
 nginx-mod-stream                     x86_64          1:1.12.2-3.el7             @epel          157 k

事务概要
======================================================================================================
移除  1 软件包 (+7 依赖软件包)

安装大小:1.9 M
是否继续?[y/N]:
- ok nginx 卸载完成!

 浙公网安备 33010602011771号