spring boot(一)
spring boot
文章目录
1.spring boot自动配置
spring boot的快速搭建Java应用的spring启动框架,Spring Boot 使创建独立、基于生产级的Spring应用程序变得简单易用。自动配置原理是Spring Boot的精髓。
1.1 自动配置信息
用spring boot开发应用时,我们都自动Spring Boot提供一个配置文件:application.properties或application.yml用来给我们修改spring boot原有的默认配置信息。
而spring boot的默认配置信息,放在jar包spring-boot-autoconfigure中,重下面图中可以看出,上面的是配置形象的元数据,下面是spring-boot的配置类。

官方给出的配置信息:Spring Boot Reference Guide
官方给的配置信息罗列了spring-boot的配置信息的字段。可以通过官方提供的字段修改你的spring-boot配置。
1.2 @SpringBootApplication
@SpringBootApplication除了标注该应用是springboot应用外,它本身就是一个复合的注解,起到启动spring boot配置功能作用。点开@SpringBootApplication,会发现以下其他注解。
@Target({ElementType.TYPE})
@Retention(RetentionPolicy.RUNTIME)
@Documented
@Inherited
@SpringBootConfiguration
@EnableAutoConfiguration
@ComponentScan(
    excludeFilters = {@Filter(
    type = FilterType.CUSTOM,
    classes = {TypeExcludeFilter.class}
), @Filter(
    type = FilterType.CUSTOM,
    classes = {AutoConfigurationExcludeFilter.class}
)}
)
1.3 @SpringBootConfiguration
@ SpringBootConfiguration只是Spring标准@Configuration批注的替代方法。 两者之间的唯一区别是@SpringBootConfiguration允许自动找到配置。可以点开@SpringBootConfiguration看看
@Target({ElementType.TYPE})
@Retention(RetentionPolicy.RUNTIME)
@Documented
@Configuration   //SpringBootConfiguration是一个配置注解
public @interface SpringBootConfiguration {
    @AliasFor(
        annotation = Configuration.class
    )
    boolean proxyBeanMethods() default true;
}
1.4 @EnableAutoConfiguration
@EnableAutoConfiguration注解,标明开启spring-boot的自动配置功能
@Target({ElementType.TYPE})
@Retention(RetentionPolicy.RUNTIME)
@Documented
@Inherited
@AutoConfigurationPackage
@Import({AutoConfigurationImportSelector.class})
public @interface EnableAutoConfiguration {
    String ENABLED_OVERRIDE_PROPERTY = "spring.boot.enableautoconfiguration";
    Class<?>[] exclude() default {};
    String[] excludeName() default {};
}
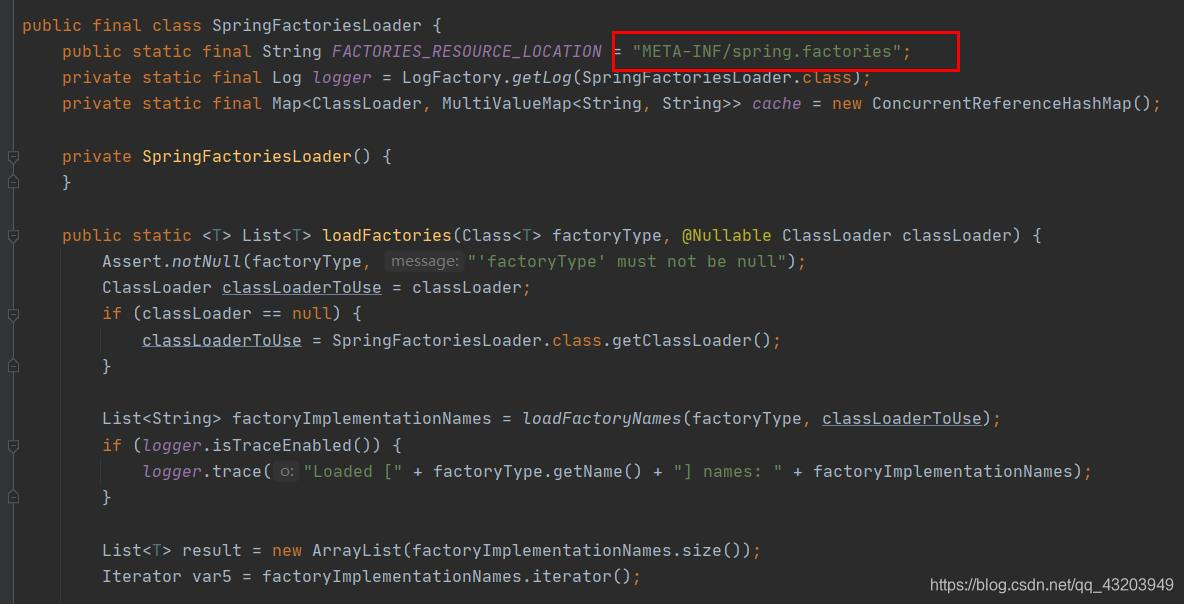
1.5 AutoConfigurationImportSelector
这个类比较大,从selectImports方法往下点,最终有一个地方会点到一个叫getCandidateConfigurations的方法,点开SpringFactoriesLoader类,点开后发现下面有个叫FACTORIES_RESOURCE_LOCATION的属性,那个就是标明自动配置类元数据的文件
protected List<String> getCandidateConfigurations(AnnotationMetadata metadata, AnnotationAttributes attributes) {
		List<String> configurations = SpringFactoriesLoader.loadFactoryNames(getSpringFactoriesLoaderFactoryClass(),
				getBeanClassLoader());
		Assert.notEmpty(configurations, "No auto configuration classes found in META-INF/spring.factories. If you "
				+ "are using a custom packaging, make sure that file is correct.");
		return configurations;
	}
1.5.1 SpringFactoriesLoader类
1.6 spring.factories
这个文件就标明了springboot各个自动配置类的路径,下面图片可以看到aop,context,data,dao等模块的自动配置类,下面还有一大串web等等的东西,spring-boot通过文件中的类路径找到各个功能模块的指定配置类。

1.7 自动配置的生效
spring-boot并非所有自动配置类都会生效,每一个XxxxAutoConfiguration自动配置类都是在某些条件之下才会生效的,如从刚才的文件中找出webMvc的自动配置类:
org.springframework.boot.autoconfigure.web.servlet.WebMvcAutoConfiguration,\
点开WebMvcAutoConfiguration
@Configuration(proxyBeanMethods = false)
@ConditionalOnWebApplication(type = Type.SERVLET)
@ConditionalOnClass({ Servlet.class, DispatcherServlet.class, WebMvcConfigurer.class })
@ConditionalOnMissingBean(WebMvcConfigurationSupport.class)
@AutoConfigureOrder(Ordered.HIGHEST_PRECEDENCE + 10)
@AutoConfigureAfter({ DispatcherServletAutoConfiguration.class, TaskExecutionAutoConfiguration.class,
      ValidationAutoConfiguration.class })
public class WebMvcAutoConfiguration {
    .......
- @ConditionalOnClass({ Servlet.class, DispatcherServlet.class, WebMvcConfigurer.class })
- @ConditionalOnMissingBean(WebMvcConfigurationSupport.class)
这两个就是自动配置类生效的条件判断,当不存在WebMvcConfigurationSupport这个类时WebMvcAutoConfiguration自动配置类才会生效。
上网找了一些有关@ConditionalXXX的注解,如下:
@ConditionalOnBean:当容器里有指定的bean的条件下。
@ConditionalOnMissingBean:当容器里不存在指定bean的条件下。
@ConditionalOnClass:当类路径下有指定类的条件下。
@ConditionalOnMissingClass:当类路径下不存在指定类的条件下。
@ConditionalOnProperty:指定的属性是否有指定的值,比如@ConditionalOnProperties(prefix=”xxx.xxx”, value=”enable”, matchIfMissing=true),代表当xxx.xxx为enable时条件的布尔值为true,如果没有设置的情况下也为true。
原文链接:https://blog.csdn.net/u014745069/article/details/83820511
1.8 配置的映射
我们平时在application.properties或application.yml的配置信息会被注解@ConditionalOnProperty映射到配置中,还是看我们的WebMvcAutoConfiguration类。
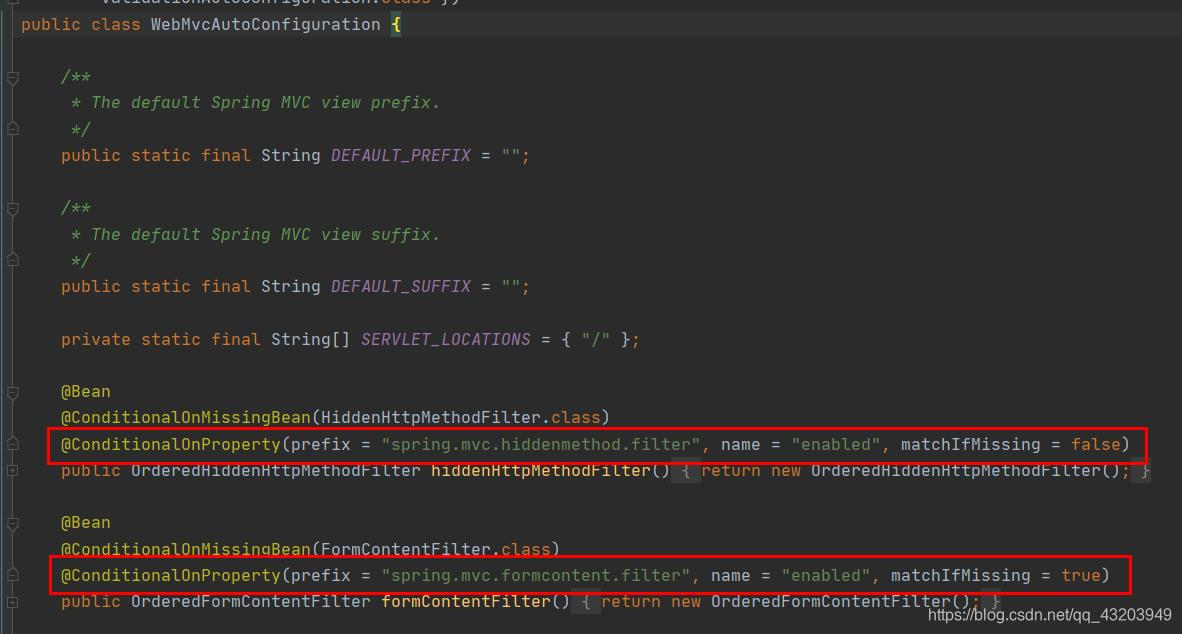
在配置文件中我们就可以通过application.properties中的如下字段对默认配置进行修改:
spring.mvc.formcontent.filter.enabled=true
spring boot事件监听
通过注入
ApplicationAvailability接口并在其上调用方法,应用程序组件可以随时检索当前的可用性状态。应用程序通常会希望侦听状态更新或更新应用程序的状态。例如,我们可以将应用程序的“就绪”状态导出到一个文件,以便Kubernetes的“ exec Probe”可以查看此文件:
import org.springframework.boot.availability.AvailabilityChangeEvent;
import org.springframework.boot.availability.ReadinessState;
import org.springframework.context.event.EventListener;
import org.springframework.stereotype.Component;

@Component
public class MyReadinessStateExporter {

    @EventListener
    public void onStateChange(AvailabilityChangeEvent<ReadinessState> event) {
        switch (event.getState()) {
        case ACCEPTING_TRAFFIC:
            // create file /tmp/healthy
            break;
        case REFUSING_TRAFFIC:
            // remove file /tmp/healthy
            break;
        }
    }

}
spring boot导入其他配置文件
spring:
  application:
    name: "myapp"
  config:
    import: "optional:file:./dev.properties"
spring boot开发web应用
Spring Boot非常适合于Web应用程序开发。您可以使用嵌入式Tomcat,Jetty,Undertow或Netty创建独立的HTTP服务器。大多数Web应用程序都使用该
spring-boot-starter-web模块来快速启动和运行。您还可以选择使用该spring-boot-starter-webflux模块来构建响应式Web应用程序。
一个示例:https://docs.spring.io/spring-boot/docs/current/reference/html/features.html#features.developing-web-applications.spring-mvc
spring boot配置数据源
Springboot默认支持4种数据源类型,DataSourceAutoConfiguration 类中指明,分别为:
- tomcat-jdbc-pool
- hikari
- dbcp
- dbcp2
当导入相关的jar包时,数据源的自动配置类讲对进行相关数据源的配置。
通过application.properties修改数据源
#数据源的基础配置
spring.datasource.url=jdbc:mysql://localhost:3306/test?useUnicode=true&characterEncoding=utf8
spring.datasource.driver-class-name=com.mysql.jdbc.Driver
spring.datasource.username=root
spring.datasource.password=123456

#配置其他数据源(非spring boot默认的)
spring.datasource.type=com.alibaba.druid.pool.DruidDataSource
spring.datasource.type=com.mchange.v2.c3p0.ComboPooledDataSource
整合mybatis相关配置信息
#指向mapper的xml文件位置
mybatis.mapper-locations=classpath:mapper/*Mapper.xml
#指向实体类的位置
mybatis.type-aliases-package=com.user.pojo.*
# 打印mybatis日志
mybatis.configuration.log-impl: org.apache.ibatis.logging.log4j2.Log4j2Impl
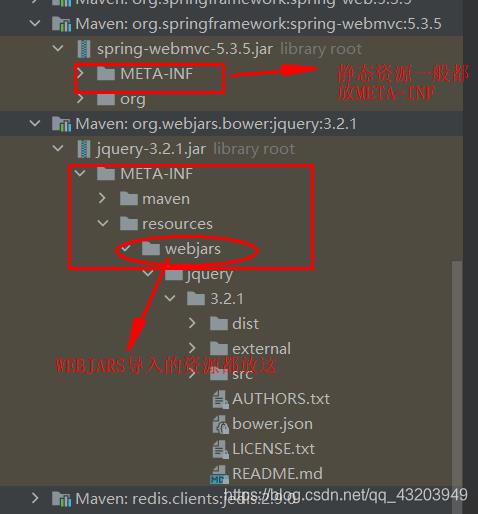
spring boot静态资源映射
webjars资源导入
一般webjars资源都是通过maven进行导入和加载,其加载资源路径为:classpath:/META-INF/resources/webjars/(就是jar包的/META-INF目录)
以maven的方式导入jquery,如下:
<!-- https://mvnrepository.com/artifact/org.webjars.bower/jquery -->
<dependency>
    <groupId>org.webjars.bower</groupId>
    <artifactId>jquery</artifactId>
    <version>3.2.1</version>
</dependency>
默认的资源路径
我们自己安放静态资源(我们写的哪些jsp或html等等)的路径如下:
classpath:/META-INF/resources/
classpath:/resources/
classpath:/static/
classpath:/public/
spring boot通过WebMvcConfigurer配置mvc框架
@Configuration + WebMvcConfigurer接口
在spring中我们可以通过用java代码配置bean,不使用xml写bean,改成使用java代码来实现javabean的配置。如下:
@Configuration   //定义是spring的bean配置类
@ComponentScan("com.ex.test")  //扫描包
@Import(other.class)  //导入config
public class beanconfig{
	@Bean
	public User user(){return new User();}
}
而WebMvcConfigurer配置类其实是Spring内部的一种配置方式,可以自定义一些Handler,Interceptor,ViewResolver,MessageConverter等等的东西对springmvc框架进行配置。如下:
@Configuration   //定义是spring的bean配置类
public class Mymvcconfig implements WebMvcConfigurer{
	@Override
    public void addInterceptors(InterceptorRegistry registry) {
        registry.addInterceptor(new MyInterceptor()).addPathPatterns("/**").excludePathPatterns("/emp/toLogin","/emp/login","/js/**","/css/**","/images/**");
    }
}
WebMvcConfigurer接口
public interface WebMvcConfigurer {

    void configurePathMatch(PathMatchConfigurer var1);

    void configureContentNegotiation(ContentNegotiationConfigurer var1);

    void configureAsyncSupport(AsyncSupportConfigurer var1);

    void configureDefaultServletHandling(DefaultServletHandlerConfigurer var1);

    void addFormatters(FormatterRegistry var1);

    void addInterceptors(InterceptorRegistry var1);

    void addResourceHandlers(ResourceHandlerRegistry var1);

    void addCorsMappings(CorsRegistry var1);

    void addViewControllers(ViewControllerRegistry var1);

    void configureViewResolvers(ViewResolverRegistry var1);

    void addArgumentResolvers(List<HandlerMethodArgumentResolver> var1);

    void addReturnValueHandlers(List<HandlerMethodReturnValueHandler> var1);

    void configureMessageConverters(List<HttpMessageConverter<?>> var1);

    void extendMessageConverters(List<HttpMessageConverter<?>> var1);

    void configureHandlerExceptionResolvers(List<HandlerExceptionResolver> var1);

    void extendHandlerExceptionResolvers(List<HandlerExceptionResolver> var1);

    Validator getValidator();

    MessageCodesResolver getMessageCodesResolver();
}
addViewControllers添加一个视图解析器
通过实现addViewControllers向mvc添加一个视图解析器(添加一个页面跳转)
@Configuration   //定义是spring的bean配置类
public class Mymvcconfig implements WebMvcConfigurer{
	@Override
    public void addViewControllers(ViewControllerRegistry registry) {
        registry.addViewController("/toLogin").setViewName("login");
    }
}
addInterceptors添加一个拦截器
@Override
public void addInterceptors(InterceptorRegistry registry) {
    super.addInterceptors(registry);
    registry.addInterceptor(new MyInterceptor())
            .addPathPatterns("/**")
            .excludePathPatterns("/emp/toLogin");
}
编写自己的拦截器(通过继承HandlerInterceptorAdapter)
//源码HandlerInterceptorAdapter
public abstract class HandlerInterceptorAdapter implements AsyncHandlerInterceptor {
   @Override
   public boolean preHandle(HttpServletRequest request, HttpServletResponse response, Object handler)throws Exception {
      return true;
   }
   @Override
   public void postHandle(HttpServletRequest request, HttpServletResponse response, Object handler,@Nullable ModelAndView modelAndView) throws Exception {
   }
   @Override
   public void afterCompletion(HttpServletRequest request, HttpServletResponse response, Object handler,@Nullable Exception ex) throws Exception {
   }
   @Override
   public void afterConcurrentHandlingStarted(HttpServletRequest request, HttpServletResponse response,Object handler) throws Exception {
   }
}

//自己的拦截器
public class MyInterceptor extends HandlerInterceptorAdapter
{
    @Override
    public boolean preHandle(HttpServletRequest request, HttpServletResponse response, Object handler) throws Exception
    {
        // 拦截处理代码
        System.out.println("前置拦截");
        //返回true通过,返回false拦截
        return true;
    }
}
addCorsMappings添加跨域允许
通过填加跨域,允许前端向后端跨域请求。
@Override
public void addCorsMappings(CorsRegistry registry) {
    super.addCorsMappings(registry);
    registry.addMapping("/cors/**")
            .allowedHeaders("*")
            .allowedMethods("POST","GET")
            .allowedOrigins("*");
}
addFormatters添加一个格式转换
//自己的格式转换器(这里对时间字符串进行转换)
public class MyFormatter implements Formatter<Date>{
	@Override
    public Date parse(String date, Locale locale) {
    	return new Date(Long.parseLong(date));
    }

    @Override
    public String print(Date date, Locale locale) {
    	return Long.valueOf(date.getTime()).toString();
    }
}


@Override
public void addFormatters(FormatterRegistry registry) {
    registry.addFormatter(new MyFormatter());
}
@EnableWebMvc
@EnableWebMvc是使用Java 注解快捷配置Spring Webmvc的一个注解。在EnableWebMvc导入了一个DelegatingWebMvcConfiguration类,而DelegatingWebMvcConfiguration继承了WebMvcConfigurationSupport。
而WebMvcAutoConfiguration类的注解@ConditionalOnMissingBean({WebMvcConfigurationSupport.class}),定义了WebMvcAutoConfiguration只有没有WebMvcConfigurationSupport.class时WebMvcAutoConfiguration才生效,所以有以下结论:
@EnableWebMvc注解的配置类将会全面接管MVC的配置。
@Retention(RetentionPolicy.RUNTIME)
@Target({ElementType.TYPE})
@Documented
@Import({DelegatingWebMvcConfiguration.class})
public @interface EnableWebMvc {
}


//-----------------DelegatingWebMvcConfiguration-----------------
public class DelegatingWebMvcConfiguration extends WebMvcConfigurationSupport {
    private final WebMvcConfigurerComposite configurers = new WebMvcConfigurerComposite();

    public DelegatingWebMvcConfiguration() {
    }
 .....


//-----------------WebMvcAutoConfiguration-----------------
@ConditionalOnClass({Servlet.class, DispatcherServlet.class, WebMvcConfigurer.class})
@ConditionalOnMissingBean({WebMvcConfigurationSupport.class})
@AutoConfigureOrder(-2147483638)
@AutoConfigureAfter({DispatcherServletAutoConfiguration.class, TaskExecutionAutoConfiguration.class, ValidationAutoConfiguration.class})
public class WebMvcAutoConfiguration {
    public static final String DEFAULT_PREFIX = "";
    public static final String DEFAULT_SUFFIX = "";
    private static final String[] SERVLET_LOCATIONS = new String[]{"/"};

    public WebMvcAutoConfiguration() {
    }
   ......

 浙公网安备 33010602011771号