FastDFS与Nginx的搭建及遇到的问题
1.1 FastDFS与Nginx的搭建

可以使用一台虚拟机来模拟,只有一个Tracker、一个Storage服务。
配置nginx访问图片。
1.1.1 搭建步骤
第一步:把fastDFS需要用到的压缩包都上传到linux系统。
第二步:安装FastDFS之前,先安装libevent工具包。
yum -y install libevent
第三步:安装libfastcommonV1.0.7工具包。
1、下载源码: wget https://github.com/happyfish100/libfastcommon/archive/master.zip
2、解压缩 unzip master.zip
3、./make.sh
4、./make.shinstall
5、把/usr/lib64/libfastcommon.so文件向/usr/lib/下复制一份
第四步:安装Tracker服务。
1、下载源码:wget https://github.com/happyfish100/fastdfs/archive/V5.05.tar.gz
2、解压缩
3、./make.sh
4、./make.shinstall
安装后在/usr/bin/目录下有以fdfs开头的文件都是编译出来的。
配置文件都放到/etc/fdfs文件夹
5、把/root/FastDFS/conf目录下的所有的配置文件都复制到/etc/fdfs下。
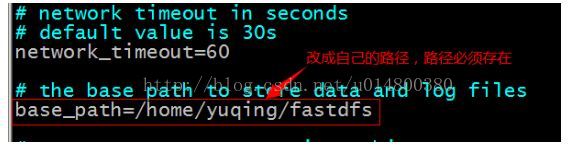
6、配置tracker服务。修改/etc/fdfs/tracker.conf文件。将其中的base_path改成自己的路径,该路径必须存在,用于存放tracher的日志文件。
7、启动tracker。/usr/bin/fdfs_trackerd /etc/fdfs/tracker.conf
重启使用命令:/usr/bin/fdfs_trackerd/etc/fdfs/tracker.conf restart
第五步:安装storage服务。
1、如果是在不同的服务器安装,第四步的1~4需要重新执行。
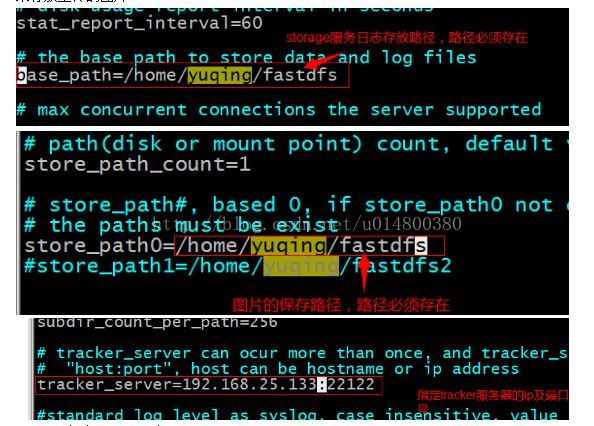
2、配置storage服务。修改/etc/fdfs/storage.conf文件,将其中的base_path和store_path0改成自己的路径,该路径必须存在,base_path用于存放storage的日志文件,store_path0用来存放上传的图片。
3、启动storage服务。
/usr/bin/fdfs_storaged /etc/fdfs/storage.conf
重启 /usr/bin/fdfs_storaged/etc/fdfs/storage.conf restart
第六步:测试服务。
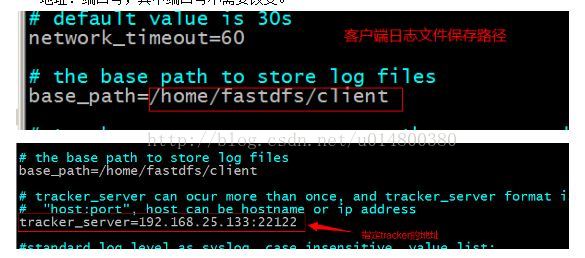
1. 修改配置文件/etc/fdfs/client.conf,将其中的base_path改成自己的路径,该路径必须存在,用于存放client的日志文件。并将tracker_server改成自己的IP:port,即IP地址:端口号,其中端口号不需要改变。
1、测试
/usr/bin/fdfs_test/etc/fdfs/client.conf upload anti-steal.jpg
可以看到上传图片生成一个特定的路径:example file url: http://192.168.25.133/group1/M00/00/00/wKiJT1lPaw6ALcfQAABdrZgsqUU733.jpg
第七步:搭建nginx提供http服务。
nginx服务器的搭建还需要依赖一些库,详细内容可以看我另外写的一篇博客:http://blog.csdn.net/u014800380/article/details/73702708
可以使用官方提供的nginx插件。要使用nginx插件需要重新编译。
fastdfs-nginx-module_v1.16.tar.gz
1、下载源码:
https://sourceforge.net/projects/fastdfs/files/FastDFS%20Nginx%20Module%20Source%20Code/fastdfs-nginx-module_v1.16.tar.gz
2、解压插件压缩包
3、修改/root/fastdfs-nginx-module/src/config文件,把其中的local去掉。

4、在/nginx-1.8.0目录下对nginx重新config
./configure \
--prefix=/usr/local/nginx\
--pid-path=/var/run/nginx/nginx.pid\
--lock-path=/var/lock/nginx.lock\
--error-log-path=/var/log/nginx/error.log\
--http-log-path=/var/log/nginx/access.log\
--with-http_gzip_static_module\
--http-client-body-temp-path=/var/temp/nginx/client\
--http-proxy-temp-path=/var/temp/nginx/proxy\
--http-fastcgi-temp-path=/var/temp/nginx/fastcgi\
--http-uwsgi-temp-path=/var/temp/nginx/uwsgi\
--http-scgi-temp-path=/var/temp/nginx/scgi\
--add-module=/root/fastdfs-nginx-module/src
5、make
6、make install
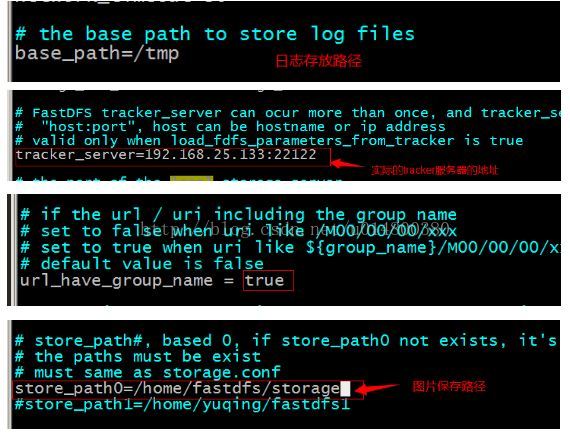
7、把/root/fastdfs-nginx-module/src/mod_fastdfs.conf文件复制到/etc/fdfs目录下。并编辑base_path改成自己存在的路径,用于存放日志,tracker_server中的IP地址改成自己的,端口号不变,url_have_group_name改成true,store_path0改成与/etc/fdfs/storage.conf中的store_path0一致。
8、nginx的配置
在nginx的配置文件中添加一个Server:
server {
listen 80;
server_name 192.168.101.3;
location /group1/M00/{
#root /home/FastDFS/fdfs_storage/data;
ngx_fastdfs_module;
}
}
9、将libfdfsclient.so拷贝至/usr/lib下
cp /usr/lib64/libfdfsclient.so /usr/lib/
10、启动nginx
11、在浏览器中输入图片地址,加载出图片表示图片服务器搭建成功。
12、如果能够访问Nginx首页,但是加载不出图片,那就需要做如下工作,
l 分别查看/etc/fdfs/tracker.conf,storage.conf,mod_fastdfs.conf中的路径是否都对着,是否都存在;
l 确定/etc/fdfs/storage.conf中http.server_port与/usr/local/nginx/conf/nginx.conf中的listen端口号一致,/etc/fdfs/storage.conf中默认的端口是8888,另外还需要对8888端口开启防火墙:
l 编辑:vi /etc/sysconfig/iptables,在文件中加入:-A INPUT -p tcp -m tcp--dport 8888 -j ACCEPT即可;
l 访问图片时,需要加上端口号:http://192.168.25.133:8888/group1/M00/00/00/wKiJT1lPaw6ALcfQAABdrZgsqUU733.jpg

 浙公网安备 33010602011771号