

Ansible-自动化运维工具
Ansible
- Ansible是一个基于Python开发的配置管理和应用部署工具,现在也在自动化管理领域大放异彩。它融合了众多老牌运维工具的优点,Pubbet和Saltstack能实现的功能,Ansible基本上都可以实现。
- Ansible能批量配置、部署、管理上千台主机。比如以前需要切换到每个主机上执行的一或多个操作,使用Ansible只需在固定的一台Ansible控制节点上去完成所有主机的操作。
- Ansible是基于模块工作的,它只是提供了一种运行框架,它本身没有完成任务的能力,真正执行操作的是Ansible的模块, 比如copy模块用于拷贝文件到远程主机上,service模块用于管理服务的启动、停止、重启等。
- Ansible其中一个比较鲜明的特性是Agentless,即无Agent的存在,它就像普通命令一样,并非C/S软件,也只需在某个作为控制节点的主机上安装一次Ansible即可,通常它基于ssh连接来控制远程主机,远程主机上不需要安装Ansible或其它额外的服务。
- 使用者在使用时,在服务器终端输入命令或者playbooks,会通过预定好的规则将playbook拆解为play,再组织成ansible可以识别的任务,调用模块和插件,根据主机清单通过SSH将临时文件发给远程的客户端执行并返回结果,执行结束后自动删除
- Ansible的另一个比较鲜明的特性是它的绝大多数模块都具备幂等性(idempotence)。所谓幂等性,指的是多次操作或多次执行对系统资源的影响是一致的。比如执行 systemctl stop xxx 命令来停止服务,当发现要停止的目标服务已经处于停止状态, 它什么也不会做,所以多次停止的结果仍然是停止,不会改变结果,它是幂等的,而 systemctl restart xxx 是非幂等的。
- Ansible的很多模块在执行时都会先判断目标节点是否要执行任务,所以,可以放心大胆地让Ansible去执行任务,重复执行某个任务绝大多数时候不会产生任何副作用。
ansible 环境安装部署
| 管理端 | 192.168.208.10 | ansible |
| 被管理端 | 192.168.208.20 | - |
| 被管理端 | 192.168.208.30 | - |
//管理端安装 ansible
1 yum install -y epel-release //先安装 epel 源
2 yum install -y ansible
//ansible 目录结构
/etc/ansible/
├── ansible.cfg           #ansible的配置文件,一般无需修改
├── hosts                 #ansible的主机清单,用于存储需要管理的远程主机的相关信息
└── roles/                #公共角色目录
//配置主机清单
 1 cd /etc/ansible
 2 vim hosts
 3 [webservers]        #配置组名
 4 192.168.208.20      #组里包含的被管理的主机IP地址或主机名(主机名需要先修改/etc/hosts文件)
 5
 6 [dbservers]
 7 192.168.208.30
 8
 9 //配置密钥对验证
10 ssh-keygen -t rsa   #一路回车,使用免密登录

11 sshpass -p 'xcc123' ssh-copy-id root@192.168.208.20
12 sshpass -p 'xcc123' ssh-copy-id root@192.168.208.30

ansible 命令行模块
命令格式:ansible <组名> -m <模块> -a <参数列表>

ansible-doc -l #列出所有已安装的模块,按q退出
1.command 模块
//在远程主机执行命令,不支持管道,重定向等shell的特性
1
2 ansible-doc -s command                      #-s 列出指定模块的描述信息和操作动作
3
4 ansible 192.168.208.10 -m command -a 'date' #指定 ip 执行 date
5 ansible webservers -m command -a 'date'     #指定组执行 date
6 ansible dbservers -m command -a 'date'
7 ansible all -m command -a 'date'            #all 代表所有 hosts 主机
8 ansible all -a 'ls /'                       #如省略 -m 模块,则默认运行 command 模块

//常用的参数:
1 chdir:在远程主机上运行命令前提前进入目录
2 creates:判断指定文件是否存在,如果存在,不执行后面的操作
3 removes:判断指定文件是否存在,如果存在,执行后面的操作
4
5 ansible all -m command -a "chdir=/home ls ./"
2.shell 模块
1 //在远程主机执行命令,相当于调用远程主机的shell进程,然后在该shell下打开一个子shell运行命令(支持管道符号等功能)
2 ansible-doc -s shell
3
4 ansible dbservers -m shell -a 'echo abc111 | passwd --stdin test"'
5 ansible dbservers -m shell -a 'echo $(ifconfig ens33 | awk "NR==2 {print $2}") | cut -d " " -f2'
6 ansible dbservers -m shell -a 'echo $(ifconfig ens33 | awk "NR==2 {print \$2}")'

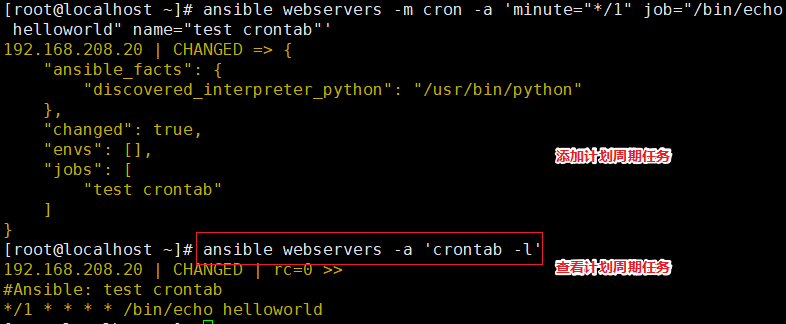
3.cron 模块
1 //在远程主机定义任务计划。其中有两种状态(state):present表示添加(可以省略),absent表示移除。
2 ansible-doc -s cron #按 q 退出
//常用的参数:
1 minute/hour/day/month/weekday:分/时/日/月/周
2 job:任务计划要执行的命令
3 name:任务计划的名称
4
5 ansible webservers -m cron -a 'minute="*/1" job="/bin/echo helloworld" name="test crontab"'
6 ansible webservers -a 'crontab -l'
7 ansible webservers -m cron -a 'name="test crontab" state=absent'
  #移除计划任务,假如该计划任务没有取名字,name=None即可
4.user 模块
//用户管理的模块
 1
 2 ansible-doc -s user
 3
 4 //常用的参数:
 5 name:用户名,必选参数
 6 state=present|absent:创建账号或者删除账号,present表示创建,absent表示删除
 7 system=yes|no:是否为系统账号
 8 uid:用户uid
 9 group:用户基本组
10 shell:默认使用的shell
11 move_home=yse|no:如果设置的家目录已经存在,是否将已经存在的家目录进行移动
12 password:用户的密码,建议使用加密后的字符串
13 comment:用户的注释信息
14 remove=yes|no:当state=absent时,是否删除用户的家目录
15
16 ansible dbservers -m user -a 'name="test01"' #创建用户test01
17 ansible dbservers -m command -a 'tail /etc/passwd'
18 ansible dbservers -m user -a 'name="test01" state=absent' #删除用户test01

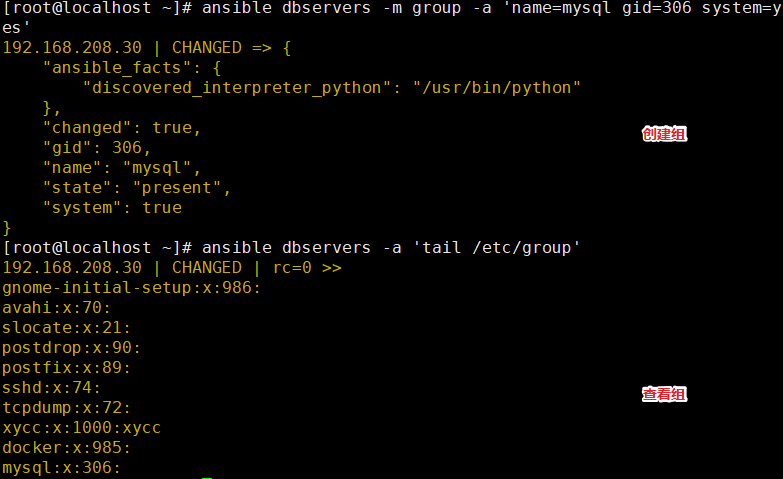
5.group 模块
//用户组管理的模块
1 ansible-doc -s group
2
3 ansible dbservers -m group -a 'name=mysql gid=306 system=yes' #创建mysql组
4 ansible dbservers -a 'tail /etc/group'
5 ansible dbservers -m user -a 'name=test01 uid=306 system=yes group=mysql' #将test01用户添加到mysql组中
6 ansible dbservers -a 'tail /etc/passwd'
7 ansible dbservers -a 'id test01'
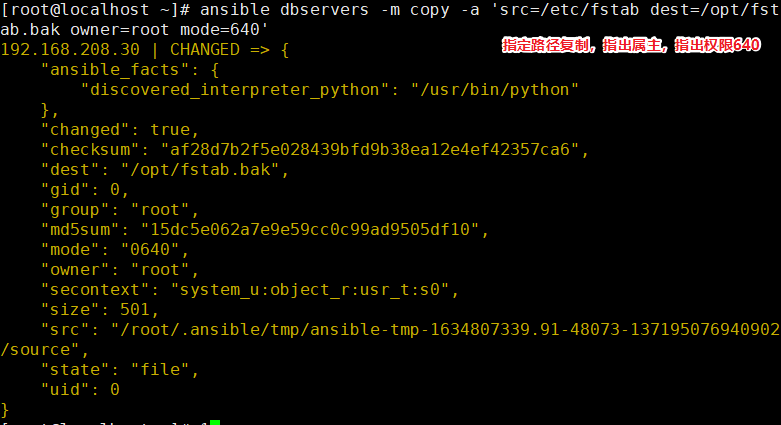
6.copy 模块
1 //用于复制指定主机文件到远程主机的
2 ansible-doc -s copy
//常用的参数:
dest:指出复制文件的目标及位置,使用绝对路径,如果是源目录,指目标也要是目录,如果目标文件已经存在会覆盖原有的内容
src:指出源文件的路径,可以使用相对路径或绝对路径,支持直接指定目录,如果源是目录则目标也要是目录
mode:指出复制时,目标文件的权限
owner:指出复制时,目标文件的属主
group:指出复制时,目标文件的属组
content:指出复制到目标主机上的内容,不能与src一起使用
1 ansible dbservers -m copy -a 'src=/etc/fstab dest=/opt/fstab.bak owner=root mode=640'
2 ansible dbservers -a 'ls -l /opt'
3 ansible dbservers -a 'cat /opt/fstab.bak'
4
5 ansible dbservers -m copy -a 'content="helloworld" dest=/opt/hello.txt' #将helloworld写入/opt/hello.txt文件中
6 ansible dbservers -a 'cat /opt/hello.txt'
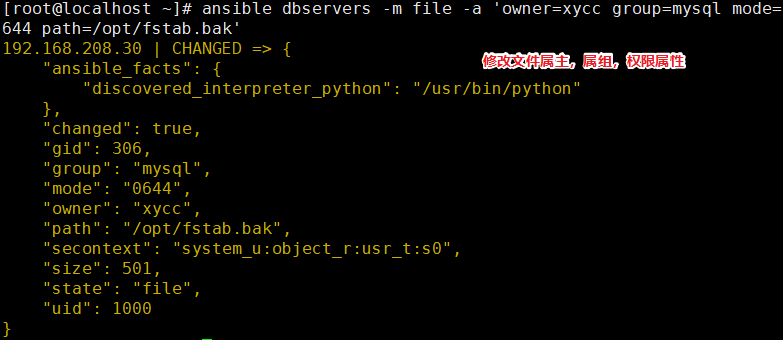
7.file 模块
//设置文件属性
1 ansible-doc -s file
2
3 ansible dbservers -m file -a 'owner=test01 group=mysql mode=644 path=/opt/fstab.bak' #修改文件的属主属组权限等
4 ansible dbservers -m file -a 'path=/opt/fstab.link src=/opt/fstab.bak state=link' #设置/opt/fstab.link为/opt/fstab.bak的链接文件
5 ansible dbservers -m file -a "path=/opt/abc.txt state=touch" #创建一个文件
6 ansible dbservers -m file -a "path=/opt/abc.txt state=absent" #删除一个文件
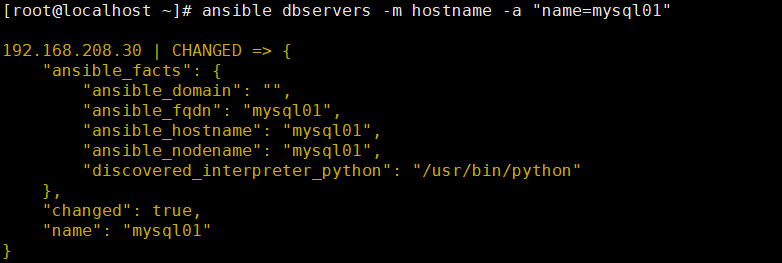
8.hostname 模块
1 //用于管理远程主机上的主机名
2 ansible dbservers -m hostname -a "name=mysql01"
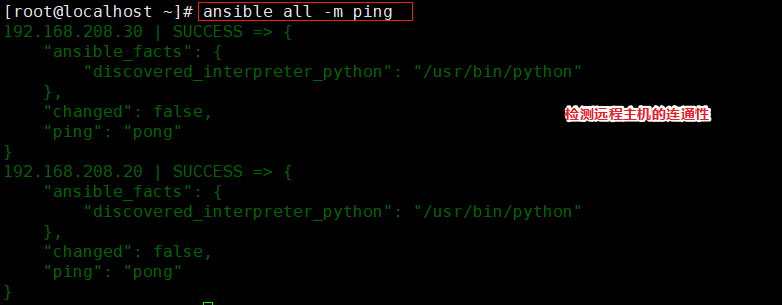
9.ping 模块
1 //检测远程主机的连通性
2 ansible all -m ping
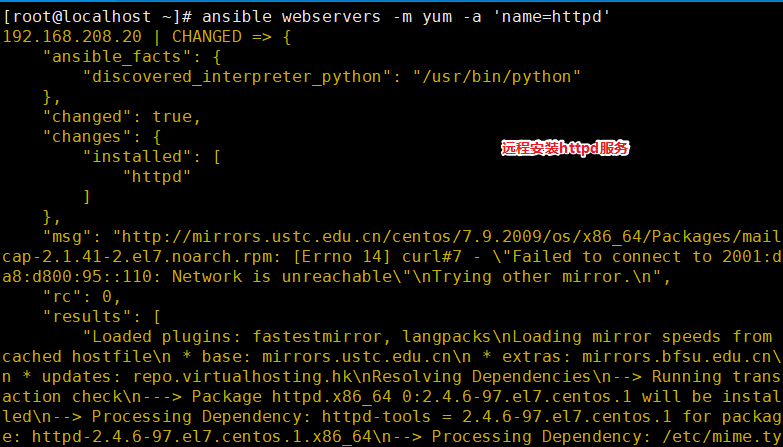
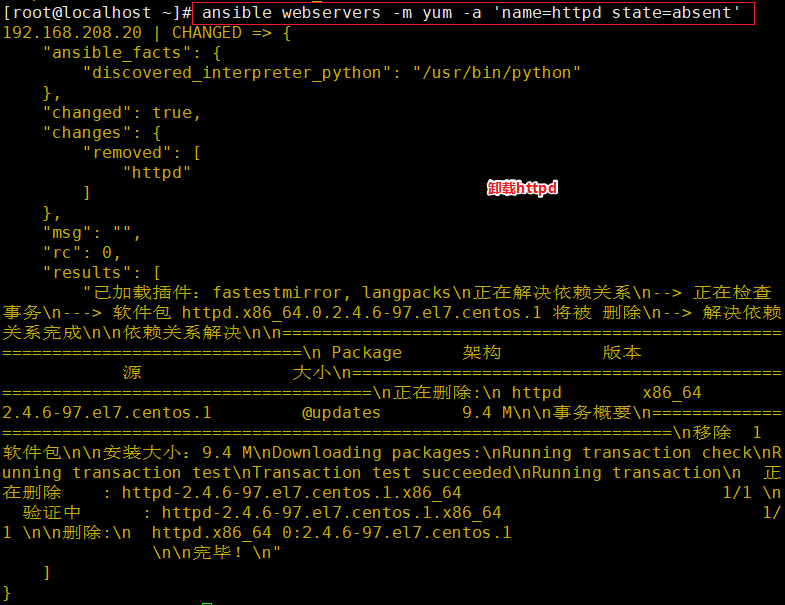
10.yum 模块
//在远程主机上安装与卸载软件包
1 ansible-doc -s yum
2
3 ansible webservers -m yum -a 'name=httpd' #安装服务
4 ansible webservers -m yum -a 'name=httpd state=absent' #卸载服务


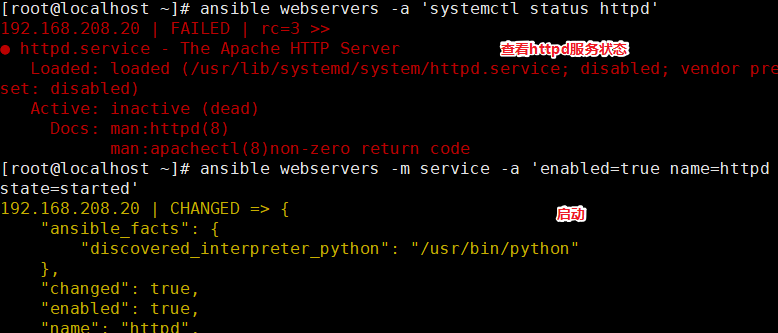
10.service/systemd 模块
1 //用于管理远程主机上的管理服务的运行状态
2 ansible-doc -s service
//常用的参数:
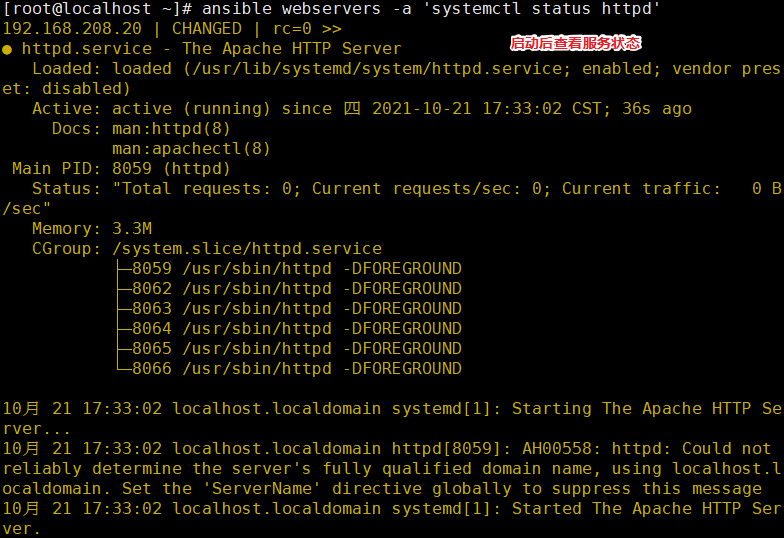
1 name:被管理的服务名称
2 state=started|stopped|restarted:动作包含启动关闭或者重启
3 enabled=yes|no:表示是否设置该服务开机自启
4 runlevel:如果设定了enabled开机自启去,则要定义在哪些运行目标下自启动
5
6 ansible webservers -a 'systemctl status httpd' #查看web服务器httpd运行状态
7 ansible webservers -m service -a 'enabled=true name=httpd state=started' #启动httpd服务
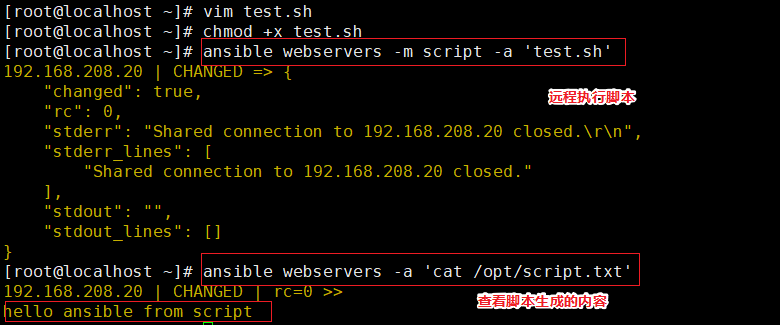
12.script 模块
//实现远程批量运行本地的 shell 脚本
1 ansible-doc -s script
2
3 vim test.sh
4 #!/bin/bash
5 echo "hello ansible from script" > /opt/script.txt
6
7 chmod +x test.sh
8 ansible webservers -m script -a 'test.sh'
9 ansible webservers -a 'cat /opt/script.txt'

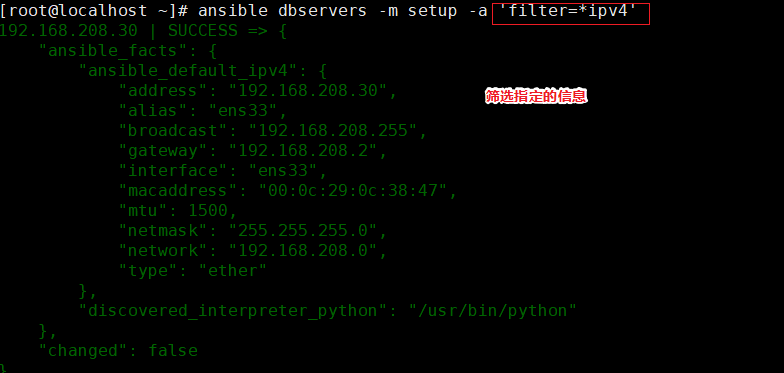
13.setup 模块
//facts 组件是用来收集被管理节点信息的,使用 setup 模块可以获取这些信息
1 ansible-doc -s setup
2
3 ansible webservers -m setup #获取mysql组主机的facts信息
4 ansible dbservers -m setup -a 'filter=*ipv4' #使用filter可以筛选指定的facts信息

inventory 主机清单
- Inventory支持对主机进行分组,每个组内可以定义多个主机,每个主机都可以定义在任何一个或多个主机组内。
- 如果是名称类似的主机,可以使用列表的方式标识各个主机。
1 vim /etc/ansible/hosts
2 [webservers]
3 192.168.208.10:2222 #冒号后定义远程连接端口,默认是 ssh 的 22 端口
4 192.168.208.1[2:5]
5
6 [dbservers]
7 db-[a:f].example.org #支持匹配 a~f
//inventory 中的变量
Inventory变量名 含义
ansible_host ansible连接节点时的IP地址
ansible_port 连接对方的端口号,ssh连接时默认为22
ansible_user 连接对方主机时使用的主机名。不指定时,将使用执行ansible或ansible-playbook命令的用户
ansible_password 连接时的用户的ssh密码,仅在未使用密钥对验证的情况下有效
ansible_ssh_private_key_file 指定密钥认证ssh连接时的私钥文件
ansible_ssh_common_args 提供给ssh、sftp、scp命令的额外参数
ansible_become 允许进行权限提升
ansible_become_method 指定提升权限的方式,例如可使用sudo/su/runas等方式
ansible_become_user 提升为哪个用户的权限,默认提升为root
ansible_become_password 提升为指定用户权限时的密码
(1)主机变量
1 [webservers]
2 192.168.208.10 ansible_port=22 ansible_user=root ansible_password=xcc123
(2)组变量
1 [webservers:vars] #表示为 webservers 组内所有主机定义变量
2 ansible_user=root
3 ansible_password=xcc123
4
5 [all:vars] #表示为所有组内的所有主机定义变量
6 ansible_port=22
(3)组嵌套
 1 [nginx]
 2 192.168.208.20
 3 192.168.208.21
 4 192.168.208.22
 5
 6 [apache]
 7 192.168.208.3[0:3]
 8
 9 [webs:children] #表示为 webs 主机组中包含了 nginx 组和 apache 组内的所有主机
10 nginx
11 apache

 浙公网安备 33010602011771号