


SpringBoot集成Thymeleaf及使用
1、认识thymeleaf
2、SpringBoot集成Thymeleaf环境配置
3、标准变量表达式 ${} 和 th:text
4、选择变量表达式 *{} 和 th:object
5、链接(URL)表达式 和 th:href
6、th标签之th:action
7、th标签之th:each
8、其他th标签
9、thymeleaf字面量
10、Thymeleaf的字符串拼接
11、Thymeleaf的内置对象
12、公共页面抽取
1、认识thymeleaf <--返回目录
thymeleaf是一个流行的模板引擎,该模板引擎采用java语言开发。
模板引擎是一个技术名词,是跨领域跨平台的概念,在java语言体系下有模板引擎,在c#、PHP语言体系下也有模板引擎,甚至在JavaScript也会用到模板引擎技术。
java生态下的模板引擎有thymeleaf、freemarker、velocity、beetl(国产)等。
thymeleaf模板引擎既能用于web环境下,也能用于非web环境下,在非web环境下,它能直接显示模板上的静态数据,在web环境下,它能像jsp一样从后台接收数据并替换掉模板上的静态数据。
thymeleaf是基于html的,以html标签为载体,thymeleaf要寄托在html的标签下实现对数据的展示。
thymeleaf的官方网站:http://www.thymeleaf.org
springboot集成了thymeleaf模板技术,并且springboot官方也推荐使用thymeleaf来替代jsp技术。thymeleaf是另外一种模板技术,它本身并不属于springboot,springboot只是很好地集成了这种模板技术,作为前端页面的数据展示。
2、SpringBoot集成Thymeleaf环境配置 <--返回目录
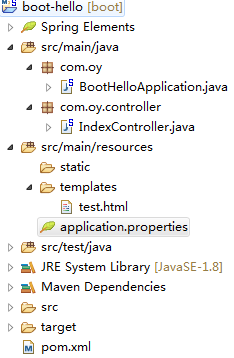
springboot使用thymeleaf作为视图展示时,约定将模板文件放置在src/main/resources/templates目录下,静态资源放在src/main/resources/static目录下。
项目结构
依赖
<dependency>
    <groupId>org.springframework.boot</groupId>
    <artifactId>spring-boot-starter-thymeleaf</artifactId>
</dependency>
application.properties
# 开发阶段,建议关闭thymeleaf的缓存
spring.thymeleaf.cache=false
#使用遗留的html5以去掉对html标签的校验
spring.thymeleaf.mode=LEGACYHTML5
在使用springboot的过程中,如果使用thymeleaf作为模板文件,则要求html格式必须为严格的html5格式,必须有结束标签,否则会报错;
如果不想对标签进行严格的验证,使用spring.thymeleaf.mode=LEGACYHTML5去掉验证,去掉该验证,则需要引入如下依赖,否则会报错;
<dependency>
    <groupId>net.sourceforge.nekohtml</groupId>
    <artifactId>nekohtml</artifactId>
</dependency>
<dependency>
    <groupId>org.unbescape</groupId>
    <artifactId>unbescape</artifactId>
    <version>1.1.5.RELEASE</version>
</dependency>
NekoHTML是一个java语言的html扫描器和标签补全器,这个解析器能够扫描html文件并"修正"html文档中的常见错误。NekoHTML能增补缺失的父元素、自动用结束标签关闭相应的元素,修复不匹配的内嵌元素标签等。
IndexController
@Controller
public class IndexController {

    @RequestMapping("/hello/thymeleaf")
    public String hello(Model model) {
        model.addAttribute("msg", "springboot集成thymeleaf");
        return "test";
    }

}
在 src/main/resources/templates 下面创建 模板文件 test.html
<!DOCTYPE html>
<html xmlns:th="http://www.thymeleaf.org">
<head>
    <meta charset="UTF-8">
    <title>标题</title>
</head>
<body>
    <span th:text="${msg}">span默认文本内容</span>
</body>
</html>
启动程序,访问http://localhost:8080/hello/thymeleaf 。
3、标准变量表达式 ${} 和 th:text <--返回目录
thymeleaf有5种表达式:
${}: 标准变量表达式
*{}: 选择变量表达式
#{}: 消息(i18n)表达式
@{}: 链接(URL)表达式
~{}: 片段表达式
${}: 标准变量表达式
@Controller
public class IndexController {

    @RequestMapping("/hello/thymeleaf")
    public String hello(Model model) {
        model.addAttribute("msg", "springboot集成thymeleaf");

        User user = new User();
        user.setId(1);
        user.setName("张三");
        user.setAge(10);
        model.addAttribute("user", user);
        return "test";
    }

}
<!DOCTYPE html>
<html xmlns:th="http://www.thymeleaf.org">
<head>
    <meta charset="UTF-8">
    <title>标题</title>
</head>
<body>
    <span th:text="${msg}">span默认文本内容</span><br/>

    id: <span th:text="${user.id}">1</span>
    name: <span th:text="${user.name}">xxx</span>
    age: <span th:text="${user.age}">18</span>
</body>
</html>
4、选择变量表达式 *{} 和 th:object <--返回目录
*{}: 选择变量表达式
标准变量表达式和选择变量表达式可以混合使用 ; 先用 th:object来绑定 user 对象, 然后用 * 来代表这个 user 对象
<!DOCTYPE html>
<html xmlns:th="http://www.thymeleaf.org">
<head>
    <meta charset="UTF-8">
    <title>标题</title>
</head>
<body>
    <span th:text="${msg}">span默认文本内容</span><br/>

    <div th:object="${user}">
        id: <span th:text="*{id}">1</span>
        name: <span th:text="*{name}">xxx</span>
        age: <span th:text="*{age}">18</span>
        <br/>
        id: <span th:text="${user.id}">1</span>
        name: <span th:text="${user.name}">xxx</span>
        age: <span th:text="${user.age}">18</span>
    </div>
</body>
</html>
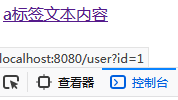
5、链接(URL)表达式 和 th:href <--返回目录

<!DOCTYPE html>
<html xmlns:th="http://www.thymeleaf.org">
<head>
    <meta charset="UTF-8">
    <title>标题</title>
</head>
<body>
    <a href="#" th:href="'http://localhost:8080/user?id=' + ${user.id}">a标签文本内容</a>
    <a href="#" th:href="@{'http://localhost:8080/user?id=' + ${user.id}}">a标签文本内容</a>
</body>
</html>
@Controller
public class IndexController {

    @RequestMapping("/hello/thymeleaf")
    public String hello(Model model) {
        User user = new User();
        user.setId(1);
        user.setName("张三");
        user.setAge(10);
        model.addAttribute("user", user);
        return "test";
    }

    @RequestMapping("/user")
    @ResponseBody
    public String getUserById(Integer id) {
        System.out.println("id=" + id);
        return "id=" + id;
    }

}
访问 http://localhost:8080/hello/thymeleaf
6、th标签之th:action <--返回目录
th:action 例子:
<!DOCTYPE html>
<html xmlns:th="http://www.thymeleaf.org">
<head>
    <meta charset="UTF-8">
    <title>标题</title>
</head>
<body>
    <form th:action="@{/user}">
        id:<input type="text" name="id" value=""/>
        <input type="submit" value="提交" />
    </form>
</body>
</html>
@Controller
public class IndexController {
    @RequestMapping("/hello/thymeleaf")
    public String hello(Model model) {
        return "test";
    }

    @RequestMapping("/user")
    @ResponseBody
    public String getUserById(Integer id) {
        System.out.println("id=" + id);
        return "id=" + id;
    }
}
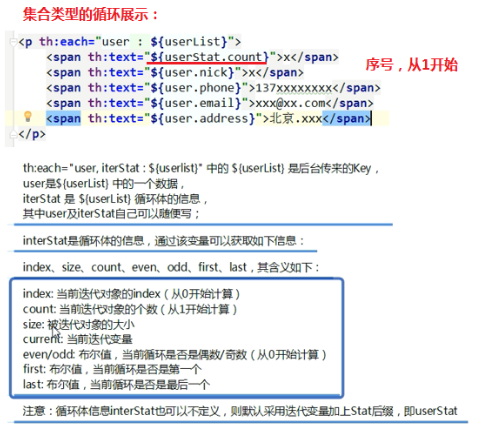
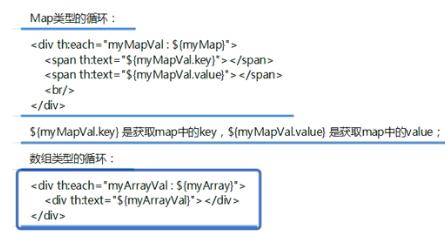
7、th标签之th:each <--返回目录
@RequestMapping("/hello/thymeleaf")
public String hello(Model model) {
    List<User> userList = new ArrayList<>();
    for (int i = 1; i <= 3; i++) {
        User user = new User();
        user.setId(i);
        user.setName("张三" + i);
        user.setAge(20 + i);

        userList.add(user);
    }

    model.addAttribute("userList", userList);
    return "test";
}
<body>
    <p th:each="user: ${userList}">
        <span th:text="${user.id}" >xxx</span>
        <span th:text="${user.name}" >xxx</span>
        <span th:text="${user.age}" >xxx</span>
    </p>
</body>
8、其他th标签 <--返回目录
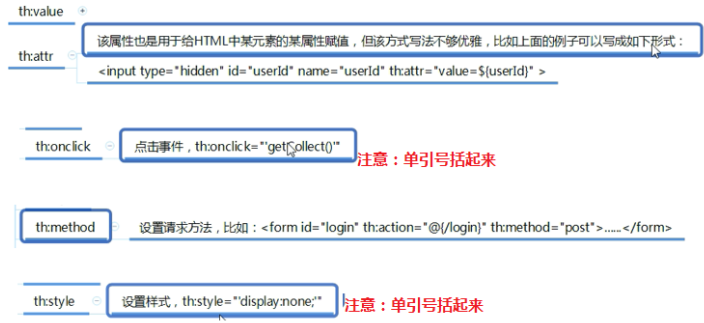
th:name , th:id , th:src , th:href
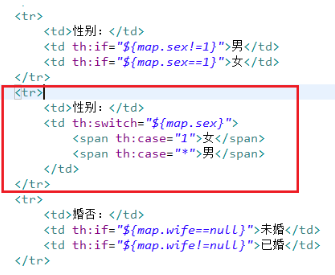
th标签之th:if
<span th:if="${sex eq 1}">男</span>
<span th:if="${sex eq 2}">女</span>
th标签之th:unless 与 th:if 相反
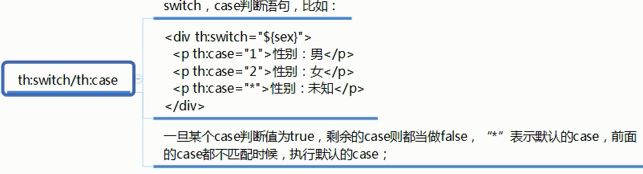
th标签之th:switch/th:case


9、thymeleaf字面量 <--返回目录

10、Thymeleaf的字符串拼接 <--返回目录

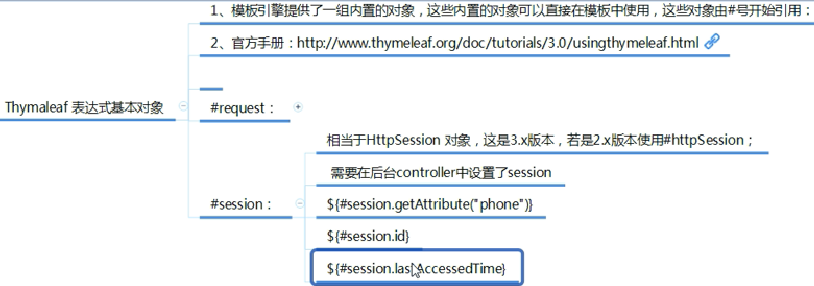
11、Thymeleaf的内置对象 <--返回目录
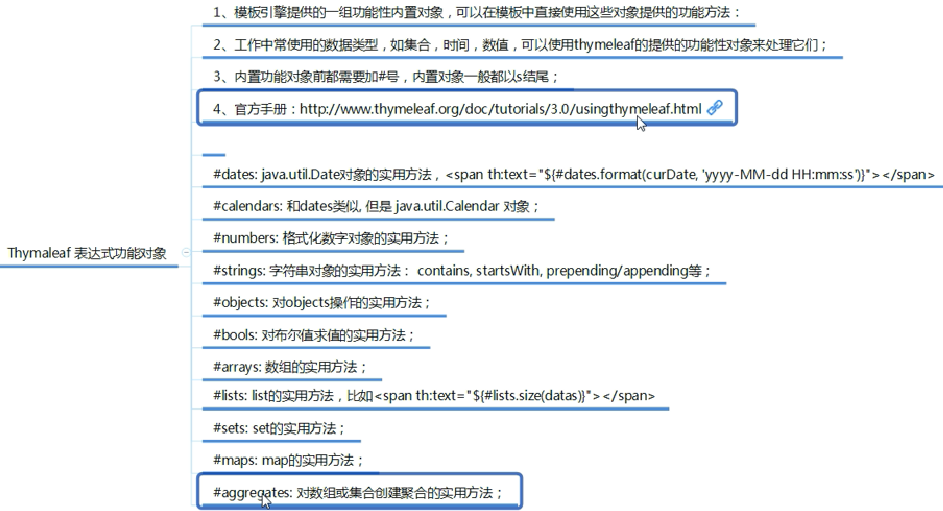

登陆错误消息的显示
<p style="color: red" th:text="${msg}" th:if="${not #strings.isEmpty(msg)}"></p>
12、公共页面抽取 <--返回目录
1、抽取公共片段 <div th:fragment="copy"> © 2011 The Good Thymes Virtual Grocery </div> 2、引入公共片段 <div th:insert="~{footer :: copy}"></div> ~{templatename::selector}:模板名::选择器 ~{templatename::fragmentname}:模板名::片段名 3、默认效果: insert的公共片段在div标签中 如果使用th:insert等属性进行引入,可以不用写~{}: 行内写法可以加上:[[~{}]];[(~{})];
三种引入公共片段的th属性:
th:insert:将公共片段整个插入到声明引入的元素中
th:replace:将声明引入的元素替换为公共片段
th:include:将被引入的片段的内容包含进这个标签中
<!-- 公共片段 --> <footer th:fragment="copy"> © 2011 The Good Thymes Virtual Grocery </footer> 三种引入方式 <div th:insert="footer :: copy"></div> <div th:replace="footer :: copy"></div> <div th:include="footer :: copy"></div> 三种引入方式效果分别为 <div> <footer> © 2011 The Good Thymes Virtual Grocery </footer> </div> <footer> © 2011 The Good Thymes Virtual Grocery </footer> <div> copy; 2011 The Good Thymes Virtual Grocery </div>
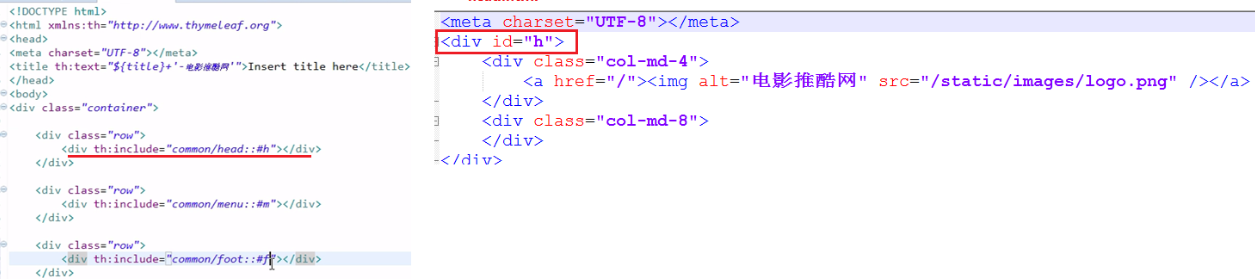
另外,也可以在引入公共片段时传入参数
<!‐‐引入侧边栏;传入参数‐‐>
<div th:replace="commons/bar::#sidebar(activeUri='emps')"></div>
---
posted on 2020-11-15 16:37 wenbin_ouyang 阅读(12674) 评论(1) 收藏 举报

 浙公网安备 33010602011771号