爬取新片场的数据
爬取新片场的数据
一:
https://www.xinpianchang.com/channel/index/sort-like?from=navigator
视频id。、视频标题。、视频缩略图。、视频分类。、视频创建时间。、视频详情链接。
二:
视频详情:
视频id、视频预览图。、视频链接。、视频格式。、作品分类。、播放时长。、作品描述。、播放次数。、被点赞次数。
三:
作者详情:
作者id。、作者主页banner图片。、用户头像。、作者名字。、自我介绍。,被点赞次数。、粉丝数量。、关注数量。、所在位置、职业。
四:
评论数据:
评论id。、评论作品id(视频id)。、评论人id。、评论人名称。、发表时间。、评论内容。、被点赞次数。、
爬取上面的数据存储到mongodb数据库中
其中每个数据对应着一个表
[网站链接](https://www.xinpianchang.com/channel/index/type-/sort-like/duration_type-0/resolution_type-/page-1)
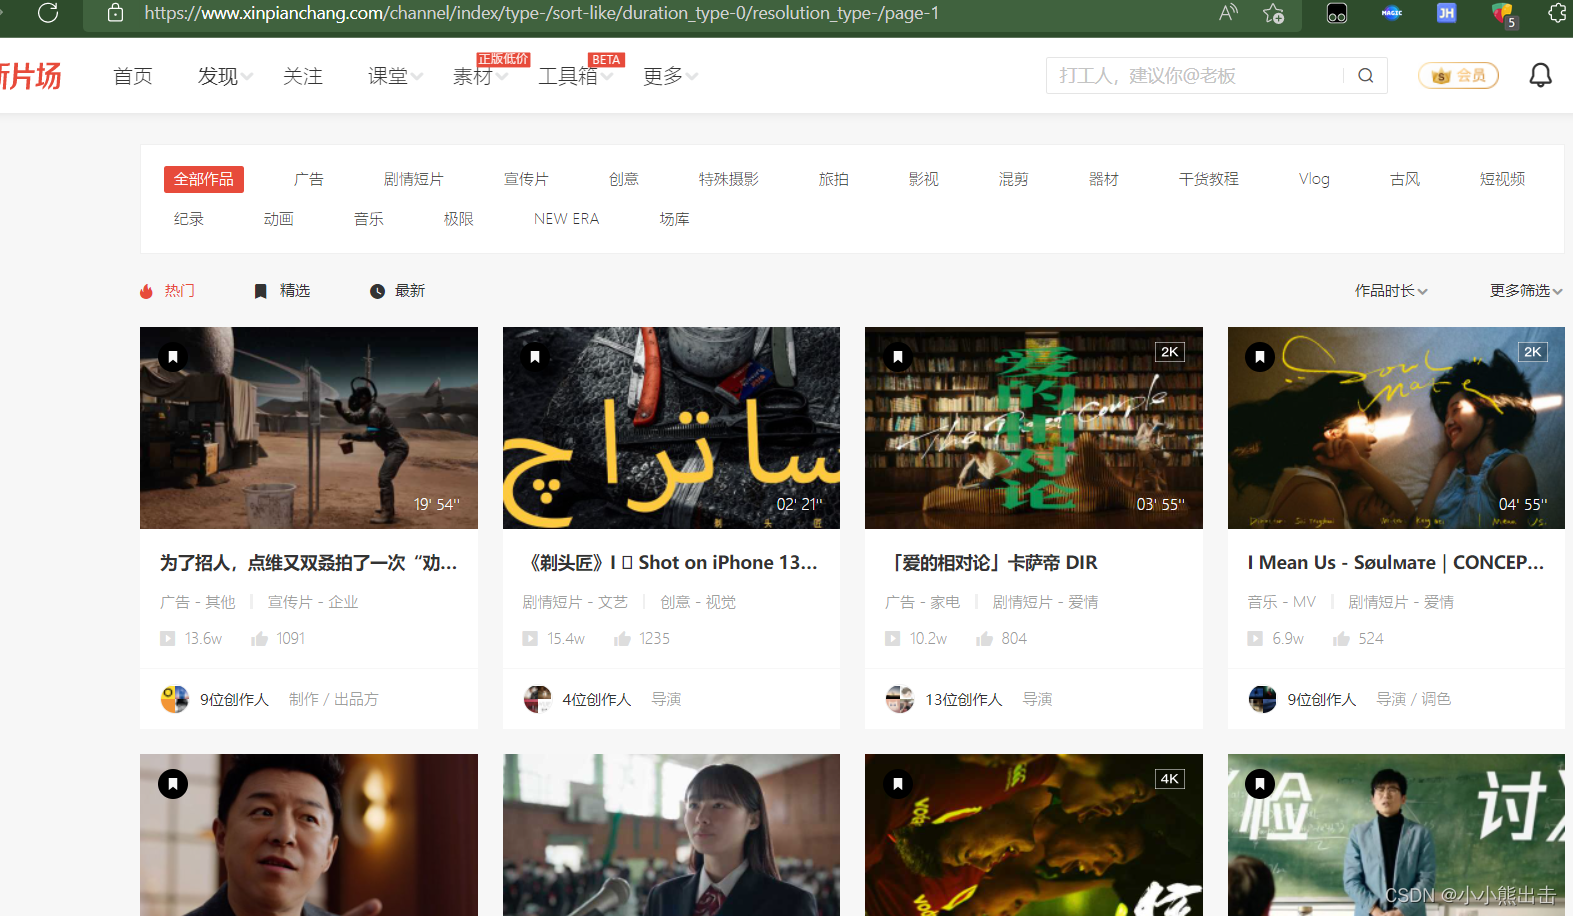
解析这个页面,获取需求的数据,
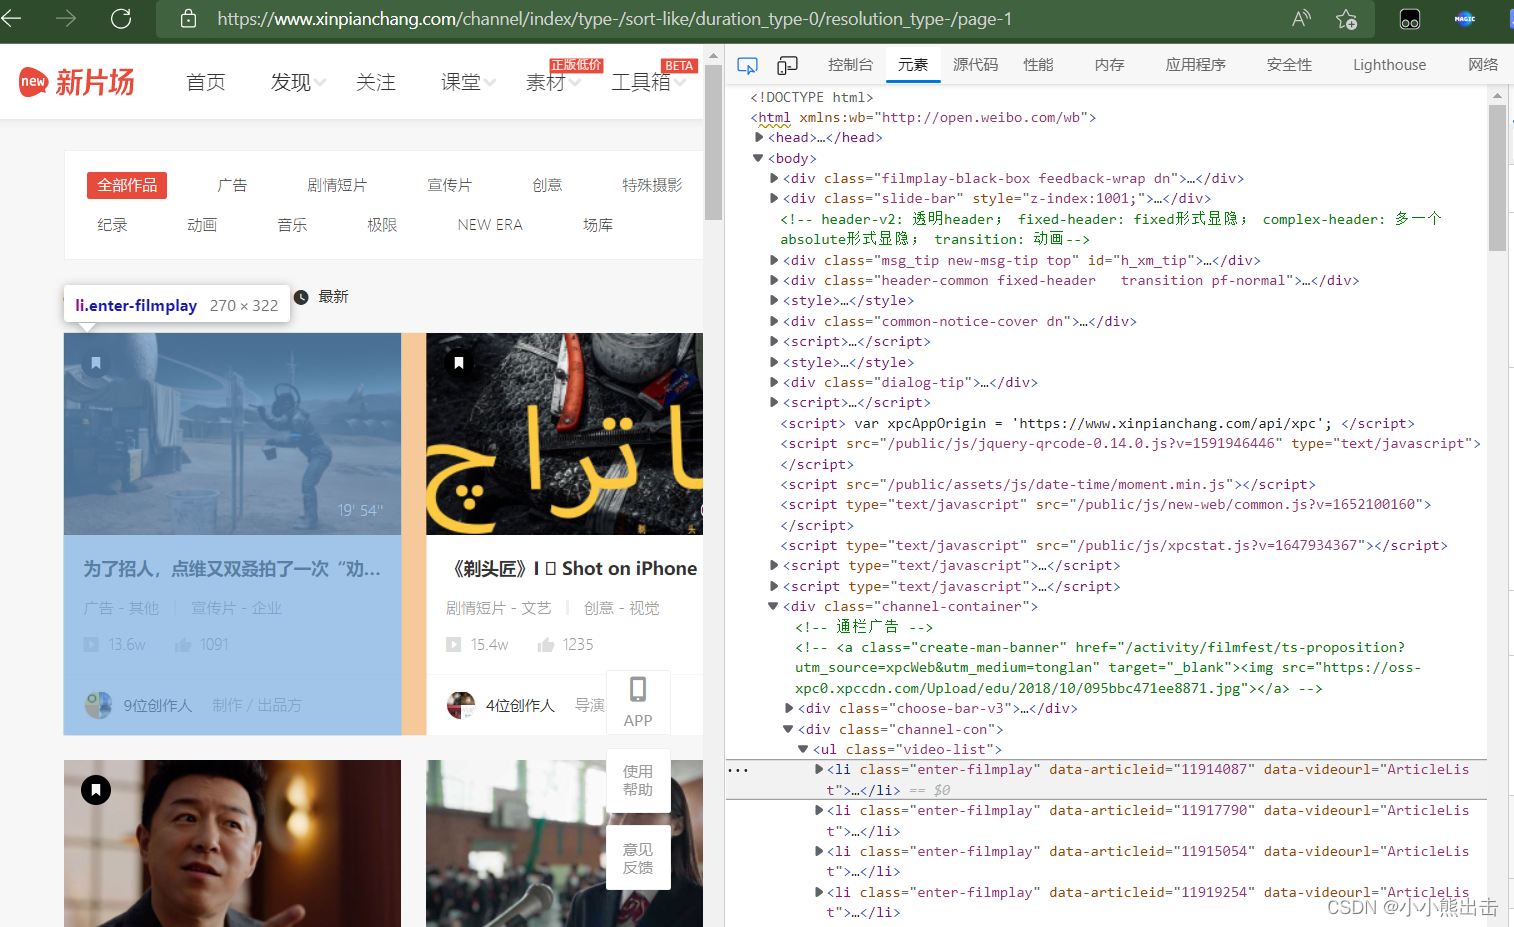
可以发现每一个li标签中
通过xpath可以定位到这里 `/html/body/div[7]/div[2]/ul/li`
```python
import scrapy
from xinpianchang.items import * # 导入items里面所有的建模类
import re
import time
import sys
import io
sys.stdout = io.TextIOWrapper(sys.stdout.buffer, encoding='gb18030')
# 修改输出格式,有些情况下print无法输出特殊字符,需要修改输出格式,可以不设置
class NodeXinpianchangSpider(scrapy.Spider):
name = 'node_xinpianchang'
allowed_domains = ['xinpianchang.com']
start_urls = ['https://www.xinpianchang.com/channel/index/sort-like?from=navigator']
# 初始页面解析
def parse(self, response,**kwargs):
temps = response.xpath("/html/body/div[7]/div[2]/ul/li[1]")
# 因为数据太多先拿第一个视频数据经行解析
#初始页面可以提取如下的数据
for temp in temps:
# 视频标题
tag_name = temp.xpath("./div/div[1]/a/p/text()").extract_first()
# print(tag_name)
# 视频时长
tag_time= temp.xpath("./a/span/text()").extract_first()
# print(tag_time)
# 视频缩略图
name_picture = temp.css(".lazy-img::attr(_src)").extract_first()
# print(name_picture)
# 视频id
tag_id = temp.css(".enter-filmplay::attr(data-articleid)").extract_first()
# print(tag_id)
# 视频详情链接
tag_url = f"https://www.xinpianchang.com/a{tag_id}?from=ArticleList"
# print(tag_url)
# 视频分类
tag_title = []
tag_titles = temp.xpath("./div/div[1]/div[1]/span/text()").extract()
for tag in tag_titles:
tag_title.append(tag.strip())
# print(tag_title)
# 播放量
tag_play = temp.xpath("./div/div[1]/div[2]/span[1]/text()").extract_first()
# 点赞量
tag_give = temp.xpath("./div/div[1]/div[2]/span[2]/text()").extract_first()
# 请求详情链接、使用callback回调、用meta将数据传出去
yield scrapy.Request(
url=tag_url,
callback=self.parse_detail,
meta={
"tag_id":tag_id,
"tag_title":tag_title,
"tag_play":tag_play,
"tag_give":tag_give,
"tag_time":tag_time,
"tag_name":tag_name,
"name_picture":name_picture,
"tag_url":tag_url,
}
)
```
在items里面经行建模将数据放到建模中
将所有所需要的数据经行建模
写在items.py里面
```python
# coding=utf-8
# Define here the models for your scraped items
#
# See documentation in:
# https://docs.scrapy.org/en/latest/topics/items.html
import scrapy
class Xinpianchang01Item(scrapy.Item):
# define the fields for your item here like:
# name = scrapy.Field()
mongodb_collection = "The_initial_video"
# """
# 视频id。、视频标题。、视频缩略图。、视频分类。、视频创建时间。、视频详情链接。
# """
video_name = scrapy.Field() # 视频标题
video_picture = scrapy.Field() # 视频缩略图
video_id = scrapy.Field() # 视频id
video_url = scrapy.Field() # 视频详情链接
video_title = scrapy.Field() # 视频分类
setup_time = scrapy.Field() # 视频创建时间
class VideoItem(scrapy.Item):
# """
# 视频id、视频预览图。、视频链接。、视频格式。、作品分类。、播放时长。、作品描述。、播放次数。、被点赞次数
# """
# # 视频详情
mongodb_collection = "video_data"
video_time = scrapy.Field() # 视频时长
video_play = scrapy.Field() # 播放量
video_give = scrapy.Field() # 点赞量
# 视频id
video_id = scrapy.Field()
# 作品分类
video_title = scrapy.Field()
# 视频预览图
video_img = scrapy.Field()
# 作品描述
CDWA = scrapy.Field()
# 视频链接
video_url = scrapy.Field()
# 视频格式
format = scrapy.Field()
class AuthorItem(scrapy.Item):
# """
# 作者id。、作者主页banner图片。、用户头像。、作者名字。、自我介绍。,被点赞次数。、粉丝数量。、关注数量。、所在位置、职业。
# """
# 作者详情
mongodb_collection = "Author"
# 作者id
author_id = scrapy.Field()
# 作者名称
author_name = scrapy.Field()
# 作者头像
author_head = scrapy.Field()
# 作者主页banner图片
banner = scrapy.Field()
# 自我介绍
introduce = scrapy.Field()
# 被点赞次数
by_gives = scrapy.Field()
# 粉丝数量
count = scrapy.Field()
# 关注数量
attention = scrapy.Field()
# 所在位置
address = scrapy.Field()
# 职业
job = scrapy.Field()
pass
class CommentItem(scrapy.Item):
# 评论详情
# """
# 评论id。、评论作品id(视频id)。、评论人id。、评论人名称。、发表时间。、评论内容。、被点赞次数。、
# """
mongodb_collection = "Comment"
# 评论内容
content = scrapy.Field()
# 评论作品id(视频id)
resource_id = scrapy.Field()
# 评论id
id = scrapy.Field()
# 评论人id
userid = scrapy.Field()
# 评论人名称
username = scrapy.Field()
# 被点赞次数
count_approve = scrapy.Field()
# 发表时间
addtime = scrapy.Field()
pass
```
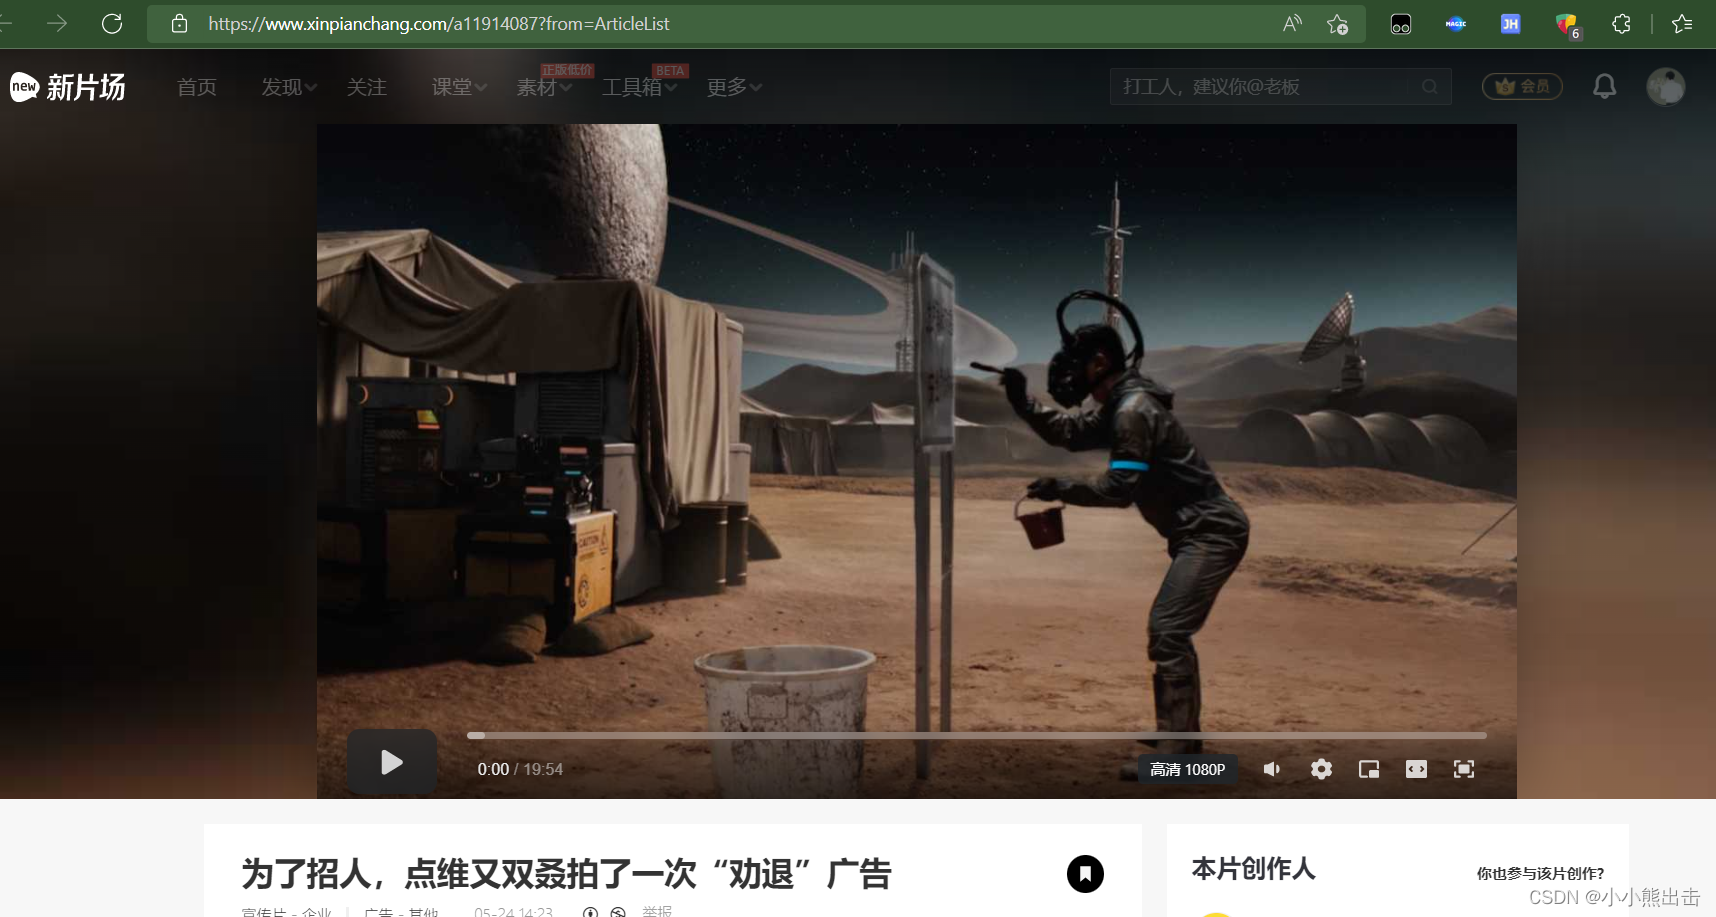
回调的方法 parse_detail 会来到这个页面
解析这个页面
```python
# 加载的视频页面解析
def parse_detail(self,response):
# 视频id
tag_id = response.meta["tag_id"]
# 视频名称
tag_name = response.meta["tag_name"]
# 视频缩略图
name_picture = response.meta["name_picture"]
# 视频详情链接
tag_url = response.meta["tag_url"]
# 作品分类
tag_title = response.meta["tag_title"]
```
通过解析会发现一些数据是异步加载的
找到这个链接
https://mod-api.xinpianchang.com/mod/api/v2/media/9Mnp8wWKkBKwK0lG?appKey=61a2f329348b3bf77&extend=userInfo%2CuserStatus
可以发现着里面藏着视频的mp4链接
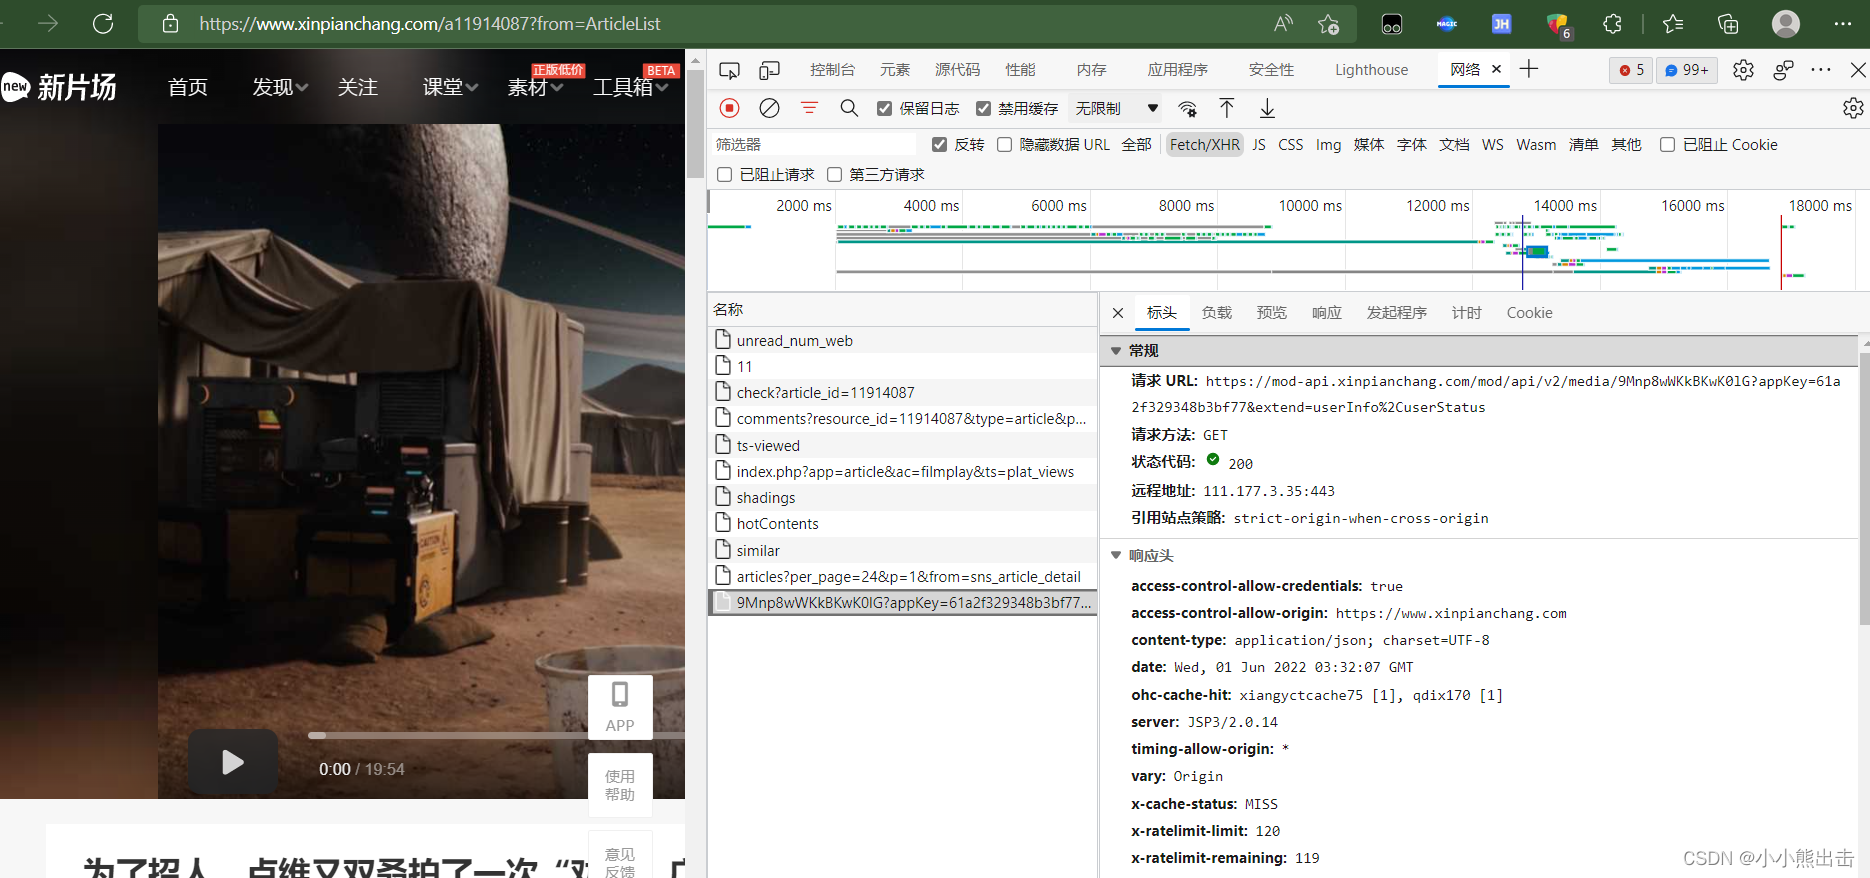
在解析链接可以发现链接后面的&extend=userInfo%2CuserStatus 可以不需要,也可以请求链接
https://mod-api.xinpianchang.com/mod/api/v2/media/9Mnp8wWKkBKwK0lG?appKey=61a2f329348b3bf77
这个就是要请求的链接
两个参数在哪里呢?
9Mnp8wWKkBKwK0lG?
appKey=61a2f329348b3bf77
在源码里面
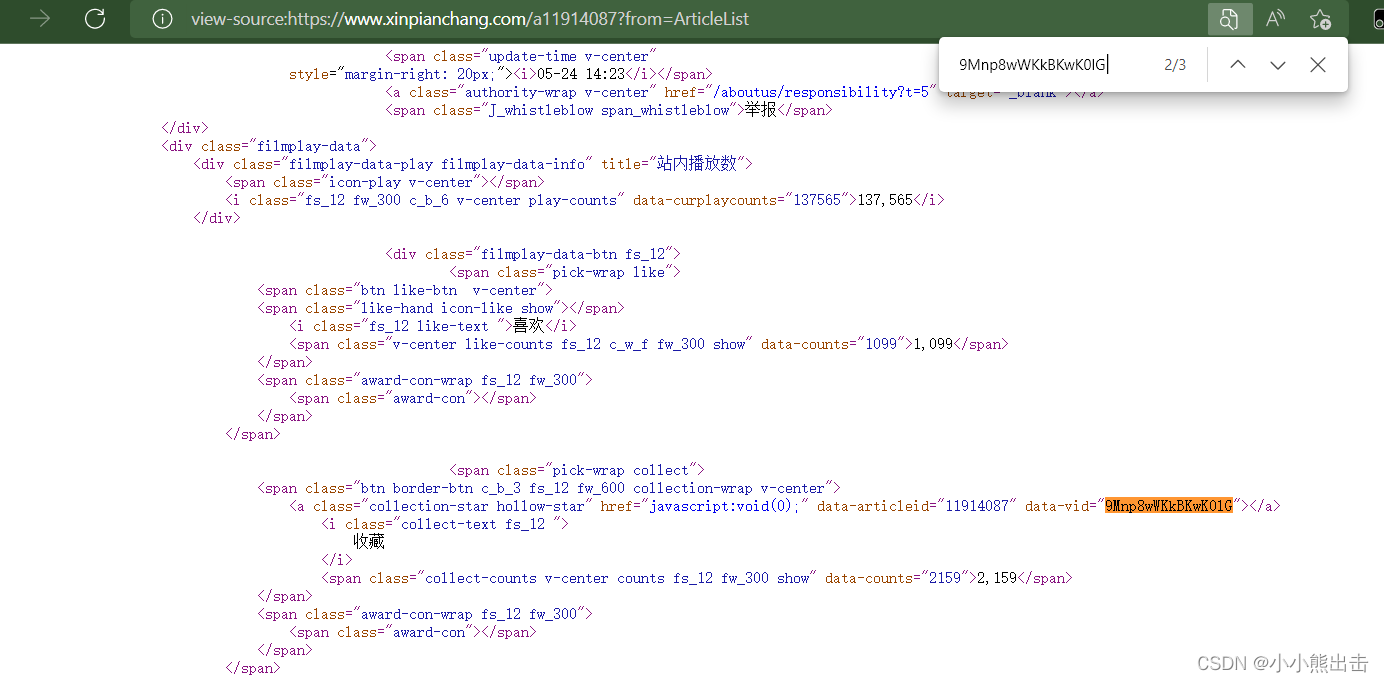
通过搜索可以发现 9Mnp8wWKkBKwK0lG 在 a标签中
通过xpath可以直接提取参数 `/html/body/div[7]/div[2]/div[1]/div[1]/div[1]/div[4]/div[2]/span[2]/span[1]/a/@data-vid`
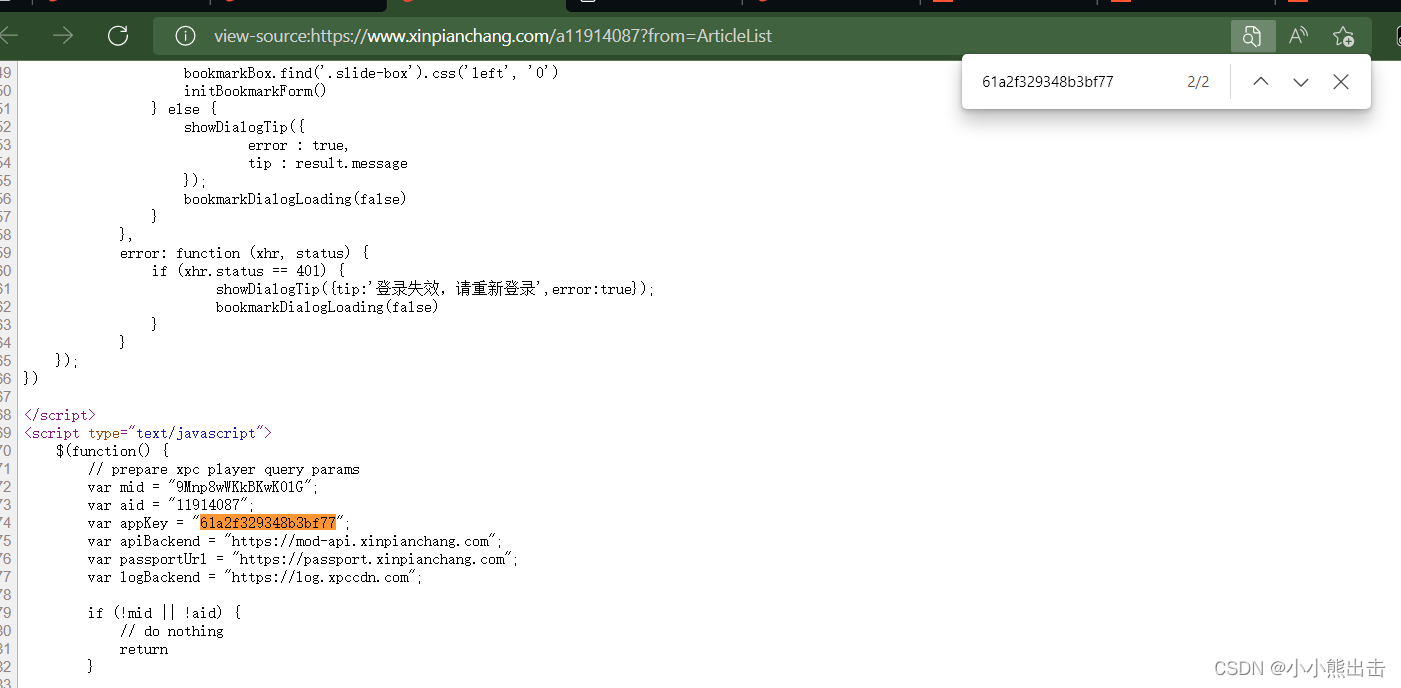
再次通过搜索可以发现 61a2f329348b3bf77 这个参数
因为这个没有标签
所有通过re正则表达式获取数据 `var.appKey.=."(.*?)"`
这样就拿到了这些参数
如何只需要将他们合并成链接就可以了
```python
f"https://mod-api.xinpianchang.com/mod/api/v2/media/{node_str}?appKey={node_id[0]}"
```
```python
# 视频加密参数
## id
node_id = response.xpath(".").re('var.appKey.=."(.*?)"')
# print(node_id)
## str
node_str = response.xpath("/html/body/div[7]/div[2]/div[1]/div[1]/div[1]/div[4]/div[2]/span[2]/span[1]/a/@data-vid").extract_first()
# print(node_str)
# https://mod-api.xinpianchang.com/mod/api/v2/media/9Mnp8wWKkBKwK0lG?appKey=61a2f329348b3bf77
# 提取视频链接的url
url = f"https://mod-api.xinpianchang.com/mod/api/v2/media/{node_str}?appKey={node_id[0]}"
# print(url)
# 视频创建时间
setup_time = response.xpath(
"/html/body/div[7]/div[2]/div[1]/div[1]/div[1]/div[3]/span[2]/i/text()").extract_first()
# print(setup_time)
# 第一个表所需要的数据全部找全了,将同他们放进建模中
yield Xinpianchang01Item(
setup_time=setup_time,
video_name=tag_name,
video_id=tag_id,
video_picture=name_picture,
video_url=tag_url,
video_title=tag_title,
)
# 播放次数
tag_play = response.meta["tag_play"]
# 被点赞次数
tag_give = response.meta["tag_give"]
# 视频时长
tag_time = response.meta["tag_time"]
# 视频预览图
name_img = response.xpath('/html/head/meta[11]/@content').extract_first()
# print(name_img)
# 作品描述
CDWA = []
abouts = response.xpath("/html/body/div[7]/div[2]/div[1]/div[1]/div[2]/p/text()").extract()
for about in abouts:
pass
CDWA.append(about.strip())
yield scrapy.Request(
url=url,
callback=self.video_detail,
meta={
"tag_id": tag_id,
"tag_time": tag_time,
"tag_title": tag_title,
"tag_play": tag_play,
"tag_give": tag_give,
"name_img": name_img,
"CDWA":CDWA
}
)
temps = response.xpath("/html/body/div[7]/div[2]/div[2]/div[1]/div[1]/ul/li")
for temp in temps:
# 作者的主页链接
author_url = f'https://www.xinpianchang.com{temp.xpath("./a/@href").extract_first()}'
# 作者id
author_id = temp.xpath("./div[2]/@data-userid").extract_first()
# print(author_id)
# 作者名称
author_name = temp.xpath("./div[1]/a/span/span/text()").extract_first()
# print(author_name)
# 作者头像
author_head = temp.xpath("./a/img/@_src").extract_first()
# print(author_head)
yield scrapy.Request(
url=author_url,
callback=self.author_detail,
meta={
"author_id":author_id,
"author_name":author_name,
"author_head":author_head
}
)
```
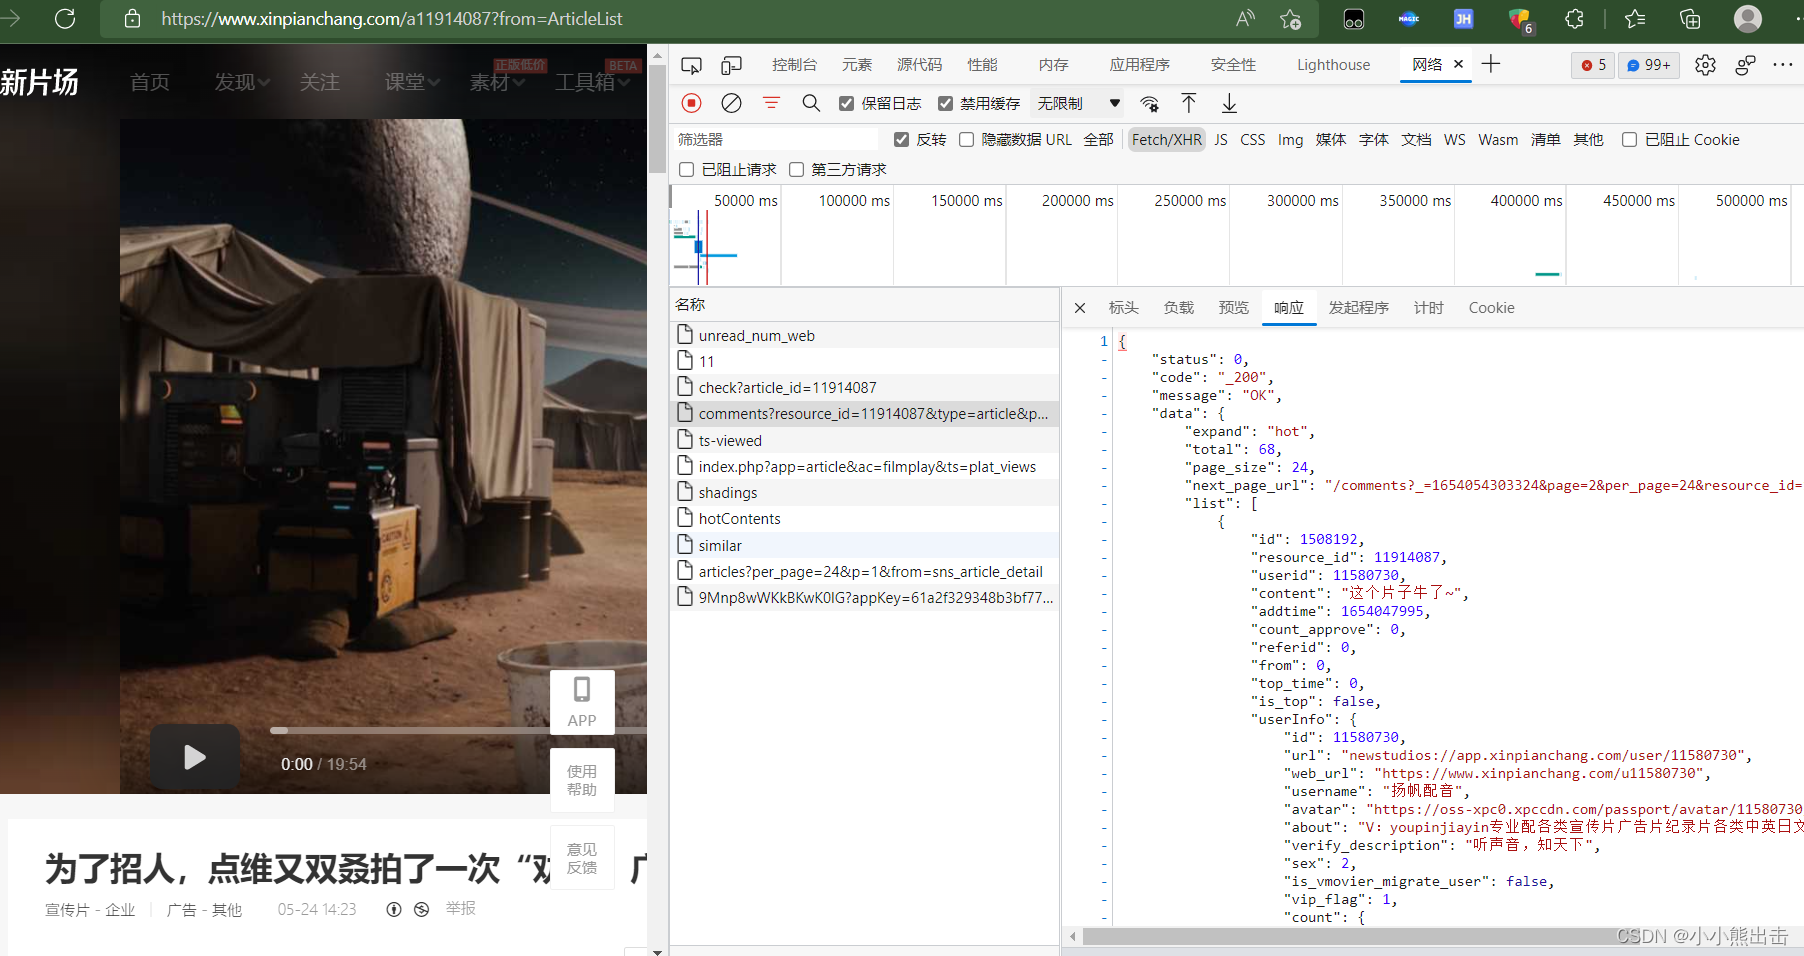
再次查看异步加载的请求可以发现评论的链接
```python
https://app2.xinpianchang.com/comments?resource_id=11914087&type=article&page=1&per_page=24&_=1654054326985
```
解析链接可以发现
&_=1654054326985 也可以不需要
还可以发展链接可以设置最大值
设置获取最大的评论数据
per_page=24
将它设置为最大获取100个评论
这个链接则会最大获取100评论,少于100个评论的则全部获取
resource_id=11914087 在里面的参数着是视频的id 上面已经获取到了
这样就解析完成了全部评论的链接
最后回调评论的解析方法
```python
# 评论url
comment_url = f"https://app2.xinpianchang.com/comments?resource_id={tag_id}&type=article&page=1&per_page=100"
yield scrapy.Request(
url=comment_url,
callback=self.comment_detail
)
```
这个链接请求的是json数据
在里面提取1数据
```python
#解析评论
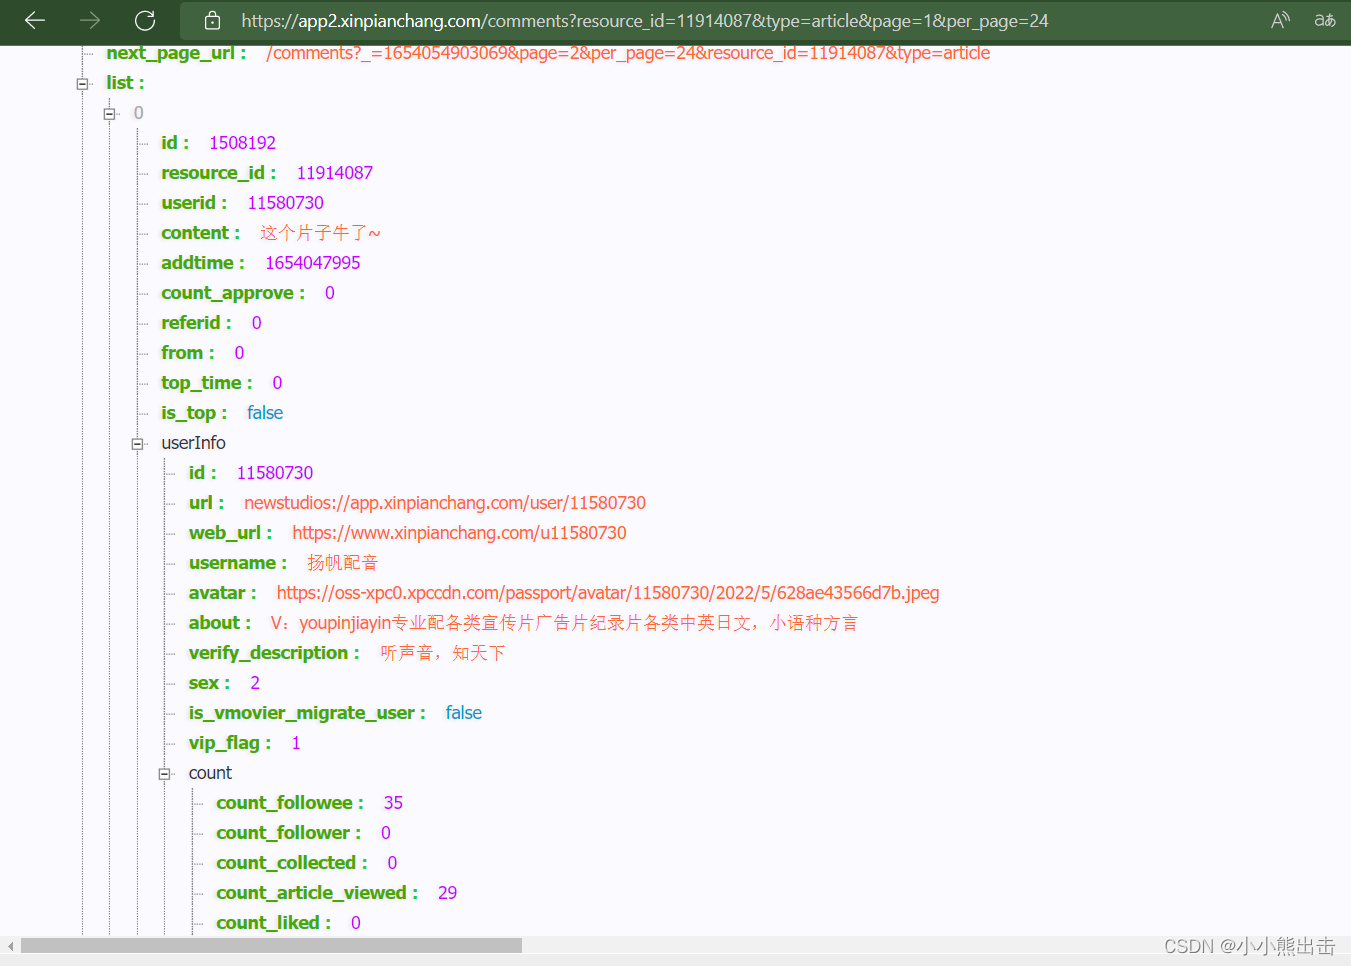
def comment_detail(self,response):
temp = response.json()
comments = temp["data"]["list"]
# print(comment)
for comment in comments:
# 评论内容
content = comment["content"]
# 使用正则去除<br />
content = re.sub("<br />","",content)
# print(content)
# 评论作品id(视频id)
resource_id = comment["resource_id"]
# print(resource_id)
# 评论id
id = comment["id"]
# print(id)
# 评论人id
userid = comment["userid"]
# print(userid)
# 评论人名称
username = comment["userInfo"]["username"]
# print(username)
# 被点赞次数
count_approve = comment["count_approve"]
# print(count_approve)
# 发表时间 是时间戳需要处理一下
addtimes = comment["addtime"] # 是时间戳
time_1 = addtimes
time_tuple_1 = time.localtime(time_1)
addtime = time.strftime("%Y/%m/%d %H:%M:%S", time_tuple_1)
# print(addtime)
yield CommentItem(
content=content,
resource_id=resource_id,
id=id,
userid=userid,
username=username,
count_approve=count_approve,
addtime=addtime
)
```
解析作者的首页
```python
# 作者主页页面解析
def author_detail(self,response):
author_id = response.meta["author_id"]
author_name = response.meta["author_name"]
author_head = response.meta["author_head"]
# 作者主页banner图片url
banners = response.xpath('//*[@id="id-bg-pre"]/@style').extract_first()
# print(banners)
banner = re.findall(".*?url\((.*?)\)",banners)[0]
# print(banner)
# 自我介绍
introduce = response.xpath("/html/body/div[7]/div[3]/div/p[2]/text()").extract_first()
# 被点赞次数
by_gives = response.xpath("/html/body/div[7]/div[3]/div/p[3]/span[1]/span[2]/text()").extract_first()
by_gives = re.sub(",","",by_gives)
# 粉丝数量
counts = response.xpath("/html/body/div[7]/div[3]/div/p[3]/span[2]/span[2]/text()").extract_first()
count = re.sub(",", "", counts)
# 关注数量
attention = response.xpath("/html/body/div[7]/div[3]/div/p[3]/span[3]/span[2]/text()").extract_first()
# 所在位置
addresss = response.xpath("/html/body/div[7]/div[3]/div/p[3]/span[5]/text()").extract_first()
address = re.sub(" ", "", addresss)
# 职业
job = response.xpath("/html/body/div[7]/div[3]/div/p[3]/span[7]/text()").extract_first()
yield AuthorItem(
author_id=author_id,
author_name=author_name,
author_head=author_head,
banner=banner,
introduce=introduce,
by_gives=by_gives,
count=count,
attention=attention,
address=address,
job=job
)
```
```python
# 获取完整的视频url
def video_detail(self,response):
# 视频id
tag_id = response.meta["tag_id"]
# 播放时长
tag_time = response.meta["tag_time"]
# 播放时长
tag_title = response.meta["tag_title"]
# 播放次数
tag_play = response.meta["tag_play"]
# 被点赞次数
tag_give = response.meta["tag_give"]
# 视频预览图
name_img = response.meta["name_img"]
# 作品描述
CDWA = response.meta["CDWA"]
response = response.json()
# 视频链接
video_url = response["data"]["resource"]["progressive"][0]["url"]
# print(video_url)
# 视频格式
format = response["data"]["resource"]["progressive"][0]["mime"]
# print(format)
yield VideoItem(
video_url=video_url,
format=format,
video_id=tag_id,
video_time=tag_time,
video_title=tag_title,
video_play=tag_play,
video_give=tag_give,
video_img=name_img,
CDWA=CDWA,
)
```
以上就拿到了所有数据
存储数据
将数据存到mongodb数据库
```python
# coding=utf-8
# Define your item pipelines here
#
# Don't forget to add your pipeline to the ITEM_PIPELINES setting
# See: https://docs.scrapy.org/en/latest/topics/item-pipeline.html
# useful for handling different item types with a single interface
from itemadapter import ItemAdapter
import pymongo
class XinpianchangPipeline:
# 数据库存储
@classmethod
def from_crawler(cls, crawler):
cls.connection_string = crawler.settings.get("MONGODB_CONNECTION_STRING")
cls.database = crawler.settings.get("MONGODB_DATABASE")
return cls()
def open_spider(self,spider):
print("-----------打开数据库----------------")
self.MongoClient = pymongo.MongoClient(self.connection_string)
self.db = self.MongoClient[self.database]
def process_item(self, item, spider):
if item.mongodb_collection == "The_initial_video":
self.db["The_initial_video"].update_one(
{
"video_id":item["video_id"]
},{
"$set":dict(item)
},True
)
print("---------The_initial_video-----------")
elif item.mongodb_collection == "video_data":
self.db["video_data"].update_one(
{
"video_id":item["video_id"]
},{
"$set":dict(item)
},True
)
print("---------video_data-----------")
elif item.mongodb_collection == "Author":
self.db["Author"].update_one(
{
"author_id":item["author_id"]
},{
"$set":dict(item)
},True
)
print("---------Author-----------")
elif item.mongodb_collection == "Comment":
self.db["Comment"].update_one(
{
"id":item["id"]
},{
"$set":dict(item)
},True
)
print("---------Comment-----------")
return item
def close_spider(self,spider):
self.MongoClient.close()
print("----------关闭数据库------------")
```
下载图片部分
```python
from scrapy import Request
from scrapy.exceptions import DropItem
from scrapy.pipelines.images import ImagesPipeline
class ImagePipeline(ImagesPipeline):
# 图片下载
def get_media_requests(self, item, info):
if item.mongodb_collection == "Author":
author_id = item['author_id']
author_name = item['author_name'] # 作者的名称
author_head = item['author_head'] # 作者头像
name_img = f"{author_name}_head"
banner = item['banner'] # 作者背景图
# 下载头像
yield Request(author_head, meta={
'author_id': author_id,
'author_name': author_name,
"name_img":name_img
})
#
name_img = f"{author_name}_banner"
# 下载背景图
yield Request(banner,meta={
'author_id': author_id,
'author_name': author_name,
"name_img":name_img
})
def file_path(self, request, response=None, info=None):
author_id = request.meta['author_id']
author_name = request.meta['author_name']
name_img = request.meta["name_img"]
file_name = f'{author_id}/{author_name}/{name_img}.jpg'
return file_name
def item_completed(self, results, item, info):
image_paths = [x['path'] for ok, x in results if ok]
if not image_paths:
raise DropItem('image Downloaded Failed')
return item
```
middlewares.py文件
将下面的类添加进去
```python
from fake_useragent import UserAgent
# fake_useragent ua头的模块,它会随机拿一个ua头
class RandomUserAgentMiddleware(object):
def __init__(self):
self.ua = UserAgent() # 实例化一下
def process_request(self, request, spider):
request.headers["User-Agent"] = self.ua.random # 添加到里面
import random
# 这是一个ip地址的类,需要自己添加IP,下面的IP应该是没用了
class RandomProxyMiddleware(object):
def __init__(self):
self.proxy = ['http://27.156.80.252:4231', 'http://27.155.167.139:4231', 'http://27.155.220.30:4231', 'http://27.155.164.102:4231', 'http://27.155.219.84:4231', 'http://110.80.160.72:4231', 'http://27.155.165.56:4231', 'http://59.61.136.199:4231', 'http://110.83.12.67:4231', 'http://110.83.12.236:4231', 'http://120.35.50.38:4231', 'http://61.154.21.197:4231', 'http://27.156.83.244:4231', 'http://120.35.50.201:4231', 'http://27.155.221.89:4231', 'http://27.155.167.165:4231', 'http://110.80.160.79:4231', 'http://110.80.160.19:4231', 'http://61.154.21.17:4231', 'http://61.154.21.113:4231']
def process_request(self,request,spider):
request.meta['proxy'] = random.choice(self.proxy)```
```
settings.py文件
```python
# coding=utf-8
# Scrapy settings for xinpianchang project
#
# For simplicity, this file contains only settings considered important or
# commonly used. You can find more settings consulting the documentation:
#
# https://docs.scrapy.org/en/latest/topics/settings.html
# https://docs.scrapy.org/en/latest/topics/downloader-middleware.html
# https://docs.scrapy.org/en/latest/topics/spider-middleware.html
BOT_NAME = 'xinpianchang'
SPIDER_MODULES = ['xinpianchang.spiders']
NEWSPIDER_MODULE = 'xinpianchang.spiders'
# mongodb的地址
MONGODB_CONNECTION_STRING = "mongodb://localhost:27017"
# mongodb的数据库
MONGODB_DATABASE = "xinpianchang"
# 图片下载的位置
IMAGES_STORE = "D:/xinpianchang"
# Crawl responsibly by identifying yourself (and your website) on the user-agent
#USER_AGENT = 'xinpianchang (+http://www.yourdomain.com)'
# Obey robots.txt rules
ROBOTSTXT_OBEY = False
# Configure maximum concurrent requests performed by Scrapy (default: 16)
#CONCURRENT_REQUESTS = 32
# Configure a delay for requests for the same website (default: 0)
# See https://docs.scrapy.org/en/latest/topics/settings.html#download-delay
# See also autothrottle settings and docs
# DOWNLOAD_DELAY = 2
# The download delay setting will honor only one of:
#CONCURRENT_REQUESTS_PER_DOMAIN = 16
#CONCURRENT_REQUESTS_PER_IP = 16
# Disable cookies (enabled by default)
#COOKIES_ENABLED = False
# Disable Telnet Console (enabled by default)
#TELNETCONSOLE_ENABLED = False
# Override the default request headers:
#DEFAULT_REQUEST_HEADERS = {
# 'Accept': 'text/html,application/xhtml+xml,application/xml;q=0.9,*/*;q=0.8',
# 'Accept-Language': 'en',
#}
# Enable or disable spider middlewares
# See https://docs.scrapy.org/en/latest/topics/spider-middleware.html
# 调用ua头,IP关闭了,需要的自己取消注释
SPIDER_MIDDLEWARES = {
'xinpianchang.middlewares.RandomUserAgentMiddleware': 543,
# 'xinpianchang.middlewares.RandomProxyMiddleware': 544,
}
# Enable or disable downloader middlewares
# See https://docs.scrapy.org/en/latest/topics/downloader-middleware.html
# DOWNLOADER_MIDDLEWARES = {
# 'xinpianchang.middlewares.XinpianchangDownloaderMiddleware': 543,
# }
# Enable or disable extensions
# See https://docs.scrapy.org/en/latest/topics/extensions.html
#EXTENSIONS = {
# 'scrapy.extensions.telnet.TelnetConsole': None,
#}
# Configure item pipelines
# See https://docs.scrapy.org/en/latest/topics/item-pipeline.html
# 开启项目管道
ITEM_PIPELINES = {
'xinpianchang.pipelines.XinpianchangPipeline': 300,
'xinpianchang.pipelines.ImagePipeline': 301,
}
# Enable and configure the AutoThrottle extension (disabled by default)
# See https://docs.scrapy.org/en/latest/topics/autothrottle.html
#AUTOTHROTTLE_ENABLED = True
# The initial download delay
#AUTOTHROTTLE_START_DELAY = 5
# The maximum download delay to be set in case of high latencies
#AUTOTHROTTLE_MAX_DELAY = 60
# The average number of requests Scrapy should be sending in parallel to
# each remote server
#AUTOTHROTTLE_TARGET_CONCURRENCY = 1.0
# Enable showing throttling stats for every response received:
#AUTOTHROTTLE_DEBUG = False
# Enable and configure HTTP caching (disabled by default)
# See https://docs.scrapy.org/en/latest/topics/downloader-middleware.html#httpcache-middleware-settings
#HTTPCACHE_ENABLED = True
#HTTPCACHE_EXPIRATION_SECS = 0
#HTTPCACHE_DIR = 'httpcache'
#HTTPCACHE_IGNORE_HTTP_CODES = []
#HTTPCACHE_STORAGE = 'scrapy.extensions.httpcache.FilesystemCacheStorage'
```


 浙公网安备 33010602011771号