

Vue-router(基础)_滚动行为和history模式
一、前言
1、滚动事件
2、h5 history模式
二、主要内容
1、 (1)使用前度路由,当切换到新路由时,想要页面滚动到顶部,或者是保持原先滚动的位置,就像重新加载页面那样。vue-router的滚动行为,它让你可以自定义路由切换的时候页面如何滚动
但是:这个功能history.pushState 的浏览器中可以使用
(2)这个滚动行为只能在h5的history模式下使用,在使用滚动行为的时候必须要先将浏览器的hash模式,改成history模式
2、创建一个小例子模拟演示
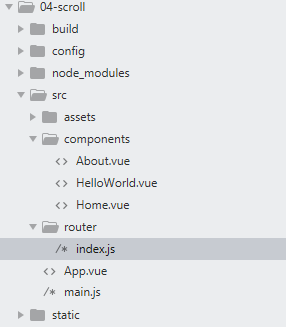
(1)目录结构如下
(2).vue文件如下.js文件如下


<template>
    <div>关于我页面</div>
</template>
<script type="text/javascript">
    export default{
        name:'About',
        data(){
            return {

            }
        }

    }
</script>

<style type="text/css" scoped></style>
<template>
    <div>
        首页页面
    </div>
</template>

<script type="text/javascript">
    export default{
        name:'Home',
        data(){
            return {

            }
        }
    }
</script>

<style type="text/css" scoped=""></style>
import Vue from 'vue'
import Router from 'vue-router'
import HelloWorld from '@/components/HelloWorld'
import Home from '@/components/Home'
import About from '@/components/About'
Vue.use(Router)

export default new Router({
  routes: [
    {
      path: '/',
      name: 'Home',
      component: Home
    },
    {
        path:'/about',
        name:'Abut',
        component: About
    }
  ]
})
(3)hash模式是一上来就加载所有的请求,当你在切换路由的时候,不会再对后端发起情求,不会重载页面

(2)在index.js中设置为history模式,发现当切换路由的时候,默认还是保持在上一个路由的位置(这个功能浏览器已经帮我们做好了)
(3)现在要实现,切换路由的时候,页面停留在指定的位置
(4)在切换路由的时候没有调用这个savedPosition,会跳到上一次加载那个页面的时候滚动到的那个位置
import Vue from 'vue'
import Router from 'vue-router'
import HelloWorld from '@/components/HelloWorld'
import Home from '@/components/Home'
import About from '@/components/About'
Vue.use(Router)

export default new Router({
    mode:'history',
    scrollBehavior (to, from, savedPosition) {
              //只有调用了history.pushState()的时候才会触发这个方法,也就是当我们点击浏览器中的“<-” "->"的时候

             //用这个方法实现期望滚动到哪一位置,
             // return { x: 0, y: 400 }

             //判断如果滚动条的位置存在直接返回当前位置,否则返回到起点
             //savedPosition只有当用户点击前进后退,或者go(-1)的时候才会调用
             console.log(savedPosition)
             if(savedPosition){

                 return savedPosition;

             }else{
                 return {x:0,y:200}
             }


    },
  routes: [
    {
      path: '/',
      name: 'Home',
      component: Home
    },
    {
        path:'/about',
        name:'Abut',
        component: About
    }
  ]
})
3、history配合后端的例子
01-使用本地服务器演示(使用npm run build打包编译之后--->cd dist文件下-->执行hs -o -p 8888),可以发现可以看到我们的页面,但是将这个地址复制到一个新的标签中打开出现404
上面验证了使用history模式必须配合后端
02-使用node, 在打包编译后的dist文件夹下新建一个server.js如下
const express = require('express')
const http = require('http')
const fs = require('fs')
const httpPort = 8088

//app.use(express.static(path.join(__dirname, 'dist')))
http.createServer((req, res) => {
    if(req.url.startsWith('/static/js') || req.url.startsWith('/static/css')){
      fs.readFile('.'+req.url, (err,data)=>{
          res.end(data)
      })

      return;
    }
  fs.readFile('index.html', 'utf-8', (err, content) => {
    if (err) {
      console.log('We cannot open "index.htm" file.')
    }

    res.writeHead(200, {
      'Content-Type': 'text/html; charset=utf-8'
    })

    res.end(content)
  })
}).listen(httpPort, () => {
  console.log('Server listening on: http://localhost:%s', httpPort)
})
启动服务器,将该访问地址拿到一个新的网页中一样可以渲染出来
4、原理:下面模拟了点击a标签变更地址栏的操作,但是必须在服务器环境下才能运行h5的history模式
服务器代码:
const http = require('http')
const fs = require('fs')
const httpPort = 8088

http.createServer((req, res) => {

 //读取你要渲染的页面
  fs.readFile('./03-history.html', 'utf-8', (err, content) => {
    if (err) {
      console.log('We cannot open "index.htm" file.')
    }

    res.writeHead(200, {
      'Content-Type': 'text/html; charset=utf-8'
    })

    res.end(content)
  })
}).listen(httpPort, () => {
  console.log('Server listening on: http://localhost:%s', httpPort)
})
<!DOCTYPE html>
<html lang="en">
<head>
    <meta charset="UTF-8">
    <title></title>
</head>
<body>
    <a class="router-link" href="/">Home</a>
    <a class="router-link" href="/about">About</a>

    <div id="router-view">

    </div>

    <script type="text/javascript">
        //获取到上面两个a标签对象
        var aobj = document.querySelectorAll('a');
        var routerView = document.getElementById('router-view');

        function Content(href){
            switch (href){
                case '/':
                routerView.innerHTML = '<div>首页</div>';
                break;

                case '/about':
                routerView.innerHTML='<div>关于我们</div>'
                break;
            }
        }

        console.log(location.pathname) //使用window.location.pathname 拿到/url
        Content(location.pathname);//让一开始就出现内容

        for(var i=0; i<=aobj.length-1;i++){
            aobj[i].addEventListener('click',function(e){
                e.preventDefault();
                var href = e.target.getAttribute('href');
                //变更地址栏
                history.pushState({},'',href);
                Content(href);
            })
        }

    </script>
</body>
</html>
5、了解history.pushState()参考MDN:https://developer.mozilla.org/zh-CN/docs/Web/API/History_API
三、总结

 浙公网安备 33010602011771号