

4.Spring注解方式 实现 IOC 和DI
1. Spring注解
Spring除了默认的使用xml配置文件的方式实现配置之外,也支持使用注解方式实现配置,这种方式效率更高,配置信息清晰,修改更方便,推荐使用。
所谓注解就是给程序看的提示信息,很多时候都用来作为轻量级配置的方式。
关于注解的知识点,参看java基础课程中java基础加强部分的内容。
2. Spring引入context名称空间
在MyEclipse中导入spring-context-3.2.xsd约束文件,要求Spring来管理。
在applicationContext.xml文件中,引入该schema文件:
**可以将以上头信息加入MyEclipse模版,方便后续自动生成。
<?xml version="1.0" encoding="UTF-8"?>
<beans xmlns="http://www.springframework.org/schema/beans"
xmlns:context="http://www.springframework.org/schema/context"
xmlns:xsi="http://www.w3.org/2001/XMLSchema-instance"
xsi:schemaLocation="http://www.springframework.org/schema/beans
http://www.springframework.org/schema/beans/spring-beans-3.2.xsd
 http://www.springframework.org/schema/context
 http://www.springframework.org/schema/context/spring-context-3.2.xsd ">
 </beans>
3. Spring注解方式实现IOC
a. 开启包扫描
在spring的配置文件中,开启包扫描,指定spring自动扫描哪些个包下的类。只有在指定的扫描包下的类上的IOC注解才会生效。会生成bean对象放到map中
<?xml version="1.0" encoding="UTF-8"?>
<beans xmlns="http://www.springframework.org/schema/beans"
xmlns:context="http://www.springframework.org/schema/context"
xmlns:xsi="http://www.w3.org/2001/XMLSchema-instance"
xsi:schemaLocation="http://www.springframework.org/schema/beans
http://www.springframework.org/schema/beans/spring-beans-3.2.xsd
 http://www.springframework.org/schema/context
 http://www.springframework.org/schema/context/spring-context-3.2.xsd ">
 <!-- 配置ioc包扫描 spring启动的时候就会自动扫描指定的包,如果包下的所有类只要有我们特定的spring注解,就会被spring管理起来
 spring 就会生成对应的bean对象,而特定的注解就是@Component @Controller @Service @Repository 其实是一种注解,代表不同层罢了,如果不扫描的话就算有注解那么spring也不会管理这个类创建bean-->
 <context:component-scan base-package="cn.tedu.beens,cn.tedu.p"></context:component-scan>
 </beans>
b. 使用注解注册bean
在配置的包中的类上使用@Component注解,则这个类会自动被注册为bean,使用当前类的class为<bean>的class,通常情况下使用类名首字母小写为<bean>id。
案例:
@Component
public class Person {
String name;
int age;
public String getName() {
    return name;
}
public void setName(String name) {
    this.name = name;
}
public int getAge() {
    return age;
}
public void setAge(int age) {
    this.age = age;
}

}
c. bean的id
通常情况下注解注册bean使用类名首字母小写为bean的id,但是如果类名的第二个字母为大写则首字母保留原样.
cn.tedu.beans.Person --> <bean id="person" class="cn.tedu.beans.Person"/>

cn.tedu.beans.PErson --> <bean id="PErson" class="cn.tedu.beans.Person"/>

cn.tedu.beans.NBA --> <bean id="NBA" class="cn.tedu.beans.NBA"/>
也可以通过在@Component中配置value属性,明确的指定bean的id 这个很重要
案例:
可以使bean类实现BeanNameAware接口,并实现其中的setBeanName方法,spring容器会在初始化bean时,调用此方法告知当前bean的id。通过这个方式可以获取bean的id信息。
package domain;


import org.springframework.beans.factory.BeanNameAware;
import org.springframework.stereotype.Component;

@Component("a")
public class Animal implements BeanNameAware{
    private static String beanName=null;
    @Override
    public void setBeanName(String name) {
        this.beanName=name;

    }
    public    static String getBeanName() {
        return beanName;
    }

}
//调用System.out.println(Animal.getBeanName());  结果为a
Spring 自动调用。并且会在Spring自身完成Bean配置之后,且在调用任何Bean生命周期回调(初始化或者销毁)方法之前就调用这个方法。换言之,在程序中使用BeanFactory.getBean(String beanName)之前,Bean的名字就已经设定好了。所以,程序中可以尽情的使用BeanName而不用担心它没有被初始化。
4.Spring注解方式实现DL
a.在配置文件中开启注解实现DI
<?xml version="1.0" encoding="UTF-8"?>
<beans xmlns="http://www.springframework.org/schema/beans"
xmlns:context="http://www.springframework.org/schema/context"
xmlns:xsi="http://www.w3.org/2001/XMLSchema-instance"
xsi:schemaLocation="http://www.springframework.org/schema/beans
http://www.springframework.org/schema/beans/spring-beans-4.3.xsd
 http://www.springframework.org/schema/context
 http://www.springframework.org/schema/context/spring-context-4.3.xsd">
<!-- 开启IOC包扫描 -->
 <context:component-scan base-package="domain"></context:component-scan>
 <!-- 开启注解配置DL -->
  <context:annotation-config></context:annotation-config>
 </beans>
b. 注解方式注入spring内置支持的类型数据 - 非集合类型
spring中可以通过@Value注解来实现spring内置支持的类型的属性的注入。
package domain;

import javax.annotation.Resource;

import org.springframework.beans.factory.annotation.Value;
import org.springframework.stereotype.Component;

@Component
public class Person {
@Value("徐旺骑")
String name;
@Value("20")
int age;
@Resource
Animal a;
public Animal getA() {
    return a;
}
public void setA(Animal a) {
    this.a = a;
}

public String getName() {
    return name;
}
public void setName(String name) {
    this.name = name;
}
public int getAge() {
    return age;
}
public void setAge(int age) {
    this.age = age;
}
@Override
public String toString() {
    return "Person [name=" + name + ", age=" + age + "]";
}

}
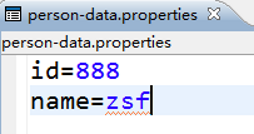
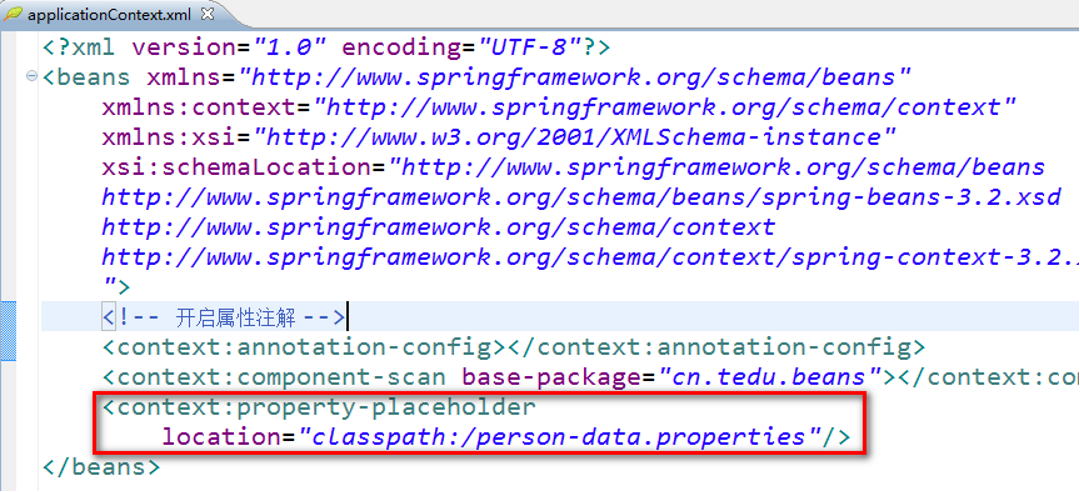
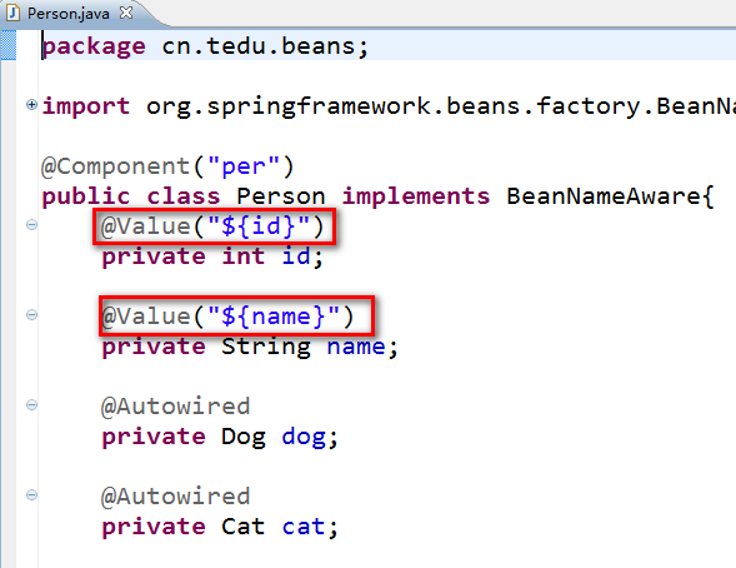
这种方式可以实现spring内置支持类型的注入,但是这种方式将注入的值写死在了代码中,后续如果希望改变注入的值,必须来修改源代码,此时可以将这些值配置到一个properties配置文件中,再在spring中进行引入。

 浙公网安备 33010602011771号