
canny边缘检测
Canny 边缘检测
原理
- Canny 边缘检测算法 是 John F. Canny 于 1986年开发出来的一个多级边缘检测算法,也被很多人认为是边缘检测的 最优算法, 最优边缘检测的三个主要评价标准是:
- 低错误率: 标识出尽可能多的实际边缘,同时尽可能的减少噪声产生的误报。
- 高定位性: 标识出的边缘要与图像中的实际边缘尽可能接近。
- 最小响应: 图像中的边缘只能标识一次。
步骤
-
消除噪声。 使用高斯平滑滤波器卷积降噪。 下面显示了一个
![size = 5]() 的高斯内核示例:
的高斯内核示例:![K = \dfrac{1}{159}\begin{bmatrix}
2 & 4 & 5 & 4 & 2 \\
4 & 9 & 12 & 9 & 4 \\
5 & 12 & 15 & 12 & 5 \\
4 & 9 & 12 & 9 & 4 \\
2 & 4 & 5 & 4 & 2
\end{bmatrix}]()
-
计算梯度幅值和方向。 此处,按照Sobel滤波器的步骤:
-
运用一对卷积阵列 (分别作用于
![x]() 和
和 ![y]() 方向):
方向):![G_{x} = \begin{bmatrix}
-1 & 0 & +1 \\
-2 & 0 & +2 \\
-1 & 0 & +1
\end{bmatrix}
G_{y} = \begin{bmatrix}
-1 & -2 & -1 \\
0 & 0 & 0 \\
+1 & +2 & +1
\end{bmatrix}]()
-
使用下列公式计算梯度幅值和方向:
![\begin{array}{l}
G = \sqrt{ G_{x}^{2} + G_{y}^{2} } \\
\theta = \arctan(\dfrac{ G_{y} }{ G_{x} })
\end{array}]()
梯度方向近似到四个可能角度之一(一般 0, 45, 90, 135)
-
-
非极大值 抑制。 这一步排除非边缘像素, 仅仅保留了一些细线条(候选边缘)。
-
滞后阈值: 最后一步,Canny 使用了滞后阈值,滞后阈值需要两个阈值(高阈值和低阈值):
- 如果某一像素位置的幅值超过 高 阈值, 该像素被保留为边缘像素。
- 如果某一像素位置的幅值小于 低 阈值, 该像素被排除。
- 如果某一像素位置的幅值在两个阈值之间,该像素仅仅在连接到一个高于 高 阈值的像素时被保留。
Canny 推荐的 高:低 阈值比在 2:1 到3:1之间。
-
想要了解更多细节,你可以参考任何你喜欢的计算机视觉书籍。
 的高斯内核示例:
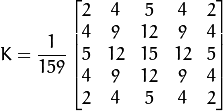
 和
和  方向):
方向):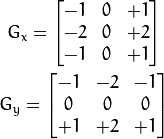
源码
- 本程序做什么?
- 要求使用者输入一个数字,设置 Canny Edge Detector 的低阈值 (通过trackbar)
- 使用 Canny 边缘检测 产生一个 mask (白线代表边缘,黑色代表背景)。
- 使用 mask 作为掩码显示原图像。
- 本教程的源码如下,你也可以从 这里 下载
#include "opencv2/imgproc/imgproc.hpp"
#include "opencv2/highgui/highgui.hpp"
#include <stdlib.h>
#include <stdio.h>

using namespace cv;

/// 全局变量

Mat src, src_gray;
Mat dst, detected_edges;

int edgeThresh = 1;
int lowThreshold;
int const max_lowThreshold = 100;
int ratio = 3;
int kernel_size = 3;
char* window_name = "Edge Map";

/**
 * @函数 CannyThreshold
 * @简介: trackbar 交互回调 - Canny阈值输入比例1:3
 */
void CannyThreshold(int, void*)
{
  /// 使用 3x3内核降噪
  blur( src_gray, detected_edges, Size(3,3) );

  /// 运行Canny算子
  Canny( detected_edges, detected_edges, lowThreshold, lowThreshold*ratio, kernel_size );

  /// 使用 Canny算子输出边缘作为掩码显示原图像
  dst = Scalar::all(0);

  src.copyTo( dst, detected_edges);
  imshow( window_name, dst );
 }


/** @函数 main */
int main( int argc, char** argv )
{
  /// 装载图像
  src = imread( argv[1] );

  if( !src.data )
  { return -1; }

  /// 创建与src同类型和大小的矩阵(dst)
  dst.create( src.size(), src.type() );

  /// 原图像转换为灰度图像
  cvtColor( src, src_gray, CV_BGR2GRAY );

  /// 创建显示窗口
  namedWindow( window_name, CV_WINDOW_AUTOSIZE );

  /// 创建trackbar
  createTrackbar( "Min Threshold:", window_name, &lowThreshold, max_lowThreshold, CannyThreshold );

  /// 显示图像
  CannyThreshold(0, 0);

  /// 等待用户反应
  waitKey(0);

  return 0;
  }
解释
-
创建程序中要用到的变量:
  Mat src, src_gray;
  Mat dst, detected_edges;

  int edgeThresh = 1;
  int lowThreshold;
  int const max_lowThreshold = 100;
  int ratio = 3;
  int kernel_size = 3;
  char* window_name = "Edge Map";

注意:

a. 我们首先设定高:低阈值比为 3:1 (通过变量 *ratio* )
b. 设定内核尺寸为 :math:`3` (Canny函数内部调用Sobel操作)
c. 将低阈值的上限设定为 :math:`100`.
-
装载原图像:
/// 装载图像 src = imread( argv[1] ); if( !src.data ) { return -1; } -
创建与 src 同类型和大小的矩阵(dst)
dst.create( src.size(), src.type() ); -
将输入图像转换到灰度空间 (使用函数 cvtColor):
cvtColor( src, src_gray, CV_BGR2GRAY ); -
创建显示窗口
namedWindow( window_name, CV_WINDOW_AUTOSIZE ); -
创建trackbar,来获取用户交互输入的低阈值:
createTrackbar( "Min Threshold:", window_name, &lowThreshold, max_lowThreshold, CannyThreshold );注意:
- 通过trackbar控制的变量为 lowThreshold ,上限为 max_lowThreshold (我们已经设定为100)
- 每次用户通过trackbar产生变动,回调函数 CannyThreshold 被调用.
-
让我们一步一步的来观察 CannyThreshold 函数:
-
首先, 使用 3x3的内核平滑图像:
blur( src_gray, detected_edges, Size(3,3) ); -
其次,运用 Canny 寻找边缘:
Canny( detected_edges, detected_edges, lowThreshold, lowThreshold*ratio, kernel_size );输入参数:
- detected_edges: 原灰度图像
- detected_edges: 输出图像 (支持原地计算,可为输入图像)
- lowThreshold: 用户通过 trackbar设定的值。
- highThreshold: 设定为低阈值的3倍 (根据Canny算法的推荐)
- kernel_size: 设定为 3 (Sobel内核大小,内部使用)
-
-
填充 dst 图像,填充值为0 (图像全黑).
dst = Scalar::all(0); -
最后, 使用函数 copyTo 标识被检测到的边缘部分 (背景为黑色).
src.copyTo( dst, detected_edges);copyTo 将 src 图像拷贝到 dst . 但是,仅仅拷贝掩码不为0的像素。既然Canny边缘检测的输出是镶嵌在黑色背景中的边缘像素,因此其结果 dst 图像除了被检测的边缘像素,其余部分都为黑色。
-
显示结果:
imshow( window_name, dst );
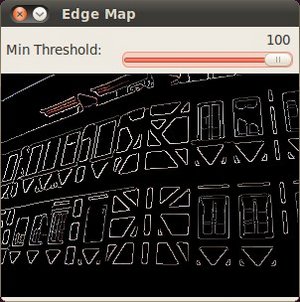
结果
-
在编译上面的代码之后, 我们可以运行结果,将图片路径输入,如下图:
![Original test image]()
-
滑动标尺, 尝试不同的阈值,我们得到如下结果:
![Result after running Canny]()
-
仔细观察边缘像素是如何叠加在黑色背景之上的。

 浙公网安备 33010602011771号