数字图像处理-python环境搭建和使用
建立并激活名称为test_py3, python版本为3.6的虚拟环境
Anaconda Prompt窗口输入
conda create -n test_py3 python=3.6
Anaconda Prompt窗口输入
activate test_py3
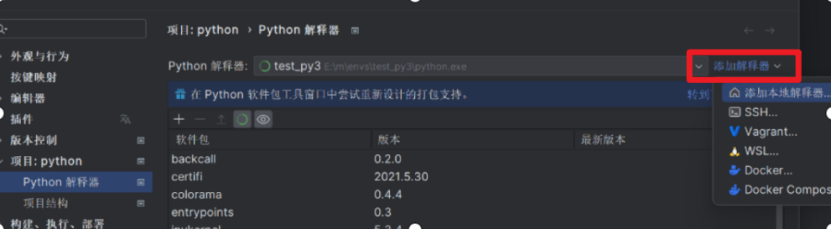
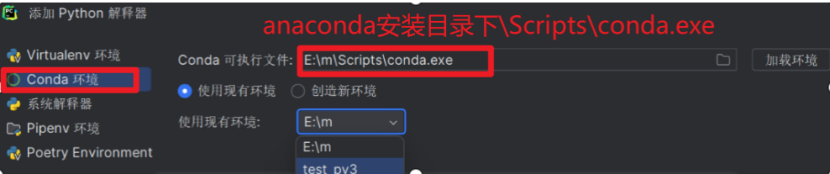
更改当前项目的解释器
附:寻找anaconda的安装地址
在终端输入
conda info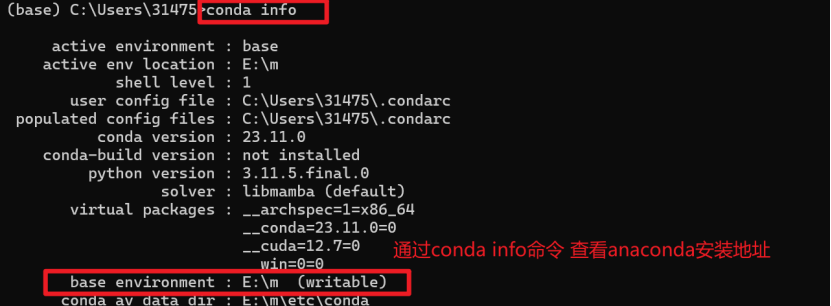
通过红色框可知 base environment信息可知 我的anaconda装在了E盘的m文件夹下
如果执行conda info 报红 说明在安装anaconda时没有勾选将其添加到环境变量
'conda' 不是内部或外部命令,也不是可运行的程序或批处理文件
如想知道anaconda安装位置 只能仔细回忆一下 或者 查看一下是否在默认安装位置
Anaconda 默认安装在以下位置:
C:\Users\<YourUsername>\Anaconda3
C:\ProgramData\Anaconda3
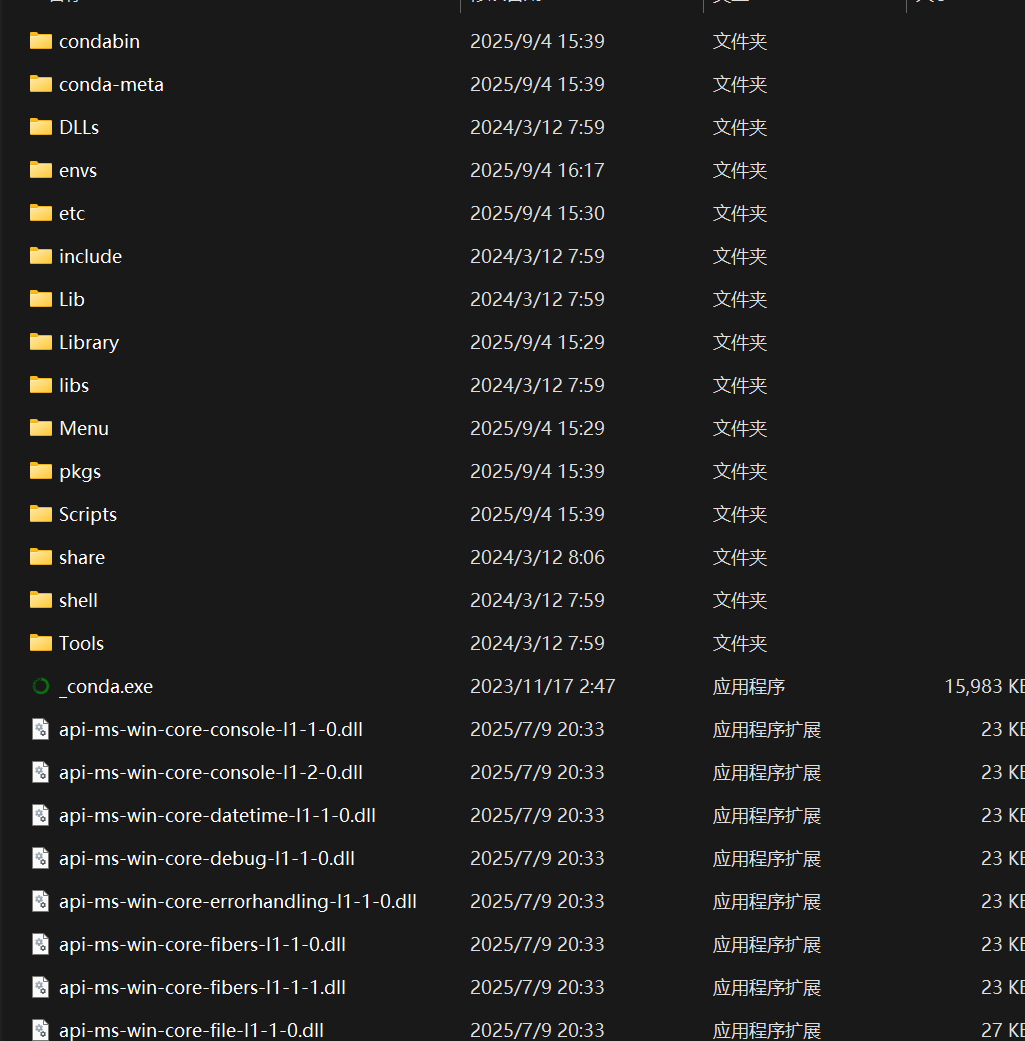
Anaconda中的目录参考结构如下
安装代码中引用的库
方式1:图形化界面安装 该方式默认使用官方镜像 由于是国外的站点 可能会出现超时情况 可以尝试更换网络
方式2:使用指定的镜像安装 代码中涉及的库
打开pycharm的终端界面
执行以下命令
pip install torch PyWavelets -i https://mirrors.aliyun.com/pypi/simple/
pip install matplotlib scikit-image -i https://pypi.tuna.tsinghua.edu.cn/simple
上述命令可以拆解为以下命令
pip install torch -i https://mirrors.aliyun.com/pypi/simple/
pip install matplotlib -i https://pypi.tuna.tsinghua.edu.cd/simple
pip install  PyWavelets -i https://mirrors.aliyun.com/pypi/simple/
pip install scikit-image -i https://pypi.tuna.tsinghua.edu.cn/simple
如果出现未找到版本号 选择提示部分的任意一个版本即可
![]()
pip install scikit-image==0.17.2 -i https://pypi.tuna.tsinghua.edu.cn/simple所安装包的存放地址 默认是 当前虚拟环境/Lib/site-packages文件夹下

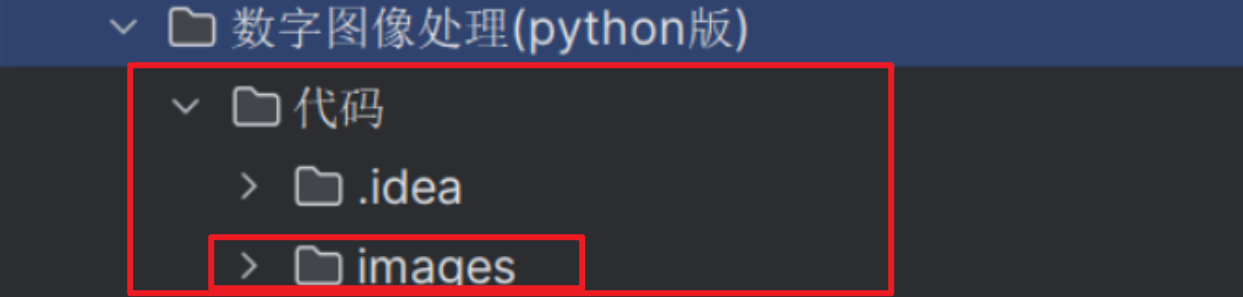
更改images文件夹的位置
由于代码中使用的是 ../ 相对路径的方式 读取对应图片 需将 images文件夹 剪切 到 代码 文件目录下
即调整为下面结构
 附:
附:
1如果想将下载软件包的默认镜像地址改为国内镜像
对于conda安装方式
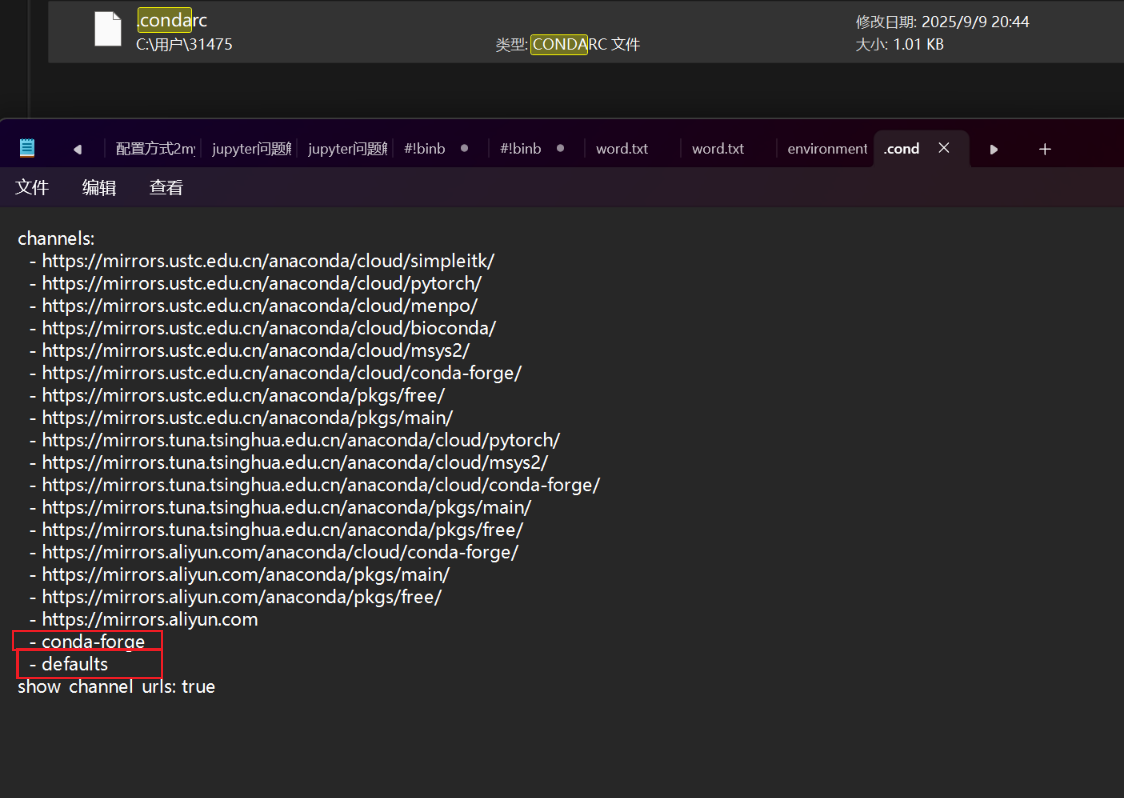
可以在终端 添加 国内镜像源 到配置文件
# 添加中科大镜像源
conda config --add channels https://mirrors.ustc.edu.cn/anaconda/pkgs/main/
conda config --add channels https://mirrors.ustc.edu.cn/anaconda/pkgs/free/
conda config --add channels https://mirrors.ustc.edu.cn/anaconda/cloud/conda-forge/

# 添加清华镜像源
conda config --add channels https://mirrors.tuna.tsinghua.edu.cn/anaconda/pkgs/main/
conda config --add channels https://mirrors.tuna.tsinghua.edu.cn/anaconda/pkgs/free/
conda config --add channels https://mirrors.tuna.tsinghua.edu.cn/anaconda/cloud/conda-forge/

# 添加阿里云镜像源
conda config --add channels https://mirrors.aliyun.com/anaconda/pkgs/main/
conda config --add channels https://mirrors.aliyun.com/anaconda/pkgs/free/
conda config --add channels https://mirrors.aliyun.com/anaconda/cloud/conda-forge/

# 开启通道显示
conda config --set show_channel_urls true
(这里添加具体的子路径渠道,减小 conda 搜索包的时间,提高效率)
执行 conda config --set show_channel_urls yes 后.condarc 文件会发现多一行 show_channel_urls: true使后续安装包时会显示包的来源通道,方便排查问题
当第一次执行 conda config 相关命令(如添加源、修改配置)时,Conda 会自动创建 .condarc 文件 (通常位于C:\Users\你的用户名\.condarc)
对于原有的conda-forge官方通道 和 defaults官方通道可以选择进行删除 也可继续保留
conda-forge 本身是一个独立的开源社区组织 国外
defaults是 Anaconda 官方默认的软件包仓库通道 国外
手动添加的清华、中科大等镜像是对 conda-forge(以及 Anaconda 官方源defaults)的 “国内镜像备份
查看镜像配置
conda config --show-sources对于pip 安装方式
# 配置清华源为默认
pip config set global.index-url https://pypi.tuna.tsinghua.edu.cn/simple
# 添加备用源(如阿里云)
pip config set global.extra-index-url https://mirrors.aliyun.com/pypi/simple/
# 添加中科大镜像源作为备用源
pip config set global.extra-index-url https://pypi.mirrors.ustc.edu.cn/simple/
# 添加腾讯镜像源作为备用源
pip config set global.extra-index-url https://mirrors.cloud.tencent.com/pypi/simple/
# 添加华为镜像源作为备用源
pip config set global.extra-index-url https://repo.huaweicloud.com/repository/pypi/simple/
pip 的配置文件的地址应该位于C:\Users\你的用户名\pip\pip.ini
查看镜像配置
pip config list2如果提示pip版本过低
更新pip
pip install --upgrade pip3如果出现版本不兼容 导致的警告
先卸载现有版本
pip uninstall -y 包名重新安装(指定镜像源加快速度) 上网检索当前python版本对应包的兼容版本号
pip install 包名==指定版本号 -i https://pypi.tuna.tsinghua.edu.cn/simple
-i https://mirrors.aliyun.com/pypi/simple/
4如果在运行L4_7.py或 L7_4.py时出现

需将原来的import scipy更改为 import scipy.io


 浙公网安备 33010602011771号