
Windows Phone 7编程实践—必应地图导航

作品目标:Windows Phone 7 开发的实用手册
必应地图导航概述
本文参考和引用Windows Phone官方教程和开发培训包,以及MSDN Windows Phone开发文档,诠释必应地图能为我们的出行提供哪些服务。导航服务能够提供给出行者的协助远远超出本文所研究和探讨的范畴,我的目标是本文能起到抛砖引玉的作用,供大家研究开发更多更有价值的导航应用。
必应地图导航的方式是使用Bing Maps SOAP服务来计算从起点至终点的路线,在路线图层来呈现必应地图服务提供的路线行程。
- Geocode Service –匹配地址,地点和地理实体到地图上的经度和纬度坐标,并返回一个指定了纬度和经度坐标的位置信息。
- Route Service –根据位置和导航点生成路线和驾驶指令,例如包括交通警告和多个地点间的路线提示的指令,以及从所有主要道路通往目的地的指示。
- Search Service –分析一个搜索查询,其中包含一个位置或关键字(或两者都有),返回搜索结果。
计算导航路线
添加Bing Maps Geocode服务的引用,为此右键点击工程UsingBingMaps的References,然后选择Add Service Reference…。
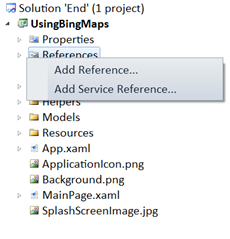
图 添加服务的 Reference
把下面的服务地址粘贴到打开的对话框,然后点击Go: http://dev.virtualearth.net/webservices/v1/geocodeservice/geocodeservice.svc
在Namespace字段,输入Bing.Geocode,然后点击OK,如图 必应地图Geocode服务。
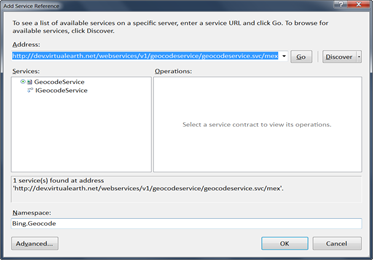
图 必应地图Geocode服务
添加Bing Maps Route服务的引用,为此右键点击工程UsingBingMaps的References,然后选择Add Service Reference…。
把下面的服务地址粘贴到打开的对话框,然后点击Go: http://dev.virtualearth.net/webservices/v1/routeservice/routeservice.svc。
在Namespace字段,输入Bing. Route,然后点击OK。
添加到Bing Maps Search服务的引用,为此右键点击工程UsingBingMaps的References,然后选择Add Service Reference…。
把下面的服务地址粘贴到打开的对话框,然后点击Go: http://dev.virtualearth.net/webservices/v1/searchservice/searchservice.svc 。
在Namespace字段,输入Bing. Search, 然后点击OK。
打开 ServiceReferences.ClientConfig 配置文件,作为项目的一项配置它一般会自动创建 ,删除文件中所有与CustomBinding 相关的内容,配置文件如下。
Silverlight Project: UsingBingMaps File: ServiceReferences.ClientConfig
<configuration>
<system.serviceModel>
<bindings>
<basicHttpBinding>
<binding name="BasicHttpBinding_IGeocodeService" maxBufferSize="2147483647"
maxReceivedMessageSize="2147483647">
<security mode="None" />
</binding>
<binding name="BasicHttpBinding_IRouteService" maxBufferSize="2147483647"
maxReceivedMessageSize="2147483647">
<security mode="None" />
</binding>
<binding name="BasicHttpBinding_ISearchService" maxBufferSize="2147483647"
maxReceivedMessageSize="2147483647">
<security mode="None" />
</binding>
</basicHttpBinding>
</bindings>
<client>
<endpoint address="http://dev.virtualearth.net/webservices/v1/geocodeservice/GeocodeService.svc"
binding="basicHttpBinding" bindingConfiguration="BasicHttpBinding_IGeocodeService"
contract="Bing.Geocode.IGeocodeService" name="BasicHttpBinding_IGeocodeService" />
<endpoint address="http://dev.virtualearth.net/webservices/v1/routeservice/routeservice.svc"
binding="basicHttpBinding" bindingConfiguration="BasicHttpBinding_IRouteService"
contract="Bing.Route.IRouteService" name="BasicHttpBinding_IRouteService" />
<endpoint address="http://dev.virtualearth.net/webservices/v1/searchservice/searchservice.svc"
binding="basicHttpBinding" bindingConfiguration="BasicHttpBinding_ISearchService"
contract="Bing.Search.ISearchService" name="BasicHttpBinding_ISearchService" />
</client>
</system.serviceModel>
</configuration>
在MainPage.xaml.cs中,添加一个新的ObservableCollection<RouteModel> 并作为公用属性公开,命名为Routes。这个集合保存计算后的路线并绑定到路线图层。
Silverlight Project: UsingBingMaps File: MainPage.xaml.cs
/// <value>Collection of calculated map routes.</value>
private readonly ObservableCollection<RouteModel> _routes = new ObservableCollection<RouteModel>();
/// <summary>
/// Gets a collection of routes.
/// </summary>
public ObservableCollection<RouteModel> Routes
{
get { return _routes; }
}
添加两个公用 string 属性:To和From,即起点和终点。
Silverlight Project: UsingBingMaps File: MainPage.xaml.cs
///<summary>
/// Gets or sets the route destination location.
///</summary>
public string To { get; set; }
///<summary>
/// Gets or sets the route origin location.
///</summary>
public string From { get; set; }
CalculateRoute 方法并使用路线计算器辅助类计算一个路线:创建try/catch块,在捕捉到异常时使用 MessageBox显示错误消息。
为实现异步计算路线,在try块中创建一个RouteCalculator实例。当路线计算完毕时,清除Route集合。并注册错误消息给RouteCalculator.Error事件,最后调用RouteCalculator.CalculateAsync方法来开始计算路线。
以路线计算器参数为基础创建一个新的RouteModel实例,并向路线集合中添加新的路线。以新路线为中心显示地图, 通过调用Map.SetView传递LocationRect 实例。LocationRect 实例使用LocationRect.CreateLocationRect方法创建。
Silverlight Project: UsingBingMaps File: MainPage.xaml.cs
private void CalculateRoute()
{
try
{
var routeCalculator = new RouteCalculator(
CredentialsProvider,
To,
From,
Dispatcher,
result =>
{
// Clear the route collection to have only one route at a time.
Routes.Clear();
// Create a new route based on route calculator result,
// and add the new route to the route collection.
var routeModel = new RouteModel(result.Result.RoutePath.Points);
Routes.Add(routeModel);
// Set the map to center on the new route.
var viewRect = LocationRect.CreateLocationRect(routeModel.Locations);
Map.SetView(viewRect);
});
// Display an error message in case of fault.
routeCalculator.Error += r => MessageBox.Show(r.Reason);
// Start the route calculation asynchronously.
routeCalculator.CalculateAsync();
}
catch (Exception ex)
{
MessageBox.Show(ex.Message);
}
}
在MainPage.xaml中添加起点和终点的文本框。找到RouteView border并添加一个新Grid子项,由两个TextBlocks的组成:From和To。From和To控件使用双向绑定模式绑定。在Grid中添加一个"Go" 按钮,设置它的样式为 ButtonGoStyle ,添加点击事件的处理函数ButtonGo_Click。
Silverlight Project: UsingBingMaps File: MainPage.xaml
<!-- Route View -->
<Border x:Name="RouteView"
Height="160" Margin="0"
Padding="8" RenderTransformOrigin="0.5,0.5" Width="480"
Background="{StaticResource ControlBackgroundBrush}">
<Border.RenderTransform>
<CompositeTransform TranslateY="-160"/>
</Border.RenderTransform>
<Grid>
<Grid.RowDefinitions>
<RowDefinition />
<RowDefinition />
</Grid.RowDefinitions>
<Grid.ColumnDefinitions>
<ColumnDefinition Width="50" />
<ColumnDefinition Width="0.8*" />
<ColumnDefinition Width="0.2*"/>
</Grid.ColumnDefinitions>
<TextBlock Text="From" Grid.Row="0" Grid.Column="0" VerticalAlignment="Center" />
<TextBox Text="{Binding From, Mode=TwoWay}" Grid.Row="0" Grid.Column="1" Grid.ColumnSpan="2" />
<TextBlock Text="To" Grid.Row="1" Grid.Column="0" VerticalAlignment="Center" />
<TextBox Text="{Binding To, Mode=TwoWay}" Grid.Row="1" Grid.Column="1" />
<Button Content="Go" Grid.Column="2" Grid.Row="1" Click="ButtonGo_Click" Style="{StaticResource ButtonGoStyle}" />
</Grid>
</Border>
创建路线图层,创建MapItemsControl绑定Routes 属性。要在地图上用单线绘制路线,用一个数据模板设置MapItemsControl.ItemTemplate,该模板包含了MapPolyline的实例。用RouteModel.Locations属性来绑定 MapPolyline 实例。
Silverlight Project: UsingBingMaps File: MainPage.xaml
<my:MapItemsControl ItemsSource="{Binding Routes}">
<my:MapItemsControl.ItemTemplate>
<DataTemplate>
<my:MapPolyline Locations="{Binding Locations}"
Stroke="#FF2C76B7"
Opacity="0.5"
StrokeThickness="6" />
</DataTemplate>
</my:MapItemsControl.ItemTemplate>
</my:MapItemsControl>
测试应用程序
变焦控制
在默认状态下切换手机为纵向显示,本例中的默认地点为青岛市的标志建筑—栈桥,点击放大按钮改变焦距俯视伸向大海怀抱的建筑。观看航测图的地图,就像身处地球之外观察我们生存的星球。


图 变焦控制
旋转手机的方向,拖动画面查看地图显示的内容。下图的位置是青岛五四广场的标志—五月的风。


图 横向和纵向视图显示
计算路线
在起点和终点的文本框中输入有效的地址。 默认起点:Wuqing, TIANJIN, CHINA。默认终点:Qingdao, SHANDONG, CHINA。点击搜索图标,程序默认显示天津武清至山东青岛的路线图。如果您输入的地点在地图上找不到,会显示"未找到相关地点的路线"的信息提示。
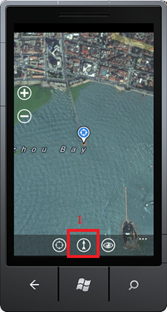
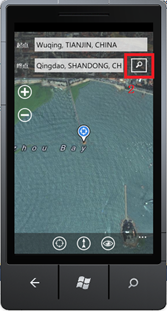
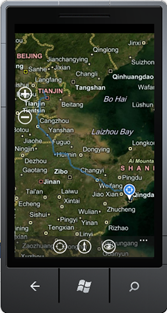
图 计算路线
航测图和路线图模式切换
在应用程序栏点击Mode按钮切换地图显示模式,即航测图模式和路线图模式切换。如图 路线图模式切换至航测图模式。左侧为航测图,右侧为路线图。
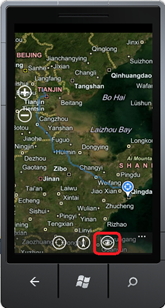

图 路线图模式切换至航测图模式

 浙公网安备 33010602011771号