


RabbitMQ
一、 RabbitMQ安装及设置
- 服务端安装在Linux(Centos 6.5)上,客户端通过Python API来访问:
安装配置epel源
$ rpm -ivh http://dl.fedoraproject.org/pub/epel/6/i386/epel-release-6-8.noarch.rpm

安装erlang
$ yum -y install erlang

安装RabbitMQ
$ yum -y install rabbitmq-server
- 客户端(Windows)安装 python API:
pip install pika
- 添加用户并分配权限:
远程访问RabbitMQ在服务器上自己增加一个用户(用户为“xue”,密码为“xue123”),步骤如下:
(1) 创建一个name用户及为用户添加密码pass:sudo rabbitmqctl add_user name pass
(2) 设置该用户为administrator角色:sudo rabbitmqctl set_user_tags name administrator
(3) 设置权限:sudo rabbitmqctl set_permissions -p '/' name '.' '.' '.'
(4) 重启rabbitmq服务:service rabbitmq-server restart 或者 /etc/init.d/rabbitmq-server restart
- 查看队列数据:
rabbitmqctl list_queues
- 角色
management
policymaker
monitoring
administrator
- 配置文件
/etc/rabbitmq.config
- 日志路径
/var/log/rabbitmq
- 注意事项
注意要关闭防火墙(centos):
1) 永久性生效,重启后不会复原
开启: chkconfig iptables on
关闭: chkconfig iptables off
2) 即时生效,重启后复原
开启: service iptables start
关闭: service iptables stop
二、 RabbitMQ基础知识
AMQP,即Advanced Message Queuing Protocol,高级消息队列协议,是应用层协议的一个开放标准,为面向消息的中间件设计。消息中间件主要用于组件之间的解耦,消息的发送者无需知道消息使用者的存在,反之亦然。 AMQP的主要特征是面向消息、队列、路由(包括点对点和发布/订阅)、可靠性、安全。 RabbitMQ是一个由erlang开发的AMQP(Advanced Message Queuing Protocol)的开源实现。支持多种客户端,如:Python、Ruby、.NET、Java、JMS、C、PHP、ActionScript、XMPP、STOMP等,支持AJAX。用于在分布式系统中存储转发消息,在易用性、扩展性、高可用性等方面表现不俗。 下面将重点介绍RabbitMQ中的一些基础概念,了解了这些概念,是使用好RabbitMQ的基础。
RabbitMQ的结构图如下:

说明:
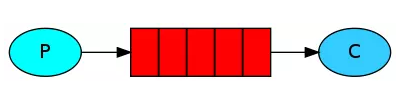
通过RabbitMQ的结构图能够清晰的看清楚整体的send Message到Receive Message的一个大致的流程。其中RabbitMQ Server部分可以看做是一个队列(Queue),工作过程就是 生产者(左边的Client A和Client B)产生数据 -----> 队列(Queue) ------> 消费者(右边的Client 1, Client 2和Client 3)处理数据 的一个过程,简化之后如下图所示。
- Message (消息):RabbitMQ 转发的二进制对象,包括Headers(头)、Properties (属性)和 Data (数据),其中数据部分不是必要的。Producer(生产者): 消息的生产者,负责产生消息并把消息发到交换机
-
Exhange的应用
- Consumer (消费者):使用队列 Queue 从 Exchange 中获取消息的应用。
- Exchange (交换机):负责接收生产者的消息并把它转到到合适的队列
-
Queue (队列):一个存储Exchange 发来的消息的缓冲,并将消息主动发送给Consumer,或者 Consumer 主动来获取消息。
-
Binding (绑定):队列 和 交换机 之间的关系。Exchange 根据消息的属性和 Binding 的属性来转发消息。绑定的一个重要属性是 binding_key。
-
Connection (连接)和 Channel (通道):生产者和消费者需要和 RabbitMQ 建立 TCP 连接。一些应用需要多个connection,为了节省TCP 连接,可以使用 Channel,它可以被认为是一种轻型的共享 TCP 连接的连接。连接需要用户认证,并且支持 TLS (SSL)。连接需要显式关闭。
补充说明:
ConnectionFactory、Connection、Channel
ConnectionFactory、Connection、Channel都是RabbitMQ对外提供的API中最基本的对象。
Connection是RabbitMQ的socket链接,它封装了socket协议相关部分逻辑。
ConnectionFactory为Connection的制造工厂。 Channel是我们与RabbitMQ打交道的最重要的一个接口,我们大部分的业务操作是在Channel这个接口中完成的,包括定义 Queue、定义Exchange、绑定Queue与Exchange、发布消息等。
三、操作RabbitMQ
1. 基于python的Queue实现生产者消费者模型:


 1 #!/usr/bin/env python
 2 # -*- coding:utf-8 -*-
 3 import Queue
 4 import threading
 5 import time
 6
 7 message = Queue.Queue(10)
 8
 9 def producer(i):
10     while True:
11         time.sleep(1)
12         print("producer --> %s" % i)
13         message.put(i)
14
15 def consumer(i):
16     while True:
17         time.sleep(1)
18         msg = message.get()
19         print("consumer --> %s" % msg)
20
21 for i in range(15):
22     t = threading.Thread(target=producer, args=(i,))
23     t.start()
24
25 for i in range(10):
26     t = threading.Thread(target=consumer, args=(i,))
27     t.start()
2. 使用RabbitMQ实现的简单消息队列
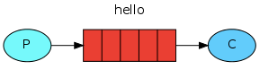
Producer向queue发送消息,一个Consumer从该queue接收消息并打印
- 生产者 Producer
 1 import pika
 2
 3
 4 credentials = pika.PlainCredentials('xue', 'xue123')
 5 connection = pika.BlockingConnection(pika.ConnectionParameters(
 6     '192.168.30.128',credentials=credentials))
 7
 8 channel = connection.channel() #建立了rabbit 协议的通道
 9
10 # 声明queue
11 channel.queue_declare(queue='test')
12
13 # n RabbitMQ a message can never be sent directly to the queue, it always needs to go through an exchange.
14 channel.basic_publish(exchange='',
15                       routing_key='test',
16                       body='Hello World!')
17 print(" [x] Sent 'Hello World!'")
18 connection.close()
- 消费者 Consumer
 1 import pika
 2
 3 credentials = pika.PlainCredentials('xue', 'xue123')
 4 connection = pika.BlockingConnection(pika.ConnectionParameters(
 5     '192.168.30.128',credentials=credentials))
 6
 7 channel = connection.channel()
 8
 9 # You may ask why we declare the queue again ‒ we have already declared it in our previous code.
10 # We could avoid that if we were sure that the queue already exists. For example if send.py program
11 # was run before. But we're not yet sure which program to run first. In such cases it's a good
12 # practice to repeat declaring the queue in both programs.
13 channel.queue_declare(queue='test')
14
15
16 def callback(ch, method, properties, body):
17     print("received msg...start processing....",body)
18     print(" [x] msg process done....",body)
19
20
21 channel.basic_consume(callback,
22                       queue='test',
23                       no_ack=True)
24
25 print(' [*] Waiting for messages. To exit press CTRL+C')
26 channel.start_consuming()
- 执行结果
1 #Producer端:
2 [x] Sent 'Hello World!'
3
4 #Consumer端:
5 [*] Waiting for messages. To exit press CTRL+C
6 received msg...start processing.... b'Hello World!'
7  [x] msg process done.... b'Hello World!'
3. acknowledgment 消息确认不丢失
1)数据丢失: 当设置no-ack = True,默认为False。当消费者遇到情况(its channel is closed, connection is closed, or TCP connection is lost)挂掉了,那么数据就会丢失,因为rabbitmq默认会把此消息标记为已完成,然后从队列中移除。
2)数据不丢失:当设置no-ack = False,默认为False。那么当rabbitmq收到消费者的获取消息请求之后,标记为处理中,当再次收到ack之后,才会标记为已完成,然后从队列中将消息删除。当rabbitmq检测到消费者(its channel is closed, connection is closed, or TCP connection is lost)挂掉了,还没收到ack,则会重新将消息放回消息队列,交给下一个消费者处理,保证消息不丢失,也就是说,RabbitMQ给了消费者足够长的时间来做数据处理。
- 设置no-ack = True
生产者代码不变,消费者代码如下:
 1 import pika
 2
 3 credentials = pika.PlainCredentials('xue', 'xue123')
 4 connection = pika.BlockingConnection(pika.ConnectionParameters(
 5     '192.168.30.128',credentials=credentials))
 6
 7 channel = connection.channel()
 8
 9 # You may ask why we declare the queue again ‒ we have already declared it in our previous code.
10 # We could avoid that if we were sure that the queue already exists. For example if send.py program
11 # was run before. But we're not yet sure which program to run first. In such cases it's a good
12 # practice to repeat declaring the queue in both programs.
13 channel.queue_declare(queue='test')
14
15 def callback(ch, method, properties, body):
16     print("received msg...start processing.... ", body)
17     print(" [x] msg process done.... ", body)
18
19 channel.basic_consume(callback,
20                       queue='test',
21                       no_ack=True)  # 不进行应答
22
23 print(' [*] Waiting for messages. To exit press CTRL+C')
24 channel.start_consuming()
- 执行结果(生产者发消息,消费者1和消费者2收消息,当断开消费者1,此时消费者2没有收到消息)
 1 #Producer端:
 2 [x] Sent 'Hello World!'
 3
 4 #Consumer端1:
 5 [*] Waiting for messages. To exit press CTRL+C
 6 received msg...start processing.... b'Hello World!'
 7  [x] msg process done.... b'Hello World!'
 8
 9 #当断开Consumer端1
10 #Consumer端2:
11 [*] Waiting for messages. To exit press CTRL+C
- 设置no-ack = False
生产者代码不变,消费者代码如下:
 1 import pika
 2
 3 credentials = pika.PlainCredentials('xue', 'xue123')
 4 connection = pika.BlockingConnection(pika.ConnectionParameters(
 5     '192.168.30.128',credentials=credentials))
 6
 7 channel = connection.channel()
 8
 9 # You may ask why we declare the queue again ‒ we have already declared it in our previous code.
10 # We could avoid that if we were sure that the queue already exists. For example if send.py program
11 # was run before. But we're not yet sure which program to run first. In such cases it's a good
12 # practice to repeat declaring the queue in both programs.
13 channel.queue_declare(queue='test')
14
15 def callback(ch, method, properties, body):
16     print("received msg...start processing.... ", body)
17     print(" [x] msg process done.... ", body)
18
19 channel.basic_consume(callback,
20                       queue='test',
21                       no_ack=False)
22
23 print(' [*] Waiting for messages. To exit press CTRL+C')
24 channel.start_consuming()
- 执行结果(生产者发消息,消费者1和消费者2收消息,当断开消费者1,此时消费者2收到消息)
 1 #Producer端:
 2 [x] Sent 'Hello World!'
 3
 4 #Consumer端1:
 5 [*] Waiting for messages. To exit press CTRL+C
 6 received msg...start processing.... b'Hello World!'
 7  [x] msg process done.... b'Hello World!'
 8
 9 #当断开Consumer端1
10 #Consumer端2:
11 [*] Waiting for messages. To exit press CTRL+C
12 received msg...start processing.... b'Hello World!'
13  [x] msg process done.... b'Hello World!'
- 设置no-ack = False 并应答
 1 import pika
 2
 3 credentials = pika.PlainCredentials('xue', 'xue123')
 4 connection = pika.BlockingConnection(pika.ConnectionParameters(
 5     '192.168.30.128',credentials=credentials))
 6
 7 channel = connection.channel()
 8
 9 # You may ask why we declare the queue again ‒ we have already declared it in our previous code.
10 # We could avoid that if we were sure that the queue already exists. For example if send.py program
11 # was run before. But we're not yet sure which program to run first. In such cases it's a good
12 # practice to repeat declaring the queue in both programs.
13 channel.queue_declare(queue='test')
14
15 def callback(ch, method, properties, body):
16     print("received msg...start processing.... ", body)
17     print(" [x] msg process done.... ", body)
18     ch.basic_ack(delivery_tag=method.delivery_tag)  # 发送ack消息
19
20 channel.basic_consume(callback,
21                       queue='test',
22                       no_ack=False)
23
24 print(' [*] Waiting for messages. To exit press CTRL+C')
25 channel.start_consuming()
- 执行结果(生产者发消息,消费者1和消费者2收消息,当断开消费者1,此时消费者2未收到消息,此时已应答)
 1 #Producer端:
 2 [x] Sent 'Hello World!'
 3
 4 #Consumer端1:
 5 [*] Waiting for messages. To exit press CTRL+C
 6 received msg...start processing.... b'Hello World!'
 7  [x] msg process done.... b'Hello World!'
 8
 9 #当断开Consumer端1
10 #Consumer端2:
11 [*] Waiting for messages. To exit press CTRL+C
4. durable 消息不丢失
消息确认机制使得消费者端在崩溃的时候,RabbitMQ服务端消息不丢失,但是如果rabbitmq奔溃了呢?该如何保证队列中的消息不丢失? 此就需要product在往队列中push消息的时候,告诉rabbitmq,此队列中的消息需要持久化,用到的参数:durable=True。通过设置 durable=True 参数可以当RabbitMQ重启等操作时,生产者端的消息队列数据依然存在。(有人发现消费者端也需要设置 channel.queue_declare(queue='task_queue',durable=True),但是我在测试过程中去掉也是可以正常运行。)
- 生产者
 1 import pika
 2 import time
 3 import sys
 4
 5 credentials = pika.PlainCredentials('xue', 'xue123')
 6 connection = pika.BlockingConnection(pika.ConnectionParameters(
 7     '192.168.30.128',credentials=credentials))
 8
 9 channel = connection.channel()
10 # 声明queue make message persistent
11 channel.queue_declare(queue='task_queue',durable=True)
12
13 message = ' '.join(sys.argv[1:]) or "Hello World! %s" % time.time()
14
15 # n RabbitMQ a message can never be sent directly to the queue, it always needs to go through an exchange.
16 channel.basic_publish(exchange='',
17                       routing_key='task_queue',
18                       body=message,
19                       properties=pika.BasicProperties(
20                       delivery_mode=2,  # make message persistent
21                       )
22                 )
23 print(" [x] Sent ", message)
24 connection.close()
- 消费者
 1 import pika
 2 import time
 3
 4 credentials = pika.PlainCredentials('xue', 'xue123')
 5 connection = pika.BlockingConnection(pika.ConnectionParameters(
 6     '192.168.30.128',credentials=credentials))
 7
 8 channel = connection.channel()
 9 # make message persistent
10 channel.queue_declare(queue='task_queue',durable=True)
11
12 def callback(ch, method, properties, body):
13     print(" [x] Received ", body)
14     time.sleep(2)
15     print(" [x] Done")
16     ch.basic_ack(delivery_tag=method.delivery_tag)
17
18 channel.basic_consume(callback,
19                       queue='task_queue',
20                       no_ack=False
21                       )
22
23 print(' [*] Waiting for messages. To exit press CTRL+C')
24 channel.start_consuming()
- 消息队列查看结果
 1 #未运行生产者端查看消息队列
 2 [root@centos ~]# rabbitmqctl list_queues
 3 Listing queues ...
 4 task_queue      0
 5 ...done.
 6 #运行生产者端并查看消息队列 task_queue 存在
 7 [root@centos ~]# rabbitmqctl list_queues
 8 Listing queues ...
 9 task_queue      1
10 ...done.
11 #重启 rabbitmq服务
12 [root@centos ~]# service rabbitmq-server restart
13 Restarting rabbitmq-server: SUCCESS
14 rabbitmq-server.
15 #重启 rabbitmq 服务查看消息队列 task_queue 依然存在
16 [root@centos ~]# rabbitmqctl list_queues
17 Listing queues ...
18 task_queue      1
19 ...done.
20 [root@centos ~]#
- 运行结果
1 #运行生产者端
2 [x] Sent  Hello World! 1547381295.894814
3
4 #重启RabbitMQ后 运行消费者端
5 [*] Waiting for messages. To exit press CTRL+C
6  [x] Received  b'Hello World! 1547381576.0062277'
7  [x] Done
5. 消息获取顺序
默认消息队列里的数据是按照顺序被消费者拿走,例如:消费者1 去队列中获取 奇数 序列的任务,消费者2去队列中获取 偶数 序列的任务。
通过 channel.basic_qos(prefetch_count=1) 表示谁来谁取,不再按照奇偶数排列。设置prefetchCount=1,则Queue每次给每个消费者发送一条消息;消费者处理完这条消息后Queue会再给该消费者发送一条消息。
- 未加 channel.basic_qos(prefetch_count=1)
- 生产者
 1 import pika
 2
 3 credentials = pika.PlainCredentials('xue', 'xue123')
 4 connection = pika.BlockingConnection(pika.ConnectionParameters(
 5     '192.168.30.128',credentials=credentials))
 6
 7 channel = connection.channel()
 8 # 声明queue make message persistent
 9 channel.queue_declare(queue='task_queue',durable=True)
10
11 # n RabbitMQ a message can never be sent directly to the queue, it always needs to go through an exchange.
12 for i in range(10):
13     channel.basic_publish(exchange='',
14                           routing_key='task_queue',
15                           body="send %s" % str(i),
16                           properties=pika.BasicProperties(
17                           delivery_mode=2,  # make message persistent
18                           )
19                     )
20     print(" [x] Sent ", str(i))
21 connection.close()
- 消费者
 1 import pika
 2 import time
 3
 4 credentials = pika.PlainCredentials('xue', 'xue123')
 5 connection = pika.BlockingConnection(pika.ConnectionParameters(
 6     '192.168.30.128',credentials=credentials))
 7
 8 channel = connection.channel()
 9 # make message persistent
10 #channel.queue_declare(queue='task_queue',durable=True)
11
12 def callback(ch, method, properties, body):
13     print(" [x] Received ", body)
14     time.sleep(2)
15     print(" [x] Done")
16     ch.basic_ack(delivery_tag=method.delivery_tag)
17
18 # channel.basic_qos(prefetch_count=1)
19
20 channel.basic_consume(callback,
21                       queue='task_queue',
22                       no_ack=False
23                       )
24
25 print(' [*] Waiting for messages. To exit press CTRL+C')
26 channel.start_consuming()
- 执行结果
 1 #运行一个生产者,两个消费者(先运行两个消费者,然后运行生产者)
 2 #生产者端
 3 [x] Sent  0
 4  [x] Sent  1
 5  [x] Sent  2
 6  [x] Sent  3
 7  [x] Sent  4
 8  [x] Sent  5
 9  [x] Sent  6
10  [x] Sent  7
11  [x] Sent  8
12  [x] Sent  9
13
14 #消费者端1
15  [*] Waiting for messages. To exit press CTRL+C
16  [x] Received  b'send 1'
17  [x] Done
18  [x] Received  b'send 3'
19  [x] Done
20  [x] Received  b'send 5'
21  [x] Done
22  [x] Received  b'send 7'
23  [x] Done
24  [x] Received  b'send 9'
25  [x] Done
26
27 #消费者端2
28 [*] Waiting for messages. To exit press CTRL+C
29  [x] Received  b'send 0'
30  [x] Done
31  [x] Received  b'send 2'
32  [x] Done
33  [x] Received  b'send 4'
34  [x] Done
35  [x] Received  b'send 6'
36  [x] Done
37  [x] Received  b'send 8'
38  [x] Done
- 加 channel.basic_qos(prefetch_count=1)
- 消费者端1
 1 import pika
 2
 3 credentials = pika.PlainCredentials('xue', 'xue123')
 4 connection = pika.BlockingConnection(pika.ConnectionParameters(
 5     '192.168.30.128',credentials=credentials))
 6
 7 channel = connection.channel()
 8 # make message persistent
 9 #channel.queue_declare(queue='task_queue',durable=True)
10
11 def callback(ch, method, properties, body):
12     print(" [x] Received ", body)
13     print(" [x] Done")
14     ch.basic_ack(delivery_tag=method.delivery_tag)
15
16 channel.basic_qos(prefetch_count=1)
17
18 channel.basic_consume(callback,
19                       queue='task_queue',
20                       no_ack=False
21                       )
22
23 print(' [*] Waiting for messages. To exit press CTRL+C')
24 channel.start_consuming()
- 消费者端2(sleep(2))
 1 import pika
 2 import time
 3
 4 credentials = pika.PlainCredentials('xue', 'xue123')
 5 connection = pika.BlockingConnection(pika.ConnectionParameters(
 6     '192.168.30.128',credentials=credentials))
 7
 8 channel = connection.channel()
 9 # make message persistent
10 #channel.queue_declare(queue='task_queue',durable=True)
11
12 def callback(ch, method, properties, body):
13     print(" [x] Received ", body)
14     time.sleep(2)
15     print(" [x] Done")
16     ch.basic_ack(delivery_tag=method.delivery_tag)
17
18 channel.basic_qos(prefetch_count=1)
19
20 channel.basic_consume(callback,
21                       queue='task_queue',
22                       no_ack=False
23                       )
24
25 print(' [*] Waiting for messages. To exit press CTRL+C')
26 channel.start_consuming()
- 执行结果
 1 #先运行消费者端1和消费者端2,再运行生产者端
 2 #生产者端
 3  [x] Sent  0
 4  [x] Sent  1
 5  [x] Sent  2
 6  [x] Sent  3
 7  [x] Sent  4
 8  [x] Sent  5
 9  [x] Sent  6
10  [x] Sent  7
11  [x] Sent  8
12  [x] Sent  9
13
14 #消费者端1
15  [*] Waiting for messages. To exit press CTRL+C
16  [x] Received  b'send 1'
17  [x] Done
18  [x] Received  b'send 2'
19  [x] Done
20  [x] Received  b'send 3'
21  [x] Done
22  [x] Received  b'send 4'
23  [x] Done
24  [x] Received  b'send 5'
25  [x] Done
26  [x] Received  b'send 6'
27  [x] Done
28  [x] Received  b'send 7'
29  [x] Done
30  [x] Received  b'send 8'
31  [x] Done
32  [x] Received  b'send 9'
33  [x] Done
34
35
36 #消费者端2
37  [*] Waiting for messages. To exit press CTRL+C
38  [x] Received  b'send 0'
39  [x] Done
6. 使用Exchanges
上面讨论的生产者将消息直接投递到Queue中,实际上这在RabbitMQ中这种事情永远都不会发生。实际的情况是,生产者将消息发送到Exchange(交换器,下图中的X),由Exchange将消息路由到一个或多个Queue中(或者丢弃)。

RabbitMQ中的Exchange有四种类型(fanout、direct、topic、headers),不同的类型有着不同的路由策略。
(1)首先介绍 routing key, Binding,Binding key作用及之间的关系。
-
routing key
生产者在将消息发送给Exchange的时候,一般会指定一个routing key,来指定这个消息的路由规则,而这个routing key需要与Exchange Type及binding key联合使用才能最终生效。 在Exchange Type与binding key固定的情况下(在正常使用时一般这些内容都是固定配置好的),我们的生产者就可以在发送消息给Exchange时,通过指定routing key来决定消息流向哪里。 RabbitMQ为routing key设定的长度限制为255 bytes。
-
Binding
RabbitMQ中通过Binding将Exchange与Queue关联起来,这样RabbitMQ就知道如何正确地将消息路由到指定的Queue了。

-
Binding key
在绑定(Binding)Exchange与Queue的同时,一般会指定一个binding key;消费者将消息发送给Exchange时,一般会指定一个routing key;当binding key与routing key相匹配时,消息将会被路由到对应的Queue中。这个将在Exchange Types章节会列举实际的例子加以说明。 在绑定多个Queue到同一个Exchange的时候,这些Binding允许使用相同的binding key。 binding key 并不是在所有情况下都生效,它依赖于Exchange Type,比如fanout类型的Exchange就会无视binding key,而是将消息路由到所有绑定到该Exchange的Queue。
(2)Exchange
RabbitMQ常用的Exchange Type有fanout、direct、topic、headers这四种(AMQP规范里还提到两种Exchange Type,分别为system与自定义),下面分别进行介绍。
1)fanout(广播类型)
fanout类型的Exchange路由规则非常简单,它会把所有发送到该Exchange的消息路由到所有与它绑定的Queue中。

上图中,生产者(P)发送到Exchange(X)的所有消息都会路由到图中的两个Queue,并最终被两个消费者(C1与C2)消费。
注意:由于fanout是广播类型,因此需要先启动消费者端,否则先启动生产者端再启动消费者端会接收不到数据(生产者已发送消息,但是生产者端错过消息接收)
- 生产者
 1 import pika
 2 import sys
 3
 4 credentials = pika.PlainCredentials('xue', 'xue123')
 5 connection = pika.BlockingConnection(pika.ConnectionParameters(
 6     '192.168.30.128',credentials=credentials))
 7 channel = connection.channel()
 8
 9 message = ' '.join(sys.argv[1:]) or "info: Hello World!"
10
11 channel.basic_publish(exchange='logs',
12                       routing_key='',
13                       body=message)
14 print(" [x] Sent ", message)
15 connection.close()
- 消费者
 1 import pika
 2
 3 credentials = pika.PlainCredentials('xue', 'xue123')
 4 connection = pika.BlockingConnection(pika.ConnectionParameters(
 5     '192.168.30.128',credentials=credentials))
 6 channel = connection.channel()
 7
 8 channel.exchange_declare(exchange='logs', exchange_type='fanout')
 9
10 result = channel.queue_declare(exclusive=True)  # 不指定queue名字,rabbit会随机分配一个名字,exclusive=True会在使用此queue的消费者断开后,自动将queue删除
11 queue_name = result.method.queue
12 channel.queue_bind(exchange='logs', queue=queue_name)
13
14 print(' [*] Waiting for logs. To exit press CTRL+C')
15
16 def callback(ch, method, properties, body):
17     print(" [x] receive ", body)
18     ch.basic_ack(delivery_tag=method.delivery_tag)
19
20 channel.basic_qos(prefetch_count=1)
21 channel.basic_consume(callback, queue=queue_name,no_ack=False)
22 channel.start_consuming()
- 执行结果
 1 #生产者端(执行两次)
 2 [x] Sent  info: Hello World!
 3
 4 #消费者端1
 5 [*] Waiting for logs. To exit press CTRL+C
 6  [x] receive  b'info: Hello World!'
 7  [x] receive  b'info: Hello World!'
 8
 9 #消费者端2
10 [*] Waiting for logs. To exit press CTRL+C
11  [x] receive  b'info: Hello World!'
12  [x] receive  b'info: Hello World!'
2)direct(关键字类型)
direct类型的Exchange路由规则也很简单,它会把消息路由到那些binding key与routing key完全匹配的Queue中。

以上图的配置为例,我们以routingKey=”error”发送消息到Exchange,则消息会路由到Queue1(amqp.gen-S9b…,这是由RabbitMQ自动生成的Queue名称)和Queue2(amqp.gen-Agl…);如果我们以routingKey=”info”或routingKey=”warning”来发送消息,则消息只会路由到Queue2。如果我们以其他routingKey发送消息,则消息不会路由到这两个Queue中。
注意:先启动消费者端,否则先启动生产者端再启动消费者端会接收不到数据(生产者已发送消息,但是生产者端错过消息接收)
- 生产者
 1 import pika
 2 import sys
 3 credentials = pika.PlainCredentials('xue', 'xue123')
 4 connection = pika.BlockingConnection(pika.ConnectionParameters(
 5     '192.168.30.128',credentials=credentials))
 6 channel = connection.channel()
 7
 8 channel.exchange_declare(exchange='direct_logs',exchange_type='direct')
 9
10 severity = sys.argv[1] if len(sys.argv) > 1 else 'info' #严重程度,级别
11
12 message = ' '.join(sys.argv[2:]) or 'Hello World!'
13
14 channel.basic_publish(exchange='direct_logs',
15                       routing_key=severity,
16                       body=message)
17 print(" [x] Sent %r:%r" % (severity, message))
18 connection.close()
- 消费者
 1 import pika
 2 import sys
 3
 4 credentials = pika.PlainCredentials('xue', 'xue123')
 5 connection = pika.BlockingConnection(pika.ConnectionParameters(
 6     '192.168.30.128',credentials=credentials))
 7 channel = connection.channel()
 8 channel.exchange_declare(exchange='direct_logs',exchange_type='direct')
 9
10 result = channel.queue_declare(exclusive=True)
11 queue_name = result.method.queue
12
13 severities = sys.argv[1:]
14 if not severities:
15     sys.stderr.write("Usage: %s [info] [warning] [error]\n" % sys.argv[0])
16     sys.exit(1)
17
18 for severity in severities:
19     channel.queue_bind(exchange='direct_logs',queue=queue_name,routing_key=severity)
20
21 print(' [*] Waiting for logs. To exit press CTRL+C')
22
23 def callback(ch, method, properties, body):
24     print(" [x] receive %r:%r" % (method.routing_key, body))
25     ch.basic_ack(delivery_tag=method.delivery_tag)
26
27 channel.basic_qos(prefetch_count=1)
28 channel.basic_consume(callback,
29                       queue=queue_name,
30                       no_ack=False)
31
32 channel.start_consuming()
- 执行结果

3)topic(模糊匹配类型)
前面讲到direct类型的Exchange路由规则是完全匹配binding key与routing key,但这种严格的匹配方式在很多情况下不能满足实际业务需求。topic类型的Exchange在匹配规则上进行了扩展,它与direct类型的Exchage相似,也是将消息路由到binding key与routing key相匹配的Queue中,但这里的匹配规则有些不同,它约定:
- routing key为一个句点号“. ”分隔的字符串(我们将被句点号“. ”分隔开的每一段独立的字符串称为一个单词),如“stock.usd.nyse”、“nyse.vmw”、“quick.orange.rabbit”
- binding key与routing key一样也是句点号“. ”分隔的字符串
- binding key中可以存在两种特殊字符“*”与“#”,用于做模糊匹配,其中“*”用于匹配一个单词,“#”用于匹配多个单词(可以是零个)

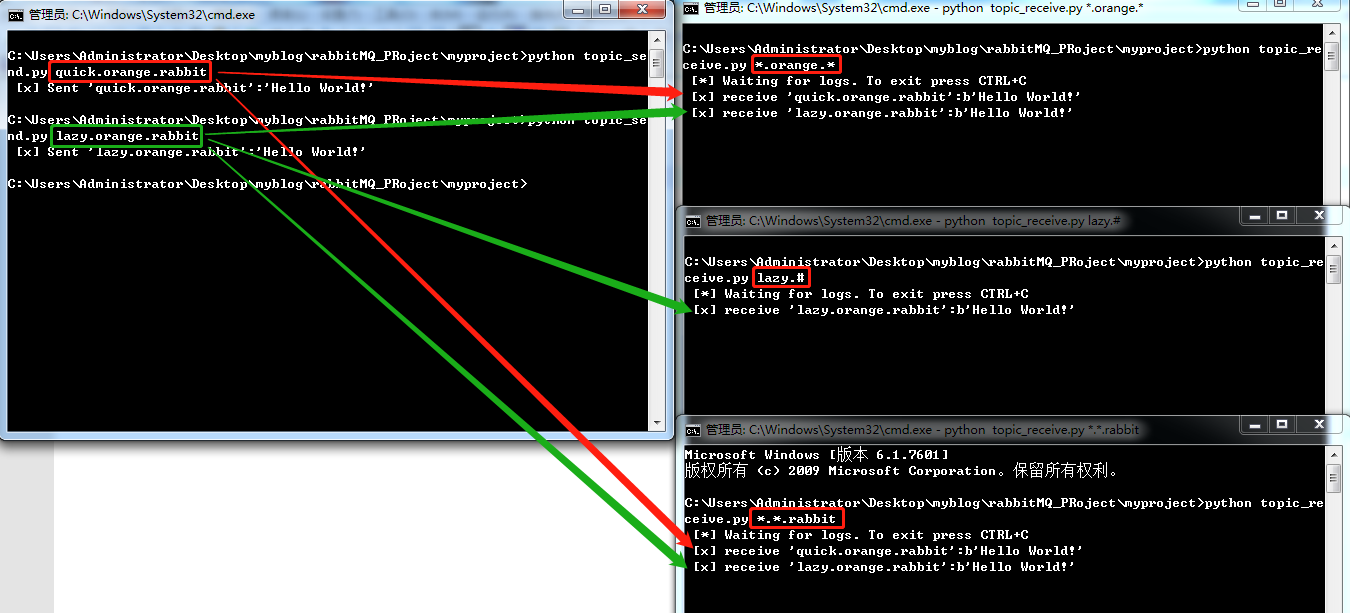
以上图中的配置为例,routingKey=”quick.orange.rabbit”的消息会同时路由到Q1与Q2,routingKey=”lazy.orange.fox”的消息会路由到Q1与Q2,routingKey=”lazy.brown.fox”的消息会路由到Q2,routingKey=”lazy.pink.rabbit”的消息会路由到Q2(只会投递给Q2一次,虽然这个routingKey与Q2的两个bindingKey都匹配);routingKey=”quick.brown.fox”、routingKey=”orange”、routingKey=”quick.orange.male.rabbit”的消息将会被丢弃,因为它们没有匹配任何bindingKey。
注意:先启动消费者端,否则先启动生产者端再启动消费者端会接收不到数据(生产者已发送消息,但是生产者端错过消息接收)
- 生产者
 1 import pika
 2 import sys
 3
 4 credentials = pika.PlainCredentials('xue', 'xue123')
 5 connection = pika.BlockingConnection(pika.ConnectionParameters(
 6     '192.168.30.128',credentials=credentials))
 7 channel = connection.channel()
 8
 9
10 channel.exchange_declare(exchange='topic_logs',exchange_type='topic')
11
12 routing_key = sys.argv[1] if len(sys.argv) > 1 else 'anonymous.info'
13 message = ' '.join(sys.argv[2:]) or 'Hello World!'
14
15 channel.basic_publish(exchange='topic_logs',routing_key=routing_key,body=message)
16 print(" [x] Sent %r:%r" % (routing_key, message))
17 connection.close()
- 消费者
 1 import pika
 2 import sys
 3
 4 credentials = pika.PlainCredentials('xue', 'xue123')
 5 connection = pika.BlockingConnection(pika.ConnectionParameters(
 6     '192.168.30.128',credentials=credentials))
 7 channel = connection.channel()
 8
 9 channel.exchange_declare(exchange='topic_logs', exchange_type='topic')
10
11 result = channel.queue_declare(exclusive=True)
12 queue_name = result.method.queue
13
14 binding_keys = sys.argv[1:]
15 if not binding_keys:
16     sys.stderr.write("Usage: %s [binding_key]...\n" % sys.argv[0])
17     sys.exit(1)
18
19 for binding_key in binding_keys:
20     channel.queue_bind(exchange='topic_logs',
21                        queue=queue_name,
22                        routing_key=binding_key)
23
24 print(' [*] Waiting for logs. To exit press CTRL+C')
25
26 def callback(ch, method, properties, body):
27     print(" [x] receive %r:%r" % (method.routing_key, body))
28     ch.basic_ack(delivery_tag=method.delivery_tag)
29
30 channel.basic_qos(prefetch_count=1)
31 channel.basic_consume(callback,
32                       queue=queue_name,
33                       no_ack=False)
34
35 channel.start_consuming()
- 执行结果
4)headers
headers类型的Exchange不依赖于routing key与binding key的匹配规则来路由消息,而是根据发送的消息内容中的headers属性进行匹配。 在绑定Queue与Exchange时指定一组键值对;当消息发送到Exchange时,RabbitMQ会取到该消息的headers(也是一个键值对的形式),对比其中的键值对是否完全匹配Queue与Exchange绑定时指定的键值对;如果完全匹配则消息会路由到该Queue,否则不会路由到该Queue。 该类型的Exchange没有用到过(不过也应该很有用武之地),所以不做介绍。
RPC
MQ本身是基于异步的消息处理,前面的示例中所有的生产者(P)将消息发送到RabbitMQ后不会知道消费者(C)处理成功或者失败(甚至连有没有消费者来处理这条消息都不知道)。 但实际的应用场景中,我们很可能需要一些同步处理,需要同步等待服务端将我的消息处理完成后再进行下一步处理。这相当于RPC(Remote Procedure Call,远程过程调用)。在RabbitMQ中也支持RPC。

- 实现过程
- 客户端发送请求(消息)时,在消息的属性(
MessageProperties,在AMQP协议中定义了properties,这些属性会随着消息一起发送)中设置两个值replyTo(一个Queue名称,用于告诉服务器处理完成后将通知我的消息发送到这个Queue中)和correlationId(此次请求的标识号,服务器处理完成后需要将此属性返还,客户端将根据这个id了解哪条请求被成功执行了或执行失败)。self.channel.basic_publish(exchange='',
routing_key='rpc_queue',
properties=pika.BasicProperties(
reply_to=self.callback_queue,
correlation_id=self.corr_id,
),
body=str(n)) - 服务器端收到消息并处理
- 服务器端处理完消息后,将生成一条应答消息到
replyTo指定的Queue,同时带上correlationId属性ch.basic_publish(exchange='',
routing_key=props.reply_to,
properties=pika.BasicProperties(correlation_id= props.correlation_id),
body=str(response)) - 客户端之前已订阅
replyTo指定的Queue,从中收到服务器的应答消息后,根据其中的correlationId属性分析哪条请求被执行了,根据执行结果进行后续业务处理
计算斐波拉切数列例子:
- 生产者
 1 import pika
 2 import uuid
 3
 4 class FibonacciRpcClient(object):
 5     def __init__(self):
 6         credentials = pika.PlainCredentials('xue', 'xue123')
 7         self.connection = pika.BlockingConnection(pika.ConnectionParameters(
 8             '192.168.30.128', credentials=credentials))
 9         self.channel = self.connection.channel()
10
11         #生成随机队列名称 reply_to=self.callback_queue
12         result = self.channel.queue_declare(exclusive=True)
13         self.callback_queue = result.method.queue
14
15         self.channel.basic_consume(self.on_response, no_ack=False, #准备接受命令结果
16                                    queue=self.callback_queue)
17
18     def on_response(self, ch, method, props, body):
19         """"callback方法"""
20         if self.corr_id == props.correlation_id:
21             self.response = body
22
23     def call(self, n):
24         self.response = None
25         self.corr_id = str(uuid.uuid4()) #唯一标识符
26         self.channel.basic_publish(exchange='',
27                                    routing_key='rpc_queue',
28                                    properties=pika.BasicProperties(
29                                        reply_to=self.callback_queue,
30                                        correlation_id=self.corr_id,
31                                    ),
32                                    body=str(n))
33
34         count = 0
35         while self.response is None:
36             self.connection.process_data_events() #检查队列里有没有新消息,但不会阻塞
37             count += 1
38             print("check...",count)
39
40         return int(self.response)
41
42 fibonacci_rpc = FibonacciRpcClient()
43
44 print(" [x] Requesting fib(30)")
45
46 response = fibonacci_rpc.call(10)
47 print(" [.] Got ", response)
- 消费者
 1 import pika
 2 import time
 3
 4 credentials = pika.PlainCredentials('xue', 'xue123')
 5 connection = pika.BlockingConnection(pika.ConnectionParameters(
 6     '192.168.30.128',credentials=credentials))
 7
 8 channel = connection.channel()
 9 channel.queue_declare(queue='rpc_queue')
10
11 def fib(n):
12     if n == 0:
13         return 0
14     elif n == 1:
15         return 1
16     else:
17         return fib(n - 1) + fib(n - 2)
18
19 def on_request(ch, method, props, body):
20     n = int(body)
21
22     print(" [.] fib(%s)" % n)
23     response = fib(n)
24
25     ch.basic_publish(exchange='',
26                      routing_key=props.reply_to,
27                      properties=pika.BasicProperties(correlation_id= props.correlation_id),
28                      body=str(response))
29     ch.basic_ack(delivery_tag=method.delivery_tag)
30
31
32 channel.basic_qos(prefetch_count=1)
33 channel.basic_consume(on_request, queue='rpc_queue')
34
35 print(" [x] Awaiting RPC requests")
36 channel.start_consuming()
- 计算结果
#消费者端
[x] Awaiting RPC requests
 [.] fib(10)

#生产者端
[x] Requesting fib(30)
check... 1
check... 2
check... 3
check... 4
check... 5
check... 6
check... 7
check... 8
check... 9
check... 10
 [.] Got  55
参考资料:
http://www.rabbitmq.com/getstarted.html(官网)
https://www.cnblogs.com/dwlsxj/p/RabbitMQ.html (RabbitMQ基础知识)
https://www.cnblogs.com/pycode/p/RabbitMQ.html
http://www.cnblogs.com/wupeiqi/articles/5132791.html (武sir)
https://www.sojson.com/blog/48.html (为什么要选择RabbitMQ ,RabbitMQ简介,各种MQ选型对比)
https://www.cnblogs.com/enjoyall/p/7767462.html?utm_source=debugrun&utm_medium=referral

 浙公网安备 33010602011771号