

Webpack搭建React开发环境详细步骤
1.安装node.js
Webpack实际是用Node.js写的,所以要先安装Node.js环境。而且Node.js中集成了NPM包管理,我们在后面用到的很多模块都需要使用NPM下载。
首先进入Node.js的官网:https://nodejs.org/zh-cn/download/,选择对应系统下载安装包,对于 windows 用户,直接下载安装包安装即可,如果是 Macos 用户,推荐使用 brew 进行安装。Node.js有很多版本,包括稳定版和开发版,不同的项目需要的Node.js版本不同,推荐大家安装 8.x 以上的版本。
2.安装webpack的步骤如下:
1.
1 cnpm init -y
2.安装react和react-dom依赖(注:install可以简写成i)
a.安装react
1 cnpm install react -S
b.安装react-dom
1 cnpm install react-dom -S
3.安装webpack和webpack-cli开发依赖
a.安装webpack
cnpm install webpack -D
b.安装webpack-cli
cnpm install webpack-cli -D
4.安装babel和babel preset-react
a.安装babel
cnpm i babel-loader @babel/core @babel/preset-env -D
b.安装 babel preset-react
cnpm i @babel/preset-react -D
以上的指令执行之后的package.json文件是:

5.在react项目的文件夹下创建webpack.config.js文件,
 1 module.exports = {
 2     resolve: {
 3         extensions: ['.wasm', '.mjs', '.js', '.json', '.jsx']
 4     },
 5     module: {
 6         rules: [
 7             {
 8                 test: /\.jsx?$/, // jsx/js文件的正则
 9                 exclude: /node_modules/, // 排除 node_modules 文件夹
10                 use: {
11                     // loader 是 babel
12                     loader: 'babel-loader',
13                     options: {
14                         // babel 转义的配置选项
15                         babelrc: false,
16                         presets: [
17                             // 添加 preset-react
18                             require.resolve('@babel/preset-react'),
19                             [require.resolve('@babel/preset-env'), {modules: false}]
20                         ],
21                         cacheDirectory: true
22                     }
23                 }
24             }
25         ]
26     }
27 };
6.
1 import React from 'react'
2 import ReactDOM from 'react-dom'
3
4 ReactDOM.render(
5     <div>hello  webpack !!!</div>
6     , document.getElementById("root"))
7.
1 module.exports = {
2     entry: './src/index.js',
3     // ...
4 };
8.在项目根目录创建 public/index.html文件,public是源文件目录,index.html
 1 <!DOCTYPE html>
 2 <html lang="en">
 3 <head>
 4     <meta charset="UTF-8">
 5     <meta name="viewport" content="width=device-width, initial-scale=1.0">
 6     <title>webpack练习</title>
 7 </head>
 8 <body>
 9     <div id="root"></div>
10 </body>
11 </html>
9.
cnpm i html-webpack-plugin -D
10.修改webpack.config.js文件的配置:
 1 const HtmlWebPackPlugin = require('html-webpack-plugin');
 2 module.exports = {
 3     // ...
 4     plugins: [
 5         new HtmlWebPackPlugin({
 6             template: 'public/index.html',
 7             filename: 'index.html',
 8             inject: true
 9         })
10     ]
11 };
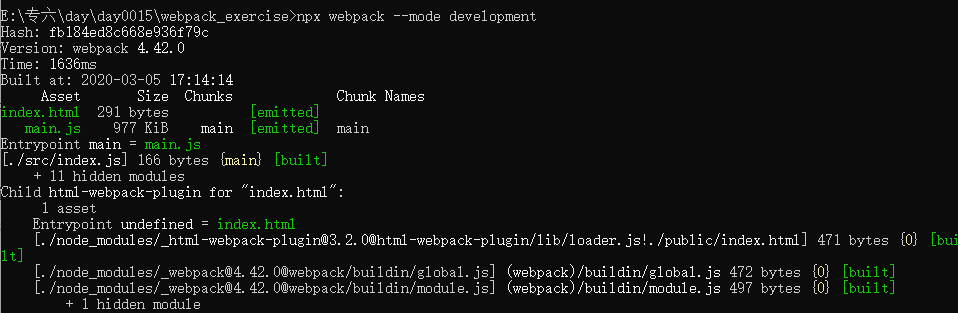
11.上面的操作都完成之后,可以执行打包命令:
npx webpack --mode development
如果出现下面的情况,就证明在react项目下自动生成了一个dist的文件夹,里面
这时在package.json文件中配置以下 的内容:
1 {
2     "scripts": {
3         "build": "webpack --mode production"
4     }
5 }
12.配置好了以后,我们就可以使用简化的命令来操作打包了:
npm run build
如果出现下面的内容,打包成功了

3.配置React项目的本地服务
我们可以基于Node.js的Express搭建一个本地服务器,通过Express的中间件 webpack-dev-middleware 来实现与 Webpack的交互。
(1)配置服务,需要以下四步:
第一步:
cnpm i webpack-dev-server -D
第二步:
 1 //webpackage.config.js
 2
 3 const path = require('path');
 4 const HtmlWebPackPlugin = require('html-webpack-plugin');
 5 module.exports = {
 6     mode: 'development',
 7     devtool: 'cheap-module-source-map',
 8     devServer: {
 9         contentBase: path.join(__dirname, './src/'),
10         publicPath: '/',
11         host: '127.0.0.1',
12         port: 3000,
13         stats: {
14             colors: true
15         }
16     },
17     entry: './src/index.jsx',
18     // 将 jsx 添加到默认扩展名中,省略 jsx
19     resolve: {
20         extensions: ['.wasm', '.mjs', '.js', '.json', '.jsx']
21     },
22     module: {
23         rules: [
24             {
25                 test: /\.jsx?$/, // jsx文件的正则
26                 exclude: /node_modules/, // 排除 node_modules 文件夹
27                 use: {
28                     // loader 是 babel
29                     loader: 'babel-loader',
30                     options: {
31                         // babel 转义的配置选项
32                         babelrc: false,
33                         presets: [
34                             // 添加 preset-react
35                             require.resolve('@babel/preset-react'),
36                             [require.resolve('@babel/preset-env'), {modules: false}]
37                         ],
38                         cacheDirectory: true
39                     }
40                 }
41             }
42         ]
43     },
44     plugins: [
45         new HtmlWebPackPlugin({
46             template: 'public/index.html',
47             filename: 'index.html',
48             inject: true
49         })
50     ]
51 };
第三步:
1 {
2     "scripts": {
3         "build": "webpack --mode production",
4         "start": "webpack-dev-server --mode development --open"
5     }
6 }
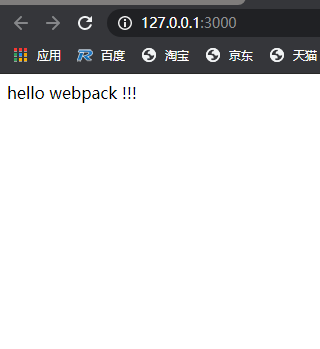
第四步:执行启动服务命令:
npm start
之后在浏览器上会出现:
(2)配置热加载(意思是,配置成功后,可以自动刷新),有三步:
第一步:
1 if (module.hot) {
2     module.hot.accept(err => {
3         if (err) {
4             console.error('Cannot apply HMR update.', err);
5         }
6     });
7 }
第二步:
 1 // webpack.config.dev.js
 2
 3 const webpack = require('webpack'); //增加导入webpack
 4
 5 module.exports = {
 6     devServer: {
 7         ...
 8         hot: true, //在devServer中增加hot字段
 9         ...
10     },
11     ...
12     entry: ['./src/index.jsx', './src/dev.js'], //在entry字段中添加触发文件配置
13     ...
14     plugins: [
15         // plugins中增加下面内容,实例化热加载插件
16         new webpack.HotModuleReplacementPlugin(),
17     ...
18     ]
19     ...
20 }
第三步:启动服务,测试热加载
npm start
可以自动刷新

以下的代码,可以让我们检查,看看是哪一点没有或者忘记配置(这只是一个参考,还需要自己动手来操作)
a.这是webpack.config.js的文件内容:
 1 const path = require('path');
 2 const HtmlWebPackPlugin = require('html-webpack-plugin');
 3 const webpack = require('webpack'); //增加导入webpack
 4 module.exports = {
 5     mode: 'development',
 6     devtool: 'cheap-module-source-map',
 7     devServer: {
 8         hot: true, //在devServer中增加hot字段
 9         contentBase: path.join(__dirname, './src/'),
10         publicPath: '/',
11         host: '127.0.0.1',
12         port: 3000,
13         stats: {
14             colors: true
15         }
16     },
17     entry:['./src/index.js', './src/dev.js'], //在entry字段中添加触发文件配置
18     resolve: {
19         extensions: ['.wasm', '.mjs', '.js', '.json', '.jsx']
20     },
21     module: {
22         rules: [
23             {
24                 test: /\.jsx?$/, // jsx/js文件的正则
25                 exclude: /node_modules/, // 排除 node_modules 文件夹
26                 use: {
27                     // loader 是 babel
28                     loader: 'babel-loader',
29                     options: {
30                         // babel 转义的配置选项
31                         babelrc: false,
32                         presets: [
33                             // 添加 preset-react
34                             require.resolve('@babel/preset-react'),
35                             [require.resolve('@babel/preset-env'), {modules: false}]
36                         ],
37                         cacheDirectory: true
38                     }
39                 }
40             }
41         ]
42     },
43     plugins: [
44         // plugins中增加下面内容,实例化热加载插件
45         new webpack.HotModuleReplacementPlugin(),
46         new HtmlWebPackPlugin({
47             template: 'public/index.html',
48             filename: 'index.html',
49             inject: true
50         })
51     ]
52 };
b.这是package.json文件内容:
 1 {
 2   "name": "webpack_exercise",
 3   "version": "1.0.0",
 4   "description": "",
 5   "main": "index.js",
 6   "scripts": {
 7     "test": "echo \"Error: no test specified\" && exit 1",
 8     "build": "webpack --mode production",
 9     "start": "webpack-dev-server --mode development --open"
10   },
11   "keywords": [],
12   "author": "",
13   "license": "ISC",
14   "dependencies": {
15     "react": "^16.13.0",
16     "react-dom": "^16.13.0"
17   },
18   "devDependencies": {
19     "@babel/core": "^7.8.7",
20     "@babel/preset-env": "^7.8.7",
21     "@babel/preset-react": "^7.8.3",
22     "babel-loader": "^8.0.6",
23     "html-webpack-plugin": "^3.2.0",
24     "webpack": "^4.42.0",
25     "webpack-cli": "^3.3.11",
26     "webpack-dev-server": "^3.10.3"
27   }
28 }

 浙公网安备 33010602011771号